1
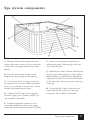
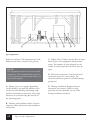
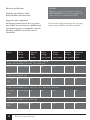
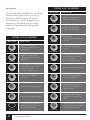
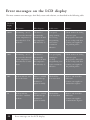
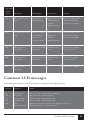
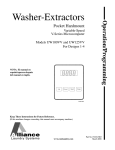
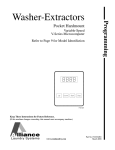
Manual
1 0 0 , 3 0 0 , 4 0 0 & 7 0 0 series
Copyrights and trademarks
Copyright 2003 MAAX Spas (Arizona), Inc.
All rights reserved. Nothing from this publication
may be copied, stored in an automatic data
system or transferred in any form or by any
means (electronic, mechanical, by photocopying,
photographing or any other method), without
prior written agreement.
Horizon™, Spectrum™, California Cooperage®,
Journey™, Powerworks™, Comfort Collar™,
Thermo-Lock™, Foot Relief Zone™,
CleanZone™, DuraMaax™ and GRIP™
are registered trademarks of MAAX Spas.
Disclaimer:
The information contained in this manual is to
the best knowledge of MAAX Spas (Arizona),
Inc., accurate. However, MAAX Spas (Arizona),
Inc. assumes no responsibility for errors or
omissions. It also assumes no responsibility
for damage that arises from the use of the
information contained herein.
This user guide contains information on the
installation, use and maintenance of your
Coleman Spas®. Read this information carefully
and keep it for future reference. We wish you
many hours of enjoyment with your purchase.
Keep this information in a safe place
Owner’s details
Date of purchase
:
Purchased at
:
Telephone number
:
Installed by
:
Serial number
:
02
Copyrights and trademarks
Model
:
Contents
Copyrights and trademarks
Owner’s details
Contents
Important safety instructions
Spa system components
Jets and air controls
Electrical specifications
Operating systems
Temperature
Standard/Economy/Sleep modes
Filter cycles
Fiber optics system
Equipment safety features
Error messages on the LCD display
Common LCD messages
Maintenance
Lights
Common problems with the spa water
General problems with the equipment
Tips for use
Summary of limited guarantee
Wiring diagram 430 serie
Wiring diagram 432 serie
Wiring diagram 630 serie
Wiring diagram 736 serie
page
page
page
page
page
page
page
page
page
page
page
page
page
page
page
page
page
page
page
page
page
page
page
page
page
2
2
3
4-6
7-8
9
10
11 - 12
13 - 14
15
16 - 17
18
19
20 - 21
21
22 - 26
26
27 - 29
29 - 30
31
31
32
33
34
35
Contents
03
Important safety instructions
Avoiding/reducing the risk of injury
and/or drowning:
1. The temperature of the water in the spa
must never exceed 40 °C. This temperature is
considered safe for a healthy adult. Lower water
temperatures are recommended for young children
and the elderly and whenever the spa is to be
used for longer than 10 minutes. Consult your
doctor or paediatrician about safe temperatures.
2. Given the high water temperature and the
very high chance that this may damage the foetus
during the first months of pregnancy, women
who are, or think they may be, pregnant should
discuss this with their doctor before using a spa.
3. Before entering a spa, the user must check
the water temperature with a reliable bath
thermometer, given that the tolerance of
equipment used for checking temperature
can vary.
4. The use of alcohol, drugs or medication
before or while using the spa can result in the
loss of consciousness and increase the risk of
drowning.
5. Overweight people or people with heart
complaints, circulation problems or diabetes
must consult a doctor before using a spa.
6. People taking medications must consult
a doctor before using a spa as some medicines
can cause drowsiness while others can influence
the heartbeat, blood pressure and circulation.
Avoid the risk of electric shock:
1. Use the earth clip on the control box to
connect the earth cable. The copper conductor
must be at least 6 mm2.
2. Install the spa at least 1.5 m away from all
metal surfaces. The spa may be installed within
1.5 m of a metal surface is each metal surface
is permanently connected to a solid copper
04
Important safety instructions
conductor of at least 6 mm2, which is fixed
to the earth clip on the control box supplied
for this purpose.
3. Do not use any electrical equipment,
such as lamps, telephones, radios or television
within 1.5 m of a spa.
N OT E :
Ask your electricity company about the
safety requirements regarding the installation
of this product. Leave the actual connection
of the electrical connections of the spa to a
qualified engineer in accordance with national
standards.
The electrical supply of this product must have
a correctly installed earth leakage circuit breaker
or circuit breaker in accordance with the
national article. The circuit breaker equipment
must be easily accessible and installed at least
1.5 m from the spa, in accordance with
prevailing national regulations.
4. Install the spa so that the electrical
component compartment can drain.
Further information
To get years of enjoyment from your spa,
please take note of the following:
DO:
• Keep these instructions!
• Cover the spa as soon as you have finished.
• Keep the cover closed whenever the spa is
not in use.
• Take care when entering and leaving the spa;
it is easy to slip on wet, slippery surfaces.
•
•
•
•
•
•
•
Get a qualified engineer to carry out
the electrical connections.
Replace damaged electrical cables
immediately.
Keep an eye on the water condition.
Untreated water not only causes problems
for your spa and equipment, but is also a
health risk.
Clean the filter element monthly or as often
as you consider necessary (see filter
maintenance (page 24).
Position the spa so that it can be accessed
for maintenance from all sides.
Use a bathing cap is you have long hair.
Only use official care products for your spa,
so that the spa and water condition are
maintained at their very best.
DON’T:
• Use the spa for longer than 30 minutes
at 40 °C.
• Use an extension cable for the electricity
supply of your spa.
• Allow anyone to stand on the spa cover.
It is not designed to bear weight.
• Connect the spa’s electricity supply while
the spa is not filled to the level on the
skimmer indicated by an arrow.
• Use the pump for long periods of time at
high speed while the cover is on the spa.
Long-term use of the pump can cause a
build-up of heat and prevent the spa from
working properly.
Location and positioning
Choose a solid base for the spa, which is level
and flat, bearing in mind the weight of the spa
when full (some models weight more than
2000 kg). If you are not sure about the
load-bearing properties of your chosen site,
contact an architect or building contractor.
The total surrounding of the spa housing and
floor must be supported in the same way.
If your spa is being installed outside, we suggest
you create a solid base for the spa to stand on.
If you do not provide a level surface for your
spa, this could result in structural damage and
render the guarantee void.
When positioning the spa remember that all
four sides of the spa must be easily accessible for
repairs and maintenance. For this reason, we also
advise against sinking the spa into the ground.
Installing outdoors
If the spa is to be installed outdoors, please
take note of the following:
1. Local conditions with regard to fencing off.
2. Local regulations on electrical installations
and cabling.
3. The view from your house.
4. Wind direction.
5. Exposure to sunlight.
6. Positioning with regard to trees (branches,
leaves and shadow).
7. Location of cloakroom and bathroom.
8. Storage space for maintenance equipment
and chemicals.
9. Place from where adults can keep an eye
on children.
10. Landscaping and night lighting.
11. Accessibility to equipment.
12. Location of electricity supply and
circuit path.
Installation indoors
If the spa is to be installed indoors,
please take note of the following:
1. An indoor spa considerably increases
the air humidity. You can limit the effects
of this by using fans or a dehumidifier.
Consult your supplier for more information.
2. Drainage points must be installed in the area
around the spa in order to remove water that
Important safety instructions
05
3.
4.
5.
6.
7.
would otherwise cause damage or someone
to slip.
The floor must be flat with an anti-slip
finish. Carpet is not recommended.
The walls, ceiling and woodwork must be
constructed of a material with high resistance
to damp.
Check whether the floor can carry the
full weight of the spa and water.
The spa must be checked for leaks before
installation to avoid any possible water
damage. This service may also be part of
your supplier’s installation service.
Conservatories can retain a high ambient
temperature, which can also affect the water
temperature of the spa. Under these
conditions we do not recommend running
the filter cycles for longer than 6 hours
per day.
06
Important safety instructions
Spa system components
A. Skimmer: Removes floating dirt from the
surface of the water, creates a point for the water
to flow back to the pump and contains a filter
element.
B. Top side control panel: Used to set the
temperature, the jet pump and the lighting.
C. Air Controls: Used to increase or decrease
the amount of air in the jets. When heating the
water, it is a good idea to keep the Air Controls
closed for maximum energy savings.
D. Comfort Collar™ flap: Used to regulate
the water supply to the Comfort Collar™ jets
(not available in all models).
F. Access to the drainage channel (next to
maintenance panel): Drainage taps on the spa
are on the kick-plate.
G. Manufacturer’s label: Contains identification
data for service under guarantee (serial number,
model number, etc.) and electrical information
(amp class and loads). Located on the kick-plate,
on the same side as the control panel on the top
of the spa.
H: Directional flap: Used to direct the water
stream from the jets to the jets in the open
seating area (not available in all models).
E. Technical equipment (contains no userserviceable components): One or two pumps,
heater and associated electrical controls (not listed).
Spa system components
07
Spa components
Purely for reference. The equipment may look
different from what is shown in the picture.
N OT E :
The equipment contains no user-serviceable
components. We recommend that you have
your spa maintained and repaired only by an
experienced engineer.
A. Pumps (one or two pumps, depending
on the model): Low speed for efficient water
circulation when filtering and heating; high
speed for maximum jet operation. The pump
functions are activated using the buttons on
the operating panel.
B. Warning and installation label: Contains
important safety information and installation
instructions.
08
Spa system components
C. Sliding valves: Used to stop the flow of water
from the spa to the equipment during maintenance. The number of valves depends on the
model. In normal operation all valves must be
open.
D. Electrical connections: Contains electrical
connection points for various plugs. The
electrical connection points are attached during
production.
E. Heating installation: Regulated by the
thermostat and contains a built-in safety
provision that automatically cuts out if the
heating installation overheats.
Jets and air controls
Jets
All the jets are designed so that each of them
provides a unique hydro-massage. All the large
jets are adjustable, from a fully open to a fully
closed position. NEVER CLOSE ALL THE
LARGE JETS AT THE SAME TIME!
Cleaning or replacing the jets
Hard water can cause the accumulation of
limescale or minerals, which can constrict or
block the jets. Each jet consists of a backplate
and a spout. Rotate these components weekly
and remove/clean them monthly so that they
continue to move properly.
N OT E :
If you want to clean or replace a jet, you do
not need to empty the water out of the spa.
Turning the flange and the spout opening
of the jet
• Turn the flange of the jet left and right
(open and closed).
• Turn the flange again fully open.
• Turn the jets on at high speed.
• Turn the spout opening left and right.
• Turn the spout opening in the tube.
N OT E :
If the inserted piece of the jet comes loose
from the spa housing, follow the procedure
below to re-install the jet.
Cleaning the jest
To remove the inserted piece, use the palm
of your hand to apply pressure to the flange
of the jet. Turn anti-clockwise until you hear
a click. Remove the jet component carefully
from the housing.
To clean the installed piece and the housing, use
a spray-gun or garden hose and spray the inside
of the jet. Leave the jet to soak in a dilute spa
cleaning solution and then rinse it off. Brush
the inside of the housing and remove any dirt.
To replace the jet, place the jet components
into the housing. Press the flange down with the
palm of your hand while turning it clockwise
until the spout opening ‘clicks’ back into place.
Air Controls
The force of the water jets can be controlled by
adjusting the amount of air which is injected into
the water before it passes through the jets. There
are two to four air controls on the edge of the
spa. Each Air Control directs air to the relevant
jet in the spa allowing you to set different
combinations and levels of jet action according
to your wishes or preferences.
Turn the Air Control anti-clockwise to close the
air intake, and clockwise to open the air intake.
N OT E :
For optimum energy consumption, the
Air Controls must stay closed when heating
the water.
If your spa is fitted with a Turbo Blower,
at least one Air Control must always
stay open.
Jets and air controls
09
N OT E :
Before you carry out any repairs to the spa,
DISCONNECT the electricity supply at the
main switch or the distribution board.
Electrical specifications
Warning: risk of electric shock
Read and follow all instructions
Important safety regulations
All electrical connections of this spa system
must ONLY be carried out be a qualified and
experienced engineer, in compliance with the
prevailing standards valid at the time of
installation.
Input
GFCI
circuitbreaker
Position
DIPswitch
The electrical configurations for the operating
system are described in the following table.
Heater
& high
speed pump
Heater
& low
speed pump
Number
Maximum
of wires,
power
incl. ground taken
yes
3
16
yes
4
26
yes
4
26
yes
4
26
4 3 0 P OW E RWO R K S S E R I E S PA PAC K
USED ON MODELS 104,105, 351 AND 361
230 V/16 A 16 A/1-polig
on
no
4 3 2 P OW E RWO R K S S E R I E S PA PAC K
USED ON MODEL 107
2 x 230 V
16A
16 A/2-polig
on
no
6 3 0 P OW E RWO R K S S E R I E S PA PAC K
USED ON MODELS 461, 470, 471, 472, 480, 481 AND 482
2 x 230 V
16A
16 A/2-polig
on
no
7 3 6 P OW E RWO R K S S E R I E S PA PAC K
USED ON MODELS 705 AND 706
2 x 230 V
16A
10
16 A/2-polig
on
Electrical specifications
no
Starting procedures
Operating systems
1. Fill the spa with tap water via the filter
opening up to the mark on the skimmer.
Never use softened water in your spa.
Softened water can affect the chemical
balance of the spa water and result in
damage to metal components.
Powerworks™ operating system 630/736 series
(430/432 series)
2. Connect the spa to the electricity supply.
3. Open the Air Controls, which are on the
top edge of the spa and rotate the jets
downwards. You will now hear water coming
out of the therapeutic jets. If this does not
happen, turn off the jets and follow the text:
‘Starting to use your spa’.
4. Add the chemicals. Refer to the section
on the maintenance of water quality.
5. Follow the user instructions for your
own model for setting the desired water
temperature. Initially, it may take 12 to
14 hours before the spa has fully warmed up.
To assist the heating process, leave the
heat cover on the system and close the
Air Controls.
The 630/736 series Powerworks™ operating
system is the best operating system for your spa.
The backlit LCD display shows the actual water
temperature, the set water temperature, the time
and the user settings. Each system function is
activated using a press button on the operating
panel. To activate the chosen function, just press
on the respective button.
When starting up, if the spa is connected to
the electricity supply, the operation should
function correctly and safely according to
the factory settings. The spa will then be in
Standard mode, the temperature is set to
37.5 °C and a filter cycle of three hours is
selected.
N OT E :
In the event of a loss or interruption of
the power supply, all settings of the 630/736
series operating system should be stored.
However, if individual settings are lost, you
can reprogram them using the instructions
in this manual, or by calling your supplier.
Important: do not use the spa if the water does
not come powerfully out of the jets.
Starting to use your spa
When you fill the spa for the first time, or after
you have emptied and refilled the spa, you may
have to get the air out of the system. If you
suspect there is an airlock in the system, remove
the filter basket, push a garden hose as far as
possible through the filter opening without
applying force. Hold the hose in place and
open the tap. This will force water into the
pump and air out of the pump.
Operating systems
11
PANEL 630/736-SERIES:
Push buttons
The push buttons are the knobs that are located
on the operating panel on the top of the spa.
You can use them to program the various
spa functions (e.g. turn on the lights, set the
temperature). The functions of the various
buttons are explained in the following table
at this page:
BUTTON
FUNCTION
• Increase the temperature
• Change the time setting
Set Up
• Reduce the temperature
• Change the time setting
Set Down
PANEL 430/432-SERIES:
BUTTON
FUNCTION
• Increase the temperature
• Change the duration of the
filter cycles
Set Up
• Reduce the temperature
• Change the duration of the
filter cycles
Set Down
•
•
•
•
Mode
Set temperature or lock/unlock
Lock/unlock panel settings
Select other mode
Set time and filter cycles
Fiber Optics
• Underwater spa lighting
on / off
Internal Lights
Mode/Prog
Set temperature or lock/unlock
Lock/unlock panel settings
Select other mode
Set time and filter cycles
Jets 1
• Activate therapeutic pump
(736 series: also Jets 3)
Jets 2
Internal Lights
• Activate the therapeutic pump
Jets 1
Invert
• Activate the therapeutic pump
Jets 2
12
•
•
•
•
• Activate main filtration pump
• Underwater spa lighting
on / off
Heat On
• DOL-system
(Digital Fibre Optic Lighting)
• on / off
Time
• Glows red when switched on
• Blinks when the current water
temperature is reached
Operating systems
Air Massage
• Turn the display around so
that it can be read inside or
outside the spa.
• Change the time settings or
Amend the set times for spa
cycles
• Optional. Used to the turn the
blower system on / off. Similar
to the Turbo Air Booster
Temperature
The highest temperature that can be set is
40 °C and the lowest is 26 °C. The actual
water temperature is shown on the display.
If the pump is not used, two stripes can be
seen. If stripes are displayed, you must first
start the pump by pressing on the JETS 1
button. Then wait until the water temperature
is displayed (this takes about 2 minutes).
The set temperature of your spa can be easily
increased or decreased at any time by pressing
on the SET UP or SET DOWN buttons.
Whenever these buttons are used, the set
temperature is displayed in the LCD window.
Each time the button is pressed, the temperature
is adjusted up or down by 0.5 °C. After three
seconds, the LCD display will automatically
show the water temperature or stripes.
If the spa is in Standard mode or in a filter
cycle, adjusting the temperature can result in the
activation of the heater. Whenever the heater is
active, the word HEAT is displayed in the LCD
screen. (430 series: the Heat On indicator glows
red or blinks when the temperature is changed).
N OT E :
230 Volt spas are not heated if pump 1 is
set at high speed and/or pump 2 is in use.
JETS 1 (430 series: Low-speed Jets)
Press JETS 1 to activate the main filtration
pump. The order of the jet action is:
touch 1x = low-speed jets
touch 2x = high-speed jets
touch 3x = off
JETS 2 (430 series: High Jets)
Press JETS 2 to activate the therapeutic pump.
The order of the jet action is:
touch 1x = high-speed jets
touch 2x = off
JETS 3 (only 736 series)
See the instructions for Jets 2
The use of pump 1 at slow speed is timed so
that the pump turns of automatically after four
hours. The use of pump 1 at high speed and
pump 2 at low and high speed is timed so
that the pumps turn off after 30 minutes.
NOTE:
Pump 1 automatically works at low speed
whenever a filter cycle or heating is required.
If the pump is automatically activated, the
low speed of pump 1 cannot be turned off;
however, all other control functions can
be activated.
Locking temperature function
(only 630/736 series)
If you have set the desired water temperature,
you can fix the new setting to prevent the spa
temperature from being changed without your
knowledge. You can lock the set temperature
as follows:
Press on SET UP or SET DOWN and then
on TIME and JETS 1 (736 series: JETS 3).
You will now see the following text in the
centre of the display:
LOCF
Temperature
13
Press SET UP to lock the temperature and the
display will then show:
Next, press SET UP. You will now see the following in the central locked display:
1
1
You have two seconds to carry out this procedure
in the correct sequence. The temperature of the
spa and the lock symbol are shown together in
the centre of the display. The buttons used to set
the temperature are deactivated. If you press on
these buttons, the set temperature is displayed
with a double arrow next to it.
You have two seconds to carry out this procedure
in the correct sequence. The temperature of the
spa and the lock symbol are shown together in
the central display. All buttons on the operating
panel are now deactivated, except for the
TIME button, which is used for the unlocking
procedure.
Whenever the operating panel is locked, all automatic spa functions operate normally. However,
they can not be adjusted.
Unlocking temperature function
(only 630/736 series)
To unlock the temperature, press SET UP or
SET DOWN, then TIME, then JETS 1 and
finally SET DOWN. In the unlocked display
you will now see:
0
The four buttons must be pressed in the
correct sequence within two seconds. Once
you have pressed the last button, the lock
symbol disappears and all the buttons become
active again.
Locking the operating panel
(only 630/736 series)
To avoid your spa being used without your
permission, the control system has a unique
locking system for the operating panel.
If you want to lock the panel, press TIME
and then JETS 1. (736 series: JETS 3)
You will now see the following text in the
central display:
LOC
14
Temperature
Unlocking the operating panel
(only 630/736 series)
If you want to unlock the panel, press on TIME,
JETS 1, SET DOWN. In the unlocked display
you will now see:
0
The lock symbol goes out. All buttons can now
be used again.
N OT E :
The three buttons must be pressed in the
correct sequence within two seconds.
Lighting
Press on the LIGHT button to switch the
underwater lighting on and off. The lighting
automatically switches off after 60 minutes.
N OT E :
The LIGHT button is also used for the
optional DOL system (see page 12).
Standard/Economy/Sleep modes
You can switch between Standard, Economy
and Sleep modes by pressing the MODE/PROG
button (430/432 series: MODE). If you place
the spa in Standard mode, the low speed of
pump 1 and the heating are automatically set
to keep the water at the set temperature. If you
set your spa in Economy mode, the heater
ONLY works during the filter cycles. In this case,
pump 1 activates several times per day for about
two minutes to check the water temperature.
If you place the spa in Sleep mode, the heater
and the pump only operate during the filter
cycles to keep the water 6.5 °C below the set
temperature.
The selected mode is show in the LCD display
on the operating panel. In standard mode,
STANDARD is displayed (430 series: STD).
In economy mode, ECONOMY is displayed
(430 series: ECN). If Sleep mode is selected,
nothing is displayed (430 series: SLP is shown).
Setting the time and filter cycles
This function is designed so that by connecting
the spa to a properly earthed supply and pressing
the MODE/PROG button (430 series: MODE),
the spa functions properly and safely at 37.5 °C.
In this mode, all user buttons are active.
However, to be able to benefit from the unique
possibilities of this function, it is important to
set the time and filter cycles.
Setting the time (630/736 series only)
When the spa is connected to the power supply,
the message SET TIME appears on the LCD
display. Press TIME and then MODE/PROG.
Then press SET UP to move the time forward,
or SET DOWN to move the time backward.
Press one of the buttons again to finish setting
the time. Press MODE/PROG to store the time
and to finish the time setting procedure.
The water temperature is now shown on the
display.
Advance setting of filter cycles (630/736 series)
Now the time is set, the spa will automatically
filter the water for three hours every 12 hours.
Whenever an automatic filter cycle is being
carried out, this procedure is shown on the
LCD display as Filter 1 or Filter 2.
Filter 1
The first filter cycle is automatically activated at
02.00 hours. The filter cycle using the low-speed
pump is carried out at 05.00 hours. During this
cycle, the heater works in Economy mode.
Filter 2
The second filter cycle is automatically activated
at 14.00 hours and runs until 17.00 hours
using the low-speed pump. The heater also
works in Economy mode during this cycle.
The second pump and blower also go through
a brief cleaning process during this cycle.
N OT E :
To keep the spa clean, a total filter time of at
least six hours per day is recommended.
Changing the filter cycles (630/736 series)
If you want, you can adjust the start and stop
times as well as the duration of each filter cycle.
The time required to filter your spa depends
on the level of use and the condition of the
surroundings. Use the following procedure if you
prefer a different filter time or duration, or if
you want to leave the heater off during filtering.
Press the TIME button. The central display
shows the time. Press on MODE/PROG
and the set time is displayed. Press again on
Standard/Economy/Sleep modes
15
MODE/PROG and the display will show SET
FILTER 1. Each time you press MODE/PROG,
the filter start time, the status of the heater and
the filter stop time are show on the LCD display.
When the filter start or stop times are shown,
you can adjust them by pressing SET UP or SET
DOWN. When the message Set Heat is show,
press SET UP or SET DOWN to turn the
central display ON or OFF. In the ON position,
the spa is heated to the set temperature during
the filter cycles. In the OFF position, the heater
is not activated during the filter cycles.
N OT E :
If you want to use the heater in Economy
mode, the display must show ON. In
Standard mode the heater is always ON.
Standard mode is recommended during
periods of cold weather.
Having set the filter commands, press
MODE/PROG to enter the start and
stop times for the second filter cycle.
Follow the same steps as for Filter 1.
N OT E :
At the start of the second filter cycle, pump 2
is activated to clean the water in the pipes
and to guarantee complete filtration.
The second filter cycle must N OT be left
out during periods of cold weather.
To finish setting the filter cycles, press
MODE/PROG. You will now see the current
water temperature on the LCD display.
Filter cycles (430/432 series)
This function is designed so that by connecting
the spa to a properly earthed supply and pressing
16
Filter cycles
the MODE button the spa works properly and
safely at 37.5 °C. In this mode, all user buttons
are active. However, to be able to benefit from
the unique possibilities of this function, it is
important to set filter cycles.
Pre-set filter cycles (430/432 series)
Your operating system functions on the basis of
two filter cycles. The first cycle starts six minutes
after you connect the spa to the power supply.
The second filter cycle starts 12 hours later.
The cycles are factory-set for a filtration cycle
of 3 hours. For example: The spa is turned on
at 08.00 hours:
Filter cycle 1 runs from 08.06 to 11.06 hours.
Filter cycle 2 runs from 20.06 to 23.06 hours.
At the start of each filter cycle, pump 1 is
activated at low speed. If the buttons are set to
Economy mode, the heater is used as required.
The ozonator is activated 60 seconds after the
start of a cycle.
Changing the filter cycles (430/432 series)
The duration of a filter cycle can be set from
one hour per cycle to twelve hours per cycle
and is carried out twice in a 24-hour period.
Therefore, a cycle of 1 hour carried out once
every 12 hours give a total filtration time of
two hours, while a cycle of 12 hours which
is carried out twice a day gives 24 hours of
continuous filtration. The time required to
filter your spa depends on the level of use
and the condition of the surroundings.
The spa filter cycles are also determined
by your personal use.
If you want to change the duration of the
filter cycles, press UP or DOWN and then
MODE. You will now see the following in
the central display:
FIL3
Press on UP or DOWN to set the duration of
the cycle. Each time you press the button, the
cycle duration is show on the LCD display as
follows:
FIL1
FIL2
FIL3
FIL4
FIL5
FIL6
FIL7
FIL8
FIL9
FILA
FILB
FILC
1 hour per cycle,
2 hours per cycle,
3 hours per cycle,
4 hours per cycle,
5 hours per cycle,
6 hours per cycle,
7 hours per cycle,
8 hours per cycle,
9 hours per cycle,
10 hours per cycle,
11 hours per cycle,
12 hours per cycle,
2 hours per day
4 hours per day
6 hours per day
8 hours per day
10 hours per day
12 hours per day
14 hours per day
16 hours per day
18 hours per day
20 hours per day
22 hours per day
24 hours per day
To finish setting the filter cycles, press JETS 1.
You will now see the current water temperature
or stripes on the LCD display.
If you change the duration of a filter cycle while
it is in operation, the change is immediately
carried out. Otherwise, the change is effective
at the start of the following filter cycle.
To change the start times of the daily filter cycles,
turn off the power supply and then turn it on
again when you want the first cycle to start.
N OT E :
If there is no power supply to the spa
(disconnected, or power cut), the settings may
reset to the standard factory settings. You will
then have to reprogram any changes you have
made to the temperature or the filter cycle
duration.
Cleaning cycle
After periods of intensive use, set the jets to
Low whirlpool for a cleaning cycle of four hours.
Turning the LCD display round (630/736 series)
The 630/736 series operating system has a function
that allows the LCD display to be ‘turned round’
so that it can be read from inside or outside the
spa. To rotate the LCD display, press the Invert
button. To rotate the LCD display again, press
the Invert button again.
The extra operating panel (736 series)
The extra panel gives you the option of
operating the jets and the lights without leaving
the Full-Body Massage Seat. The three buttons
for the jets work in the same way: press once to
set the jets at low speed, press twice to set them
at high speed, and three times to switch the jets
off.
Turbo Air Booster option (630 series)
Depending on your type of spa, your model
may be fitted with a Turbo air system to
increase the power and therapeutic effect
of the jets. To switch the Turbo Air System
on and off, press the AIR MASSAGE button.
N OT E :
The Turbo Air blower automatically switches
off after 30 minutes.
At the start of a filter cycle, the blower is activated to clean the water in the pipes and to
guarantee complete filtration. Make sure that
at least one Air Control is fully open.
Selecting different lighting options
(fibre optics system)
The standard DOL setting is Mode 1 (see
below). To change the mode, press the Light
or Fibre Optic button off and on within five
seconds. The lighting changes to the following
colour-coded mode. Go through them and
select your chosen colour.
Filter cycles
17
The different lighting options are:
Mode 1: Random colour changes with a
flowing, smooth transition from
one colour to the next.
Mode 2: One colour - red
Mode 3: One colour - green
Mode 4: One colour - blue
Mode 5: One colour – red and green
Mode 6: One colour – red and blue (violet)
Mode 7: One colour – green and blue (aqua)
If you press the button one more time it goes
back to Mode 1
N OT E :
If the power is turned off for longer than ten
seconds, the lighting automatically resets itself
to Mode 1.
N OT E ( 7 3 6 s e r i e s ) :
by pressing OFF for at least 10 seconds, the
lighting sets itself to Mode 1.
Ozone treatment
All Coleman Spas® come with Coleman Spas®
CleanZone™ ozonator as standard to help
you keep the water clean. All ozone-generating
equipment installed in the factory is designed
to be used in combination with an injection
system for maximum cleaning by fully mixing
the ozone with the water stream.
CleanZone™ only produces ozone when
a programmed filter cycles for the spa is set.
Activating other functions during the filter
cycle switches off the production of ozone
for thirty minutes.
18
Fiber optics system
N OT E :
By setting pump 1 on low speed for one
cleaning cycle the filtration will start,
although no ozone will be generated,
unless a programmed filter cycle is started
during the four-hour cleaning period.
Equipment Safety Features
Automatic cut-off
Your spa comes with an automatic time-out
function. This is for the protection of the
equipment and the user. In the interests of your
safety and to limit the unnecessary use of the
pumps and lighting, the selected equipment
is automatically switched off by the time-out
function as follows:
Accessory
Mode
Shuts off in...
Pump 1
Pump 2
Pump 1
Pump 2
Blower
Lighting
Fibre Optics
Low speed
Low speed
High speed
High speed
4 hours
30 minutes
30 minutes
30 minutes
30 minutes
1 hour
1 hour
Equipment safety features
19
Error messages on the LCD display
The most common error messages, their likely causes and solutions, are described in the following table:
The LCDdisplay
shows...
This means...
What happens...
Possible cause...
Solution...
OHH
Overheating - one of
the sensors has detected
a water temperature of
more than 47.5 °C in
the heater
The heater is
automatically
switched off until
the temperature
falls below 43 °C
• Low-speed
pump running
for too long
• Programming
error causes
continuous
filtration
• Check whether the sliding
valves are open
• Re-program so that cycles
do not overlap each other
• Contact your supplier is
the problem persists
OHS
Overheating - one of
the sensors has detected
a water temperature of
more than 43 °C in the
heater
The heater is
automatically
switched off until
the temperature
falls below 43 °C
• Low-speed pump
running for
too long
• Programming error
causes continuous
filtration
• Check whether the sliding
valves are open
• Re-program so that cycles
do not overlap each other
• Contact your supplier is
the problem persists
HFL
Problem with the water
flow to the heater
Heater is switched
off while the spa
continues to
operate normally
• Blocked filter
• Low water level
• Remove and clean filter
• Add water
• Contact your supplier or
maintenance engineer
LF
Problem with the
water flow - stubborn
problem
Heater is switched
off while the spa
continues to
operate normally
• Blocked filter
• Low water level
• Remove and clean filter
• Add water
• Contact your supplier
or maintenance engineer
20
Error messages on the LCD display
The LCDdisplay
shows...
This means...
What happens...
Possible cause...
Solution...
drY
No water flow to the
heater
Spa functions
are switched off
• Sliding valves closed
• Blocked drainage
channels
• Blocked skimmer
• Open the sliding valves
• Remove the blockage
• Contact your supplier
Dr
Too little water for the
heater
Heater is switched
off while the spa
continues to
operate normally
• Sliding valves closed
• Wall suctions
blocked
• Blocked skimmer
• Open the sliding valves
• Remove the blockage
• Contact your supplier
SnA
Heating sensor A
not working
Spa is automatically • Non-functioning
switched off
sensor
• Contact your supplier
for a new sensor
Snb
Heating sensor B
not working
Spa is automatically • Non-functioning
switched off
sensor
• Contact your supplier
for a new sensor
Sns
Heating sensors
imbalanced
• Contact your supplier
Common LCD-messages
Frequently seen messages in the LCD display are explained in the following table:
Message...
Stands for...
Means...
Pr
SLP
Ecn
Std
ICE
—
Priming mode
Sleep mode
Economy mode
Standard mode
Frost
Watertemperature
Spa is set to the normal commissioning mode
Spa is set to the normal sleep mode
Spa is set to the normal low use mode
Spa is set to the normal standard mode
Heating is activated to keep the water temperature above 7 °C
Water temperature is not being measured
Common LCD messages
21
Maintenance
Chemical composition of the water
The chemical composition of the water in a spa
system is extremely important. Chemicals are
used to clean the water and regulate the pH
balance. High water temperatures combined
with a small volume of water requires careful
monitoring of the chemical balance of the water.
We recommend that you get a starter kit with
chemicals from your supplier as well as any
extra materials that you will need to maintain
the correct/ideal chemical balance.
pH level
pH is the balance of acidity and alkalinity in the
water. Maintaining the right acidity is important
for the effectiveness of the water cleaning agent,
the comfort of the users and for the prevention
of corrosion in the spa equipment.
Cleaning
Cleaning the water in your spa ensures that
dangerous organisms are destroyed and that your
spa stays safe and healthy. Two frequently used
cleaning or oxidation agents for spas are chlorine
and ozone. Chlorine is a chemical product that
you add to the water. Ozone is a gas which is
produced by an ozonator and then injected into
the water. It is important that there is always
some water cleaning agent in the water. High
water temperatures, ventilation and regular use
increase the need for water cleaning agents.
Warning: never use hydrochloric acid to
balance the acidity, as this product will damage
the surface of your spa and the equipment.
Besides containing the agents, the spa water
must also go through additional regular cleaning
processes. This is also the case after intensive use.
Adding large quantities of water cleaning agents
thoroughly disinfects the water, and organic
residue that cannot be filtered out is oxidised.
Let the water cleaning agent drop to the residual
level before adding any more. If the spa is used
intensively, also use the cleaning cycle for extra
filtration (see page 17).
You should test the water quality daily using
the tester kit. Chlorine residue: free chlorine
level minimum 1.5 mg/l, bound chlorine level
maximum 0.2 mg/l.
22
Maintenance
Warning: never mix different chemical products.
Warning: never store chemical products in the
equipment compartment.
Recommended levels
pH
: 7.0-7.5 (7.4 is ideal)
Free chlorine : 1.5 mg/l
Bound chlorine : 0.2 mg/l
Total alkalinity : 80-100 mg/l is ideal
for tricholrine
N OT E :
Make sure that you do not use any old test
strips or chemicals. Tester kits and testing
chemicals must be stored in a cool, dry place.
Check how long you can store the chemicals
and their expiry date.
Water maintenance using the
CleanZone™ water treatment system
Your spa comes with a Coleman® CleanZone™
system fitted with the Powerworks™ ozonator.
CleanZone™ treats the water with a special
ozone application. The use of ozone in
combination with water cleaning and balancing
chemicals results in a clean, healthy spa, ensures
the minimal use of chemical products and protects
you against irritation caused by chemicals.
Cleaning the water with ozone
The size of spas varies, as does the frequency
and conditions of their use. Therefore, it is best
to arrange your cleaning schedule to suit your
personal level of use. When you use ozone,
you must first balance the chemical composition
of the water as you would normally do.
A spa must run for at least six hours per day
and be provided with ozone. If your spa is
used intensively, you should do this for longer.
Your spa produces ozone during the filter cycles
(see page 18).
The quantity of residual water cleaning agent
(chlorine) in the water varies and is also dependent
on the level of use. Maintaining a residual level
of 0.2 mg/l is recommended. In addition, the spa
should regularly have extra treatments using large
quantities of the water cleaning agent. This is
also the case after periods of intensive use.
N OT E :
Extra filtration can take place by manually
starting a cleaning cycle. Set pump 1 to low
speed. The pump will now run for four hours,
after which it is automatically switched off. If
you set your spa in Standard mode, the heater
will also run during this four-hour period.
Special chemical products
Although the use of special chemical products,
such as chlorine, is considerably reduced by
ozone, it is not a substitute for these chemical
agents. All chemical products must continuously
be checked, especially at times when the spa is
used intensively, as well as when replacing or
topping up the water.
Emptying the spa
N OT E :
Always make sure that the power supply is
switched of when emptying the spa. Only
switch on the heater after the water comes out
of the jets powerfully for several minutes.
Large concentrations of dirt can build up in the
water due to evaporation, body oils, perfumes
and other contaminants that cannot be filtered
out. It is therefore a good idea to empty and
refill the spa with clean water once every six
to eight weeks, or more often, depending on
the level of use.
All spas are fitted with external and internal
drainage pipes. The external pipe is used to
drain the water from the spa. The internal
pipes help to remove water from the internal
hoses when cleaning your spa for the winter
(see page 25) or if the water is very dirty.
N OT E :
Use a normal garden hose to drain the water
to a suitable place.
The flap of the external drainpipe is at the
bottom of the spa below the side panel. Remove
the outermost black cap and connect the garden
hose to the fitting. Turn the ring behind the flap
anti-clockwise until it stops and open the flap by
pulling on it. The water will now flow out. Once
the water has been drained from the spa, press
the flap in again, turn the ring clockwise until
it stops, remove the hose and replace the cap.
Maintenance
23
The internal drainpipe(s) is/are behind the front
panel. Remove the screws from the access panel,
and then the panel itself. Locate the drainpipe(s).
Remove the cap from the valve of each drainpipe,
couple the garden hose and turn the handwheels
of the valve 90° anti-clockwise. The water will
start to flow. Once the water has been drained
from the spa, turn the handwheel of the valve
clockwise until it stops. Remove the hose and
replace the cap. Do this for each internal
drainpipe.
N OT E :
N EV E R try to empty the spa using
the pump.
N OT E :
Always make sure that you close the
drainpipes before you refill the spa.
N OT E :
When replacing the spa water you may
have to bleed the air out of the system.
For more information, see page 11,
starting to use your spa.
Maintaining the filter
N OT E :
You do not need to empty the water from
the spa to clean the filters.
The removable filter element is in the skimmer
behind the skimmer flap. Under normal conditions,
the filter must be checked/cleaned monthly,
and more often if the spa is used intensively.
24
Maintenance
The filter system in your spa may also include a
First Filter. This is an extra filter that is fixed to
the top of the skimmer basket. This filter helps
to trap microscopic organic particles, as well as
dust, hairs, soap residue and cosmetic oils. To
clean this filter, remove it, rinse it clean or let it
soak in a filter cleaning agent according to the
instructions. Then replace the filter. If the First
Filter is not completely white after cleaning, it
should be replaced. The filters can be bought
from your spa supplier.
Keep the filter cartridge clean!
Clean the filter cartridge at least once every
three months. A clogged filter can affect the
water quality and how well the spa works.
To clean the filter cartridge:
1. Switch the pump off.
2. Remove the cover from the skimmer.
3. Remove the filter basket.
4. Remove the filter element from the
skimmer by gripping the top edge and
pulling it upwards.
5. Soak the filter in a commercial filter cleaner /
degreaser (available from your Coleman
Spas® supplier) making sure to follow the
manufacturer’s instructions. Clean the filter
element and replace as necessary.
6. Replace the filter element into the skimmer.
If the spa is empty, the skimmer can be
obstructed by the skimmer flap. Hold the
flap out of the way while replacing the filter
element. If the spa is full, move the skimmer
flap to make it easier to replace the filter
element.
7. Replace the filter basket and the skimmer
cover.
8. Switch the pump on.
To keep your spa working at its best, we
recommend that you replace the filter element
every year. How often you have to clean the filter
depends on how intensively the spa is used.
Getting your spa ready for winter
In cold climates, where the temperature drops
below freezing, special care is needed to prevent the
spa and accessories from being damaged by frost.
If you intend to use your spa in winter, you need
to ensure that the pump and heater are working
properly. The outside of the spa is insulated so
that it works efficiently in cold regions.
N OT E :
If you do not want to empty the spa and the
temperature is expected to be below freezing
for an extended period, it is a good idea to set
the heater to the highest temperature (40 °C),
especially if a power cut is possible. This
should prevent the water from freezing while
power is being restored.
If you do not want to use the spa during the
winter months, and there is a risk of frost, you
can get your spa ready for winter as follows:
1. Switch of the power supply to the spa.
2. Drain the spa and drainpipes according to
the instructions (page 23). Open all units and
remove the drainage plugs on the underside
of the pumps. If you are not able to remove
all the water (except for out of the pipes),
you can add anti-freeze to the remaining
water via the underside of the skimmer and
the jets. If you do this, the anti-freeze
product must contain a propylene glycol
with a delaying action.
N OT E :
Before filling your spa again, all anti-freeze
must be flushed out of the spa and pipes
according to the instructions for emptying
the spa (page 23). Check the chemical components in the water carefully until all traces
of the anti-freeze agent have been removed.
3. Let the water flow through the filter and
remove and clean the filter element.
4. Check that the heater element housing
does not contain any water.
5. Clean your spa according to the instructions
in the following two sections.
6. Cover your spa with a water-repellent,
impenetrable covering.
7. Contact your supplier for more information
on emptying the pipes and procedures for
getting ready for winter.
Looking after and cleaning the inside of the spa
The surface of the spa is made from acrylic. In
terms of care and cleaning, the spa needs little
attention in order to stay looking new for years.
Use a special spa cleaning agent to remove the
build-up of residues and limescale on the inside
of the spa around the water line. To prevent the
water for getting dirty, you can lower the water
level by 5 to 7.5 cm before you start cleaning.
Apply the cleaning agent to a soft cloth and wipe
the acrylic surface clean. Use a non-abrasive,
household cleaning agent for the inside of the
spa, or a non-aggressive washing-up liquid.
Rinse well and dry with a dry cloth.
N OT E :
The acrylic surface must not come into contact
with products such as acetone (remover), nail
polish, dry cleaning solution, thinner, benzene,
pine oil, etc. Remove dirt and dried-on dirt
with a soft, damp cloth. Clean grease, oil, paint
and ink spots with isopropyl alcohol. Avoid
the use of razor blades or other sharp objects
that can damage the surface of the spa.
Maintenance
25
Protect the varnish of your spa - always cover
the spa when not in use.
Lights
The lights in the spa can be replaced via
the housing. Remove the side panel and the
insulation, which is thickest around the lighting
units. Look for the light fitting. Turn the black
holder 90° anti-clockwise and remove from the
fitting. Take out the bulb and replace it.
Replace the lamp-holder in the fitting and
tighten the holder by turning it through
90° clockwise.
26
Lights
Common problems with the spa water
Problem
Cause
Solution
Cloudy water
• Insufficient filtration /
dirty filter
• Too much oil /
organic material
• Unsuitable cleaning method /
bacteria
• High pH value and/or high
alkalinity
• Floating particles /
organic material
• High content of dissolved
materials
• Check whether the filter is working properly; clean the
filter with a special filter cleaner or degreaser.
• Give the water a shock treatment with a chlorine-based
cleaning agent or with another product.
• Bring the water quality back in balance by increasing the
quantity of cleaning agents. Use shock treatment if necessary
• Adjust the pH value; add a suitable sodium bisulphate
product.
• Use a clarifier. Note: you must not use any polymer-based
clarifiers together with the ozone generator and CleanZone™.
• Depending on the circumstance, half empty the spa and refill,
or clean the spa and replace the water.
Smell of
the water
• To many organic materials
or too much chloramines;
insufficient cleaning agent
available.
• Unsuitable cleaning method
• Insufficient filtration
• Low pH value
• Give the water a shock treatment with a chlorine-based
cleaning agent or with another product.
• Bring the water quality back in balance by increasing the
quantity of cleaning agents. Use shock treatment if necessary
• Check whether the filter is working properly; clean the filter
with a special filter cleaner or degreaser.
• Increase the pH value with a sodium bicarbonate product.
Add a chelate if metals are present.
Chlorine
in the air
• To many chloramines;
insufficient cleaning agent
available.
• Low pH value
• Give the water a shock treatment with a chlorine-based
cleaning agent or with chlorine-free shock treatment product.
• Adjust the pH level; increase the pH value with a sodium
bicarbonate product.
Yellow water
• Low pH value
• Adjust the pH level; increase the pH value with a sodium
bicarbonate product.
Mouldy smell
• Bacteria or algae growth
• Give the water a shock treatment with a chlorine-based
cleaning agent or similar product for shock treatment.
If the problem is visible, clean the spa, change the water and
balance.
Common problems with the spa water
27
Problem
Cause
Solution
Ring of
scum/dirt on
the spa walls
• Build-up of cosmetic oils,
lotions and chemicals from
soap or cleaning agents
• Remove the scum with a hand net, or change the water.
Algae
• pH value out of balance
• Low content of available
chlorine
• Adjust the pH value
• Shock treatment with chlorine
Eye irritation
• Low pH value
• Insufficient chlorine
• Increase the pH value using sodium bicarbonate.
• Give the water a shock treatment with a chlorine-based
cleaning agent or similar product for shock treatment.
Skin
irritation/
breakout
• Contaminated water
• Lying too long in the water
• Chemicals not balanced,
too much ozone
• Always stick to the recommended quantities of cleaning
agent residues; intensive chlorine treatment or chlorine-free
shock treatment.
• Do not use the spa for too long, e.g. no longer than
15 minutes.
• Correct the chemical balance
Deposits
• Too much calcium
dissolved in the water
• pH value and total
alkalinity too high
• Add a product to combat deposits. Adjust total alkalinity
and pH level by adding a suitable sodium bisulphate product.
• If metals are present, use a chelate. Keep the pH value at
the right level (7.0 to 7.5).
• If metals are present, use a chelate. Keep the levels of calcium
at at least 150-200 mg/l.
• If metals are present, use a chelate.
• Keep the alkalinity at the right level for the type of cleaning
agent being used.
Incorrect pH
test results /
unusable pH
test colour
• Too much cleaning agent
in the water
• pH indicator is old
• The pH must only be tested if the cleaning agent content
is lower than 5 mg/l.
• Replace the pH indicator
28
Common problems with the spa water
Problem
Cleaning agent
disappears
too quickly
Cause
Solution
• Excessive organic growth
in the water
• Temperature too high
• Low pH
• Low pH corrosion of metal
connections
• Low calcium hardness
• Low total alkalinity
• Increase shock dosage; add cleaning agent; shower before
using the spa
• Reduce the temperature
• Increase the pH using sodium bicarbonate.
• If metals are present, use a chelate. Keep the pH value at
the right level (7.0 to 7.5).
• If metals are present, use a chelate. Keep the levels of calcium
at at least 150-200 mg/l.
• If metals are present, use a chelate. Keep the alkalinity at
the right level for the type of cleaning agent being used.
N OT E : If the water in your spa has a high content of metals or minerals, you must use a special
chemical product to prevent spots or deposits. This manual describes the most common problems
with the water when using a spa fitted with an ozonator. Consult your supplier if you have any further
questions about the water quality.
General problems with the equipment
Problem
Usual cause
Solution
System does
not work
• Power is turned off
• Reset spa
Heater does
not work
• Water level is too low
• Heating mode not selected
• No power for heating
• Heater does not work
• Add water until it reaches the fill line on the skimmer
• See temperature/heating instructions See adjustment
instructions on page 13
• Check the power supply
• Contact your dealer
Water not
clean
• Block wall suctions or skimmer
• Filter blocked (dirt)
• Poor water chemistry
• Insufficient filtration time
• Improper maintenance
• To many solid particles
in the water
• Clean the wall suction/skimmer. Remover the blockage
• Clean or replace
• See maintenance (page 22-25)
• Let the filtration mode run for longer
• See maintenance (page 22-25)
• Use a cleaner or empty and refill the spa
General problems with the equipment
29
Problem
Usual cause
Solution
Abnormal water
consumption
• Very strong condensation
and/or splashes
• Use the cover and refill as necessary
Low water
stream from
the jets
• Running in FILTER mode - slow speed
• Block wall suctions or skimmer
• Dirty filter
• Jets are OFF
• Sliding valves closed
• Select High Speed jets
• Clean the wall suction/skimmer. Remove blockage
• Clean and replace
• Open jets
• Open sliding valves
No water
stream from
the jets
• Pump has airlock
• Adjustable jets switched off
• Power switched off, system off
• Defective pump or motor
• Pump fluctuations
• Sliding valves closed
• See starting to use your spa (page 11)
• Switch on jets
• Reset power
• Contact your dealer
• Low water. Check level on skimmer flap
• Open sliding valves
Noisy pump
and motor
• Block wall suctions or skimmer
• Low water level.
• Damaged or worn-out motor block
• Clean the wall suction/skimmer.
• Add water until it reaches the normal water level
• Contact your dealer
Water leakage
from below
the spa
• Check the connections and empty
the hoses
• Close or turn off empty cycle if necessary
No airstream
from the jets
• Air control not open
• Jet spout opening not fixed properly
• Jet spout opening missing
• Open the control
• Check jet spout openings
• Check jets and replace as necessary
Motor does
not work
• Power is turned off
• Incorrect or faulty wiring of electrical
supply
• Switch is off
• Reset power
• Contact your dealer
• Auto reset after the motor has cooled down
Black powder
film around
the waterline
• New turbo/blower brushes
• Disappears with use
It is not possible • Spa is trying to heat up
to switch of
• Spa is in filter cycle
the spa
• Spa is in Standard mode
30
General problems with the equipment
• Check the temperature setting is in Standard mode
• Normal. No adjustment necessary.
• Check setting
Tips for use
1. Wash well with soap and water before and
after you use the spa. Showering before you
use the spa ensures that common bacteria,
sweat, lotions, deodorants, creams, etc. are
removed, so that they do not undo the effect
of the cleaning agent and the ability of the
filter to work efficiently. Showering after
use reduces the risk of skin irritation that
can arise from being in contact with the
chemicals in the spa water.
2. Sit down slowly and carefully in the spa.
Look where you put your feet and let your
body gradually get used to the water
temperature. Leave the spa slowly, given
that your legs are fully relaxed and you
may feel a bit light-headed.
3. Staying in the spa for too long can make
some users feel nauseous, dizzy or lightheaded. If you want to sit in water with a
higher temperature (40°C), it is a good idea
to leave the spa after fifteen minutes, shower,
cool off and then return to the spa. At lower
water temperatures (37°C - normal body
temperature), most people can stay safely
and comfortably in the water for longer
periods of time. If you are unsure about the
ideal temperature for you, your family members
or guests, please consult your doctor.
4. Never use the spa on your own.
5. Never allow the spa to be used by
unsupervised children or elderly people.
Summary of limited guarantee
For full information on the guarantee, please
refer to the warranty card that came with your
product. In order to be eligible for fast service
under guarantee, you must immediately send
your warranty card to your dealer after the
installation of the spa is complete, remembering
to include the model and serial number.
MAAX Spas (Arizona), Inc. offers our customers
a limited guarantee. This applies to the structure,
surface, taps, pumps, heater, blower and control
buttons.
The limited guarantee does not cover any
damage that is the result of incorrect
maintenance, incorrect installation, improper
use, misuse, accident, fire, normal wear and tear
or incorrect water maintenance. Unauthorised
amendments to the spa can render this guarantee
null and void. The replacement costs associated
with transport, removal and re-installation are
the sole responsibility of the spa owner.
This manual refers exclusively to spa models
produced since 2003. MAAX Spas (Arizona),
Inc. reserves the right to make amendments
at any time to the design or materials of their
products without being held liable. This limited
guarantee applies to the first purchaser and ends
with the transfer of ownership.
Tips for use
31
32
Wiring diagram 430 serie
Wiring diagram 432 serie
33
34
Wiring diagram 630 serie
Wiring diagram 736 serie
35