1
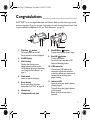
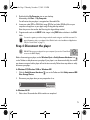
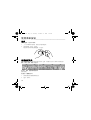
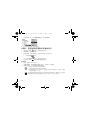
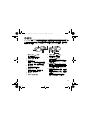
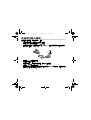
Language TOC.fm Page i Wednesday, November 16, 2005 11:30 AM
English . . . . . . . . . . . . . . . . . . . . . . . . . . . . . . . . . . . . . . . . . . 1
. . . . . . . . . . . . . . . . . . . . . . . . . . . . . . . . . . . . . . 13
. . . . . . . . . . . . . . . . . . . . . . . . . . . . . . . . . . . . . . . 25
i
Language TOC.fm Page ii Wednesday, November 16, 2005 11:30 AM
ii
Osaka.fm Page 1 Wednesday, November 16, 2005 2:15 PM
Congratulations ____________________
MuVo® VIDZ™ is the new digital audio player from Creative. Read on to learn how to get started
with your new player! To get the most out of your player, also read the comprehensive User’s Guide
on your Installation and Applications CD (see “More Information” on page 11).
11
1
2
3
10
4
9
8
7
5
6
NAVI/B-MARK
PLAY/STOP
1.
Play/Stop
button
Turns your player on and off.
Starts, pauses or resumes playback.
2.
3.
OLED Display
Menu button
Displays the Options menu.
Selects options and files on the
OLED display. For more information,
see “Using the Menu Button” on
page 2.
4.
Hold switch
Locks or unlocks the player.
5.
Reset button
Resets your player. For more
information, see “FAQ” on page 10.
6.
7.
Microphone
Headphone/Line-In jack
8.
Navi/B-Mark
button
Displays the contents of your player.
9.
Rec/A-B
button
Changes play modes.
Starts and stops recording in FM,
Voice and Encoding modes.
REC/A-B
10. USB connector
Connect your USB cable to this
connector and connect the other
end of the cable to your computer to
transfer files or to charge your
player's battery.
11. Indicator LED
Lights up when your player's battery
is being charged.
Turns off when your player's battery
is fully charged.
Blinks when the screen saver is
activated.
1
Osaka.fm Page 2 Wednesday, November 16, 2005 2:15 PM
Using the Menu Button ______________
Select
We use the term “Select” to mean the following action:
1.
Move the Menu button left or right, or up or down, to highlight the option that you want.
2.
Press the Menu button to select the option.
You can also select an option by moving the button to the right.
Accessing the Options menu
The Options menu is the main menu from which you switch modes and select settings. Select an icon
to see available options in the following menus: Mode, System, Control, Sound and Display.
While in Music, FM, Voice or Encoding modes
Press the Menu button.
While viewing an image display
1. Press the Menu button to display the contents of your player.
2.
Select an audio track.
3.
Press the Menu button.
2
Osaka.fm Page 3 Wednesday, November 16, 2005 2:15 PM
While viewing a video
1. Press and hold the Navi/B-Mark
2.
Select an audio track.
3.
Press the Menu button.
NAVI/B-MARK
button to display the contents of your player.
To prevent the loss of recordings, you cannot access the Options menu while making a
recording. If you are making a recording, stop the recording, and then press the Menu button to
access the Options menu.
Getting Started ____________________
Step 1: Set up software
DO NOT connect your player to your computer before setting up the software.
1.
Turn on your computer.
If you have Windows XP or Windows 2000, you must log in as an administrator in Windows
before you can set up the software. For more information, refer to your operating system's
online Help.
2.
Insert the Installation and Applications CD into your CD-ROM/DVD-ROM drive. Your CD
should start automatically. If it does not, follow the steps below:
i.
Double-click the My Computer icon on your desktop.
Alternatively, click Start → My Computer.
ii.
Right-click the CD-ROM/DVD-ROM drive icon, and then click AutoPlay.
3.
Follow the instructions on the screen.
4.
When prompted, restart your computer.
5.
When your computer restarts, follow the product registration instructions on the screen.
Note that you require an Internet connection to register your product.
3
Osaka.fm Page 4 Wednesday, November 16, 2005 2:15 PM
6.
When prompted, connect your player to your computer's USB port using the supplied USB
cable.
RESET
POWER
For Windows 98 SE
You may be prompted by an Insert Disk dialog box when Windows detects your player.
1.
Make sure that the Installation and Applications CD is still in your CD-ROM/DVD-ROM drive.
2.
Click the OK button. The New Hardware Found window appears.
3.
In the Copy files from box, type d:\drivers\win98 (replace d:\ with the drive letter of your
CD-ROM/DVD-ROM drive) and click the Next button.
4.
Click the OK button to complete the installation.
Step 2: Charge the battery
Make sure that your player is connected to your computer’s USB port with the supplied USB cable.
The Indicator LED lights up when your player’s battery is being charged, and turns off when the
battery is fully charged. It takes approximately four hours to charge your battery fully.
Step 3: Transfer videos, images and audio
Transfer videos, images and audio (such as music you have ripped from your CD collection or have
purchased online) files from your computer to your player.
1.
Make sure that your player is connected to your computer’s USB port with the supplied USB
cable.
2.
Press the Play/Stop
PLAY/STOP
4
button to turn on your player.
Osaka.fm Page 5 Thursday, November 17, 2005 5:20 PM
3.
Double-click the My Computer icon on your desktop.
Alternatively, click Start → My Computer.
You will notice that your player is recognized as a Removable Disk.
4.
Locate your audio (MP3 or WMA files), image (JPG files) and video (MV4 files) files on your
computer and copy them to your player using the drag-and-drop method.
Note that you can also transfer data files using this drag-and-drop method.
5.
Organize audio tracks in the ROOT folder, images in the JPEG folder and videos in the MV4
folder.
You can also organize your videos, images and audio tracks using your own folder structure. For
more information, refer to your player’s User’s Guide found on the Installation and Applications
CD (See “User’s Guide” on page 11).
Step 4: Disconnect the player
DO NOT disconnect your player from your computer if you see the Comm Mode
screen on the OLED display.
Before disconnecting your player, use the Windows Eject or Safely Remove Hardware icon
on the Taskbar to safely disconnect your player. If your player is not disconnected safely, the content
may become corrupted and the player will not function correctly. Follow these steps below to safely
disconnect your player:
In Windows XP, Windows 2000 or Windows ME
1. Click the Safely Remove Hardware
icon on the Taskbar and click Safely remove USB
Mass Storage Device.
2.
Disconnect your player when you are prompted to do so.
Safely remove USB Mass Storage Device - Drive (E:)
12:05PM
In Windows 98 SE
1. Wait at least 10 seconds after all file transfers are completed.
5
Osaka.fm Page 6 Wednesday, November 16, 2005 2:15 PM
2.
Right-click the My Computer icon on your desktop and select Explore.
3.
In the window that appears, right-click the Removable Disk icon and select Eject.
4.
Disconnect your player when you are prompted to do so.
Step 5: View videos or images, and play music
PLAY/STOP
1.
Press and hold the Play/Stop
2.
Press the Menu button. The Options menu appears.
3.
When you turn on your player for the first time, the display will be in English. To change the
language:
i.
Select the System
ii.
Select the Language
button until your player turns on.
option.
option, and then Select the language that you want.
NAVI/B-MARK
4. Press and hold the Navi/B-Mark
button to display the contents of your player.
To view videos
1. Select a video (MV4 file).
The video is displayed, followed by the next video in your player, and so on.
2.
Connect your earphones and move the Menu button up and down to adjust the volume.
• Files are sorted in alphanumeric order on your player.
• Your player can only play back video files in MV4 format.
• Your player can store as many video files as its memory will allow, but each video file can
only be up to one hour long.
Use the Transcoder application included with your player to convert videos in other formats
to MV4 format. For more information, refer to your player’s User’s Guide found on the
Installation and Applications CD (see “More Information” on page 11).
6
Osaka.fm Page 7 Wednesday, November 16, 2005 2:15 PM
To view images
Select an image (JPG file).
The image is displayed, followed by the next image in your player, and so on.
Your player does not support images in progressive JPG format.
Your player also displays text (TXT). Instead of Selecting an image file, Select a text file. Your
player displays the text file as a slideshow.
To play music
1. Select an audio track (MP3 or WMA file).
2.
Connect your earphones and move the Menu button up and down to adjust the volume.
Listening to FM radio _______________
You can automatically scan for all available radio stations and save up to 20 radio presets.
1.
Connect your earphones to the Headphone jack.
2.
From the Options menu, Select the Mode
3.
Press the Menu button to switch to Preset view (if necessary).
The Preset
indicator lights up.
4.
Press and hold the Navi/B-Mark
button until the Preset Number
displayed.
The player scans and stores up to 20 radio stations.
5.
Move the Menu button left or right to select the preset station you want.
option, and then Select FM
NAVI/B-MARK
mode.
indicator is
7
Osaka.fm Page 8 Wednesday, November 16, 2005 2:15 PM
REC/A-B
6.
To record from radio, press the Rec/A-B
button.
If you are using your player in Japan, you will need to change the FM region setting.
1.
From the Options menu, Select the Control
Ctrl
2.
3.
option, and then Select the Radio
option.
Select the Band Width
option, and then Select the Japan option.
Move the Menu button to the left, and then Select the Exit option.
Direct Line-In encoding ______________
Record audio from a Line-In source and encode the recording directly into an MP3 file.
1.
From the Options menu, Select the Mode option, and then Select Encoding mode.
Alternatively, press and hold the Rec/A-B
button while in Music mode.
REC/A-B
2.
Connect the Line-In source, such as a CD or MiniDisc player, to your player's Headphone/
Line-In jack with the Line-In cable.
3.
Press the Rec/A-B
4.
Begin playback on the Line-In source.
5.
Press the Play/Stop
6.
Press the Rec/A-B
button to end the recording.
A name is automatically assigned to your recording and it is saved in the RECORD folder of
your player. The naming convention used is: AUDI[Current File Number].MP3.
REC/A-B
button to start the recording.
PLAY/STOP
button to pause, and again to resume the recording.
REC/A-B
8
Osaka.fm Page 9 Wednesday, November 16, 2005 2:15 PM
Customizing the start up screen _____
You can replace the MuVo VIDZ logo that appears when your player turns on with an image of your
choice.
1.
On your computer, create a 128 x 80 pixel image using your favorite image creation software and
save the image file as LOGO00.BMP.
2.
Make sure that the file size of the LOGO00.BMP file is less than 1 MB.
3.
Connect your player to your computer's USB port with the supplied USB cable.
4.
Press and hold the Play/Stop
5.
Double-click the My Computer icon on your desktop.
Alternatively, click Start → My Computer.
You will notice that your player is recognized as a Removable Disk.
6.
Locate the LOGO00.BMP file you created on your computer and copy it to your player’s Root
folder using the drag-and-drop method.
7.
Disconnect your player from your computer properly (see “Disconnect the player” on page 5).
DO NOT disconnect your player from your computer if you see the Comm Mode screen on
the OLED display.
8.
Press and hold the Play/Stop
9.
Press and hold the Play/Stop
PLAY/STOP
PLAY/STOP
PLAY/STOP
button to turn on your player.
button to turn off your player.
button again to turn your player back on.
10. The LOGO00.BMP file appears after the Creative logo appears.
You can also customize your player’s screen saver using your favorite images. For more
information, refer to your player’s User’s Guide found on the Installation and Applications CD
(see “More Information” on page 11).
9
Osaka.fm Page 10 Wednesday, November 16, 2005 2:15 PM
FAQ _______________________________
How do I purchase music on the Internet?
You can legally buy music online from digital music stores. Music files that you purchase can be stored
on your computer, and be transferred later to your player.
How do I reset my player?
You can use the end of a thin object (for example, a straightened paperclip) to push the Reset button
located next to the Hold switch. Hold the Reset button until the OLED display turns off.
How do I format my player?
You can format your player if your player gets corrupted and starts performing erratically. Before you
begin, back up the files found on your player, as the files will be lost during formatting.
1.
Connect your player to your computer’s USB port using the supplied USB cable.
2.
Double-click the My Computer icon on your desktop.
Alternatively, click Start → My Computer.
3.
Right-click your player’s Removable Disk icon and select Format. Make sure that you have
selected FAT32 in the File system box and Default allocation size in the Allocation size
box.
4.
Click the Start button located at the bottom of the window.
5.
After the formatting is complete, make sure you stop your player before disconnecting it from
your computer. For instructions on disconnecting your player safely, see “Disconnect the player”
on page 5.
For more FAQ, refer to your player’s User’s Guide found on the Installation and Applications
CD (see “More Information” on page 11).
10
Osaka.fm Page 11 Wednesday, November 16, 2005 2:15 PM
More Information___________________
User’s Guide
Read the User’s Guide found on your Installation and Applications CD to learn about your player’s
many features. Go to d:\manual\<language>\manual.chm
(replace d:\ with the drive letter of your CD-ROM/DVD-ROM drive, and <language> with a language that
your User’s Guide is available in)
Creative Knowledge Base
Resolve and troubleshoot technical queries at Creative's 24-hour self-help Knowledge Base.
Go to www.creative.com, select your region and then select Support.
Product Registration
Registering your product ensures you receive the most appropriate service and product support
available. You can register your product during installation or at www.creative.com/register.
Please note that your warranty rights are not dependent on product registration.
Customer Support Services and Warranty
You can find Customer Support Services, Warranty and other information in the CD.
Customer Support Services
d:\support\<region>\<language>\support.chm
Warranty
d:\warranty\<region>\<language>\warranty.chm
Please keep your Proof of Purchase for the duration of the
warranty period.
(replace d:\ with the drive letter of your CD-ROM/DVD-ROM drive, <region> with the region that you are in,
and <language> with the language that your document is in)
Copyright © 2005 Creative Technology Ltd. All rights reserved. The Creative logo, MuVo and VIDZ are trademarks or
registered trademarks of Creative Technology Ltd. in the United States and/or other countries. Microsoft, Windows and
the Windows logo are registered trademarks of Microsoft Corporation.
11
Osaka.fm Page 12 Wednesday, November 16, 2005 2:15 PM
Safety Advice _______________________
Refer to the following information to use your player safely, and to reduce the chance of electric
shock, short-circuiting, damage, fire, hearing impairment or other hazards.
Improper handling may void the warranty for your player.
For more information, read the warranty available with your product.
Do not dismantle or attempt to repair your player, battery or power adapter.
Refer all servicing to Creative or authorized repair agents.
Do not expose your player or battery to temperatures outside the range of 0°C to
45°C (32°F to 113°F).
Do not pierce, crush or set fire to your player or battery.
Keep your player or battery away from strong magnetic objects.
Do not subject your player to excessive force or impact.
Do not expose your player or battery to water or moisture.
If your player is moisture-resistant (see product packaging for details), take care not to
immerse your player in water or expose it to rain.
Do not listen to audio at high volume for prolonged periods of time.
Do not attempt to remove the embedded battery.
The player must be disposed of according to local environmental regulations. To replace the
battery, return your player to your regional support office. For product service information,
go to www.creative.com.
As with any digital media-based storage device, data should be backed up regularly. We strongly recommend
that you observe the usage precautions laid out in this booklet, and also back up the data in your player
regularly. In no event will Creative be liable for any indirect, incidental, special or consequential damages
to any persons caused by Creative's negligence, or for any lost profits, lost savings, loss of use, lost revenues
or lost data arising from or relating to this device, even if Creative has been advised of the possibility of
such damages. In no event will Creative’s liability or damages to you or any other person ever exceed the
amount paid by you for the device, regardless of the form of the claim. Some countries/states do not allow
the limitation or exclusion of liability for incidental or consequential damages, so the above limitation or
exclusion may not apply to you.
12
Osaka.fm Page 13
Thursday, November 17, 2005
7:22 PM
祝贺您 _____________________________
MuVo® VIDZ™ 是 Creative 的新款数字音频播放机。请继续阅读,学习如何使用这一新款播
放机!如要充分利用您的播放机,请仔细阅读安装和应用程序光盘上的用户指南 (请参见第
23 页的 “更多信息”)。
11
1
2
3
10
4
9
8
1. 播放 / 停止
按钮
打开或关闭播放机。
开始、暂停或恢复播放。
PLAY/STOP
2. OLED 显示屏
3. 菜单按钮
显示选项菜单。
选择 OLED 显示屏上的选项和文
件。详情请参阅第 14 页的 " 使用
菜单按钮 "。
4. 锁定开关
锁定或解除锁定播放机。
5. 复位孔
重启播放机。详情请参阅第 22 页
的 " 常见问题 "。
6. 麦克风
7. 耳机 / 线性输入插孔
7
5
6
NAVI/B-MARK
8. 导航 / 书签
按钮
显示播放机内容。
REC/A-B
9. 录音 /A-B
按钮
改变播放模式。
在 FM、语音或编码模式中开始或
停止录制。
10. USB 接口
将您的 USB 连接线连接到此接
口,并将连接线的另一端接至电
脑,用以传输文件或给您的播放机
的电池充电。
11. LED 指示
给您的播放机的电池充电时亮起。
在您的播放机的电池已完全充电时
熄灭。
在屏幕保护程序激活时闪烁。
13
Osaka.fm Page 14
Thursday, November 17, 2005
7:22 PM
使用菜单按钮 ________________________
选择
术语 “选择”包含以下动作:
1. 上下左右移动菜单按钮,高亮显示您要的选项。
2. 按菜单按钮,选择一个选项。
您也可以向右移动此按钮选择一个选项。
使用选项菜单
选项菜单是您切换模式和选择设置的主菜单。选择一个图标可显示以下菜单中可用的选项:
模式、系统、控制、声音以及显示。
在音乐、 FM、语音或编码模式中
按菜单按钮。
在查看一个图象显示时
1. 按菜单按钮显示您的播放机内容。
2. 选择一首曲目。
14
Osaka.fm Page 15
Thursday, November 17, 2005
3. 按菜单按钮。
在查看视频时
1. 按住导航 / 书签
NAVI/B-MARK
7:22 PM
按钮显示您的播放机内容。
2. 选择一首曲目。
3. 按菜单按钮。
为了防止录音文件的丢失,在录音时您不能使用选项菜单。如果您正在录音,先停止录
音,然后按菜单按钮使用选项菜单。
使用入门 ___________________________
步骤 1: 安装软件
安装软件之前不要将播放机连接至电脑。
1. 打开电脑。
如果您使用 Windows XP 或 Windows 2000,您必须作为管理员登录 Windows 才能安装
软件。更多信息请参阅操作系统的在线帮助。
2. 将安装和应用程序光盘放入 CD-ROM/DVD-ROM 光驱。 CD 安装程序应自动运行。如果
没有自动运行,请按以下步骤操作:
i.
双击桌面上的我的电脑图标。
或者,单击开始 → 我的电脑。
ii. 右击 CD-ROM/DVD-ROM 驱动器图标,然后单击自动播放。
3. 按照屏幕上的指示操作。
4. 如果提示重新启动电脑,请按照提示操作。
5. 电脑重启后,按照屏幕上的产品注册指示操作。
请注意您需要 Internet 连接来注册产品。
15
Osaka.fm Page 16
Thursday, November 17, 2005
7:22 PM
6. 收到相应提示后,通过提供的 USB 连接线,将播放机与电脑的 USB 端口连接。
RESET
POWER
针对 Windows 98 SE
当 Windows 检测到您的播放机时,可能会出现插入磁盘对话框。
1. 确保安装和应用程序光盘仍在您的 CD-ROM/DVD-ROM 光驱中。
2. 单击确定按钮。找到新硬件窗口出现。
3. 在文件复制来源框中,键入 d:\drivers\win98(将 d:\ 替换为 CD-ROM/DVD-ROM 驱动
器的盘符),然后单击下一步按钮。
4. 单击确定按钮完成安装。
步骤 2: 为电池充电
请确保使用提供的 USB 连接线将播放机与电脑的 USB 端口相连接。
LED 指示在您的播放机的电池充电时亮起,电池充电已满时熄灭。电池完全充电大约需要 4
小时。
步骤 3: 传输视频、图像和音频
从电脑中将视频、图像和音频复制到播放机中 (例如您从收集的 CD 抓取的音轨,或在线购
买的音乐)。
1. 请确保使用提供的 USB 连接线将播放机与电脑的 USB 端口相连接。
2. 按播放 / 停止
16
PLAY/STOP
按钮打开您的播放机。
Osaka.fm Page 17
Thursday, November 17, 2005
7:22 PM
3. 双击桌面上的我的电脑图标。
或者,单击开始 → 我的电脑。
您会注意到您的播放机被识别为可移动磁盘。
4. 找到电脑中的音频文件 (MP3 或 WMA 文件)、图像 (JPG 文件)和视频 (MV4 文
件),并通过拖放操作复制到您的播放机。
注意,您也可以使用这种拖放操作传输数据文件。
5. 在 ROOT (根)文件夹内编排音乐曲目,在 JPEG 文件夹内编排图像,在 MV4 文件夹
内编排视频。
您也可以用您自己的文件夹结构编排视频、图像和音乐曲目。详情请参考安装和应用程
序光盘内的播放机用户指南 (见第 23 页的 " 用户指南 ")。
步骤 4: 断开播放机的连接
如果您的 OLED 显示屏上显示的是联络模式屏幕,请不要将播放机从电脑上
断开连接。
请用任务栏上的 Windows 弹出或安全删除硬件图标 断开播放机与电脑的连接。如果播放
机没有安全断开连接,播放机里的内容可能会损坏而且播放机将无法正常工作。按以下步骤
断开播放机的连接:
在 Windows XP、 Windows 2000 或 Windows ME 下
1. 单击任务栏上的安全删除硬件
图标,然后单击安全删除 USB Mass Storage Device。
2. 在出现相应提示时,拔下播放机。
在 Windows 98 SE 下
1. 在所有的文件传输完毕后再等待至少 10 秒。
2. 右击桌面上我的电脑图标,选择资源管理器。
17
Osaka.fm Page 18
Thursday, November 17, 2005
7:22 PM
3. 在出现的窗口内,右击可移动磁盘图标,然后选择弹出。
4. 在出现相应提示时,拔下播放机。
步骤 5: 查看视频或图像以及播放音乐
1. 按住播放 / 暂停
PLAY/STOP
按钮,直到播放机打开为止。
2. 按菜单按钮。选项菜单出现。
3. 如果您是第一次打开播放机,会看到英文菜单。要改变语言:
i.
选择 System
选项。
ii. 选择 Language
选项,然后选择您要的语言。
NAVI/B-MARK
4. 按住导航 / 书签
按钮显示您的播放机内容。
查看视频
1. 选择一个视频 (MV4 文件)。
该视频即播放,接着播放您的播放机中的下一个视频,以此类推。
2. 连接您的耳机,上下移动菜单按钮调整音量。
• 播放机中的文件按字母数字顺序排列。
• 播放机仅能播放 MV4 格式的视频文件。
• 在您的播放机内存允许的情况下,播放机可以储存很多视频文件,但是每一个视频
长度最多只能是 1 小时。
使用您的播放机附带的转码器应用程序将其他格式的视频转换为 MV4 格式。详情请参
考安装和应用程序光盘内的播放机用户指南 (见第 23 页的 " 更多信息 ")。
18
Osaka.fm Page 19
Thursday, November 17, 2005
7:22 PM
查看图像
选择一个图像 (JPG 文件)。
该图像即显示,接着显示您的播放机中的下一个图像,以此类推。
您的播放机不支持 progressive JPG 格式的图像。
您的播放机也可显示文本 (TXT)。选择一个文本文件,而不是选择图像文件。播放机
以幻灯片形式显示文本文件。
播放音乐
1. 选择音乐曲目 (MP3 或 WMA 文件)。
2. 连接您的耳机,上下移动菜单按钮调整音量。
收听 FM 广播 ______________________
您可以自动搜索所有广播电台,预置多达 20 个电台。
1. 将耳机连接至耳机插孔。
2. 从选项菜单,选择模式
选项,然后选择 FM
模式。
3. 按住菜单按钮切换至预置视图 (如果必要)。
预置
指示灯亮起。
NAVI/B-MARK
4. 按住导航 / 书签
按钮直到预置编号
播放机开始扫描并储存多达 20 个广播电台。
指示显示。
5. 左右移动菜单按钮选择您要的预置电台。
6. 录制广播,按录音 /A-B
REC/A-B
按钮。
如果您在日本使用播放机,您需要改变 FM 区域设置。
1.
从选项菜单选择控制
2.
3.
选择频率范围
选项,然后选择日本选项。
向左移动菜单按钮,然后选择退出选项。
选项,然后选择广播控制
选项。
19
Osaka.fm Page 20
Thursday, November 17, 2005
7:22 PM
直接线性输入编码 ____________________
从线性输入源录制音频,并直接将录音编码为 MP3 文件。
1. 从选项菜单选择模式选项,然后选择编码模式。
或者,在音乐模式里,按住录音 /A-B
按钮。
REC/A-B
2. 用线性输入连接线将线性输入源,例如 CD 或 MD 播放机等,连接到播放机的耳机 /
LINE IN 插孔。
3. 按录音 /A-B
REC/A-B
按钮,开始录音。
4. 开始播放线性输入音源。
5. 按播放 / 停止
PLAY/STOP
REC/A-B
按钮,可暂停录音,再一次按下可恢复录音。
6. 按录音 /A-B
按钮,停止录音。
录音将被自动赋予一个名称并保存到播放机上的 RECORD 文件夹内。使用的命名惯例
为:AUDI[ 当前文件序号 ].MP3。
20
Osaka.fm Page 21
Thursday, November 17, 2005
7:22 PM
自定义启动屏幕 _____________________
您可以用自己选择的图像来替换播放机打开时出现的 MuVo VIDZ 标志。
1. 在电脑上使用您喜爱的图像创建软件,创建一个 128 x 80 像素的图像,并将图像另存为
LOGO00.BMP。
2. 确保 LOGO00.BMP 的文件尺寸小于 1 MB。
3. 用提供的 USB 连接线,将播放机与电脑的 USB 端口相连接。
4. 按住播放 / 停止
PLAY/STOP
按钮打开您的播放机。
5. 双击桌面上的我的电脑图标。
或者,单击开始 → 我的电脑。
您会注意到您的播放机被识别为可移动磁盘。
6. 在电脑上找出您创建的 LOGO00.BMP 文件的位置,用拖放的方式将它复制到您的播放
机的 ROOT 文件夹内。
7. 正确断开播放机与电脑的连接 (请参见第 17 页的 " 断开播放机的连接 ")。
如果您的 OLED 显示屏上显示的是联络模式屏幕,请不要将播放机从电脑上断开连接。
8. 按住播放 / 停止
PLAY/STOP
按钮关闭您的播放机。
9. 按住播放 / 停止
PLAY/STOP
按钮再次打开您的播放机。
10. 在 Creative 标志出现后, LOGO00.BMP 图像出现。
您也可以用自己喜爱的图像自定义播放机的屏幕保护。 详情请参考安装和应用程序光盘
内的播放机用户指南 (见第 23 页的 " 更多信息 ")。
21
Osaka.fm Page 22
Thursday, November 17, 2005
7:22 PM
常见问题 ____________________________
如何在 Internet 上购买音乐?
您可以合法地从网上数字音乐商店购买音乐。您购得的音乐文件可以储存在您的电脑上,以
后才传输到您的播放机上。
如何复位播放机?
您可以用一个细长物件的一端 (例如,拉直的回形针)插入位于锁定开关旁的复位孔。抵住
复位孔直到 OLED 显示屏关闭。
如何格式化播放机?
如果您的播放机运转不良或运行不稳定,您可以格式化播放机。在开始前,先备份播放机上
的文件,因为格式化将丢失所有的文件。
1. 使用提供的 USB 连接线,将播放机与电脑的 USB 端口连接。
2. 双击桌面上的我的电脑图标。
或者,单击开始 → 我的电脑。
3. 右击播放机的可移动磁盘图标并选择格式化。请确保您已经选定文件系统框中的 FAT32
以及分配值大小框中的默认分配值大小。
4. 单击位于窗口底部的开始按钮。
5. 格式化完成后,请确保在断开播放机同电脑的连接之前首先关闭播放机。关于安全断开
播放机与电脑连接的详情请参阅第 17 页的 " 断开播放机的连接 "。
有关常见问题的详情,请参考安装和应用程序光盘内的播放机用户指南 (见第 23 页
的 " 更多信息 ")。
22
Osaka.fm Page 23
Thursday, November 17, 2005
7:22 PM
更多信息 ___________________________
用户指南
阅读安装和应用程序光盘上的用户指南,了解播放机的诸多功能。请到
d:\manual\<language>\manual.chm
(将 d:\ 替换为您的 CD-ROM/DVD-ROM 光驱的盘符,将 <language> 替换为用户指南所用的语
言)
Creative 知识基地
Creative 知识基地 24 小时不间断地为您排疑解难,解决技术问题。
请到 www.creative.com,选择您所在的地区,然后选择客户服务。
产品注册
注册您的产品,可获得最贴心的服务和产品支持。您可以在安装时注册产品,亦可访问
www.creative.com/register 进行注册。
请注意产品保修不取决于产品是否注册。
客户支持服务和保修信息
您可以在光盘上找到客户支持服务、保修和其它信息。
客户支持服务
保修
d:\support\<region>\<language>\support.chm
d:\warranty\<region>\<language>\warranty.chm
请保留购买凭证,以确保保修期限。
(用 CD-ROM/DVD-ROM 光驱的盘符替代 d:\,用您所在的地区替代 <region>,并用文件使用的
语言替代 <language>)
© 2005 Creative Technology Ltd. 版权所有。 Creative 标志、 MuVo 与 VIDZ 是 Creative Technology Ltd. 在美国
和 / 或其它国家的注册商标。 Microsoft、 Windows 和 Windows 标志是 Microsoft Corporation 的注册商标。
23
Osaka.fm Page 24
Thursday, November 17, 2005
7:22 PM
安全使用建议 ________________________
参考以下信息,安全使用播放机,减少触电、短路、损坏、火灾、听力损坏或其它事故发生
的几率。
使用不当可能使您的播放机保修服务失效。
详情请参阅产品附带的保修说明。
不要自行拆卸或维修播放机、电池或充电器。
所有相关服务应交与 Creative 或授权的维修代理。
不要将播放机或电池放置在 0°C 至 45°C (32°F 至 113°F)范围之外的环境中。
不要刺戳、挤压或燃烧播放机或电池。
将播放机或电池远离具有强磁场的物体。
不要使播放机遭受强大外力冲击。
不要使播放机或电池浸水或处在潮湿的环境中。
如果您的播放机具有防潮功能 (详情请见播放机包装说明),不要使其浸水或被雨淋。
不要长时间地收听过大音量的音频。
不要试图拆卸内嵌的电池。
废弃播放机的处理必须符合当地环保规定。要更换电池,请将播放机送返当地的客户
支持机构。有关产品服务信息,请访问 www.creative.com。
像其它数字媒体存储设备一样,数据应该定期进行备份。我们建议您遵守本手册上的使用警示并
定期对播放机的数据进行备份。无论何种情形,Creative 不会承担任何由于疏忽而导致的任何
人间接的、意外的、特殊的或即发性的损失,以及本设备引发或同本设备有关的利润、存款、效
用、预算或数据损失的责任,即使 Creative 已经得知这些损失的可能性。无论索赔形式如何,
对于您或其他人造成的损害,公司的责任赔付不会超过您购买产品的价格。一些国家或州 (省)
不允许排斥或限制对突发的或即发的损失的责任,所以上述限制或排斥可能不适用于您。
24
Osaka.fm Page 25
Thursday, November 17, 2005
6:38 PM
恭喜您 _____________________________
MuVo® VIDZ™ 是 Creative 的新款數位音樂播放機。請通讀本簡易手冊了解播放機的使用! 為
充分利用播放機的各項功能,您還需閱讀安裝與應用程式光碟上的使用者指南 〈請參見第 35
頁的的 “更多資訊”〉。
11
1
2
3
10
4
9
8
7
5
6
NAVI/B-MARK
1. 播放 / 停止
按鈕
開 / 關播放機。
開始、暫停或繼續播放。
PLAY/STOP
2. OLED 螢幕
3. 選單按鈕
顯示選項選單。
選擇 OLED 上的選項和檔案。詳情
請參見 第 26 頁 " 使用選單按鈕 "。
4. 鎖定開關
鎖定或解除鎖定播放機。
5. 重設孔
重新設定播放機。詳情請參見
第 34 頁 " 常見問題 "。
6. 麥克風
7. 耳機 / 線性輸入插孔
8. 瀏覽 / 書籤
按鈕
顯示播放機上的目錄。
REC/A-B
9. 錄音 /A-B
按鈕
變更播放模式。
在 FM、語音和編碼模式中開始和
停止錄音。
10. USB 連接埠
用您的 USB 連接線連接此連接埠,
並將連接線的另一端連接至電腦用
以傳輸檔案或給播放機電池充電。
11. LED 指示
在給播放機的電池充電時,此指示
燈亮起。
在播放機的電池充飽電後,此指示
燈熄滅。
啟動螢幕保護程式時此燈閃爍。
25
Osaka.fm Page 26
Thursday, November 17, 2005
6:38 PM
使用選單按鈕 ________________________
選擇
術語 “選擇”意指以下動作:
1.
上下左右移動選單按鈕,反白顯示您要的選項。
2.
按選單按鈕選擇選項。
您也可以向右移動此按鈕來選擇一個選項。
存取選項選單
選項選單是您切換模式和選擇設定的主選單。選擇一個圖像可顯示以下選單中的選項:模式、
系統、控制、聲音以及顯示。
在音樂、FM、語音或編碼模式中
按選單按鈕。
在檢視圖像顯示時
1. 按選單按鈕顯示播放機目錄。
2.
26
選擇一首曲目。
Osaka.fm Page 27
Thursday, November 17, 2005
3. 按選單按鈕。
在檢視影像時
1. 按住瀏覽 / 書籤
2.
選擇一首曲目。
3.
按選單按鈕。
6:38 PM
NAVI/B-MARK
按鈕顯示播放機目錄。
為了防止錄音檔案的遺失,在錄音期間,您不能存取選項選單。如果您正在錄音,先停
止錄音,然後按選單按鈕存取選項選單。
使用入門 ___________________________
步驟 1: 安裝軟體
安裝軟體前不要將播放機接至您的電腦。
1.
開啟您的系統。
如果您用的是 Windows XP 或 Windows 2000,在安裝軟體時必須以管理員的身份登入
Windows。詳情請參考您的作業系統的線上說明。
2.
將安裝與應用程式光碟放入 CD-ROM/DVD-ROM 光碟機中。光碟將自動開始執行。如果
沒有,請按下面的步驟作業:
3.
i.
雙按桌面上的我的電腦圖像。
或者,單按 開始 → 我的電腦。
ii.
右按 CD-ROM/DVD-ROM 光碟機圖像,然後單按自動播放。
按照螢幕指示作業。
4.
如果提示您重新啟動電腦,按照提示作業。
5.
在電腦重新啟動後,按照螢幕上的指示進行產品註冊。
注意,進行產品註冊需要有 Internet 連接。
27
Osaka.fm Page 28
6.
Thursday, November 17, 2005
6:38 PM
在出現相應指示時,使用提供的 USB 連接線將播放機連接至電腦的 USB 連接埠。
RESET
POWER
在 Windows 98 SE 下
當 Windows 偵測到您的播放機時,螢幕上可能會出現插入磁碟對話方塊。
1.
請確保安裝與應用程式光碟仍然位於您的 CD-ROM/DVD-ROM 光碟機中。
2.
單按確定按鈕。找到新硬體對話方塊出現。
3.
在檔案複製來源對話方塊中,鍵入 d:\drivers\win98 ( 將 d:\ 取代為表示 CD-ROM/
DVD-ROM 光碟機的字母 ),然後單按 下一步按鈕。
4.
單按確定按鈕完成安裝。
步驟 2: 為電池充電
確保已使用提供的 USB 連接線將播放機連接至電腦的 USB 連接埠。
當您的播放機的電池在充電時,LED 指示燈亮起;電池在充飽電時,指示燈熄滅。電池充飽電
大約需要 4 小時的時間。
步驟 3: 傳輸影像、圖像和音樂曲目
將電腦上的影像、圖像和音樂曲目 (如從您收藏的 CD 上轉換的音樂或在線上購得的音樂)
傳輸到播放機。
1.
確保已使用提供的 USB 連接線將播放機連接至電腦的 USB 連接埠。
2.
按播放 / 停止
28
PLAY/STOP
按鈕開啟播放機。
Osaka.fm Page 29
Thursday, November 17, 2005
6:38 PM
3.
雙按桌面上的我的電腦圖像。
或者,單按開始 → 我的電腦。
您會發現您的播放機被認作一個卸除式磁碟。
4.
找到電腦上的音樂曲目 (MP3 或 WMA 檔案)、圖像 (JPG 檔案)以及影像 (MV4 檔
案),使用拖曳作業將它們複製到您的播放機。
注意,您也可以使用拖曳的方式傳輸資料檔案。
5.
在 ROOT 資料夾內編排音樂曲目,在 JPEG 資料夾內編排圖像,在 MV4 資料夾內編排
影像。
您也可以使用自己的資料夾結構編排影像、圖像以及音樂曲目。有關詳情,請參閱您的
播放機的安裝與應用程式光碟上的使用者指南 (見 第 35 頁 " 使用者指南 "〉。
步驟 4: 分開播放機的連接
如果您在 OLED 上看見連線模式,請不要分開播放機和電腦的連接。
播放機與電腦分開連接前,請使用任務列上的 Windows 退出或安全移除硬體圖像 將播放
機與電腦分開連接。如果播放機未能正確分開連接,播放機中的內容可能會損毀或者播放機
本身將不能正常工作。按照以下步驟妥善分開播放機的連接:
在 Windows XP、Windows 2000 或 Windows ME 下
1.
單按任務列上的安全移除硬體
Device。
圖像,然後單按安全地移除 USB Mass Storage
2.
按提示分開播放機與電腦的連接。
在 Windows 98 SE 下
1.
所有的檔案傳輸完畢後,至少還要等候 10 秒。
2.
右按桌面上的我的電腦圖像,然後選擇檔案總管。
29
Osaka.fm Page 30
Thursday, November 17, 2005
6:38 PM
3.
在出現的視窗中,右按卸除式磁碟圖像,然後選擇跳出。
4.
按提示分開播放機與電腦的連接。
步驟 5: 檢視影像或圖像以及播放音樂
PLAY/STOP
1.
按住播放 / 停止
2.
按選單按鈕。選項選單出現。
3.
如果您是第一次開啟播放機,顯示的語言是英語。如要變更語言:
i.
選擇 System
ii.
選擇 Language
按鈕,直到播放機開啟為止。
選項。
選項,然後選擇您要的語言。
NAVI/B-MARK
4. 按住瀏覽 / 書籤
按鈕顯示播放機目錄。
檢視影像
1. 選擇一個影像 (MV4 檔案)。
該影像即播放,接著播放您的播放機中的下一個影像,以此類推。
2.
連接耳機,上下移動選單按鈕調整音量。
• 播放機中的檔案按英數字元順序排列。
• 您的播放機只能播放 MV4 格式的影像檔案。
• 在您的播放機記憶卡允許的情況下,播放機可以儲存很多影像檔案,但是每一個影
像檔案長度最多只能是 1 小時。
使用播放機附贈的轉碼器應用程式將其他格式的影像轉換成 MV4 格式。有關詳情,請
參閱播放機的安裝與應用程式光碟上的使用者指南 (見 第 35 頁 " 更多資訊 ")。
30
Osaka.fm Page 31
Thursday, November 17, 2005
6:38 PM
檢視圖像
選擇一個圖像 (JPG 檔案)。
該圖像即顯示,接著顯示您的播放機中的下一個圖像,以此類推。
播放機不支援 progressive JPG 格式的圖像。
您的播放機也可以顯示文字 (TXT)。選擇一個文字檔案,而不是圖像檔案。播放機以
投影片的形式顯示文字檔案。
播放音樂
1. 選擇一個音樂曲目 (MP3 或 WMA 檔案)。
2.
連接耳機,上下移動選單按鈕調整音量。
收聽 FM 廣播 ______________________
您可以自動掃瞄可以收聽的電台,最多可儲存 20 個預設頻道。
1.
將耳機連接到耳機插孔。
2.
從選項選單選擇模式
3.
按選單按鈕切換到預設檢視 (如果必要)。
預設
指示燈亮起。
4.
按住瀏覽 / 書籤
按鈕直到預設編號
播放機掃瞄並儲存多達 20 個廣播電台。
5.
左右移動選單按鈕選擇您要的預設電台。
6.
要錄製廣播,按錄音 /A-B
選項,然後選擇 FM
NAVI/B-MARK
REC/A-B
模式。
指示顯示。
按鈕。
如果您是在日本使用此播放機,應當變更 FM 區域設定。
1.
從選項選單,選擇 CONTROL (控制)
2.
3.
選擇頻率範圍
選項,然後選擇日本選項。
向左移動選單按鈕,然後選擇結束選項。
選項,然後選擇廣播控制
選項。
31
Osaka.fm Page 32
Thursday, November 17, 2005
6:38 PM
直接線性輸入編碼 ____________________
從線性輸入音源錄音,直接編碼為 MP3 檔案。
1.
從選項選單選擇模式選項,然後選擇編碼模式。
或者,在音樂模式中按住錄音 /A-B
按鈕。
REC/A-B
2.
用線性輸入連接線將線性輸入音源,如 CD 或 MiniDisc 播放機等連接到您的播放機的耳
機 /LINE-IN 插孔。
3.
按錄音 /A-B
4.
開始播放線性輸入音源。
5.
按播放 / 停止
6.
32
REC/A-B
按鈕開始錄音。
PLAY/STOP
REC/A-B
按鈕可以暫停錄音,再按一下繼續錄音。
按錄音 /A-B
按鈕結束錄音。
錄音名稱為自動指派並且該錄音被儲存於播放機中的 RECORD 資料夾內。命名慣例通常
為:AUDI[ 目前檔案編號 ].MP3。
Osaka.fm Page 33
Thursday, November 17, 2005
6:38 PM
自訂啟動螢幕 _______________________
您可以用自己選定的圖像取代開啟播放機時出現的 MuVo VIDZ 標誌。
1.
在電腦上,使用您喜愛的圖像建立軟體建立一個 128 x 80 像素的圖像,並儲存圖像檔案為
LOGO00.BMP。
2.
請確保 LOGO00.BMP 檔案尺寸小於 1 MB。
3.
使用提供的 USB 連接線將播放機連接至電腦的 USB 連接埠。
4.
按住播放 / 停止
5.
雙按桌面上的我的電腦圖像。
或者,單按開始 → 我的電腦。
您會發現您的播放機被認作一個卸除式磁碟。
6.
在電腦上找出您建立的 LOGO00.BMP 檔案的位置,並使用拖曳的方式將它複製到播放
機的 ROOT 資料夾。
7.
妥善的將播放機與電腦分開連接 ( 參見 第 29 頁 " 分開播放機的連接 ")。
如果您在 OLED 上看見連線模式,請不要分開播放機和電腦的連接。
8.
按住播放 / 停止
9.
再次按住播放 / 停止
PLAY/STOP
PLAY/STOP
按鈕開啟播放機。
按鈕關閉播放機。
PLAY/STOP
按鈕,重新開啟播放機。
10. 在 Creative 標誌出現後,接著顯示 LOGO00.BMP 檔案。
您也可以用自己喜愛的圖像自訂播放機的螢幕保護程式。有關詳情,請參閱您的播放機
的安裝與應用程式光碟上的使用者指南 (見第 35 頁 " 更多資訊 ")。
33
Osaka.fm Page 34
Thursday, November 17, 2005
6:38 PM
常見問題 ____________________________
如何從線上購買音樂?
您可以從線上數位音樂商店合法購買音樂。您可以將購得的音樂儲存在您的電腦上,以後再
傳輸到您的播放機。
如何重設我的播放機?
您可以用一個尖細物件 (如拉直了的迴紋針)的一端推入位於 HOLD (鎖定)開關旁的重設
孔。抵住重設孔直到 OLED 關閉。
如何格式化我的播放機?
如果您的播放機有檔案損壞,工作不正常,可以進行格式化。在您開始之前,先備份您的播
放機上的檔案,因為在格式化過程中檔案將會遺失。
1.
使用提供的 USB 連接線將播放機連接至電腦的 USB 連接埠。
2.
雙按桌面上的我的電腦圖像。
或者,單按開始 → 我的電腦。
3.
右按您的播放機的卸除式磁碟圖像並選擇格式化。確保您選定了檔案系統方塊中的
FAT32 以及配置單位大小方塊中的預設配置大小。
4.
單按視窗底部的開始按鈕。
5.
格式化完畢後,確保先停止播放機,然後再將其從電腦上分離。有關正確分離播放機的指
示,請參見 第 29 頁 " 分開播放機的連接 "。
有關常見問題的詳情,請參閱您的播放機的安裝與應用程式光碟上的使用者指南 (見
第 35 頁 " 更多資訊 ")。
34
Osaka.fm Page 35
Thursday, November 17, 2005
6:38 PM
更多資訊 ___________________________
使用者指南
閱讀安裝與應用程式光碟上的使用者指南,了解播放機的更多功能。移至
d:\manual\<language>\manual.chm
( 將 d:\ 取代為表示 CD-ROM/DVD-ROM 光碟機的字母,將 <language> 取代為文件所使用的語
言)
Creative 智庫
Creative 的 24 小時自助式智庫,為您解決技術問題。
移至 www.creative.com,選擇您所在地區,選擇客戶支援。
產品註冊
註冊產品後您即可享有各項貼心服務與產品支援。您可以在安裝過程中註冊您的產品或者於
www.creative.com/register 註冊。
請注意,無論您註冊與否,都享有同等的保固權利。
客戶支援服務和保固資訊
您可以在光碟上找到客戶支援服務、保固及其他資訊。
客戶支援服務
保固資訊
d:\support\<region>\<language>\support.chm
d:\warranty\<region>\<language>\warranty.chm
在保固期限內請務必保留一份購買憑證。
( 將 d:\ 取代為表示 CD-ROM/DVD-ROM 光碟機的字母,將 <region> 取代為您所在的地區,將
<language> 取代為文件所用的語言 )
© 2005 Creative Technology Ltd. 版權所有。Creative 標誌、MuVo 和 VIDZ 是 Creative Technology Ltd. 在美國和 / 或
其他國家的商標或註冊商標。Microsoft、Windows 和 Windows 標誌是 Microsoft Corporation 的註冊商標。
35
Osaka.fm Page 36
Thursday, November 17, 2005
6:38 PM
安全建議 ____________________________
為避免觸電、產品短接、損壞、起火、聽力損害或其他危險,請參閱以下資訊以了解如何安
全使用本播放機。
使用不當可能導致您的播放機的保固失效。
詳情請閱讀產品附帶的保固資訊。
不要嘗試自行拆卸或維修播放機、電池或充電器。
維修應交由 Creative 或其授權維修代理進行。
不要在 0°C 至 45°C (32°F 至 113°F)這個範圍之外的溫度下存放或使用播放機或電
池。
不要刺穿、擠壓或燃燒播放機或電池。
使播放機或電池遠離強磁場的物件。
不要重壓或用力擠碰播放機。
播放機及電池應避免沾水,遠離潮濕環境。
如果播放機具有防潮特性 (詳情請見產品外盒),注意不要將其浸入水中或被雨淋。
不要長時間聆聽大音量的聲音。
不要試圖卸除內嵌的電池。
必須根據當地的環境法令處理廢棄的播放機。如要更換電池,請將播放機送至您所在
地區的產品支援部門。關於產品服務的資訊,請移至 www.creative.com。
和其他數位媒體儲存裝置一樣,資料必須定期備份。我們極力建議您閱讀並遵守以下使用注意事
項,同時也定期備份播放機中的資料。 在任何情況下,Creative 都不會對由於 Creative 的疏忽造
成的間接、偶然、特殊或連帶的人身傷害負責,同時對於此產品造成的或與產品相關的原因造成
的利潤流失、資料遺失、收益喪失等不負有任何責任,即使 Creative 曾經就上述損害收到相關建
議。 在任何情況下,Creative 的損害賠償都不會超過您購買產品的價格,無論索賠形式如何。 一
些國家或州(省)不允許對間接或必然損失負責實行限制或排斥,所以上述限制或排斥可能不適
用於您。
36
Notes template.fm Page 37 Wednesday, November 16, 2005 11:50 AM
Notes
37
Notes template.fm Page 38 Wednesday, November 16, 2005 11:50 AM
Notes
38