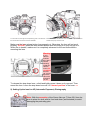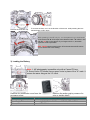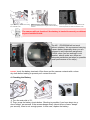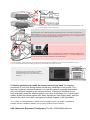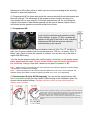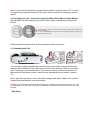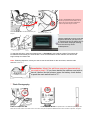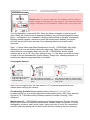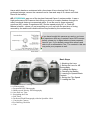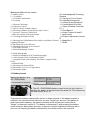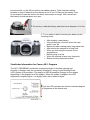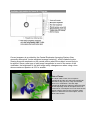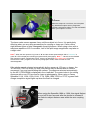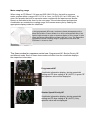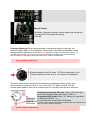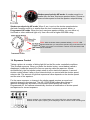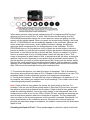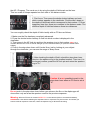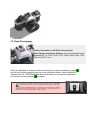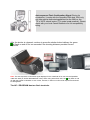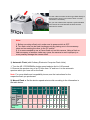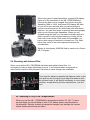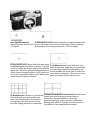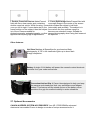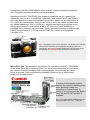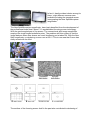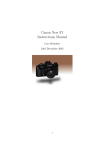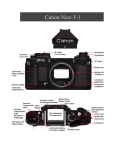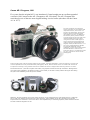
1
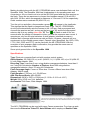
Canon AE-1 Program, 1981
Five years after the original AE-1 was introduced, Canon brought out an excellent upgraded
version in 1981, known as the AE-1 Program or AE-1P in short. The AE-1 Program was
considered as one of the two most elegant looking A series bodies (the other was the Canon
A-1 in 1977).
The AE-1 Program was certainly a
worthy successor. It was packed with
improved features, which were not
found in its predecessor. Among the
features was the Programmed AE,
(first debut in the A-1) in addition to
the Shutter-priority AE and manual
override modes. It also has eight user
interchangeable focusing screens,
using the new laser matte types as
well as some with extra bright laser
matte technology developed for the
flagship model, the New Canon F-1. It
has a new, dedicated Power Winder
A2 that has additional remote
capability, but the camera still accepts
the older Winder A and can even
share the Canon A-1's Motor Drive MA
for up to 4 fps burst rate for action
photography.
It also accepts most of the accessories within the FD system, including Data Back A, macro accessories, A and G-type
of Canon Speedlites for fully automated flash photography. All FD, New FD and FL lenses are usable with the AE-1P.
Full aperture metering is only possible with the FD and New FD lenses. Stopped-down metering with the FL lenses.
As with the Canon A-1, the AE-1 Program was indeed, very popular and well received by consumers. Although there
were some minor shortfalls in its design to make it a true classic, it was still a worthy camera among its class during
the years of its availability, from early to the mid-80s.
Obviously, the AE-1 Program was a much easier camera to use as compared to the multi-mode Canon A-1. Although
the A-1 has more features and functions to control exposure, those available on the AE-1 Program were actually
improvements over what the A-1 has and it has a more simplified way in controlling exposure, which made the camera
an easier model for beginners to use.
1) Attaching the Lens
Removed the body cap.
Turn the rear lens cap in the direction of the arrow until it stops and pull it off the lens.
Note: The instructions in this section concerning the
lens are for an FD lens without a chrome mount ring
(Earlier FD lenses). If your lens looks like this one
with a chrome mount ring, read its instructions for
handling the rear cap and mounting it on the camera.
To re-attach the rear lens cap, align it with the lens as illustrated. Then
lightly push it in and turn it clockwise until it stops.
To mount the lens, first align the red positioning point on the lens with Then turn the lens in the direction of the arrow until it stops and the lens
the red dot above the camera mount as illustrated.
release button pops out with a click.
Make sure the lens release button has popped out. Otherwise, the lens will not work
properly. DO NOT press the lens release button while mounting or it may not pop out.
When film is loaded, make sure it is completely advanced to the next frame before
mounting the lens.
Warning:
If your
camera
look like
this, with a
red dot
showing
inside the
camera
mount, do
not mount
the lens
yet, correct
exposure
cannot be
ensured if
you do.
To release the stop-down lever, unfold and lightly press it down so it pops out. Then
mount the lens. Leave the stop-down lever as it is. Normal position of the lever-->>
2) Setting Up the lens for AE (Automatic Exposure) Photography
Note: With the exception of the Canon fish-eye 7.5mm f/5.6 lens, be
sure to place the lens with its front end down (as illustrated) to avoid
damaging the protruding pins.
Remove the front lens cap.
To remove the lens, turn it in the direction of the arrow. while pressing the lens
release button, until it stops.
While pressing in the AE lock pin, turn the aperture ring in the direction
of the arrow until "A" click-stops at the distance index. "A" will be in line
with the red dot on the camera. If you forget to do th~s, automatic
exposure will be impossible.
Note : BOTH shutter-speed priority AE and programmed AE require
you to set the lens to this setting.
3) Loading the Battery
Note: 1. AE photography is possible only with a Canon FD lens.
2. Some Canon FD lenses have a green circle in place of the "A'' mark. it
means the same thing as the "A" mark.
Remove the viewfinder cover from the
Remove the action grip by means of a
accessory shoe.
coin or similar object.
Correct Batteries
Examples
Alkaline-manganese, 6V
Eveready (UCAR) No A544 IEC 4LR44
Silver Oxide, 6V
Eveready (UCAR) No 544 Duracell PX 28, IEC 4 SR44
Lithium, 6V
Duracell PX 28 L
.
Open the battery chamber cover using
the viewfinder cover.
Load a new battery so that its terminals are in the
directions indicated by the diagram inside the battery
chamber.
Insert the negative end first. Then push down and
insert the positive end. Close the chamber cover.
The camera will not function if the battery is loaded incorrectly or without
anyone installed inside.
The AE- 1 PROGRAM will not work
without a battery. We recommend carrying
a spare battery especially when you are
engaged in any important assignment.
Further, when you are working in cold
weather, always make sure there are
adequate precaution are taken for possible
weak performance of the cell(s)..
DO NOT touch the battery terminals. Wipe them and the camera contacts with a clean
dry-cloth before loading to prevent poor contact from dirt.
4. Checking the Battery
1) Turn the main dial to "A".
2) Then, press the battery check button. Shooting is possible if you hear about six or
more "beeps" per second. If the camera beeps slowly (about three or fewer "beeps"
per second), there is not enough power. In this case, replace the battery.
Note:
1. With normal use, the battery should last about one year.
2. It is necessary to take special precautions with the battery when you are shooting
in temperatures below 0°C (32° F}.
3. Remove the battery if you do not expect to use the camera for about three weeks
or longer.
5. Learning to Operate Basic Control
Make sure the main switch is on "A."
Note: Turn the main switch to "L''to prevent accidental shutter
release or battery drain whenever you are not using the camera.
Turn the film advance lever in the direction of the arrow until
it stops. You may turn it in one continuous stroke or in
several short strokes. When film is loaded, this will advance
it to the next frame.
The AE- 1 PROGRAM has a two-step shutter button.
Press it halfway to turn the meter on and to get a
display in the viewfinder. Gently squeeze it all the way
down to release the shutter. You cannot release the
shutter again until the film is advanced. Never apply
excessive force or jab the shutter button. Pressing it
gently only with your finger tip. This is important step
for getting sharp picture, as most blur images are
result of users' own mistake.
6) Setting the Film Speed
While pressing the lock release button,
slide the film speed setting lever until the
film speed of your film is aligned with the
green index. This is necessary for getting
correct exposure.
7. Loading the Film
Pull up the rewind knob until the back cover pops open. As with any camera
purchase new, when you flip open the film back, a plastic insert is attached to the
pressure plate of a new AE-1 PROGRAM to protect it in transport. Before loading
the first film cartridge, remove this insert and throw it away.
The AE- 1 PROGRAM uses color (negative or slide) or
black-and-white film in standard 35mm cartridges. Place the
cartridge in the film chamber as shown. Then push the
rewind knob down, turning it until it drops into its normal
position.
Pull the film leader across the camera
and insert it into any slot of the take-up
spool. Shield the film from direct
sunlight while loading.
Advance the film once. Make sure the film perforations are engaged in the teeth of the
film transport sprocket and the take-up spool.
Warning: While loading the film, take care not
touch the shutter curtain, the film rails or the
pressure plate (Shown in Pink).
The film should be taut. If there is slack. gently turn the rewind crank in the direction of the
arrow until it stops. Close the back cover.
Take several blank shots, releasing the shutter and advancing the film, until the frame counter reads " 1"
While doing this, keep an eye on the rewind knob. If it rotates in the direction of the arrow, the film is loaded
correctly. There is no other way to check IF the film has been loaded correctly - this is a standard pratice for
virtually all manual focus camera, so please use this as a guide.
Each time you advance the film, the frame counter also advances to the
next frame. It can count up to 38 frames. The numbers 20 and 36 are in orange to call your attention to the
fact that rolls with those numbers of frames are or are almost finished.
Note: For film loading, in particular, do not set the shutter speed selector dial to "PROGRAM" if vou have a lens cap attached to the lens
or you are in dim light. We recommend setting the dial to any shutter speed from 1/125 to 1/1000 sec.
The back cover of this camera has a memo holder. It
conveniently holds the end of the film box as a
reminder of the type of film in use and the number of
exposures.
8. General guidelines to handle the camera correctly by hand The slightest
movement of your body during shutter release may cause blur in the picture. The
best way to prevent camera movement is to hold the camera as steady as possible,
with your left hand supporting the camera and lens. Press your left elbow to your
body and lightly press the camera against your cheek or forehead. For a vertical shot
steady at least one elbow against your body. Spread your feet slightly apart, one foot
ahead of the other, and relax. Lean against a steady support if one is available.
Note: There is no distinctive way to define the most suitable way for you. Select a method that
provides comfort in addition to stability. It may help to practice in front of a mirror.
9.AE (Automatic Exposure) Photography The AE-1 PROGRAM offers the
following two AE modes, either of which you can choose according to the shooting
situation or personal preference.
(1) Programmed AE for those who prefer the camera sets both the shutter speed and
aperture settings. The advantage of this exposure mode is that it allows you to
concentrate fully on your subject. (2) Shutter-speed priority AE for controlling the
subject's movement. Faster shutter speeds can be used to freeze subject motion,
and slower shutter speeds can provide artistic blur effects.
(1) Programmed AE
Look into the viewfinder and press the shutter
button halfway. A green "P" and a number will
appear to the right of the field of view, indicating
programmed AE and the aperture selected
automatically by the camera.
Exposure will be correct if the aperture display does not blink. The "P" will blink to
warn you of camera shake when the shutter speed is 1/30 sec. or slower. If the "P"
blinks, use a flash or attach the camera to a tripod. You can also use a film with a
higher ISO/ASA rating.
Turn the shutter speed selector dial until the green "PROGRAM" on the shutter speed
dial is aligned with the index. Do not set the shutter speed selector dial between
the click stop settings. Note that it does not turn past "PROGRAM" or "B".
Note *: When there is not enough light for correct exposure, the maximum aperture of the lens blinks;
"16" will blinks to indicate too much light.
Note **: When shooting with a lens whose maximum aperture is f/1.8 or f/3.5, for an example, the
aperture display will indicate a maximum aperture of either f/1.4 or f/2, or f4 respectively.
(2) Shutter-speed Priority AE Photography Turn the shutter speed selector dial
from "PROGRAM" and set a shutter speed. While looking in the viewfinder, press the
shutter release button halfway. Exposure will be correct as long as the aperture
display does not blink.
In the case of an overexposure warning, "32" blinks regardless of the lens' minimum
aperture. When using a lens whose minimum aperture is f/16 or f/22, even when "32"
does not blink, 1) choose a faster shutter speed until the number displayed in the
viewfinder is equal to or 2) smaller than the lens' minimum aperture.
To warn of underexposure, a number equal to or smaller than the lens' maximum
aperture will blink. Choose a slower shutter speed until the aperture display stops
blinking.
Note: If you must set the shutter speed selector dial to a number below "60." If action
is a particularly important element in the shot, check sections on choosing a shutter
speed.
10. One Shot at a time - Other than using the Motor Drive MA or Power Winder
(s) A or A2 Turn the focusing ring until the main subject is sharp and compose the
picture.
Note *: If there is light, such as the sun or a window, behind your subject, see more details on
exposure compensation.
Note **: The AE-1 PROGRAM's focusing screen can be changed according to the subject you
are shooting and the lens in use.
Gently press the shutter button all the way down to take the picture.
11. Rewinding the Film
You can tell you have reached the end of the film by the frame counter and the film
advance lever. Either the film advance lever will not turn at all or it will not turn all the
way. First press in the rewind button. Then turn the rewind crank in the direction of
the arrow until the frame counter, which counts backwards as you rewind, reaches
"S."
Next, open the back cover, remove the film cartridge and place it back in its canister.
It should be developed as soon as possible.
Caution: Until you have rewound the film back into the cartridge. Don't open the film back yet - If you
do, light falling on the film may ruin the picture. Make sure the rewind crank does not move if you wind
the lever
* Self-Timer
The AE- 1 PROGRAM sets the exposure the
moment you press the shutter button. Do not
stand in front of the lens whiie pressing the
button or exposure may be incorrect.
Advance the film to the next frame and focus your
subject.
Set the main switch to "S."
Use the viewfinder cover to cover the
eyepiece whenever your eye is not
to it at the moment you take a shot. If
it is uncovered, stray light entering
from the rear may cause
underexposure
To start the self-timer, press the shutter button. A "beepbeep" sound will be emitted. The shutter will
be released automatically ten seconds later. At two seconds before shutter release, the camera will
begin to beep at a faster rate.
Note: Following exposure, unless you want to use the self-timer for the next frame, reset the main
switch to "A" or "L."
Cancellation: What if the self-timer operation has started but
you wish to stop it ? If you have started the selftimer and wish to
cancel it before shutter release, press the battery check button
or push the main switch back to "L".
* * Flash Photography
With dedicated Speedlite 188A
Slide the Speedlite's ISO/ASA film speed switch to the ISO/ASA speed of your film.
Make sure the main switch on the flash is OFF. Then slide Then push the Aperture/ MANU selection switch to select an aperture. The green
the flash into the AE-1 PROGRAM's accessory shoe.
Tighten the lock nut.
and red positions each indicate the distance range which corresponds to the
aperture you have set on the flash.
Please note: For correct exposure, the subject must be within a
certain range of distances from the camera. The required distance
range is indicated on the Speedlite 188A by the red or green line.
Turn the Speedlite's main switch ON. When the flash is charged, its pilot lamp will
glow. When the shutter button is depressed halfway, the auto working aperture and a
green ~ will appear in the viewfinder, indicating that the flash is charged. Immediately
following shutter release, continue to press the shutter button halfway; the green ~
will flash on and off for two seconds if your shooting distance provided correct
exposure.
Note: 1. Canon offers eight other Speedlites for the AE- 1 PROGRAM. With slight
differences, all nine are used in almost the same way. Refer to the Speedlite's
instructions for more details. Make sure the AE- 1 PROGRAM's shutter speed
selector dial is not on "B." Any other setting is okay. 2. If the flash icon does not flash
on and off for two seconds after shutter release, change your shooting distance so it
is within the distance range specified on the flash.
Carrying the Camera
For carrying the camera, in
Thread the ends of the strap
particular, insert it into its semithrough the rings on the
hard case (optional accessory) as
camera as shown.
shown.
To remove the top cover, turn it down, then
push it straight up and out. Turn the lens'
focusing ring to infinity (OO) before closing
the top cover.
Note: Do not forget to turn the main switch to "L" to prevent accidental shutter
release when carrying the camera.
Pre-shooting Checklist Shutter speed selector dial set to "PROGRAM" (for
programmed AE) or to a shutter speed (for shutter-speed priority AE)? Lens aperture
ring set to "A" ? ISO/ASA setting? Battery inserted or function normally ? Film
Advance ?
Maintenance AE- 1 PROGRAM camera is a precision instrument. Regular use with
proper care will ensure maximum performance. Reliable under normal use, it can be
damaged by moisture, heat, shock, water, sand or the use of force. We recommend
periodic external cleaning with a blower brush and lens cleaning with lens cleaning
tissue which has been moistened with a few drops of lens cleaning fluid. During
prolonged storage, remove the camera from its case and wrap it in a clean soft cloth.
Remove the battery.
AE-1 PROGRAM, was one of the two best featured Canon A series models. It was a
high performance SLR camera that offers you plenty of creative freedom through its
many functional features incorporated within. It can be used in three automatic
exposure (AE) modes: Programmed AE, Shutter-speed priority AE, or Flash AE.
Manual override - where you set everything on your own with the precision of timing
assured by the stable and reliable electronics provided by the camera body.
If you have bought this camera as used or you have
no experience with any A-series Canon SLR camera
before, please try to digest what we have prepared
here for you. If you already owned this camera and
wish to do a reorientation, fine. The content in this site
may suite your purpose as well.
Basic Steps
1. Attaching the Lens
2. Setting the Lens for AE
Photography
3. Loading the Battery
4. Checking the Battery
5. Learning to Operate Basic
Controls
6. Setting the Film Speed
7. Loading the Film
8. Hold the Camera Correctly
9. AE Photography
a. Programmed AE Photography
b. Shutter-speed Priority AE Photography
10. One Shot at a Time
11. Rewinding the Film
a. Self-Timer
b. Dedicated Flash Photography with the Speedlite 188A
c. Carrying the Camera
d. Pre-shooting Checklist
e. Care
Making the Most of Your camera
12. Battery Issues
13. Viewfinder
a. Viewfinder Information
b. Focusing
26. Interchangeable Focusing
Screens
27. Caring for Your Camera
28. Optional Accessories
a. Canon Power Winder A2
c. Exposure Warnings
b. Canon Motor Drive MA
14. Exposure Control
c. Canon Wireless Controller
15. How to Choose a Shutter Speed
LC-1
16. Shooting at Shutter Speeds Slower than 1/60 sec
d. Data Back A
17. Aperture. Exposure's Other Half
e. Angle Finders A2 and B
a.How the Aperture affects the Picture
f. Lens Hoods
18. Checking the Depth of Field
g. Dioptric Adjustment Lenses
S
19. Shooting with Light Behind Your Subject (and Other Unusual h. Magnifier S
Lighting Situations
i. Filters
20. Shooting with a Non-FD Lens
21. Shooting with Close-up Accessories
a. Film Plane Indicator
b. Manual Diaphragm Control
22. Flash Photography
a. Display Information in AE Flash Photography
b. Auto-exposure Flash Confirmation Signal
c. Automatic Flash (with Ordinary Electronic Computer Flash
Units)
d. Manual Flash
23. Shooting with Infrared Film
24. Shooting in Very Low Temperatures
25. Shooting at Night
13. Battery Issues
Making the Most of Your
AE-1 PROGRAM
1. Correct Batteries Examples
Alkaline manganese 6V
Silver Oxide 6V
Lithium 6V
Eveready (UCAR)
No. A544
IEC 4LR44
Eveready (UCAR) No. 544
Duracell PX 28 IEC 4SR44
Duracell PX 28 L
2. The AE-1 PROGRAM's battery check circuit not only tells you
whether the battery is good but also how good it is. First make sure
the main switch is on "A."
Then press the battery check button for two to three seconds. If the battery's power is
sufficient, the camera will emit about six or more "beeps" per second. If the battery is
weak and needs replacing, the camera will beep at the slower rate of about three
"beeps" or fewer per second. 3. The battery is exhausted if, after pressing the battery
check button for about three seconds, no sound is emitted. Replace the battery with a
new one. 4. Pressing the battery check button, the shutter button, the exposure
preview switch, or the AE lock switch uses battery power. Take care that nothing
presses on any of these when the camera is not in use. 5. Remove the battery if you
do not expect to use the camera for about three weeks or longer. With normal use,
the battery should last about one year.
6. Do not try to take the battery apart and never dispose of it in fire.
7. Try to make a habit of checking the battery at the
following times:
•
•
•
•
•
•
•
•
After loading a new battery.
If the shutter won't function when the main
switch is on "A"
Before and after making many long exposures.
After storing the camera for a long time.
When you are using the camera in low
temperatures.
Before going on a trip.
When the camera is used very frequently.
Before shooting important events.
Viewfinder Information for Canon AE-1 Program
The AE-1 PROGRAM's viewfinder is especially bright to facilitate viewing and
focusing. It displays only the necessary information, using a Light-Emitting Diode
(LED) system of illumination. The degree of LED illumination changes in four stages
depending on the brightness of the subject. When the subject is brighter, the LED
brightness is slightly higher; it is slightly lower with a darker subject.
Thus the LED maintains an almost consistent degree
of brightness to the human eye.
Correct exposure is provided by the Central Emphasis Averaging System (Also
generally referred as "center-weighted average metering"), which reads the entire
viewing area with emphasis on the central portion where the subject is most likely to
be placed. Since a new type of split-image rangefinder is used in the center of the
viewfinder, the brightness of the split-image rarely changes even when using a lens
whose maximum aperture is f/5.6 or smaller.
Out of Focus
The laser matte screen, the microprism
rangefinder and the new spit image rangefinder
are aids to help you focus. They can be used
alone or in combination. The New Split
rangefinder divides the subject in half horizontally
and is especially useful for a subject which has
vertical lines. The subject is in focus when the two
halves merge to become one unbroken image.
When it is difficult to focus the subject, use the
laser-matte screen.
In Focus
When the subject is out of focus, the microprism
ring breaks the subject into tiny fragments,
causing a shimmering effect. It is clear and steady
when your subject is in focus.
The laser-matte screen appears fuzzy until the subject is in focus. It is particularly
effective when you are using accessories for copying or close-ups. Canon offers
eight different types of inter-changeable focusing screens. When using a lens with a
maximum aperture of f/5.6 or smaller, half of the split-image rangefinder may take on
a slight color.
Note*: When the lens aperture ring is set to "A" and the shutter speed selector dial to "PROGRAM," a
green "P" LED is displayed, indicating programmed AE photography. Note **: Other than the standard
split image/microprism rangerfinder screen. Canon has designed seven other types of focusing
screens for the AE-1 program to suit various photographic needs, these screens are user
interchangeable
If the shutter speed selected automatically by the camera is 1/30 sec. or slower, the
"P" will blink. This is to warn you that your picture may be blurred due to camera
movement if you are hand-holding the camera. The aperture selected automatically
by the AE-1 PROGRAM is displayed in the viewfinder. The meter index is for setting
exposure with a non-FD lens and in close-up photography. When using a Canon
Speedlite 011A, 133A, 155A, 166A, 177A, 188A, 199A, 533G or 577G, a green flash
charge-completion signal lights up when the flash is charged.
When using the Speedlite 188A or 166A, this signal flashes
on and off for two seconds after the shutter is released if
the flash-to-subject distance was within the auto coupling
range.
Meter coupling range
When using an FD 50mm f/1.4 lens and ISO/ ASA 100 film, the built-in exposure
meter couples within a range of EV1 (f/1.4 at 1 sec.) to EV18 (f/16 at 1/1000 sec.). At
given film speeds, the built-in exposure meter couples with the aperture and shutter
speed, as indicated in the chart on the next page. If the shutter speed and aperture
combination are outside the coupling range, the camera warns you by flashing the
appropriate display inside the viewfinder.
In
the programmed AE mode, continuous frame photography with a
Motor Drive MA or Power Winder A or A2 is recommended only if the
light is bright enough to give an aperture display of f/4 or larger. In this
case. the shutter speed will be at least 1/60 sec. Note: The dotted line
indicates the meter coupling range in programmed AE when the
FD50mm f/1.4 lens is used.
The three modes for exposure control are: Programmed AE, Shutter Priority AE
and Manual mode. Each of these three modes will affect how the viewfinder displays
the respective information:
Programmed AE
Viewfinder information display, shutter speed dial
setting and FD lens setting at 'A' (AUTO). A green "P"
and aperture value will be displayed.
Shutter Speed Priority AE
Viewfinder information display, shutter speed dial
setting and FD lens setting at 'A' (AUTO). Only
aperture value will be displayed.
Manual Control
Viewfinder information display, shutter speed dial setting and
user defined FD lens aperture setting.
A red "M
Exposure Warnings When taking pictures in excessively bright or low light, the
aperture display blinks in the viewfinder. Depending on the warning displayed, make
the appropriate adjustment as follows: Note: Besides pressing the shutter button halfway, you
can also turn the meter on to check exposure in the viewfinder by pressing the exposure preview
switch. Pressing it uses battery power. Be careful not to press it unintentionally.
Over Exposure Warning
Shutter-speed priority AE mode: "32" blinks regardless of the
minimum aperture of the lens in use. aperture is displayed.
Choose a faster shutter speed until the display stops blinking. When using a lens
whose minimum aperture is f/22 or f/16, even when "32" does not blink, turn the
shutter speed selector dial until a number equal to or smaller than the lens' minimum
Shutter-speed priority AE mode: When "32" blinks and
the shutter speed selector dial is set to 1000; or
Programmed AE mode: When "16" blinks, you can either:
a) Attach an ND filter *; or
b) Use a film with a lower ISO/ ASA rating.
* An ND (neutral density) filter reduces the light intensity while having no
effect on colors. Optional accessory.
Under Exposure Warning:
Shutter-speed priority AE mode: A number equal to or
smaller than the lens' maximum aperture blinks. Choose a
slower shutter speed so that the aperture stops blinking.
Shutter-speed priority AE mode: When 2 sec. is set on the shutter speed selector
dial and a number equal to or smaller than the lens' maximum aperture blinks; or
Programmed AE mode: When the lens' maximum aperture blinks, you can either: a)
Use flash or other additional light or b) Use a film with a higher ISO/ASA rating.
Note: With the shutter button pressed halfway, a red "M" LED
appears whenever you remove the aperture ring of the lens from "A"
or when you mount a non-FD lens. It warns you that exposure will
not be automatic.
14. Exposure Control
Taking a picture is a matter of letting light fall on the film under controlled conditions.
This is called exposure. When you press the shutter button, some blades (called a
diaphragm) inside the lens shift to form an opening called the aperture. Almost
simultaneously, the first shutter curtain starts to move inside the camera. A second
shutter curtain follows it after a fixed interval which you control with the shutter speed
selector dial. The amount of light that exposes a frame depends on the shutter speed
and the size of the aperture.
For the same exposure, a change in the shutter speed requires an equal and
opposite change in the aperture. The AE-1 PROGRAM makes this change in
aperture automatically by means of the shutter-speed priority AE mode. In
Programmed AE, the camera automatically chooses a combination of shutter speed
and aperture for correct exposure.
Strongly suggest you to Download a copy of the PDF file to see the relationship
between shutter speed, opening of the diaphragm and the shutter curtain traveling time.
There are usually several combinations of shutter speed and aperture which will give
the same exposure. This fact is the key to one of the most creative tools in
photography. Find out more about it in the next three sections.
15. Choose an Appropriate Shutter Speed
The shutter controls exposure by the length of time it remains open.
The basic function of shutter speed is to get correct exposure (In combination with
opening of he lens diaphragm for any given light scene), but you can also use it to
control the expression of your subject's motion and to control the effect of camera
movement.
Blurring part of the picture can heighten the sense of
action. In most cases, however, image blur is undesirable.
To avoid blurred pictures from camera movement, use a
shutter speed of at least 1/60 second for handheld
shooting with a standard (50 mm) lens. Even higher
speeds are necessary with a telephoto lens
What is ISO/ASA film speed all about ? The higher the film's ISO/ ASA speed, the
less the light it needs for exposure, it is due to film with higher ISO/ASA film rating
comes with emulsion designed to more 'light sensitive' than a lower ISO/ASA film.
That must mean that with a higher film speed we can shoot in lower light or use faster
shutter speeds if a higher ISO/ASA rating film is used. What is the compromise?
Graininess when doing enlargement, higher speed film usually exhibits higher grains
formation when a photo is being enlarged.
1. Freezing Motion
Usually a certain shutter speed is chosen to freeze the motion of a subject. The faster
the subject is moving, the higher the shutter speed required to stop the action. While
it is possible to freeze the motion of a pedestrian at 1/60 second, you need 1/1000
second for a moving train.
2. Blurring the Subject's Motion
Blurring part of the picture intentionally can give a convincing sense of action. To blur
the subject, simply set a shutter speed which is too slow to freeze its action.
You can also blur the background by "panning." Choose a slower shutter speed in
proportion to the effect and suitable for the subject's motion and release the shutter
as you follow the movement, turning the upper part of your body.
16. Shooting at Shutter Speeds Slower Than 1/60 Sec. With a standard 50
mm lens on your AE-1 PROGRAM, a shutter speed of 1/30 second or slower is liable
to result in blurred pictures because of camera movement when you are handholding
the camera. Instead of using such slow shutter speeds, it is better to raise the shutter
speed, if possible, add light or use a flash. If you are in macro or astrophotography,
the chances are even higher dues to high magnification usually demands more light
to compensate for such magnification, and usually that interprets in slower shutter
speed settings. In such cases, a tripod with a cable release to handle time and
lengthy exposure are almost inevitable. Mount the camera on a sturdy tripod and use
a cable release is a good practice - if your type of photography allows you to do that
(but most of the time, we are not and it is highly impractical to do so). Attach the
camera to the tripod via the tripod socket. A cable release is an accessory which
screws into a socket in the shutter button and allows you to release the shutter
without touching the camera.
With a wide-angle (less than 50 mm) lens, it may be possible to use
shutter speeds slightly slower than 1/60 second for handheld
shooting. With a telephoto (more than 55 mm) lens, even faster
shutter speeds are necessary to prevent blurring.
Top: Canon offers a handy and inexpensive optional accessory called Tripod Adapter A. If the tripod
head is quite large, it may be helpful to place this accessory between the camera and the head.
Otherwise, it may be difficult to turn the focusing and aperture rings. This accessory also prevents
damage to the camera when the tripod screw is too long for the camera's tripod socket.
Rule of Thumb: Generally, DO NOT use a number on the shutter speed scale which
is any smaller than the focal length of the lens for handheld shooting. For handheld
shooting with a 100 mm lens, for instance, set a shutter speed of 1/125 second or
faster; with a 200 mm lens, at least 1/250 second. If this is not possible, use a tripod
and a cable release. Note: In the programmed AE mode. the "P" blinks when the shutter speed is
1/30 or slower to warn you of the possibility of camera movement if you are hand holding the camera.
17. Aperture, Exposure's Other Half The lens has diaphragm blades. They open
and close to form certain-sized holes, or apertures, which control the amount of light
allowed to expose the film. The aperture scale can be found on the lens' aperture
ring. The numbers on the scale are called f-numbers or f/stops.
When taking pictures using shutter-speed priority AE or programmed AE the lens'
aperture ring must be set to the "A' mark. With the lens on this setting, the AE-1
PROGRAM automatically selects the correct aperture, based on lighting, the film
speed, and the shutter speed. When you press the shutter button halfway, the f/stop
the AE- 1 PROGRAM has set automatically appears in the viewfinder. Because the
meter reads light continuously, as the lighting conditions change, the different
apertures which compensate for the change appear in the viewfinder. The AE-1
PROGRAM does not fix the aperture until you press the shutter button to take the
picture.In addition to controlling the quantity of light, the aperture influences depth of
field which, in turn affects the way a picture will look. When you; subject is in focus,
there is a certain area in front of it and behind it which will also be in focus. This
range of sharpness is called depth of field. In portraits and still-life shots, a particular
aperture may be more important to your picture than a particular shutter speed. To
get the aperture you want in shutter-speed priority AE, simply turn the shutter speed
selector dial, while pressing the exposure preview switch, until the desired f-number
appears in the viewfinder. Keep in mind that the shutter speed should not be slower
than 1/60 second for handheld shooting with a standard lens.
1. The smaller the aperture, the wider the range of sharpness. This is illustrated by
this picture above which was taken at f/16. Compare it with the photo to its right. This
extended depth of field is especially good for such subjects as landscapes.
2. The larger the aperture. the narrower the range of sharpness. An aperture of f/1.4,
for instance, can isolate your subject from its surroundings. This is often used to blur
a disturbing background in portraiture.
Note: Depth of field is also greater the shorter the focal length of the lens. For
example, a 24 mm lens will show greater depth of field than a 50 mm lens, provided
the aperture and shooting distance are the same. Depth of field is also greater the
longer the shooting distance, and is generally greater in the background than in the
foreground by a ratio of two to one. With a Canon FD lens, viewing and metering are
done at maximum aperture where the viewfinder is brightest. The lens diaphragm
does not close to the shooting aperture until the shutter is released. Afterwards, it reopens automatically to the maximum aperture. Because the maximum aperture
provides the narrowest range of sharpness, the subject is viewed with the shallowest
depth of field.
Checking the Depth of Field : There are two ways to check the depth of field with
the AE-1 Program. The usual one is by using the depth-of-field scale on the lens.
This is a scale of f/stops repeated on each side of the distance index.
1. First focus. Then press the shutter button halfway and note
which number appears in the viewfinder. Find the two f-stops on
the depth-of-field scale which correspond to that number. 2. Draw
imaginary lines from those two numbers to the distance scale. The
effective depth of field lies between those two distances.
You can roughly check the depth of field visually with an FD lens as follows:
1. Make sure the film has been completely advanced.
2. Press the shutter button halfway to find out which number is displayed in the
viewfinder.
3. Then press in the AE lock pin and turn the aperture ring to that number. Note: As a
reminder that the lens is off "A" the "M" will light up in the viewfinder when you press the shutter button
halfway.
4. Push in the stop-down lever until it locks. Now, just by looking at your subject
through the viewfinder, you can see the range of sharp focus.
5. After checking the depth of field, unlock the stop-down lever.
Now turn the aperture ring to the smallest number. Then turn it to
the largest number, press the AE lock pin and return the aperture
ring to "A."
Caution: It is NOT possible to push in the
stop-down lever when an FD lens is set at
"A".
Do not push in the stop-down lever before you advance the film or the diaphragm will
close down only as far as the aperture used for the previous exposure.
Warning: When an FD lens is mounted DIRECTLY on the camera (with no accessories between),
NEVER take a shot before releasing the stopdown lever or exposure may be incorrect. And unless you
want to make an exposure correction, return the aperture ring to "A" before shooting.
22. Flash Photography
Display Information in AE Flash Photography:
Flash Charge-completion Display (with only dedicated Canon
Speedlites 011 A, 155A, 166A, 177A, 188A, 199A, 533G, 577G,
299A and 300 TL etc..)
When the Speedlite is charged and the shutter button is pressed halfway, a green
and the auto working aperture light up in the viewfinder display. After the shutter is
released, the AE-1 PROGRAM switches automatically to normal AE photography
until the pilot lamp and green glow again.
Note: 1. Except when the shutter speed selector dial is set to "B", the AE- 1 PROGRAM
automatically switches to 1/60 sec. as soon as the Speedlite's pilot lamp and the green
glow.
2. Since the AE-1 PROGRAM displays only full apertures in the viewfinder, the aperture
displayed may be one-half f/stop larger or smaller than the auto working aperture set on
the flash; the auto working aperture is the effective aperture.
Auto-exposure Flash Confirmation Signal (During its
introduction, it works with the Speedlite 188A and 166A only,
but other similar dedicated speedlites like the 299A or the
TTL's 300TL should works (TTL mode is not possible). Please
check with your local Canon Distributor for the compatibility
listing.
After the shutter is released, continue to press the shutter button halfway; the green
will flash on and off for two seconds if the shooting distance provided correct
exposure.
Note: The auto-exposure confirmation signal displayed in the viewfinder is for use with the Speedlite
188A and 166A (or similar dedicated flash units). When using other flash units, the may flash on and
off after the shutter is released. In such cases, however, it does not confirm auto-exposure and should
be disregarded.
The AE-1 PROGRAM has two flash terminals.
1. Insert a direct-contact hot-shoe type flash directly in
the accessory shoe. For this type of flash, no other
connection is necessary.
2. If you use a flash which requires a synchronization
cord, branch the cord between the flash and the
camera's PC socket.
Note:
1. Before mounting a flash unit, make sure its power switch is OFF.
2. Two flash units can be fired simultaneously by placing one in the accessory
shoe and connecting the other to the PC socket.
3. It is recommended to use a Canon flash unit on this camera. Using a flash or
flash accessory of another make may cause the camera to work improperly or
even possibly damage the camera itself.
1) Automatic Flash (with Ordinary Electronic Computer Flash Units)
1. Turn the AE-1 PROGRAM's shutter speed selector dial to 1/60 second.
2. Remove the aperture ring of an FD lens from "A" and turn it to the automatic
aperture which you have set on the flash.
Note: For more details and compatibility issues, see the instructions for the
respective flash you purchased.
2) Manual Flash a. Set the shutter speed selector dial according to the information in
the table below:
Type /
Synchronized
1 2
1/1000 1/500 1/250 1/125 1/60 1/30 1/15 1/8 1/4 1/2
B
Shutter
sec sec
Speed(s)
FP
<> O O O O O O O
Class
Flash
Bulbs M &
MF
<> O O O O O O O
Class
Electronic
O O O O O O O O O
Flash
When using any of these Speedlites, a green LED display
lights up in the viewfinder of the AE-1 PROGRAM the
moment the flash unit is charged. And, when using the
Speedlite 188A or 166A, that same LED display will flash
on and off for two seconds after you take a picture to
confirm correct exposure. No other flash units offer these
features. You can also switch to manual fiash photography
with six out of these eight Speedlites. When you are
finished using the flash, you can shoot normally while the
flash or sensor is still mounted simply by turning off the
flash unit's main switch. With seven units available, you
have a wide range of features to choose from. The table
below lists some of the most important elements for
consideration.
Shown is a third party SUNPAK flash is used on the Canon
AE-1 Program.
24. Shooting with Infrared Film
When you load the AE-1 PROGRAM with black and-white infrared film, it is
necessary to make a slight adjustment in focus. A red infrared index is engraved on
most Canon lenses for this purpose First focus as usual through the viewfinder.
Then read the distance opposite the distance index on the
lens and turn the focusing ring to align that distance with
the infrared index. It will also be necessary to use a deep
red filter, as specified by the film manufacturer, over the
lens.
25. Shooting in Very Low Temperatures
When you use the AE- 1 PROGRAM in temperatures below 0°C (32° F), there
are two things you should keep in mind. First, battery power may decrease or
fail altogether. Second, extreme temperature changes may damage the camera
uhless certain precautions are taken.
Try to remember the following:
1. Load a new battery, and keep the camera warm until you are ready to shoot. Try to
finish the shooting session as quickly as possible. If you must shoot for a long time,
carry a spare battery. Alternate the two batteries, keeping the one that is not in use
warm. Do not throw the original battery away. That it does not perform well in the cold
does not necessarily mean that it will not work normally again in warmer
temperatures. An optional accessory, the Canon External Battery Pack A, is the most
reliable power source for uninterrupted shooting in cold weather. 2. Condensation
forming on a camera and lens taken from cold outside temperatures into a warm
room may cause corrosion. To avoid this, while still outdoors place the camera in a
plastic bag. Then seal the bag and take it indoors. Leave the camera in the bag until
it gradually reaches room temperature. Generally, this takes about one-half hour.
Shooting at Night
In very dim lighting, such as at night, it may be necessary to make an exposure
longer than the slowest shutter speed of two seconds. This is what the "B'! setting of
the shutter speed selector dial is for. When you use this setting, the shutter will
remain open as long as you press the shutter button.
AE photography is not possible; switch to manual override. With the lens off the
"A" setting, an "M" will light up in the viewfinder when you take a meter reading.
The "B" setting is useful whenever it is too dark for metering. It is also the best way to
record several bursts of fireworks on a single frame.
Note:
1. The AE-1 PROGRAM's meter will not give a reading at the "B" setting. You will
have to experiment to find the best combination of ~ aperture and exposure duration.
2. Always use a tripod and cable release, preferably lockable, for time exposures,
and remember that the camera uses more battery power on the "B" setting. We
suggest carrying a spare battery as a safeguard.
26. Interchangeable Focusing Screens * Never change the screen with your
fingers unless you are 'seasoned' enough to do so. A special tool is provided with
each accessory focusing screen to facilitate screen replacement. You can change the
focusing screen in your AE-1 PROGRAM according to your specific focusing needs.
Canon offers EIGHT (8) different types of focusing screens for the AE-1 PROGRAM.
A. Microprism Matte/Fresnel field with microprism rangefinder
New Split/Microprism
Standard screen with the AE- spot in the center of the screen. Especially suited for general
1 Program
photography when using an aperture of f/5.6 or larger.
B. New Split Matte/Fresnel field with split-image
C. All Matte Matte/Fresnel field with clear
rangefinderspotin the center of screen. The lens
matte center spot. Especially recommended
is in focus when the bottom half is even with the
for macro and telephoto photography, this
upper half. Suited for general photography since,
screen enables the entire field of view to be
unlike former focusing screens, rarely does oneseen without distraction. The lens is in focus
half of the rangefinder darken, even when using
when the subject can be clearly seen.
small maximum aperture lenses.
H. Matte/Scale Matte/Fresnel field With fine matte
D. Matte/Section Similar to C screen but
center plus horizontal and vertical scales in
with horizontal and vertical reference
millimeters. Recommended for close-ups,
lines. Recommended for architectural
photomacrography, copy work and architectural
photography and copy work in which
photography where it is useful to know the size of
accurate image placement is essential.
the subject or the magnification involved.
I. Double Cross-hair Reticle Matte/Fresnel L. Cross Split-image Matte/Fresnel field with
field with 5mm clear center spot containing
cross split-image in the center of the screen
double cross-hair reticle. While focusing, move which divides the subject in half both
your eye left to right. If cross-hairs stay in the horizontally and vertically. The subject is in
same position on the subject, then the subject focus when the four quarters merge to
is in focus. Recommended for
become one unbroken image. Suitable for
photomicrography, astrophotography, or other general photography when using fast lenses at
applications requiring high magnifications.
full aperture.
Other features:
Hot Shoe Matches all Speedlites for synchronized flash
photography. A "S" in the viewfinder lights up to show flash
charge completion.
Battery A single 6-Volt battery will power the camera's varied electronic
functions for a year under normal use.
Convenient Action Grip A Canon idea designed to help you keep
the camera rock-steady and look very well balance and elegant
indeed. This feature and the raised contour of the battery cover
provide a firm grip for excellent mobility in action situations
27. Optional Accessories
CANON A-SERIES SYSTEM ACCESSORIES Your AE-1 PROGRAM's advanced
electronics has enabled Canon to design a number of unique accessories for it.
Controlled by the AE-1 PROGRAM's microcomputer, these accessories expand the
AE-1 Program's shooting versatility and handling ease.
Attached to the AE-1 PROGRAM, this accessory advances the film, readying the
camera for the next shot automatically. Lightweight and compact, the Power Winder
A2 is very effective in capturing a subject's movement. Simply set the main switch to
"C", hold in the shutter button, and you can shoot at about two frames per second at
any shutter speed from 1/60 to 1/1000 sec.; single frame shooting is possible at any
shutter speed when the main switch is set to "S". Since the Power Winder A2 is
equipped with a socket for remote control, remote controlled shooting is possible with
Canon Remote Switch 3 or 60, the Interval Timer TM-1 Quartz or the Wireless
Controller LC-1.
Note: The original Canon Power Winder A can be also used with this
camera. Both continuous and singleframe shooting modes are
controlled by use of the camera's shutter button. But remote control
photography is not possible with the earlier Power Winder A.
Motor Drive MA This accessory will enhance the versatility of the AE-1 PROGRAM.
At the Motor Drive MA's maximum speed, you can shoot continuously at four frames
per second. Especially suited for fast-moving subjects, this accessory can freeze
action at its peak. Continuous shooting capability at about 4 fps or single frame
shooting is possible as well.
A choice of three shutter buttons
ensures the utmost in handling ease
when shooting in either the
horizontal or vertical format. A
choice of two power sources, Battery
Pack MA and Ni-Cd Pack MA, is
available.
Note: The usable shutter speeds at the "L"
and "H" positions are 1/60 - 1/1000 sec.
Canon Wireless Controller LC-1 This older accessory is a remote control
photography device using infrared rays to control cameras from a distance. The LC-1
is particularly useful in sports photography, wildlife photography, news coverage, and
for numerous other fields.
The Wireless Controller LC-1 consists of a transmitter and a receiver.
Up to three cameras can be operated in series when the receivers are
set to different channels.
Data Back MA The Data Back replaces the AE-1 PROGRAM's back cover in
seconds where it records the date in the lower right-hand corner of the photo
automatically at shutter release or manually afterwards if you wish. You can leave it
attached even when you are not using its data recording feature. Date-guessing will
become a thing of the past.
Since letters of the alphabet and Roman numerals can also be
recorded, it is also a convenient coder - a point of particular
interest for technical photographers.
Angle Finders A2 and B There are some subjects which are
uncomfortable to view directly through the eye-level viewfinder of
the camera. This is particularly true in such fields as close-up
photography and photomacrography. In these cases, it might be
more convenient to view through an angle finder. Both of these
angle finders rotate 90° for viewing from above or from the side.
Angle Finder A2 gives a correct image top-to-bottom, but is
reversed left-to-right, while the more sophisticated Angle Finder B
gives a completely normal image. Both show the entire field of view
and viewfinder information.
28. Other Accessories
Lens Hood
The use of a lens hood is to keep out side light which may cause flare
and ghost images to form on the image. Rigid Canon hoods also help
to protect the lens from shock. Use only a hood which is specified for
your particular lens. Most Canon hoods fit into the bayonet mount and
are fixed by turning. For more details, please see the respective lens'
instructions.
Dioptric Adjustment lenses S Those days, unlike modern AF SLR
which has built-in correction lenses, dioptric lenses are accessory. Ten
eyesight correction lenses are available in the powers of +3, +2, +1.5 +1,
+0.5, 0, - 0.5, -2, -3 and -4 diopters.
They may make viewing and focusing easier if you are near- or farsighted. Choose
the one which is closest to your eyeglass prescription, and make a practical test if
possible.
Magnifier S The Magnifier S gives a 2.5X magnification of the center of
the viewing area for precision focusing in close-up work and wide-angle
photography. Its power is adjustable to your eyesight within a range of +4
to -4 diopters. Its adapter is hinged so that the magnifier can be swung
upward from the eyepiece, leaving the entire screen image visible.
Filters Most Canon lenses accept filters which screw into the front of the lens. Canon
offers a wide variety of filters for both color and black-and white films. A holder for
gelatin filters is also available. A successful picture is a blend of personal vision, a bit
of technical know-how and effective use of equipment. Taking a special kind of
picture often requires special equipment. Canon offers a complete system of
accessories to assist you in your creative pursuits. From our famous line of FD lenses
to bellows units and cable releases, we offer just about every accessory you will ever
need to take any kind of picture.
30.Caring for your Camera As with any precision instrument, proper care and
maintenance involve a few simple rules in addition to common sense. Observing
these few rules will keep your AE-1 PROGRAM in top condition at all times.
1. The best thing you can do for your AE-1 PROGRAM is to use it regularly. In the
event that you must store it for quite a while, first remove it from its case or camera
bag. Remove the battery. Wrap the camera in a clean, soft cloth and place it in a
cool, dry, dust-free place. If you store the body and lens separately, attach both the
body and rear lens caps.
2. Keep the camera and lens out of direct sunlight and away from "hot spots," such
as the trunk, rear window shelf or glove compartment of a car. Do not store the
camera in a laboratory or other such area where chemicals may cause corrosion.
s3. To keep the camera in top condition during prolonged storage, occasionally insert
the battery and take several blank shots to "exercise" the mechanisms. Check the
operation of each part before you use the camera following long storage.
4. Water, spray, excessive humidity, dust and sand are your camera's worst enemies.
Clean it especially well immediately after you use it at the beach.
5. To clean the exterior of the camera body, first blow off dust with a blower brush.
Wipe off smudges with a silicone cloth or chamois leather. if smudges remain on the
eyepiece after using a blower brush, wipe it lightly with lens cleaning tissue which has
been moistened with a couple of drops of lens cleaner.
6. If the lens surfaces are clean, yet the viewfinder appears dusty, the picture will not
be affected by the dust in the viewfinder. If the mirror gets dirty, it will not affect
pictures but it may make viewing difficult. Dust it VERY gently with a blower brush. If
further cleaning is necessary, NEVER do it yourself but take the camera to the nearest
authorized Canon service facility or any qualified service centre.
7. The film chamber needs cleaning from time to time to remove film dust which may
scratch the film. Gently dust it out with a blower brush. Be careful NEVER to press on
the film rails, shutter curtain and pressure plate.
8. To clean the lens surfaces, use only a blower brush, cleaning fluid and tissue
made specially for cleaning camera lenses. Carefully follow the lens' instructions.
Chamois leather or a silicone cloth may be used for wiping smudges off the lens
barrel - NEVER use such cloth on the glass surfaces!
Programmed AE
As with most of the other A Series model, the AE-1 PROGRAM has a Central
Processing Unit (CPU) which functions as the brain of the camera's sophisticated
electronic system. It handles all signal information and issues appropriate commands
for immediate response to any picture-taking situation. And in Programmed AE
mode, it computes two essential functions - the shutter speed and aperture. This
"focus and shoot" feature naturally makes taking pictures a lot easier. You no longer
have to worry about sudden changes in lighting conditions, e.g., when your subject
moves from an extremely bright, sunlit place into shadow.
For Programmed AE, turn the shutter speed selector dial to
"PROGRAM," making sure that the lens aperture ring is set
on "A." Although the aperture is selected for you
automatically, the f/stop will still appear in clear, red LED's
in the viewfinder.
Shutter-Speed Priority AE Whatever the shutter speed you have set, the AE-1
PROGRAM's viewfinder will display the f/stop, providing a handy reference to the
depth of field. And in case the picture will be under- or overexposed, the appropriate
f/stop will flash on and off to warn you. With shutter-priority AE to capture the action
and a Programmed AE Mode which lets you just focus and shoot, the AE-1
PROGRAM is one of the most versatile SLR's around.
Manual Control With two AE modes (plus Electronic Flash AE), why the need for
manual control as well (Not referring to battery issue, the AE-1 Program still needs
battery to power all its function, even when you are in manual exposure control
mode), you may ask? One reason is that some photographers still like to do
everything themselves and the other is that the situation (e.g., unusual lighting
conditions or for special creative effects) sometimes requires it. Manual doesn't mean
difficult, however, with the AE-1 PROGRAM. First, disengage the lens' aperture ring
from the "A" mark. Next, select a shutter speed by turning the shutter speed selector
dial. Now, depress the shutter release button halfway. A red "M" will appear in the
viewfinder to remind you that you are on manual mode, while the aperture the
camera would otherwise have chosen will also be displayed. The choice is yours
whether to set this aperture or compensate by over- or underexposing the shot.
Metering The AE- 1 PROGRAM's meter employs a center-weighted averaging
system and the camera has incorporated some of the latest in electronics and optical
technology available during its era. Exposure information is invisible until you need it,
at which time you press the shutter release button halfway or the Exposure Preview
Switch. Then all necessary data will appear in red LED's on the right-hand side. If the
picture will be underexposed, the appropriate aperture blinks to warn you. And if the
shutter speed selected in the programmed mode is 1/30 sec. or slower, the "P" blinks
to warn you of camera shake. The brightness of these LEDs changes according to
the brightness of your subject, so they are always easy to read, no matter what the
lighting conditions.
The light sensitivity pattern (shown
below) remains virtually unchanged even
when different lenses are used.
AE Lock Switch There is only a single handy way in the AE-1 Program to override
camera's selected exposure - with the AE (Automatic Exposure) Lock. Although one
would expect Canon to incorporate an additional exposure compensation dial as well
as but strangely it was omitted. However, a seasoned photographer should able to
utilize the film speed setting to attain similar compensation.
The one touch AE lock, facilitated compensation by increasing the
exposure by 1.5 stops and triggers a memory control to free your
left hand for focusing or steadying the camera.
Partially depress the shutter release button to meter and press in the AE Lock
Switch. Keeping the shutter release button depressed, compose your picture and
shoot.
Focusing Screens AE-1 PROGRAM uses a standard New Split rangefinder focusing
screen. The New Split, designed especially for the New F-1, was the world's first
screen that eliminated the darkening of the splitting image of the focusing part. It is
the main reason why AE-1 Program has such an impressive viewfinder image. It is
bright, very bright that one has to try to believe it (Anyway, so used to the dimmer
views in many of the Canon's SLR..). The New Split is made up of crossed prisms
having two angles lined up to form a grating.
The prisms are positioned vertically. When the light beam
coming through a large-aperture lens is broad, the steepangled part is used. With a small aperture lens, focusing is
performed.
<<-- A special tweezer tool is provided for user with each screen to
facilitate their installation but highly unlikely that you will be still using it after
a few rounds. Anyway, just be cautious and avoid damaging any parts.
In fact, it has the widest choice among its
class - eight different screens were
available including the standard screen
incorporating the New Split/Microprism
rangefinder.
The New Split/Microprism rangefinder, has clearly benefited from the development of
the professional class New Canon F-1's sophisticated focusing screen technology.
With the gentle-angled part of the screen. The conventional split-image rangefinder
employs the single-angled echellette prism. The problem with this system is that the
image darkens when slow lenses are used, blackening out at about f/4. With the New
Split rangefinder, no darkening occurs even at f/5.6 ! This is one area that Canon has
really scored with its effort.
The surface of the focusing screen itself in the past also contributed to darkening of
the image at small apertures. Until now the matte's surface particles were irregularly
shaped with the consequence that light rays striking it were diffused in different
directions. Canon has solved this problem with a unique laser-matte screen. Its
surface texture is finer and smoother, and the particle sizes are different. Light rays
hitting the surface are less diffused, so less light is lost. As a result the AE-1
PROGRAM's viewfinder is 50% brighter than its predecessors. And unlike some
makers' matte screens, this new laser-matte screen purposely has an irregular
pattern to solve the problem of moire effect:
The AE-1 PROGRAM focusing screen compatibility chart
with various FD lenses.
One BIG advantage of the AE-1 PROGRAM is, it can be used with many Canon
accessories within the huge Canon photographic system. As the FD mount lever and
pin based system was considered 'abandoned' and replaced with the electronic EOS
mount system, the once world largest camera manufacturers must have a lot of used
bodies, lenses and system accessories floating around the market. With the
exception for those who are depending on photography to make a living (termed
'Pro'), or disturbing eyesight (like me..), take a look at the FD system seems logical
enough for the pocket if you can forget about support and service issues from Canon,
its manufacturer. Accessories ranging from power winder(s) and motor drive,
databack, remote, focusing aids, optics and accessories for macro and close up
photography, it should be good enough to handle virtually any photographic situation
imaginable.
Note: The AE-1 PROGRAM can use both new and older Power
Winder A and A2. Difference was only the older winder will only
advance the film when you release your finder from the shutter
release button, further, remote capability is NOT possible with
the older Power Winder A.
Motor drive That was made possible with the electrical terminal and as well as the
motor drive coupling as with the Canon A-1. The earlier AE-1 and other models within
the A series have only a two pin terminal and not permissible to use with the motor
drive MA set These terminals align with the winder contacts to provide perfect
electronic matching and enable instantaneous film advance. Canon claimed a
maximum firing rate of 4 fps can be achieved with the Ni-cd Battery Pack MA and 3
fps with alkaline cells.
Since all the manual-focus Canon
cameras and their accessories have been
discontinued, it is better to use the Motor
Drive MA with its battery Pack MA that
uses AA-size alkaline or carbon-zinc
batteries.
The Motor Drive MA has two speeds which advance the film at a rapid 4 fps and 3
fps, respectively. Single-frame shooting is also possible. Two power sources are
available: the Battery Pack MA and the rechargeable Ni-Cd Pack MA. The Power
Winder A2 provides automatic film advance of about 2 fps. It has a convenient switch
for continuous or single frame shooting. With the Power Winder A, continuous film
winding takes place as long as you depress the shutter button. The Power Winder A
accepts four size AA alkaline or carbon-zinc batteries; the Power Winder A2 accepts
these and Ni-Cd batteries as well. The Wireless Controller LC-1 can be used with the
Motor Drive MA or Power Winder A2 (Not possible with the older Winder A).
Specifications:
Winding Speed: Approximately 0.5 seconds.
Operation: When the shutter release button on the camera is pressed, the winder
will function.
Shutter Speed Coupling Range: 1/60 to 1 /1000 second for continuous
photography. "B," or any shutter speed for single frame photography. (However, if set
at "B," AE photography cannot be performed.)
Two Positions: "C" for continuous shooting at about two frames per second. "S" for
single frame shooting. Automatic Cut-off Circuit: When the film is completely wound
or if the batteries become exhausted, the winder will automatically stop and the
warning lamp (LED) will light up.
Power Source: Four AA size 1.5V alkaline, carbon zinc or Ni-Cd batteries.
Mounting on Camera: By using tripod socket on the camera.
Size: 140.8 x 53.4 x 27.5mm
Weight: 275g including batteries.
Flash Photography
Diverting from the mainstream flash photography technology employed by virtually all
its competition during the early '80s, the AE-1 PROGRAM only has automatic and
manual flash to toy around with, and came without the popular TTL OTF (Through
the lens, off the film plane) flash exposure control, first developed by Olympus in their
OM-2n in 1975. Canon claimed the reliability and accuracy of the technology used by
its competition was an issue and instead, decided to provide only automatic flash.
Making its debut along with the AE-1 PROGRAM was a new dedicated flash unit: the
Speedlite 188A. The Speedlite 188A has its advantage in its operating ease and
convenience. All you need to do is to set the ISO film speed and the auto aperture on
the flash. There are two apertures to choose from besides manual: f/2.8 and f/5.6
with ASA 100 film, which correspond to distances of 1-9m and 0.5-4.5m respectively.
Guide number was a moderate 25 (ASA 100, m).
Turn the unit on and after a few seconds a green " " will appear in the viewfinder.
This signifies that the flash is charged and ready to go. The AE-1 PROGRAM's
circuitry will automatically sets the camera to the 1/60 sec. flash sync speed and
chooses the aperture as well, as long as the lens is on "A" and the shutter speed
selector dial is at any setting other than "B" The " " will flash on and off for two
seconds after the shutter is released to inform you that the exposure was correct. It
operates on only four AA-size batteries. A wide adapter (standard accessory)
enables flash coverage with lenses as wide as 28mm. However, depends on your
requirement on the variable power output, Canon's other Speedlites, like 133A, l 55A,
l 77A, l 99A, 533G and 577G, can be used with the AE-l PROGRAM. With the
exception of auto-exposure flash confirmation, they provide the same ease of
operation as the Speedlite 188A.
Some quick general info on the Speedlite 188A
Specifications:
Type: Electronic computer flash unit with a series control system.
Guide Number: 25 (ASA 100, m) or 41 (ASA 25, ft.). l 6 (ASA 100, m) or 26 (ASA 25,
ft.) with Wide Adapter 188A.
Recycling Time: Less than 8 sec. using alkaline-manganese batteries. Less than 6
sec. using Ni-Cd batteries. Number of Flashes: About 200 using alkalinemanganese batteries. About 70 using Ni-Cd batteries.
Flash Coverage Angle: Covers a 35mm lens. Covers a 28mm lens when Wide
Adapter 188A is used.
Flash Duration: 1/700 sec. to 1 /50,000 sec.
ASA Film Speed Scale: ASA 25-800.
Dimensions: 68(W) x 52(D) x 103(H)mm (2-11/16-x 2-1/16-x 4-1/16")
Weight: 290g (101/4 ozs.) incl. batteries.
Accessories: Soft Case, Wide Adapter 188A.
The film back is detachable type and thus it can be used with Canon Databack
MA. But it has its limitations since Canon Databack is little weak* in its original
design.
The AE-1 PROGRAM can be used with many Canon accessories. For close-up work
there are the Extension Tubes FD, Auto Bellows which employs a Double Cable
Release for automatic diaphragm control, and the easy-to-use Macrolite ML-1 flash
unit. Two close-up lenses - the 450 and 240 - can be used on any Canon lens from
35mm to 135mm to take superb macro pictures. Copying - taking pictures of flat
objects is another field fully catered to with Canon accessories. Essential in this line
is the Copy Stand 4. For the scuba diver who wants to take his Canon AE-1
PROGRAM underwater to film the wonders of the deep, there is the Marine Capsule
A. Used with the Power Winder A, it can accept 16 different lenses.
•
Canon's Data Back
A. It attaches to the
back of the camera
and automatically
imprints data on the
lower right hand
corner of the picture in
perfect
synchronization with
exposure. Three dials
enable you to imprint
the day, month and
year, or classify your
pictures with Roman
numerals or letters of
the alphabet. In
addition, the Data
Back A can be used
with the Power
Winder A2 or A
The numeric dial doesn't
provide to year 2000 +
Specifications:
Type: 35mm single-lens reflex
(SLR) camera with electronicallycontrolled automatic exposure (AE)
and focal-plane shutter.
Exposure Modes: Programmed AE,
shutterspeed priority AE, AE flash
photography with specified Canon
electronic flash units, and manual
override.
Format: 24 x 36mm.
Usable Lenses: Canon FD (for full-aperture metering) and Canon FL and non-FD
(for stopped-down metering) series lenses.
Standard Lenses: FD 50mm f/1.2, FD 50mm f/1.4, FD 50mm f/1.8
Lens Mount: Canon breech-lock mount.
Viewfinder Information: Fixed eye-level pentaprism.
Gives 94% vertical and 94% horizontal coverage of the
actual picture area with 0.83x magnification at infinity
with a standard lens.
Information is displayed in form of LED digital display to the right of viewing area.
Includes "P" mark (programmed AE and camera shake warning indicator), "M" mark
(manual aperture control indicator), aperture display (f/1 - f/32, in full f/stops), flashing
warning for overexposure and underexposure, stopped-down metering index, " "
mark (flash charge-completion display with specified Canon flash units and autoexposure flash confirmation signal with Speedlite 188A and 166A).
Dioptric Adjustment: Built-in eyepiece is adjusted to standard -1 diopter.
Focusing Screen: Standard split-image/microprism rangefinder. Seven other types
of interchangeable screens are available optionally.
AE Mechanism: Electronically-controlled programmed AE and shutter-speed priority
AE metering system using one IC and three LSl's with .
Light Metering System: Through-the-lens (TTL), Center-Weighted Averaging by
silicon photocell (SPC).
Meter Coupling Range: EV 1 (1sec. at f/1.4) to EV 18 (1/1000 sec. at f/16) with
ISO/ASA 100 film and f/1.4 speed lens.
Exposure Memory: EV locked in when shutter button is pressed halfway and the AE
lock switch is pressed once. Exposure is memorized as long as shutter button is
pressed halfway.
Exposure Preview: By pressing shutter button or exposure preview switch.
Shutter: Cloth, focal-plane, 4-spindle, electronically-controlled. With shock and noise
absorbers.
Mirror: Instant-return, with shock-absorber.
Film Speed Scale: ISO/ASA 12 - 3200.
Shutter Speed Selector Dial: 2 sec.- 1/ 1000 sec.. plus "PROGRAM" and "B" With
guard.
Shutter Release Button: Two-step, electromagnetic shutter release button. Also
serves as exposure preview switch. With lock, cable release socket, and finger rest.
Main Switch: Three positions: "A" "L," and "S." At "L" all active circuits are cut off as
a safety feature. "S" position is for self-timer photography.
Self-timer: Electronically-controlled. Main switch set to"S."Activated by pressing
shutter button. Ten-second delay with electronic "beep-beep" sound. Number of
beeps emitted per second increases two seconds before shutter release.
Cancellation possible.
Stop-down Lever: For depth-of-field preview (FD lens) or metering (non-FD lens or
close-up accessories).
Power Source: One 6v alkaline-manganese (Eveready [UCAR] No. A544,IEC
4LR44) silver oxide (Eveready [UCAR] No. 544, IEC 4SR44, Duracell PX 28), or
lithium (Duracell PX 28L) battery. Battery lasts about one year under normal use.
Battery Check: "Beep-beep" sound when pressing battery check button. Six or more
beeps per second indicate sufficient power; three or fewer beeps per second indicate
insufficient power.
Flash Synchronization: X synchronization at 1/60 sec.; M synchronization at 1/30
sec. or slower. Direct contact at accessory shoe for hot-shoe flash. PC socket (JIS-B
type) with shock-preventive rim for cord-type flash. Accessory shoe has contact for
normal automatic flash plus special contact for AE flash with dedicated Canon
Speedlites.
Automatic Flash: Full AE flash photography with specified Canon Speedlites.
Shutter speed set automatically. Aperture controlled automatically according to
setting of flash when pilot lamp glows.
Back Cover: Opened with rewind knob. Removable, interchange with Databack A.
With memo holder.
Film Loading: Via multi-slot take-up spool.
Film Advance Lever: Single-stroke 120° throw with 30° stand-off. Ratchet winding
possible.
Frame Counter: Additive type. Automatically resets to "S" upon opening back cover.
Counts backwards as film is rewound.
Film Rewind: With rewind button and crank
Other Safety Devices: Camera will not function when power level insufficient. Film
winding impossible while shutter is in operation.