1
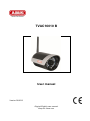
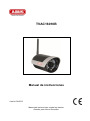
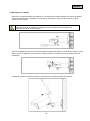
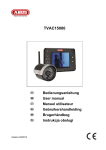
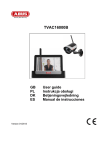
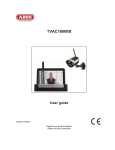
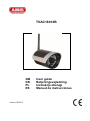
TVAC16010B GB DK PL ES Version 02/2013 User guide Betjeningsvejledning Instrukcja obsługi Manual de instrucciones English These user manual contains important information for installation and operation. This should be also noted when this product is passed on to a third party. Therefore look after these operating instructions for future reference! A list of contents with the corresponding page number can be found in the index on page 4. Dansk Denne manual hører sammen med dette produkt. Den indeholder vigtig information som skal bruges under opsætning og efterfølgende ved service. Dette skal huskes også når produkter gives videre til anden part. Læs derfor denne manual grundigt igennem også for fremtiden. Indholdet kan ses med sideanvisninger kan findes i indekset på side 14. Polski Niniejsza instrukcja obsługi zawiera ważne wskazówki dotyczące uruchamiania i obsługi. Pamiętaj o tym, także przekazując produkt osobie trzeciej. Zachowaj instrukcję do wykorzystania w przyszłości! Spis treści wraz z numerami stron znajduje się na stronie 24. Español Este manual de instrucciones contiene indicaciones importantes para el manejo y la puesta en funcionamiento del producto. Téngalas también en cuenta si entrega la máquina a terceros. Por ello, consérvelas en un lugar adecuado para su posterior lectura. En el índice de la página 34 encontrará un listado de los contenidos con las páginas donde podrá consultarlos. TVAC16010 B User manual Version 02/2013 Original English user manual. Keep for future use. English Introduction Dear Customer, Thank you for purchasing this product. This product meets the requirements of the applicable European and national guidelines. The corresponding declarations and documents can be obtained from the manufacturer (ABUS Security-Center GmbH & Co. KG, Linker Kreuthweg 5, 86444 Affing, Germany). To maintain this condition and to ensure risk-free operation, you as the user must observe these operation instructions! Before initial start-up, read through the complete operating instructions observing operating and safety instructions. All company and product names mentioned in this document are registered trademarks. All rights reserved. If you have any questions, please contact your installer or your local dealer! Disclaimer This user manual was prepared with greatest care. If you should notice omissions or inaccuracies, please inform us about these on the back of this manual given address. The ABUS Security-Center GmbH assumes no liability for technical and typographical faults and reserves the right to make at any time modifications to the product or user manual without a previous announcement. The company is not liable or responsible for direct and indirect subsequent damages which are caused in connection with the equipment, the performance and the use of this product. No guarantee for the content of this document is taken. 2 English Icon explanation A flash in the triangle is used if there is danger for the health, e.g. by an electric shock. An exclamation mark in the triangle points to an important note in this user manual which must be minded. This symbol can be found when you are to be given tips and information on operation. Important safety advice The warranty will expire for damage due to non-compliance with these operating instructions. ABUS will not be liable for any consequential loss! ABUS will not accept liability for damage to property or personal injury caused by incorrect handling or non-compliance with the safety-instructions. In such cases the warranty will expire. The device has been manufactured in compliance with international safety standards. Please read these safety advices carefully. Safety advice 1. Mains supply 100–240 V AC, 50–60 Hz (via power adapter plug to 5 V DC) Operate this product only from the type of power supply indicated on the marking label. If you are not sure of the type of power supplied to your home, consult your local power company. Disconnect the product from the mains before you start any maintenance or installation procedures. 2. Overloading Do not overload a wall outlet, extension cord or adapter as this may result in electric fire or shock. 3. Liquids Protect the device from any kind of liquids entering. 4. Cleaning Disconnect the product from the wall outlet before cleaning. Use a light damp cloth (no solvents) to dust the product. 5. Accessories Do not use any unsupported accessories as these may be hazardous or cause damage the product. 6. Location This device can be used in inside as well as outside. The product will be damaged even it falls from a low height. During the installation of the camera please take care that direct sunlight cannot fall onto the image sensor of the device. Please follow the installation instructions in the corresponding chapter of this user manual. Do not place the device near a radiator or heat register. Setup the device only in areas with the advised operating temperatures of -10° ~ 50°C. 3 English 7. Wireless transmission The range of wireless transmission depends on various environmental factors. The local conditions at the installation location can have a negative impact on the range. For this reason, if there is a clear line of sight between the receiver and the transmitter, the range can be as much as 200 m, but in buildings it is significantly less. The following environmental factors impair both the range and the frame rate: Mobile phone masts, high-tension electricity pylons, power lines, ceiling and walls, devices with the same or similar radio frequency. Warnings Follow all safety and operating advises before starting-up the device! 1. Follow these directions in order to avoid damage of the power cord or plug: Do not modify or process the power cord or plug arbitrarily. Make sure to disconnect the power cord holding the plug. Keep heating appliances as far as possible from the power cord in order to prevent the cover vinyl from melting. The outdoor camera’s power supply unit must be protected against humidity and damp. 2. Follow these directions. Failure to follow any of them may cause electrical shock: Do not open the main body or the power supply. Do not insert metal or inflammable objects inside the product. In order to avoid any damage during lighting use a surge protection. 3. Do not use the product when it is out of order. If you continue to use the product when defective, serious damage can be caused to it. Make sure to contact your local product distributor if the product is out of order. During the installation into an existing video surveillance system make sure that all devices are disconnected from the low and supply voltage circuit. If in doubt allow a professional electrician to mount, install and wire-up your device. Improper electrical connection to the mains does not only represent at threat to you but also to other persons. Wire-up the entire system making sure that the mains and low voltage circuit remain separated and cannot come into contact with each other in normal use or due to any malfunctioning. Avoid using the device under the following unfavorable ambient conditions: wetness or excessive air humidity extreme cold or heat direct sunlight dust or combustible gases, vapors or solvents strong vibration strong magnetic fields, such as those found in the vicinity of machinery or loudspeakers the camera must not be directed into the sun as this can destroy the sensor. the camera may not be installed on unstable surfaces Unpacking While you are unpacking the device please handle it with utmost care. If you notice any damage of the original packaging, please check at first the device. If the device shows damages, please contact your local dealer. 4 English Table of contents 1. Intended Use ........................................................................................................................ 6 2. Scope of delivery ................................................................................................................. 6 3. Features and functions........................................................................................................ 6 4. Description of device ........................................................................................................... 6 4.1 Overview ...................................................................................................................... 6 4.2 Camera description ...................................................................................................... 7 5. Installation ............................................................................................................................ 7 5.1 Pairing the camera and monitor .................................................................................... 7 5.2 Installing the camera .................................................................................................... 8 6. Maintenance and cleaning .................................................................................................. 9 6.1 Maintenance ................................................................................................................. 9 6.2 Cleaning ....................................................................................................................... 9 7. Disposal ................................................................................................................................ 9 8. Technical data .....................................................................................................................10 5 English 1. Intended Use This 2.4 GHz IR wireless outdoor camera is an optional accessory for the 7" wireless monitor (TVAC16000B). You have the option of connecting up to 4 cameras to the monitor. You can use this 2.4 GHz IR wireless outdoor camera for easy wireless transmission of video signals to the wireless monitor. Wireless signal transmission is an advantage in all locations where cables cannot be laid: the camera transmits the video signal to the monitor without the need for wires. Faults and interference can be avoided due to the conversion into digital signals. A detailed function description can be found in chapter 3 (“Description and functions”). 2. Scope of delivery IR wireless external 2.4 GHz camera, including camera mount and installation material Power supply units including EU, AU and UK adapters 5 V DC/1 A 3. Features and functions Compact IP66 outdoor camera with infrared night vision function Integrated digital 2.4 GHz transmitter for encrypted wireless video data transmission IR digital wireless outdoor camera for integrating in TVAC16000B wireless monitor 640 x 480 pixel resolution, 3.6 mm fixed lens 4. Description of device 4.1 Overview Item number Resolution IR IR cut filter (ICR) Operating voltage TVAC16010B 640 x 480 pixel 5VDC 6 English 4.2 Camera description Antenna Fixed lens Power LED LINK LED IR LED Light sensor Camera mount Microphone Pairing button Power supply connection 5 V DC/1 A 5. Installation 5.1 Pairing the camera and monitor To connect a camera with the monitor, proceed as follows: 1. 2. 3. 4. Connect the power supply to the cameras and monitor. In the monitor’s menu “Camera Setup” > “Pairing” select the camera you require (1–4). The system starts a 60 second countdown. During the 60 seconds, press the PAIRING button on the camera cable until the green LINK LED on the front of the camera starts to flash. Once the connection is successful, the LINK LED on the camera lights up continuously. Warning: Please note that connection can take up to 60 seconds. 7 English 5.2 Installing the camera Warning: Before you start with the installation, make sure that the wireless transmission range reaches your desired installation location. Select a suitable place for installing the camera using the camera mount. Mark the drill holes on the base and pre-drill them. Insert the wall plugs provided and attach the mount with the screws. You now have the option of swivelling the mount by 90° to position it where you want it. Loosen the screw at the side and set the angle of view required. Then tighten the screw in the required position to fasten. Then screw the camera onto the mount and the power supply unit with the camera. 8 English 6. Maintenance and cleaning 6.1 Maintenance Regularly check the product's physical state, e.g. check for damage of the housing. If you suspect that safe operation cannot be guaranteed anymore, disconnect the product and ensure that it cannot be used by mistake. You can assume that safe operation is not possible anymore when the device shows visible damage, the device does not function anymore Please note: The product is maintenance free for you. Inside the product are no parts that can be checked or repaired, so do not ever open it. 6.2 Cleaning Wipe the product with a clean, dry cloth. If the device is very dirty, you can moisten the cloth with lukewarm water. Make sure that no liquids can enter the equipment as the device can be destroyed. Never use chemical detergents as they could attack the surface of the device 7. Disposal Devices with this marking should not be put in the household garbage. Dispose of the product at the end of its lifetime according to the applicable regulations. 9 English 8. Technical data Model number Frequency Modulation Transmission power Sensitivity Image sensor Resolution No. of IR LEDs Lens Angle of view Night vision function range IR swivel filter IP protection class Wireless range Power supply Power consumption Operating temperature Dimensions (L × W × H) Weight TVAC16010 B 2.4 GHz GFSK 15 +/- 2 dBm -80 dBm 1/4" CMOS 640 × 480 pixel (VGA) 25 IR LEDs 3.6 mm 60° (H)/43° (V) 5-8 m Yes IP66 approx. 100 m (clear sight line)* 5 V DC/1 A Max. 550 mA -10 °C–50 °C 150 × 74 × 68 (without antenna and mount) 390 g * The range depends on the ambient conditions (e.g. mobile phone masts, high-tension electricity pylons, power lines, ceiling and walls, etc.). If the conditions are unfavourable, the range may be very restricted. 10 TVAC16010B Brugerhåndbog Version 02/2013 Original betjeningsmanual på dansk. Opbevares til fremtidige formål! 11 Indføring Kære kunde, vi takker Dem fordi du har købt dette produkt. Dette produkt opfylder alle krav og regulativer der findes såvel nationalt som europæisk. Konformiteten er efterafprøvet, og de relevante erklæringer og underlag er mulige at få hos producenten (ABUS Security-Center GmbH & Co. KG, Linker Kreuthweg 5, 86444 Affing, Germany). For at opnå denne tilstand og sikre en idriftsætning uden farer må du som bruger sætte dig ind i denne betjeningsvejledning! Inden idriftsætning af produktet læs da hele betjeningsvejledningen, og se her om betjening og sikkerhedsforskrifter! Alle indeholdte firmanavne og produktbeskrivelser er varemærker hos den aktuelle producent og der tages forbehold for alle rettigheder. Ved spørgsmål henvend Dem da til din forhandler eller installatør! Hæftelses udelukning Denne betjeningsvejledning er lavet med den største omhu. Skulle der alligevel være udslag eller unøjagtigheder så meddel os det venligst via den adresse der står på bagsiden af vejledningen. ABUS Security-Center GmbH tager ikke ansvar for teknisk eller typografiske fejl, og forbeholder sig retten til at til enhver tid og uden forudgående advisering at foretage ændringer ved produktet og betjeningsvejledningen. ABUS Security-Center kan ikke stilles til ansvar eller hæftelse for følgeskader ved brug af produktet såvel i drift som ibrugtagning. Der gives ingen garanti for indholdet af dette dokument. Dansk Ikon forklaring Et lyn i en trekant betyder at der er en helbredsrisiko forbundet med elektrisk stød. Et udråbstegn I en trekant, betyder at man skal kigge i manualen efter vigtige henvisninger.. Dette symbol findes når der bliver gives vigtige oplysninger. Vigtige sikkerhedsinformationer Garantien forsvinder hvis anbefalinger I manualen ikke følges nøjagtigt. ABUS er ikke ansvarlig for konsekvenserne af dette! ABUS vil ikke et ansvar for skader af egendom eller personlige skader forsaget af forkert behandling eller uoverensstemmelse af sikkerhedsinstruktionerne. I sådanne tilfælde ophører garantien. Denne enhed er lavet efter internationale sikkerhedsstandarter, læs venligst sikkerheds instruktionerne omhyggeligt. Sikkerhedsinstruktioner 1. Hoved forsyning 100–240 V AC vekselspænding, 50–60 Hz (via strømforsyning til 5 V DC) Forsyn dette produkt med en strømforsyningstype af typen der star på mærkaten. Hvis du ikke er sikker på hvilken forsyning der findes i dit hjem, kontakt derfor dit lokale elforsyningsfirma. Fjern produktet fra hovedforsyningen før du starter installationen. 2. Overbelastning Lad vær med at overbelaste en vægkontakt, en forlænger eller en adapter. Dette kan resultere i elektrisk ild eller stød. 3. Væsker Installer kun enheden i tørre og støvbeskyttede rum, beskyt enheden imod alle slags former for væsker. 4. Rensning Fjern enheden fra hovedforsyningen. Brug en let dampet klud(Ingen opløsningsmidler) til at støve af produktet. 5. Tilbehør Lad vær med at bruge tilbehør som ikke er godkendt, dette kan give skader på produktet. 6. Placering Dette apparat er både udviklet til anvendelse i beskyttede udendørsområder og til anvendelse indendørs. Et fald selv fra lav højde kan beskadige produktet. Monter produktet på en sådan måde, at apparatets billedoptager ikke udsættes for direkte sollys. Vær opmærksom på monteringsoplysningerne i det pågældende kapitel i denne betjeningsvejledning. Beskyt enheden med alle former for væsker. Placer ikke enheden nær radiatorer ikke varmeblæsere. Placer enheden i miljøer med temperaturer imellem -10° ~ 50°C. 13 Dansk 7. Trådløs overførsel Den trådløse overførsels rækkevidde afhænger af forskellige miljøpåvirkninger. De lokale forhold på monteringsstedet kan påvirke rækkevidden negativt. Derfor kan ved frit udsyn opnås en strækning på indtil 200 m mellem modtageren og senderen, men i bygninger betydeligt mindre. Følgende miljøpåvirkninger begrænser både rækkevidden og billedhastigheden: Mobiltelefonantenner, højspændingsmaster, elektriske ledninger, lofter og vægge, apparater med den samme eller tilstødende trådløse frekvens. Advarsler Følg alle sikkerheds instruktioner før at installationen begynder! 1. Følg alle disse bestemmelser for at undgå skader af strømledningen og stikket. Lad vær med at ændre strømledningen eller stikket vilkårligt. Vær sikker på at afkoble ledningen når du holder i stikket. Hold varme enheder så langt væk fra ledningen, for at undgå at vinyl kappen kan smelte. Udendørskameraets strømforsyning skal beskyttes mod fugt og væde. 2. Følg disse instruktioner. Hvis ikke, kan det forsage elektrisk stød: Åben ikke hovedenheden eller strømforsyningen. Lad vær med at indsætte metal eller brandfarlige ting i enheden. For at undgå skade ved lyn, brug derfor an overspændings beskytter. 3. Lad vær med at bruge produktet hvis det er gået i stykker. Hvis dette gøres, kan der ske større skade.. Kontakt den lokale leverandør hvis produktet er gået i stykker. Under installationen i et eksisterende videoovervågnings system, vær da sikker på at alle enheder er fjerne fra lav og 230 VAC strømforsyninger. I tvivl, brug derfor en professionel elinstallatør til at installere og opsætte elektricitet til produktet. Forkert installation er til fare for dig og andre. Installer det således at ingen frie strømkabler kan komme I kontakt med personer under brug og ved problemer. Undgå følgende problematiske omgivelser ved betjeningen: Våde omgivelser eller for høj luftfugtighed Ekstrem kulde eller varme. Direkte sollys Støv eller brændbare gasser, dampe eller opløsningsmidler kraftige rystelser kraftige magnetfelter, som f.eks. i nærheden af maskiner eller højtalere. Kameraet må ikke rettes mod solen. Det kan medføre ødelæggelse af sensoren. Kameraet må ikke installeres på ujævne flader. Udpakning Når du pakker apparatet ud skal dette gøres med forsigtighed. Ved en eventuel beskadigelse på forpakningen da tjek venligst om enheden også har synlige tegn på skade. Såfremt at dette er tilfældet skal du hurtigst muligt returnere/ gøre opmærksom på dette overfor leverandøren. 14 Dansk Indholdsfortegnelse 1. Korrekt anvendelse.............................................................................................................16 2. Leveringsomfang ................................................................................................................16 3. Kendetegn og funktioner ....................................................................................................16 4. Apparatbeskrivelse .............................................................................................................16 4.1 Overblik .......................................................................................................................16 4.2 Beskrivelse af kameraet ..............................................................................................17 5. Installation ...........................................................................................................................17 5.1 Forbindelse af kameraerne og monitoren ....................................................................17 5.2 Kameramontering ........................................................................................................18 6. Vedligeholdelse og rengøring ............................................................................................19 6.1 Vedligeholdelse ..........................................................................................................19 6.2 Rengøring ..................................................................................................................19 7. Vækanskaffelse ...................................................................................................................19 8. Tekniske data ......................................................................................................................20 15 Dansk 1. Korrekt anvendelse Dette trådløse IR-udendørskamera 2,4 GHz er ekstra tilbehør til den trådløse 7" monitor. Du har mulighed for at forbinde indtil 4 kameraer med monitoren. Med dette trådløse 2,4 GHz IR-udendørskamera kan du uden problemer overføre videosignaler trådløst til den trådløse monitor. Den trådløse signaloverførsel er en fordel over alt, hvor det ikke er muligt at trække kabler: Kameraet overfører videosignalet trådløst til monitoren. På grund af omformningen til digitale signaler kan forstyrrelser og interferenser dermed undgås. En udførlig funktionsbeskrivelse finder du i kapitel „3. Kendetegn og funktioner“. 2. Leveringsomfang strømforsyning inkl. EU-, AU- og UK-adapter 5 V DC/1 A Trådløst IR-udendørskamera 2,4 GHz inkl. kameraholder og monteringsmateriale 3. Kendetegn og funktioner Kompakt IP66 udendørskamera med infrarød natsigtfunktion Integreret digital 2,4 GHz sender til kodet trådløs overførsel af videodata Digitalt, trådløst IR-udendørskamera til integration i TVAC16000B trådløs monitor 640 x 480 pixel opløsning, 3,6 mm fast objektiv 4. Apparatbeskrivelse 4.1 Overblik Varenummer Opløsning IR IR-drejefilter (ICR) Driftsspænding TVAC16010B 640 x 480 pixel 5VDC 16 Dansk 4.2 Beskrivelse af kameraet Antenne Fast objektiv Power LED Link LED IR-LED Lyssensor Kameraholder Mikrofon Pairing-tast Tilslutning spændingsforsyning 5 V DC/1 A 5. Installation 5.1 Forbindelse af kameraerne og monitoren Gå frem på følgende måde for at forbinde et kamera med monitoren: 1. 2. 3. 4. Tilslut strømforsyningerne til kameraerne og monitoren. Vælg det ønskede kamera (1-4) i monitorens menu “Camera Setup” > ”Pairing”. Systemet tæller nedad fra 60 sekunder. Tryk på PAIRING-tasten på kameraets kabel i de 60 sekunder, indtil den grønne LINK LED på forsiden af kameraet begynder at blinke. Når forbindelsen er etableret, lyser LINK-LED på kameraet konstant. Vigtigt: Vær opmærksom på, at forbindelsesvarigheden kan vare indtil 60 sekunder. 17 Dansk 5.2 Kameramontering Vælg et egnet sted til installationen ved hjælp af kameraholderen. Tegn nu boringshullerne på underlaget, og bor dem. Sæt de vedlagte dyvler i, og fastgør nu holderen med skruerne. Du har mulighed for at dreje holderen 90° for at vælge en ønsket position. Løsn først skruen på siden, og indstil den ønskede synsnvinkel. Fastgør derefter skruen for at fastgøre den ønskede position. Skru derefter kameraet på holderen, og forbind strømforsyningen med kameraet. 18 Dansk 6. Vedligeholdelse og rengøring 6.1 Vedligeholdelse Kontroller regelmæssigt produktets tekniske sikkerhed, f.eks. skader på kabinettet. Hvis man har en formodning om, at en risikofri drift ikke længere er muligt, skal produktet sættes ud af drift og sikres mod utilsigtet betjening. Fjern akkumulatorerne. Det kan antages, at en risikofri drift ikke længere er mulig, når apparatet har tydelige beskadigelser, apparatet ikke længere fungerer Vær venligst opmærksom på: Produktet er vedligeholdelsesfrit for dig. Der er ingen dele i den indvendige del produktet, som kræver kontrol eller vedligeholdelse. Du må aldrig åbne det (bortset fra det akkumulatorskift, der bliver beskrevet i denne betjeningsvejledning). 6.2 Rengøring Rengør produktet med en ren og tør klud. Ved kraftig tilsmudsning brug en let fugtig klud med lunkent vand. Vær opmærksom på, at der ikke kommer væsker ind i apparatet Anvend ikke kemiske rengøringsmidler, og vær sikker på at der ikke kommer vand ind i kameraet. 7. Vækanskaffelse Dette apparat skal anbringes på et kommunalt affaldsstation, og dette er også kendetegnet ved disse elektroniske produkter, hvor man har pligt til at sørge for en korrekt afskaffelse. Spørg din forhandler hvorledes da der findes retslige vejledninger for dette. 19 Dansk 8. Tekniske data Typenummer Frekvens Modulation Sendeeffekt Følsomhed Billedoptager Opløsning Antal IR LED'er Objektiv Synsvinkel Rækkevidde natsigtfunktion IR-drejefilter IP-kapslingsklasse Trådløs rækkevidde Spændingsforsyning Strømforbrug Driftstemperatur Mål (L × B × H) Vægt TVAC16010B 2,4 GHz GFSK 15 +/- 2 dBm -80 dBm 1/4" CMOS 640 × 480 pixel (VGA) 25 IR LED’er 3,6 mm 60° (H)/43° (V) Ca. 5-8 m Ja IP66 Ca. 100 m (frit udsyn)* 5 V DC/1 A Maks. 550 mA -10 °C–50 °C 150 × 74 × 68 (uden antenne og holder) 390 g * Rækkevidden afhænger af omgivelsesbetingelserne (f.eks. mobiltelefonantenner, højspændingsmaster, elektriske ledninger, lofter og vægge osv.). Under ugunstige betingelser kan der også kun opnås mindre rækkevidder! 20 TVAC16010B Instrukcja obsługi Wersja 02/2013 Instrukcja obsługi przetłumaczona z języka niemieckiego. Przechować do wykorzystania w przyszłości! Polski Wprowadzenie Szanowna Klientko, Szanowny Kliencie! Dziękujemy za zakup naszego produktu. Produkt ten spełnia wymagania obowiązujących norm europejskich i krajowych. Zgodność została udokumentowana, odpowiednie deklaracje i dokumenty są dostępne u producenta (ABUS SecurityCenter GmbH & Co. KG, Linker Kreuthweg 5, 86444 Affing, Germany). Aby zachować ten stan i zapewnić bezpieczną eksploatację, użytkownik musi przestrzegać niniejszej instrukcji obsługi! Przed uruchomieniem produktu przeczytaj całą instrukcję obsługi i przestrzegaj wszystkich zasad bezpieczeństwa! Wszystkie zawarte w niej nazwy firm i oznaczenia produktów są zarejestrowanymi znakami towarowymi odnośnych właścicieli. Wszystkie prawa zastrzeżone. W razie wątpliwości zwróć się do instalatora lub sprzedawcy! Wyłączenie odpowiedzialności cywilnej Niniejsza instrukcja obsługi została opracowana z najwyższą starannością. Jeżeli mimo to zauważysz w niej braki lub niedokładności, prosimy o ich pisemne zgłaszanie na adres podany na odwrocie niniejszego podręcznika. ABUS Security-Center GmbH nie odpowiada za błędy techniczne i typograficzne oraz zastrzega sobie prawo do wprowadzania w każdej chwili bez wcześniejszej zapowiedzi zmian w produkcie i w instrukcjach obsługi. ABUS Security-Center nie odpowiada za bezpośrednie i pośrednie szkody następcze, powstałe w związku z wyposażeniem, wydajnością i zastosowaniem produktu. Zawartość niniejszego dokumentu nie jest objęta gwarancją. 22 Polski Objaśnienie symboli Symbol błyskawicy w trójkącie jest stosowany w celu wskazania na zagrożenie dla zdrowia, np. porażeniem elektrycznym. Wykrzyknik w trójkącie oznacza w niniejszej instrukcji obsługi ważne wskazówki, które muszą być bezwzględnie przestrzegane. Tym symbolem oznaczane są specjalne rady i wskazówki dotyczące obsługi. Ważne zasady bezpieczeństwa Szkody spowodowane nieprzestrzeganiem niniejszej instrukcji obsługi powodują wygaśnięcie roszczeń gwarancyjnych. Nie odpowiadamy za szkody następcze! Nie odpowiadamy za szkody materialne lub osobowe, spowodowane nieprawidłową obsługą lub nieprzestrzeganiem zasad bezpieczeństwa. W takich przypadkach wygasają wszelkie roszczenia gwarancyjne! Urządzenie zostało wyprodukowane zgodnie z międzynarodowymi standardami bezpieczeństwa. Przeczytaj uważnie poniższe informacje dotyczące zasad bezpieczeństwa. Zasady bezpieczeństwa 1. Zasilanie elektryczne 100 – 240 V AC, napięcie przemienne, 50 – 60 Hz (zasilacz wtyczkowy do 5 V DC) Zasilaj urządzenie tylko ze źródła napięcia sieciowego zgodnego z podanym na tabliczce znamionowej. W razie wątpliwości co do parametrów lokalnego zasilania elektrycznego zwróć się do właściwego zakładu energetycznego. Przed przystąpieniem do konserwacji lub instalacji odłącz urządzenie od zasilania sieciowego. 2. Przeciążenie Unikaj przeciążania gniazd sieciowych, przedłużaczy i adapterów, ponieważ może to spowodować pożar lub porażenie elektryczne. 3. Ciecze Chroń urządzenie przed kontaktem z wszelkimi płynami. 4. Czyszczenie Czyść urządzenie tylko wilgotną ściereczką bez silnych środków czyszczących. Przed czyszczeniem odłącz urządzenie od sieci. 5. Akcesoria Podłączaj tylko dedykowane do tego celu urządzenia. W przeciwnym razie może dojść do sytuacji niebezpiecznych lub uszkodzeń urządzenia. 6. Miejsce ustawienia Urządzenie jest przewidziane do eksploatacji na zabezpieczonym terenie zewnętrznym oraz we wnętrzach. Upadek nawet z niewielkiej wysokości może spowodować uszkodzenie produktu. Zamontuj produkt tak, aby światło słoneczne nie padało bezpośrednio na czujnik obrazowy urządzenia. Przestrzegaj wskazówek montażowych zawartych w odpowiednim rozdziale niniejszej instrukcji obsługi. Nie umieszczaj urządzenia w bezpośrednim sąsiedztwie ogrzewania, pieca i innych źródeł ciepła bądź w miejscu bezpośredniego oddziaływania promieni słonecznych. Używaj urządzenia tylko w miejscach, w których temperatura otoczenia mieści się w dozwolonym zakresie -10°C – 50°C. 23 Polski 7. Transmisja radiowa Zasięg transmisji radiowej zależy od wpływu różnych czynników środowiskowych. Lokalne warunki w miejscu zamontowania mogą mieć negatywny wpływ na zasięg. Dlatego przy braku przeszkód między odbiornikiem i nadajnikiem zasięg może wynieść do 150 m ale w budynkach znacznie mniej. Poniższe czynniki środowiskowe wpływają negatywnie na zasięg a także na częstotliwość odświeżania obrazu: anteny telefonii komórkowej, słupy linii elektroenergetycznych, przewody elektryczne, stropy i ściany, urządzenia pracujące na tej samej lub podobnej częstotliwości radiowej. Ostrzeżenia Przed pierwszym uruchomieniem należy spełnić wszystkie wymagania określone w zasadach bezpieczeństwa i instrukcji obsługi! 1. Przestrzegaj poniższych wskazówek, aby uniknąć uszkodzenia kabla sieciowego i wtyczki sieciowej. Nie zmieniaj ani nie manipuluj kablem sieciowym i wtyczką sieciową. Odłączając urządzenie od sieci, nie ciągnij za kabel sieciowy, lecz za wtyczkę. Dopilnuj, aby kabel sieciowy był maksymalnie oddalony od urządzeń grzejnych, aby zapobiec stopieniu powłoki kabla wykonanej z tworzywa sztucznego. Zasilacz sieciowy kamery zewnętrznej musi być zabezpieczony przed wilgocią i wodą. 2. Przestrzegaj tych wskazówek. Ich nieprzestrzeganie może doprowadzić do porażenia elektrycznego. 3. Nigdy nie otwieraj obudowy ani zasilacza. Nie wkładaj do wnętrza urządzenia przedmiotów metalowych lub łatwopalnych. Aby uniknąć uszkodzeń w wyniku przepięć (np. w czasie burzy), zastosuj zabezpieczenia przepięciowe. Uszkodzone urządzenia odłącz niezwłocznie od sieci elektrycznej i poinformuj sprzedawcę. W razie wątpliwości nie wykonuj montażu, instalacji i okablowania samodzielnie, lecz zleć ich wykonanie specjaliście. Nieprawidłowe i niefachowo wykonywane prace na sieci elektrycznej i instalacjach wewnętrznych stwarzają niebezpieczeństwo dla użytkownika, a także dla innych osób. Okabluj instalację tak, aby obwód sieciowy i obwód niskiego napięcia były ułożone osobno i nie stykały się w żadnym miejscu ani nie mogły zostać połączone w wyniku uszkodzenia. Unikaj wymienionych niżej niekorzystnych warunków otoczenia w czasie eksploatacji urządzenia. Wilgoć lub za wysoka wilgotność powietrza. Temperatury poza dozwolonym obszarem. Bezpośrednie nasłonecznienie. Zapylenie, palne gazy, opary lub rozpuszczalniki. Silne wibracje. Silne pola magnetyczne, występujące np. w pobliżu maszyn lub głośników. Kamery nie wolno kierować na słońce, ponieważ może to doprowadzić do zniszczenia czujnika. Kamera nie może być instalowana na niestabilnych powierzchniach. Rozpakowanie Rozpakowując urządzenie, należy zachować szczególną ostrożność. W razie stwierdzenia uszkodzenia oryginalnego opakowania, sprawdź najpierw urządzenie. W razie stwierdzenia uszkodzeń urządzenia, odeślij je wraz z opakowaniem, informując jednocześnie przewoźnika. 24 Polski Spis treści 1. Użycie zgodne z przeznaczeniem ......................................................................................26 2. Zakres dostawy ...................................................................................................................26 3. Cechy i funkcje ...................................................................................................................26 4. Opis urządzenia ..................................................................................................................26 4.1 Przegląd ......................................................................................................................26 4.2 Opis kamery ................................................................................................................27 5. Instalacja .............................................................................................................................27 5.1 Parowanie kamer z monitorem ....................................................................................27 5.2 Montaż kamer .............................................................................................................28 6. Konserwacja i czyszczenie.................................................................................................29 6.1 Konserwacja ................................................................................................................29 6.2 Czyszczenie ................................................................................................................29 7. Utylizacja .............................................................................................................................29 8. Dane techniczne..................................................................................................................30 25 Polski 1. Użycie zgodne z przeznaczeniem Ta radiowa kamera zewnętrzna IR 2,4 GHz to opcjonalny osprzęt monitora radiowego LCD 7“ (TVAC16000B). Z jednym monitorem mogą działać maks. 4 kamery. Ta zewnętrzna kamera radiowa 2,4 GHz IR umożliwia bezproblemowe przesyłanie sygnałów wideo drogą radiową do monitora radiowego. Radiowa transmisja sygnałów jest zaletą szczególnie tam, gdzie ułożenie kabli jest niemożliwe: obie kamery przesyłają sygnał wideo bezprzewodowo do monitora. Konwersja na sygnały cyfrowe umożliwia wyeliminowanie zakłóceń i interferencji. Szczegółowy opis działania znajduje się w rozdziale „3. Cechy i funkcje“. 2. Zakres dostawy 2 radiowe kamery zewnętrzne IR 2,4 GHz z uchwytem do kamery i materiałami do montażu Zasilacz z adapterem EU, AU i UK 5 V DC/1A 3. Cechy i funkcje Kompaktowa kamera zewnętrzna IP66 z funkcją noktowizora na podczerwień Zintegrowany nadajnik cyfrowy 2,4 GHz do szyfrowanej bezprzewodowej transmisji danych wideo Cyfrowa radiowa kamera zewnętrzna IR do integracji z monitorem radiowym TVAC16000A Rozdzielczość 640 x 480 pikseli @ 25 fps, obiektyw stałoogniskowy 3,6 mm 4. Opis urządzenia 4.1 Przegląd Nr artykułu Rozdzielczość IR Filtr obrotowy IR (ICR) Napięcie robocze TVAC16010B 640 x 480 pikseli 5 V DC 26 Polski 4.2 Opis kamery Antena Obiektyw stałoogniskowy LED zasilania LED stanu łącza IR-LED Czujnik światła Uchwyt do kamery Mikrofon Przycisk Pairing Złącze do zasilania napięciowego 5 V DC/1A 5. Instalacja 5.1 Parowanie kamer z monitorem Aby sparować kamerę z monitorem, wykonaj następujące czynności: 1. 2. 3. 4. Podłącz zasilacze sieciowe do kamer i monitora. W menu monitora „Ustawienia kamer“ > „Parowanie“ wybierz odpowiednią kamerę. System zacznie odliczać 60 sekund. Podczas tych 60 minut naciskaj przycisk PAIRING znajdujący się na kablu kamery do momentu, aż zielona dioda LED stanu łącza z przodu kamery zacznie migać. W przypadku nawiązania połączenia dioda LED stanu łącza świeci w sposób ciągły. Uwaga: Pamiętaj, że nawiązywanie połączenia może trwać do 60 sekund. 27 Polski 5.2 Montaż kamer Za pomocą uchwytu kamery ustal odpowiednie miejsce instalacji. Zaznacz miejsca do wywiercenia otworów na podłożu i nawierć je. Włóż dostarczone w komplecie kołki rozporowe i zamocuj uchwyt śrubami. Uwaga: Przed przystąpieniem do instalacji upewnij się, czy zasięg transmisji radiowej w miejscu przeznaczonym do instalacji jest zapewniony. Uchwyt można obrócić o 90° w celu wybrania odpowiedniej pozycji. Najpierw poluzuj śrubę z boku i ustaw pożądany kąt widzenia. Przykręć śrubę w złączu, aby ustalić pożądaną pozycję. Następnie przykręć złącze kamery do uchwytu i połącz zasilacz sieciowy z kamerą. 28 Polski 6. Konserwacja i czyszczenie 6.1 Konserwacja Sprawdzaj regularnie bezpieczeństwo techniczne produktu, np. czy obudowa nie jest uszkodzona. Jeżeli są powody do przypuszczenia, że bezpieczna eksploatacja jest niemożliwa, należy wycofać produkt z eksploatacji i zabezpieczyć przed przypadkowym uruchomieniem. Należy przyjąć, że bezpieczna eksploatacja nie jest możliwa, jeżeli: urządzenie ma widoczne uszkodzenia, urządzenie nie działa. Pamiętaj: Produkt nie wymaga konserwacji. Nie posiada on części, które powinno się sprawdzać lub konserwować, dlatego nie należy go nigdy otwierać. 6.2 Czyszczenie Czyść produkt czystą, suchą ściereczką. W razie większych zabrudzeń ściereczkę można zwilżyć letnią wodą. Uważaj, aby do wnętrza urządzenia nie dostała się jakakolwiek ciecz. Nie używaj chemicznych środków czyszczących, ponieważ mogą one uszkodzić powierzchnię obudowy (spowodować odbarwienia). 7. Utylizacja Tak oznaczonych urządzeń nie wolno wyrzucać razem z odpadami domowymi. Po wycofaniu z eksploatacji produkt należy utylizować zgodnie z obowiązującymi przepisami ustawowymi. Zwróć się do sprzedawcy lub oddaj produkty w komunalnym punkcie zbiórki złomu elektrycznego. 29 Polski 8. Dane techniczne Numer typu Częstotliwość Modulacja Moc nadawcza Czułość Czujnik obrazowy Rozdzielczość Liczba diod IR LED Obiektyw Kąt widzenia Zasięg w funkcji noktowizora Obrotowy filtr IR Stopień ochrony IP Zasięg radiowy Napięcie zasilające Pobór prądu Temperatura pracy Wymiary (D x S x W) Masa TVAC16010B 2,4 GHz GFSK 15 +/- 2 dBm -80 dBm 1/4‘‘ CMOS 640 x 480 pikseli (VGA) 25 diod IR LED 3,6 mm 60° (H) / 43° (V) Ok. 5 – 8 m Tak IP 66 Ok. 100 m (bez przeszkód)* 5 V DC/1 A Maks. 550 mA -10°C – 50°C 150 x 74 x 68 (bez anteny i uchwytu) 390 g * Zasięg zależy od warunków środowiskowych (np. sąsiedztwo anten telefonii komórkowej, słupów sieci elektroenergetycznej, przewodów elektrycznych, stropów i ścian, itd.). W niekorzystnych warunkach faktyczny zasięg może być mniejszy! 30 TVAC16010B Manual de instrucciones Versión 02/2013 Manual de instrucciones original en alemán. Guardar para futuras consultas. Español Introducción Estimado cliente: Le agradecemos la compra de este artículo. Este producto cumple los requisitos de las directivas europeas y nacionales vigentes. Se ha comprobado la conformidad. La documentación y declaraciones correspondientes están en poder del fabricante (ABUS Security-Center GmbH & Co. KG, Linker Kreuthweg 5, 86444 Affing, Alemania). Para conservar este estado y garantizar un funcionamiento exento de peligros, debe tener en cuenta lo expuesto en este manual de instrucciones. Antes de poner en funcionamiento el producto, lea todo el manual de instrucciones y respete todas las indicaciones de utilización y seguridad. Todos los nombres de empresas y denominaciones de producto son marcas registradas del correspondiente propietario. Todos los derechos reservados. Si tiene alguna pregunta, diríjase a su instalador o a su distribuidor especializado. Exención de responsabilidad Este manual de instrucciones ha sido elaborado muy detalladamente. Si a pesar de ello usted advirtiera omisiones o imprecisiones, comuníquenoslo por escrito a la dirección indicada al dorso de este manual. ABUS Security-Center GmbH no asume ningún tipo de responsabilidad por los fallos técnicos ni tipográficos y se reserva el derecho a realizar modificaciones en el producto y en los manuales de instrucciones sin previo aviso. ABUS Security-Center no se hace responsable de los daños que deriven directa o indirectamente del equipamiento, las prestaciones y el empleo de este producto. No se otorga ninguna garantía por el contenido de esta documentación. 32 Español Explicación de los símbolos El símbolo con un rayo dentro de un triángulo se utiliza para advertir de un peligro para la integridad física debido, por ejemplo, a una descarga eléctrica. Un signo de admiración dentro de un triángulo señaliza una indicación importante del manual de instrucciones, la cual es imprescindible tener en cuenta. Este símbolo señaliza consejos e indicaciones útiles para la utilización. Indicaciones importantes de seguridad En el caso de daños provocados por no haber respetado las indicaciones expuestas en el manual de instrucciones, se extingue el derecho de garantía. No nos hacemos responsables de los daños resultantes. No nos hacemos responsables de los daños personales o materiales provocados por una utilización incorrecta o por no haber respetado las indicaciones de seguridad. En tales casos se extingue el derecho de garantía. Este aparato ha sido fabricado en cumplimiento de los estándares internacionales de seguridad. Lea detenidamente las siguientes indicaciones de seguridad. Indicaciones de seguridad 1. Alimentación de corriente 100-240 V CA de tensión alterna, 50-60 Hz (con la fuente de alimentación: 5/12 V CC) Conecte este aparato solo a fuentes de alimentación que suministren la tensión de red indicada en la placa de características. Si no está seguro de cuál es la tensión de red, pregunte a la empresa distribuidora de electricidad. Desenchufe el aparato de la red de alimentación antes de llevar a cabo trabajos de mantenimiento o instalación. 2. Sobrecarga Evite la sobrecarga en cajas de enchufe, cables alargadores y adaptadores, ya que esto puede provocar un incendio o una descarga eléctrica. 3. Líquidos Proteja el aparato para que no pueda penetrar ningún líquido. 4. Limpieza Limpie el aparato únicamente con un paño húmedo y no utilice agentes de limpieza abrasivos. Para ello se ha de desenchufar el aparato. 5. Accesorios Conecte únicamente los aparatos expresamente previstos para ello. De otro modo se podrían producir situaciones de peligro y daños en el aparato. 6. Lugar de instalación Este aparato está previsto tanto para zonas exteriores protegidas como para interiores. Si se cae, aunque sea desde poca altura, se pueden producir daños en el aparato. Monte el aparato de forma que el sol no incida directamente sobre el sensor de imagen. Siga las instrucciones de montaje contenidas en el capítulo correspondiente de este manual de instrucciones. No coloque el aparato muy cerca de calefacciones, hornos u otras fuentes de calor ni bajo la incidencia directa del sol. Utilice el aparato solo en lugares con una temperatura ambiente que esté dentro del margen permitido de -10 °C-50 °C. 33 Español 7. Transmisión inalámbrica La cobertura de la transmisión inalámbrica depende de las condiciones del entorno. Las condiciones concretas del lugar de montaje pueden influir negativamente en la cobertura. Por ello, si no hay obstáculos entre el receptor y el emisor puede alcanzarse una cobertura de 150 m, aunque dentro de edificios será bastante menor. Las siguientes condiciones del entorno pueden reducir la cobertura, así como la frecuencia de imágenes por segundo: antenas de telefonía móvil, postes de líneas de alta tensión, líneas eléctricas, techos y paredes, aparatos con frecuencia de transmisión igual o similar. Advertencias Tenga en cuenta las indicaciones de seguridad y de utilización antes de la primera puesta en funcionamiento. 1. Respete las siguientes indicaciones a fin de evitar que se produzcan daños en el cable de red y en el enchufe de red. No modifique ni manipule el cable de red ni el enchufe de red. Para desenchufar el aparato de la red, no tire del cable de red, sino directamente del enchufe. Preste atención a que el cable de red esté lo más alejado posible de fuentes de calor para así evitar que se derrita el recubrimiento de plástico. La fuente de alimentación de la cámara exterior se tiene que proteger de la humedad y el agua. 2. Respete las siguientes instrucciones, pues de lo contrario se podría producir una descarga eléctrica: 1. 2. 3. 3. No abra nunca la carcasa o la fuente de alimentación. No introduzca ningún objeto metálico ni inflamable en el interior del aparato. A fin de evitar que se produzcan daños por sobretensión (por ejemplo, a causa de una tormenta), utilice una protección contra sobretensión. Desenchufe inmediatamente de la red los aparatos defectuosos e informe a su distribuidor. En caso de no estar seguro de cómo realizar el montaje, la instalación y el cableado, encárgueselo a un especialista. Los trabajos no profesionales o indebidamente realizados en la red eléctrica o en las instalaciones de viviendas suponen un peligro no solo para usted, sino también para otras personas. Tienda los cables de las instalaciones de tal forma que los circuitos de red y de baja tensión discurran siempre separados y que no se unan en ningún punto ni se puedan unir por algún defecto. Evite las siguientes condiciones ambientales perjudiciales durante el funcionamiento: Agua o humedad excesiva del aire Temperaturas fuera del margen permitido Radiación directa del sol Polvo o gases, vapores o disolventes inflamables Fuertes vibraciones Campos magnéticos de gran intensidad, como cerca de máquinas o altavoces Orientación de la cámara en dirección al sol, lo que puede destruir el sensor Instalación de la cámara sobre superficies inestables Desembalaje Manipule el aparato con extremo cuidado al desembalarlo. Si el embalaje original presenta algún desperfecto, compruebe el aparato. En caso de que este presente algún daño, devuélvalo en el embalaje e informe al servicio de reparto. 34 Español Índice 1. Uso adecuado .....................................................................................................................36 2. Volumen de entrega ............................................................................................................36 3. Características y funciones................................................................................................36 4. Descripción del aparato .....................................................................................................36 4.1 Vista general ...............................................................................................................36 4.2 Descripción de la cámara ............................................................................................37 5. Instalación ...........................................................................................................................37 5.1 Emparejamiento de la cámara y el monitor ..................................................................37 5.2 Montaje de las cámaras ..............................................................................................38 6. Mantenimiento y limpieza ...................................................................................................39 6.1 Mantenimiento .............................................................................................................39 6.2 Limpieza ......................................................................................................................39 7. Gestión de residuos ...........................................................................................................39 8. Datos técnicos ....................................................................................................................40 35 Español 1. Uso adecuado Esta cámara de exteriores IR inalámbrica de 2,4 GHz es un accesorio optativo del monitor LCD inalámbrico de 7”(TVAC16000B). El monitor permite la conexión de hasta 4 cámaras. Con esta cámara de exteriores IR inalámbrica usted puede transmitir sin problemas señales de vídeo por radiofrecuencia al monitor inalámbrico. La transmisión por radiofrecuencia de la señal supone una ventaja si no se pueden tender cables. La cámara transmite la señal de vídeo de forma inalámbrica al monitor. La conversión digital de las señales permite evitar fallos e interferencias. Encontrará una descripción detallada del funcionamiento en el capítulo 3 “Características y funciones”. 2. Volumen de entrega Cámara inalámbrica IR de exteriores de 2,4 GHz incl. soporte de la cámara y material de montaje Fuente de alimentación incl. adaptador EU, AU y UK 5 V CC/1 A 3. Características y funciones Cámara de exteriores compacta IP 66 con visión nocturna por infrarrojos Emisor digital integrado de 2,4 GHz para la transmisión cifrada inalámbrica de datos de vídeo Cámara digital de exteriores IR inalámbrica para integración con monitor inalámbrico TVAC16000A Resolución de 640 x 480 píxeles, objetivo fijo de 3,6 mm 4. Descripción del aparato 4.1 Vista general N.° de artículo Resolución IR Filtro IR basculante (JCR) Tensión de funcionamiento TVAC16010B 640 x 480 píxeles 5 V CC 36 Español 4.2 Descripción de la cámara Antena Objetivo fijo LED de alimentación LED de conexión LED IR Fotocelda Soporte de la cámara Micrófono Botón de emparejamiento Conexión a tensión de alimentación 5 V CC/1A 5. Instalación 5.1 Emparejamiento de la cámara y el monitor Para emparejar una cámara con el monitor proceda como sigue: 1. Conecte las fuentes de alimentación a la cámara y al monitor. 2. Seleccione la cámara deseada en el menú del monitor “Ajustes de cámara” > “Emparejamiento”. El sistema comienza una cuenta atrás de 60 segundos. 3. Durante los 60 segundos pulse la tecla PAIRING en el cable de la cámara hasta que el LED verde DE CONEXIÓN en la parte delantera de la cámara empiece a parpadear. 4. Cuando ha tenido lugar la conexión, se ilumina el LED DE CONEXIÓN de la cámara de forma permanente. Atención: Tenga en cuenta que la conexión puede tardar hasta 60 segundos en establecerse. 37 Español 5.2 Montaje de las cámaras Seleccione un lugar adecuado de instalación con el soporte de la cámara. Marque los orificios de fijación en la superficie de apoyo y taládrelos. A continuación, introduzca en ellos los tacos adjuntos y fije el soporte con los tornillos. Atención: Antes de comenzar la instalación, asegúrese de que la distancia de transmisión sea suficiente para llegar al lugar elegido. Tiene la posibilidad de girar 90° el soporte para fijar la posición que desee. A continuación, afloje el tornillo lateral y ajuste el ángulo de visión que dese; después, apriete el tornillo de nuevo para fijar la posición establecida. Finalmente, atornille la cámara al soporte y conecte la fuente de alimentación a la cámara. 38 Español 6. Mantenimiento y limpieza 6.1 Mantenimiento Compruebe regularmente la seguridad técnica del producto, por ejemplo, si está dañada la carcasa. Cuando no esté garantizado un funcionamiento seguro, ponga fuera de funcionamiento el aparato y evite que pueda ponerse en marcha de nuevo involuntariamente. El funcionamiento seguro no está garantizado si: El aparato presenta daños visibles. El aparato no funciona. Tenga en cuenta lo siguiente: El producto no requiere ningún mantenimiento por su parte. No hay ningún componente que deba controlar o mantener en el interior del aparato; no lo abra nunca. 6.2 Limpieza Limpie el producto con un paño limpio y húmedo. En caso de estar muy sucio, el paño se puede humedecer con agua templada. Evite que entren líquidos en el aparato. No utilice limpiadores químicos; estos pueden dañar (desteñir) la superficie de la carcasa. 7. Gestión de residuos Los aparatos que llevan este símbolo no se pueden eliminar en la basura doméstica. Al finalizar la vida útil del producto, deséchelo cumpliendo lo establecido en la ley. Diríjase a su distribuidor o deposite el artículo en un punto de recogida municipal para equipos eléctricos y electrónicos. 39 Español 8. Datos técnicos Código de referencia Frecuencia Modulación Potencia de emisión Sensibilidad Sensor de imagen Resolución Número de LEDs de infrarrojos Objetivo Ángulo de visión Alcance función de visión nocturna Filtro de IR basculante Clase de protección IP Cobertura Alimentación de tensión Consumo de corriente Temperatura de funcionamiento Dimensiones (An x P x Al) Peso TVAC16010B 2,4 GHz GFSK 15 +/- 2 dBm -80 dBm 1/4‘‘ CMOS 640 x 480 píxeles (VGA) 25 3,6 mm 60° (H)/43° (V) Aprox. 5-8 m Sí IP 66 aprox. 100 m (sin obstáculos)* 5 V CC/1 A Máx. 550 mA -10 °C-50 °C 150 x 74 x 68 (sin antena y soporte) 390 g * La distancia máxima de transmisión depende de las condiciones del entorno (por ej., antenas de telefonía móvil, postes de líneas de alta tensión, líneas eléctricas, techos y paredes, etc.). En condiciones adversas solo se alcanzan distancias de transmisión menores. 40 GB Imprint These operating instructions are published by ABUS Security-Center GmbH & Co.KG, Linker Kreuthweg 5, 86444 Affing, Germany. No reproduction (including translation) is permitted in whole or part e.g. photocopy, microfilming or storage in electronic data processing equipment, without the express written consent of the publisher. The operating instructions reflect the current technical specifications at the time of print. We reserve the right to change the technical or physical specifications. DK Redaktionel note Denne betjeningsvejledning er publiceret af ABUS Security-Center GmbH & Co. KG, Linker Kreuthweg 5, 86444 Affing, Germany. Der må ikke foretages kopiering, inklusive oversættelser, fotokopierng, mikrofilms optagelse af proces udstyr uden forudgående tilladelse fra udgiveren. Denne brugervejledning reflekterer de kendte til dato tekniske specifikationer. Vi forbeholder os retten til at ændre frit og uden forudgående advisering. PL Nota redakcyjna Niniejsza instrukcja obsługi jest publikacją ABUS Security-Center GmbH & Co. KG, Linker Kreuthweg 5, 86444 Affing. Wszystkie prawa, także do tłumaczenia, zastrzeżone. Reprodukcje wszelkiego rodzaju, np. fotokopia mikrofilm oraz zapis w elektronicznych systemach przetwarzania danych wymagają pisemnej zgody wydawcy. Przedruk, także we fragmentach, zabroniony. Niniejsza instrukcja obsługi odzwierciedla stan faktyczny w dacie złożenia do druku. Zmiany techniczne i zmiany wyposażenia zastrzeżone. ES Pie de imprenta Este manual es una publicación de la Seguridad ABUS-Center GmbH & Co. KG, enlazador Kreuthweg 5, 86444 Affing. Todos los derechos reservados, incluyendo traducciones. Queda prohibida la reproducción, por ejemplo, Fotocopia, microfilm, o en los datos de los equipos electrónicos de procesamiento, sin la autorización por escrito de la editorial. No puede ser reproducido en cualquier forma. Este derecho para cambiar el estado de la técnica de la impresión. Los cambios en la tecnología y el equipo. © Copyright 06/2011 by ABUS Security-Center