1
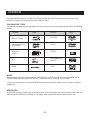
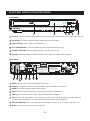
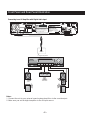
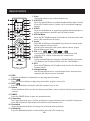
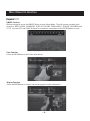
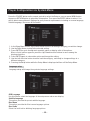
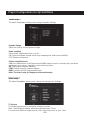
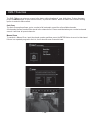
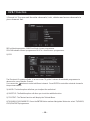
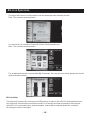
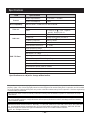
DFTA60BR
Toll Free Warranty and Service: 1800 509 394
Gold Technical Support Line: 1902 215 259
(Charges will apply at $2.95 per minute for Gold Technical Support Only)
INSTRUCTION MANUAL
HIGH DEFINITION DIGITAL SET TOP BOX WITH
INTEGRATED BLU-RAY PLAYER
Safety Instructions
Always read the safety instructions carefully
Keep this Instruction Manual for future reference
Keep this device away from humidity
Lay this device on a reliable flat sur face before setting it up
Do not stand it on soft furnishings
If any of the following situation arises, get the Set Top Box checked by a service
technician:
It has been exposed to moisture
It has been dropped and damaged
It has obvious sign of breakage
It has not been working well or you cannot get it to work according to the Instruction
Manual
Warning
To prevent the risk of electric shock, do not open the cover or the back of the receiver.
Do not block the ventilation holes of the device. Leave appropriate gap
above and around it to allow for adequate ventilation.
Do not place the device in an unventilated cabinet or on top of a unit which emits heat.
Copyright Statement
No par t of this publication may be reproduced in any form by any means without the
prior written permission. Other trademarks or brand names
mentioned herein are trademarks or registered trademarks of their respective companies.
This product incorporates copyright protection technology that is protected by U.S.
patents and other intellectual property rights. Use of this copyright protection technology
must be authorized by Rovi Corporation, and is intended for home and other limited viewing
uses only unless otherwise authorized by Rovi Corporation. Reverse engineering or
disassembly is prohibited.
This symbol indicates that this product incorporates double insulation between
hazardous mains voltage and user accessible parts. When servicing use only
identical replacement parts.
WARNING: To reduce the risk of fire or electric shock, do not expose this apparatus
to rain or cords.
Introduction
Thank you for buying this Bush product, which is designed to give you many years of trouble
-free service.
You may already be familiar with using a similar unit, but please take time to read these instructions.
They are designed to familiarise you with the unit s m any features and to ensure you get the very
best from your purchase.
Safety is important
Your safety and the safety of others is impor tant. Please therefore, ensure you read the
Safety Instructions before you operate this unit.
Warranty
In the unlikely event that your product fails to work normally, please call the below Bush warranty
number for suppor t.
Australia
Bush Warranty: 1800 509 394
New Zealand
Bush Warranty: 0800 450 259
About the High Definition Digital Set Top Box with Integrated Blu-Ray Player
This DVB-T TV Receiver allows you to access Free-to-Air Digital TV Channels and Radio
Broadcasts on your TV set. Its digital reception covers VHF & UHF band. Digital TV
eliminates noise and inter ference and offers high quality video and audio. It also can
suppor t multi-format of BD and DVD disk play back.
An easy to use on-screen installation guide is provided. In addition, a fully featured Remote
Control is included that offers you access to every feature with a simple press of a button.
Main Features
Compliant with Australian DVB-T Standards
Bandwidth of 7/8MHz Supported
COFDM Demodulator
Receives All High Definition Digital Free to Air Channels
Integrated Blu-Ray Player
Blu-Ray Player Supports Multi Format Playback (BD/DVD/DVD+/-R,
RW/MP3/ CD/CD-R/CD-RW/ VCD/DVD+/JPEG Formats)
USB Input Supports MP3, WMA and JPEG files
Easy Set Up Out of the Box with Auto and Manual Channel Scan
On Screen 7 Day Program Guide with Now and Next Event Info
HDMI Output for Perfect Picture Quality
Composite Video Output
Digital Audio via SPDIF Coaxial Output for Connection to a Surround
Sound Amplifier
Teletext (where applicable) with Subtitle Support for the Hard of Hearing
Parental Lock
Remote Control
Package Contents
Before installation, please check the items of the package.
The package should contain the following items:
~ Set Top Box
x1 pc
~ Remote Control
x1 pc
~ AAA Battery for the Remote Control x1 pair
~ Instruction Manual
x1pc
~ Composite RCA Cable
x1 pc
Table of Contents
Overview -------------------------------------------------------------------------------------- 2
Front Panel and Rear Panel Illustration----------------------------------------------------- 3
Remote Control ------------------------------------------------------------------------------ 6
Main Menu Introduction --------------------------------------------------------------------- 8
Player Configuration via System Menu---------------------------------------------------- 10
DVB-T Function------------------------------------------------------------------------------ 15
BD-Live Operation-------------------------------------------------------------------------- 17
Troubleshooting ----------------------------------------------------------------------------- 19
Specifications-------------------------------------------------------------------------------- 20
Warranty-------------------------------------------------------------------------------------- 21
-1-
OVERVIEW
This High Definition Digital Set Top Box with Integrated Blu-Ray Player will provide you with high
definition, cinema-like pictures and multi-channel audio.
PLAYABLE DISK TYPES
Please see below the disk format types that are accepted and can be played by your Bush DFTA60BR
player:
Format
Logo
Format
Blu-Ray Disks
DVD-RW
DVD Video Disks
(DVD-ROM)
DVD-R
Audio CDs
(CDDA)
DTS-CD
VCD
MP3/WMA/JPEG
Data CD
HDMI
DVB-T
TM
Logo
NOTES:
For recordable DVD & CD disks formats, only DVD-RW/-R & CD-R/-RW disks recorded with UDF or
ISO9660 format can be played via this unit. The disks must be finalised via VR-mode.
If your disk format type is not specified above then it may not work with this unit or perform specific
operations.
REGION CODE
If the region number of a Blu-Ray or DVD disk does not correspond to the region number of this unit the
disk will not be available for playback. The region code is printed on the rear panel of this unit.
-2-
Front Panel and Rear Panel Illustration
Front panel
1 Disc Tray: Once you press the Eject Button the Disc Tray will open and you can load your DVD or Blu-Ray disk.
2 LED Display: The LED Display will display the channel you are watching.
3 EJECT BUTTON Used to open or close the disc tray.
4 PLAY/PAUSE BUTTON Used to playback or pause the program being viewed .
5 STANDBY BUTTON: Press the STANDBY Button to turn the unit on or off.
6 USB Input: USB Input Supports JPEG Files, Music Files, Video Files and Software Upgrade.
Rear panel
B00057400001
U.S. Patent Nos. 6,836,549; 6,381,747;
7,050,698; 6,516,132; and 5,583,936.
Manufactured under license under U.S.
Patent #s : 5,451,942; 5,956,674; 5,974,380;
5,978,762; 6,487,535 & other U.S. and
worldwide patents issued & pending. DTS and
the Symbol are registered trademarks & the
DTS logos are trademarks of DTS, Inc.
DTS, Inc. All Rights Reserved.
DFTA60BR
HIGH DEFINITION DIGITAL SET TOP BOX WITH
INTEGRATED BLU-RAY PLAYER
POWER SUPPLY: AC 230V~ 50Hz
MAX POWER CONSUMPTION: 20W
WARRANTY: 1800 509 394 AUSTRALIA
WARRANTY: 0800 450 259 NEW ZEALAND
WWW.Bush.NET.AU
MADE IN P.R.C.
2011/01
N14119
7 8
1 AUDIO L/R: This socket outputs Analog Audio L/R signal.
2 COAIXAL: This socket connects to a Coaxial cable on your surround sound system.
3 VIDEO:This socket outputs composite video signal.
4 HDMI: High definition audio and video output used to connect to a HDMI device.
5 USB Supports JPEG Files, Music Files, Video Files and Software Upgrade.
6 LAN: The Lan Connection allows you to connect to the internet and access any links on your Blu-Ray disk.
The disk must support BD live 2.0. Alternatively it can be used for software upgrades.
7 R F LOOP THROUGH: This socket will bypass the RF signal to either your TV or another video system.
8 RF IN:This socket connects to your external Aerial.
-3-
Front Panel and Rear Panel Illustration
TV Set Connections
TV Aerial
VIDEO
R
L
HDMI
AUDIO IN
VIDEO IN
HDMI IN
B00057400001
U.S. Patent Nos. 6,836,549; 6,381,747;
7,050,698; 6,516,132; and 5,583,936.
Manufactured under license under U.S.
Patent # s: 5,451,942; 5,956,674; 5,974,380
5,978,762; 6,487,535 & other U.S. and
worldwide patents issued & pending. DTS and
the Symbol are registered trademarks & the
DTS logos are trademarks of DTS, Inc.
DTS, Inc. All Rights Reserved.
B00057400001
U.S. Patent Nos. 6,836,549; 6,381,747;
7,050,698; 6,516,132; and 5,583,936.
Manufactured under license under U.S.
Patent #s : 5,451,942; 5,956,674; 5,974,380;
5,978,762; 6,487,535 & other U.S. and
worldwide patents issued & pending. DTS and
the Symbol are registered trademarks & the
DTS logos are trademarks of DTS, Inc.
DTS, Inc. All Rights Reserved.
DFTA60BR
HIGH DEFINITION DIGITAL SET TOP BOX WITH
INTEGRATED BLU-RAY PLAYER
POWER SUPPLY: AC 230V~ 50Hz
MAX POWER CONSUMPTION: 20W
WARRANTY: 1800 509 394 AUSTRALIA
WARRANTY: 0800 450 259 NEW ZEALAND
WWW.Bush.NET.AU
MADE IN P.R.C.
2011/01
N14119
CONNECTING THE BLU-RAY PLAYER TO YOUR TV SET VIA THE AV CONNECTION
Connect the unit's L and R audio output via the composite cable provided to the corresponding audio
input on your TV.
Then connect the unit's video output via the composite cable provided to the corresponding video input
on your TV.
CONNECTING THE BLU-RAY PLAYER TO YOUR TV SET VIA THE HDMI CONNECTION
Use a HDMI cable (not supplied) to connect your unit to your TV via the HDMI Output.
It will supports video resolution up to 1080p 60Hz.
-4-
Front Panel and Rear Panel Illustration
Connecting to an AV Amplifier with Digital Audio Input
B00057400001
U.S. Patent Nos. 6,836,549; 6,381,747;
7,050,698; 6,516,132; and 5,583,936.
Manufactured under license under U.S.
Patent #s : 5,451,942; 5,956,674; 5,974,380;
5,978,762; 6,487,535 & other U.S. and
worldwide patents issued & pending. DTS and
the Symbol are registered trademarks & the
DTS logos are trademarks of DTS, Inc.
DTS, Inc. All Rights Reserved.
DFTA60BR
HIGH DEFINITION DIGITAL SET TOP BOX WITH
INTEGRATED BLU-RAY PLAYER
POWER SUPPLY: AC 230V~ 50Hz
MAX POWER CONSUMPTION: 20W
WARRANTY: 1800 509 394 AUSTRALIA
WARRANTY: 0800 450 259 NEW ZEALAND
WWW.Bush.NET.AU
MADE IN P.R.C.
2011/01
N14119
Coaxial cable
Coaxial
Digital Amplifier
Notes:
1. Connect the unit to your external sound system/amplifier via the coaxial output.
2. Make sure you set the digital amplifier to the AV input source.
-5-
Remote Control
1. Eject
Press this button to open/close the disk tray.
2. SUBTITLE
Press the Subtitle Button to enable/disable subtitle feature in both
BD and Set Top Box mode. Press to cycle through the language
options.
3. AUDIO
Press the Audio Button to select the available audio languages or
set the sound mode in both BD and Set Top Box mode .
4. BDTitle/Menu
Press the BDTitle/Menu when in BD mode to enter the movie main
menu. (Not available on all disks).
5. Angle
Some BD and DVDs are filmed with more than one camera angle.
During playback of such a disk,
pressing this button will allow you to switch camera angles.
(Not available on all disks)
6. VOL (+/-)
Press the VOL + Button to increase the volume level and
press the VOL - Button to decrease the volume level.
7. STOP/TTX
Press the Stop Button to stop play in BD/DVD mode or press the
TTX Button in Set Top Box mode to enter the Teletext Menu.
8. EPG
Press the EPG Button in Set Top Box mode to enter the Electronic
Program Guide.
9. Navigation Keys
Use the Navigation Keys to scroll through the on-screen menus,
channels and other on-screen functions.
0
9
16
10. INFO
Press the Info Button to display the current program information.
11. PREV
Press the Previous Button to play the previous title, chapter, track or file.
12. NEXT
Press the Next Button to play the next title, chapter, track or file.
13. Return
Press the Return Button to return to the previous folder, menu or switch to the previously watched
channel.
14. SMART
Press the SMART Button to open the operation menu.
15. Colour Keys
The Colour Keys (red, green, yellow, and blue) are used to implement disk-specific features on
some BD disks and to operate specific functions in the teletext menu.
16. Resolution
Press the Resolution Button to change the resolution settings directly.
17. BD Subtitle
Press the BD Subtitle Button to enter subtitle function in BD mode only.
-6 -
Remote Control
18. STANDBY
Press the Standby Button to turn the unit on or off.
Note: After the power has been turned on, the unit will take up to 16 seconds to run linux and initialise
hardware, please be patient. Please wait while the system loads.
19. Numeric Keypad
The Numeric Buttons are used to select channel numbers or input information into the settings menu.
20. MUTE
Press the Mute Button to turn off the audio output only. Press the Mute button to turn it back on.
21. CLEAR
Press the Clear Button to clear any incorrect input information in the menu or setting options.
22.SLOW
Press the Slow Button to slow down the speed of play in BD mode. Press repeatedly to scroll through
the possible speeds (1/2, 1/4, 1/8, 1/16, 1/32).
23. Step
Press the Step Button to play the movie by one frame in BD mode.
24.Play
Press the Play Button to start or resume playback in BD/DVD mode.
25. Pause
Press the Pause Button to pause playback in BD/DVD mode.
26.Menu
Press the Menu Button to access the unit main menu.
27.Setup
Press the Setup Button to enter the settings menu.
28.Fast Forward
x 32
…
Press the Fast Forward Button to scroll forwards through play in BD/DVD mode. x 2
29.Rewind
x 32
x2
…
Press the Rewind Button to scroll backwards through play in BD/DVD mode.
30.A-B
Press the A-B Button once to save a "start point" for repeating play in BD/DVD mode.
Press again to select an "end point" of you want repeated.
31.REPEAT
Press the Repeat Button to cycle through the possible repeat modes based on content played.
32.BD View
Press the BD View Button to to turn the video portion of the director's commentary (picture-in-a-picture)
on and off.
Note: Director's commentary must have been turned on in the BD's main menu in
order for this to work.
33.BD Audio
Press the BD Audio Button to cycle through all of the languages available for the director's
Commentaries.
-7-
Main Menu Introduction
In the main menu mode, use the LEFT and RIGHT Buttons to scroll through options. Then press the
ENTER Button to select.
Playback on USB device
To play your USB, please insert your USB, the screen will display USB CONNECTED. Then select the
USB icon and press the ENTER Button to begin your USB function.
USB function will support files such as JPEG,MP3,WMA,MPEG2,MPEG4,AVI,VOB,WAV,MKV, MITS andTS.
Press the SOURCE Button if you wish to return to the main menu or press the STOP Button to return to the
file list.
-8-
Main Menu Introduction
Playback
SMART Function
When playing disc, press the SMART Button to open Smart Menu. This will provide you with quick
access to; MUTE, AUDIO, VIEW MODE, DISPLAY, VOLUME, ZOOM, ANGLE, SEARCH, DISC MENU and
TITLE. Use the LEFT and RIGHT Buttons to choose one icon and press the ENTER Button to start.
Time Function
Press the INFO Button to select time information.
Display Function
Press the INFO Button to view the current program or movie information.
-9-
Player Configuration via System Menu
Press the SOURCE button on the remote control to select the Setup or you can press MENU button
then press RETURN button to select the Setup option. Then press the ENTER button to select. You
will be able to amend the unit Settings for your personal requirements, including on screen language,
Subtitle language, Disc menu & Disc audio.
1. In the Setup Menu use the Up/Down Buttons to select the settings category you wish to change.
2. Use the Right Button to skip to the selected setting.
3. Press ENTER to cycle through each possible option or display a list of the options.
When a list of options appears, press the Up/Down direction buttons to move among the
displayed options.
4. Press ENTER again to choose the option and change the setting.
5. Use the Left direction button to return back the category, and ready to change settings in a
different category.
6. Pressing the Setup button while the Setup Menu is displayed will turn off the Setup Menu.
Language setup
Language setup will change the system's language settings.
OSD Language
Use this item to select the language of the setup menu and screen display.
Subtitle Language
This option provides the preset subtitle language.
Disc Menu
This option provides the film's menu language options.
Disc Audio
Select the built-in disc dubbing language options.
- 10 -
Player Configuration via System Menu
Audio setup
The Audio Setup Menu allows you to change the audio Settings.
Dynamic Range
Select on or off to control Dynamic Range.
Down sampling
Select down sampling function on or off.
ON: System will down sample rate for high sampling rate audio(more than 96K).
OFF: Disable this function.
Digital output(Optional)
Adjust the audio output of the Coaxial ports/HDMI output to work in harmony with your audio
equipment (e.g.receiver, amplifier) connected to the player.
Off: Digital audio output is disabled.
PCM: Transfer stereo 2 channels signals
RAW: Transfer the DVD original audio track
Note: This item is only for the player with coaxial output.
Video setup
The video Setup Menu allows you to change the video/picture Settings.
TV System
This feature allows you to change the reception system.
Note: The DVD player setting should be matched to your TV set.
For more information of output format, refer to the instructions or your TVset.
- 11 -
Player Configuration via System Menu
Resolution
After you set the video output to HD output, you can choose the resolution of the HDMI output.
Smart Picture
You can change the Smart Picture to Standard, Bright or Soft to optimise the effect of the screen.
Subtitle Setup
This feature allows you to change the font size item to Big/Middle/small.
This feature allows you to change the font colour item to White/Red/Yellow/
Green/ Blue/Gray.
This feature allows you to change the position item to change font position to Button or Top.
TV Display
Here you can change the aspect ratio.
Notes:
The image display ratio is related to the recorded disc format.
Some disc can not display images in the aspect ratio you choose.
If you play a disc recorded in 4:3 format on a wide screen TV, black bars will appear on the left and
right side of the screen.
You must adjust the screen setting depending on the type of the television you have.
Slide Setup
The Slide Setup Menu allows you to create a Slide Show of the images on your USB.
Transition Mode
The Transition Mode allows you to change the Style of Slide Show you would like.
There are None / Slide / Stripes/Fade / Wipe and Random modes to lay picture to choose from.
Slide Interval Time
You can choose the Slide Interval Time as 5 Seconds / 10 Seconds/30 Seconds / 1 Minute
/5 Minutes.
Background music
You can select On or Off to control the Slide Background music.
- 12 -
Player Configuration via System Menu
Parental Control
The Parental Control Menu allows you to lock certain channels to protect children from inapproate
programs. To set a password, you will have to enter the default password 666666.
DVB-T Rating
In the System Menu you can set the Parental Guidance settings to restrict access to unsuitable
channels. To restrict/lock the selected channels you will need to enter either the default password
666666 or your own password and then follow the prompts.
Rating Level
This feature lets you lock certain Rated programs.
Changing the Password
In the System Menu you are able to set your own password. Enter your old password or the default
password 666666 to unlock this setting. Then you will then be asked to enter your new password.
To confirm re-enter your new password. Once it is confirmed.
Network Setup
In Network Setup, select Auto Obtain and press ENTER to obtain the IP address. If successful you
see successful on screen or Connection failed if it fails.
Select Fix IP to manually input your IP Address.
- 13 -
Player Configuration via System Menu
DVB-T setup
Country Select
Confirm your country of residence. Use the navigation buttons to select your desired country.
Time offset
The Time Offset can be set to auto or manual. If set to auto the Set Top Box will automatically change
day light savings time etc.
Country Region
The Country Region option also you to set the state time in which you live. Select the Country Region
option when Time Offset is set to Auto.
Time Zone
You can also change the Time Zone, this is best used when the Time Offset is set to Manual.
Logical channel Number
In the Program Menu you can set the LCN to on or off.
General setup
Screen Saver
You can turn of or off the unit Screen Saving in this option.
Use Default Settings
This feature allows you to conduct a unit factory reset. This will clear/delete all unit settings &
channel lists. If you have any issues with this unit, it is recommended to do a factory reset to fix.
BD Info Storage
This option allows you to see the BD info Storage. Select this option to clear the Blu-ray storage.
Version
To display the current Software version.
Software Update
From time to time new software maybe available for your digital box, which can be
updated via the USB port or by receiving the software via your network.
- 14 -
DVB-T Function
The DVB-T Menu can give you access to the basic setting function of your digital box. To view the menu,
press the MENU button on your remote control, or press the SMART button to select the Channel Setting
option to enter the Menu mode.
Auto Scan
The Auto Scan option allows you to conduct a full automatic search for all available channels.
All channels that are found will be stored in the channels list. Please note that when you conduct a channel
search it will clear all preset channels.
Manual Scan
To conduct a Manual Scan, input the chanel number and then press the ENTER Button to scan for that chanel.
If there is a repeated program in the list, it will show No new channels found.
- 15 -
DVB-T Function
1)Channel list: You can set favorite channels, lock, delete and move channels in
your channel list.
RED will delete programs, GREEN will lock chosen programmes.
YELLOW to delete chosen programmes. BLUE to move choose programmes.
2) EPG
The Electronic Programme Guide, is an on-screen TV guide. It shows all scheduled programmes in
advance for every tuned in Channel.
You can use the
buttons to select a different channel. Press ENTER to watch the selected channel in
the preview window
3) AUDIO: The Audio option will allow you to adjust the audio level.
4) SUBTITLE: The Subtitle option will allow you to set the subtitle function.
5) TELETEXT: The Teletext function will display the Teletext Menu.
6)TV/RADIO/LOCK/FAVORITE: Press the ENTER Button and use Navigation Buttons to select TV/RADIO/
LOCK/FAVORITE programmes.
- 16 -
BD-Live Operation
Some (but certainly not all) BD disks contain additional features that are made available to players that
are connected to the internet, and have additional memory added.
These additional features may include things like
-the ability to download new movie trailers,
-additional 'commentary' by actors and directors,
- multiperson game play and chat
In order to access BD-Live functions, the player must be properly configured for BD-Live internet access,
and it must be equipped with additional memory.
Adding external BD-live Memory to player
Obtain USB memory which has been formatted as FAT32.
Insert the USB memory stick into the USB slot on the player.
Setting BD-Live Internet Access Mode
In the BD Player's main setup menu, go to the Other menu choice; Then, choose BD-Live Internet
Access. Be sure that Always Allow Access is checked.
Once the USB memory stick has been inserted, if there is not at least 100Mbyte of free space on the
device, you should choose Clear BD Storage from the Other setup menu.
In the BD Player's main setup menu, go to the Network menu. Then, choose IP mode. Set up the
Network IP addresses per your router's or ISPs recommendations.
NOTE: The Connectivity Test must pass, or you are not connected to the internet, and cannot access
BD-Live Content on the web.
BD-Live Internet Access Example
Obtain a BD-Live disk like <The 6 th Day>
Select BD-Live option from Special Features Menu (or on some disks, you can see BD-Live option in
main menu)
- 17 -
BD-Live Operation
The player will connect to internet and show the download menu as below picture.
Note: This can take several minutes.
You can select the content to download from the Previews sub menu.
Note: This can take several minutes.
The downloaded content is stored under My Downloads. You can choose to either play back or delete
the downloaded content.
BD-Live Notes
This player only support the connection of USB memory in order to store BD 2.0 downloaded content
Any externally connected device will be set as BD-Live storage and internal storage will be ignored.
Some BD-Live content will expire and not playable, users need to manually delete the contents in
BD storage in order to free space.
- 18 -
Troubleshooting
If you experience problems with your Set Top Box/Blu-Ray Player, we recommend you follow the below
suggestions first which are outlined to assist you with any basic issues. If you continue to have
problems we recommend you contact the Bush Service and Warranty
Toll Free Number - 1800509394 .
NO PICTURE OR SOUND
Ensure the power button is on.
Ensure the power outlet is operational.
Ensure the power cord is not damaged.
Ensure the power plug is connected firmly to the outlet.
PICTURE BUT NO SOUND
Ensure the audio jacks are securely connected.
Ensure the audio connector is not damaged.
Ensure you have set the player's Audio settings correctly.
Ensure you have entered the correct AV input for your TV.
Ensure the audio is not set to mute.
SOUND BUT NO PICTURE
Ensure the video jacks are securely connected.
Ensure you have entered the correct AV input for your TV.
Ensure the video connector is not damaged.
Ensure you have set the player's VIDEO settings correctly.
POOR PICTURE OR SOUND
Ensure you have set the player's Audio settings correctly.
Ensure the disc is not scratched or stained.
Ensure the AV connector or the output terminal is not damaged.
REMOTE NOT WORKING
Make sure the mains power and the unit's power is is on.
Ensure the remote batteries are working.
Point the remote control directly at the player's IR sensor.
Remove any obstacles between the remote and the IR sensor.
UNIT NOT WORKING
Turn off the power, and then turn it on again.
NO DISC DISPLAYED
Conduct a Factory Reset
Ensure you have put the disc on the tray.
Ensure the disc is not upside down.
Ensure the disc is not distorted, stained or scratched.
- 19 -
Specifications
Item
General
Discs Compatibility
Specification
Power requirements:
100-240V~ 50/60Hz
Power consumption:
20W
BD,DVD,DVD+/-R/RW,VCD,CD-DA,CD-R/RW.
HDMI
Video out
Audio out
CVBS:
1.0V(p-p)/75
, sync, negative
polarity, RCA pin jack x 1
2 channel out:
RCA pin jackx2
Coaxial out:
0.5V(p-p)75 , RCA pin Jack x l
Frequency response:
20Hz to 20kHz
S/N ratio:
>90dB
Total harmonic distortio n:
<-65dB
Input Frequency Range
VHF:174 - 230 MHz UHF:470 - 862 Mhz
Bandwidth:7 or 8 MHz
DVB-T TV-Tuner
Input Signal Level:-75 ~ -20 dBm
RF Input Connector:IEC169-2 type, F type
Demodulation Mode
Waveform:COFDM
Demodulation:QPSK, QAM16, QAM64
Transmission Mode:2K, 8K
Guard interval:1/4, 1/8, 1/16, 1/32
Specifications are subject to change without notice.
This product incorporates copyright protection technology that is protected by U.S. patents and other intellectual
property rights. Use of this copyright protection technology must be authorized by Rovi Corporation, and is intended
for home and other limited viewing uses only unless otherwise authorized by Rovi Corporation. Reverse engineering
or disassembly is prohibited.
Manufactured under license from Dolby Laboratories. Dolby and the double-D symbol are trademarks of Dolby
Laboratories.
This device complies with Part 15 of the FCC Rules. Operation is subject to the following two conditions:(1) this device may
not cause harmful interference, and(2) this device must accept any interference received, including in terference that may
cause undesired operation.
Manufactured under license under U.S. Patent # s: 5,451,942; 5,956,674; 5,974,380; 5,978,762; 6,487,535 & other
U.S. and worldwide patents issued & pending. DTS and the Symbol are registered trademarks, & DTS-HD, DTS-HD
Advanced Digital Out and the DTS logos are trademarks of DTS, Inc. Product includes software.
DTS, Inc. All Rights Reserved.
- 20 -
Our goods come with guarantees that cannot be excluded under the Australian
Consumer Law. You are entitled to a replacement or refund for a major failure and for
compensation for any other reasonably foreseeable loss or damage. You are also
entitled to have the goods repaired or replaced if the goods fail to be of acceptable
quality and the failure does not amount to a major failure.
- 21 -