1
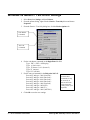
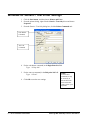
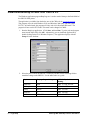
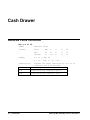
Samsung SRP-350 Thermal Receipt Printer Integrator’s Manual Contents Driver Installation Information 2 Overview ............................................................................................................................. 2 Windows 98 SRP-350 Driver Installation............................................................................. 3 Windows 98 Generic / Text Driver Settings ......................................................................... 4 Windows 2000 Generic / Text Driver Settings...................................................................... 5 Windows XP Generic / Text Driver Settings ........................................................................ 6 Logo Setup 7 Design & Save Bitmap in Microsoft Paint ............................................................................ 7 Download Bitmap to SRP-350 from a PC............................................................................. 8 Upgrade Instructions 10 Downloading Procedure for SRP-350 Printer Software....................................................... 10 Hexadecimal Dumping 11 Overview ........................................................................................................................... 11 Hexadecimal Dump Sample Printout.................................................................................. 12 Troubleshooting ................................................................................................................. 13 Cash Drawer 14 Generate Pulse Command .................................................................................................. 14 Connection Information ..................................................................................................... 15 Wall Mount Option 16 Downloading Procedure for SRP-350 Wall Mount Printer Software ................................... 16 Special Application Firmware 16 Overview ........................................................................................................................... 17 CRS, Inc. 2909 Anthony Lane Minneapolis, MN 55418 (612) 781-3474 All specifications are subject to change without notice 2002, Cash Register Sales, Inc. Driver Installation Information Overview If your POS software requires a generic printer driver, you must make the appropriate driver settings for auto cut and cash drawer opening. If you are using one of the SRP-350 drivers the generic driver settings shown here do not apply. The appropriate SRP-350 drivers operate the cutter and cash drawer automatically. 2 • Driver Installation Information Samsung SRP-350 Setup & Service Information Windows 98 SRP-350 Driver Installation You can download the compressed SRP-350 driver, 350_130_2K.zip, from the dealer area of the CRS site, www.crs-usa.com. Unzip (extract) the file SRP350.drv. 1. Select Start, then Settings, and then Printers. 2. From the printers dialog, right click the Add Printer icon. 3. From the Add Printer wizard window, click Next. 4. Choose Local Printer, click Next. 5. Click the Have Disk command button. From the Install From Disk dialog box, click the Browse button to locate the driver file SRP350.drv. Click OK. The wizard displays the list of available drivers for the SRP-350. 6. Select a driver from the table that follows and click Next. Driver Description SRP350 No cut STP130 No cut OM8324 No cut SRP350 Partial cut STP130 Partial cut OM8324 Partial cut SRP350 No cut & Bel Use with SRP350 – no paper cut Do not use Do not use Use with SRP350 – partial paper cut Do not use Do not use Use with SRP350 – no paper cut and sounds auto paper beep when data is sent to printer – requires version 1.19B EPROM installed in SRP350. Use with SRP350 – partial paper cut and sounds auto paper beep when data is sent to printer – requires version 1.19B EPROM installed in SRP350. SRP350 Partial cut & Bel 7. Select the port to which the printer will be connected and click Next. 8. Enter a printer name and select whether you want your windows based program to use this printer as the default printer. Click Next. 9. Select whether you wish to print a test page and click Finish. The printer driver installation is complete. Samsung SRP-350 Setup & Service Information Driver Installation Information • 3 Windows 98 Generic / Text Driver Settings 1. Select Start, then Settings, and then Printers. 2. From the printers dialog, right click the Generic / Text Only driver and choose Properties. 3. From the Generic / Text Only dialog box, click the Device Options tab: Cash Drawer Command Auto Cut Command 4. For the cash drawer command, in the Begin Print Job field: Type: ESC (<ESC> will display) Type: p (lower case) Type: 0 (drawer 1) or 1 (drawer 2) Type: 25 (on time) Type: 125 (off time) 5. For the auto cut command, in the End print Job field: Press ALT and type: 0010 (line feed) : Press ALT and type: 0010 (line feed) : Press ALT and type: 0010 (line feed) : Press ALT and type: 0010 (line feed) : Press ALT and type: 0010 (line feed) Press ALT and type: 0029 (GS) : Press ALT and type: 0086 (V) : Press ALT and type: 0001 (ASCII 01) NOTE: To enter these commands, it may be necessary to activate the Num Lock and use the 10-key pad on your keyboard. 6. Click OK to save the new settings. 4 • Driver Installation Information Samsung SRP-350 Setup & Service Information Windows 2000 Generic / Text Driver Settings 1. Click the Start button, and then choose Settings, and then choose Printers. 2. From the printers dialog, right click the Generic / Text Only driver and choose Properties. 3. From the Generic / Text Only dialog box, click the Printer Commands tab: Cash Drawer Command Auto Cut Command 4. For the cash drawer command, in the Begin Print Job field: Type: “<1B>p<00>” 5. For the auto cut command, in the End print Job field: Type: “<1B>m” 6. Click OK to save the new settings. Samsung SRP-350 Setup & Service Information NOTE: To enter these commands, it may be necessary to activate the Num Lock and use the 10-key pad on your keyboard. Driver Installation Information • 5 Windows XP Generic / Text Driver Settings 1. Click the Start button, and then choose Printers and Faxes. 2. From the printers dialog, right click the Generic / Text Only driver and choose Properties. 3. From the Generic / Text Only dialog box, click the Printer Commands tab: Cash Drawer Command Auto Cut Command 4. For the cash drawer command, in the Begin Print Job field: Type: “<1B>p<00>” 5. For the auto cut command, in the End print Job field: Type: “<1B>m” 6. Click OK to save the new settings. 6 • Driver Installation Information NOTE: To enter these commands, it may be necessary to activate the Num Lock and use the 10-key pad on your keyboard. Samsung SRP-350 Setup & Service Information Logo Setup Design & Save Bitmap in Microsoft Paint Maximum horizontal pixels = 512. 1. Set Bit Map size: • Select IMAGE • Select ATTRIBUTES • Set Units = PELS • Set Colors = Black and White • Enter the width and height of the bit map. Values must be in multiples of 8 (per above Bit Map file specifications). 2. Design the Bit Map Image. 3. Prior to saving the Bit Map Image: • Select IMAGE • Select INVERT COLORS Then: • Select IMAGE • Select FLIP/ROTATE • Select ROTATE BY ANGLE • Select 90 DEGREES repeat two more times to obtain a rotation of 270 degrees in total. 4. Save the Bit Map Image. Example: Image To Print (Created In Paint Brush) Image As Saved Samsung SRP-350 Setup & Service Information Logo Setup • 7 Download Bitmap to SRP-350 from a PC The Windows application program BmpLogo.exe is used to send a bitmap to the flash ROM of the SRP-350 POS printer. The application is available from the dealer area of the CRS web site, www.crs-usa.com. This program will work with Windows 95\98, and Windows 2000 (only with file system FAT32). In Parallel mode, the program will only work in bi-directional\EPP mode. The program will not work in ECP mode. This mode can be changed in CMOS. 1. Start the BmpLogo application. (Click Start, and then Run. Type the path and program name into the Open field; click OK. Alternatively you can launch the application by double-clicking on the file in Windows Explorer.) The application displays with the Setup tab in the forefront. 2. Select the port to which the SRP350 is connected, and then fill the remaining fields to match the settings on the SRP350. Use the table below as a guide: 8 • Logo Setup Option BmpLogo Program Setting SRP350 Dip Switch Setting Baud rate 9600 SW1 #7=ON; #8=OFF Bit length 8 SW1 #4=OFF Parity NONE SW1 #5=OFF Stop Bit 1 SW1 #6=OFF Handshake DTR/DSR SW1 #3=OFF Samsung SRP-350 Setup & Service Information 3. Click the Bitmap Selection tab. 4. Click the Open File command button. Select the path and document name of the bitmap file you wish to upload to the SRP350 printer. 5. Click the Logo Upload tab. 6. Select the bitmap file you wish to upload and click the Upload command button. 7. Click Close to exit the program. Samsung SRP-350 Setup & Service Information Logo Setup • 9 Upgrade Instructions Downloading Procedure for SRP-350 Printer Software 1. Turn off the printer. 2. Set the SW2 DIP switch 2-3 to ON position. 3. Connect the printer to PC with a standard Parallel cable. If using a serial connection, use the cable described below. 4. Open the printer cover. 5. Press the paper feed key and turn on the printer while holding down the feed key. 6. Execute the 350loade.exe. You must input the number for type of interface, 3 for parallel (lpt1) downloading. 7. Enter the binary file name you want to download. Example: 350v120.bin. 8. You should see download status scroll on your PC screen. 9. Download complete. 10. Turn off printer and set SW2 DIP switch 2-3 to OFF position. 11. Turn on printer and check version and operation. PC DB-9F DCD RXD TXD DTR GND DSR RTS CTS VCC Printer DB-25M 1 2 3 4 5 6 7 8 9 1 2 3 4 5 6 7 8 20 22 10 • Upgrade Instructions Serial Printer Cable NC TXD RXD RTS CTS DSR GND CD DTR CRS Part No. 250030 Samsung SRP-350 Setup & Service Information Hexadecimal Dumping Overview This feature allows experienced users to see exactly what data is coming to the printer. This can be useful in finding software problems. When you turn on the hexadecimal dump function, the printer prints all commands and data in hexadecimal format along with a guide section to help you find specific commands. SRP-350 Hexadecimal Dump To use the hexadecimal dump function, follow these steps: 1. After you make sure that the printer is off, open the cover. 2. Turn on the printer while holding down the feed button. 3. Close the cover. The printer is in the hexadecimal dump mode. 4. Run any software program that sends data to the printer. The printer will print all the codes it receives in a two-column format. The first column contains the hexadecimal codes and the second column gives the ASCII characters that correspond to the codes. 5. When the printing finishes, turn off the printer. 6. Turn on the printer. Hexadecimal mode is OFF. Epson TM-T88 Hexadecimal Dump It may be useful to compare hexadecimal dumps with a known printer, such as the Epson TMT88. To print a hexadecimal dump on the TM-T88: 1. Make sure the printer is off and open the cover. 2. Hold down the FEED button while you turn on the printer. 3. Close the cover. 4. Run any program the sends data to the printer – the hexadecimal dump will print. 5. Open the cover to set the printer off line so that it will print the last line. 6. Close the cover and turn off the printer or reset it to turn off the hex dump mode. Samsung SRP-350 Setup & Service Information Hexadecimal Dumping • 11 Hexadecimal Dump Sample Printout The sample “No Sale” transaction below is also shown in the two-column hexadecimal dump format on the right. The first column contains the hexadecimal codes. The second column gist the ASCII characters that correspond to the codes. • A period is printed for each code that has no ASCII equivalent. • During the hex dump, all commands except DLE EOT and DLE ENG are disabled. 12 • Hexadecimal Dumping Samsung SRP-350 Setup & Service Information Troubleshooting If you are connecting an SRP-350 to a specific software application for the first time, you may encounter printing differences from a printer model you are currently supporting. You can isolate the commands causing the print difference by comparing hex dumps from a working printer the printer with a problem print format. For example, receipts and the corresponding hex dumps from two printers, the Samsung SRP-350 and the Epson TM-T88 are shown below: SRP-350 Receipt & Hex Dump Samsung SRP-350 Setup & Service Information TM-T88 Receipt & Hex Dump Hexadecimal Dumping • 13 Cash Drawer Generate Pulse Command ESC p m t1 t2 [Name] Generate Pulse [Format] ASCII ESC p m t1 t2 Hex 1B 70 m t1 t2 Decimal 27 112 m t1 t2 [Range] m = 0, 1, 48, 49 0 ≤ t1 ≤ 255, 0 ≤ t2 ≤ 255 [Description] Outputs the pulse specified by t1 & t2 to connector pin m as follows: m Connector pin 0,48 Drawer kick-out connector pin 2 0,49 Drawer kick-out connector pin 5 14 • Cash Drawer Samsung SRP-350 Setup & Service Information Connection Information SRP 350 to CRS Cash Drawer (Drawer #1) SRP 350 Description Pi Frame ground 1 Drawer kick-out drive signal 1 2 Drawer open/close signal 3 +24V 4 Drawer kick-out drive signal 2 5 Signal ground 6 CRS Cash Drawer Pin Description 1 (blue) Frame ground 2 (yellow) Solenoid 3 (green) Drawer open switch 4 (red) Solenoid 5 (black) Not used 6 (white) Drawer open switch SRP 350 to CRS Cash Drawer (Drawer #2) SRP 350 Description Pi Frame ground 1 Drawer kick-out drive signal 1 2 Drawer open/close signal 3 +24V 4 Drawer kick-out drive signal 2 5 Signal ground 6 Samsung SRP-350 Setup & Service Information CRS Cash Drawer Pin Description 1 (blue) Frame ground 2 (yellow) Solenoid 3 (green) Drawer open switch 4 (red) Solenoid 5 (black) Not used 6 (white) Drawer open switch Cash Drawer • 15 Wall Mount Option Downloading Procedure for SRP-350 Wall Mount Printer Software This special software version is for use when wall-mounting the SRP-350 printer. The Paper near end sensor has been disabled in this special version. Note: Part Number for Wall Mount Bracket is 101218. 1. Turn off the printer. 2. Set the SW2 DIP switch 2-3 to ON position. 3. Connect the printer to PC with a standard Parallel printer cable. If using a serial connection use the cable described below. 4. Open the printer cover. 5. Press the paper feed key and turn on the printer while holding down the feed key. 6. Execute the 350loade.exe. You must input the number for type of interface, 3 for parallel (lpt1) downloading. 7. Enter the binary file name you want to download. Example: 350_wall.bin. 8. You should see download status scroll on your PC screen. 9. Download complete. 10. Turn off printer and set SW2 DIP switch 2-3 to OFF position. 11. Turn on printer and check version and operation. Printer DB-25M PC DB-9F DCD RXD TXD DTR GND DSR RTS CTS VCC 1 2 3 4 5 6 7 8 9 1 2 3 4 5 6 7 8 20 22 16 • Wall Mount Option Serial Printer Cable NC TXD RXD RTS CTS DSR GND CD DTR CRS Part No. 250030 Samsung SRP-350 Setup & Service Information Special Application Firmware Overview Special application firmware can be downloaded from www.crs-usa.com. SRP350 version 1.20 Wall This version is to be used with the WALL MOUNT. Wall mount part number is 101218. SRP350 version 1.20 Speed This version is to be used when a faster serial printing is required when using a windows driver. SRP350 version 1.20 Beep This version will beep 3 times after each print job. SRP350 version 1.20 CRLF This version has an option to automatically add a LF after a CR. Samsung SRP-350 Setup & Service Information Special Application Firmware • 17