1
. .--;
-;.
~~~~
.,''':;""
. "! '- " - .
. .
:f')
tf::J' . .
JVIA
t.
:'C
St:
-1'
.J
:P .
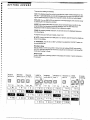
T A
D R U M
M A
CHINE
OBERHEIM ELECTRONICS, INC.
Second Edition
U A L
DIGITAL DRUM MACHINE
Owner's Manual
Daniel Soter
SECOND EDITION
JANUARY 1985
For Units With Serial Number H44801 or Above
CAUTION:
To Prevent lire or shock hazard do not expose this appliance to rain or moisture. Do not remove cover. No
user serviceable parts inside. Refer servicing to qualified service personel.
WARNING:
This equipment generates and uses radio frequency energy and il not inslaUed and used properly,
Le.. in
strict accordance with the instruction manual. may cause harmful interference to radio communications. II
has been lesfed and found fa comply with the limits for a Class A computing device persuant to Subpart J
of Part 15 of FCC Rules, which are designed 10 proVJe reasonable proteclion against such interference
when operated in a commercial environment.
Operation of Ihis equipment in a residential area is likely to cause interference in which
cae Ihe user at his
own expense wil be required to take whatever measres may be required to correct the interference.
OBERHEIM ELECTRONICS , INC.
2250 South Barrington Avenue
Los Angeles, California 90064
USA
Telex 6831071 OBRHM
c 1985 Oberheim Electronics . Inc. All Rights Reserved
Reproduction in Whole or in Part is Prohibited Without Permission
Oberheim . The Oberheim Logo. Xpander. 08- 6. ox , osx . and Or.X are trademarkS 01 Oberhe,m Electron,cs. Inc
Manual Oes,gn and GraDhics by Oanoel Soler
PrOduCI,on: Kalhy, Weems
Typeseuong: Typoqraph\CService/GeorgelithograDh
I/iDLC ur !-UIV/C/V/i)
TABLE OF CONTENTS
INTRODUCTION
WELCOME TO THE DX
PICTURES
Rear Panel
Front Panel
Sound Hookup
GETTING AROUND
SEQUENCES
Selecting A Sequence
Playing A Sequence
Real Time Recording
Erasing A Sequence
Erasing Notes Within A Sequence
Tempo
Length
SONGS
Selecting A Song
Playing A Song
Creating A Song
Erasing A Song
Song Length
THE VOICES
SOUNDS
Tuning
Changing Sounds
SOUND LIBRARY
SOPHISTICATION
QUANTIZE
SWING
METRONOME
SIGNATURE
STEP RECORDING
GOODIES
RECORDING
Countdown
Punch- Out/PunchFlams
ERASING
Erasing Individual Notes While In Record
Deleting A Sequence
Erasing Everyhing
COPYING
Copying Sequences
Appending Sequences
Copying And Appending Songs
OTHER TRICKS
17"
Programmable Metronome Clock
Turning Individual Drums On And Off
Cue Tempo Mode
Song Tempo
HOUSEKEEPING
Free Memory Display
Data Check
Ram Check
If Your OX Gets Lost
When All Else Fails
TABLE OF CONTENTS
EDIT PARAMETERS
00 Countdown
01 Timing Source
02 Auto Start
03 Clock Out Rate
04 Set Programmable Click
05 Set Drum Outs
06 Set Trigger In
MIDI EDIT PARAMETERS
07 Receive Channel
08 Transmit Channel
. 21
09 Omni Mode
10 MIDI Clock Out
11 Echo Notes
12 Song Changes
13 Set Drums To MIDI Notes
14 Set Transportation
DATA STORAGE
TAPE INTERFACE
Connection
Access
Save It
Check To Be Sure
Load In
One At A Time
Compatibility
Errors
Hints
MIDI DATA TRANSFER
Connection
Access
Sending All Sequences
Sending One Sequence Or Song
BATTERY BACKUP
INTERFACE
TALK TO THE WORLD
Using The OX With Oberheim Sequencers & Drum Machines
Other Sequencers And Drum Machines
SYNCHRONIZING WITH THE EXTERNAL CLOCK
Setup
OX As Master
DX As Slave
Operation
Auto- Start
Recording As Master
Recording As Slave
SYNCHRONIZING WITH THE MIDI CLOCK
Setup
DX As Master
DX As Slave
Auto- Start
Song Select
Recording As Master
Recording As Slave
METRONO E AS CLOCK SOURCE
I/iDLC ur r.UfY/CfY/;)
SYNCHRONIZING TO TAPE
Recording The Sync Tone Onto Tape
Playing The Sync Tone To Sync The OX
Hints.
TRIGGERED NOTES
Programming The Trigger
Input
MIDI NOTES
Setting Notes To Drums
REALTIME MIDI RECORD
FOOTSWITCHES
Start Footswitch
Next Footswitch
MORE INFORMATION
ABOUT MIDI
Messages
Channels
Omni Mode
Timing
Song Select
ABOUT DIGITAL AUDIO
INTERFACE GUIDE
GLOSSARY
SPECIFICATIONS
INTRODUCTION
INTRODUCTION
WELCOME TO THE DX
You have just purchased a most powerful tool for composition and performance. The
Oberheim DX Programmable Digital Drum Machine represents the latest in the Oberheim line of drum computers. The DX has been designed with the idea of giving you
better sound , and better control of it , than has ben previously available in a drum box
at a more economical price.
The DX generates the sounds of real drums. Actual drum recordings have been digitized , stored in computer memory, and are avalable at the touch of a button. A drum
beat can be recorded in real time at any spee, remembereq, and edited to make any
beat of any length , tempo, or style- in short , any drum beat that you hear in your head
you can create on the Ox. After you have created your drum beats , you can save them
on tape for future use. Of course , the DX has a battery to keep the memory on when
the power is
oft.
The DX has a MIDllntertace , which enables interconnections with other equipment
such as sequencers , keyboards , drum pads , and other drum machines.
The DX operates like a tape recorder: press RECORD + PLAY to Record your
rhythms; then press PLAY to hear It back. But there s more to it than that. There are
features incorporated into the OX that actually give you more control over your music
than a tape recorder allows. We recommend that you familiarize yourself with these
features in order to get the most out of your DX.
The OX can make most any drum beat that an acoustic drummer can create. In fact.
this rhythmic flexibility of the DX creates a new dilemma for the user. exactly WHAT
makes a good drum beat? It is not within the scope of this manual to try to answer this
question , but if you re not a drummer already. we strongty suggest spending some
time listening and studying the rhythms of your favorite music. Listen to where the
notes are and where they re NOT where the accents are , when the beat is pushed or
swung. If your drum machine sounds cold and robot- like, fl' s beause you ve programmed it that way. It takes a good sense of timing to create rhythms that really
breathe.
Experiment! You ll never know what you ll discover.
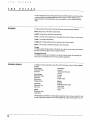
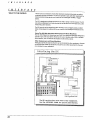
;,........;..;..::.. ..-..;,,-........;,..
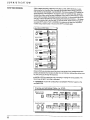
Data Stora
1 Enables transfering
Memor
Power Switch
On/Off!
Protect
Prevents changi ng programs. 1
Tunin
Turn off to Record , Erase , etc.
!Individual pitch for each voice
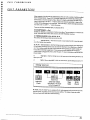
Oberheim
DIG IT "'L DRUM M "'CHINE
"'"91111'
programs
via tape o
j DRUM TUN ING
000000
Mocll DK 140. : 000000
00(00000 00000
Power
1 1
Direct Out(!uts
One for each voice
Connect to
Click:Out
Grounded Outlet
' Programmable Metronome Output
MIDI In/Out
Mixed Out(!uts
Any drum can be assigned to any note.
Stereo and Mono
A130 transmits & receives ti mi ng
and Song Changes
To/From Ta(!e
EHternal Clock: In/Out
For Data Storage and Tape Sync
For external control of ti mi ng.
Can be set to 24 , 48 , or 96
Pulses per Quarter Note.
Footswitches
START: Starts and stops ti mi ng
NEXT: Advances to the next Sequence or Song
EHternal Tri
er In(!ut
Triggers any drum from an inverted trigger
signal or footswitch.
OP
enough for two- finger operation.
Play the drums with these buttons.
Big
LO CRASH
01RE
08TRCJ
DSooM:
IDMDCUcx
RAV/S
lO=!=!
OU
0i
TR
t:l .
::11:
IGBBJEJ
:0:i
GIEj
Cf C,
AU .CN
to select Sequences
Songs, Tempos , etc.
or use the arrow keys.
Enter numbers directly
KEYPAD:
settngs.
OPERATION BUTTONS:
These buttons access the different modes of
the machine , such as PLAY . STOP , RECORD,
TEMPO. etc.
0t l.
.
-- l: .
TO MD MJ
EONO
-- a- I
SO
, 3 SE CR
, If SE
JJ
RE ER COP _l&
WN
I-Iii
'-Iii
CJ
CASE: SAVE
ClAP
. SHR
as SE I:
OlfSE
OIiSE
MI
'f8 SIi
CYBA
NX . t. Rl2
DRUM BUTTONS:
Obri
LC L.
fv fv
SNAR H- AT TOM
-=f
:::-=.,~~~
...
~~~~~~~~~~~~~~~~~~
::::::::::::;::::::::;:::::::::::::;;::;:::...-_....
::::
::::
~~~
~~~~~~~~
:::;:;::;::::
;.",
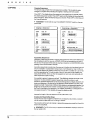
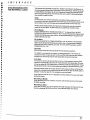
I Sound Hookup
?- Miller/Amp j
Audio
Outputs
Power
:8I:
:::t::.
:T. :;T T::
I=f ;T:'
.::::::ii:Q:.::
:::8::::8::::8::::8::-.:8:::.8=::::::::::.:.:.:.::
;;h;f;..m"""'"''-'''M_''' ."....--....
The lIolume of each sound is controlled by the front
panel sliders for the MIH OUTPUTS. Each lIoice has its
own OIAECT OUTPUT as well , independent of the sliders.
IitllllVli
IIHUUIVU
GETTING AROUND
SEQUENCES
Selecting A Sequence
The DX can store up to 100 drum sequences. numbered 00 thru 99. Select one by
pressing two numbers , or one of the arrow buttons. The display will show you which
sequence you have selected.
Playing A Sequence
Press PLAY. The sequence will play over and over until you press STOP. You can also
select another sequence while playing ahd the OX wil play it immediately after the first
sequence has finished.
Real Time Recording
There are two ways to record on the OX: REAL TIME and SINGLE STEP. In REAL
TIME . the sequence plays over and over and you simply press the buttons where you
want the drums to sound. In SINGLE STEP, the sequence advances one beat each
time you press either of the arrow buttons , which allows you to record your drum beat
slowly. The REAL TIME mode of recording is expiained here. The SINGLE STEP mode
of recording is explained in the section entitled STEP.
Recording a Sequence
Select Sequence 00 (Display)
II
IHa
m:CI
Start Recording
PLAY
Bar Numbe
FlashirujlMetronome
Play Orums
K: K:
LOUD SOFT
(Bass) (Snare)
Stop Recording
STOP
Press and hold RECORD and then press PLAY. The Metronome will click in eighth
notes and the OX wil record over and over on two measures. In RECORD , the OX
does not ERASE , so you can build your drum beat as it loops over, playing the cymbal
first, the bass drum , then the snare, etc. , unti you are finished. The OX wil also Quantize or raun!= off , your playing. When you have finished recording, press STOP.
You can add more parts to the sequence simply by recording once again. Erasing is a
separate process.
REMEMBER: The OX will not RECORD if the MEMORY PROTECT switch on the
rear panel is ON.
""'''.''
-----....
-.. -..
- --- - --- --- -............
----..
---.... --....
---.. ...-.. -._.-.---""""."",,...'
- - - ---- ---.. -......
- --- ----..
.. --- --- --------....
- ------..
----.--..
-- - ._-....
- - - ---------
GETTING AROUND
Erasing A Sequence
If you have made a mistake , or would like to record over again , press and hold ERASE
and while holding ERASE press RECORD. The current sequence will be erased, and
you can record again from scratch. The OX will " beep " when the erasure actually
takes place. The volume of the beep is controlled by the metronome volume control.
Erasing a Sequen
ng,
And while
Press RECORD:
iQ+
ERASE RECORD
Erasing Notes Within
Sequence
You can erase any single drum (or cymbal) from the entire sequence. Hold ERASE
and then press the drum you wish to erase.
Erasing a drum from the entire Sequence:
fJ'.''
ERASE
Rnd while holdmg,
Press the desired button:
iQ+
ERASE ACCENT
(Hi-Hat)
Er
GETTING AROUND
Tempo
Setting the Tempo:
Enter TEMPO Mode: (Display)
C 11
TEMPO
Set Tempo to
105 Beats/Minute
The DX is normally set to a tempo of 80 Beats per Minute , but can be varied within a
range of 25 to 250 Beats per Minute. You can change the tempo at any time by entering the tempo mode. Press TEMPO. The Tempo button will light and display wil show
the tempo currently selected. You can change the tempo by pressing the buttons with
the arrows to increase or decrease the tempo, or you can enter the desired Seats per
Minute on the keypad (3 digits). To exit the tempo mode press TEMPO once again.
To program the tempo in a sequence press TEMPO while in Record, set to the desired
speed and pres TEMPO once again to exit. Whenever that sequence is recalled
, the
DX will recall the tempo as well. You can change the tempo at any time
, but the pro-
grammed tempo will be changed only when the tempo Is set in record.
. NOTE: Not
every tempo marking between 25 and 250 Beats per Minute can be
played. Near the high end of this range the tempo steps are larger than one Beat per
Minute. If you enter a tempo which cannot be played, the DX will play the nearest valid
tempo to the one which you entered. Also . if you try to RECORD an invalid tempo
, the
DX will actually record the nearest valid one.
rn
EHit TEMPO Mode:
If you enter a number that is out of the tempo range . the display will flash. You must set
the tempo to be in range before you can eXIT from the tempo mode.
The arrow buttons will always step between valid tempos.
TEMPO
Length
Settng the Sequence length:
Enter lENGTH Mode: (Display)
C 8E
LENGTH
Select length
of 8 Bars:
A sequence can be any length from 1 to 99 bars. The DX sets a length of 2 bars for
each sequence unless you set it differently. To change the length of the current
sequence press LENGTH. Then , using the arrow buttons or the number keys, choose
the new length. The display will flash. The new length can be entered in memory by
pressing the LENGTH key again. If any other key is pressed
, the length will not
change.
If you have recorded a sequence and then shorten the length , you wil lose
the bars
you have cut. If you lengthen a sequence you have recorded , rests wil appear at the
end.
LENGTH sets the number of bars within a seuence. The length of each bar is set by
SIGNATURE.
REMEMBER: If the MEMORY PROTECT switch is on , the Length of a sequence
cannot be changed, although the Length can be displayed.
Set length and
EHit LENGTH Mode:
C'I))b..P
LENGTH
"" .'-_..
- . . . ~~~
.. ..'''''-- ..........
----'
-
SONGS
One prominent feature of music is that it is organized into sections that repeat and
alternate with each other. The Song Mode allows you to record each section of a
piece as a separate sequence and then combine sequences into a complete
composition.
A Song is a listing of sequences. The DX contains 50 Songs , numbered 00 thru 49 , in
addition to the 100 sequences. Unlike a sequence , a song does not remember the
notes , only the order of sequences thaf you wish to play. There can be as many as 255
sequences contained with!n a song, and each sequence within a song can have its
own tempo , length , or time signature. Songs make more efficient use of the OX
memory. In fact , playing three sequences in a song uses as . much memory space as a
single note
in a sequence.
Selecting A Song
To enter the song mode , press SONG. The Song button wiH light and the DX will select
the song previously selected. To select a different Song simply press the number of
the desired Song.
To go back to Sequence mode , press SONG again.
Playing A Song
Once the desired song has been selected , press PLAY and the selected song wil play
from beginning to end and then stop.
As the song plays through the different sequences in it . the sequence number on the
display wil change to reflect the actual sequence presently being played. Each
sequence in the song is given an ascending PART number that reflects its order in the
song.
Creating
A Song
Creating a song is different than recording a sequence. because you are not playing
any notes , just making a list of sequences.
To create a song press EDIT (while in Song mode- both SONG and EDiT buttons
should be lit.). Once you enter SONG EDIT mode , the OX wil ask you to select the
sequences that will make up the song: the " Song List:.
The arrow buttons can be used to " rewind" and " fast forward" through the song list to
get to a particular part.
Function:
Enter
SONG ED IT
; ROD
SEQ 01
: Rduance to ;
: NeHt Part
; b
Press:
Song list:
ROD
; Rduance to
, ROD
; Rduance to
SEQ 02
; NeHt Part
; SEQ 01
; NeHt Part
beep
, ROD
SEQ 00
; b
lOHQJi
SONG EDIT'
_1_1i_1811
Part: Seq: ; Part: Seq: ;
Part: Seq:
1011
Part: Seq: Part: SeQ:
1011
Part: SeQ:
1011
1011
202
202
Pert: SeQ:
1011
Part: Seq:
1 0 1
:_:II:1_1-
(Empty Song)
--''T-
202
2 02
301
3 0 1
n,u_
GETTING AROUND
There are four editing commands:
ADD: If the display shows the end of a song list (only a part number displayed on the
left side - right side blank), you can add a
seuence to the end of the song byenter-
ing the desired sequence number. If a song list is empty, the first part wil be blank.
REPLACE: You can REPLACE any sequence currently displayed with another simply
by entering the new sequence number.
INSERT: By pressing RECORD and EDIT, the DX wil insert Sequence 00 into the
song list before the sequence previously displayed. You can then REPLACE
Sequence 00 with the desired sequence by entering its number.
ERASE: By pressing ERASE and EDIT, the DX will remove the displayed sequence
from the song list.
To play the song you have just created , press PLAY.
. NOTE: A song can have up to 255 parts in it. However
, only the lowest two digits are
shown in the display.
REMEMBER: The DX will not EDIT a SONG if the MEMORY PROTECT switch on
the rear panel is ON.
Erasing A Song
You can erase an entire song while in Song mode by holding ERASE and pressing
RECORD. Individual sequences within the song list can be removed in the Song Edit
mode (see Creating A Song).
Song Length
When in Song Mode , pressing LENGTH will display the number of parts contained in
the song lisL
; Rewind
, to Part 3
REPLRCE : Rewind
with SEa 14: to Part 2
: INSERT a
: New Part
: REPLRCE : Rduance to : Rduance
with SEa 19: Part 3
to : ERRSE
' Part 4
Part Seq:
1011
1011
202
202
400
Part: Seq:
1011
1 3141
400
400
Part: Seq:
1011
302
Part: Seq;
1011
302
: ERASE EDIT EDIT
Part: Seq:
1011
; Pert: Seq:
1011
1 2191 1 2191
1 3021
1 4141 l 4141 l 4141
500
500
Finish
Editing
IC+C C
C+C1i
; RECRD EDIT,
; Part; Seq:
: SEa 14
500
500
; Part: Seq:
1011
219
302
OJ ,
v ..
The OX contains six sets of voices. Each voice has three variations , and some of the
voices contain two completely different sounds. Only one voice variation can be
played at a time. The sound of each voice is contained on one or several memory
chips.
SOUNDS
The OX comes from the factory with the following voices and these variations:
BASS / Bass drum , with three volume levels.
SNARE / Snare drum , with three volume levels.
HI- HAT / A hihat , with a closed and an accented sound , plus a longer " open
sound.
TOMS / Toms with three pitches.
CYMBALS / A Ride cymbal , with two volumes , plus a Crash cymbal.
PERC / Two sounds: a shaker with accent , plus hand claps.
Tuning
The pitch of each of the voices can be tuned up or down half an octave by adjusting
the pitch controls located on the rear panel of the DX.
Changing Sounds
The OX drum sounds are contained on computer memory chips. By changing the
chips , you can customize your OX to your specific application.
SOUND LIBRARY
In addition to the sounds that come with the DX . the library of Sound Chips available
include:
Bass Drums
Percussion
Electronic Bass
Beat Kick
Snare Drums
Electronic Snare
Fat Snare
Beat Snare
Reggae Snare
Tom- Toms
Electronic Tom
Rota Tom
HiHats
Electronic Hihat
Cowbell
Tambourine/Rimshot
Conga
Timbale
Bones -
Finger Snaps
Effects
Scratch
Backwards Snare-Clap
Click/Clap
Punch/Zap
Noise
Long HiHat
The Oberheim sound library is continually expanding. Check with your dealer for new
sounds. Additional sounds for the OX are available from other manufacturers as well.
THE
VOICES
Changing Sound Chips
"""H"......m :"H""""'
'-""_H"_"""""_"_"'HHm
::8I:
I"-
7.:
::!!=-I!
Remove Power Cord
Before Doin
jl:rijt;;
ANYTHING!
Then
:.=:.:i:iU::
"----'-"-'_W'
Open your OH...
L-Remoye Screws-.
end Lift up Front Pene!
::Q :.
::Q
Locete the Sound Chip
to be remoued..
Using a small s crewdriuer
or Chip EHtractor , CAAEFULL Y
lift the chip out of its socket
from both sides.
Line up the new chip, making
sure that the notch on the chip
faces the same way as the
notch on the socket.
Press the chip firmly into
the socket. Check to make
sure that all of the pins haue
mated correctly.
For easier chip changing, install
Zero Insertion Force (" ZIF"
sockets in your machine.
:)UfHI:)T/CATION
SOPHISTICA TlON
The OX incorporates several functions that change the time and feel of the machine
and enable programming one beat at a time. Utiizing them wil increase your rhythmic
possibilities and make
QUANTIZE
gramming
faster and easier.
Quantizing automatically corrects your playing to the nearest beat. The quantizing
value also establishes the smallest beat that can be recorded . and is used for establishing the value of a " Beat" as used in STEP and SWING.
The DX is normally set to quantize to a sixteenth note. To change the quantizing, press
QUANTIZE. The display wil show the value of quantizing c rrently set. You can now
enter the note value that the DX wil round off to by using the arrows to increase or
decrease the number in the display.
Quantize is a record function. That is. it only corrects what you are recording. This
enables you to record over and over on the same sequence in different quantize
modes. Quantizing is also independent of the metronome. It is possible to quantize to
the nearest quarter note , even though the metronome is clicking in sixteenth notes.
The Quantize value can be changed while in Record or Play as
ell.
QUANTI ZE euens out your playing:
.2.
Quant = 1/16
. . 3
.4.
QUANTI ZED...
SWING
Swing is similar to Quantize in that it corrects the timing of your recordings. However
Swing wil alter the time so that the first half of the t1t
creating a " shuffle " feel.
gets more than half
of the time,
Press SWING. The display will show the current swing value which is normally set to
50% (the first half of the beat gets 50% of the time). To change the swing value , press
the arrows to increase or decrease the percentage. Swing is a Record function. That
, it wil record your playing corrected to the swing value you have selected.
You can apply the Swing function while Quantizing to any value from 1- 2 to 1-48. If
Quantize is set to 1- , 1- , or OFF , the DX will " beep " and the QUANTIZE button
will light.
rUIIN6.fuzzes up your pluy/ny:
v,llng=70%
quant=
1/16
Lil/th SUI/N6...
:1
SOPHIST/CA T/ON
METRONOME
Ouantize
lues
Metronome
18
Half Note
Half Note
Triplet
Quarter Note
Quarter Note
The Metronome can be set to click in any note value between half-notes and onehundred-ninety-second-notes (48 clicks per 1/4 note). The Metronome defaults to
eighth notes and varies in speed according to the tempo. A dot representing the Metronome pulse also appears on the display.
To change the Metronome , press SIGNATURE. The current Metronome click value wil
appear on the display. The click value can be set to any standard note value by using
the arrows buttons to increase or decrease the number in the display.
After you have set the desired click value
, you may exit by pressing STOP; or you may
continue to the time signature by pressing SIGNATURE once more. (See Signature.
The Click Value can be changed in STOP
modes.
, PLAY, or RECORD , in Sequence or Song
Triplet
18
Eighth
Note
f) Eighth Note
Triplet
The Metronome is heard through the mixed outputs of the OX while In Record. The
click is accented on each downbeat. The Metronome also app
ars at the CLICK OUT
jack on the rear panel in Record and Play and can be routed through an external
mixer. The output of the CLICK OUT jack is not accented and has been designed to
be used as a clock source for other devices , such as arpeggiators.
The OX can be set to countdown four metronome clicks before recording. See EDIT
SiHteenth Nole
88
SiHteenlh Nole
.J" Triplet
Thirty-Second
PARAMETER 00.
The Metronome can also be programmed to click only when a drum or combination of
drums is played. This is useful for clocking other devices. such as the arpeggiator on
the 08-8 , in uneven patterns. See Programmable Metronome blick In the GOODIES
section.
Note Triplel
Thirty- erond
JT
II
Dr
Note Tnplet
SiHly-Fourth
Note
SiHIY-F
urth
Note Tnplet
1/192
High Resolution
SIGNATURE
The SIGNATURE buttn is used to change the time s!gnature.
The OX can be set to play in most any lime signature. There can be between 1 and 99
beats per measure , and between a half note and 1/192 note can receive one beat.
Press SIGNATURE. The current Metronome value will appear on the display. (see
METRONOME. above).
Pres SIGNATURE once more. Now the current time signature will appear on the dis-
play, and the beats per measure wil flash. You can use the arrows to increase or
decrease the beats per measure or you can enter the desired value with the keypad.
Press SIGNATURE again , and the beat value will now flash. You can use the arrow
buttons to increase or decrease the beat value to any common increment.
. NOTE: Changing the time signature of a programmed sequence causes the length
seque ce to be redefined in terms of the new time signature. For example if a
sequence of 3 bars of 4/4 (12 quarter notes) is changed to be 3/4
of the
the time
length
will be
recalculated to become 4 bars of 3/4 (12 quarter notes). Changing. the
signature
can also create sequences that are longer than 99 bars.
......
..........
-.
-----,....,.,-...-................,..._
'--""""""-_- ------_
--_ ..-._-_..-..._.._-------~~~
- ----------------.
-- --:-.----.
- ---_...._
..-----..-,........- --- - -., - .-----
- - -.. ----
--.- -.,.... ,........... -..
SOPHISTICATION
STEP RECORDING
STEP enables Recording a Sequence one step at a time. STEP advances at a rate
determined by the Quantize Value. Normally the Quantize Value is set to a sixteenth
note , but this can be changed-see QUANTIZE. From stop, pressing STEP places you
at the beginning of the sequence. To program a drum on a particular step, press the
desired drum button while that step is displayed. Every time any drum button or
either
arrow button is pressed , the sequence
advances
one step. To record several drums on
one step, hold the RECORD key while pressing the desired drum buttons - this keeps
the DX trom advancing to th e next step. To exit step mode . press STEP once again. If
you press STEP while in PLAY or RECORD . the sequence will step from its present
location and go back to play or record when STEP is pressed again.
Recording in STEP Mode:
(""""M"'
and PLay STEP I:
o
STtP..
U"Dlov
_..__nn_____"---------"H___
5::;'
M.C(lIr
n.. - W-_n..____-
H"
H"- "
_.
""""- _n_n___- - --- un
'''D"m''
D.c
-=""t
I:
l1
Sf("4:
Ej'
"CCOIT
(HI- I\!!
While in STEP , you can erase any Of the drums one step at a time. Holding ERASE and
pressing the desired drum erases only that drum on that step. Holding down either arrow
key will slowly play through the sequence.
. NOTE: If STEP is entered from Play, recording or erasing will not be possible. The
Record key will light ff recording is attempted.
REMEMBER: The DX will not RECORD if the MEMORY PRCTECT switch on the
rear panel is ON.
Erasing an Individual Note. in STEP:
Aduance to the
desired Step:
Erose Boss Drum:
b.tep
IQ +
ERASE
LOUD
(9.55)
"&
RECORDING
Countdown
The OX can be set to countdown four metronome clicks before recording. EDIT
PARAMETER 00 turns the countdown on and off. Remember that the metric value of
the countdown clicks is determined by the Metronome setting. See "
EDIT PARAMETER 00:'
Punch- Out
Metronome
Punch-
Holding RECORD and pressing PLAY while recording a sequence "
Punches Out" into
Play mode. Once you have punched out of a seuence
, if you have not changed
sequences , you can " Punch In " by again holding RECOR
and pressing PLAY. You
can punch In any time , but the OX will not start Recording until the beginning of the
sequence.
You cannot punch in from Play without having ben in Record
first.
Flams
While recording, flams (" grace notes ) can be added whenever desired by holding the
RECORD key while pressing the desired drum button. A second note is recorded right
after the played note. This Flam feature is
. 1-
ERASING
only
active while the Quantizing is set to 1-
. or OFF.
Erasing Individual Notes While In Record
You can erase individual notes
on- the-fly
While in RECORD: holding ERASE and any drum button will remove all notes programmed with that button that occur
while they are held down.
Notes wil continue to
be erased until the button is released. Holding ERASE and RECORD will erase notes
played on
all
drums while they are held down.
It is also possible to erase individual notes while in the STEP mode (see "
STEP
RECORDING"
Deleting A Sequence
In Stop, holding ERASE while pressing RECORD
once
erases all notes from the
sequence , but retains length , tempo , and time signature information. At this point you
may re-program the sequence , or use this feature to program blank spaces into songs.
second time fe-sets the sequence to the standard default con-
Erasing the sequence
dition
of 2 bars. 80
beats per minute,
4/4
time signature.
The display will verify that this
has happened by reading: " dEL ;' and will completely remove the sequence from
memory-
Erasing Everyhing
To erase the entire memory of the DX , hold ERASE and press both -c ;, buttons. The
display wil show the message " CLr?:' and the ERASE light will be on. Press the
ERASE button and the OX will " beep " and flas all of the
lights. This will clear
memory, but wil have no effect on the EDIT PARAMETERS.
COPYING
Copying Sequences
The DX can copy a rhythm from one sequence to another. This is useful to make
changes in a rhythm without erasing the original or strting over from scratch.
Press COPY. The display shows the sequence to be copied from (on the left. ) Select
the desired Sequence number. Press COpy again and the display wil show the destination Sequence. Select the desired Sequence number. Press COpy a third time and
the Copy wil execute.
REMEMBER: The DX will not copy If the MEMORY PROTECT switch on the rear
panel is ON.
Copying" Sequence:
COPY
Appending a Sequence:
SEQ. 10
COpy
COpy
SEQ. 10
cOPY
SEQ. 20
SEQ. 20
COpy
COpy
COpy = SEQ.
APPENO=SEQ.
RECORD
1Q'))b"P
I' . . . I
6;)O,p
COPY
COpy
Appending Sequences
COpy REPLACES
the new sequence to the end of
the old one. The process is the same as copying a sequence , but hold RECORD while
presing COPY the third time to execute.
Appending a sequence is similar to copying them except that while
the old sequence with the new one,
APPEND ADDS
Appending sequences is useful when the same set of rhythms is to be played over and
over, for example in a composition having 3 bars of 4/4 followed by 1 bar of 7/8 as a
basic phrase element. By making a sequence of 3 bars of 4/4, another of 1 bar of 7/8
and then appending the 7/8 onto the end of the 4/4 , you have quickly created your
basic phase element , which can then be repeted over and over, and combined wrth
other sequences as part of a song.
It is possible to append a sequence to itself. This eftectively doubles the length of the
sequence. It is also possible to append sequences , one after another, to one
sequence. Appended sequences can be of any time signature or length; however, the
tempo and signature of the first part of the seuence will be applied to the rest of the
sequence as well. If sequences of different time signatures are appended together, the
length may not equal an exact number of mesures and this wil be refiected by a "
(for Plus) in the length of the sequence. For example , appending a 7/8 sequence to a
4/4 sequence (each of 1 bar length) will cause the display to read:
'" P"
because the length of the new sequence is not quite 2 bars of 4/4.
Copying And Appending Songs
Just as one can copy or append a rhythm from one sequence to another, a song list
can be copied or appended from one Song to another.
The procedure is the same as copying or appending sequences
except
that it must be
done from Song Mode.
REMEMBER: The DX will not copy or append if the MEMORY PROTECT switch on
the rear panel is ON.
"-
,"
OTHER TRICKS
Programmable Metronome Click
The Metronome can also be programmed to click only when a drum or combination of
drums is played. This is useful for clocking other devices
. such as the arpeggiator on
the 08-8 , in uneven patterns.
Select EDIT PARAMETER 04 by presing EDIT
, then 04 (See the EDIT PARAMETER
section for more information. ) While in EDIT PARAMETER 04
, hoiding down
any
combination of drums first then pressing RECORD
wil cause a Click output in piay whenever that combination of drums occurs. The normal steady metronome click wil still be
given in record mode. The ciick can be set to normal by hiting RECORD
while holding
ERASE.
A drum button can be used to program the click without sou,ding by turning off that
drum (see SET DRUM OUTS and EDIT PARAMETER 05.
Turning Individual Drums
On &
Off
Individual drum buttons can be " muted" from the "
SET DRUM OUTS" page of the
EDIT PARAMETERS. A drum can stili be recorded and erased even though it is
off; only the audio ' output is disabled. It will transmit MIDi as well. Access EDIT turned
PARAMETER 05 by pressing EDIT and then 05. While in EDIT PARAMETER 05
a drum button while holding RECORD enables the output for that drum. Hitting ,ahitting
drum
button while holding ERASE disables that drum. Hitting RECORD while holding
ERASE
enables
all drums.
Cue Tempo Mode
In Stop, pressing TEMPO while holding RECORD enters Cue Tempo mode: Tempo
may
be set by pressing the STEP button or playing the external trigger in
quarter
at the desired speed. The tempo will be set to match that rate.
notes
Song Tempo
Each sequence within a song wil play at its programmed tempo
, allowing tempo
changes within a song. When in song mode , changing the tempo changes all 01 the
tempos by a proportional amount, and the display will show the incremental change
i.e. 10" or
10:'
HOUSEKEEPING
Free Memory Display
To check the amount of available memory, hold the RECORD button while in Stop
(Sequence or Song Mode). After a moment , the display wil show the percentage of
memory left. The percentage of memory available at a grven time varies depending on
the length
at the current sequence.
The DX has the capacity to store 2200 events. An event Is
any
any
or all the
, that adds up to
time that
OX voices are playing. If all six voices are playing on every event
200 notes that can be stored. There are
many
ways this capacit can be divided
amongst sequences. In general , it is best to take advantage of the repetitive nature of
music by constructing songs from short sequences.
Each part of a song requires one-third as much memory as a single event in a
sequence! A song consisting of one bar repeated eight times uses less than one fifth
the memory of an eight bar sequence. Therefore
, the most efficient use of memory is
achieved by using the SONG mode whenever possible.
Data Check
One of the features of the DX is a data check routine that runs automatically when the
unit is turned on and when leaving the Data Storage mode. The data check routine
looks at each sequence and song to make sure that it is properly configured in
memory.
Bad Sequences can appear in the DX' s memory several ways , by loading a cassette
tape with more than 2200 notes from a OMX into a OX , for example. If there is ilegal
information in a sequence , the Data Check routine wil alternately flash the Sequence
Number followed by " dEL?" and the ERASE key will light. If a bad Song is discovered
the Song key will light up as well. Press ERASE to delete the bad Sequence. If any
other key is pressed the sequence in question will not be deleted , and it wil look for
more bad Sequences.
After checking all of the sequences and songs the OX
wil
return
to normal operation.
However, if any bad sequences or songs remain in the memory (ones that you
declined to delete), the display wil flash " bAd" and the unit wil " beep:'
. Note: Be careful
when working with bad sequences (ones that you didn t delete). In
particular, any attempt to alter a bad sequence by Recordin g, Erasing, etc. wil almost
always cause the DX to crash. See " If Your DX Gets Lost:
Ram Check
Besides the above mentioned Data Check routine , a Ram Check routine is run when
the OX is turned on. This routine checks for random data in the memory. Random data
of this type can result from a loss of power to the memory, for example. If the data in
the memory is bad , the OX wil " beep " and display " bAd;' followed by a " CLa" message while the ERASE key lights up. Pressing the ERASE key erases everyhing in
memory and resets the Edit Parameters to their default values.
If Your DX Gets Lost
Under certain circumstances many computer based products can lock up. In particular. if the message " Err " appears unexpectedly, the OX has gotten lost. In this
instance clearing memory will solve the lock up problem , but you wil lose aU your work
too! If this condition ever happens , we STRONGL Y ADVISE
recording your memory on
a cassette. Immediately enable cassette mode on the back panel and follow the directions In the CASSETTE INTERFACE section of this manual. When your memory Is
safely on cassette , proceed as follows: Press any key and the OX will attempt to proceed. It wil usually succeed , but wil occasionally lock up once again. If it locks up
again , even turning the power off and then on again may not help.
When All Else Fails
If your OX does not respond to the above methods of resuscitation , turn the power off.
Then while holding the ERASE key, turn the power on again. This Failsafe Erase Mode
wil clear memory and reset the Edit Parameters to t!1eir default values.
CUll
ED I T
Ii n Ii
IVI t; I t; H
PARAMETERS
Many aspects of the OX can be customized by the user with a series of switches called
EDIT PARAMETERS. These EDIT PARAMETERS can be accessed by pressing the
EDIT button at any time except while in SELECT SONG mode where the EDIT key is
used to edit songs. Use the
:: keys to select the desired parameter or type in the
number of the parameter to be changed. The STEP key is used to change parameters
from ON ("On ) to OFF ("'
) and vice-vers.
There are 1S EDIT PARAMETERS, numbered 0014:
COUNTDOWN (- On)
Enables or disables a countdown in before recording. The countdown is 4 metronome
00
clicks. The beat value of the clicks is set by the METRONOME function.
24, 48, 96, S,
01 TIMING SOURCE (I,
This selects the timing control source for the
DX.
Internal Clock / The internal clock is used when the OX is used by itself
or as the master clock source.
, 48
96 External Clock / Set the timing source to external clock when slaving the
OX 10 another clocking source such as another
Oberheim Drum Machine or Sequen-
cer. The numbers select the rate of the external clock (pulses per quarter note); set
this to 96 for Oberheim equipment. These external clock settings wil not appear
unless a jack is plugged into the CLOCK IN jack. For more information
, see the INTERFACE GUIDE.
Tape Sync / Set the timing source to tape sync when slaving the OX to its
tape sync tone.
MIDI / When using MIDI CLOCK 10 clock the DX, set the timing source to "'
d:'
Timing Sources:
DSX::::::::::::
II.
Internal
Cloc
External Cloc
Selectable Ti me Ba3e
'(only ifpluggod in)
Tape
Sync
HIDI
Cloc
. NOTE: If AUTO START is on , pressing PLAY while stopped wil run the OX from the
Internal Clock. regardless of the clock source setting. This makes it easy to switch
back and forth from internal to external timing.
L.U, ,
"n"mCfCn,)
02
AUTO START(- On)
When this feature is on , external Timing Sources (EXTERNAL CLOCK . TAPE SYNC
or MIDI) will cause the OX to enter play mode automatically. Because the OX is always
looking for a clock signal in this mode , any signal (even noise) that is present at the
CLOCK IN or FROM TAPE jacks wil place the DX into Play. This may cause occasional false starts. However, the OX wil not false start once the leader tone is detected
at the FROM TAPE input. When Auto Start is oft . the OX wil not detect external signals
until you press PLAY. You can only Auto Start from Select Sequence or Select Song
modes.
If AUTO START is on , pressing PLAY while stopped wil run the OX from the Internal
Clock. This makes it easy to switch back and forth from internal to external timing.
03 CLOCK OUT RATE
(24 48, 96)
This parameter sets the rate of the EXTERNAL CLOCK OUTPUT, used for slaving
other equipment to the OX , such as other Oberheim Drum Machines or Sequencers.
The numbers select the rate of the external clock (pulses per quarter note); set this to
96 for Oberheim equipment.
. NOTE: The Clock Out Rate cannot be faster than the Clock In Rate. For example
, if,
the Timing Source is set to MIDI (which uses a clock rate of 24 pulses per quarter
note), the Clock Out Rate cannot be faster than 24.
04 SET PROGRAMMABLE CLICK
The Metronome Click can be set to click when one or several particular drum buttons
are pressed. This allows the click to be used as a programmable trigger output. Holding down any combination of drums first.
then pressing RECORD
wil cause a Click
output in play only when that combination of drums occurs together. The normal
steady metronome click wil still be given in record mode. The Click can be set to
normal (steady) by hitting RECORD
while holding ERASE.
05 SET DRUM OUTS
DRUM OUTS" act like mutes for the sound of each button. Hitting a drum button
while holding RECORD enables the output for that drum. Hitting a drum button while
holding ERASE disables that drum. Hitting RECORD while holding ERASE
drums.
enables
Note that these drums can still be recorded ar:d erased: only the audio is
all
disabled.
06 SET TRIGGER IN
The External Trigger Input on the rear panel can be set to play any of the drum buttons
or a combination of buttons. To set which ones are to be triggered , select this parame-
ter and hold the desired drum button or buttons then trigger the input. The drums wil
play and the OX wil " beep:' To remove the trigger setting, hold ERASE and then trigger the input. For more information , see " EXTERNAL TRIGGER:'
EDIT PARAMETERS
MIDI EDIT PARAMETERS
(also see " ABOUT MIDI"
07 RECEIVE CHANNEL (1-16)
This sets the MIDI Channel that the DX receives on. If OMNI MODE (Parameter
, the OX wil receive on ALL channels.
08
09)
(1- 16)
TRANSMIT CHANNEL
This sets the MIDI Channel that the DX sends MIDI intormation on.
On)
09 OMNI MODE
When OMNI MODE is on , the DX will receive MIDI information on ALL 16 channels.
When off , the DX wil only receive information on the RECEIVE CHANNEL
. set on
EDIT PARAMETER
07.
This OMNI MODE command is also received and transmitted
via MIDI , on the RECEIVE and TRANSMIT channels set aDove.
10 MIDI CLOCK OUT(- On)
This turns on the MIDI timing clock , for slaving other Sequencers and Drum Machines
via MIDI. See the INTERFACE GUIDE for more information.
11
On)
ECHO NOTES
If on , any notes that appear at the MIDI IN will be retransmited to the MIDI OUT. The
Song Select message wil be echoed as well.
On)
12 SONG CHANGES
This enables the Song Select MIDI command. When on
, Song numbers are transmitted and received by the DX. This way, the master MIDI controller can select a particular Song to be played by slaved machines. Song Select does not transmit or receive
Sequence numbers , and wil only select Songs when in Stop.
13 SET DRUMS
TO
MIDI NOTES
On MIDI drum machines , the drum buttons are transmitted as MIDI notes. This fUnction allows you to set a MIDI note to particular drum button. Playing a note into the
MIDI IN
while holding a drum button sets the note to that drum. Playing a note into the
MIDI IN while holding ERASE sets the note not to play any drums. A drum can be programmed to several notes. but a note can only be programmed to one drum. These
MIDI notes must be within a 32 note range.
Pressing RECORD and COPY resets the notes to default settings (see the diagram in
the " INTERFACE/MIDI NOTES" section). Presing RECORD and
ERASE clears all
settings.
14 SET TRANSPOSITION
The range of the MIDI notes can be set with this edit parameter. Hold RECORD and
press the note desired to be the bottom of the range. The MIDI note number wil
appear in the display.
See the " INTERFACE/MIDI NOTES" section for more information.
NOTE: The phrase " any combination of drums " means any combination of up to 6
qrums with a limit of one drum per voice. Thus pressing LOUD BASS and SOFT BASS
has the same effect as only pressing LOUD BASS (on all columns of drum buttons
. the
lowest button has priority).
..
U A
OAT A
" !!
- , =-: ",,:," ;' ;: '.'......
;;""" :
;..".::..
:::.::::.::::.::::.::::.::::.::::::::::-.:::::::.:.:.:.::
:= "'
:::
~~~~~~~~~~~~~~~~~
:::::::::::::::::::::::::::::::::::::::::::::::::::::::::::::::::::::'
~~~~~
:::: :::
::::
~~~~~~
::::~~~~~~~~
~~~
::/UHAfiE
STORAGE
The OX Data Storage feature permits off- line backup storage of all of your rhythm
programs.
Making backups of your wqrk is something that you should do frequently, with aU your
machines. You ll find that keeping copies of your programs wil help speed up your
work and eliminate duplication of effort.
What was that rhythm I had before?' No matter, if you ve got it stored. You can load it
back into your OX (or anyone else s for that matter) and get on with it.
The OX can store its memory in two ways: via the TAPE jacks onto Cassette , or via
MIDI to another OX or other MIDI device.
TAPE INTERFACE
The DX' s Cassette Interface allows programs to be stored externally on an audio cas-
sette. The tape recorder should have a Line or Aux Input if possible; either Line Level
or Speaker Level (Earphone) outputs.
Connection
Connect the Speaker or line Output of your cassette recorder to the jack labeled
FROM TAPE" on the rear of the OX. Connect the " TO TAPE" jack on the rear panel
of the OX to the Line or Aux input of your cassette recorder. Connect both cables so
that you can monitor the tape through the OX,
Hookup for Tape Sync or Cassette Data Storage
OuTPuT
0:,',"',
INPUT i
II)I
mw\
t;
out
filp8'"syrtc or
Data Recorder
r-MI
l'
II!.!'I!!!el\!:er
1m
ff::::t::lt
!I" :::tj1tj:t'
.::::;:iiix..
i"cib-';h
'..'m."m"...".,-""'-.-""."."--
IMPORTANT:
Disconnect your cassette recorder when not using the Cassette
Interface to prevent random noise from triggering the DX.
Access
Enable the Cassette Intertace by turning on the DATA STORAGE switch on the rear
panel. The display will now read " CASS:'
OAT A
STORAGE
Save It
Press the RECORD switch on the tape recorder. You should now hear a steady tone
through the MIXED OUTPUTS of the DX. The volume of the tone is controlled by the
Metronome control.
Press the CASSETTE SAVE button on the DX. After the SAVE button is pressed
, seven
seconds of the steady " leader " tone will be sent out followed by the actual memory
information. The SAVE button will be lit during the leader tone and then flash as each
sequence is transferred. After all of the memory information has been transferred
, the
SAVE button light wil go out , the DX wil " bep;' and the
display will read " CASS"
once again.
It is very important to CHECK a tape after recording. See '
Check
To
:Check To Be Sure;' below.
Be Sure
The CHECK function of the Cassette Intertace chec!,s a t
pe for valid data without
actually transferring the data into the DX' s memory. A tape should always be checked
after recording.
Press the PLAY switch on the tape recorder. You wil now be able to monitor the tape
through the MIXED OUTPUTS of the DX.
As soon as the " leader " tone is heard, press the CASSETTE CHECK button on the
DX. At least three seconds of the " 'eader " tone must come between pressing CHECK
and the rough sound of the memory information. When the leader tone is detected.
the CHECK light will go out , and then wil fiash as each sequence is loaded. When the
data has finished . the DX will " beep " and " CASS" wil reappear on the display.
If an error is detected , the DX wil " beep " and the display will read "
Err:' See
ERRORS:' below.
. NOTE: Once the leader tone has started the cassette interface must complete its
cycle. The only way to stop it is to turn the OX off and then on again.
Load In
Press the PLAY switch on the tape recorder. You wil now be able to monitor the tape
through the MIXED OUTPUTS of the DX.
As soon as the " leader " tone is heard , press the LOAD ALL button on the
X. At least
three seconds of the " leader " tone must come between preSing LOAD ALL and the
rough sound of the memory information. When the leader tone is detected
, the LOAD
ALL light will go out. and then will flash as each sequence is loaded. When the data
has finished , the DX will " beep " and " CASS" will reappear on the display.
If an error is detected , the OX will " beep "
ERRORS;' below.
and the
lay
wil read " Err:'
See
REMEMBER: The DX will not LOAD if the MEMORY PROTECT switch on the rear
panel is ON.
One At A
Time
The cassette format of the OX codes the locaon of each Sequence and Song, which
allows an individual sequence or Song to be loaded from a tape. The
casstte interface does not write an individual sequence onto the tape, but can read a single
sequence from the entire cassette.
Loading a single Sequence or Song is the sae as loading aU of the data except that
you press LOAD ONE. The left side of the display will show the sequence to be loaded
from tape. Use the keypad to enter the desired Sequence number. To load from a
Song, press
SONG button and then enter the desired Song number. Then press
LOAD ONE again. The right side of the display will now show the destination for the
tape sequence. Use the keypad to enter the desired Sequence number. Press LOAD
ONE again , and the display will go dark and the DX wil wait
tor
tape data.
REMEMBER: Loading a Song loads only the list of sequences contained within the
Song, not Ihe actual sequence data.
un,
u'uunuL.
Compatibility
The OX can read tapes recorded on other Oberheim drum machines. See the accompanying char for compatibilty.
When reading a tape from a Rev. 3 OMX . only Sequences 0-99 and Songs 0-9 will be
read in. In addition , only the first 2200 notes of the 5000 note DMX memory will be
read in. II the OX' s memory capacity is exceeded , the OX will " beep " and the display
will read " FULL:'
Individual Sequences and Songs can only be read from Revision 3 tapes , produced by
Rev. 3 DMXs and MIDI DXs. However, reading in an older cassette and then recording
it back onto tape will change the format to allow an individual Sequence or Song to be
read.
Drum Machine Tape Compatibility
7ape
I.
toads 70:
From:
DMX
w/MIDI
wo/MIDI
Rev.
Rev.
20 Noles
sooo Notes
YES
YES
../MIDI
YES
YES
YES
YES
..o/MIDI
DMX
YES 1
YES
Rev.
DMX
YES
YES
YES
YES
Rev
Notes:
1 Individual
Sequence, 8nd Song, can be loaded
fromt.!pe.
2 The DX ignores the DNX drum, TOM2 8nd PER: 1
3 Only DNX Sequence" 0-99.!nd Song, 0-
49 'Wll be 108ded
ubject
10 IIvai1abie memory 'pou. If the DX. , memory
captbility i, exceeded thedispl8yvm reed - rULL- lInd
the DX..il
beep
Errors
If the DX cannot read the tape properly, the display will read " Err:' for ERRor in data. II
this happens , one of the following might be responsibJe:
Tape playback volume. Gelling the OX to read the data properly and reliably generally
is a function of the proper playback level. The bet level should be as loud as possible
without distortion. Some trial and error is probably necesry, however. Some users
find that the cassette intertace reads the data the be when the playback level is
tumed all the way up. The data
can
be distorted to a certain extent and still playback
properly. If the playback volume is too low , or If the tape recorder is connected incorrectly, the DX wil not acknowledge the data at all.
The leader tone Is too short. At least three sends of the " leader " tone should come
between pressing PLAY and the rough sound of the memory information. Generally, if
the leader tone is too short, the DX wil immediately read " Err:'
The tone control may be set Improperly. It is important that the tone control(s) be set
so that the high frequencies are not attenuated. Some trial and error is involved here
too.
Many cassette recorders invert the phase of the signal in the process of recording
and playing back. If tapes made on your casstte recorder NEVER check properly and
result in the " Err " message , inverted phase may be the problem. To set the DX to read
inverted data , press the 0 button before pressing PLAY or LOAD. The display wil read
-CAS:' indicating that the DX is expecting inverted data.
The Batteries in the cassette machine are too weak.
..
OAT A
STORAGE
The playback head azimuth of the tape recorder may be out of
alignment. This wil
only affect recordings made on other tape reorders. A minor head adjustment may
required.
be
There Is a bad spot (dropout) on the tape.
The tape heads are dirt. Clean and degauss the tape heads
stan and pinch roller.
, and clean the tape cap-
Sometimes tape errors are caused by poor reordings. Use a
LINE or AUX input If
available. MIC inputs seem to work better if the DX "
TO INPUT" signal is attenuated
approximately 10-2Odb before recording. Many consumer electronics companies sell
cables with built- in attenuators.
Hints
The cassette interface can be very
ustratjng
at first. Some trial and error is usually
required to get the cassette interface to read data reliably with a particular tape deck.
But once you get your recorder to work , the interfce is very
reliable. Exp eriment with
the recording or playback levels , tone controls , and type of tape. Some users like to
use computer grade cassettes beause of their lack at dropouts. Others prefer high
bias (CR02) tapes because of their extra high frequency response. Once you have
arrived at the proper settings for the controls. you may want to mark them to ease
future use.
The DX is designed to work with data recorders and profesional walkman-type
recorders as well as standard home cassette decks.
One cassette recorder that is used at Oberheim is the Superscope C200 LP. This
recorder seems to work well and does not invert the
catte data.
MIDI DATA TRANSFER
The OX can also transfer its memory via MIDI. This is especially useful for sending
data from one OX to another, or to a MIDI storage device.
Connection
The only connection required is a MIDI cable from the MIDI OUT at the source unit to
the MIDI IN of the destination unit.
Access
Enable DATA STORAGE with the switch on the rear panel. The display wil read
CASS:' Both source and destination units must be in Data StoraQe Mode to transfer
data.
REMEMBER: The DX will not receive a data trnsfer
switch on the rear panel is ON.
its MEMORY PROTECT
Sending All Sequences
To send all of the sequences , press MIDI SEND ALL. The ALL button will light during
the data transter. If a DX is used as the destination unit
, its ALL button will light as well.
When the data has finished the light will go out and the display will once again read
CASS:'
Sending One Sequence Or Song
To send a single Sequence or Song, press MIDI SEND ONE. The left side of the display wil show the sequence to transterred from the DX. Select the desired sequence
(or Song, by pressing the SOng button), then pres ONE again. The right side of the
display will show the location that the sequence will be transferred to. Select the
desired destination . then press ONE again. The ONE light will be on while the data
transfer is taking place (short time). The light then will go out and the display will again
read " CASS:' .
BATTERY BACKUP
The OX contains a lihium battery that maintains power to the memory even when the
OX is unplugged. This way you can turn off the
poer and not lose your sequences.
With normal use, battery should last 5 years before needing replacement. However
you should always save important sequences via Cassette or MIDI
, u sing the Data
Storage function of the DX.
TALK TO THE WORLD
The OX can be connected to most other electronic musical instruments
, as well as
computers and tape recorders. The OX can operate in sync with other equipment by
interconnecting timing signals , and notes can be exchanged via MIDI or trigger
pulses.
The OX is designed to operate synchronously with a variety of other devices. The OX
can start automatically from these devices as well as slave to its own tape sync pulse
while driving other devices.
The OX sounds can be played from other sources , such as trigger pulses and MIOI
notes. Notes played on another MIDI drum machine can actually be recorded on the
OX.
Using The DX With Oberheim Sequencers and Drum Machines
The OX . DSX Polyphonic Sequencer, and DMX Orum Machine have been designed to
operate in sync with each other. When the OX runs in tandem with a DSX or another
drum machine , one unit must be the master and the others , slaves.
Other Sequencers
and
Drum Machines
There are a variety of ways that the OX can be connected to other equipment. Consult
the INTERFACE GUIDE as well as the manual for your other equipment tor the optimum hookup for your application.
Interfacing the DX
: J. :.P. 99.
. ()II
I!........
.o.J??'
MIDI
Percussion
Controller
.- j. os -s -1
OSX
Digital
Trigger
SeQ ue nee r
Source
,f/
L -
"oS Power
::::::::::::::::::::.::::::::::::::::::::::::8I:
""s
MIDI
:'f:;:f;;:f :I..' f:::f::: ;t..:f:
SeQuencer
60bC'heil:
Mul! S JII1tJ(
tZf)
The DH can interface with most other eQuipment.
See the INTERFACE GUIDE for specific information.
T E R
SYNCHRONIZING WITH
THE EXTERNAL CLOCK
The Exernal Clock generally provides the " tightes" syc between machines and is
the recommended timing source if you have a choice of hookups. The DX can be set
to three different clock rates: 96 , 48 , or 24 Puls per Quarter note. Most equipment
uses one of these standards. The extemal clock can be use for timing at the
time that MIDI is use for notes.
same
Setup
For bes results , tum off both units before conneting. Using a cable
with a 1/4"
phone plug at each end, connect the CLOCK OUT jack on the rear panel of the unit to
be the master to the CLOCK IN jack on the rea panel of the unn to be the slave.
The DX can be interfaced wnh other Oberheim components using the tape jacks
instead of the clock jacks. Try this hookup is you experience excesive noise.
DX
As Mastel
Set EDIT PARAMETER 01 (TIMING SOURCE) to " I" for Intemal Clock. Set EDIT
PARAMETER 03 (CLOCK OUT RATE) to " 96;' to transmn the Oberhelm System Clock
standard of 96 pulses per quarter note; or the appropriate setting for equipment that
nees a different clock rate.
DX
As
SIa"e
Set EDIT PARAMETER 01 (TIMING SOURCE) to " 96;' to respond to the Oberheim
System Clock standard of 96 pulses per quarer note; or the appropriate setting for
equipment that nees a different clock rate. For AUTO START operation , set EDIT
PARAMETER 02 to " On:'
Opetlon
Each unn wil operate the same as before wnh the following exceptions:
The TEMPO Is controlled by the maser. Incresing the tempo on the master
will
increas the tempo on slave as well. The DX and DSX/DMX have the
sae TEMPO
programming. Recordings may be made separtely and synchronized later.
Auto Start
If a slaved DX has its Auto Start function tumed on , n will recognize incoming clock
pulse and automatically enter the PLAY mode whenever clock pulse start. If n does
not se any pulse for 125 miliseconds (1 /8 seond), n wil automatically
STOP. These
feaures allow the DX to be remotely stared and stoppe by the extemal clock pulse.
Note that pressing STOP will not stop the DX
clock pulse continue; the DX wil recognize the continuing clock pulse and jump back into PLAY after the STOP buton is
release. To stop the slave DX , it is neces to stop the master.
If Auto Start is turned off , PLAY or RECORD must be pres on the slave unit before
starting the master.
Reclng
as Master
Press RECORD and PLAYas before. The slave units will start as soon as the master
DX starts recrding.
Recording
as
Sla"e
Follow this procedure: Turn AUTO-TART OFF (Edn Parameter 02); Place the DX into
Record by presing RECORD and PLAY; Then start the master clock source.
SYNCHRONIZING WITH
THE MIDI CLOCK
Utilizing the MIDI Timing Clock provides an easy method of interconnecting MIDI
devices.
Setup
For best results , turn off both units before connecting. Using a standard MIDI cable
connect the MIDI OUT jack on the rear panel of the unit to be the master to the MIDI IN
jack on the rear panel of the unit to be the slave.
DX As Master
To use the DX as the master, set EDIT PARAMETER 02 to "
I" for Internal Clock , and
turn " ON" EDIT PARAMETER 10 (MIDI Clock Out).
On:'
DX As Slave
To slave the DX to another MIDI timing source , set EDIT PARAMETER 02 (Timing
Source) to " d" for MidI. For AUTO START operation , set E;DIT PARAMETER 02 to
Auto Start
If a slaved DX has its Auto Start function turned on , it will automatically enter the PLAY
mode whenever a MIDI Start Command is recognized. The DX wil stop when a MIDI'
Stop Command is received or the STOP buton pressed , even if MIDI timing pulses.
continue.
If Auto Start is turned off , PLAY or RECORD must be pressed on the slave unit before
st'arting the master.
Song Select
Turning on SONG CHANGES (EDIT PARAMETER 12) enables remote selection of
Songs (not Sequences) via MIDI. The DX transmits and receives Songs 00-49.
Recording
as
Master
Press RECORD and PLAYas before. The slave units will start as soon as the master
OX starts recording.
Recording
as
Slave
Follow this procedure: Turn AUTO- START OFF (Edit Parameter 02); Place the DX into
Record by pressing RECORD and PLAY; Then start the master clock source.
METRONOME AS CLOCK
SOURCE
The DX has also been designed to slave sequencers and arpeggiators
, using the metronome output. The CLICK OUT outputs the metronome at all times for this reason.
The Tempo as well as the Click Value of the Metronome wil control the rate of the metronome pulses. The Metronome output is -; 12 Volts DC
, 900 millseconds duration.
The Metronome can be set to click in a programmable rhythm instead of a steady
click. See EDIT PARAMETER 04 (SET PROGRAMMABLE CLICK).
SYNCHRONIZING TO TAPE
You can record a sync tone from the OX onto tape , and then use the sync tone on
tape to control the DX. Sync to Tape is achieved by recording a sync tone from the TO
TAPE jack on the Rear Panel on to a track of a tape recorder
, and then playing it back
to the FROM TAPE jack.
Recording The Sync Tone Onto Tape
When monitoring your tape recorder, you should hear a steady tone which is the
Leader Tone. Record the leader tone at a level of between - 5db and 0 db. Some
experimentation wil give the best results for your particular setup. After recording 5 to
10 seconds of leader tone . press PLAY on the DX at the point you wish the sequence
to start. The leader tone will give way to a chattering sound much like the sound of the
cassette data. This is the timing data. When the DX stops playing the leader tone will
return.
F A
The DX will output the timing data only while in RECORD or PLAY. In STOP or other
modes , the output wil be the leader tone. Make sure the tempo that is set on the DX is
the proper tempo , because the tempo wil be controlled by the sync tone when playing
back. (Because the DX is reading timing information from the tape , the DX wil tollow
changes in the tape speed within a range of about 20% up or down.
Playing The Sync
Tone To
Sync The OX
Connect the LINE OUT of the tape recorder to the FROM TAPE jack of the DX.
Set the TIMING SOURCE to " S" for tape Sync (EDIT PARAMETER 01), and turn
AUTO START " ON" (EDIT PARAMETER 02). Start the tape recorder. The DX recognize the sync tone , and will start when the timing data on the tape begins and will stop
when the timing data ends.
If the DX does not respond to the sync tone or if It loses time , adjust the level of the
sync tone from the tape recorder. Generally louder is better.
Note that pressing STOP on the DX wil not stop it if timing data continues; the DX will
recognize the continuing timing data and jump back into PLAY after the STOP button
is released. To stop the DX , it is necessary to stop the tape.
IMPORTANT: TO and FROM TAPE should be disconnected when using Timing
Sources other than tape to avoid timing errors caused by noise.
Hints
A word of advice: Getting sync to tape to work properly will probably require a bit of
trial and error. So don t get frustrated if it doen t work perfectly the first time. Once
you get it right , mark your settings so that it will work easily next time.
Record the Sync Tone First
Because syncing the OX or any other computer device
to a previously recorded track (such as piano) is diffcult , it is best to record the DX
first , and then record the other tracks while listening to the DX. Once the sync tone is
recorded , the drum machine can be reprogrammed and rerecorded at any time if
desired.
A good way to achieve great drum parts is to first program a drum beat with the basic
feel of the piece. Record this beat and the sync tone first. Then , after the other parts
have been recorded while playing along to the basic beat. the drums can be reprogrammed to work with the recorded parts. Becuse the sync tone has been recorded
first. the drum machine can be recorded last or several times during the recording ses-
sions , and maintain perfect sync.
Check the Sync Tone / There is nothing wors
than discovering that the sync tone
doesn t sync after everyhing else has already been recorded. So , make sure that the
DX reads the sync tone properly before recording anything else.
Set the Tape Recorder to Sync / Remember to use the Sync Playback setting if you
have one (sometimes called sel-sync or simul-sync) when playing back on your tape
recorder. This tape recorder feature allows playback of the tape from the record head
hlch keeps the timing straight when overdubbing parts. Most three head multi- track
tape recorders have this setting.
Tape Dropouts / Tape dropouts can be a problem when using sync to tape, especially
on multi- track cassette recording systems. Use fresh. good quality tape for best
results.
Crosstalk and Signal Blee / The sync tone is definitely susceptible to crosstalk from
adjacent tracks of a mult- track tape recorder. Depending on the recorder, blank adjacent tracks may be necessary to maintain sync. However, the use of noise reduction
may
eliminate the need for a blank adjacent track.
Bleedthrough of the sync tone to other tape tracks is also a problem . but a major
cause of " bleeding sync tone " is the electronics between the drum machine and the
tape. On many mixing consoles , routing the sync tone through any of the mix busses
frequently causes the sync tone to bleed into
al/ the busses. The best way is to patch
the sync tone directly in and out of the tape recorder and keep it out of the board altogether. If more gain is needed for proper recording level. use a miGrophone input or an
outboard amplifier to increase the gain. Other electronics, such as mult-channel noise
reduction systems may also contribute to crosstalk.
F A
Noise Reduction / Generally, sync to tape wil work bener without noise reduction.
Noise reduction won t record the sync signal better, since the level o f the sync tone
doesn t change appreciably the way that music does. However, using noise reduction
may reduce crosstalk between the sync signal and adjacent tracks. This is another
one of those things to experiment with!
Recording Sync instead of the DX / Many musicians working with 4 and 8 track tape
recorders don t record the drum machine on tape at all- they record only the sync
track , and then use the sync tone to slave the drum machine when overdubbing other
parts and during mixdown.
TRIGGERED NOTES
The OX has an external trigger jack which enables you to control any drum or any
combination of drums from an external source , such as a footswitch or a GATE.from a
sequencer such as the Oberheim OSX.
The External Trigger Input acts essentially the same as pressing one of the drum but-
tons on the front panel. When in record , triggering any of the voices externally wil
cause them to be recorded subject to the same correction schemes (QUANTIZE and
SWING) that would apply to the buttons on the front paneL
The Trigger Input is designed for a switch closure, or an inverted Moog S- Trig type
trigger. To utiize an acoustic signal such as a live drum or Simmons type drum pad. it
is necessary to utilize one of the trigger interface devices on the market.
Programming
the
Trigger
Input
The External Trigger can be set to piay any of the drum buttons. or a combination of
I TRIGGER INPUT Programming: I
Rccess EDIT PRRRMETERS:
buttons. To set which ones are triggered, select EDIT PARAMETER 06 (see EDIT
PARAMETERS), hold the desired drum button or buttons then trigger the input. The
drums will piay and the DX wil " beep:' To remove the trigger setting, hold ERASE and
then trigger the input.
EO IT
PRRRMETER D6:
(SETTRIGGER IN)
Select ED IT
t;
Select Orum(s)
to be Triggered:
Hold Down...
IC
!
lOUD
(B8ss)
1)
Set Trigger:
TRIG IN
EHit:
EDIT
Several drum buttons can be assigned to be triggered by the external input. Realize
that only one of the three buttons on each voice can be played at a time. so that if , for
example, you attempt to assign two of the Toms to be triggered at once , only one wiil
sound.
----..-..
---..
. ----..............
..-------------------------..-........
----..
---- ------..- -------------..
- -------....
-..
--------.-----..
-.....
- ---- -------..
-- -----..
--
MIDI NOTES
The OX can transmit and receive notes played via MIDI. Drum notes are the same as
melodic notes. This means that a DX can be played from a keyboard , MIDI drum pads
or even another DX. MIDI notes such as these can also be recorded andplayed back
as well.
Note that playing notes on synthesizers from MIDI drum machines usually does not
work , because drum notes have a shorter duration than most synthesizers are capable
of playing.
Setting MIDI Notes to OH Drums:
Rccess EDIT PARAMETERS:
EDIT
Select EDIT PARRMETER 14:
(SET TRRNSPOS IT ON)
Setting Notes to Drums
Since correlating drums with keys on a keyboard is a matter of personal taste . the DX
enables programming a MIDI note to any of the DX drum buttons. This can be done
using EDIT PARAMETERS 13 & 14.
Connect the MIDI OUT from a controller such as a keyboard or another DX to the MIDI
IN of the DX. All notes must be withi" a two and one-half octave range , starting at the
transposition setting, so change the transposition setting if the notes are not within the
desired range (EDIT PARAMETER 14). Hoid RECORD and press the note desired to
be the bottom of the range. The MIDI note number will appear in the display.
Next . select EDIT PARAMETER 13. Playing a note into the MiDI IN while holding a
drum button sets the note to that drum. Playing a note into the MIDI IN while holding
ERASE sets the note not to play any drums. Several notes can be assigned to a partic-
Parameter Numb
Current Se.ttinq (MIDI NOle
Hold RECORD;
Play MIDI Source to
Set Lowest Trigger Note:
bE-fop
I"" '"II
RECORD MIDI CONTROLLER
PIa\! MiddleC Nl''' Settinq
ular drum button but each note cannot be assigned to more than one drum. Pressing
RECORD and ERASE clears all settngs.
There is an informal standard arrangement used by other drum machines which is
incorporated within the DX' s default configuration shown in the accompanying keyboard diagram. The DX can be reset to this configuration by pressing RECORD &
COpy while in EDIT PARAMETER 13.
When using the OX to transmit drum buttons to another instrument, only the highest
Select EDIT PRRRMETER 13:
(SET ORUM
note programmed to that drum wil be transmitted.
TO MIOI NOTES)
Default MIDI Note Assignments
K;
Hold down Drum to be Set;
Play Desired Notes on MIDI Source:
b.tt'
111111
11111
LOUD MIDI CONTROLLER
(B8
EHit:
EDIT
Hi- Hat
Open
Accent
Clo:sed
REALTIME MIDI RECORD
One additional feature of the DX is the ability to transfer sequences between
diferent
of drum machines. This is done by recording on the DX while slaved to another
drum machine. The second machine sends notes across MIDI as it plays them , and
the DX simply records the notes that are received.
brands
To transfer sequences this way:
Connect the two drum machines so that the OX is the slave unit.
Set the EDIT PARAMETERS on the DX:
. 00 COUNTDOWN -(off
01
TIMING SOURCE
02
AUTOSTART - (off
07
RECEIVE CHANNEL
09 OMNI
MODE probably On
d (MIDI)
same as master
Set the master drum machine to transmit MIDI timing. Make sure that the Tempo
Length , and Quantize settings of the slave are appropriate for the sequence to be
recorded. Press RECORD and PLAY on the slave unil, then start the master.
Remember that the DX wil record the assigned MIDI notes , which are not necessarily
the same drums on both machines. Make sure that the drums of the master machine
are assigned to appropriate buttons on the slave. See " Setting Note to Drums;' above.
Some other models of drum machines can also record from the DX via MIDI. If the
drum machine can read MIDI notes from the DX, it should be able to record them. For
more information , refer to the INTERFACE GUIDE as well as the owner manuals of the
other drum machines.
FOOTSWITCHES
On the rear panel are two jacks for footswitches. These inputs are designed to be
used with switches with a MOMENTARY CLOSED configuration such as those available from Oberheim.
Start Faatswitch
When in sequence mode (all button lights off pressing the START footswitch will play
the sequence from the beginning. Pressing it again wil stop it. Pressing it once more
wil restart the sequence from the beinning.
When in song mode (Song button light on) the switch works a bit differently. From
STOP, pressing the footswitch starts the song from the beinning. Pressing it again will
stop it. If the footswitch is pressed once more , the song will continue from where it
stopped.
Next Footswitch
When in sequence mode (all button lights off pressing the NEXT footswitch advances
the DX to the next sequence. When playing a sequence , the DX wil wait until the
sequence currently being played is finished before starting the next sequence.
When in song mode (Song button light on) the switch works a bit differently. From
STOP , pressing the footswltch advances the DX to the next song. While playing a
song, if the NEXT footswltch is held down at the end of a sequence , the DX wil
vamp;' that is , repeat the current sequence, and
not
advance to the next sequence in
the song. Releasing the switch will allow the song to continue.
,._--m u
c:
IIV
run
IYIM I I
MORE INFORMA TION
ABOUT MIDI
MIDI (Musical Instrument Digital Interface) is designed to allow computer controlled
musical instruments such as the OX to communicate with each other.
Messages
There are several different types of data messges that are transmitted via MIDI:
VOICE / These are messages about notes. MIDI transmits a NOTE ON and a NOTE
NUMBER when a note is played on a keyboard or drum machine. On some devices
velocity is transmitted as well. When the note is release , a NOTE OFF is transmitted.
Levers , Wheels , Program Changes , Footswitches , and Pressure are also transmitted
as Voice Messges , however these are not utilized by the ox.
COMMON / Among the Common Messages is Song Select , used to change from one
Song to another.
REALTIME / These are commands that control sequencer timing and start/stop information , that tell a slaved sequencer or drum machine when to start and at what tempo
to play.
EXCLUSIVE / Exclusive messages are used for data storage and anything else specific to a particular machine. Each manufacturer has its own System Exclusive 10.
Channels
MIDI transmits on 16 independent channels at once , which means that information for
many different machines can be transmitted on the same MIDI cable. The OX can
transmit on any channel , and receive on any channel. EDIT PARAMETER 07 sets the
receive channel , EDIT PARAMETER 08 sets the Transmit Channel.
Omn;
Mode
The DX can be set to receive on all 16 channels at once by turning OMNI MODE on.
EDIT PARAMETER 09 turns on Omni Mode.
Timing
MIDI sends start and stop commands for running sequencers and drum machines.
Timing pulses are also transmitted at a rate of 24 pulses per quarter note. The exact
rate depends upon the master Tempo setting. Set EDIT PARAMETER 01 to " d" to
slave the DX to MIDI. Turn on EDIT PARAMETER 10 to transmit MIDI timing. To
receive MIDI timing set EDIT PARAMETER 01 to "
Song Select
The SONG SELECT command enables remote selection of Songs (not Sequences)
via MIDI. The DX responds to Songs 009.
MORE INFORMATION
ABOUT DlmTAL AUDIO
The DX is not a Synthesizer. It does not synthesize sound. What it does is play back
sounds from it memory. These sounds are stored as numbers , inside special integrated circuits called ROMs (Read Dnly Memory) which are pre- programmed. Before
explaining how digital audio works , let's digress for a minute and discuss how regular
analog audio works:
Sound , as far as your ears are concerned. is caused by very small but regular changes
in atmospheric pressure. The air moves back and forth , over and over, alternately
pushing and pulling on your eardrums and the rest of your body. When these waves of
air occur between 20 and 20 000 times per second , your brain perceives them as
sound. Anything that makes noise must ultimately disturb the air in this sort of regular
way. Look at the low frequency speaker in your sound system. If you turn the voiume
way up (don t damage your speakers , though!) you will see the speaker (and feel the
air near it) moving in and oUl , in exactly this sort of regu(ar movement.
So what any analog audio system does , is provide a pattern of regular movement
(oscilation) for the speaker to move in , so that you feel the air moving in this same pattern so that your brain can translate all this into sound and you can HEAR! Look at a
, phonograph record very ciosely and you wil see the same repeating wiggles that are
amplified by your amplifier to move your spekers.
Digital audio stores , not the oscillations that move your speakers , but a series of num-
bers that represents those oscilations. Take the groove from that phonograph record
and, in your mind , stretch it out in a straight line and piace it on a piece of graph paper.
Now if you went from the left end of the graph to the right, and everY centimeter wrote
down a number that represented how far that phonograph wiggle moved up and
down , you would become a recorder of digitl audio. Now , if you took another piece of
graph paper and plotted all those numbers that you just wrote down , you would do
what a digital audio recorder does to play back.
So what is programmed inside an ROM in the OX is a series of numbers (lots of numbers!) that represents the sound of a snare drum. Another one has the representation
of the sound that a cymbal makes . and so on , for all of the sounds.
INltHtAt;t tiUIUt
INTERFACE GUIDE
Use this chart to find the optimum way to connect your OX to your other equipment.
INSTRUMENT
EXTERNAL CLOCK
DX
Master
DX
Slave
MIDI CLOCK
DX
Master
MIDI NOTES MIDI SONGS
DX
Slave
Oberheim
YES
YES
YES
YES
OMX
OSX (via OB-B)
Transmits
EMu
Emulatoril
Orumulator
YES
YES
YES
YES
Fairlight
CMI (W / General Interface Card)
YES
Kurzweil
250
YES
Linn
linnOrum (New Version)
9000
YES
YES
PPG
Wave 2.
YES
Roland
MSQ- 700
MSQ- 100
TR- 909
TR- 707
YES
YES
YES
YES
YES
YES
YES
YES
SCt
SixTrak
OrumTracks
64 Sequencer
YES
YES
YES
YES
YES
YES
YES
YES
YES
YES
YES
YES
YES
YES
Receives
YES
YES
YES
Yamaha
RXRX-
Transmits
YES
YES
This Glossary contains definitions of terms as used in the OX Manual.
Address
A location in memory that contains DATA.
Beat Value
The note value of the time signature. In a time signature of 3/4 , the BEAT VALUE is
equal to a quarter note , and there are three quarter notes per measure.
Click Value
The note value of the metronome click. The CLICK VALUE can be the same or differ-
ent than the BEAT VALUE.
Control Voltage
An electrical signal which can be used as an input to Voltage Controilable devices
such as Oscilators , Filters , Amplifiers , etc.
Data
DATA is the information that is processed by the MICROPROCESSOR. It is stored in
an ADDRESS.
Default
The result of not making decisions concerning parameters in the DX. If you do not
specify how long a sequence is to be for example, the DX will DEFAULT and specify
that the length is to be two bars.
Event
Any number of drums that are played on the same beat. The DX has the capacity to
store 2200 EVENTS , each of which can contain between 1 and 6 notes.
Gate
An electrical signal which can be used to trigger Envelope Generators and other time
dependent devices.
Master
The unit that provides timing, notes , or other data to control slave units that are connected to it. Changing the master wiU generally change aU of the siave units as well.
Microprocessor
The MICROPROCESSOR is the " brain " of the DX. It looks at the SOFTARE instructions and then carries them out , reading DATA from the proper ADDRESSES , performing the instructed function , and then writing the result in the proper ADDRESS.
Part
In the DX the term PART refers to a segment of a Song. Each Sequence recorded in a
Song adds another PART to the Song. There can be up to 255 PARTS contained in a
Song, each PART can be one of the one hundred sequences.
Punch Out
Punch In
Switching from Play to Record (punch in) or Record to Piay (punch out) without stopping. A recording studio term.
Quantize
A process of rounding off , in the case of the DX the rhythms that are played , to the
closest specified increment. in the DX , your recordings can be QUANTIZED to the
nearest Half note , Quarter note , Eighth note , or other smaller subdivisions down to a
1/192 note.
RAM
RAM or Random Access Memory acts like a piece of scratch paper for the MICROPROCESSOR. Unlike Read Only Memory (ROM , PROM , or EPROM), RAM can be
read from AND written into by ttie MICROPROCESSOR. RAM is usually used in a
oomputer sysem to store information that is constantly changing. In the case of the
, that includes notes , tempos , sequences , etc.
ROM
This acronym stands for Read Only Memory, which is exactly what it is , a memory chip
that can only be read by the MICROPROCESSOR , and can not be written into iike the
Random Access Memories . (RAM).
Sequence
A succession of events stored in the DX as numbers. The DX wil remember the events
as played and then wil repeat them upon command.
Slave
A unit that is controlled from another source. The remote source can provide timing,
notes , or other data to control slave units that are connected to it.
Software
The computer program or instructions that the computer follows to do its assigned
task. In the DX and other Oberheim products, the SOFTARE is stored in ROMS
located on the circuit boards.
Song
A combination of sequences.
.)rt:t.lrlt.JlIIUIV
SPECIFICA TIONS
Voices
Sounds
Frequency Response
Dynamic Range
Maximum Number
Of
Notes
Sequences
Songs
10-
000 Hz (varies among voices and is dependent upon tuning)
80Db
2200 Events ,
each of which can contain as many as six notes occurring
simultaneously
100
Maximum Typical Sequence
6 Minutes of 1 /8 Notes at 80 Beats/Minute
Maximum Sequence Length
Over 5 Hours at 25 Beats/Minute
. Maximum Song
Length
Tempo Range
Recording Modes
254 Sequences
25- 250 Beats per Minute (programmable with each sequence and song)
REAL TIME:
Records rhythm as buttons are pressed. Selectable Quantize Mode rounds off rhythms
from 1/192 notes to 1/2 notes.
STEP:
Notes and rests are programmed separately. one beat at a time. Value of beat can be
between 1/2 note and 1 /192 note.
Inputs
External Trigger: S- Trig
(Inverted), ::4. 7KOhm
Impedence
External Clock: 5 Volt positive pulse , TTL compatible
Tape: 350mV or more (Line or Speaker Level)
Footswitches: Start/Stop, Next Sequence; contact closure to ground
Outputs
Signals: Stereo and Mono mixed outputs , individual voice outputs; Level + 4dBm
(nominal), 50 Ohms Impedance, unbalanced
Metronome: + 12VDC Pulse , 900Ms.
External Clock: 5 Volts , TTL compatibie
Tape: 350mV rms (line ievel)
Power
Dimensions
Weight
(North America/Japan): 95-130 VAC, 21W
(Rest of World): 190- 260 VAC , 21W
L X 11. W X 5"
45. 7cm. L X 30. 0cm.w X 12. 7cm.
12 Lbs. /5.4 Kg