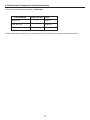
1
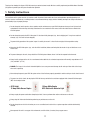
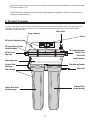
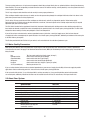
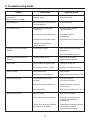
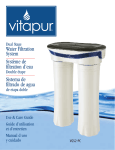
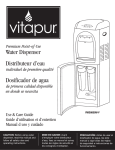
Whole Home
Ultraviolet (UV) Water
Treatment System
Maison entière
Système de filtration
d'eau ultraviolet (UV)
Sistema ultravioleta (UV)
de tratamiento de agua
para todo el hogar
Use & Care Guide
Guide d’utilisation
et d’entretien
Manual d uso
y cuidado
VPS1140
VITAPUR VPS1140
1. SAFETY INSTRUCTIONS . . . . . . . . . . . . . . . . . . . . . . . . . . . . . . . . . . . . . . . . . . . . . . . . . . . . . . . . . . . . . . . . . . . . . 2
2. PRODUCT OVERVIEW . . . . . . . . . . . . . . . . . . . . . . . . . . . . . . . . . . . . . . . . . . . . . . . . . . . . . . . . . . . . . . . . . . . . . . . 3
. . . . 2.1 WATER QUALITY PARAMETERS . . . . . . . . . . . . . . . . . . . . . . . . . . . . . . . . . . . . . . . . . . . . . . . . . . . . . . . . . . . . . . . 4
. . . . 2.2 ABOUT YOUR SYSTEM . . . . . . . . . . . . . . . . . . . . . . . . . . . . . . . . . . . . . . . . . . . . . . . . . . . . . . . . . . . . . . . . . . . 4
3. INSTALLATION INSTRUCTIONS . . . . . . . . . . . . . . . . . . . . . . . . . . . . . . . . . . . . . . . . . . . . . . . . . . . . . . . . . . . . . . .
. . . . 3.1 ACCESSIBILITY, ORIENTATION & FITTINGS . . . . . . . . . . . . . . . . . . . . . . . . . . . . . . . . . . . . . . . . . . . . . . . . . . . . . . . .
. . . . 3.2 OPTIONAL BYPASS LINE AND DRAIN VALVE INSTALLATION . . . . . . . . . . . . . . . . . . . . . . . . . . . . . . . . . . . . . . . . . . . . . .
. . . . 3.3 IN-HOUSE WATER DISTRIBUTION SYSTEM DISINFECTION . . . . . . . . . . . . . . . . . . . . . . . . . . . . . . . . . . . . . . . . . . . . . . .
5
5
5
5
4. OPERATING INSTRUCTIONS . . . . . . . . . . . . . . . . . . . . . . . . . . . . . . . . . . . . . . . . . . . . . . . . . . . . . . . . . . . . . . . . . . 7
. . . . 4.1 INITIAL START-UP PROCEDURE . . . . . . . . . . . . . . . . . . . . . . . . . . . . . . . . . . . . . . . . . . . . . . . . . . . . . . . . . . . . . . 7
. . . . 4.2 ACCREDITED SERVICE TECHNICIAN . . . . . . . . . . . . . . . . . . . . . . . . . . . . . . . . . . . . . . . . . . . . . . . . . . . . . . . . . . . . 7
5. SERVICE AND MAINTENANCE . . . . . . . . . . . . . . . . . . . . . . . . . . . . . . . . . . . . . . . . . . . . . . . . . . . . . . . . . . . . . . . .
. . . . 5.1LAMP INSTALLATION AND REPLACEMENT . . . . . . . . . . . . . . . . . . . . . . . . . . . . . . . . . . . . . . . . . . . . . . . . . . . . . . . . .
. . . . 5.2 CLEANING THE QUARTZ SLEEVE . . . . . . . . . . . . . . . . . . . . . . . . . . . . . . . . . . . . . . . . . . . . . . . . . . . . . . . . . . . . . .
. . . . 5.3 REPLACEMENT OF FILTER CARTRIDGES . . . . . . . . . . . . . . . . . . . . . . . . . . . . . . . . . . . . . . . . . . . . . . . . . . . . . . . . .
. . . . 5.4 SEASONAL USE MAINTENANCE REQUIREMENTS . . . . . . . . . . . . . . . . . . . . . . . . . . . . . . . . . . . . . . . . . . . . . . . . . . . . .
. . . . 5.5 REPLACEMENT COMPONENTS ORDERING INFORMATION . . . . . . . . . . . . . . . . . . . . . . . . . . . . . . . . . . . . . . . . . . . . . . . .
7
8
8
9
9
10
6. TROUBLESHOOTING GUIDE . . . . . . . . . . . . . . . . . . . . . . . . . . . . . . . . . . . . . . . . . . . . . . . . . . . . . . . . . . . . . . . . . . 11
7. MANUFACTURER’S LIMITED WARRANTY . . . . . . . . . . . . . . . . . . . . . . . . . . . . . . . . . . . . . . . . . . . . . . . 13
1
Thank-you for choosing the vitapur® VPS1140 to meet your water treatment needs. We have carefully engineered your Whole Home Ultraviolet
(UV) System to provide you with years of trouble-free operation.
1. Safety Instructions
The installation of this system must be in accordance with all provincial/state and/or local laws and regulations regarding plumbing and
electrical services. Installation by a certified plumber is recommended. Always comply with the following warnings and safety instructions, to
prevent bodily injury or property damage.
Do not attempt to install, operate, clean or perform routine maintenance on your VPS1140 system unless you have first read and
understood all of the warnings and safety instructions that are contained in this manual and on the labels that are affixed to the
VPS1140 system.
Do not attempt to operate the VPS1140 system if it has been visibly damaged, (e.g., due to shipping) or if it may have sustained
damage, (e.g., if the unit has been dropped).
To prevent faulty operation of the system, inspect it carefully to ensure it is free of leaks and physical damage before using.
Never start the VPS1140 system, (e.g., after the initial installation) before confirming that the exterior is dry and that there are no
visible leaks.
To prevent damage to the unit, always install the VPS1140 system indoors, where it will not be exposed to the elements.
Always install and operate the unit in an environment where both the air and water temperatures will normally range between 41°F
(5°C) and 100°F (37.7°C).
DANGER: The lamps in the unit emit ultraviolet light that can cause permanent damage to skin and eyes. Never look at the lamps
when unit is operating.
Never attempt to operate your VPS1140 system unless it has first been properly grounded, to avoid creating an electric shock hazard.
To prevent an electric shock, do not plug the VPS1140 into any socket that has not been equipped with a Ground Fault Interrupter
(GFI). See examples below.
GFCI Outlet
15 Amp White Decora Duplex
15 Amp White Duplex
GFCI Outlet with Indicator Light
Always unplug the power cord before attempting to install, clean or perform other routine maintenance on the unit.
Always stop the inlet water flow before performing any maintenance on the unit.
Do not attempt to service this unit unless you are an accredited service technician, as system operation could be detrimentally
affected.
Never operate this unit in an oxygen-rich environment, or within 6 feet, (2 metres) of any oxygen source.
2
Always drain all water from the unit, cap the inlet and outlet ports, and drain and disconnect all plumbing lines, if temperatures should
fall below freezing (0°C / 32°F).
The VPS1140 system is designed to reduce normally occurring non-pathogenic microorganisms. This system is not intended for the
disinfection of contaminated water.
2. Product Overview
The vitapur® Whole Home Ultraviolet (UV) Water Treatment System has been engineered to rigid standards, and has been quality inspected at
the factory prior to packaging. Please review this manual in its entirety for a detailed system explanation, and ensure that the following
components accompany this system:
Water Outlet
Lamp Connector
Ballast
UV Reactor Mounting Clamp
UV Lamp & Quartz Sleeve
(inside chamber)
UV Reaction Chamber
UV Port Cover
Open End
UV Port Cover
Closed End
Lamp Connector
Mounting Bracket
Filter Housing Coupler
Stainless Steel
Connector
Water Inlet
Filter Housing
Sediment Filter
(inside housing)
Carbon Block Filter
(inside housing)
3
To ensure system performance, all replacement components should be purchased directly from an authorized dealer or directly from Greenway
Home Products. The use of components purchased from other sources will void the warranty, and will potentially cause the system to function in
a lesser capacity than intended.
The UV lamp and quartz tube should be serviced annually to ensure proper performance.
Filter cartridges should be replaced every six months, or when the pressure drop through the cartridges inhibit water flow in the home to the
point where pressure losses are being experienced.
The life of the UV lamp, quartz tube and filter cartridges are estimates only, and will vary dependant upon the influent water quality.
Replacement/service schedules referenced above should be a maximum, and more frequent service/cartridge replacement may be required
dependant upon your local water quality.
The VPS1140 is intended for the supplemental bactericidal treatment of disinfected public drinking water or other drinking water which has
been tested and deemed acceptable for human consumption by the provincial/state or local health agency having jurisdiction. The VPS1140 is
designed to reduce normally occurring non-pathogenic nuisance microorganisms.
If you will be using an untreated surface water or groundwater source (rather than a municipal supply source) that has been deemed
acceptable for human consumption by the provincial/state or local health agency having jurisdiction, additional pre-treatment of the water prior
to the VPS1140 may be required.
The filtration provided with the VPS1140 is 5 µm nominal, and is not suitable for the reduction of protozoan cysts.
2.1 Water Quality Parameters
Water quality will adversely affect the performance of your vitapur® VPS1140, particularly when untreated surface water or groundwater
is being used as the source of supply, if the Maximum Contaminant Levels (MCL’s) for the following six critical water quality characteristics are
being exceeded:
Iron
Hydrogen Sulfide
Suspended Solids
Manganese
Hardness
%UVT (transmittance)
Total iron count must be less than 0.3 ppm (0.3 mg/L)
Count must be less 0.05 ppm (0.05mg/L)
Count must be less than 5 ppm (5mg/L)
Count must be less than 0.05 ppm (0.05mg/L)
Count must be less than 120 ppm (7 grains per gallon)
Must be greater than 75%
If you are using untreated surface water or untreated groundwater as your source of supply, the suitability of the water supply for potable
applications must be confirmed by provincial / state and/or local health agency having jurisdiction.
If the test results indicate that: (1) any of the above MCL’s are being exceeded, or (2) any prevailing drinking water health standards
are not being met, additional pretreatment facilities must be installed that will eliminate all contaminants, which pose health risks.
2.2 About Your System
Specifications
VPS1140
Rated Service Flow
Unit Dimensions (L x W x H)
Power Input
Operating Pressure Range
Feed Water Temperature Range
Unit Volume
Temperature Range
Inlet Port Size
Outlet Port Size
Minimum distance for adjacent
combustible materials
30LPM / 8GPM
55.9cm/22” x 21.6cm/8.5” x 85.1cm/33.5”
115V / 60Hz
0 - 100 PSI
41 – 100 -0F (5 – 37.7 0C)
17L / 4.5G
41 – 130 0F (5 – 37.7 0C)
1” Female NPT
1/2” Male NPT
15 cm/6”
4
3. Installation Instructions
3.1 Accessibility, Orientation & Fittings
Always mount the VPS1140 in a location that provides ample space for accessing the ultraviolet lamps. Service may require removing the UV
lamp and quartz tube. A minimum of 18”, (45 cm) of clear space should be provided on either the left or right side of the unit based on the
direction of installation of the UV lamp. As the VPS1140 generates heat during use, please ensure that no combustible items come into contact
with, or are in proximity to the system.
It is recommended that you maintain at least 6”, (15 cm) of clear wall space on all sides of the VPS1140 for cooling purposes. This will prolong
the operating life of the system.
CAUTION: Whenever soldering is required on any VPS1140 system component, always detach that component from the system first.
3.2 Optional Bypass Line and Drain Valve Installation
WARNING: To prevent contamination of water in the plumbing, which may pose a health hazard, do not use bypass line and valve if your source
of supply is untreated surface water or groundwater.
If your source of supply is treated municipal water, use of the bypass line and valve will permit uninterrupted treated water service in the event
of system malfunction.
Always test the bypass valve following each use of the bypass line, prior to re-starting the VPS1140 to confirm that the valve has been fully
closed and that only water from the outlet port will thereafter be going downstream.
The installation of a drain valve, while not required for system operation, is recommended for all installations of the VPS1140. The installation of
a drain valve will allow the service technician to drain the system of water prior to conducting any service on the unit.
A bypass system for the VPS1140 can be installed as outlined below:
BYPASS LINE SETUP DIAGRAM
Outlet valve
Please note that the VPS1140 is not equipped with a
bypass valve system when purchased. The addition of a
bypass valve system is at the discretion of the user. All
plumbing components must be purchased separately.
Bypass valve
Inlet valve
5
3.3 In-House Water Distribution System Disinfection
The following procedure is recommended for non-municipally supplied water installations of the VPS1140 system. For systems
installed on municipally water system, plumbing system disinfection is at the discretion of the user.
The entire household water system, between the VPS1140 and your taps and water outlets, can be sterilized before system start up in order to
destroy any residual contamination. The same treatment can also be completed at any time in the future that untreated water is allowed into
your distribution system (e.g. through an inadvertent by-pass, plumbing additions or repairs, etc.) or in the case of seasonal dwellings at the
beginning of each operating season.
Unscented household bleach (5% sodium hypochlorite) is an acceptable decontaminant when used at the rate of 1 liter, (0.3 gallons) of bleach
per 1000 liters, (264 gallons) of household plumbing volume. This includes the volume of water contained in all lines, hot water tanks, etc.
located 'downstream' of the filter housings. This ratio provides a dosage of 50 mg / L or 50 ppm. Using a volume of 1 liter, (0.3 gallons) of
bleach would be erring on the side of caution for most home and cottage plumbing volumes.
It is best to perform the super chlorination procedure at night as the concentration of bleach needs to remain in the distribution
system from 2-12 hours. To disinfect the distribution system, carry out the following steps:
1. Familiarize yourself with the various shut-off valves on your system. It is important to understand which combinations of valve
positions allow you to isolate the VPS1140, by-pass the unit without by-passing the cartridge filter housings or by-passing the
VPS1140 and pre-filtration systems, which enables isolation of the filter housing for removal or replacement of the Sediment and
Carbon Block filter cartridges.
2. Shut the main water supply off and drain the hot water tank and any other storage tanks that may be downstream of the filter
housing.
3. Unplug the Vitapur unit and then close the valves at its inlet and outlet ports.
4. Close the valves necessary to isolate and remove the Sediment filter cartridge and Carbon Block filter cartridge. Remove the filter
housings using the wrench provided with the system. Pour 1 liter, (0.3 gallons) of bleach into the sediment filter housing and
reattach to the filter cap. Leave the carbon filter out during super-chlorination.
5. Open valves closed in #3 and #4 above, as well as the main water supply valve and the valve that allows water from the Carbon
Block filter housing to by-pass the vitapur® unit.
6. Go to the furthest tap in the house and run the cold water until you notice the odor of bleach. Repeat this step at all other taps,
washing machine, and all toilets.
7. Leave all taps shut off for 2-12 hours.
8. Remove the filter housings with the wrench provided with the system. Re-insert both the Sediment and Carbon Block filters into
their housings and attach them to the system. Make sure that the housings are seated properly against the filter heads.
9. Check the system for any leaks.
10. Plug the system in, and then flush all the lines for a minimum of 15 minutes.
Note: The introduction of a chlorine disinfection solution to a hot water heater that has been used with untreated hard water or water
with excessive iron, manganese or other organic contaminants may lead to oxidization of these materials. If you feel that these
conditions may apply to your installation, a thorough flushing of the hot water tank should be done to eliminate the oxidized material
from the system.
6
4. Operating Instructions
4.1 Initial Start-Up Procedure
The VPS1140 system has been designed to be installed on the cold water line only.
NOTE: When there is no flow in the system, the water in the vitapur® chamber will be warmed by the ultraviolet lamps. Running a cold water
tap for about 30 seconds will eliminate all of the warm water.
The presence of small air bubbles in the water system may occasionally give tap water a milky appearance, but air bubbles will not affect water
quality or taste.
Initially, filtered water may appear cloudy due to the release of air trapped within the filters and throughout the system. Dependant upon your
use of the system, this condition should disappear within a few days to a few weeks following system installation.
Always perform the following start-up procedure when starting your VPS1140 system for the first time or after a storage period:
1. Shut off the main water supply valve.
2. Mount the VPS1140 system to the wall. Please note that due to the weight of the VPS1140, it is essential that the unit is mounted
directly to a concrete wall or directly into framing studs. Do not mount the unit directly on dry wall.
3. Hook up inlet water connections and the outlet water connection. For ease of installation and service it is
recommended using couplings on both the inlet and outlet lines.
4. Confirm that all of the plumbing connections are secured. Partially open the main supply valve while releasing air from the
system by pressing the red pressure relief button on top of the filter housings. Release once water begins to flow from valve.
5. Plug in the vitapur® system and confirm that the UV lamps are illuminated; (blue glow at the end of the UV port cover).
6. If no leaks are visible at low flow, then fully open the main supply valve. Check for leaks.
7. Optional – for chlorine disinfection of household water distribution system, follow procedures outlined in section 3.3.
8. Open a downstream tap and flush the system for 15 minutes prior to initial use.
9. Your VPS1140 system is now ready for use.
4.2 Accredited Service Technician
Whenever you require assistance, please visit www.greenwayhp.com or call the Customer Service Department at 1-866-253-0447.
5. Service and Maintenance
Your VPS1140 uses a dual treatment process involving both filtration and an optical system to treat water with ultraviolet light. The water filters,
quartz tube and ultraviolet lamp require regularly scheduled replacement / service in order for the VPS1140 to provide you with reliable system
performance.
The ultraviolet lamp has an approximate life of one year. Replacement UV lamps and quartz sleeves are available from an authorized retailer
and Greenway Home Products. Use only vitapur® lamps and sleeves to ensure system performance. Replacement lamp and quartz sleeve
model # VUVL-8
The following instructions have been provided to assist with general maintenance of the system; UV lamp replacement, quartz sleeve cleaning/
replacement, and filter replacement. All other system repairs must be completed by an accredited service technician.
WARNING: Never attempt to service the VPS1140 unless you are an accredited service technician, as the performance of the system could be
adversely affected.
7
5.1 Lamp Installation and Replacement
WARNING: The lamps heat up after continuous use and can burn your skin if touched. Allow lamps to cool for at least 5 minutes before
removing them.
Do not operate the UV lamp outside of the reactor. The lamps in the unit emits Ultraviolet light that can cause permanent damage to skin and
eyes. Never look at the lamps when unit is turned on.
Handle the UV lamp by the ends only. Do not touch the bulb of a lamp with your fingers. If the surface of the lamp becomes dirty, use a clean
lint-free cloth and glass cleaner to remove the dirt.
Procedure for Replacing / Installing the Ultraviolet (UV) Lamp:
1. Turn off the water supply at both ends of the system.
2. Unplug the unit.
3. Drain water from the Stainless Steel UV Chamber.
4. Allow at least 5 minutes for lamp to cool.
5. Remove the connector from the end of the UV lamp.
6. Remove the UV lamp from the quartz sleeve by gently rotating the lamp free. Be sure to hold the lamp only by the ceramic tips.
7. Insert the new UV lamp into the quartz sleeve and attach the connector.
8. Refill the UV chamber by opening the water supply just enough to fill the chamber with water.
9. Check the system for leaks.
10. Ensure that the UV lamp is operating. A purple glow should be visible on the end of the gland nut.
5.2 Cleaning the Quartz Sleeve
Mineral deposits and sediment build-up on the quartz sleeve will affect the system performance by decreasing the UV light transmitted through
the quartz sleeve into the water column.
The proper maintenance and replacement of the Sediment and Carbon Block filters supplied with the VPS1140 system will reduce the
accumulation of mineral and sediment residue on the quartz sleeve.
The quartz sleeve may be cleaned with a commercially available, non-abrasive, scale remover and a lint free cloth. Cleaning of the quartz sleeve
should be done on a regular basis to insure system performance. The amount of cleaning required will be dependant upon local water
conditions.
All traces of the cleaning solution must be fully removed from the sleeve before it is reinstalled in the system. Care should be taken to prevent
any cleaning fluid from coming into contact with the inside surface of the quartz sleeve.
Procedure for Removing / Installing the Quartz Sleeve:
1. Turn off the water supply at both ends of the system.
2. Unplug the unit.
3. Drain water from the Stainless Steel UV Chamber.
4. Allow at least 5 minutes for lamp to cool.
5. Remove the connector from the end of the UV lamp.
6. Remove the UV lamp from the quartz sleeve by gently rotating the lamp free. Be sure to hold the lamp only by the ceramic tips.
7. Remove the quartz sleeve and clean as noted above.
8. Insert quartz sleeve into the UV chamber.
9. Insert new or old UV lamp into the quartz sleeve and attach the connector.
10. Refill the UV chamber by opening the water supply just enough to fill the chamber with water.
11. Check the system for leaks.
12. Ensure that the UV lamp is operating. A purple glow should be visible on the end of the gland nut.
8
5.3 Replacement of Filter Cartridges
Filter cartridge life varies depending on usage and/or water conditions. Changes in taste, color, and flow of the water being filtered indicate that
the cartridge should be replaced. It is recommended that the filter cartridges be replaced every 6 months. Replace sooner if water pressure at
faucet begins to drop noticeably or cartridge fails to perform satisfactorily.
WARNING: Do not use with water that is microbiologically unsafe or with water of unknown quality without adequate disinfection before or after
the system.
Procedure for replacing filter cartridge:
1. Turn off the water supply at both ends of the system.
2. Unplug the unit.
3. Depress the red pressure relief buttons on both filter housings, (a small amount of water may come out of the release valve
when the pressure is released).
4. Using the filter housing wrench, loosen the filter housing.
5. When the filter housing, is turning freely, hold onto it with both hands while backing the housing off the threads. The housing,
filled with water and a wet filter is heavy, be cautious and ensure that you are adequately positioned to support the weight.
6. Remove the old filter, and dispose in the trash. Used filters are not considered hazardous waste.
7. Empty the housing of water, and insert the new filter cartridge. Make sure the o-ring on the filter housing has not fallen off the
housing when dumping the excess water or removing the old filter.
8. Attach the filter housing onto the system.
9. Tighten the filter housing back into position lightly with your hands, (the use of the wrench should not be required). If
desired, the wrench can be used, although caution should be taken to ensure the housing is not over tightened.
10. Refill the system by opening the inlet water line just enough to fill the chamber with water.
11. Check the system for leaks.
12. If no leaks are evident, open the inlet water line completely and re-check for leaks.
13. Plug the system in and ensure that the UV lamp is operating.
14. Open the water supply line from the system.
15. Flush the system for a minimum of 5 minutes prior to use.
5.4 Seasonal Use Maintenance Requirements
If your system is only being used seasonally, it must be stored properly for the winter. Drain all water from the system and disconnect it from
the power source. Cap both the inlet port and the outlet port, to prevent entry of insects and small animals.
Remove the filters from the system and discard in the trash.
Before placing the system back in service, it is recommended that the household plumbing procedures described in section 3.4 be followed and
that the entire plumbing network be fully disinfected and flushed prior to using the VPS1140 system.
Install new filters in the system, (see section 5.3). Do not re-install filters used during the previous season.
To clean any dust build up and/or dirt on the outside of the Quartz Sleeve, use a lint-free cloth with alcohol or non-abrasive scale remover.
9
5.5 Replacement Components Ordering Information
Please contact the Customer Service Department : 1-866-253-0447.
Part Description
Quantity Per Unit
Part #
Sediment Filter
1
VS20RF-PP
Carbon Block Filter
1
VS20RF-CTO
UV Lamp & Quartz Sleeve
1
VUVL-8
If additional replacement component items are required, please contact the Customer Service Department at the number listed above.
10
6. Troubleshooting Guide
Problem
Suggested Solution
Possible Cause
Pressure Drop
(More than 40 psi loss at 8GPM).
Prefilter(s) clogged.
Replace filter cartridge.
Warm Output Water.
Water sitting in VPS1140 and heating up
due to infrequent use.
Run tap for short time.
VPS1140 leaking water.
Misaligned or cross-threaded ports
(inlet or outlet).
Reinstall to ensure a good solid
connection with ports.
Excessive water pressure (beyond 80 psi).
Install pressure regulator
ahead of system.
Water Hammer causing pressure spikes.
Install a Water Hammer* Arrestor in system.
Installed on the system without a ∑ ∑ ∑
pressure relief device.
No power to UV lamp when system is
plugged in.
GFI wall socket is tripped.
∑
Reset, following instructions provided
with that device.
Check socket with other appliances.
∑
System has power but UV lamps not
coming on.
Lamps not installed correctly.
Water is milky.
Small air bubbles are trapped in water.
∑
Air purging from new filters / system.
Leave tap on for short time.
Not mounted securely.
Secure fasteners.
Water Hammer* causing vibrations.
Install a Water Hammer* Arrestor in system.
Not being allowed sufficient space
for cooling.
Clear space for cooling.
(see section 2.4 for details).
Operated in an excessive ambient temp.
Unplug unit until temp. is lower than
37.7oC / 99.9 oF.
System is Vibrating.
Excessive heat generated.
∑
Water temp too high.
Outlet water has bad taste.
∑
Check to see that the lamp is
installed correctly and not loose.
Find source of air bubbles and correct.
Water temp. is higher than 37.7oC / 99.9 oF.
Filters not installed.
Ensure filters are in position.
Filter(s) / Housing(s) not seated properly.
Ensure filters are correctly seated in
the housing, and the housing are
seating properly.
Testing / source identification / additional
pre-treatment may be required.
Testing should be conducted to determine
cause of bad taste. Additional
pre-treatment may be required.
11
* Water Hammer: Sudden closure of a control valve or stopping of a pump produces excess pressure in a pipeline. The hydraulic
engineer, water supply designer and pumping system operator have the responsibility to ensure the surges due to Water Hammer are
within acceptable limits and can be dampened as quickly as possible.
Note: If you experience trouble with your system other than the symptoms described above, please visit www.greenwayhp.com or
contact the Customer Service Department at 1-866-253-0447.
12