1
Chapter 11
EXTENDING FIREWORKS:
DEVELOPING AN EFFECTIVE WORKFLOW
USING JAVASCRIPT AND FLASH
Adobe Fireworks includes a rich extensibility. model that allows advanced users to
create sophisticated custom panels (Flash panels) using a combination of JavaScript
and Flash. In fact, many of the panels that ship with Fireworks, including the Align
panel and the Path panel, are Flash panels. Because the Fireworks engineering team
has exposed practically every aspect of Fireworks through a JavaScript extensibility model, you’re really only limited by your imagination (and technical abilities, of
course).
This chapter is designed to give you an understanding of the entire Flash panel
development process and presents a workflow I have refined through developing
a number of Fireworks panels, including the Fireworks to XAML Exporter panel and
the Gradient panel. You’ll see how to author Fireworks JavaScript and integrate that
JavaScript in both Flash- and F lex-based custom panels for Fireworks.
This chapter is written for advanced users of both Fireworks and Flash and may be
a bit overwhelming if you do you not have programming experience. If you’re not
a programmer, you may choose to skim through the chapter and gain a greater
appreciation of what goes into creating custom panels that enhance your Fireworks
experience. However, if you are a programmer and are ready to enhance to your
favorite design application (Fireworks of course!), you need to be proficient with the
following environments and programming languages:
189
Chapter 11
JavaScript: Intermediate to advanced
ActionScript 2 or 3: Intermediate to advanced
Adobe Flash: Intermediate to advanced
Adobe Flex: Optional
Foundation terminology
The following terms will be used throughout the chapter and should be considered as foundational to
the conversation. We’ll go into more detail on these as the chapter progresses, but take a few minutes
to absorb these before moving on.
Fireworks command: A Fireworks command is similar to a macro in other programs. In the
simplest sense, it is a recorded set of actions that can be replayed by the application. Fireworks
ships with a number of predefined commands, all accessible from the main menu under
Commands.
JSF: JSF stands for JavaScript Fireworks. JavaScript is the programming language used to define
Fireworks commands. JSF is the term used to refer to JavaScript written specifically for
Fireworks. Fireworks commands are simply JavaScript files named with the .jsf extension.
Fireworks panel/Flash panel: Most of the floating panels in Fireworks, such as the Align panel
and the Path panel, are either Flash or Flex based. These panels are referred to as Flash
panels.
ActionScript: ActionScript is the programming language used by both Flash and Flex and is
required when authoring Flash panels.
SWF: Files compiled by Flash and Flex are saved in the SWF file format. We will use the term
“SWF” throughout the chapter to refer to an exported file.
FLA: Flash source files are saved in the FLA file format. We will use the term “FLA” throughout
the chapter to refer to source files.
Fireworks API: The Fireworks API, or application programming interface, is a set of methods and properties accessed via JSF to perform Fireworks core actions or apply changes to
objects on the canvas. For example, to show the color picker in Fireworks, you call the fw.
popupColorPickerOverMouse method in JSF.
Learning the basics of an advanced workflow
Before you start creating anything—JavaScript, Flash files, Flex projects, and so forth—it’s important
that you understand the big picture of Fireworks extensibility and get a firm grasp of the basic concepts and ideas. Consider for a moment all of the various actions you’ve performed while working in
Fireworks: you’ve drawn elements on the canvas, scaled them, rotated them, applied filters to them;
you’ve create layers and pages and named and renamed them; you’ve applied fill colors and strokes
and edited them endlessly; and much more.
190
EXTENDING FIREWORKS: DEVELOPING AN EFFECTIVE WORKFLOW USING JAVASCRIPT AND FLASH
All of these actions that you have performed are core actions (or combinations of actions) that
Fireworks supports. And, as we mentioned in the introduction, all of these core actions are exposed by
the Fireworks API and are accessible via JavaScript. This JavaScript can be housed in a JSF text file and
run via the Commands menu, or it can be compiled into a SWF and run either as a modal command
window (again via the Commands menu) or as a persistent Flash panel, accessible from the Window
menu like the Align panel or Path panel.
Most of the Fireworks methods exposed via the Fireworks API perform actions on the selected object
(or objects). For example, the clipCopy() method assumes you have something selected on the canvas. Considering again your experience with Fireworks, this probably makes sense. You don’t apply a
filter to nothing; you apply it to the active selection.
Individually, the methods exposed via Fireworks are not that special. It’s their combination, however,
that can result in a very powerful, t ime-saving addition to the Fireworks toolset. Consider any operation
that you perform monotonously, and then consider the subtle variations you make in executing that task
each time. It’s the variations that can be extracted into a custom interface, acting as variables into your
repetitive task. You can then plug those variables into Fireworks API calls and reclaim some lost time.
So, with that basic overview out of the way, let’s get to it!
Defining a Fireworks workflow
Since this chapter is, after all, about workflow, how about defining one? Read and reread the following
workflow. The sections that follow will breathe life into these steps and give you a clear understanding
of each stage in the development process.
1. Create the JSF command file.
2. Create the UI (using Flash or Flex).
3. Import the JSF command text into the UI project.
4. Execute JSF commands in Flash or Flex using MMExecute().
5. Export/Publish the SWF and test it within Fireworks.
Let’s summarize that list in sentence form. Start by creating a JSF command and test that command
in Fireworks. Then, create a user interface using either Flash or Flex. Once you have your interface
in place, you need to have Fireworks execute your JSF command. This is achieved by calling the
MMExecute() method in ActionScript and passing it the JSF you want to execute. Once you have everything in place in your UI, you publish a SWF to a special folder that Fireworks knows about.
That was the “trailer” paragraph. We hope you feel sufficiently enticed by the proposed workflow.
Now for the movie!
Step 1: Creating a simple JSF command
Let’s start by creating a simple JSF command. Without knowing any of the Fireworks API methods, you
can quickly create a JSF file using the Fireworks History panel (select Window ➤ History from the main
menu).
191
Chapter 11
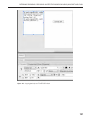
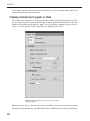
Using the History panel to create a command
Not only does the History panel show the recent actions you’ve performed, it lets you save a sequence
of those actions as a Fireworks command file. Perform the following actions to create your first
Fireworks command:
1. Create a new document.
2. Draw a rectangle on the canvas and change its fill color.
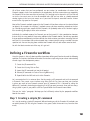
3. Select the steps you just performed in the History panel, and then click the Save icon.
4. When prompted for a command name, enter Draw Rect (see Figure 11‑1).
Figure 11‑1. Creating a simple command using the History panel
After saving the command, you should now have a new menu item available from the main toolbar’s
Commands menu. Try deleting your rectangle and executing the command you just created (select
Commands ➤ Draw Rect). If you saved the correct steps in your History panel, a new rectangle should
appear with the same specifications as the one you previously created.
What just happened?
Fireworks created a new JSF file and saved it to a special directory on your hard drive. The file contains
JavaScript code that performs the actions you selected in the History panel. Fireworks sees this new
file and displays it in the list of commands in the Commands menu. When you select the command
from the menu, the JavaScript within this file is interpreted and executed by the internal Fireworks
JavaScript interpreter. This process is similar to a web browser executing JavaScript, and then manipulating the elements within its Document Object Model (DOM) based on the JavaScript. And, in the
same way that web browsers provide a DOM that can be interacted with via JavaScript (document.
getElementById(), for example), Fireworks exposes its DOM to be accessed via JavaScript.
192
EXTENDING FIREWORKS: DEVELOPING AN EFFECTIVE WORKFLOW USING JAVASCRIPT AND FLASH
Where is the command stored?
Fireworks commands that are saved from the History panel are stored in your user profile folder.
These commands will be available only to you when logged in and not to other users. Commands can
be copied to a common location so that they are available to all accounts if you are using a shared
machine or if you log in with different accounts. Unlike command panels, when commands are added,
Fireworks does not have to be restarted to recognize them. You can add new commands to either
your user profile folder or the common folder at any time while Fireworks is running, and those commands will be available immediately via the Commands menu. The following details the location of the
Commands and Command Panels folders on Windows XP, Vista, and Mac OS X.
Commands vs. command panels
Commands can either be pure JSF or SWF based. When executed, the command is run modally, meaning it has focus in the application for its entire life cycle. You cannot interact with anything else while
the command is running. SWF-based commands are authored in the same way as command panels,
but they cannot be persisted in Fireworks. Use commands for w
izard-like operations.
Command panels use JSF to talk to Fireworks but must be SWF based. Command panels can be persisted in the UI and docked with other panels just like native Fireworks panels.
Note: There are some slight authoring differences between SWF-based commands and command
panels not covered in this chapter.
Commands folder: current user
Windows XP: C:\Documents and Settings\<User Name>\Application Data\Adobe\
Fireworks CS4\Commands
Windows Vista: C:\Users\<User Name>\AppData\Roaming\Adobe\Fireworks CS4\
Commands
Mac OS X: HD:Users:<User Name>:Library:Application Support:Adobe:Fireworks
CS4:Commands
Commands folder: all users
Windows XP: C:\Program Files\Adobe\Fireworks CS4\Configuration\Commands
Windows Vista: C:\Program Files\Adobe\Fireworks CS4\Configuration\Commands
Mac OS X: HD:Applications:Adobe:Fireworks CS4:Configuration:Commands
Command Panels folder: current user
Windows XP: C:\Documents and Settings\<User Name>\Application Data\Adobe\
Fireworks CS4\Command Panels
Windows Vista: C:\Users\<User Name>\AppData\Roaming\Adobe\Fireworks CS4\
Command Panels
Mac OS X: HD:Users:<User>:Library:Application Support: Adobe:Fireworks
CS4:Command Panels
193
Chapter 11
Command Panels folder: all users
Windows XP: C:\Program Files\Adobe\Fireworks CS4\Configuration\Command Panels
Windows Vista: C:\Program Files\Adobe\Fireworks CS4\Configuration\Command Panels
Mac OS X: HD:Applications:Adobe Fireworks CS4:Configuration:Command Panels
Editing and understanding the JSF
Now that you know where commands are stored, browse to the file that you just created, Draw
Rect.jsf, and open it using your text editor of choice. At this stage in the process, the lightweight
Notepad++ is a great choice that provides syntax highlighting. (Just select Language ➤ JavaScript so
that Notepad++ interprets the JSF file as JavaScript.) If you followed our example earlier and saved the
same history steps we did, you should see code similar to the following:
line 1: fw.getDocumentDOM().addNewRectanglePrimitive ➥
({left:36, top:39, right:101, bottom:104}, 0);
line 2: fw.getDocumentDOM().setFillColor("#99cc33");
Let’s break this down so you understand what’s happening. The two history steps you saved have been
translated into two lines of JavaScript, each representing a specific history item. Notice that both of
these lines begin with fw.getDocumentDOM(). This method call gets a reference to the DOM of the
active Fireworks document. All of the methods that we call to operate on objects on the canvas are
housed on the document’s DOM.
You can also access specific documents directly using the fw.documents object:
fw.documents[documentIndex] returns the DOM for the specified document.
So, following the requisite call to access the current document’s DOM is the actual method call.
On line 1, the addNewRectanglePrimitive method is called. This method accepts two arguments:
a boundingRectangle argument (of type Rectangle) and a roundness argument (of type double,
where 0 equals no roundness and 1 equals 100% roundness). The Rectangle type includes four properties: left, top, right, and bottom, each of type float. The syntax used as the first argument for
addNewRectanglePrimitive({left: 35, top: 39, right: 101, bottom: 104}) is a common way to
define an object in JavaScript (and other languages).
If you’re wondering how we know what parameters these methods are expecting, we’ll
cover this later in the section “Navigating the Extending Fireworks documentation.”
We could also have explicitly declared an object, and then set left, top, right, and bottom properties:
var myRect = new Object();
myRect.left = 36;
myRect.top = 39;
myRect.right = 101;
myRect.bottom = 104;
194
EXTENDING FIREWORKS: DEVELOPING AN EFFECTIVE WORKFLOW USING JAVASCRIPT AND FLASH
var cornerRadius = 0;
fw.getDocumentDOM().addNewRectanglePrimitive(myRect, cornerRadius);
That pretty much covers the details of line 1. A rectangle will be created with the specified bounding
box and corner radius. The second line sets the color of the newly created rectangle by calling the
setFillColor method. setFillColor accepts a hexadecimal color string of the format #RRGGBB or
#RRGGBBAA, where AA represents opacity (alpha).
Remember how we said earlier that most methods operate on selected objects? You may be wondering how we selected the rectangle that was just added. The answer is that we didn’t need to. Consider
any time that you’ve drawn a rectangle on the canvas—after drawing the rectangle, it’s automatically
selected, right? The same is true when you add an object via code; it becomes the active selection.
Experiment with the values passed to addNewRectanglePrimitive and setFillColor, save Draw Rect.
jsf, and rerun the command within Fireworks. You can get immediate feedback on changes to your
code via the Commands menu. You have now performed actions that you will perform countless times
if you proceed with Fireworks extension development (change code, save, test in Fireworks).
Step 2: Creating a Flash UI
The first phase of this workflow focuses on creating a working JSF file and testing that file in Fireworks.
The sample we looked at was extremely simple and didn’t require much testing. Really complex panels, however, can often be difficult to debug. It’s sometimes hard to determine whether the bug is in
your JSF or in your panel’s ActionScript. By working with and testing pure JSF via the Commands menu
before moving into a panel, you can be confident that the underlying JSF is working correctly.
Creating a document and adding a button
Now that you have a working, tested JSF file, it’s time to create a command panel that gives the underlying command a
face. We’ll keep things simple at first and show you how to
create a panel in Flash that executes the JSF code defined in
Draw Rect.jsf.
1. Start by creating a new Flash document (select an
2. Set the document width to 250 pixels (px) and the
ActionScript 2 project for now).
height to 300 px. The size that you define on your
document becomes the minimum size of the panel in
Fireworks. The panel can be sized larger than this in
Fireworks but never smaller.
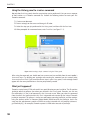
3. Now, add a Button component to the stage (note that
Flash uses the term “stage” instead of “canvas”), and
give it an instance name of executeJSF_btn.
4. Set the component’s Label property to Execute JSF, as
shown in F igure 11‑2.
Figure 11‑2. Adding a Button to the stage in
Flash
195
Chapter 11
Steps 3 and 4: Importing and executing the JSF
Flash panels pass JSF to Fireworks via the MMExecute() method in ActionScript. When an exported
SWF is run inside Fireworks as a Flash panel, MMExecute() passes the JavaScript directly to Fireworks.
Fireworks then executes the JavaScript and returns the resulting value to Flash (if any):
var result = MMExecute(jsfCode);
The JavaScript is passed to MMExecute() as a string, which means you must escape quotation marks
and potentially double-escape text that has already been escaped in JavaScript strings. That sounds
more confusing than it actually is. The following example executes the setFillColor() line of code
in Flash using MMExecute():
MMExecute("fw.getDocumentDOM().setFillColor(\"#99cc33\");");
Notice that the entire string is wrapped with quotation marks, and the inner quotes surrounding
#99cc33 have been escaped: \"#99cc33\". For single lines of JavaScript, this method of execution
works well. As your JavaScript grows in complexity, however, escaping large sequences of code
becomes laborious and introduces the potential for error.
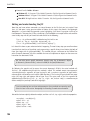
One way around this for simple commands is to paste the JSF into a Flash TextField. Let’s use this
approach for our Draw Rect example:
1. Create a new TextField on the stage.
2. Change its text type to Dynamic Text and give it an instance name of jsfCode_txt (see
Figure 11‑3).
3. Move this TextField off the stage so that it is not visible at runtime.
4. Paste the contents of the Draw Rect command directly into this TextField.
The Fireworks JavaScript is now available to you directly within the Flash document, accessible via
jsfCode_txt.text, and you didn’t have to make any modifications to the code at all.
196
EXTENDING FIREWORKS: DEVELOPING AN EFFECTIVE WORKFLOW USING JAVASCRIPT AND FLASH
Figure 11‑3. Copying JavaScript to a TextField in Flash
197
Chapter 11
Adding the Mouse.onRelease event handler
With all of the pieces in place on the Flash stage, it’s now time to add an event handler to the button’s
onRelease event and execute the JSF:
1. Create a new layer in the timeline.
2. Change the layer name to Actions.
3. Lock the layer.
4. Open the Actions panel and add the following code to Frame 1 of the Actions layer:
executeJSF_btn.onRelease = function() {
MMExecute(jsfCode_txt.text);
}
When the button is clicked, MMExecute() will be called with the value of the TextBlock passed as the
argument.
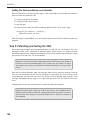
Step 5: Publishing and testing the SWF
You’re now ready to publish your new command panel as a SWF and test it in Fireworks. This is the
exciting part! Refer to the “Commands vs. command paths” section earlier in this chapter to locate
the correct Command Panels folder for your operating system. Once you have the correct path, export
your current file as Draw Rect.swf to that location.
Because this is the first time you are exporting the file, you will have to restart Fireworks
in order to see the new command panel in the Window menu of Fireworks. For subsequent exports, you can just close the panel in Fireworks and reopen it to see your latest
version.
Once you’ve restarted Fireworks, open the new panel from the main menu by selecting Window ➤
Draw Rect. You should now see your Execute JSF button in a new panel. Let’s test this thing! Create
a new document, and then click the Execute JSF button. If you’ve followed along correctly, a new
rectangle should appear on the stage, just as it does when you select Draw Rect from the Commands
menu.
Congratulations! You’ve now created your first custom Flash panel for Fireworks!
Change the publish path in Flash via File ➤ Publish Settings to the Command Panels
folder you just exported to. Publish by selecting File ➤ Publish (press Alt+F+B to navigate the main menu quickly) or by pressing Shift/Cmd+F12, all from the comfort of
your keyboard.
198
EXTENDING FIREWORKS: DEVELOPING AN EFFECTIVE WORKFLOW USING JAVASCRIPT AND FLASH
This simple example illustrates an effective workflow for developing Flash panels. You started by creating a JSF command and testing that command within Fireworks. When you knew it was performing as
expected, you copied the JSF into a Flash TextField. You then added code to execute the JSF when a
button was clicked within Flash.
Building a functional UI in Flash
The Draw Rect sample covered just the basics. You saw how to execute JSF from a command panel,
but the panel didn’t provide any enhanced functionality at all. It performed the exact same action as
the Draw Rect.jsf run from the Commands menu. Let’s build on the Draw Rect sample and create a
functional UI.
The scenario: Update the Draw Rect UI to include left, top, height, width, and cornerRadius
TextBlocks and a ColorPicker component. To support this behavior, we need to update the JSF, converting the inline code into a function that can be called.
In the following JSF code, we’ve created a function named CreateRectangle that accepts all of these
values as parameters:
// Test the CreateRectangle Function
CreateRectangle(10,10,100,50, 10, "#FFCC00");
function CreateRectangle(left, top, width, height, cornerRadius, color)
{
var rect = new Object();
rect.left = left;
rect.top = top;
rect.right = left + width;
rect.bottom = top + height;
fw.getDocumentDOM().addNewRectanglePrimitive(rect, cornerRadius);
fw.getDocumentDOM().setFillColor(color);
}
Draw Rect.jsf updated with the CreateRectangle function
The CreateRectangle function accepts width and height instead of right and bottom parameters.
Thinking in terms of a bounding box is unnatural for most people, so we do the translation from width
and height to right and bottom in the CreateRectangle function. Notice that we have a sample function call in the preceding listing. Remember, we do as much testing in the JSF via the Commands menu
as possible to ensure that the JSF is working correctly.
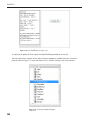
After a couple of run-throughs and corrections (the first time we tested we forgot the
.getDocumentDOM() before setFillColor), we are confident in the function. We will now copy the
function to the TextBlock inside Flash. Figure 11‑4 shows the updated TextBlock.
199
Chapter 11
Figure 11‑4. Flash TextBlock housing JSF code
It’s now time to update the UI to support the added flexibility provided by the new JSF.
Start by creating four instances of the NumericStepper component (available from the Components
panel as shown in Figure 11‑5) and name them nsX, nsY, nsWidth, nsHeight, and nsCornerRadius.
Figure 11‑5. Selecting the NumericStepper
component
200
EXTENDING FIREWORKS: DEVELOPING AN EFFECTIVE WORKFLOW USING JAVASCRIPT AND FLASH
F igure 11‑6 shows the new layout with all of the NumericSteppers in place. We’ve also added labels
to make it clear what each control represents and some moderate styling to give this panel a little
personality.
Figure 11‑6. Updated panel layout in Flash
Using a NumericStepper instead of a TextInput component will let us enforce certain value
ranges—you don’t want someone entering “thirty” for the width, for example. For all of the controls
besides nsCornerRadius, set the minimum property to 0 and the maximum property to 10,000. For
nsCornerRadius, set the minimum to 0 and maximum to 100. Even though the CreateRectangle
function expects a cornerRadius in the 0–1 range, we think users will expect a value in the 0–100
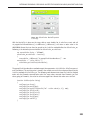
range. A simple division by 100 will take care of the discrepancy. Figure 11‑7 shows the Component
inspector in Flash with the nsCornerRadius NumericStepper control selected.
Figure 11‑7. Setting NumericStepper values
via the Component inspector
201
Chapter 11
With all of the controls in place, with the exception of the ColorPicker, it’s now time to update
the ActionScript event handler for the Add Rectangle button. The ColorPicker will be a little more
involved, so we’ll add it in a minute. Return to the executeJSF_btn.onRelease event handler on the
actions timeline and update the ActionScript with the following:
executeJSF_btn.onRelease = function() {
// Execute the JSF, creating the CreateRectangle function
MMExecute(jsfCode_txt.text);
// Calculate the CornerRadius value
var cornerRadius:Number = nsCornerRadius.value / 100;
// Call CreateRectangle
MMExecute("CreateRectangle(" + nsX.value + "," + nsY.value + ➥
"," + nsWidth.value + "," + nsHeight.value + "," + ➥
cornerRadius.toString() + ", '#FF0000');");
}
The first thing we do is execute the JSF contained in the TextBlock. Instead of the original JSF that
created a rectangle when executed, this just registers the function definition. Now the function
CreateRectangle will be available as long as Fireworks is running. After executing the JSF, the value
of the nsCornerRadius NumericStepper is divided by 100. This gives us a value in the 0–1 range—the
value expected by the Fireworks createRectanglePrimitive method. With those two housekeeping
steps out of the way, it’s now time to actually call the CreateRectangle function, passing it values
from Flash UI elements. Again, use MMExecute(), this time dynamically building the parameter string,
directly injecting the NumericStepper values. For now, we’ll use a hard-coded color value (#FF0000).
Later this value will be replaced with a value from the ColorPicker.
Working with returned values: Adding a ColorPicker
It’s great that we can now define the size and location of a rectangle from within our panel, but we’re
still missing the crucial color component. We could just add a TextBlock and accept a straight hexadecimal string, or we could take advantage of Fireworks’ built-in ColorPicker. Remember, just about
everything that the Fireworks core is capable of has been exposed via the API, and the ColorPicker
is no exception. We can launch the ColorPicker by calling the fw.popupColorPickerOverMouse()
method. Notice that this method is defined directly on the Fireworks (fw) object and not the DOM
object. This is because the ColorPicker itself isn’t performing an action on a specific document but is
instead providing general-purpose functionality. When called, the native Fireworks color picker will be
launched. Once a color is selected, the value will be returned in the #RRGGBBAA format. Figure 11‑8
shows the command panel updated with a new MovieClip named ColorPicker_mc. This MovieClip
has a custom method named SetColor that, when called, paints the ColorPicker with the specified
color. (Open the sample files for this chapter to see how this is achieved.)
202
EXTENDING FIREWORKS: DEVELOPING AN EFFECTIVE WORKFLOW USING JAVASCRIPT AND FLASH
igure 11‑8. ColorPicker MovieClip added
F
to the stage
With the MovieClip in place on the stage, add an event handler for its onRelease event and call
fw.popupColorPickerOverMouse() via MMExecute(). MMExecute() will return a color value in the
#RRGGBBAA format that can then be passed to the SetColor method defined on ColorPicker_mc.
Following is the ActionScript event handler for ColorPicker_mc.onRelease:
var currentColor:String = "#FF0000";
colorPicker_mc.onRelease = function()
{
currentColor = MMExecute("fw.popupColorPickerOverMouse('" + ➥
currentColor + "',false,false);");
colorPicker_mc.SetColor(currentColor);
}
The popupColorPickerOverMouse method accepts three parameters: initialColor, allowTransparent,
and forceWeb216. The resulting value is stored in the variable currentColor and passed directly to the
SetColor method of ColorPicker_mc. The following code demonstrates how the SetColor method
works with the Fireworks-returned color value. Like many values returned from Fireworks (or Flash
values going to Fireworks), the value has to be massaged into a format that makes sense to Flash.
function SetColor(color:String)
{
rectTarget_mc.clear();
rectTarget_mc.moveTo(0,0);
rectTarget_mc.beginFill(parseInt("0x" + color.substr(1, 6)), 100);
rectTarget_mc.lineTo(22,0);
rectTarget_mc.lineTo(22,22);
rectTarget_mc.lineTo(0,22);
rectTarget_mc.lineTo(0,0);
rectTarget_mc.endFill();
}
203
Chapter 11
In this method, the Flash Drawing API is used to draw a rectangle directly into an empty MovieClip
named rectTarget_mc. rectTarget_mc is prepositioned on the stage and serves as the selected color
swatch. The third line of ActionScript
(rectTarget_mc.beginFill(parseInt("0x" + color.substr(1, 6)), 100);)
demonstrates how to convert the color string returned from Fireworks into a hexadecimal value
that Flash can use in its beginFill method. This solid color conversion example is an easy one. The
Gradient panel that I wrote has to convert back and forth between the Fireworks gradient format and
the Flash gradient format constantly throughout its life cycle. After publishing the SWF (press Alt+F+B
or Shift/Cmd+F12) and testing Draw Rect.swf, the ColorPicker now works as expected, launching the
native Fireworks color picker and drawing the selected color in the Flash panel. However, there’s still
one piece missing: the Add Rect button’s event handler needs to be updated to take advantage of the
selected color. Back to the code:
executeJSF_btn.onRelease = function() {
// Execute the JSF, creating the CreateRectangle function
MMExecute(jsfCode_txt.text);
// Calculate the CornerRadius value
var cornerRadius:Number = nsCornerRadius.value / 100;
// Call CreateRectangle
MMExecute("CreateRectangle(" + nsX.value + "," + nsY.value ➥
+ "," + nsWidth.value + "," + nsHeight.value + "," ➥
+ cornerRadius.toString() + ", '" + currentColor + "');");
}
Notice that the hard-coded #FF0000 color string has been replaced with the currentColor variable
in the second MMExecute() call. After publishing again, you can select a color, click Add Rect, and the
selected color is applied as expected!
This is just one example of many cases where Fireworks and Flash values vary to a certain extent. You
have to know the differences between ActionScript requirements and the Fireworks object model and
convert these values into something that can be used.
Streamlining your workflow with the Fireworks
developer toolbox
So far we’ve shown you how to execute JSF inline via MMExecute() and by including the JSF in a
TextBlock on the design surface. You’ll never get away from the first method completely, but you
should not have to rely on it exclusively. The TextBlock method gives you a way to import your JSF
without having to escape all of your JSF. This is great for small chunks of JSF but introduces another
manual step that can result in errors. Having to copy and paste all of your JSF code from a text editor
to the design surface in Flash becomes laborious, and it’s one of those steps that can drive you crazy.
Fortunately, there’s another approach that can streamline your workflow even further, and it doesn’t
change the workflow proposed at the beginning of this chapter. It actually continues to enable it for
204
EXTENDING FIREWORKS: DEVELOPING AN EFFECTIVE WORKFLOW USING JAVASCRIPT AND FLASH
complex projects that include large amounts of JSF. Instead of copying the JSF to a TextBlock, you
can export the JSF as a single ActionScript variable defined in an AS file, and then use ActionScript’s
#include to import the variable into your project. You then use MMExecute() just as you did with
the TextBlock, only this time passing it the variable name defined in the external AS file. This actually requires that you escape the entire JSF file again, something that we were trying to get you away
from earlier. Fortunately, this is not something you have to do manually. While creating the FW to
XAML Exporter panel, I created the Fireworks Developer Toolbox (FDT), a utility that does the escaping and conversion to ActionScript for you automatically, which you’ll see how to use momentarily.
First, let’s review where we’ve come from and see how this latest solution is really just another evolution of the process. In the first MMExecute() examples, we defined the JSF string inline as the method
parameter:MMExecute("fw.popupColorPickerOverMouse();");.
We then moved the JSF directly to a TextBlock and accessed the TextBlock’s text property to execute JSF:MMExecute(jsfCode_txt.text);.
What we haven’t demonstrated is how to define a variable that houses the JSF code, and then pass that
variable to Fireworks via MMExecute(). In this approach, we have to escape the string values again:
var jsfCode:String = "fw.getDocumentDOM().setFillColor(\"”#FF0000\");";
MMExecute(jsfCode);
Taking this one step further, instead of defining the variable jsfCode inline in the Flash file, we can
create an external AS file that defines the variable:
// Contents of jsfCode.as
var jsfCode:String = "fw.popupColorPickerOverMouse();";
We can now use #include to include the contents of the external AS file. The variable jsfCode can be
accessed exactly as if it had been defined inline:
// ActionScript within Flash File
#include "jsfCode.as"
colorPicker_mc.onRelease = function()
{
// Execute JSF defined in jsfCode variable,
// housed in external jsfCode.as file
MMExecute(jsfCode);
}
This may seem like a step in the wrong direction, having to convert the JSF code to a string variable.
Fortunately, the FDT will do this automatically.
Converting JSF to AS using the FDT
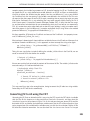
Converting the JSF file to an ActionScript file is easy using the FDT. Launch the FDT (which is available
with the files for this chapter or at www.granthinkson.com/tools/fireworks), and then select the
ActionScript Conversion tab as shown in Figure 11‑9. On this tab, you select your source JSF file and the
destination AS file, and define the ActionScript variable name that the JSF will be assigned to. Once
you’ve targeted your files and defined the variable name, just click the convert button, and the AS file
will either be created or overwritten. You can also check the Auto Convert when Source File Changed
205
Chapter 11
option on this tab. When enabled, the FDT will watch for file changes and automatically perform the
conversion in the background. When you step back to Flash, you don’t have to remember to click
convert in the FDT.
Figure 11‑9. FDT ActionScript conversion
Following is the original CreateRectangle function introduced earlier in the chapter, housed in Draw
Rect.jsf:
function CreateRectangle(left, top, width, height, cornerRadius, color)
{
var rect = new Object();
rect.left = left;
rect.top = top;
rect.right = left + width;
rect.bottom = top + height;
fw.getDocumentDOM().addNewRectanglePrimitive(rect, cornerRadius);
fw.getDocumentDOM().setFillColor(color);
}
The following code listing shows the contents of Draw Rect.as after being converted to an ActionScript
variable using FDT:var jsfCode:String = "":
+ "function CreateRectangle(left, top, width, height, ➥
cornerRadius, color)\n"
+ "{\n"
+ "
var rect = new Object();\n"
206
EXTENDING FIREWORKS: DEVELOPING AN EFFECTIVE WORKFLOW USING JAVASCRIPT AND FLASH
+ "
rect.left = left;\n"
+ "
rect.top = top;\n"
+ "
rect.right = left + width;\n"
+ "
rect.bottom = top + height;\n"
+ "
\n"
+ "
fw.getDocumentDOM().addNewRectanglePrimitive(rect, ➥
cornerRadius);\n"
+ "
fw.getDocumentDOM().setFillColor(color);\n"
+ "}\n"
+ "";
The entire contents of the JSF source file specified in the FDT have been converted to a string, escaped
correctly, and assigned to the variable name specified, in this case jsfCode. You can now use the
#include method introduced earlier and reference this AS file. With the AutoConvert option enabled,
you’ll be able to edit, save, and test your JSF, and then switch to Flash and recompile, without having
to manually import/update the JSF code in your Flash project.
Updating the Draw Rect panel
Now that you have an external AS file housing your JSF, you can remove the code-housing TextBlock
that you added earlier in the chapter. The only other thing you need to do is update the ActionScript
on your Actions layer to reference the external file and execute the JSF variable:
#include "jsfCode.as"
executeJSF_btn.onRelease = function() {
// Execute the JSF, creating the CreateRectangle function
MMExecute(jsfCode);
// Calculate the CornerRadius value
var cornerRadius:Number = nsCornerRadius.value / 100;
// Call CreateRectangle
MMExecute("CreateRectangle(" + nsX.value + "," + nsY.value ➥
+ "," + nsWidth.value + "," + nsHeight.value + "," ➥
+ cornerRadius.toString() + ", '" + currentColor + "');");
}
With the exception of adding the #include statement, the only other change required in the
ActionScript is the MMExecute() statement—jsfCode_txt.text was replaced with jsfCode, the variable name defined in the FDT. This now concludes the workflow section of the chapter. We’ve worked
our way from the ground up, starting with a simple JSF command and ultimately creating a fully functional Flash panel.
Defining Flash panel resize behavior
When creating Fireworks panels, you must be aware that the user can resize the panel, just like any other
panel you encounter in Fireworks. When authoring panels in Flash (and not Flex), we have to manually
define the resize behavior. Flex provides layout panels that automatically react to stage resizing, so this
section can pretty much be ignored if you’re planning to exclusively author your panels in Flex.
207
Chapter 11
By default, Flash SWFs scale when resized—not the behavior expected by users. Go ahead and try
resizing the Draw Rect panel you just created. All of the elements should scale in size, as if you had
zoomed in on the stage in Flash. Scaling can easily be prevented by adding the following ActionScript
to Frame 1 of the Actions layer in the movie’s main timeline:
Stage.scaleMode = "noScale";
Stage.align = "TL";
The first property tells Flash not to scale/stretch its content when resized; the second property tells
Flash to anchor its content to the top-left (TL) corner of the Flash Player window. Go ahead and
update your Draw Rect panel with these changes, republish, and then test the panel. Figure 11‑10
shows these settings in action.
Figure 11‑10. Basic scaleMode and align properties set
The panel is no longer scaling, but none of the elements on the stage actually react to the resizing,
they just don’t scale. Cosmetically, this is definitely an improvement, but it still doesn’t get us all the
way there. Take the Add Rect button, for example. It is common practice to have the main dialog
command button anchored to the lower-right corner of the dialog window. This can be achieved by
handling the stage object’s onResize event in ActionScript:
Stage.onResize = function()
{
// Define a common margin
var MARGIN:Number = 10;
// Manually update the position of executeJSF_btn
executeJSF_btn._left = Stage.width – executeJSF_btn.width – MARGIN;
executeJSF_btn._top = Stage.height – executeJSF_btn.height – MARGIN;
208
EXTENDING FIREWORKS: DEVELOPING AN EFFECTIVE WORKFLOW USING JAVASCRIPT AND FLASH
// TODO: Manually update positions of all other elements on stage
}
Updating the position of the single button was not that bad—it just took a couple of lines of
ActionScript. However, that’s just for the single button on the stage. We really want the header and
background artwork to stretch as the panel is resized. For panels with more UI elements, our resize
desires will grow in complexity. Enter the AlignmentManager extension for Flash. I wrote this Flash
panel a few years ago to save time when creating resizable Flash layouts. (Note: This panel was written
in ActionScript 2 and will not work with ActionScript 3 projects. I don’t currently have plans to update
this as I see the Flex layout controls as a replacement for this panel.)
The AlignmentManager is included as an MXP in the Utilities folder of the resource files for this
chapter. After installing it via the Flash Extension Manager, you should see AlignmentManager listed in
the Components panel under the Infragistics section, as shown in Figure 11‑11.
Drag an instance of the component onto the stage, and then open the Component inspector in
Flash (Window ➤ Component Inspector). Figure 11‑12 shows the custom Property inspector for the
AlignmentManager component. The managed MovieClips listed are elements on the Draw Rect stage.
Figure 11-11. AlignmentManager Flash Figure 11‑12. Managing MovieClips
component with the AlignmentManager
209
Chapter 11
The AlignmentManager can manage only objects that are MovieClips, so the header artwork has
been converted to a MovieClip and given an instance name of headerBackground_mc. With the
headerBackground_mc item selected in the MovieClip tree, you can specify values for HorizontalAlignment,
VerticalAlignment, and Margins. After making changes, you have to click the save changes button (an
admitted quirk of the panel).
We’ve included an alternative version of the Draw Rect sample file that uses the AlignmentManager
to completely define the resize behavior of the panel. (See the version of Draw Rect.fla located in
the source projects folder as “Draw Rect/4. Using the Alignment Manager/Draw Rect.fla”.) The final
version behaves nicely as it is resized in Fireworks. Republish Draw Rect.fla to see the final layout
behavior in Fireworks as the panel is resized:
The background artwork stretches to fill the panel.
The header background stretches horizontally.
The logo remains anchored to the top-left corner.
Configuration fields remain anchored to the t op-left corner.
The Add Rect button anchors to the lower-right corner.
Coding this resize behavior by hand would have taken a long time and be very frustrating to maintain.
Using this panel empowers you to deliver expected layout results in a fraction of the time you would
spend hand-coding the same behavior.
Responding to Fireworks events
Up to this point, we’ve been pretty much oblivious to what’s been going on around us in Fireworks.
We haven’t cared about selection changes or tool changes or documents opening or closing. We’ve
just focused our attention on one thing: creating rectangles. For content creation panels, this is fine,
but for panels that need to respond to selection changes (such as the Gradient panel), we need a way
to react to such changes. Fireworks provides a number of events that we can listen for and handle
directly via ActionScript. We’ll show you how to handle these in ActionScript 2 (since we’ve been using
ActionScript 2 exclusively so far) and save the ActionScript 3 demonstration for the section “Building
panels with ActionScript 3” later in the chapter.
Detecting change of selection
Let’s start by handling the onFwActiveSelectionChange event. This event is raised any time you select
a different object on the Fireworks design surface. With the Gradient panel, we handle this event and
redraw the brush preview based on the fill of the selected object. Fireworks event handling is a little
different from traditional event handling. In Fireworks, you simply define an ActionScript function
with the name of the event you wish you handle. When Fireworks checks for event handlers, it will
find your matching function name and register it. Any time the event is raised, your function will be
called.
The following ActionScript defines a function named onFwActiveSelectionChange. When the selection changes in Fireworks, an alert box is displayed.
210
EXTENDING FIREWORKS: DEVELOPING AN EFFECTIVE WORKFLOW USING JAVASCRIPT AND FLASH
function onFwActiveSelectionChange()
{
MMExecute("alert('Selection Changed!');");
// Do something with the selected object, like retrieve its color
// var currentColor:String;
// currentColor = MMExecute("fw.selection[0].pathAttributes➥
.fillColor");
}
This function needs to be defined at the _global level, meaning you should define these
event handlers either on the Actions layer or in an #include ActionScript file. Defining
event handlers on nested MovieClips will render them useless.
Detecting tool changes
When the active tool changes in Fireworks (from the Pointer to the Text tool, for example), the
onFwActiveToolChange event is raised. Because no arguments are passed with this event, you have to
define a variable named fwActiveToolForSWFs in order to access the name of the active tool. Once this
variable is defined, Fireworks will update its value with the name of the currently active tool. The following ActionScript defines the fwActiveToolForSWFs variable and handles the onFwActiveToolChange
event. When the event is raised, the name of the active tool is displayed in an alert box.
// Define variable to hold name of Active Tool
var fwActiveToolForSWFs:String;
// Active Selection Change Event Handler
function onFwActiveToolChange()
{
MMExecute("alert('Tool Changed: " + fwActiveToolForSWFs + "');");
}
These are two of the most common events that you’ll need to handle in your custom panels, though
there are a number of other events raised by Fireworks, such as onFwStartMovie and onFwStopMovie,
raised when your panel starts and stops, respectively. The list of Fireworks events can be found in the
Extending Fireworks documentation at Cross-Product Extensions ➤ Flash panels ➤ Events ➤ Creating
event handlers.
Building panels with ActionScript 3
We’ve spent most of the chapter looking at how to create Flash panels using ActionScript 2. ActionScript
2 is more accessible for most hobbyist programmers than ActionScript 3, and you’ll find most examples of Flash panels available online today have been authored with ActionScript 2 (either because
they were authored prior to ActionScript 3, or because ActionScript 2 is more accessible). However,
many of the panels that ship with Fireworks CS4 have been reauthored using Flex and ActionScript 3.
211
Chapter 11
In this section, we’ll first show you how to use ActionScript 3 in Flash to author custom panels, and
then introduce you to Flex panel authoring.
Creating ActionScript 3 panels in Flash
The concepts we’ve covered so far are all still valid when creating ActionScript 3–based panels. There
are just a few things that we have to do differently to ensure communication between the SWF and
Fireworks. When authoring ActionScript 3 panels, start by specifying a document class for the FLA.
Figure 11‑13 shows the class DrawRect specified as our document class in Flash.
igure 11‑13. Specifying a document class using the Flash
F
Property inspector
Now create a Draw Rect.as file and save it in the same folder as Draw Rect.fla. We’ve re-created
the original Draw Rect layout in a new ActionScript 3 file and added the actions layer as we did earlier.
212
EXTENDING FIREWORKS: DEVELOPING AN EFFECTIVE WORKFLOW USING JAVASCRIPT AND FLASH
ActionScript 3 still supports the concept of “including” external files, only you don’t need to include
the # symbol. So, the first thing we do is update the include statement:
// Import External JSF
include "jsf/jsfCode.as"
The rest of the code will be moved to the new Draw Rect.as file and will need to be modified slightly.
Start by defining the package and DrawRect class:
package {
import
import
import
import
import
flash.display.*;
flash.events.*;
flash.text.*;
flash.external.ExternalInterface;
adobe.utils.*;
public class DrawRect extends MovieClip
{
}
}
Note that the flash.external.ExternalInterface and adobe.utils.* packages have been imported.
These are required in order to communicate with Fireworks. Now assign event handlers to the buttons, this time using the addEventListener method:
public class DrawRect extends MovieClip
{
// Add Button Event Handlers
executeJSF_btn.addEventListener(MouseEvent.CLICK,
executeJSF_onRelease);
colorPicker_mc.addEventListener(MouseEvent.CLICK,
colorPicker_onRelease);
}
// Event Handlers
function executeJSF_onRelease(e:Event):void
{
// Execute the JSF, creating the CreateRectangle function
MMExecute(jsfCode);
// Calculate the CornerRadius value
var cornerRadius:Number = nsCornerRadius.value / 100;
// Call CreateRectangle
MMExecute("CreateRectangle(" + nsX.value + "," + nsY.value + "," +
nsWidth.value + "," + nsHeight.value + "," +
cornerRadius.toString() + ", '" + currentColor + "');");
}
213
Chapter 11
The changes here are minor and no different than any ActionScript 2 to ActionScript 3 migration.
With the event handlers in place and assigned, this FLA can be published and executed in Fireworks.
The functionality should be equivalent between the two. Note that MMExecute(jsfCode) has remained
the same. Since ActionScript 3 supports the include statement, our workflow has remained relatively
unchanged.
Responding to Fireworks events in ActionScript 3
Responding to Fireworks events in ActionScript 3 is a bit more structured than in ActionScript 2.
Whereas in ActionScript 2 you simply define a function with the name of the event, in ActionScript
3 you must register an event handler for the events you want to listen to (just like we registered
event handlers for our buttons using addEventListener). The following code shows how to register
Fireworks events using the ExternalInterface object:
// Constructor
public function DrawRect()
{
// Register all Fireworks Event Handlers
ExternalInterface.addCallback("IsFwCallbackInstalled", ➥
IsFwCallbackInstalled);
ExternalInterface.addCallback("onFwActiveToolChange", ➥
onFwActiveToolChange);
ExternalInterface.addCallback("setfwActiveToolForSWFs", ➥
setfwActiveToolForSWFs);
ExternalInterface.addCallback("onFwActiveSelectionChange", ➥
onFwActiveSelectionChange);
}
// Fireworks calls IsFwCallbackInstalled whenever an event is generated
// Return true when you wish to handle the event.
function IsFwCallbackInstalled(funcName:String):Boolean
{
switch( funcName )
{
case "onFwActiveToolChange":
return true;
case "setfwActiveToolForSWFs":
return true;
case "onFwActiveSelectionChange" :
return true;
default :
return false;
}
}
214
EXTENDING FIREWORKS: DEVELOPING AN EFFECTIVE WORKFLOW USING JAVASCRIPT AND FLASH
// onFwActiveSelectionChange Event Handler
// Get the color of the currently selected object
// (only works for solid fills)
function onFwActiveSelectionChange()
{
currentColor = MMExecute("fw.selection[0].pathAttributes.fillColor");
colorPicker_mc.SetColor(currentColor);
}
The first event that we are handling is IsFwCallbackInstalled. Before sending an event like
onFwActiveSelectionChange to the panel, Fireworks first raises the IsFwCallbackInstalled event as
a sort of polling mechanism. The event passes a single string argument representing the name of the
event Fireworks is about to raise. If you want to handle the event, your function should return true;
otherwise, it should return false. This is commonly achieved by using a switch statement, as demonstrated in the previous code sample.
When you return true, the actual event is raised on your panel, and your event handler code is executed. So, handling Fireworks events in ActionScript 3 is really a two-step process. You first handle the
IsFwCallbackInstalled event and respond with the true value to events that you want to handle,
and then you actually handle the event you’re interested in.
The updated sample in the AS3 Flash Panel folder includes a fully working ActionScript 3 version
of the Draw Rect example. In the ActionScript 3 version, the onFwActiveSelectionChange event is
handled, and the value of the ColorPicker is updated based on the fill value of the selected object.
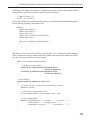
Creating ActionScript 3 panels in Flex
This section assumes you are familiar with the Flex environment and the Flex programming model.
Aside from the differences between Flex and Flash, enabling your Flex project to work with the workflow presented in this chapter is a natural evolution of what you’ve seen thus far. The following code
shows the <mx:Application> tag of DrawRect.mxml, the Flex version of the Draw Rect example we’ve
been using:
<mx:Application
xmlns:mx="http://www.adobe.com/2006/mxml"
layout="absolute"
minWidth="250" minHeight="190"
initialize="init()"
creationComplete="UpdateLayout()"
width="250" height="200">
<mx:Script>
<![CDATA[
include "jsf/jsfCode.as";
import mx.containers.HBox;
import adobe.utils.*;
...
215
Chapter 11
Notice that we are handling both the initialize event and the creationComplete event. The init()
method specified as the event handler for initialize registers all of the Fireworks event handlers
that were previously handled in the DrawRect constructor of the Flash ActionScript 3 project. We can
still use the include statement to read in JSF code. We’ve done this on the first line in the <mx:Script>
section: include "jsf/jsfCode.as". The jsfCode variable defined in the external file is accessible as
a member of this application, which means we can continue to load the external JSF variable using
MMExecute(jsfCode).
Note also that adobe.utils.* is now imported and flash.external.ExternalInterface is not.
Following is the init method, defined in the CDATA section of <mx:Script />:
private function init():void
{
// Register all Fireworks Event Handlers
ExternalInterface.addCallback("IsFwCallbackInstalled", ➥
IsFwCallbackInstalled);
ExternalInterface.addCallback("onFwDocumentOpen",onFwDocumentOpen);
ExternalInterface.addCallback("onFwDocumentClose", ➥
onFwDocumentClose);
ExternalInterface.addCallback("onFwActiveToolChange", ➥
onFwActiveToolChange);
ExternalInterface.addCallback("setfwActiveToolForSWFs", ➥
setfwActiveToolForSWFs);
ExternalInterface.addCallback("onFwActiveSelectionChange", ➥
onFwActiveSelectionChange);
// Handle Resize Event of Panel
this.parent.addEventListener(Event.RESIZE, UpdateLayout);
}
private function UpdateLayout(e:*=null):void
{
this.width = this.parent.width;
this.height = this.parent.height;
}
As in Flash ActionScript 3 projects, ExternalInterface.addCallback is used in Flex to register event
handlers for Fireworks events, like onFwActiveSelectionChange or onFwDocumentOpen. We have
also added an event handler to the Event.RESIZE event of the movie. When this event is fired, the
UpdateLayout method is called, which updates the size of this application to match the size of the
parent window. Without this event handler in place, the Flex layout will not resize in Fireworks as
expected. Figure 11‑14 shows the DrawRect Flex project open in Adobe Flex Builder. We have used
the native Flex components to re-create the original Flash panel in Flex. Instead of using a component
like AlignmentManager to handle layout, we now rely on the Flex panels and their support for dynamic
repositioning and scaling at runtime.
216
Figure 11‑14. Authoring DrawRect in Flex Builder
EXTENDING FIREWORKS: DEVELOPING AN EFFECTIVE WORKFLOW USING JAVASCRIPT AND FLASH
217
Chapter 11
And, just like setting the publish path in Flash, we always set the Flex build path of the active project to the Fireworks Command Panels folder for fast testing. You can change the Flex build path by
right-clicking the project in the Flex Navigator panel in Flex Builder and selecting Properties. From the
resulting dialog, shown in Figure 11‑15, select the Flex Build Path category on the left, and then change
the Output folder field on the right to match the path of your Command Panels folder.
Figure 11‑15. Specifying a build path in Flex Builder
With that setting changed, you can now select Project ➤ Build Project from the main menu in Flex
Builder, immediately switch to Fireworks, and test your updated panel.
218
EXTENDING FIREWORKS: DEVELOPING AN EFFECTIVE WORKFLOW USING JAVASCRIPT AND FLASH
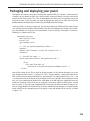
Packaging and deploying your panel
Throughout this chapter, we’ve been working with exported SWF files. To add a custom panel to
Fireworks, we just copied the SWF to the correct folder, restarted Fireworks, and then accessed the
panel from the Window menu. This is fine for development, but when you’re finished with your panel
and want to share it with the world, you need to package your panel into an MXP file that can be
double-clicked and automatically installed using the Adobe Extension Manager.
Creating an MXP is a relatively simple task. You start by authoring an XML-based file saved with the
.mxi extension. We’ve included a starter MXI file in the files that accompany this chapter (StarterMXI.
mxi, also available at C:\Program Files\Adobe\Adobe Extension Manager CS4\Samples\Fireworks).
Following is a snippet from this file:
<macromedia-extension
name="Draw Rect Panel"
version="1.0"
type="Command Panel">
<!-- List the required/compatible products -->
<products>
<product name="Fireworks" version="10" primary="true" />
</products>
<!-- Describe the author -->
<author name="Grant Hinkson, www.granthinkson.com" />
<files>
<file name="Draw Rect.swf"
destination="$fireworks/Configuration/Command Panels/" />
</files>
Most of the sections of this file are used for display purposes in the Extension Manager, such as the
name attribute and the <author /> section. The <files> section, however, is where you reference the
SWF (or SWFs) that you want installed with this particular MXP. The name attribute of the <file /> tag
is a relative reference to the file you want packaged. Since there is no folder name specified, the Draw
Rect.swf file is expected to be located in the same folder as the MXI. Open the sample MXI to see the
handful of remaining sections that you can customize. Once you’ve edited the MXI and are satisfied
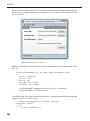
with the results, it’s time to create a compiled MXP file that you can share with other Fireworks users.
You can simply double-click the MXI file to launch the Adobe Extension Manager. It will automatically
create an MXP for you, prompting you first to specify a name and location for the new file, as shown
in Figure 11‑16.
219
Chapter 11
Figure 11‑16. Saving an extension in the Adobe Extension Manager
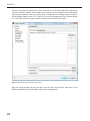
Now that you have an MXP file, you can either double-click the file to launch the Extension Manager
or select File ➤ Install Extension from the Extension Manager main menu. Once installed, your panel
will appear in the list of installed extensions as shown in F igure 11‑17.
Figure 11‑17. Installed extension displayed in the Extension Manager
220
EXTENDING FIREWORKS: DEVELOPING AN EFFECTIVE WORKFLOW USING JAVASCRIPT AND FLASH
Learning the Fireworks object model
This chapter has primarily concerned itself with defining an effective workflow for developing Fireworks
panels. We’ve shown you how to do this in both ActionScript 2 and 3, using both Flash and Flex. Along the
way, we’ve used certain Fireworks methods and handled Fireworks events that you probably didn’t even
know existed. You may have wondered how we knew that calling fw.popupColorPickerOverMouse()
in JSF would launch the color picker or how calling fw.selection[0] would give us a handle to the
first selected object. We learned our way around the Fireworks object model using the following
resources and methods:
The Extending Fireworks documentation
The History panel method—demonstrated at the beginning of this chapter
The FWAPI_Inspector panel
Online samples, tutorials, and articles
The Extending Fireworks documentation
The Extending Fireworks documentation is available online and can be found by selecting Help ➤
Fireworks Help from the main menu (or directly via http://help.adobe.com/en_US/Fireworks/10.0_
Using/). Select Extending Adobe Fireworks CS4 from the main menu on the left. This documentation covers all of the methods, events, objects, and properties available to you as a Fireworks panel
author.
The History panel method
The History panel method introduced at the beginning of this chapter is a fast way to come up to
speed with the methods that Fireworks is calling as you use the tool. You simply perform steps within
Fireworks that you want to know how to achieve via JSF, and then select the steps you just performed
in the History panel (Window ➤ History). With the steps of interest selected, click the Copy button
to copy the JSF directly to your clipboard. You can then paste the JSF into your authoring tool and
review the code. Learn more about the methods used by looking them up in the Extending Fireworks
documentation.
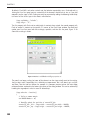
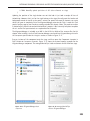
The FWAPI_Inspector panel
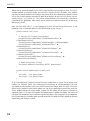
Learning to navigate the Fireworks object model is a fundamental step in Fireworks panel development. Often, navigating the Extending Fireworks documentation can be confusing. Fortunately, Aaron
Beall has written a panel that displays the property tree of the currently selected element on the stage
(see Figure 11‑18). You can see the values for each property and even edit the properties that aren’t
read-only. Using this panel, you can learn the hierarchy of Fireworks objects and properties and predictably code against selected objects.
221
Chapter 11
igure 11‑18. Using the FWAPI_Inspector panel to browse
F
the Fireworks DOM
You can download the panel and its source file at Aaron’s Fireworks web site: http://fireworks.
abeall.com/extensions/panels.
Aaron has a number of great Fireworks commands and command panels available for download and
just happens to be the author of the Path panel that ships with Fireworks.
222
EXTENDING FIREWORKS: DEVELOPING AN EFFECTIVE WORKFLOW USING JAVASCRIPT AND FLASH
Summary
We’ve covered a lot in just one chapter! You should now have a solid understanding of what it takes
to create and deploy Fireworks panels. We’ve tried to give you a big-picture understanding of all the
moving pieces in this exciting world of extension development. It’s now up to you to dig into the
documentation and really learn the Fireworks API.
You now have a number of additional tools at your disposal (like the FWAPI_Inspector panel), and you
have a number of source files to start from (included with the resources for this chapter). In addition
to the files included with this chapter, you’ll find a number of great articles available online at the
Fireworks Developer Center (www.adobe.com/devnet/fireworks/). We also recommend visiting www.
fireworksguruforum.com, where you can learn from an active community of Fireworks enthusiasts.
223