1
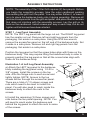
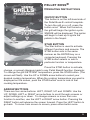
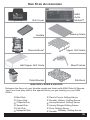
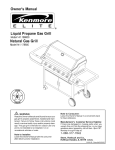
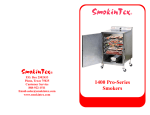
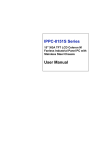
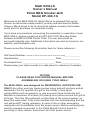
MAK GRILLS
Owner’s Manual
Pellet BBQ Smoker-Grill
Model EP-380-1G
Welcome to the MAK GRILLS family! We're so pleased that you've
chosen an American-made product, proudly manufactured in Dallas,
Oregon. We're proud to be an American-based company that makes
every effort to purchase our materials locally.
If you have any questions concerning the assembly or operation of your
MAK GRILL, please contact us at (503) 623-1234, Monday-Friday
between 8:00AM-5:00PM Pacific Time. You can also email us:
[email protected]. Additional information can also be found on our
website, www.makgrills.com
Please record the following information here for future reference:
Grill Serial Number: (located on the left end of the grill on the access panel)_______________
Inspected by:__________________________ Date:_____________
Purchased from: _______________________ Date:_____________
Please keep your sales receipt in a safe place for reference if needed.
NOTICE!
PLEASE READ THIS ENTIRE MANUAL BEFORE
ASSEMBLING OR USING YOUR GRILL!
The MAK GRILL was designed for RESIDENTIAL OUTDOOR USE
ONLY! Any other use may cause serious injury and will void any and all
warranties. Do not operate this grill in the vicinity of any liquid
combustibles such as gasoline, or use any such items inside the unit.
Maintain a clearance of at least (24) twenty-four inches around this grill at
all times. The One Star exhausts out the back of the main chamber, so
keep that area clean. Only touch handles with the understanding that the
unit will be HOT during operation. In case of fire or other emergency,
unplug the unit immediately from the power source. Before removing any
electric powered component or the Pellet Boss® Control board for
servicing or other reason, disconnect unit from power source.
Superior Wood Pellet BBQ Smoker-Grills
TABLE OF CONTENTS
GRILL CONTENTS & PARTS LIST
Page 3
BBQ DIAGRAM/HARDWARE LIST
Page 4
ASSEMBLY INSTRUCTIONS
Page 5
READ THIS BEFORE USING!
Page 7
®
PELLET BOSS INSTRUCTIONS
Page 9
CLEANING YOUR GRILL
Page 16
TROUBLE SHOOTING & REPAIR
Page 19
GRILL WARRANTY
Page 24
ACCESSORIES
Page 25
BASIC MAK GRILL RECIPES
Page 26
When Grill is not in use, ALWAYS unplug
power cord from outlet.
2
PACKAGE CONTENTS
There will be some assembly of your MAK 1 STAR GENERAL GRILL
required. Please make sure that you have each of the items listed below
when removing your grill from the shipping carton. Please refer to the BBQ
PARTS LIST for help in identifying the individual components needed to
assemble and operate your grill. Please Note: The approximate
assembly time for this grill is 20-60 minutes.
BBQ PARTS LIST
ITEM
DESCRIPTION / QUANTITY
1
Grill Body (1)
2
Left Leg Panel (1)
3
Right Leg Panel (1)
4
Casters, locking (4)
5
Grease Shield (1)
6
Grease/Ash Drawer (1)
7
Heat diffuser (1)
8
Grease tray (1)
9
Cooking grate (1)
10
Owner’s manual (1)
11
M-3 Standard Meat Probe (1)
3
BBQ DIAGRAM
1 Star Grill Hardware List
APPLICATION
SCREWS
WASHERS
NUTS
Leg Panels
SBHCS SST 1/4-20 x 3/8"
1/4 - 20 flange lock nut
Baffle
SBHCS SST 1/4-20 x 3/8"
1/4 - 20 flange lock nut
Access Panel Cover
SBHCS SST 1/4-20 x 3/8"
Hood
Hood Handle
Pellet Hopper Handle
Pellet Boss
Ground Wire
Fan
Auger Motor
Auger Assembly
SST Truss 1/4-20 x 7/8”
1/4-20 lock nut
SBHCS SST 1/4-20 x 1/2"
1/4-20 lock washer,
1/4" flat washer
SBHCS SST #6 x 3/8”
#6 lock washer
SBHCS SST 8-32 x 7/16"
SBHCS SST #6 x 3/8"
SBHCS SST 8-32 x 7/16"
SHCS 6-32 x 1"
SHCS 6-32 x 3/4"
6-32 Nylock nut
Toolhook (Optional Accessory)
SBHCS SST 1/4-20 x 1/2”
1/4 - 20 flange lock nut
Side Shelf (Optional Accessory)
SBHCS SST 1/4-20 x 1/2”
1/4 - 20 flange lock nut
SST= Stainless Steel (All Grill HDW is Stainless Steel).
SBHCS= Socket Button Head Cap Screw (has a smooth dome style head).
SHCS= Socket Head Cap Screw (has a straight knurled head).
Socket head is another word for an Allen or Hex configuration vs. a Phillips or straight screwdriver
configuration.
First callout, 6, 8, ¼ etc. is the diameter of the screw.
Second callout, -20, -32, -16 etc. is the thread pitch (or threads per inch).
Third callout is the length of the screw.
4
ASSEMBLY INSTRUCTIONS
NOTE: The assembly of the 1 Star Grill requires (2) two people. Before
you begin the assembly process, take the outer cardboard packing
surrounding the grill from the pallet. You may either flatten it, or leave it
as is to place the barbecue body onto it during assembly. Remove all
parts and components from the grill and pallet, and place them in an area
that does not interfere with the assembly process. Lay the grill on its
back on the cardboard. Install screws part way in each step, but do not
tighten until all screws have been started.
STEP 1 - Leg Panel Assembly
NOTE: The LEFT leg panel has the large cut out. The RIGHT leg panel
has the smaller cut out. Remove left and right leg panels from the
packaging. Set aside in a safe place. Using the 5/32 hex wrench,
remove the access/fan panel on the left end of the barbecue body. Set
it aside in a safe place. Remove left and right leg panels from the
packaging. Set aside in a safe place.
Position the leg panel so that the screw holes align with those on the
barbecue body. This may require lifting the barbecue body in order to
properly position the leg panel so that all the screw holes align with
those on the barbecue body.
Illustration 1-A Left Leg Panel Assembly
a) Attach the LEFT leg panel to the barbecue
body installing the leg panel using 1/4-20 x
3/8” screws. Install the screws on the top
side. Affix the flange nuts to each screw and
lightly tighten. NOTE: Access to the top
screws will be through the access/fan panel.
There are a total of (11) eleven screws and
nuts which need to be used to install this
panel. You will also need to reach inside the
barbecue body to attach the nuts to the
screws.
Illustration 1-A
Illustration 1-B
b) Install the remaining (3) three screws and
nuts below the fan panel opening. NOTE: You
will need to reach under the barbecue and
behind the leg panel to attach the nuts to some
of the screws.
5
c) Position the RIGHT leg panel as shown (illustration 1-B Right Leg
Panel Assembly). This will require lifting the barbecue body in order to
properly align the panel screw holes with those on the barbecue body.
d) Attach the RIGHT LEG panel to the barbecue body by installing the
screws on the top side of the panel. Affix the flange nuts to each screw
and lightly tighten. Note: There are a total of (10) ten screws and nuts
which need to be installed. You will need to reach inside the barbecue
body to attach the nuts to some of the screws.
e) Once the grill is assembled and standing up, go back and tighten all of
the installed screws and nuts.
f) Re-install the Access/fan panel, double checking to make sure all
components inside the grill are secured in place.
STEP 2
Positioning Heat Diffuser Over Firepot
Position the heat diffuser over the firepot. The diffuser should fit over the
top of the front and rear brackets which hold the heat diffuser in place.
STEP 3
Positioning The Grease Shield
Place the grease shield into position, making sure that
the bottom tab is facing towards the firepot, and that the
lip overlaps the flange on both sides of the grease drain.
Grease Shield
STEP 4
Placing The Ash Clean-Out Cover
The ash clean-out is located between the firepot and grease shield inside
the bottom of the grill. Simply place the cover over the cut out to close.
STEP 5
Placing The Drip Pan In Place
To set the drip pan into position, place the short edge over the bracket on
the left hand side of the barbecue body. The long, right side edge of the
drip pan should be placed so that it rests behind the triangular shaped
grease shield.
STEP 6
Placing Cooking Grate In Place
The cooking grate sits on the extended lip located just below the interior
lip of the grill.
6
READ THIS BEFORE USING YOUR GRILL!
WARNING! This unit will get extremely hot!
Only touch handles while operating.
INITIAL START UP PROCEDURE
Make sure the grill is assembled properly. Remove any shipping
materials, parts or supplies from inside the grill before lighting the grill.
1) Fill hopper with hardwood barbecue pellets
2) Plug grill power cord into a 110 grounded outlet
3 Push the On/Off button once. The Pellet Boss display should light up,
and you should hear the fan operating
4) Make sure grill lid is closed during ignition sequence, or the grill will
not light properly
5) Raise the grill SET POINT temperature to 450F. Do this by pressing
the “STAR” button once, then press the UP arrow button until 450 is
displayed on the Pellet Boss. Push the “STAR” button once to lock in
this temperature. Run grill for (30) thirty minutes to season BEFORE
COOKING FOOD ON GRILL FOR THE FIRST TIME
6) After seasoning the grill, you may adjust the SET POINT temperature
to any desired cooking temperature and begin cooking on your MAK
GRILL.
7) Always start and cook with the grill lid CLOSED.
NOTE: On initial start-up it will take at least 20 minutes before the fire
starts, while the auger between the hopper and firepot gets filled with
pellets. This is only during initial start-up or if the grill runs out of pellet
fuel.
If the grill shuts down during initial start-up and displays “Check Firepot,
Check Hopper, Flame Out”, this is an indication that you should make
sure there are pellets in the hopper. Check firepot to make sure there is
no ash covering the igniter, which will prevent it from lighting the un-burnt
pellets. If the firepot is over-filled with un-burnt pellets, remove the
firepot, empty the contents into a non-combustible container. Place the
firepot back into position and restart the grill to continue cooking.
7
SHUT DOWN PROCEDURE
Push the On/Off button one time. The Pellet Boss will automatically begin
the cool-down mode. The grill may run for as long as (20) twenty minutes
before it completely shuts down.
NOTE: Always wait at least (10) ten minutes after the grill has completely
turned off before placing the cover on the grill. Never place a cover on a
hot grill.
SUBSEQUENT STARTING PROCEDURE
AFTER INITIAL FIRING & SEASONING
When you turn on your MAK GRILL, the Pellet Boss display lights up, the
fan begins operating, the auger begins to feed pellets into the firepot and
the igniter heats up to light the pellets in the firepot.
When you first start the grill, the Pellet Boss screen will show the Set
Point temperature, the Grill Temperature with the word IGNITING. A small
letter “A” will display in the lower right hand corner of the screen
whenever the auger is operating. The auger will run for (2) two minutes,
feeding pellets into the firepot, and then will stop.
At (6) six minutes into IGNITION, the auger will feed more pellets into
the firepot and will run as necessary. The grill temperature will continue to
rise to your selected SET POINT temperature.
Depending on the SET POINT temperature, and outside weather
conditions, it may lengthen the time it takes for the grill to achieve the
cooking temperature you want.
It is IMPORTANT that the grill lid is kept closed during the IGNITION
sequence. Otherwise, the grill will continue to try to ignite, dumping more
pellets into the firepot. If IGNITION is not reached after 3 attempts, the
grill will shut down completely.
NOTE: Before attempting to re-start the grill, empty the firepot of
pellets, otherwise the grill may not ignite properly, and will produce
a large volume of white smoke as the pellets in the firepot try to
light. The entire IGNITION sequence will take approximately 7-10
minutes.
8
®
PELLET BOSS
OPERATING INSTRUCTIONS
ON/OFF BUTTON
This button is on the left-hand side of
the Pellet Boss ® control faceplate.
To turn the grill on or off, press the
button once. When first turned on,
the grill will begin the ignition cycle.
SMOKE will be displayed. The igniter
will begin to heat up to ignite the
pellets in the firepot.
STAR BUTTON
The Star button is used to activate
different functions and screens. The
STAR button acts in the same
manner as the ENTER key on a
computer keyboard. Pressing the
STAR button selects or sets a
particular function or temperature.
Press the STAR button to activate,
change, or accept changes made to any Pellet Boss® function. Example:
To change the grill SETPOINT temperature, press the STAR button. (The
screen will flash). Use the UP or DOWN arrow buttons to select your
desired cooking temperature. When the cooking temperature you want is
displayed on the screen, push the STAR button once to lock-in that
cooking temperature.
ARROW BUTTONS
There are four arrow buttons: LEFT, RIGHT, UP and DOWN. Use the
UP, DOWN, LEFT or RIGHT arrow buttons to scroll through screens or
adjust settings up or down. To change screens or move from one
function to another, use the LEFT or RIGHT arrow button. Pressing the
RIGHT button will advance the screen forward. Press the LEFT button to
go back. To move from screen to screen, press either button once.
9
Example: You want to set a MEAT PROBE alarm for 150 degrees. Press
the RIGHT Arrow button to advance the screen to Probe 1. Now press
the STAR button. The word OFF will flash. Use the UP or DOWN
ARROW button until you reach 150 degrees. Now press the STAR
button to accept that meat probe alert temperature.
To lock any screen, press and hold the UP arrow button until the lock
icon appears in the upper left-hand corner of the display screen. To unlock, simply press any button one time.
TEMPERATURE/MEAT PROBE INPUTS
You may use up to (3) three Temperature/Meat Probes to monitor the
internal temperature of the food you are cooking. Put the probe plug into
any of the (3) three Temperature/Meat Probe
inputs. Run the probe through the “mouse hole”
on the front left side of the grill opening and
insert the probe end into your food. The internal
temperature of the food will be displayed as
probe number 1, 2 or 3, depending on which
input you plugged the probe into.
AUGER OPERATION ICON
A small “A” will appear in the lower right hand corner of your grill
temperature display screen. This confirms that your grill auger is
running, transporting pellets from the hopper to the firepot. When the
auger is not turning, the “A” will not be displayed on the screen. NOTE:
The auger does not turn continuously unless you are cooking at
temperatures above 300 degrees.
10
PELLET BOSS®
SCREEN DISPLAY DESCRIPTIONS & SETTINGS
Screen Display - SET POINT
Description: Shows the temperature setting for the main cooking
chamber. Note: When you first turn on the grill, the default SETPOINT
temperature is SMOKE.
Settings: The setpoint temperature can be changed in (5) five degree
increments from 200 degrees up to 450 degrees. The SMOKE setting will
produce temperatures of 170 to 180 degrees. On HIGH, the grill will cook
above 450 degrees. To change the temperature setting for the grill, press
the STAR button. The temperature will flash. Use the UP or DOWN
arrow buttons to select your desired cooking temperature. Once the
temperature you want is displayed, press the STAR button once. The
temperature will stop flashing and the grill will adjust to the new cooking
temperature. Once the grill reaches set point temperature, the Pellet
Boss® will beep three times.
Screen Display- GRILL TEMP
Description: Shows the actual temperature inside the grill. NOTE:
When the grill is first turned on, it will activate the ignition mode. The
Pellet Boss® screen will display IGNITING.
Settings: There are no user settings for this screen. To change the grill
cooking temperature, follow the instructions above.
Screen Display- PROBE 1
Description: Displays the internal temperature of the food the
Temperature/Meat Probe is inserted into.
Settings: To add a setpoint alarm for the probe, press the RIGHT arrow
button until you reach PROBE 1 on the screen. Press the STAR button.
The word OFF will flash. Use the UP or DOWN arrow button to adjust the
setting from OFF to 225 degrees. Press the STAR button again. Now
the grill will alarm when the probe reaches that selected temperature.
NOTE: The temperature probes have a range of 32 to 225 degrees. If the
probe temperature is below 32 degrees, the screen will display “LOW”. If
the probe is not plugged in correctly, the screen will display “CHECK”.
Above 225 degrees, the probe display screen will display “HIGH”.
Probes 2 &3- Description and Settings are the same as Probe 1.
To ensure proper operation of the temperature/meat probes, never
expose the meat probe inputs to moisture, dust or dirt. Otherwise the
probes may not function correctly. If water has entered a probe jack, try
drying it out using a can of computer air.
11
NOTE: For best results, prevent twisting the probe cable, exposing it to high heat or
direct flame, or immersing it in water. To clean, wipe the probe with a damp cloth with
mild detergent. The probes should only be used to monitor internal meat temperatures,
not your grill's cooking temperature. Store probes in a dry place away from water or
moisture.
Screen Display-TIMER
Description: The TIMER can be set to count down and alarm when it
reaches zero. It will reset to zero whenever the grill is turned off.
Settings: Press and hold the STAR button for 3 seconds. The MINUTES
will flash. Using the UP or DOWN arrow buttons, set the minutes from 01
to 59. To set HOURS, press the LEFT or RIGHT arrow button. The
HOURS will now flash. To set hours, use the UP or DOWN arrow buttons
to select the number of hours you want. Once the hours and minutes are
set, press the STAR button to lock in. Press the STAR button once more
to activate or pause the timer.
When the timer reaches zero, an alarm will sound and the display screen
will flash until any button on the control panel is pressed. When the grill is
turned off, all alarms will reset to OFF. Press and hold the STAR button
for (3) three seconds to reset the timer back to zero.
Screen Display-ELAPSED TIMER
Description: The Elapsed Timer keeps track of the total amount of
cooking time. When activated, the timer counts-up both hours and
minutes. The timer will reset to zero whenever the grill is turned off.
Settings: Press the STAR button to start the Elapsed Timer. Press the
STAR button again to stop the timer. To reset to zero, press and hold the
STAR button for (3) three seconds.
Screen Display-USER PROGRAM
Description: There are (3) three User Programs available for use. Set-up
and operation of each User Program will be the same. Each program
allows you to make up to (5) five cooking steps, which will automatically
change from one step to the next based on either time or meat probe
temperature. Note: You can only use (1) one User Program at a time.
Once a program is set, it will remain until you change it.
? To set up any USER PROGRAM, use the Left or Right ARROW buttons
to select USER PROGRAM 1, 2 or 3.
? Press the STAR button---the word OFF will flash.
? Use the Up or Down ARROW buttons to reach SETUP.
? Press the STAR button again. The screen will now display STRT 1.1
SET:SMKE. Use the UP or DOWN arrow buttons to select your desired
starting temperature.
12
? Press the STAR key to accept your starting cooking temperature.
? The screen will now display END 1.1. SET: NONE. Use the ARROW
buttons for NONE, TIME or MEAT PROBE 1, 2 or 3. If you have
selected a MEAT PROBE, you will need to select a temperature for the
probe to reach in order for the program to go to the 1.2 setting in the
program.
? If TIME is selected, the TIMER screen will appear. Set timer by following
the directions for TIMER.
? Once you have selected a MEAT PROBE Temperature, or TIME, press
the STAR button once.
? The display will now show 1.2 SET: SMKE. The word SMKE will be
flashing. Go through all of the same steps for settings 1.1. Do this for
steps 1.3, 1.4 and 1.5 if so desired.
? To END the program, set END to NONE.
? Once the program has been set-up the screen will display OFF.
? To start the program, use the ARROW buttons to reach USER 1, 2 or 3.
Press the STAR button once. Use the UP or DOWN arrow buttons to
START, press the STAR button to accept. The program will begin to
run.
? To STOP any USER PROGRAM, press the STAR button, choose a
different USER PROGRAM, select OFF or change the temperature.
? To restart any USER PROGRAM, select START and press the STAR
button once.
FOR USER PROGRAMS 2 & 3—Follow the above steps to program.
Descriptions are the same as USER 1.
SCREEN LOCK
Description: Allows you to stop the display screens from scrolling from
function to function, letting you display only one screen.
Settings: Use the LEFT or RIGHT ARROW buttons to reach the screen
you want displayed. Press the UP button until the LOCK icon appears in
the upper left-hand corner of the display screen. To resume screen
scrolling function, press any button.
ACTIVE SCREEN SCROLL
Description: The screen will scroll through all ACTIVE SCREENS
(screens for functions that are in use) when left un-locked and untouched.
Settings: There are no settings for this feature.
13
ALARMS
Description: When ALARMS are set and reached, the Pellet Boss ® will
sound a LOUD beep, and the appropriate display screen will flash. The
alarm is programmed to sound for (10) ten minutes before it automatically
shuts off.
? Settings: To end an active alarm, push any button on the Pellet Boss ®
control panel. To entirely shut off ALL audible ALARMS on the Pellet
Boss:
? Push the UP ARROW button for (10) ten seconds until MAKGRILL Ver.
2.0 (or higher) is displayed.
? Press the RIGHT ARROW button until you reach ALARM ENABLED.
? Press the STAR button.
? Use the UP or DOWN arrow button to select either ENABLED or
SILENT. Press the STAR button to accept.
? Press and hold the UP ARROW button for (3) seconds to exit. The
screen reverts back to the SETPOINT temperature.
MANUAL MODE
Description: Manual Mode is designed as a back-up in case there is a
thermocouple failure. If your thermocouple stops working, the grill will not
be able to detect the actual grill temperature. Therefore, your MAK GRILL
will not function properly. In this case, the MANUAL MODE will allow you
to use your grill until you receive and install a replacement thermocouple.
Settings: To enable the MANUAL MODE, press and hold the STAR
button unit MANUAL SMOKE is displayed. Press the STAR button again.
The word SMOKE will begin flashing. Use the UP or DOWN ARROW
buttons to select from SMOKE (175 degrees), LOW (225 degrees),
MEDIUM (275 degrees), MEDHIGH (350 degrees) or HIGH (450+
degrees). Press the STAR button again to set your selected cooking
temperature. The setting selected will stop flashing and the grill will adjust
to the new set temperature. Note: Because there is no working
thermocouple, the screen will not show the grill temperature. To return to
the NORMAL MODE, press and hold the STAR button (3) seconds, or
turn the grill off.
IGNITING PELLETS
Description: This screen will display whenever the igniter rod is on.
Once the igniter has turned off, the screen will display the grill
temperature. The screen will also activate whenever the “auto relight
sequence” which initiates if the fire in the firepot has gone out. IGNITING
will show on the display screen, and the grill will repeat the lighting
sequence up to (3) three times before the Pellet Boss® shuts off the grill
and displays FLAME OUT, CHECK FIREPOT, CHECK HOPPER.
Settings: There are no user settings for this feature.
14
COOL & SHUT DOWN
Description: This screen appears whenever you press the ON/OFF
button to turn the grill OFF. The controller will run the fan on high speed
until the temperature in the grill drops to 160 degrees. It will then switch to
a 4 minute countdown-timer and entirely shut the unit OFF. This feature is
designed to help burn up all remaining pellets in the fire pot and give you
a clean start the next time you cook. Simply turn the grill off and let the
PELLET BOSS ® do the rest!
Settings: There are no user settings for this feature. If you wish to
override the SHUT DOWN mode just press any button and the unit will
turn off.
Register Your Grill,
Receive MAK's All Star Wood Pellet Grill Cookbook!
Now that you've got your MAK set-up and running, be sure to REGISTER
your grill with us. You may register by filling out the form included in the
manual and mailing it to us, or you may go on-line to
www.makgrills.com/Register Your Grill.php
Once we receive your grill registration,
we'll send you a free copy of our All
American Wood Pellet Grill
Cookbook, filled with over 100
mouth-watering recipes developed
exclusively for MAK GRILL owners.
Thanks again for purchasing an
American-made MAK GRILL!
15
CLEANING YOUR MAK GRILL
In order to keep your MAK looking as good as new, follow these
recommended cleaning/maintenance guidelines. Take care of your MAK,
and it will take good care of you!
EXTERIOR:
* Fan Panel: Twice a year clean the ports in the fan panel of dust, dirt,
pollen or other debris. Use a shop-vac to quickly clean the panel, or
remove it from the grill, clean it and then re-install it.
* Pellet Hopper: Remove accumulated pellet dust by vacuuming out the
pellet hopper as needed. Be sure to vacuum out any pellet dust
accumulation in the auger tube as well.
* Powder Coat Finish: Remove grease cooking residue from the powder
coating using a mild dish detergent and hot water. If the residue does
not clean off, lightly agitate the area using a “Dobie” pad. Wipe clean
using a damp cloth and a soft towel or cloth to dry.
* Pellet Boss: Use a damp cloth and mild detergent to remove greasy
fingerprints, dust or dirt. Avoid getting any water or soap into the meat
probe inputs. Wipe dry using a soft towel or cloth.
* Grill Lid: To reduce grease dripping, clean the lip and inside of the grill
lid using mild dish detergent and hot water. Some grill owners remove
their lids from the grill and clean the underside of the lid with a general
purpose degreaser or dish detergent and hot water.
* Grease Drawer: Holds up to 2 quarts of grease, and cooking
drippings. We recommend that you use a disposable foil mini-loaf pan
to capture the drippings and help in quick disposal. You can also line
your drawer with foil to facilitate easier clean out as well. Make sure
that pan or foil do not overlap the sides or ends of the drawer, as this
will prevent it from properly fitting into its slot under the grill.
* Exhaust Louvers: To ensure proper airflow in your grill, keep the
exhaust louvers free of smoke, grease and cooking residue. (Use hot
water and mild dish detergent to clean the inside and outside of the
louvers.) To access the louvers from inside your grill, remove the four
nuts and bolts, which attach the baffle to the inside back wall of the
cooking chamber. After cleaning, reattach the baffle to the inside of
the grill.
16
INTERIOR:
* Cooking Grates: While grates are still warm from cooking, take a grill
brush and scrub off food debris. Follow by rubbing a paper towel from
front to back on the grates to finish cleaning. Or remove from grill and
soak in hot, soapy water. Use a brush or steel wool to clean off debris.
Rinse under running water and dry using a soft cloth or towel.
* Thermocouple: In order to maintain proper temperature control of your
grill, it's important to keep the thermocouple clean. Use a dampened
piece of #2 or #3 steel wool to remove food debris and smoke from the
thermocouple. Clean it so that the shiny metal is visible on all sides.
When cleaning be careful so that you don't bend or break the
thermocouple.
* Firepot: One of the great features of your MAK Grill is the removable
firepot. Lift up the securing pin and slide the firepot out. Empty the ash,
slide the firepot back in and secure it into position using the pin. Do
this at least every 3-5 cooks.
* Igniter: Over time, it is possible for scale to develop on the igniter. To
clean, remove the firepot. Then, take a piece of #2 or #3 steel wool
and clean the outside circumference of the igniter. Do this once a year.
* Heat Diffuser: Brush off ash accumulation as needed. There is no
other cleaning that needs to be done.
* Cooking Chamber: Use a wisk broom to brush ash into clean out
located between firepot and grease shield. To remove grease or food
debris, use a general all purpose degreaser. Wipe down with a damp
(not dripping) cloth or towel and repeat until clean. Dry with a soft cloth
or towel, or allow to air dry.
* Grease Shield: Soak in hot, soapy water. If needed, use steel wool or
a brass brush to clean. Rinse under running water. Dry with a soft
cloth or towel.
* Grease Chute: Spray with all purpose degreaser, allow it to loosen
grease run off. Use a small, soft bristled brush to clean away grease
and drippings. Take a damp (but not dripping) cloth and wipe down. Air
dry or use a soft cloth or towel to dry.
17
RECOMMENDED
EXTERIOR CLEANING
SCHEDULE
Clean Grill Finish
Grill Shelves
WEEKLY
RECOMMENDED
INTERIOR CLEANING
SCHEDULE
WEEKLY
Firepot
MONTHLY
Louvers
Grease Chute
Accumulated Pellet Ash
MONTHLY
Cooking Chamber
ONCE PER
QUARTER
Clean Pellet Hopper
ONCE PER
QUARTER
Grease Shield
TWICE
A YEAR
Heat Diffuser
TWICE
A YEAR
Clean Fan Panel
AS NEEDED
Inside of Lid
Pellet Hopper
Grill Lid
ANNUALLY
Igniter
AS NEEDED
Cooking Grates
Termocouple
Grease Pan
MAK’S ALL STAR PELLETS
Introducing MAK'S ALL-STAR
HAZELNUT BLEND
BBQ PELLETS!
Our Hazelnut Blend BBQ Pellets are different
than all the others/ We start with select
Northwest Hazelnut (Filbert) wood, along with
fruit and other flavor woods to create a mouthwatering blend that will compliment any type of
food cooked on your pellet grill.
Enjoy the wonderful flavor of cooking with real
wood and a true Oregon original, MAK All-Star
Barbecue Pellets!
Our All-Star Hazelnut Blend BBQ Pellets are
available from your MAK dealer or on-line at
www.makgrills.com
18
TROUBLE SHOOTING & REPAIRS
If you have trouble with your grill operation, please refer to this trouble
shooting guide first before calling for service. If the problem persists,
contact the dealer where your purchased the grill for help. Write down
the model and serial number of your grill, and be prepared to provide
that information when you speak with a MAK customer service
representative. The MAK GRILLS service number is (503) 623-1234.
Help is available Monday-Friday between 8:00 AM- 4:30 PM, Pacific
Time. There are also a number of helpful videos on the MAK GRILLS
website; www.makgrills.com You may also email us at:
[email protected]
PROBLEM
ACTION TO TAKE
DISPLAY WILL
NOT TURN ON
? Make sure the unit is plugged in to a working,
grounded electrical outlet.
? Check to see if the GFI outlet where the grill is
plugged in has tripped.
GRILL DOES NOT
LIGHT, DISPLAY
READS
FLAME OUT,
CHECK FIREPOT
& HOPPER
? This is an indication that the hopper has run out
of pellets, or has excessive ash build up in the
firepot, covering the igniter and preventing the
pellets from igniting.
? Turn the grill OFF, then back on to relight.
? Press any button to end the alarm.
? Make sure there are pellets in the hopper.
? Clean ash out of the firepot. DO THIS ONLY
WHEN THE GRILL IS COMPLETELY COLD.
GRILL STILL DOES ? Remove fan panel on left end of grill.
NOT LIGHT
? Check fan to ensure it's operating. If not, check
the fuse on back of control board to see if it has
blown.
? If the fuse has blown, the fan, igniter and auger
will not operate. The Pellet Boss® display will still
light.
? Turn off grill. Unplug from outlet.
? Replace the fuse. Always use the same size 2
AMP fast blow fuse in your Pellet Boss®.
? Unplug igniter, plug grill back into power and turn
on. If the grill operates without blowing a fuse,
the most likely issue is a bad igniter.
19
PROBLEM ACTION TO TAKE
MY GFCI
CIRCUIT
KEEPS
TRIPPING
This is an indication of a failing igniter.
? Turn off grill. Unplug from power source.
? Remove fan panel, unplug igniter from the back of the
Pellet Boss®
? Make sure igniter plug does not interfere with fan or auger
operation.
? RE-secure fan panel.
? Follow Manual Lighting instructions to continue cooking on
your MAK GRILL.
GRILL STILL ? Be sure firepot is free from excessive pellet ash, which can
DOES NOT
cover the igniter rod and prevent the pellets from lighting.
LIGHT
? Check to see if igniter rod glows red. Disconnect from
power, remove the fan/access panel to get to the back of
the control board. Make sure that the plug IGNITER is
tightly plugged into the RED receptacle on the back of the
board.
? Make sure pellets are feeding into the firepot during startup. If the auger is not turning, check the auger plug
connection on the back of the board. Unplug the power
cord, remove the fan/access panel to get to the back of
the control board. Confirm that the plug labeled AUGER is
tightly plugged into the WHITE receptacle on the back of
the control board.
MANUAL LIGHTING PROCEDURE:
In the event that your igniter fails, and will not light the pellets in the firepot,
you can still start your grill using the easy to follow Manual Lighting
instructions below:
? Unplug the grill from power source
? Remove fan/access panel
? Unplug the igniter from the back of the Pellet Boss® control board. Make
sure that the plug end is out of the way of the fan blades and auger
motor.
? Re-attach the fan/access panel and secure.
? With a clean firepot, add a small handful of un-burnt pellets to the firepot.
? Add 2 Tablespoons of either Alcohol Fire Gel or Hand Sanitizer to the
pellets. Mix in with pellets.
? Drop a match into the firepot.
? Wait (5) Five minutes and allow the fire in the firepot to establish.
? Replace interior components-making sure you don't get burnt.
? Turn on grill and cook as normal.
? Contact MAK GRILLS for a replacement igniter.
20
PROBLEM
ACTION TO TAKE
FAN DOES ? The fan should operate any time the power is turned on. If
NOT RUN
the fan is not running, unplug the power cord, remove the
fan/access panel to get to the back of the control board.
Make sure that the plug labeled FAN is tightly plugged into
the BLUE receptacle on the back of the Pellet Boss®
control board.
? Check fan blades for any obstruction such as pellets or dirt.
Clean as necessary.
? Check the fuse on the back of the Pellet Boss® to make
sure it has not blown. If necessary, replace with 2.0 AMP
Fast Blow fuse of the same size and diameter.
AUGER IS ? The auger works on a timed interval basis depending on
NOT
the temperature setting of the controller. During start-up,
TURNING
the auger will run for approximately 2 minutes. It will then
shut off for four minutes, then continue to run again.
? Empty the pellet hopper to see if your pellets have been
exposed to moisture. If they have absorbed moisture or
water, they will swell and jam your auger.
? Check to make sure that no foreign objects have fallen into
the pellet hopper (like dirt or rocks). Remove any foreign
objects if necessary.
? If the pellets have jammed your auger, you will need to
remove the auger and clean out both the auger and auger
tube. This can be done by removing all of the pellets from
the hopper and removing the firepot. Use a shop-vac to
suck out as many pellets from each end of the auger
tube. Remove the fan/access panel, fan and fan deflector.
Unplug the auger from the back of the Pellet Boss®, it is
labeled AUGER. (the white plug receptacle). Remove the
(2) two auger mounting screws from the rear of the motor
and pull the auger motor out through the back of the grill.
Clean out any remaining wet pellets or dust from the auger,
auger
tube and surrounding areas. Replace auger in
reverse order and test to see if auger turns before adding
new pellets to the hopper.
? Never put spilled pellets from the ground back into
your pellet hopper.
21
PROBLEM
ACTION TO TAKE
GRILL IS NOT ? Empty firepot so that it is completely clean.
GENERATING ? Clean all exhaust louvers in the grill to facilitate good
AS MUCH
air flow.
SMOKE AS
BEFORE
GRILL DOES
NOT GET AS
HOT AS
BEFORE
There are several reasons why this may be happening:
? Dirty thermocouple. Take a piece of steel wool and
clean it so the metal housing all around the
thermocouple is shiny clean.
? Clean all exhaust louvers on the grill.
? Change brand and variety of pellets you are using.
? Move grill out of wind or reposition grill so that wind
does not blow into the grill louvers.
NOTE: There are various support videos available on-line to help
you with replacing MAK GRILL components. Visit
www.makgrills.com and click on SUPPORT for a variety of helpful
videos.
For any additional operation issues not covered in this guide, please
contact your local MAK GRILLS DEALER. You may also phone us at
(503) 623-1234 between 9AM-4:30 PM, Monday-Friday, Pacific Time or
contact us via email: [email protected]
22
PELLET BOSS ® REAR VIEW
Use this diagram to familiarize yourself with each of the components and
plug receptacles found on the back of the Pellet Boss® control board. In
the event that you will need to do any grill repairs, you will have a better
idea where to locate and correctly plug in a component.
Pellet Boss
®
THERMOCOUPLE
MOLEX PLUG
WI-FI/BLUE TOOTH CHIP RECEPTACLE
ALARM
MODULE
UPDATE
CONNECTION
FUSE
POWER
AUGER
IGNITER
FAN
GROUNDING
LUG
23
GRILL WARRANTY
3 YEAR WARRANTY
MAK GRILLS, LLC (“MAK GRILLS”) warrants this barbecue unit against defects in
material and workmanship under normal residential use and maintenance for a period of
three (3) years from the date of purchase for the following components: circuit board,
auger motor, fan motor and heat rod. MAK GRILLS warrants all metal components for a
period of three (3) years from date of purchase against defects in material and
workmanship under normal residential use and maintenance.
MAK GRILLS will provide a replacement part for any part found by MAK GRILLS to be
defective and shall not be responsible for any re-assembly. Original part(s) approved for
return by the MAK GRILLS Service Department must be returned prepaid by customer.
Customer should inspect the unit on purchase for any defects and immediately contact
the retailer of any apparent damage for which the retailer may be responsible
This warranty does not include labor charges connected with the determination of
replacement of defective parts, or freight charges to ship these parts.
MAK GRILLS shall not be liable under this, or any implied warranty for incidental,
special, or consequential damages or any damage or defect to finish on the unit. In no
event shall MAK GRILLS' obligation to customer exceed the purchase price of the unit.
This warranty gives customer specific legal rights and customer may have other rights
which vary from state to state. In consideration of this warranty, customer agrees that
any dispute related to the unit or this warranty shall be tried in Marion County, Oregon
and subject to Oregon law.
This warranty shall be void if the unit is not assembled or operated in accordance with
the operation instructions provided with the unit, the unit is exposed to unreasonable or
extreme weather conditions, the unit is re-sold or traded to another owner, components,
accessories, or fuels not compatible with the unit have been used , the unit has been
used in a commercial or food service application, or the user has abused or otherwise
failed to maintain, cover, or properly store the unit depending on weather conditions.
To process a warranty claim, MAK GRILLS will require proof of customer's date of
purchase from the retailer and must be in timely receipt of the warranty. Customer must
retain its sales slip or invoice along with this certificate with your valuable documents for
this warranty to be valid.
THE AGREEMENT IS IN LIEU OF ALL OTHER WARRANTIES, STATUTORY OR
OTHERWISE, EXPRESS OR IMPLIED, ALL OTHER REPRESENTATIONS MADE BY
MAK GRILLS OR ANY THIRD PARTY DISTRIBUTOR OR RETAILER AND ALL OTHER
OBLIGATIONS OR LIABILITIES WITH RESPECT TO THE UNIT COVERED BY THIS
AGREEMENT WHICH, AT THE TIME OF PURCHASE OR AT ANY TIME IN THE
FUTURE, MAY BE MADE AGAINST MAK GRILLS, ITS OFFICERS, DIRECTORS,
EMPLOYEES, AND AGENTS. EXCEPT AS EXPRESSLY PROVIDED HEREIN, MAK
GRILLS GIVES NO OTHER EXPRESS OR IMPLIED WARRANTIES RELATING TO
FITNESS FOR USE OF THE UNIT; MERCHANTABILITY OF THE UNIT, FITNESS FOR
A PARTICULAR PURPOSE OF THE UNIT, QUALITY OF THE UNIT; OR CONDITION
OF THEUNIT. MAK GRILLS' OBLIGATIONS SHALL NOT EXCEED ITS OBLIGATION
EXPRESSLY SET FORTH IN THIS AGREEMENT.
MAK GRILLS provides no representation, warranty, or promise relating to damages or
defects in the unit which are the result of: (i) ordinary wear and tear; (ii) failure of
customer to provide normal maintenance or proper care of the unit; (iii) characteristics
common to materials used; (iv) natural disaster; (v) loss; or (vi) injury caused in any way
by natural elements, changes made to the unit by the customer, or any misuse,
negligence, recklessness, or intentional act or acts of any person.
24
ONE STAR ACCESSORIES
MAK
Grills
Mobile™
Grill Cover
Griddle
Searing Grate
Remote Boss®
Upper Grill Grate
Half Upper Grill Grate
Meat Probes
Pellet Bucket
Rib Rack
MAK GRILL RUBS & SAUCES
Enhance the flavor of your favorite meats and foods with MAK Rubs & Sauces.
You’ll love how they add to the special flavor you get cooking on your MAK
GRILL.
4 Bird Rub
4 Cajun Rub
4 Chipotle Rub
4 Sweet Rub
4 Fish Rub
4 Mesquite Rub
4 Devil’s Punch Grilling Sauce
4 Smokin’ Hickory Grilling Sauce
4 Honey Bourbon Grilling Sauce
4 Honey Stinger Grilling Sauce
4 Rum Grilling Sauce
4 Smokin’ Whiskey Grilling Sauce
25
BASIC MAK GRILL RECIPES
Here are some basic recipes to get you cooking on your MAK GRILL.
These recipes will help you become acquainted with how the grill
operates, and allow you to become accustomed to the many features and
types of cooking you can do on your MAK GRILL.
To receive your free MAK GRILL COOKBOOK featuring 112 delicious
recipes, please fill-out and mail in the registration form included with the
grill. You may also register online at www.makgrills.com
BEEF
Steaks
(Approximate cooking time: 15-25 min.)
One 8 - 12 oz. steak per person
2 tsp. MAK Mesquite Rub
2 Tbsp. MAK Smokin' Whiskey Grilling Sauce
Sprinkle each side of the steak with one teaspoon of MAK Mesquite Rub,
massaging it into the meat. Start grill and adjust setpoint temperature to High.
Pre-heat grill approximately 15 - 20 minutes. Place steaks on cooking grate,
close lid and cook to your desired level of doneness. Rare 130 degrees.
(approximately 5-6 minutes per side), medium 140 degrees (approximately 7
minutes per side), well-done 155 degrees.(approximately 8-9 minutes per side)
Serve with MAK Smokin' Whiskey Grilling Sauce on the side.
26
Brisket
(Approximate cooking time: 12-18 hours)
Note: Brisket cannot be cooked quickly. It is the toughest cut on the cow
and requires ample cooking time for the meat to become tender. The
approximate cooking time is 12-18 hours depending on the weight of your
brisket. This recipe calls for a WHOLE BRISKET.
1 whole brisket (about 12 to 18 lbs.)
¼ cup MAK Mesquite Rub
1 Cup Beef Bullion (1 Cube in water)
Trim fat cap so it is even, but do not remove entirely. Trim down any pockets of
fat in meat. Lightly coat entire brisket with rub mixture. Start grill and adjust
setpoint temperature to 225 degrees. Preheat grill, approximately 10 minutes.
Place brisket on grill, fat side up. Insert meat probe into brisket in a horizontal
fashion. Plug probe into Pellet Boss® control and program meat thermometer
alarm for 165 degrees. Close lid and cook approximately 7-9 hours until internal
temperature reaches 165 degrees. Remove brisket from grill and place in foil.
Add 1 cup heated beef bullion. Seal tightly, place back on grill, and set grill
temperature to 250 degrees. Insert meat probe and program alarm for 195
degrees. Cook for approximately 1 to 3 hours until internal temperature reaches
195. Remove from grill and allow to rest for 15 minutes. Slice against the grain in
1/4-inch slices.
NOTE: You may use any of the 3 User Programs on the Pellet Boss® to
automatically cook your favorite MAK GRILL recipes. Please refer to the
instructions found in the front of the cookbook.
27
POULTRY
Whole Chicken
(Approximate cooking time: 2-2.5 hours)
1-whole chicken (4-5 lbs)
2 Tbsp. olive oil
2-3 Tbsp. MAK Bird Rub
Optional: vertical roaster
Wipe chicken down, remove gizzards and trim off excess skin from tail and neck
section. Rub a thin layer of olive oil over entire surface of chicken. Apply MAK
Bird Rub to entire outside of chicken. Start grill and adjust setpoint temperature
to 325 degrees. Pre-heat grill, approximately 15 - 20 minutes. Insert meat probe
horizontally into chicken breast. Plug probe into Pellet Boss® control and
program for 170 degrees. Place chicken in center of grid, close lid and cook until
internal breast temperature reaches 170 degrees, approximately 2-2-1/2 hours.
Once cooked, remove chicken from grill, allow to rest 15 minutes, carve and
serve with your favorite MAK grilling sauce.
Classic Beer Can Chicken
(Approximate cooking time: 60-90 minutes)
2 whole chickens (about 3 to 4 lbs. each)
2 - 12 oz. cans of beer (Dark, Stout or Porter is recommended)
1-1/3 cup MAK Rum Grilling Sauce
1 - 2 Tbsp. MAK Bird Rub per chicken
Mix together two-thirds of each can of beer and BBQ sauce in a bowl. (Discard or
save remaining beer for other use). Divide and pour mixture back into empty
beer cans, filling each can two thirds full; set aside. Rub MAK Bird Rub over and
in cavity of each chicken. Stand chicken upright and place the rear of the body
over top of a filled beer can; repeat with second chicken. Spread the legs to form
a tripod with can to support the bird. Start grill and adjust setpoint temperature to
400 degrees. Pre-heat grill, approximately 15 - 20 minutes. Insert meat probe(s)
horizontally into deep center of chicken breast(s). Plug in meat probe(s) and
program for 165 degrees. Put chickens on foil covered baking sheet to prevent
flare-ups and place on grill. Close lid and cook for 1 to 1-1/2 hours or until meat
probe registers 165°F. Carefully remove chickens and cans from grill (liquid in
cans will be HOT!); discard beer cans and contents using hot mitts. Let
chickens rest 15 minutes. Cut up chicken and serve.
28
PORK
Sweet 'N Spicy Baby Back Ribs
(Approximate cooking time: 3 hours)
1-3 slabs baby back ribs (2.5 and down weight) 3 Tbsp. MAK Mesquite Rub
3 Tbsp. MAK Sweet Rub
1/3 cup yellow mustard
1/2 cup Smokin' Whiskey Grilling sauce
Aluminum foil
Peel membrane off bone side of ribs. Trim ribs as needed. In a glass bowl,
combine the rubs and mustard together, mixing thoroughly. Apply a thin coat of
rub mixture on rib meat. Wrap ribs tightly in foil. Start grill and adjust setpoint
temperature to 275 degrees. Pre-heat grill, approximately 10 minutes. Place ribs
in grill and cook for approximately 2 hours. Open foil after 2 hours and reduce
setpoint temperature to Smoke. Continue to smoke for 1 hour (or longer
depending on level of smoke penetration desired). (Option: While smoking ribs,
baste with MAK Smokin' Whiskey sauce.) Once done, remove ribs, allow to rest
for 10 minutes before cutting ribs apart.
Half Ham (cooked)
(Approximate cooking time: 3.25 hours)
8 lb. half ham
1 cup orange juice
2 Tbsp. paprika
½ Tbsp. ground cloves
1 cup yellow mustard
1/4 cup clover honey
1 Tbsp. allspice
Unwrap ham and wipe down with a paper towel. In a glass bowl, combine and
mix all ingredients except ham until thoroughly blended. Divide mixture in half.
Apply half of the mixture to entire ham. From the side, insert meat probe, making
sure not to touch any bone with probe end. Start grill and adjust setpoint
temperature to 350 degrees. Pre-heat grill, approximately 10 minutes Place ham
in grill and plug in meat probe. Program probe for 145 degrees. While ham is
warming up, baste every half hour until heated through, approximately 3.25
hours. Once ham reaches target internal temperature, remove from grill, allow to
rest for 15 minutes, carve and serve.
NOTE: You may use any of the 3 User Programs on the Pellet Boss® controller
to automatically cook your favorite MAK GRILL recipes. Please refer to the
instructions found in the front of the cookbook.
MAK Bacon
(Approximate cooking time: 2 hours)
1 package of thick sliced bacon
Start grill, adjust setpoint temperature to smoke. Pre-heat grill. approximately 10
minutes. Arrange bacon horizontally across cooking grate, leaving room between
bacon slices. Allow bacon to smoke approximately two hours, turning once.
Remove and serve.
29
North Carolina Pork Shoulder
(Approx. cooking time: 9-12 hrs.)
1 pork shoulder roast (5 to 8 lbs.)
1 quart apple cider vinegar
1 quart water
Juice of 1 lemon
2 oz. dried red peppers, chopped
1 tsp. salt
1/2 tsp. ground black pepper
1 bottle of your favorite MAK Grilling Sauce
Onion buns
Note: In order to get meat to properly shred, you must achieve an internal
meat temperature of 190-210 degrees. Total cooking time for the average
sized pork shoulder is 9-12 hours. Please plan accordingly.
Trim pork shoulder, leaving 1/4-1/2 inch thick fat cap on meat, set aside.
In a large pot, combine 1 quart water,1 quart apple cider vinegar, dried
peppers, lemon juice, salt and pepper; bring mixture to boil on stove top,
reduce heat to low and simmer uncovered for 10 minutes. Start grill with
setpoint temperature at 250 degrees. Pre-heat grill, approximately 10
minutes. Pour water and vinegar mixture into heat tolerant container.
Place container on one side of the grill. Program meat probe alarm for
190 -210 degrees. Insert probe from side of shoulder into deep center.
Place pork shoulder on grill; baste on all sides with vinegar mixture. Close
lid and cook 5 hours, basting every hour. After 4 hours, reduce setpoint
temperature to Smoke. Continue cooking an additional 4-6 hours, basting
every 1/2 hour or until meat probe registers 190-210 degrees. Remove
from grill and let sit for 15 minutes. Shred pork. Serve on onion bun with
your favorite MAK Grilling Sauce.
NOTE: You may use any of the 3 User Programs on the Pellet Boss®
Controller to automatically cook your favorite MAK GRILL recipes. Please
refer to the instructions found in the front of the manual or cookbook.
Pork Chops
(Approx. cooking time: 40 min.)
4-4 oz. pork loin chops, boneless
1 tsp. MAK Bird Rub (per chop)
Sprinkle MAK Bird Rub on each side of the chops. Start grill and adjust
setpoint temperature to High. Pre-heat grill approximately 10 minutes.
Place pork chops on cooking grate and brown both sides (approximately
2 minutes per side). Continue to cook chops for approximately 10 minutes
per side, or until internal temperature reaches 165 degrees.
30
FISH & SEAFOOD
Simple Salmon Steaks
(Approximate cooking time: 20 minutes)
One 6oz. Salmon steak per person
2 tsp. MAK Fish Rub
2 tsp. olive oil
Rinse steaks under cold running water. Towel pat dry. Apply olive oil to each
side. Lightly sprinkle MAK Fish Rub over each side of steak. Start grill and adjust
setpoint temperature to 450 degrees. Allow grill to pre-heat, approximately 15 20 minutes. Place steaks on cooking grate and grill for approximately 10 minutes
per side, per inch of thickness. Remove from grill immediately when fish turns
from bright to pale in color. Do not over cook fish.
Cold Smoked Salmon (whole or half)
(Approximate cooking time: 5 hours)
1 salmon whole or half-skin on
Brine mixture:
2 cups of brown sugar
1 cup of sea salt
1/4 cup garlic salt
Place fish in a re-sealable bag, or a plastic container that seals, add brine mixture
and close. The brown sugar and salt break down into a liquid creating a soupy
brine. Brine for 12 hours in refrigerator. Take the fish out, rinse off and allow to air
dry. When dry, sprinkle brown sugar over the top of the fish to caramelize it.
Start grill and adjust setpoint temperature to Smoke. Pre-heat, grill,
approximately 10 minutes. Open Warmer/Smoker box and place fish inside.
Close and smoke for about 5 hours (depending on thickness of fish).
31
Grilled Shrimp
(Approx. cooking time: 30 min.)
2 lbs. raw shrimp, thawed if necessary
MAK Chipotle Rub
Bamboo skewers
Any variety of MAK Barbecue sauce
Peel and de-vein shrimp; sprinkle with MAK Chipotle Rub. Marinate
shrimp in refrigerator for one hour. Soak wood skewers in boiling hot
water for 30 minutes. Remove shrimp from refrigerator and thread onto
skewers. Start grill and adjust setpoint temperature to 300 degrees. Preheat grill approximately 10 minutes. Place shrimp skewers on cooking
grates, close lid and cook approximately 6-8 minutes per side. Remove
skewers from grill and brush with barbecue sauce on both sides. Return
to grill and cook an additional 2-3 minutes.
32
BAKED GOODS
Take 'N Bake Pizza
(Approximate cooking time: 12-22 min.)
One Fresh Take 'N Bake Pizza
Remove plastic wrap and any printed matter from pizza. Start grill, adjusting
setpoint temperature to 400 degrees. Pre-heat grill, approximately 15 minutes.
Leave pizza on cardboard tray and place inside grill, close lid and cook for
approximately 12-22 minutes, depending on thickness of pizza crust. Once
cooked, use tongs to carefully grip pizza tray and transfer to pizza platter. Allow
pizza to cool for 5 minutes before slicing.
E-Z Cheesy Bread
(Approximate cooking time: 10 min.)
1 loaf French bread
1 cup mayonnaise
1 cup Mozzarella cheese, grated
Optional: 1 Tbsp. MAK Chipotle Rub
Slice bread in half lengthwise. Spoon or brush on mayonnaise on each half until
bread becomes moist. Do not over moisten the bread. Sprinkle ½ cup of cheese
on each half of bread. Option: Sprinkle ½ TBSP of MAK Chipotle Rub on each
half of bread. Start grill, adjusting setpoint temperature to 350 degrees. Pre-heat
grill, approximately 15 minutes. Place bread, flat side up on grill, close lid and
bake for approximately 8-10 minutes, until the cheese is bubbling. Remove, allow
to cool, cut and serve.
Fresh Fruit Pie (uncooked)
(Approximate cooking time: 60 min.)
1 fresh fruit pie of your choice
Start grill, adjusting setpoint temperature to 400 degrees. Pre-heat grill,
approximately 10 minutes. Place pie on a cookie sheet, and then into center of
grill. Close lid and bake for approximately 1 hour for fresh fruit uncooked pie. (For
a pre-cooked pie, cook for approximately 20-30 minutes.) Carefully remove from
grill, and allow to cool on a wire rack for approximately 30 minutes before slicing
and serving.
33
Cold Smoked Cheese
(Approximate cooking time: 20-60 min.)
1 block of cheese (semi-hard or hard cheese is recommended)
Aluminum foil
NOTE: Smoking cheese is best done when the outside temperature is
below 80 degrees.
Start grill and adjust setpoint temperature to Smoke. Allow grill to pre-heat,
approximately 10 minutes. Cut cheese into squares no larger than one and a half
inches thick. Place cheese blocks on foil arranged on top of grate inside
Warmer/Smoker box, or use pie tin or plate for the cheese. Smoke cheese for
approximately 20-60 minutes, depending on the level of smoke flavor you desire.
Carefully remove after smoking and allow cheese to cool. Store in an air-tight
container in the refrigerator.
34