1
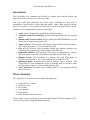
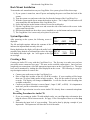
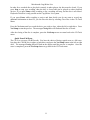
®
CopyWriter Live
CWL-6200
Audio Disc Recorder
Instruction Manual
Microboards Technology LLC
8150 Mallory Court
Chanhassen, MN 55317
Version 2.3
www.microboards.com
Microboards CopyWriter Live
2
Microboards CopyWriter Live
Table of Contents
Introduction....................................................................................................................... 5
What’s Included:............................................................................................................... 5
Controls.............................................................................................................................. 6
Connections ....................................................................................................................... 7
Back Panel: XLR, RCA Output, RCA Input 1, and Power.............................................. 7
Front Panel: MIC, Input 2, and Headphones.................................................................... 7
Rack Mount Installation................................................................................................... 8
System Operation.............................................................................................................. 8
Creating a Disc .................................................................................................................. 8
Recording Procedure for Audio CD................................................................................. 8
Playing a Disc .................................................................................................................... 9
Copying a Disc................................................................................................................. 10
CopyWriter Live Menu Options.................................................................................... 10
Input ............................................................................................................................... 10
Volume ........................................................................................................................... 10
CD Tools ........................................................................................................................ 10
Track Extraction............................................................................................................. 12
Beep................................................................................................................................ 12
System Info .................................................................................................................... 12
System Update................................................................................................................ 12
Auto Track Index ........................................................................................................... 13
Gap Size ......................................................................................................................... 13
Recording ....................................................................................................................... 13
Setup Exit? ..................................................................................................................... 13
Troubleshooting .............................................................................................................. 14
Contact Information ....................................................................................................... 15
Technical Specifications ................................................................................................. 15
Advanced Features ......................................................................................................... 15
Specifications ................................................................................................................. 15
Supported Formats ......................................................................................................... 15
Mechanical / Electrical................................................................................................... 15
3
Microboards CopyWriter Live
Important Safety Instructions
•
Read the User’s Manual completely
•
Observe all warnings
•
Do not connect or disconnect the power cord when your hands are wet
•
Keep unit and power cord aware from any heat source, such as radiators,
stoves, or heat registers.
•
Do not attempt to repair the AC cord in any way.
•
Do not modify the AC plug. The grounding plug is designed for your safety.
•
Do not remove or otherwise modify the power cord for any reason.
•
Protect the power cord from being walked on or pinched.
•
Keep away from water. Do not place this unit near water, including flower
vases, tubs, sinks, etc.
•
Clean this unit only with a dry cloth.
•
Unplug this unit during lightning storms or when unused for long periods of
time.
•
Do not stack heavy objects on top of this unit. Place the player in a horizontal
position only.
•
Avoid placing the player in direct sunlight, areas of excessive dust, high
temperature or vibration.
•
Use only attachments and accessories specified by the manufacturer.
•
Do not insert any foreign object into the unit or on to the drive trays.
•
Refer all servicing to qualified service personnel.
4
Microboards CopyWriter Live
Introduction
The CopyWriter Live combines the flexibility of cassette tapes with the quality and
longevity of CDs, in one low-cost, easy to use unit.
You can record from practically any audio source, including live feed from a
microphone, a cassette deck, a mixer and many others. Make a high quality CD on the
first try, every time. You can span from disc to disc to record non-stop for hours on end,
or burn to 2 discs simultaneously from one audio input.
•
•
•
•
•
•
•
•
•
Audio: Audio CD playback is possible on virtually any player.
Automatic Audio Track Indexing: Insert tracks automatically into the recorded
master.
Manual Audio Track Creation: Just by pressing the RECORD button, you can
create your next track on your audio CD.
Audio Gap Size: You can select how long the silence will be in between tracks.
This value ranges from 1/75 of a second to 2 seconds.
Ease of Use: With an easily navigable display and intuitive interface, the
CopyWriter Live requires very little training to use effectively.
Duplication Function: The CopyWriter Live works as a duplicator, too. Simply
drop your master in one drive and a blank in the other and hit “Disc Copy”.
Multiple Sources: The CopyWriter Live features RCA and XLR inputs, so
virtually any audio source, live or pre-recorded, can be burned to a CD.
Spanning Capable: Recording more than 80 minutes is not a problem. The
CopyWriter Live will continuously record by utilizing both its recorders; when
one disc reaches capacity, it starts recording on the other.
Track Extraction: Re-master your recorded audio CD’s by selecting only the
tracks you want.
What’s Included:
The CopyWriter Live system comes with the following items:
•
•
•
•
•
•
CopyWriter Live system
AC Power Cord
RCA cables
Users Manual
CD-R media
Rack Mount brackets and screws
If any of these items are missing, please contact Microboards Technical Support at 952556-1639 or by email at [email protected].
5
Microboards CopyWriter Live
Controls
1
7
2
9
13
11
3
4
5
6
8
12
10
1) Left CD Recorder Drive
2) Eject for Left CD Recorder Drive
3) Right CD Recorder Drive
4) Eject for Right CD Recorder drive
5) Power Button
6) Disc Change Button
7) Yes/Setup Button
8) No Button
9) Volume Up
10) Volume Down
11) Input Button
15
14
17
16
18 19
20
21
12) Play Mode Button
13) Display Screen
14) Display Button
15) Previous Button
16) Next Button
17) Play/Pause Button
18) Stop Button
19) Record Button
20) Disc Copy button
21) Headphone Volume
6
Playback
Controls
Microboards CopyWriter Live
Connections
Important Note:
Make sure the power is turned off to the CopyWriter Live system when
connecting or disconnecting any cables.
Back Panel: XLR, RCA Output, RCA Input 1, and Power
Input connections can be made to the XLR connection on the back, or to the RCA Input 1
connection. The power connection is also on the back.
Audio monitoring can be done either from the Headphone jack on the front of the CopyWriter Live,
or from the Output RCA jacks on the back.
RCA Input 1 to Tape
or CD Player
(Left & Right)
XLR Connection
to External
Source
Power Connection, 100240V AC (Auto Detect)
Left/Right RCA Output
to Audio Receiver
Front Panel: MIC, Input 2, and Headphones
Plug a microphone into the 1 ¼ inch input port on the front of the CopyWriter Live. Left/Right
RCA Input 2 is available as an input source on the front panel.
The Headphone jack can be used to monitor the audio either during recording or playback. It is
recommended that you set the headphone volume at a comfortable level before changing the input
volumes during recording.
Headphone
Jack
Left/Right RCA Input 2
7
Microboards CopyWriter Live
Rack Mount Installation
To mount the rack mount brackets on your CopyWriter Live system, please follow these steps:
1) If you system is turned on, turn off power and unplug the power cord from the back of the
system.
2) Turn the system over and remove the four feet from the bottom of the CopyWriter Live.
3) With the system upside down, mount the brackets in place. The L shape of each bracket will
wrap around the side and bottom of the CopyWriter Live.
4) Secure the brackets on the bottom with two screws for each bracket.
5) Flip the CopyWriter Live system over and secure the side of the bracket with a screw in the
upper corner on each side.
6) Each bracket should now have three screws installed, two on the bottom and one on the side.
7) The CopyWriter Live is now ready to be placed in your rack.
System Operation
After powering on the system, the following screen is
displayed:
NO
DISC
<INP1
NO
DISC
The left and right captions indicate the contents of the left and right drives. The center caption
indicates the input method currently selected.
During duplication, the display will show the audio levels of the disc
REC02
currently being burned as horizontal lines above the input, with
the
08:16
left channel above the right. An * will appear on the right if levels
are too high.
====
<INP1
NO
DISC
Creating a Disc
Creating an Audio CD is easy with the CopyWriter Live. The first step is to make sure you have
your audio source connected (see page 7 for more on the available connections). Once you have
completed your connections, select the appropriate input source on the CopyWriter Live. The input
level can be monitored by reading the meter displayed on the screen. The following is a step-bystep description on how to create a disc.
•
•
•
•
Connect your audio source to the CopyWriter Live.
Place a blank disc in either of the two CD-R/W recorders. If your recording will be longer
than one CD, place blank media in both recorders. Wait for the media to spin up in the
recorder. The display will change to Blank Disc. It will also list the total recording time
available on that disc.
Confirm your Input Selection is correct (Input 1, Input 2, MIC, or XLR). It is important to
make sure you have selected the correct input.
The MIC input selection is used to create Audio CD’s directly from a connected microphone
only.
Recording Procedure for Audio CD
1. If you are creating an Audio CD with multiple tracks, set your Gap value to determine how
long the silence will be between tracks. See page 12 for a description of how to set the Gap
value.
2. Determine the input level of your recording. This can be done by playing a sample of your
input audio. The input meter will show the level of the audio.
8
3.
4.
5.
6.
7.
8.
9.
Microboards CopyWriter Live
If your audio source volume is too low, the meter may show little or no activity. In that case,
you should increase your input volume by pressing the Vol Up button. If your audio source
volume is too high, the meter will indicate this by displaying an asterisk ( * ) as the right bar
symbol, and the input volume should be reduced by pressing the Vol Down button.
Once you have your input volume set for your particular source, you are ready to record.
Start playing your source. If you are recording a live session, wait for the program to begin.
Press Record on the CopyWriter Live. This will start the recording. If your recording is
longer than 1 CD, it will span to the second disc. The second CD will start to record up to 30
seconds before the first CD ends, so this amount of time will be recorded on both discs.
Once the second disc is full, it will span back to the first CD, assuming you have a blank disc
in the drive.
Recording volume from the input can be changed during recording by using the Vol Up and
Vol Down buttons.
Press the Record button to start creating your next track immediately. You can have up to 99
tracks on a single CD.
Pressing Disc Change during the recording process will switch the recording from the
original drive to the other drive, provided that it contains a blank disc. The disc in the
original drive will be closed automatically.
Press the Pause button to pause the recording process. Press Record to begin recording
again to a new track. Note that you cannot start the next track until the last track information
has been completed, during which time the display will read Close Track. Recording can
begin again once that message clears.
While paused, the input selection can be changed.
Press and hold the STOP button for 2 seconds while recording live to finalize the disc.
The disc MUST be finalized in order to play the CD in any other system. If the Pause
button was used to end the last recorded track, the disc has not been finalized and you will
need to do so from the CD Tools menu before the disc will be playable (see pg 11, CD Tools:
Close Disc).
Playing a Disc
1. Confirm you have your Audio Out connected to a playback device (Audio Receiver, etc.) or
have headphones connected to the front panel.
2. Place the disc you wish to play back into either of the CD-R/W drives.
3. Press the Play button on the front panel.
4. Use the playback buttons on the front panel to control playback. If using headphones, adjust
the volume using the knob next to the headphone jack
5. Play mode can be selected as follows by pressing the PLAY MODE button:
A. Normal – no Play Mode displayed. Plays audio tracks sequentially and stops when the
disc ends.
B. Random – display shows RDM. The audio tracks are played in a random order.
C. Repeat CD 1 – display shows REP1. This mode will repeat the entire CD in the selected
drive.
D. Repeat CD 2 – display shows REP2. This mode will repeat the CD’s in both drives in
sequence, starting with the selected drive.
E. Repeat Track – display shows REPT. This mode will repeat play the current track.
9
Microboards CopyWriter Live
Copying a Disc
To copy a disc, all you need to do is place a blank disc in one drive and the master disc in the other
drive. It does not matter which drive contains the master and which drive contains the blank. Press
the Disc Copy button on the CopyWriter Live front panel and the copy process will begin. Please
follow these steps to copy a disc.
1. Place your master disc you wish copied into either of the two recorders. The display for that
drive will change to read the type of disc it is, such as Data CD or Audio CD.
2. Place your blank CD-R or CD-RW disc into the other recorder. The display will change to
Blank Disc. It will also display the total time available on that disc.
3. Press the Disc Copy button on the front panel.
4. The copy process will now start. The display will show you the progress of the copy job.
NOTE: If your master disc is larger than your blank disc, you will see the message SPACE
NOT ENOUGH. If you see this message, you will need to use a higher capacity blank disc.
CopyWriter Live Menu Options
Pressing the Yes/Setup button while no recording or playback is taking place will take you into the
Setup menu. Pressing the Yes/Setup button at each displayed item will allow you to make changes
to the specified setting.
Input
This menu option allows you to switch the default input selection. Note that you can change the
input selection at any time except during recording by pressing the Input button, but this will not
change the selection that first appears when the CopyWriter Live is turned on. The CopyWriter Live
default for input selection is Input 1.
Choices for the input selection are INPUT 1, INPUT 2, XLR, and MIC.
Volume
You can control the input volume for each input selection of the CopyWriter Live system. A
different volume level can be saved for each input selection.
Press the Yes/Setup button to change the volume for the displayed input selection, or No to move to
the next selection. After pressing Yes/Setup, use the Vol Up and Vol Down buttons to change the
volume setting for the input selection. Press Yes/Setup again to save the new volume level and
return to Volume in the Setup menu. Pressing No will discard the changes.
The input volume can also be controlled during recording by using the Vol Up and Vol Down
buttons.
CD Tools
The CD Tools menu item allows you to close an open Audio CD. It also allows you to erase a CDRW disc. Press Yes/Setup when you have selected the CD Tools entry on the Setup Menu. There
are 3 options under the CD Tools menu:
Close Disc
10
Microboards CopyWriter Live
In order for a recorded disc to play back correctly in other players, the disc must be closed. If you
press Stop to stop your recoding, then the disc is closed and can be played on other playback
devices. If you press Pause while recording a disc, recording will stop, but the disc is not closed.
Playback of this disc is only possible on the CopyWriter Live system.
If you press Pause while recording a project and then decide you do not want to record any
additional information to that CD, you can close the disc by selecting Close Disc in the CD Tools
Menu.
Press the No button until you reach the drive you wish to close, either the left or right drive. Press
Yes/Setup to start the process. The message Closing Disc will flash until the disc is closed.
After the closing of the disc is complete, press the Yes/Setup screen to return back to the CD Tools
menu.
Quick Erase/Full Erase
The CW Live can erase CD-RW media. You have the choice of doing a quick erase or a full erase.
Just place the CD-RW disc in either or both drives and press the Yes/Setup button at the left or right
drive. The message Erasing CD will flash on the display until the process is complete. Once the
erase is completed, press the Yes/Setup button to go back to the CD Tools menu.
11
Microboards CopyWriter Live
Track Extraction
This menu option allows you to extract tracks from one master and burn them to a blank disc. To
use this feature, follow the directions below:
1. Press Yes/Setup at the Track Extraction menu selection in the Setup menu to begin.
2. The display will read Extraction OK? Press Yes/Setup, and the drives will eject. Place the
master disc in one drive and a blank in the other and close the drive trays. The master will
run through a track analysis. It does not matter in which drive the master is placed.
3. After the master is analyzed, the display will read EXTRACT THE TRK?, followed by
TRACK 01/XX, where XX is the number of tracks on the master. Press Yes/Setup to select
the track or No to not select the track.
4. Repeat step 3 until all tracks on the master have been offered for extraction.
5. After the last track on the master, the display will read End Extraction? Press Yes/Setup to
begin burning the selected tracks to the blank disc. Press No if you wish to change your
selections; you will run through steps 3-5 again.
6. After the selected tracks have been burned, the display will read Next Master? Press
Yes/Setup, and the master drive will be ejected to allow you to insert a new master. Close
the tray, and repeat steps 3-5 for the new master.
7. When you have burned the last track to the disc, answer No to the Next Master? query. The
disc will then be closed automatically, ejecting when complete.
You cannot put more tracks on the disc than the disc will hold. If the capacity of the disc will be
exceeded by selecting a track, you will not be able to select that track.
Note: If you wish to rearrange the tracks on a single master, you can do so by selecting tracks off
the same master multiple times. You will need to plan the order of the tracks, as you cannot reverse
the orders of tracks during a single master track extraction sequence. For example, you wish to
place all the even numbered tracks in order on the new disc first, followed by the odd numbered
tracks in order. You would need to select the even numbered tracks from the master the first pass,
then burn to the blank disc. When asked for the next master, press Yes/Setup but keep the master in
the tray. Select the odd numbered tracks, burn the tracks, then answer No at the next master prompt
to close the disc.
Beep
This setting allows you to turn on or off the button beep. Use the Vol Up or Vol Down button to
turn the beep on or off. Press Yes/Setup when done.
System Info
System Info allows you to view the current firmware version installed on the CopyWriter Live.
Press Yes/Setup at the System Info menu selection in the Setup menu to review the Firmware
Version and Hardware Version. Press No to review the drive make, model, and firmware.
Press No to have the option of returning to the Setup menu.
System Update
The CopyWriter Live system can be updated with a CD. If there are changes in the firmware, such
as improved features, bug fixes, etc., the system can be updated using the System Update feature.
12
Microboards CopyWriter Live
In the Setup menu, press the No button until System Update is selected. Press the Yes/Setup button
and the left drive will eject, prompting you to place the firmware disc in the drive with the message
Insert Program Disc. Place the disc in the drive and close the tray
The new firmware will be read by the system and then copied into the CopyWriter Live.
After the firmware is updated, you will need to shut the CopyWriter Live off and restart it. Once the
system boots back up, it is ready to use with the new firmware installed. Input, Volume, and Gap
Sizes will be returned to the default values.
Auto Track Index
This feature allows you to have the Copywriter Live automatically create tracks based on the time
period you select.
Press Yes/Setup button when the Setup menu display reads AUTO Trk INDEX. The first selection
is No, which will not create tracks automatically. The choices which will allow auto tracking are 3
minutes, 5 minutes, 7 minutes, and 10 minutes. Press No until the correct interval appears, then
press Yes/Setup to select that interval.
You can still manually index tracks even with the Auto Track Index feature turned on by pressing
the Record button. The next auto track will be the length you have specified in the Auto Track
Index.
Note that the gap between tracks will be set based on the Gap Size setting (see below).
Gap Size
The length of silence in between audio tracks can be set by changing the Gap Size value. The Gap
Size value ranges from 001 to 150. At 150, the gap is 2 seconds. At 001 the gap is approximately
1/75 of a second. The default value is 001.
Use the Vol Up and Vol Down buttons to change the Gap size.
Recording
The Copywriter Live can run in Span mode or in Twin mode. The default setting is Span mode.
For uninterrupted recording, you should select Span mode. As the first disc fills, the second
automatically starts burning. Another blank disc can be loaded in the first drive, so when the second
disc fills, the new blank disc begins burning. This sequence can be continued indefinitely.
To burn 2 identical discs from the same audio input, select Twin mode. The CopyWriter Live will
burn to both drives at the same time; when the discs are full, the recording stops and the discs are
automatically closed and ejected. If you wish to continue recording, replace both discs with blank
media and press the Record button once the discs are ready.
Setup Exit?
Press Yes/Setup to leave the Setup menu, or No to cycle through the options again.
13
Microboards CopyWriter Live
Troubleshooting
Playback is not appearing on the screen.
Confirm the RCA connections are correct.
No Audio playback
Confirm the RCA connections are correct.
Check the playback volume and make sure it is not too low.
Disc will not play back on other player
Confirm the recorded disc is Closed.
Check compatibility of player (Supports CD Recordable media).
Playback volume too high or too low on burned CD.
Check input volume. Default settings for Input 1 and Input 2 are 22. Default settings for
MIC and XLR are 25. Check this number in the setup menu and adjust accordingly.
14
Microboards CopyWriter Live
Contact Information
For technical questions or support issues, contact Microboards Technology technical support:
United States
PH: 952-556-1639
FAX: 952-556-1628
[email protected]
www.microboards.com
Europe
PH: +44 (0) 845 230 7800
www.microboards.co.uk
Japan
PH: 03-3561-2266
www.microboards.co.jp
Technical Specifications
Advanced Features
•
•
•
•
•
•
Standalone CD Duplication with automatic format detection
Record and Pause to create multiple tracks for playback
Black set-top configuration
Play back Audio discs on PC or Mac
Track Extraction
Auto-Track Indexing
Specifications
•
•
•
•
•
•
LCD system display
2 pairs of RCA inputs (1 rear / 1 front)
1 pair of XLR inputs (rear)
1 pair of RCA outputs (rear)
1 ¼ inch Microphone input (front)
1 ¼ inch Headphone output (front)
Supported Formats
•
•
•
•
•
•
•
•
CD-ROM Mode 1 & 2
CD-DA (Red Book) Audio
CD-ROM XA
Mixed Mode
Multisession
HFS
CD Bridge
CD Extra
Mechanical / Electrical
•
•
•
•
Signal to Noise Ratio: 90dB
Power Supply:
AC 90V ~ 264V
Dimensions:
11.38” x 16.69” x 4.56” (4.38” without feet)
Weight:
12.3 lbs
15