1
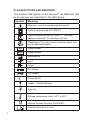
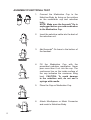
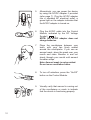
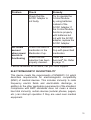
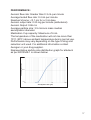
Instruction Manual
Table of Contents
Introduction........................................................ 1
Warnings........................................................... 2
Warranty............................................................ 6
Classifications and Markings............................. 7
Aeroneb Go Parts.............................................. 8
Assembly/Functional Test.................................. 9
Operational Instructions.................................. 10
Cleaning and storing....................................... 12
Troubleshooting Guide.................................... 15
Electromagnetic Susceptibility......................... 16
Specifications.................................................. 17
Performance.................................................... 18
Replacement Parts and Accessories............... 19
This page has been intentionally left blank
INTRODUCTION
Be sure to read these instructions fully before use.
Thank you for purchasing the Aeroneb® Go Nebulizer. Certain
conditions such as asthma, COPD (chronic obstructive
pulmonary disease) and cystic fibrosis require that prescribed
liquid medication be turned into a fine mist, called an aerosol,
and then inhaled into the lungs. The Aeroneb® Go turns liquid
medication into an aerosol, which you can then inhale through
a mouthpiece or an aerosol mask into your lungs.
The Aeroneb® Go uses the unique OnQ™ Aerosol Generator,
which is unlike any other nebulizer technology available.
When you turn on your nebulizer, OnQ pumps liquid through
tiny holes in a wafer-thin metal plate to create a soft mist
aerosol.
The Aeroneb® Go, for use by paediatric and adult patients,
is intended to aerosolize physician-prescribed solutions for
inhalation that are approved for use with a general-purpose
nebulizer.
Designed with your needs in mind, the Aeroneb® Go is
portable, lightweight, compact and silent. The control module
operates with three (3) “AA” disposable or rechargeable
batteries (not included), or can alternatively be powered by
the AC/DC adapter.
1
IMPORTANT SAFEGUARDS
When you use electrical products, always follow basic safety
precautions. As with any electrical device take particular care
around children.
READ ALL WARNINGS AND INSTRUCTIONS BEFORE
YOU USE YOUR NEBULIZER
WARNING:
If this product is being used to treat a life threatening
condition, a backup device is necessary.
2
•
As with any electronic device, this product may become
unusable due to an electrical outage, battery depletion,
or mechanical failure. We recommend that you have
spare batteries and have a backup device available to
you.
•
The AC/DC adapter does not charge batteries.
•
If you are using batteries and the green light is flashing,
your batteries are low. You may finish your treatment and
then change (or replace and recharge) the three “AA”
batteries immediately.
•
Do not share your Aeroneb® Go Nebulizer with others.
It is intended for use by a single user. If more than one
person uses it, there is a risk of spreading infectious
illness.
•
As with all electronic devices, it is recommended that it
the product is unplugged when not in use.
•
Adult supervision is required when this product is used by
children and individuals who require special assistance.
•
Use this product only for physician-prescribed solutions
for inhalation as described in this manual.
WARNINGS CONTINUED:
•
Do not use components or attachments that are not
recommended by Aerogen. Refer to the Replacement
Parts and Accessories section in this manual (page 18).
•
Never operate this product if any of the parts are not
working properly or have been damaged.
•
Do not use the Aeroneb® Go Nebulizer in the presence
of a flammable anaesthetic mixture with air, oxygen or
nitrous oxide. As with any electrical equipment, take care
when using the device in a potentially oxygen enriched
environment.
•
Do not use the Aeroneb® Go Nebulizer with anaesthetic
breathing systems or lung ventilator breathing systems.
•
Do not place or drop this product into water or any liquid
when it is plugged into a power source.
•
Keep this product and cords away from heated surfaces.
•
Be sure the device has been properly cleaned before
use to avoid possible contamination.
•
If after proper cleaning it takes longer than 12 minutes to
deliver 3mL of normal saline (0.9%), the Nebulizer Unit
should be replaced.
•
The user should ensure that exhaled medication is
directed away from bystanders.
•
Do not microwave any parts.
•
By connecting the AC/DC adapter to the Aeroneb® Go
Control Module, the Aeroneb® Go Control Module and
batteries are not being charged.
•
As with any cables keep all cables tidy to avoid tripping
or strangulation hazards and take particular care around
children.
3
WARNINGS CONTINUED:
4
•
Do not nebulize alcohol-based drugs in an oxygen-rich/
high pressure environment.
•
In event of loss of mains power, remove the AC/DC cable
from the control module and operate with batteries (refer
to page 9).
•
Never clean your Nebulizer Unit with solvents, chemicals,
alcohol or abrasive cleaners.
•
Do not use brushes, sharp tools or abrasive cloths that
could scratch or damage the surfaces.
•
Do not clean parts in a dishwasher.
•
Store your Aeroneb® Go in the carrying case.
•
Do not store the Aeroneb® Go in a location where it is
exposed to direct sunlight, extreme heat or cold, dust or
water. Store out of reach of children.
•
Follow local laws and recycling plans regarding disposal
or recycling of components, batteries and packaging.
•
Before storing your Aeroneb® Go for an extended period,
remove the batteries from the Aeroneb® Go Control
Module and store them separately. If you do not take the
batteries out, they may leak and cause your nebulizer to
stop working.
WARRANTY
The Aeroneb® Go Control Module and AC/DC Adapter are
warranted for a period of two years from the date of purchase
against defects in manufacturing. The Aeroneb® Go nebulizer
unit is warranted for one year from date of purchase against
defects in manufacturing. All warranties are based on typical
usage.
The life of the Aeroneb® Go nebulizer unit has been validated
for use for 100 disinfecting treatments (boiling or baby
bottle steam steriliser). This is based on a minimum of one
year typical usage profile of 2 treatments per day and two
disinfecting treatments per week. The user should note that
any use in excess if this may result in reduced life of the
product.
5
CLASSIFICATIONS AND MARKINGS
The symbols that appear on the Aeroneb® Go Nebulizer and
its accessories are described in the table below:
Symbol
Meaning
Attention, consult accompanying documents
Class II equipment per IEC 60601-1
Type BF equipment per IEC 60601-1. This label
applies to Aeroneb® Go nebulizer unit only
US
Classified by TUV with respect to electric shock, fire
and mechanical hazards
SN
Serial number
REF
Model number
Manufacturer
Input
Output
DC Voltage
AC Voltage
Power On/Off
Fragile – Handle with care
Keep Dry
+60 oC
–20 C
o
Storage temperature limits: -20°C to 60°C
This device compiles with the requirements of the
Medical Devices Directive (93/42/EEC)
Consult Instructions for Use
6
AERONEB® GO SYSTEM PARTS:
Medication Cup Cap
Mouthpiece
Cable
Nebulizer body
Base
Control Module
AC/DC Adapter*
Mask Adapters
*Available with complete
Aeroneb® Go System
UNIT ASSEMBLY AND USAGE
NOTE: Clean all parts of your Aeroneb® Go Nebulizer
(described on page 11) before first use, after each use, or after
extended storage.
PRIOR TO ASSEMBLY:
Check all parts for visible damage. Replace any damaged
parts before you use the Aeroneb® Go. In the case of missing
parts, malfunction or damage, contact your local Aeroneb® Go
representative or equipment supplier.
7
ASSEMBLY/FUNCTIONAL TEST
1. Connect the Medication Cup to the
Nebulizer Body by lining up the notches
on the medication cup and nebulizer
body.
NOTE: Make sure the Aeroneb® Go is
unplugged before you add medication
to the Medication Cup.
2. Insert the nebulizer cable into the back of
the nebulizer unit.
3. Add Aeroneb® Go base to the bottom of
the handset.
4. Fill the Medication Cup with the
prescribed nebulizer medication. Never
pour more than 6 mL into the cup. The
continuous line on the inside surface of
the cup indicates the maximum filling
level. CAUTION: To avoid damage
to the nebulizer unit, do not use a
syringe with needle.
5. Place the Cap on Medication Cup.
6. Attach Mouthpiece or Mask Connector
and mask to Nebulizer Body.
8
HOW TO OPERATE THE AERONEB® GO NEBULIZER
3 x AA LR6
1. Turn the Aeroneb® Go Control Module
upside down. Slide the battery cover
in the direction of the arrow to remove
the lid. Put in three (3) “AA” batteries
(not included). Replace the cover on
the Control Module and slide the cover
until it locks in place. You can expect at
least three (3) hours of operation from
a new set of disposable batteries, (up
to five (5) hours from high performance
batteries).
2. Connect the nebulizer cable to the
Aeroneb® Go Control Module, indicated
by the Output symbol (
).
3. Turn on the unit by pressing the “On/Off”
button on the Control Module. You will
see a green light on the Control Module
light up.
3 x AA LR6
4. Visually verify that aerosol is coming out
of the mouthpiece or mask to indicate
that the device is functioning properly.
NOTE: Do not cover the ventilation
holes during use.
9
5. Alternatively, you can power the device
by using the AC/DC Adapter if provided
(refer page 7). Plug the AC/DC adaptor
into a standard AC electrical outlet, a
green light on the adapter indicates that
the AC/DC adapter is turned on.
6. Plug the AC/DC cable into the Control
Module, indicated by the DC Voltage
Symbol (
).
NOTE: the AC/DC adapter does not
charge batteries.
7. Place the mouthpiece between your
teeth, with your lips firmly sealed
around the mouthpiece. If you use an
aerosol mask, place the mask over your
mouth and nose. Breathe in and out
slowly through your mouth until aerosol
formation stops.
Note: Aerosol mask is not provided.
Do not cover ventilation holes.
8. To turn off nebulizer, press the “On/Off”
button on the Control Module.
9. Visually verify that aerosol is coming out
of the mouthpiece or mask to indicate
that the device is functioning properly.
10
CLEANING AND STORING YOUR AERONEB® GO
AFTER EVERY USE:
Disconnect the control module before you take the nebulizer
apart to rinse it.
1. Rinse the Nebulizer Unit (Medication Cup, Nebulizer
Body, Base and Mouthpiece or Mask Adapter) under
running hot tap water after every use.
2. Shake off excess water, and allow parts to fully air dry on
a clean, dry towel, out of the reach of children.
3. Make certain that all cleaned parts are completely dry
before you store or use them.
DAILY:
Disconnect the power source before you take the nebulizer
apart to clean it.
1. Wash the Nebulizer Unit (Medication Cup and Cap,
Nebulizer Body, Base and Mouthpiece or Mask Adapter)
by hand in a solution of warm water and mild liquid
dishwashing soap. Use soap intended only for washing
dishes by hand. Do not use dishwasher detergent. Do not
leave parts soaking.
2. Rinse all pieces thoroughly under running hot tap water.
Make sure that no soap is left on any of the parts.
3. Shake off excess water, and allow parts to fully air dry on
a clean, dry towel, out of the reach of children.
4. Make certain that all cleaned parts are completely dry
before you store or use them.
11
OPTIONAL DISINFECTION:
If you would like to disinfect your Aeroneb® Go Nebulizer,
you may use choose one of two options; Boiling or Vinegar
Solution.
1.
BOILING:
i.
ii.
iii.
iv.
v.
vi.
Rinse the Nebulizer Unit (Medication Cup,
Nebulizer Body, Base and Mouthpiece or
Mask Adapter) under running hot tap water
after every use.
Shake off excess water, and allow parts to fully
air dry on a clean, dry towel, out of the reach
of children.
Bring a saucepan of DISTILLED water to the
boil and allow it to continue to boil.
NOTE: Using regular tap water to boil the
nebulizer unit will greatly reduce the life of the
nebulizer unit.
Carefully immerse the Nebulizer Unit in the
boiling water. Leave the nebulizer immersed
in the boiling water for a maximum of
twenty (20) minutes.
Carefully remove the nebulizer from the boiling
water and shake off the excess water. Allow
parts to fully air dry on a clean, dry towel, out
of the reach of children.
Make certain that all parts are completely dry
before you store or use them.
Similarly, the Nebulizer Unit may be steam disinfected in a
standard baby bottle steam sterilizer for fifteen (15) minutes.
Refer to manufacturers instructions.
12
OPTIONAL DISINFECTION (cont’d):
2.
VINEGAR SOLUTION:
i.
ii.
iii.
iv.
v.
vi.
vii.
Rinse the Nebulizer Unit (Medication Cup,
Nebulizer Body, Base and Mouthpiece or
Mask Adapter) under running hot tap water
after every use.
Shake off excess water, and allow parts to fully
air dry on a clean, dry towel, out of the reach
of children.
Fill a container with a mixture of three (3) parts
hot water to one (1) part white distilled vinegar.
Soak the Nebulizer Unit parts (Medication Cup
and Cap, Nebulizer Body, and Mouthpiece
or Mask Adapter) in the solution for thirty
(30) minutes.
Rinse all pieces thoroughly under running hot
tap water.
Shake off excess water, and allow parts to air
dry on a clean, dry towel, out of the reach of
children.
Make certain that all disinfected parts are
completely dry before you store or use them.
Cleaning of Control Module, Cable, AC/DC Adapter:
Wipe with a clean cloth dampened with warm water and mild
liquid detergent.
•
Do not immerse in liquid.
•
Do not use abrasive or sharp tools.
•
Do not spray liquid directly onto the control
module.
•
Do not immerse control module in liquid.
13
TROUBLESHOOTING GUIDE
If you have difficulty operating your Aeroneb® Go, check the
following points:
Problem
Check
Remedy
No visible
aerosol
when using
batteries
Check that the
batteries are
inserted correctly.
Using the markings
under each battery
location, place
each battery in the
Control Module
housing. Match (+)
and (-).
Check to see if the
low battery power
light is flashing.
Replace the
batteries or use the
AC/DC Adapter.
Check that the
Control Module
cable is connected
properly to the
nebulizer and to the
Control Module.
Connect the cable
properly to the
nebulizer and the
Control Module
(Refer to page 7).
Check that the
AC/DC Adapter is
plugged correctly
into a working AC
outlet and the green
light is on the AC/DC
Adapter.
Insert the plug into
a working outlet
and verify that the
green light on the
controller is lit (Refer
to page 9).
Check that the
AC/DC Adapter
cable is connected
properly to the
Control Module.
Connect the
AC/DC Adapter
cable properly to
the Control Module
(Refer to page 9).
No visible
aerosol when
using AC/DC
Adapter
14
Problem
No visible
aerosol
when power
source is
functioning
Check
Remedy
Check that the
AC/DC Adapter is
not faulty.
Try to operate the
Control Module
by using batteries
instead of the
AC/DC Adapter. If
the Control Module
functions properly
with batteries but
not with the AC/DC
adapter, replace the
AC/DC Adapter.
Check that there is
medication in the
Medication Cup.
Fill the Medication
Cup with prescribed
medication.
Check that the
nebulizer has been
properly cleaned.
Clean the
Aeroneb® Go. Refer
to page 11.
If above remedies do not work, call your local supplier.
ELECTROMAGNETIC SUSCEPTIBILITY
This device meets the requirements of EN60601‑1‑2 which
describes requirements for electromagnetic compatibility
(EMC) of medical devices. This includes immunity to radio
frequency electric fields and electrostatic discharge, in
addition to the other applicable requirements of the standard.
Compliance with EMC standards does not mean a device
has total immunity; certain devices (cellular phones, pagers,
etc.) can interrupt operation if they are used near medical
equipment.
15
SPECIFICATIONS
POWER SOURCES:
Aeroneb® Go Control Module: 4.5 VDC (3 “AA” disposable or
rechargeable batteries), 350 mA
AC/DC Adapter: 100-240 VAC, 200 mA, 50-60 Hz
POWER CONSUMPTION:
Less than 2 watts
APPROXIMATE WEIGHT:
Aeroneb® Go Nebulizer Unit: 60g
Aeroneb® Go Control Module with batteries: 260g
AC Powered Controller: 180g
AC/DC Adapter: 100g
SOUND LEVEL:
<35 dBA at 1 meter
APPROXIMATE DIMENSIONS:
Aeroneb® Go Nebulizer Unit (assembled):
40.0 x 105.0 x 95.0 mm
Aeroneb® Go Control Module:
70.0 x 110.0 x 32.0 mm
AC/DC Adapter:
74 (H) x 72 (D) x 49 (L) mm
RECOMMENDED OPERATING ENVIRONMENT:
Temperature range: 5°C to +45°C (+41°F to +113°F)
Atmospheric pressure: 450 to 1100 mBars
Humidity: up to 95% relative humidity
RECOMMENDED TRANSPORT AND STORAGE
ENVIRONMENT
Temperature range: -20°C to +60°C (-4°F to +140°F)
Atmospheric pressure: 450 to 1100 mBars
Humidity: up to 95% relative humidity
16
PERFORMANCE:
Aerosol flow rate: Greater than 0.3 mL per minute
Average tested flow rate: 0.4 mL per minute
Residual Volume: <0.1 mL for a 3 ml dose
Aerosol output rate: 0.25 mg per minute (salbutamol)
Aerosol Output: 0.86 mL
Average particle size: 3.5 microns mass median
aerodynamic diameter
Medication Cup capacity: Maximum of 6 mL
The temperature of the medication will not rise more than
10°C (50°F) above ambient temperature during normal use.
Performance may vary depending on the type of drug and
nebulizer unit used. For additional information contact
Aerogen or your drug supplier.
Representative particle size distribution graph for albuterol
as per EN13544-1 is shown below:
Cumulative Mass (%)
100.0
50.0
0.0
0.1
1
10
100
Aerodynamic Size (µm)
17
REPLACEMENT PARTS AND ACCESSORIES:
PART
Aeroneb® Go System
Medication Cup Cap
Aeroneb® Go Handset
Mouthpiece
Handset Base (pack of 10)
AC/DC Adapter*
Control Module
Control Module Cable
Mask Adapter (22mm M)
Mask Adapter (22mm F)
Carrying Case
Instruction Manual*
REORDER NUMBER
AG-AG4200-XX*
AG-AG3010
AG-AG4300
AG-AG3040
AG-AG4030
AG-AG3410-XX*
AG-AG3060
AG-AG4070
AG-AG3080
AG-AG3090
AG-AG3110
AG-AG4120-XX*
*Contact your local supplier for reorder number specific for
your geographical region.
To order replacement parts or accessories, contact your local
supplier.
If you have any questions or problems regarding your
Aeroneb® Go nebulizer unit, call your local supplier.
18
Aerogen Limited,
Galway Business Park,
Dangan,
Galway,
Ireland.
www.aerogen.com
Ph: +353 91 540400
©2010 Aerogen Limited
AG-AG4120-EN Rev B 2010
Manufacturing no.: 30-553 Rev B