1
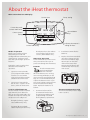
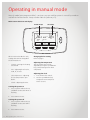
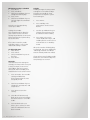
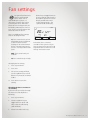
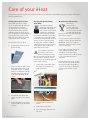
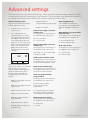
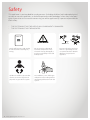
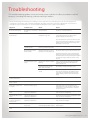
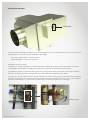
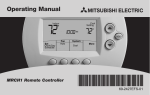
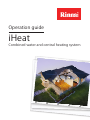
Operation guide iHeat Combined water and central heating system Important: This appliance shall be installed in accordance with: -- Manufacturer’s installation instructions -- AS/NZS 3500 -- Local regulations and municipal building codes Installation, servicing and repair shall be carried out only by authorised personnel. Please retain this manual for future reference. Warning Improper installation, adjustment, alteration, service or maintenance can cause property damage, personal injury or loss of life. For more information about buying, living and servicing of Rinnai appliances call: 0800 RINNAI (0800 746 624) Rinnai New Zealand Limited 105 Pavilion Drive, Mangere, Auckland PO Box 53177, Auckland Airport, Auckland 2150 Phone: (09) 257 3800, Fax: (09) 257 3899 Email: [email protected] Web: rinnai.co.nz, youtube.com/rinnainz : s t n e cont About your Rinnai iHeat................................... 4 About the iHeat thermostat............................. 5 Operating in manual mode.............................. 6 Operating in timer mode................................. 7 Fan settings...................................................... 9 Care of your iHeat............................................ 10 Advanced settings............................................ 11 Safety................................................................ 12 Troubleshooting............................................... 13 General information......................................... 15 Installation checklist......................................... 16 Installer details................................................. 16 Limited warranty.............................................. 18 About your Rinnai iHeat Congratulations on the purchase of your Rinnai iHeat combined water and heating system. The Rinnai iHeat is a ducted home heating system that uses hot water from your Rinnai Infinity continuous flow water heater to warm air and circulate it around your home. Rinnai Infinity continuous flow installed—external or internal* models available Rinnai iHeat installed in the ceiling space or under the floor Ducting outlets—up to 12, each outlet provides approximately 1.8 kW Rinnai thermostat controller provides multiple control options Suitability The Rinnai iHeat may be retrofitted to any home with an existing Rinnai Infinity continuous flow water heater, or both units can be installed simultaneously. The Rinnai iHeat can be installed in the ceiling space or under the floor. It must not be mounted in areas subject to direct splashing—this is relevant to underfloor installations that could be exposed to water. Specification summary -- Power output -- No. outlets -- Heating area -- Efficiency -- Noise level of fan = nominal 20 kW, maximum 25 kW (dependent on installation) = up to 12 (each outlet provides approximately 1.8 kW) = up to 250 m² (depending on where you live and how well insulated your house is) = delivers heat at the same efficiency as the Rinnai Infinity = sounds like an air conditioning unit The Rinnai Infinity provides hot water to the iHeat air handler unit (heat exchanger). The heat exchanger extracts the heat from the hot water and transfers it to a steady stream of air. This air is fed into the ducting system and is distributed into each room. Water is returned to the Infinity for reheating. The Rinnai iHeat is controlled via a wall thermostat which has three fan speed settings and can control up to four different schedule periods per day. * Ensure the Rinnai Infinity is positioned where overnight operation will not disturb occupants or neighbours. 4 | iHeat operation guide: 12063-A 01-13 About the iHeat thermostat Main screen selections and display Current time Current day week Current room temp. Temp. setting Mon 18 Current system setting System Auto System & Fan 6:05 20 Fan Auto Occupied Override More Indicates thermostat is ‘calling for heat’ Current fan setting Modes of operation Ideally your installer will have discussed your needs and configured the thermostat to your requirements, and spent some time with you setting it up for the first time. During the cooler months there will be two main modes of operation. 1. System is in manual mode (non-programmable mode)— no timers are set and the system is manually turned on and off via the thermostat. 2. System is on heat with the fan on auto—system runs on timers, and is on all the time. Location of the thermostat The thermostat must be installed approximately 1.5 m above the floor on an internal wall and in the location that requires heating. Do not place in areas subject to: --- draughts (hallways, regular accessed doorways etc.) -- Up and down keys Heat on dead spots where the air does not circulate freely (alcoves, corners, behind doors etc.) LCD screen: Important The thermostat has an LCD screen. Sharp instruments like a pen or pencil can damage the thermostat. Batteries The thermostat comes with two AA alkaline batteries installed. When the batteries are running low a warning will display on the main screen for approximately 30 days. It is recommended that you replace the batteries once a year to prevent leakage, and to prevent the thermostat from shutting down. Replace the batteries as follows: 1. Remove the front of the thermostat from the base by pulling it straight out. All programming is retained during battery replacement. 2. Install two new AA alkaline batteries. 3. Replace the thermostat back on its base making sure the terminal screw blocks align with the pins on the back of the thermostat. After two minutes the device will automatically return to the main screen. Batteries (2) Battery holder Back of thermostat Thermostat temperature range The thermostat temperature range is 4.5 °C to 32 °C. Wall UP hot spots (direct sunlight, above fireplaces/heaters etc.) iHeat Operation Guide: 12063-A 01-13 | 5 Operating in manual mode Manual mode (non-programmable)—no timers are set and the system is manually turned on and off via the thermostat. Setup number 160 = 0 (refer to p. 11). Main screen selections and display Set temp. Actual temp. Set To 20.0 6:05 22.0 PM Sat System Heat System When in manual mode the only settings that can be changed on the thermostat are: -- System—turning the heating on and off. -- Fan—adjusting the fan to lo, med, hi, or auto. -- Set temperature—adjusting the set temperature up or down. -- Clock—adjusting the time. Turning the system on 1. Press ‘System’ and use the up and down arrows until ‘Heat’ is flashing. 2. Press ‘Done’ to save. Turning the system off 1. Press ‘System’ and use the up and down arrows until ‘Off’ is flashing. 2. Press ‘Done’ to save. 6 | iHeat operation guide: 12063-A 01-13 Fan Auto Lo Fan Heat More Changing the fan setting Refer to page 9. Adjusting the temperature The set temperature can be adjusted by using the up and down keys, and selecting ‘Done’ when completed. Adjusting the clock 1. Press ‘More’ then ‘Clock’. 2. Use the up and down keys to adjust the time and press ‘Done’ to save. Operating in timer mode The system when in timer mode (programmable) is on heat with the fan on auto. It runs on timers and is on all the time. Setup number 160 = 4 (refer to p. 11) Function keys Days selected Schedule period Period Occupied1 Unocc1 Occupied2 Unocc2 Mon Tue Wed Thu Fri 6:05 Go Back Up key - changes time and temperatures 20 Next Done Down key - changes time and temperatures Go back key - goes back to the last step Programmable periods The thermostat can control up to four different periods per day. -- -- -- -- Occupied1 Period to keep space at a comfortable temperature, i.e. first thing in the morning. Unocc1 Period to keep space at an energy-saving temperature, i.e. when leaving for work. Occupied2 Second occupied period, i.e coming home from work. Unocc2 Second unoccupied period, i.e. when going to bed. The thermostat is usually configured to have four programmable periods. If you would like to change this to two, refer to the Advanced Settings section (0540) in this guide. Next step key advances period, time, and heat temperatures through the programming sections available. To get familiar with how this works, walk through some of the steps below without changing anything. Once comfortable with how the display works you can change the respective settings to suit. Ignore any settings relating to cooling by selecting ‘Next’, these have no effect on the iHeat operation (this only appears as the thermostat is also used for other applications). 1. Press ‘More’. 2. Press ‘Schedule’. 7. Use the up and down keys to change the schedule period. 8. Press ‘Next’. The selections automatically cycle through period, time, and temperature. 9. Use the up and down keys to modify the flashing item (e.g. time, temperature). 10. When complete press ‘Done’, this will save all of the changes that have been made and ‘Saved’ will appear on the screen. To exit scheduling without saving, press ‘Cancel’. If that option is not available, press ‘Go Back’ until ‘Cancel’ is available. 3. Press ‘Edit’. 4. Use the up and down keys to change the flashing day. 5. Select any combination of days. 6. Press ‘Next’. The thermostat, dependent on the buttons pressed, walks you Done key - exits and saves changes made Tip If you find yourself in a totally different area of the program and don’t have an option to ‘Go Back’ or ‘Cancel’, let the display flash without pressing any buttons. After approximately one minute the screen will go back to the main display. iHeat Operation Guide: 12063-A 01-13 | 7 Reviewing one day’s schedule 1. Press ‘More’. 2. Press ‘Schedule’. 3. Use the up and down keys to change the flashing day. 4. Press ‘View’. 5. Use the up and down keys to cycle through the scheduled periods. To make any changes during review press ‘Edit’. Setting the calendar This should have been done by your installer as this is the first setting required to be set once the thermostat has been powered up for the first time. If for some reason this needs to be done again—refer to the ‘Advanced Settings’ section. To adjust the time 1. Press ‘More’. 2. Press ‘Clock’. 3. Use up and down keys to set the time. 4. Press ‘Done’. Override Overrides the timer setting. For example, the house while everyone is away (unoccp1) is set to 18 °C until 5:30pm, but you’ve come home from work at midday and would like the house to be warmer. 1. Press ‘Override’. The override settings will default to those contained in the next occupied period. 2. Use the up and down keys to change the override time and temperature. 3. Press ‘Done’ to save the setting. 4. Override will continuously flash on the screen to indicate the thermostat is in ‘Override’ mode. 5. To revert back to the set timers, press ‘Cancel’, or wait until the ‘Hold Until’ time has been reached. 8 | iHeat operation guide: 12063-A 01-13 Holiday Holiday changes the temperature setting for a set number of days. Typically you would set a low temperature to stop the system from coming on. 1. Press ‘More’. 2. Press ‘Holiday’. The temperature on the screen flashes. 3. Use the up and down keys to change the temperature for the duration of the holiday. 4. Press ‘Next’. The screen shows ‘Hold Until x days’, and ‘Holiday’ flashes on the screen to show that it is in ‘Holiday’ mode. When the number of holiday days has finished, the screen will display ‘Following Schedule’ to indicate that the holiday mode has ended. If you wish to cancel holiday mode before the set number of days has completed, press ‘Cancel’. Fan settings For optimal performance the fan setting would be on ‘Auto’—fan is controlled by the system, i.e. only comes on when the system is heating the house. When the thermostat is running the fan, the fan blade symbol appears next to ‘Fan’ on the screen to indicate the thermostat has the fan on. There are additional fan settings that can be programmed. -- Lo, fan is continuously on low. Depending on the installation, in some instances better heating can be achieved with the fan running continuously on low—can help reduce cold spots. -- Med, fan is continuously on medium. -- Hi, fan is continuously on high. down keys to toggle between the fan settings and select the desired fan speed. The screen display would look similar to that shown below—fan symbol would also display. Wed 20.2 System Off System & Fan 1:27 PM Fan Med More Remember this is a manual override of the system so if you want to stop the fan you will need to go back into the fan menu and change ‘Fan’ back to auto. Changing the fan setting 1. Press ‘System & Fan’. 2. Press ‘Fan’. 3. The current setting will flash, use the up/down keys to shift between Lo, Med, Hi, and Auto modes. 4. Press ‘Done’ to save the setting. Changing the fan to circulate air on a hot day If you want air to circulate through the house on a hot day do the following: 1. Press ‘System & Fan’. 2. Use the up/down keys to toggle between ‘Heat’ and ‘Off’, select the off setting (‘Off’ will flash). 3. Select ‘Fan’ and use the up/ iHeat Operation Guide: 12063-A 01-13 | 9 Care of your iHeat Your iHeat system needs very little maintenance, however the following information will keep it working efficiently. Cleaning the return air filter Your iHeat system has a large return air grille through which air is returned to the iHeat for reheating. The return air grille contains a filter that traps dust and other particles from the air. This needs to be cleaned regularly (every 2-4 weeks). If this is not done you may notice increased noise at the return air grille. To clean the return air filter: 1. Remove filter from return air grille housing. Cleaning the Rinnai Infinity water filter Cleaning the Infinity water filter will reduce the likelihood of blockages to the water heater which could cause insufficient water flow to the iHeat. It is recommended the water filter is cleaned every year. This would normally be completed by a Rinnai Service Centre as part of annual servicing, but could be needed inbetween times if you experience any problems with insufficient water flow to the pump. To avoid burns wait until the water heater cools before cleaning the water filter as hot water may drain from the unit if there has been recent hot water use. Turn off the gas and power to the Infinity. WARNING 2. Clean any dust or debris from both sides of the filter using a vacuum cleaner, a soft dry cloth, or a soft brush. Do this on a flat surface to stop the frame from bending out of shape. 1. Unscrew the water filter from the position marked in the diagrams below. 3. If required, wipe down the return air grille using a damp cloth. 4. Return the filter to the return air grille and secure the grille in place. 2. Flush the filter using clean water. 3. Replace the water filter. 4. Turn on the gas and power to the unit. 10 | iHeat operation guide: 12063-A 01-13 Maintenance and servicing Rinnai has a maintenance, service, and spare parts network with personnel who are fully trained and equipped to give you the best advice on your Rinnai iHeat system. If your system needs maintenance and/or servicing, please call Rinnai (0800 746 624) from a land line and select option one for a service centre in your area. For reliable operation the Rinnai iHeat and Rinnai Infinity unit should be serviced annually. Regular maintenance and servicing is not covered by the Rinnai warranty. Do not attempt to carry out any work on your system other than that mentioned in this guide. If you have any faults or problems, contact your installer, or call Rinnai. Advanced settings The thermostat has many advanced settings. These should have been configured by the installer in conjunction with the home owners requirements. These settings can be adjusted if necessary, i.e. changing the display of the clock from a 24 hour clock to a 12 hour clock. Advanced settings menu To get into the advanced settings section of the thermostat: 1. From the main screen, press ‘System & Fan’. 2. Press and hold ‘fan’ for approximately five seconds. The setup number displays in the middle of the screen. It is a four-digit code beginning with zero. The current setting flashes and is displayed to the right. In the example below 0140 is the month setting which has been set to 10 for October 0140 Go Back Next 10 Done We recommend that only the below setup numbers are changed by the home owner as other setting changes could negatively affect the performance of the iHeat system and should only be adjusted by a trained iHeat installer. -- 0120: First two digits of current calendar year -- 0130: Last two digits of current calendar year -- 0140: Current calendar month -- 0150: Current calendar date -- 0160: Non programmable/ programmable -- 0320: Temperature display -- 0330: Daylight saving time on or off (US only) -- 0540: Number of programmable periods per day -- 0640: Time format 0120: First two digits of current calendar year To change the current setting, use the up/down keys. Options are: 20—for years 20xx 21—for years 21xx 0330: Daylight saving This should be left at 0 as the thermostat is only configured to adjust for daylight saving in the U.S. 0540: Number of programmable periods per day To change the current setting, use the up/down keys. Options are: 2—Two periods per day 4—Four periods per day 0130: Last two digits of current calendar year To change the current setting, use the up/down keys. Options are: 0640: Time format To change the current setting, use the up/down keys. Options are: 01 through 99—for example 2012 would be set to 12. 12—12 hour clock 24—24 hour clock 0140: Current calendar month To change the current setting, use the up/down keys. Options are 1-12 for January through to December. 0150: Current calendar date To change the current setting, use the up/down keys. Options are 1-31 (1st to the 31st of the month). 0160: Non programmable/ programmable To change the current setting, use the up/down keys. Options are: 0—Non programmable, thermostat cannot be programmed 4—Programmable, thermostat is fully programmable, allowing all seven days to be programmed. 0320: Temperature display To change the current setting, use the up/down keys. Options are: 0—Fahrenheit 1—Celsius iHeat Operation Guide: 12063-A 01-13 | 11 Safety This appliance is not intended for use by persons (including children) with reduced physical, sensory or mental capabilities, or lack of experience and knowledge, unless they have been given supervision or instruction concerning use of the appliance by a person responsible for their safety. -- The system must not be used if any component is damaged -- the system must not be modified Switch off WARNING Switch off the power and unplug the iHeat before touching any wiring. Do not touch any damaged electrical component. If any electrical wiring is damaged, it must be replaced by a licensed tradesperson. Children should be supervised at all times to ensure they do not play with any part of the system. To avoid burns, turn off the gas and power to the Infinity before attempting to bleed air from the system. 12 | iHeat operation guide: 12063-A 01-13 Do not unplug the appliance while it is operating. Do not use power boards or double adaptors to operate the appliance. Troubleshooting This troubleshooting guide assumes the iHeat system and Rinnai Infinity have been installed correctly, including the ducting, and that nothing is broken. Check the following information before making a service call. There are some things you can do to investigate and possibly fix. Some checks such as checking LED lights, bleeding air from the system etc. will depend on your level of confidence. If you are still unsure or concerned after reading this section, please contact Rinnai. Symptom Possible cause Check No thermostat display No batteries, or batteries Check batteries are flat Recharge or replace batteries iHeat fan not operating in heating mode No power to the iHeat No: There could be a problem with the power point. Check power point with another appliance (light, hair dryer etc.). Check if the bottom green LED light is on (p. 14) Action Yes: Indicates there is power to the iHeat, but there is something wrong with the connection between the iHeat and the thermostat—this will require a service call. Thermostat not requesting heat Check if the thermostat has been programmed correctly Review thermostat settings No hot water from the Rinnai Infinity Check if hot water is present by turning on a hot water tap No: Ensure there is gas and power to the unit. Yes: Check iHeat unit, is the red LED double flashing? If yes then rectify issue by resetting the thermostat. Do this by turning the ‘System’ off, then turning the ‘System’ to heat—wait 30 secs. Insufficient water flow to pump Check if the red LED is double flashing If yes, reset the thermostat by turning the ‘System’ off, then turning the ‘System’ to heat—wait 30 secs. Check if the Rinnai Infinity water filter is blocked Clean Rinnai Infinity water filter (p. 10) Check if air is in the heating circuit Operate easing gear on the pressure relief valve for two minutes (p. 14). Make sure the gas, power, and water has been turned off to the Infinity, and that a drain line has been fitted. Water drips from the pressure relief valve Service call Water drips from the iHeat overflow Leak in iHeat unit Service call iHeat pump operates for no reason Biosafe operation (p. 15) If operating at an inconvenient time (i.e. midnight), turn power at mains to the iHeat off and on at a convenient time to reset the biosafe operation. Room temp. varying too much Thermostat setting not suitable for installation Contact Rinnai, thermostat configuration 0680 may need to be changed to 3. Infinity switching on too much Thermostat setting not suitable for installation Contact Rinnai, thermostat configuration 0680 may need to be changed to 1. Thermostat temp. varies to that of my trusted thermometer Thermostat setting not suitable for installation Contact Rinnai, thermostat configuration 0700 may need to be changed. House not warm enough Rinnai Infinity dip switch set too low Check installation checklist to view Infinity dip switch setting Request installer to change Rinnai Infinity dip switch setting. Excess noise at return air grille Blocked return air filter Check air return filter Clean return air filter (p. 10) iHeat Operation Guide: 12063-A 01-13 | 13 Checking the LED lights Viewing panel You can check the LED lights through the narrow viewing panel on the control box lid. Do not remove the control box lid as there is a risk of electric shock due to high voltage. --- One or more green lights—you have power Red flashing light—an error has occurred Bleeding air from the system Sometimes air can get trapped in the iHeat circuit which can affect the performance of the system. This can be easily fixed by operating the easing gear on the pressure relief valve for approximately two minutes. To avoid burns (water can come out of the unit at 75 °C), wait until the water heater cools as hot water may drain from the unit if there has been recent hot water use. Turn off the gas and power to the Infinity. The pressure relief valve of the iHeat is located in between the Rinnai Infinity piping (as shown below). To bleed air from the system gently raise the easing gear and hold open for approximately two minutes. If air is in the system it will come ‘sputtering’ out—just like air in your water pipes. To close gently lower the easing gear. Lift and lower gently 14 | iHeat operation guide: 12063-A 01-13 General information Before operation please read these instructions to get an overview of how to operate, maintain and service your Rinnai iHeat system. Electrical connection The iHeat air handler unit is supplied with a 1.5 m power cord and 3-pin plug. The standard electrical connection is to the side of the unit. This must be plugged into an earthed power point. The electrical cord should not come into contact with the air handler unit. If the supply cord is damaged, it must be replaced by a licensed tradesperson. This must be a genuine replacement part available from Rinnai—part number 12019. Keeping the power on to the iHeat on at all times It is critical that power to the iHeat unit is left on at all times. This is required to enable the automatic frost protection and biosafe operations. Biosafe operation This operation occurs if the iHeat has not been used in seven days (i.e. during summer). Power is required to run the biosafe operation, which runs the pump for two minutes every week (after a week of inactivity) to kill any bugs in the water. Rinnai water controllers If you have existing Rinnai water controllers these will need to be disconnected as these will not work with the Rinnai iHeat system. This is because the preset temperature of your Rinnai Infinity needs to be raised from 55 °C to ≥ 60 °C, to get sufficient heat output for your central heating system, and to operate the biosafe operation. The timing of this operation will depend on when the unit was connected to power. For example, if this occurred at 4pm, the biosafe operation will operate at 4pm. Gas and/or electricity failure during operation If the power and/or gas is disrupted during operation the central heating system will stop operating, but the thermostat will still indicate the system is on due to the battery backup. Once the power and/or gas is restored the system will return to normal operation without you having to do anything. Frost protection Frost protection is fitted on your iHeat unit as well as on all current Rinnai Infinity VT, HD, and EF models. Frost protection operates automatically, as required, whenever the appliance is connected to the electric power supply. For the iHeat unit, it will activate when temperatures fall below 2 °C, and for Rinnai Infinity models (with frost protection), when the temperature inside the units falls below 3.5 °C. If normal operation does not resume refer to the Troubleshooting section in this guide. If you experience a power cut in the middle of the night the biosafe operation will revert to the time that the power was restored. If this is a nuisance (due to noise), disconnect the power to the iHeat at a suitable time to reset the biosafe operation. gas supply to the Rinnai Infinity unit and open a tap slightly to allow water flow through the unit. This may prevent damage from freezing. If the iHeat and Infinity are not going to be used for an extended period, and the electric power supply is disconnected, turn off the water and gas supplies and arrange for your plumber to drain all the water from the iHeat unit and the Rinnai Infinity to prevent frost damage. This is important as frost damage is not covered by warranty. Typical modes of operation The four common modes of iHeat operation will be: Cooler months -- System is on heat with the fan on auto—runs on timers and is on all the time. -- System is in manual mode—no timers are set and the system is manually turned on and off via the thermostat. Warmer months -- Thermostat is set to ‘heat off’, or -- Thermostat is set to ‘heat off’, but the fan is set to continuously run on lo, med, or hi to circulate air through the house—this will need to be done manually each time (p. 9). If power has failed and there is risk of damage from frost, turn off the iHeat Operation Guide: 12063-A 01-13 | 15 Installation checklist The installer must complete an installation checklist, which is on the back of the commissioning sheet supplied with the iHeat. They must also instruct you about the use and care of the appliance, and ensure you understand the safety instructions and operation of the appliance. Before the installer leaves ensure they leave the commissioning sheet with you. This is important as it demonstrates they have installed the system in accordance with our instructions. Installer details Company name: Installer name: Address: Phone:Mobile: Signed:Date: 16 | iHeat operation guide: 12063-A 01-13 Rinnai iHeat Warranty Limited Warranty Rinnai warranty summary IHEAT CENTRAL HEATING SYSTEM Parts Labour Thermostat Heat exchanger Pump 3 years 3 years All other components Rinnai Infinity Refer warranty statement supplied with the unit All terms of the warranty are effective from the date of installation of the Rinnai iHeat system. Proof of installation will be required. General warranty terms Rinnai reserves the right to make modifications and change specifications and its parts without notice. For the purposes of the Consumer Guarantees Act 1993, Rinnai only guarantees the availability of repair facilities and spare parts for the express warranty periods recorded in the Rinnai warranty summary table. If the Rinnai iHeat central heating system is being acquired for personal, domestic or household use, this warranty does not limit any consumer rights or guarantees that may apply under the Consumer Guarantees Act 1993. If the product is being acquired for the purposes of a business, the provisions of the Consumer Guarantees Act 1993 do not apply and no other warranties (either express or implied by law) apart from those stated in this warranty apply. Warranty terms and conditions All terms of this warranty are effective from the date of installation. The attending service person reserves the right to verify this date. 18 | iHeat operation guide: 12063-A 01-13 All Rinnai appliances must be installed, commissioned, serviced, repaired and removed in accordance with the manufacturer’s instructions, local regulations, and municipal building codes by persons authorised by local regulations to do so. All appliances must be operated and maintained in accordance with the manufacturer’s operating instructions. The warranty applies only to the components supplied by Rinnai. It does not apply to components supplied by others, such as, isolating valves, electrical switches, pipe work, electrical cables, fuses, and where applicable components supplied by others, but not limited to these. Where the appliance has not been sited in accordance with the installation instructions or installed such that normal service access is difficult, a service charge will apply. If at the discretion of the attending service person the installation is deemed illegal or access is dangerous, service will be refused. Any work required to gain access to the appliance will be chargeable by the attending service person (for example, removal of walls, or the use of special equipment to move components, but not limited to these). Where a failed component is replaced under warranty, the balance of the original appliance warranty will remain effective. The replacement part or appliance does not carry a new warranty. Rinnai reserve the right to transfer functional components from defective appliances if they are suitable. Rinnai reserve the right to have the installed product returned to the factory for inspection. Where the iHeat central heating system is installed outside the metropolitan area or further than 40 km from a Rinnai authorised service centre, travel costs shall be the owner’s responsibility. Warranty exclusions The following exclusions may cause the warranty to become void and will result in a service charge and costs of parts (if required). -- Accidental damage and acts of God. -- Failure due to abuse or misuse, improper maintenance or improper storage. -- Failure due to incorrect or unauthorised installations. -- Failure or damage caused by alterations, service or repair work carried out by persons other than a Rinnai service person or service centre. -- Where the iHeat has failed directly or indirectly as a result of poor water quality outside the limits specified. -- Where it is found that there is no fault with the appliance and the issue is related to the installation or is due to power/ gas failure. -- Where it is found that the Rinnai Infinity water temperature has been set to higher than 75 °C. -- Subject to any statutory provisions to the contrary, Rinnai does not accept: a. liability for consequential damage or any incidental expenses resulting from any breach of the warranty. b. claims for damage to buildings or any other consequential loss either directly or indirectly due to leaks from the iHeat system or any other faults. Water quality Water quality outside the limits, as set down below, will void this warranty. Water quality tests must be carried out at the customer’s own cost. Rinnai will reimburse any reasonable test costs where water quality is within the limits tabled. Water quality and impurity limits TDS (Total Dissolved Solids) Total Hardness CaCO3 Alkalinity (as CaCO3) Dissolved (free) CO2 pH Chlorides Magnesium Sodium Iron Langelier Index Up to 600 mg/L or ppm Up to 200 mg/L or ppm Up to 200 mg/L or ppm Up to 25 mg/L or ppm 6.5-8.5 Up to 300 mg/L or ppm Up to 10 mg/L or ppm Up to 150 mg/L or ppm Up to 1 mg/L or ppm Between -1.0-0.8 Most metropolitan water supplies fall within these limits. If you are unsure about water quality, please contact Rinnai and we will provide you with details of an authorised agency able to test your water for compliance to Rinnai standards. If sludge or foreign matter is present in the water supply, a suitable filter should be incorporated in the water supply. Some examples of water quality issues where water may need to be treated: ---- Hard water (areas including Wanganui) Aggressive water (areas including Christchurch) Both hard and aggressive water (some bore water) Other continuous flow water heaters connected to the Rinnai iHeat The Rinnai iHeat system has been designed and tested for optimum performance with a Rinnai Infinity continuous flow water heater. Other continuous flow water heaters may also be suitable. Please check the suitability with the manufacturer of the water heater before installation as this may affect your water heater warranty. If a continuous flow water heater, other than a Rinnai Infinity, is installed with the Rinnai iHeat this will be deemed as a component supplied by others and will not be covered by this warranty. This includes iHeat system faults caused by a faulty continuous flow water heater other than a Rinnai Infinity. Installation by trained installers only The warranty only applies to systems installed by listed installers, installers who have completed the Rinnai iHeat online specifying and installation courses. For listed installers please refer to the Rinnai website: www.rinnai.co.nz/iheatinstallers.html. iHeat Operation Guide: 12063-A 01-13 | 19 Experience our innovation Rinnai.co.nz 0800 746 624 http://www.youtube.com/rinnainz