1
~
- ::4
TABLE
GENERAL
INFORMATION
Owner's
Record
Important
Safety
Do's and Don't's,
INSTALLATION
OPERATION
SPA
WATER
OF CONTENTS
.,
,."
lnstructions
,
,
INSTRUCTIONS
Site Selection
Electrical
Requirements
and
,
,
MAINTENANCE
Draining Your Spa
Winterizing
Your Spa
Filter Maintenance
Redwood
Cabinet Maintenance
Marine Vinyl Cover
,
ATTACHMENT
AND
MAINTENANCE
Sanitizing
pH Control
VitaZone
Wiring
Diagram
Troubleshooting
,...,..,
4
4
,
,..,
,
,
,
,
,.,
"
"
,
,
:
,
,
,
,
,
,
,
,
,
,
,
,
,
,
,
,...,
,
,
,
,
,...,.."
6
6
6
6
6
6
6
6
6
7
7
7
7
7
7
7
7
7
7
7
7
7
7
7
7
9
9
9
9
9
10
10
10
"...""
Guide
,... 1
2
,
3
,
Installation
INSTRUCTIONS
Fill Your Spa
Getting Started
Settir\g 1lme
,
Startjng Filter
Starting Heater
,
Adjusting
Settings
Changing Temperatures
,
,...,
Changing Filter Hours
,
Changing Heater Days
Using Your Spa
,
Starting Jet 1
Starting Jet 2
,
Starting Blower
Tuming On Light
Special Features
Automatic
Blower and Purge
Freeze Protection
Ozone Generator
Monitor
Panel Lockout
Overheat
Protection ,
Battery Backup
Add Start"up Chemicals
,
Jet Operations
,
Add 'start-up Chemicals
Jet Operation
QUALITY
,
,
,
I
,
II
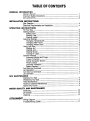
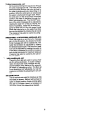
This Owner's Manual has been designed to familiarize you with your Vita Spa operations
and general maintenance. We suggest that you take some time to carefully review it.
Please keep this manual available for reference.
If you have any questions regarding your Vita Spa set.up, operation
contact your Authorized Vita Spa Dealer.
or maintenance,
DATE PURCHASED:
DATE INSTALLED:
DEALER:
ADDRESS:
TELEPHONE:
SERIAL #:
--
The Serial Number is located on the cabinet (Left of Door) or within the equipment
compartment. Please verify that the serial number is noted on your dealer's contract
purchase.
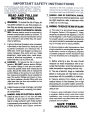
READ
AND
FOLLOW
INSTRUCTIONS.
1
WARNING
-To reduce the risk of injury, do
not permit children to use this product unless they are closely supervised at all times.
7.
DANGER. RISK OF ELECTRICAL SHOCK..
Do not permit any electrical appliances, such
as a light, telephone. radio. or television within
5 feet (1.5 m) of the spa.
8.
WARNING. TO REDUCE THE RISK OF INJURY:
DROWNING. Extreme caution must be exercised to
prevent unauthorized access by children. To
avoid accidents, ensure that children cannot
use a hot tub or spa unless they are super~
vised at all times.
A. The water in a spa should never exceed
40 degrees Celsius (104 degrees F). Water
temperatures between 38 degrees C ( 100 F)
and 40 degrees C (104 F) are considered safe
for a healthy adult. Lower water temperatures
are recommended for extended use {exceed~
ing 10 minutes} and for young chifdren.
3. A ground terminal (pressure wire connector)
is provided on the control box inside the unit
to permit connection of a minimum No.8
AWG (8.4 mm2) solid Copper bonding conductor between this point and any metal
equipment, metal water pipe, metal enclosures of electrical equipment, or conduit
within five feet (1.5 m) of the unit.
B. Since exceS$ive water temperatures have
a high potential for causing fetal damage during the early months of pregnancy, pregn$nt
or possibly pregnant women should "mit spa
or hot tub temperatures to 38 degrees C (100
F).
2. DANGER -RISK OF ACCIDENTAL
c. Before entering a spa, the user should
measure the water temperature with an accurate thermometer, since .the tolerances of
water temperature regutating devices vary.
4. DANGER
-To reduce the risk of injury to
persons, DO NOT remove suction fittings.
The suction fittings in this spa are sized to
match the specific water flow created by the
pump. Should the need arise to replace the
suction fittings or the pump, be sure that the
flow rates are compatible. Never operate the
spa if the suction fittings are broken or missing. Never replace a suction'-fitting with one
rated less than the flow rate marked on the
original suction fitting.
D. The use of alcohot. drugs or medication
before or during spa use may' lead to unconsciousness with the possibility of drowning.
E. Persons suffering from obesity or with a
medical hfstory of heart disease, low or high
blood pressure, circulation system problems,
or diabetes should consult a physician before
using a spa.
5. Install the spa so proper drainage is provided
tor the compartment containing the electri.
cal components.
F. Persons using medication should consult
a physician before .using a spa since some
medication may induce drowsiness while
other medication may affect heart fate, b1ood
pressure and circulation.
6. DANGER. RISK OF ELECTRICAL
SHOCK.
Install at least 5 feet (1.5 m) from all metal
surfaces. (A spa may be installed within 5
feet of a metal surface if each metai surface
is permanently connected by a minimum No.
8 AWG (8.42mm2) solid Copper conductor
SAVE
THESE
INSTRUCTIONS.
?
;;;.
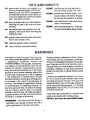
DO
DO
Make sure the Spa is connected to a
Ground Fault Interrupter (GFCI) pro
tected circuit. This GFCI is required by
the National Electrical Code (NEC) and
must be installed by a licensed electrician. Test GFCI monthly.
test the water with your hand before
entering the spa to be sure it is com~
fortable.
DO
remember that wet surfaces can be
slippery. Take care when entering and
exiting the spa.
,
DO
use the thermal cover when the spa is
not in use, empty or full.
DO
maintain
DO
clean the filter cal1ridge weekly.
DON'T
use the spa for long periods of
time at temperatures over 104 F.
DON'T
operate spa without water. Turn
circuit breaker off before emptying the spa and while it is empty.
DON'T
store chemicals in the spa's equip.
ment compartment.
DON'T
open the electrical box. There are
no user serviceable parts inside.
proper water chemistry.
Persons taking medications which induce
drowsiness such as tranquilizers, antihista~
mines or anticoagulants should not use the
spa. Pregr\snt women and persons with a
medica( history of heal1 disease, circulatory
problems, diabetes or high blood pressure
should consult their physician before using
the spa.
°rolonged immersion in water that is W8m1er
I.nan normal body temperature can result in
a dangerous
condition
known
as
HYPERTHERMIA. The causes, symptoms,
and effects of hyperthermia may be described as follows: Hyperthermia occurs
when the internal temperature of the body
reaches a level several degrees above the
nom1al body temperature of 98.6 degrees
F. The symptoms of hyperthermia include
dizziness, fainting, drowsiness, lethargy, and
an increase in the internal temperature of
the body. The effects of hyper1hemia include
(1) unawareness of impending hazard, (2)
failure to perceive heat, (3) failure to recog.
nize the need to exit the spa, (4) physical
inability to exit the spa, {5) fetal damage in
pregnant women, and {6) unconsciousness
resulting in a danger of drowning.
Children are especially sensitive to hot W6ter. At no time should chifdren have unsupervised access to the spa. The use of elevated decking may encourage children to
climb onto the thermal cover -rT IS NOT
DESIGNED AS A SAFETY OR CHILD RESISTANT COVERI
Every Vita Spa comes with a Thermal cover
which is provided with locking straps.
INSTALL the locks for your chIldJs safety,
WARNING
-The use of alcohol, drugs, or
-nedication can greatly increase the risk of
,atal hyperthemla in hot tubs and spas.
':I
~1
SITE SELECTION/PREPARATION:
The spa must be installed on a structur~
ally strong, solid and reasonably level surface. The site should allow for drainage
away from the equipment compartment in
which the electrical
components
are
housed. Take into account the following
when considering prospective sites:
LOCAL
CODES:
There may be celiain restrictions
requirements
that are particular
MAINTENANCE:
Trees. IU'Nn, placement surfaces. etc. can
create extra work in keeping your spa and
spa area clean and safe.
PRIVACY
AND WIND SHIELDING:
A sheltered environment can result in lower
operating and maintenance
costs.
Your VITA SPA dealer is your best resource
to answer any questions or provide suggestions for your spa instal'ation.
and/or
to your
locality.
DELIVERY
PASSAGEWAY:
Doors, halls, stairs, etc. may pose obstructions to deliver the spa to its
intended site.
ELECTRICAL
REQUIREMENTS
AND
*THHN type wire is recommended.
IMPORTANT: All electrical wiring to the spa
must meet the requirements of the National
Electrical Code (NEC) and any applicable
state or local codes. The electrical circujt
must be installed by a qualified, LICENSED
electrical contractor and approved by a local
building/electrical inspection authority.
1)
2)
3)
INSTALLATION
*Wire size for the distanc-e of the wire run
must conform to NEC.
*Use copper conductor only to ensure
proper conrtections. DO NOT USE ALUMJNUM WIRE.
The spa must be permanently connected
(hard-wired) to the power supply. No extension cords or plug-in type connections are
to be used in conjunction with the opera.
ti on of the spa. Failure to supply power to
the spa which is not in accordance with
these instructions could create a potential
health hazard and will void both the
manufacturer's warranty and the independent testing agency listing.
4) To obtain access to the spas power termi-
nal strip, unlock equipment access door and
remove the control box cover (Ill. l1'~o 14.).
5)
Feed supply conductors through powersupptY tubes provided on spa (DL 1 No.16) and
install into control box.
6) Connect wires to terminal b1ock (TBI) color
for color. All wires must be connected or
damage ~ilay result. TIGHTEN SEC.URELY!
THE NATIONAL
ELECTRICAL
CODE
(NEC)r REQUIRES THAT THE POWER
SUPPL y TO THIS SPA MUST aE A DEDI..
CATED, GROUND FAULT (GFCI) PRO..
TECTED CIRCUIT WITH NO OTHER APPUANCESOR LIGHTS SHARING POWER
OFF THIS CIRCUIT.
7) A separate #8 (* .4mm2) solid copper ground
wire should be connected between the spa
grounding lug (Ill. 1 No.11) and a recognized grounding rod that is fuUy driven into
the ground. NOT-E: Do nottum powet-onto
the spa until the start-up instructions have
been followed.
Refer to the wiring diagram to determine!
the current, voltage and wire size requirements for this spa.
4
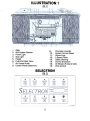
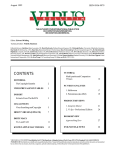
ILLUSTRATION
(Ill. 1)
1.
2.
3.
4.
5.
Filter
20A System Breaker
Power LIght
Spa Light
Heater
~
6.
7.
8.
Push-Pull Gate Valve
Air Control Knob
Control Panel (Selectron)
1
9.
10.
11.
12.
13.
14.
15.
16.
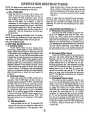
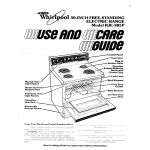
SELECTRON
(Ill.
Z)
~
;.I
Drainage Hose Bib
Systam Hi-Umit Reset
Ground Lug
2 Speed Pump
Safety Warning
Control Enclosure
Air Slower (Pump #2 L53)
Wire Conduit
NOTE; For best results. read each step carefully
and entirely before proceeding to the next.
1)
takes longer than 6 hours. the filter will con.
tInue running. (Wherlever the water reaches
the set temperature and heater turns off , the
filter will rurt orle extrc:i minute to cool the heater
elemerlt.)
FILL YOUR SPA
Wipe the interior of the spa with a damp, soft
cloth to remove any residue that may be on
the surface. Fill with a garden hose. As the
spa is filling check in U)e equipment access
area for any leaks. On occasion, it may be
necessary to hand tighten a union fitting that
may have come loose during transit. Also check
that the gate valves (Ill. 1 No.6) are pulled out
to the oper, position and that the hose bib is
ctosed (Ill. 1 No.9). Continue; to fill to the wa~
ter level line.
t-.1OTE: If
ture level
llsed the
matically
reached.
3)
NOTE: if your water is extremely hard, it is preferable to fill the spa nalfWay with hard water and the
rest with softened water. Never tlil the spa entirely with softened water.
2) GETTING
STARTED (lIl. 2)
A. Setting
Timer
Touch TIME switch once to display time,
then touch switch again to enter the time set
mode. (Note that the light is flashing over the
TIME switch and the display Is showing the day
number). Use UP and DOWN switches to set
present day of week (Sunday is considered day
number 1). Touch TIME switch again to show
the hour, then use UP and DOWN switches to
set the current hour. Be careful to observe the
AM/PM indicator in the display window. Touch
TIME switch once again to show and set the
current minute. The display will alJtomatlcally
return to nom1al and the light will stop flashing
after 20 seconds, or when the next switch is
touched.
water has not reached the set temperaafter a fiitrC:ition cyole. or after you have
spa, the filter and heater will stay autoon LJntil the set temperature has been
AD.JUSTINC
SETTINGS
(llJ. 2)
A. Changing
Temperatures
Your spa has been preset to heat the wa.
ter to 102 dearees sach time the filter runs.
Touch the TE~MP switch once to display the
actual water temperature; touch again to dis"
play the set temperature. While the light is
flashing, you may decrease or increase (up to
104 degrees) the set temperature by using the
UP and DOWN switches. If the heater fs on
and you wish to turn it off. simply reduce the
set temperature belovv the actual temperatlJra.
B- Changing
FIlter Hours
Touch the FIL TEA switch once to enter the
filter hour set mode. Whlfe the FilTER light is
flashlrlg, use th& UP ah{j DOWN switches to
revleweach hour of the day. If an "P' Is displayed beside the hour, the filtf)r will run during that hour each day. Use repeated touches
of the FILTER switch to add or remove the "P'
b&slde each hour. If the filter is running be.
cause the current hour has an "PO in the display. you may turn off the fitter by removing
the "P. The flJter wIll contir1ue to run, however,
if the heater is oh.
B. Starting
Filters
Touch and hold the FILTER switch for 5
seconds. The FILTER iight Will then collIe on
and the display will show "F=6H", meaning that
the filter will run for 6 hours; clearing up your
tap water. Afterwards; the filter hours will be 7
am to 9 am and 4 am to 6 am each day unless
you reset the filter hours for your pa.rtictJlar
needs. If you wish to stop the filter in less than
6 hours, hold the FILTER switch again for 5
seconds or until the display shows "F=O'r, ThEt
filter will continue to run, however, if the heater
is still on.
c.
Changing
Heater
Days
Your spa has been preset to heat the wa~
ter to the set temperature every day of the
week., If you wish to eliminate heating on one
or more cays, touch the HEATER 9witch once
to enter the heater set mods. While the
HEATER light is flashing, review each day of
the week by touching
the UP or DOWN
switches. If a particular day is set for heating,
an "H" will be displayed beside the day number. You can remove (or add back) the "HOtby
touching the HEATER switch again. If you wish
to stop the heater before the s~ttemperature
;8 reached, simply remove thA "H" from the
current day.
c.
Starting
Heater
After the filter has run for 15 seconds, the
heater will come on and heat the v"ater until it
reaches a temperature of 102 degrees. If this
6
.4)
USING THE SPA
A. Starting
Jet 1
You can activate the first set of jets by
touchilig the JET 1 s'vVitch at any time. You
might notice that the FILTER light goes off
whenever the JET 1 light comes on. This is
because the filter function and the first set of
jets share a common motor. Touch the JET1
switch again to stop the jets and retum to nor"
mal filtering, or wait 30 minutes and the jets
will automatically turn themselves off .
c. Ozone Generator
Monitor
If your spa is equipped with an ozone
generator, the actual ultraviolet iight from the
generator will cause the OZONE light on the
display to glow, indicating proper operation
of the generator.
a. Starting
-Jet 2
The second set of jets Is independent of
any other function and can be turned on and
off at any time by touching the JET 2 switch.
These jets will also turn themselves off after
30 minutes of use.
D. Panel Loekout
If you wish to make the SELECTROr-J
panelchjld proof, you can deactivate al!
touch switches by pressing the UP switch,
the DO\'VN switch, and the UP swItch 8gain
in exact order. If you do the sequenoe suc.
cessfully, the LOCK light on the display will
begin flashing and no more switch inputs will
be accepted. You may unlock the panel by
repeating the exact sequence of UP/DOWNI
UP.
c. Starting
Blower
Your spa is equipped w.ith a 3~spesd air
blower. The first touch of the BLOWER switch
starts the blower at its iiight)'st speed; a sec~
ond touch reduces t\'ie blower to medium
speed: a third touch reduces the blower to low
speed: and a fourth touch turns the blower off.
The blower will automatically stop after 30 mtnutes of use.
E. Overheat
Protection
if a possibilIty of overheating is detected,
the display wIll show HlL.l (high limit} and the
heater wilt be disabled. After the water
temperature cools below 104 degrees, you
may reset the heater function by holding the
HEATER switch for 5 seconds. or until the
dfsplay returns to nannal. If the HILI message returns. you should calf for service.
D. Turning
on Llgh1
Your spa also has an underwater light with
two levels of brightness. The first touch of ttle
LIGHT switch turns the light on at full brightness; a second touch reduces the light to half
brightness; and a third touch tums the light off.
If left on, the light will automatically tum itself
off after 6 hours.
F. Battery
Backup
fn the event of a power out8:ge, your spa
wIll remember individual settlnt;s for ttme,
temperature. fi1ter hours and h&ater days for
over 30 minutes. In cases of extreme ejectri.
cal noise problems or nearby electrical
storms, the SELECTRON's internal computer
could be disturbed. If you suspect a problem
with the computer because of a stranga
display or perfonT1anca that is not normal,
disconnect the spa at your circuit breaker
and allow the battery to run down for at 1east
2 hours. The:: SELECTRON will automatically
clear its memory and return to its original
operation.
NOTE: While heating the $pa of when the spa Is
not being used; keep the air controls closed.
5) SPECIAL FEATURES
A. Automatic Blower/purge and Jets Pump
At 1 :00 pm each day, the blower will
automatically run for 1 mirlute to circulate
potential stale water in the water lines. This
is a nomlsl function of the spa.
6} ADD START-UP
CHEMICALS
CarefuUy follow the directions and add
the start-up chemicals recommended to you
by your dealer. Contact your dealer to clarify
any questions you may have.
B. Freeze Protection
If the TEMPERATURE IN THE PLUtv1B.
ING of the spa approaches 40 degrees. th$
filter and jet pumps will automatically come
on and run for at least one minute. If this
doesn'{ raise U)e ten-Jperature enough. the
heater will come on and raise the water
temperature about 10 degrees.
7) JET OPERATION
Your Vita Spa Is designed with a unique
jet system whrch allovys you to select a wide
variety of massage pattems~ Thefoltqwingi~
a description of the various types of jets and
their operation you may use to taIlor your spa
to your specific n;ltiSsage n~ed$.
7
TURBO MASSAGE ..JET
.All
the water entering the spa passes through
the turbo massage jet first. The water will be
delivered either through the turbo jet itself or
the other hydrotherapy jets depending on Its
position. When the turbo jet is on (clockwise),
the water is delivered through itself. When
the turbo jet is in the off (counter clockwise}
position, the water is delivered through the
other hydrotherapy jetG. Tho ON/OFF position of the turbo massage jet is adjusted by
rotating the outer rim of the jet. NOTE: For
ease of operation, rotate the jet when the
pump is either off or in the low speed mode.
When the turbo jet is on, the water flow direction can be adjusted by rotating the jet nozzle.
The pressure may also be varied by using
the air control.
DIRECTIONAL & ROTATIONAL MASSAGE JETS
When the pump is on and the turbo massage
jet is in the off position. the directional & rota"
tional massage jets will be operational. The
water flow direction is adjustable by rotating
the directional jet nozzle. The amount of pressure can be adjusted by rotating the outer rim
of the jet(s): clockwise for minimum pressure
and counter clockwise for maximum pressure.
Pressure may also be varied by the use of
the ajr control.
(
~URO MASSAGE
.JET
These tiny Euro jets are used in various models for various purposes. In cluster conflgu~
ration for back and neck massage and for
ozone injection, they deliver a firm pinpoint
jet stream of massaging action. The Euro jet
is not directional nor adjustable, but can be
pressure controlled by adjusting the air con~
trot.
AIR CONTROLS
The air controls are used to introduce air into
the water jet stream. Marked with arrows for
open or closed position. these controls allow
the user to increasc (open} jet pressure or
decrease (close) jet pressure as desired.
8
Your VITA SPA is manufactu%ed with the highest and
most durable materials available. A spa care and
11aintenance program is recommended to increase
your comfort, maintain the spa's reliability a.r~dpro.
tect your investment.
3. FaLTER MAINTENANCE
Vita Spas are d,esigned with the most efficient
top loading filtration system in the industry. Filter mamtenance is the most critical factor in
keeping your spa water clean.
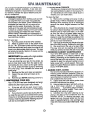
1. DRAINING
YOUR SPA
Detergent residues from bathing suits as well
as soap film from your body may gradually
accumulate in the water. Foam inhibitors wfl/
suppress the foam b~Jt\vill nQt remove the
soap from the water. Eventually, the SQap
build-up in the water will concentrate enough
to leave an unclean feeling on the user's skin,
cause sudsing and make the water impossible to clarify. Depending on tl)e amount of
soap input, the spa water should last between
two and three months.
To clean the filter:
A. Remove the cartridge and spray it with a
garden hose. it v"ill be necessary to rotate the
cartridge while spraying so as to thoroughly
remove the debris lodged between the filter
pleats.
B. After allowing to dry, inspect the cartridge
for calcium deposit (scaling) or an oil film. Rapid
mjnGraJ build~up from hard water, or on bund~
up from the use of oll-bas&d water scent or
body oil may coat the filter cartridge. A filter
cleaner to soak the cartridge is available from
your VITA SPA Dealer and should be used as
part of your spa maintGnance.
C. Use a rag to remove any debris at the bottom of the filter housing. Replace the cartridge.
D. Vve recommend
the use of a spare fitter.
This way one can be soaking and cleaning
while you continue to enjoy the use of your spa.
To drain your spa:
A. Turn the power off at the GFCI breaker.
B. Attach a garden hose to the yellow hose
bib (III. 1 No.9) located under ths filter housing
inside the equipment and route the Dutlat of the
hose to an appropriate
draining area.. The spa
will empty by gravity. Siphon or scoop out the
balance of the water.
4. REDWOOD.CABINET
MAINTENANCE
Your VITA SPA cabinet is made with a high
qua.tity redwood. It is factory stained and
sealed. Depending on the location and exposure of the spa to the rain and aunf it is recommended to seal the redwood cabinet once or
twice a year with a wood sealant. Vita's speclally formu1ated Redwood sealer is available
at your VITA SPA dealer.
IMPORTANT:
Spa water with a high sanitizer
level may harm plants and grass.
If you are draining your spa for the winter. be
sure to fully drain water from the pipe by dis~
connecting the two unions at the gate valves
(III. 1 N. 6). Drain the water pump by removing
the pump plug; Then reinstall the valves and
pump plug.
C. Remove the filter and clean as required.
D. Inspect the spa shell and clean as required.
E. Refill the spa BEFORErestoring power to it
5. MARINE VINYL COVER
Yourco'/eris manufactured from a durabl~ U.V.
marine grade resistant material. Even SO,
monthly cleaning and periodic conditioni~ is
recommended10 maintain its beauty~ To clean
and condition the vinyl cover:
A. lightly spray the cover with a garden hose
to rinse It and remove the debris.
B. Using a large sponge or soft cloth, and us~
ing a mild soap solution
(1 te2spoon
dishv...ashing
liquid with 2 gallons of \,latsr),
scrub lightly in c~rcular motion. Then rinse it
thoroughly with plenty of water.
C. Condition the vinyl after c!$aning by aPM
plying a frlin film of vinyl conditioner such as
ArmorAII. "JOTE: To remove tree saps, use
lighter .fluid (not charcoal lighter but the kind
used in cigarette lighters}, Use spanng1yand
rinse with mild soap Golution afterwards. Wipe'
2. WINTERIZING
YOUR SPA
Your VITA SPA has been designed and engi.
neered for year-round use in any climate.
A. If the spa will not be USGd, drain It com.,
pletely following the instructions on "DRAINING
THE SPA."
B. If you intend to use the spa during the win~
ter, keep the spa warm and set the timer to bring
the pump on at night and a couple hours during
the day. Note that accidental freezing could re.
suit due to prolonged power failures.
dry.
g
WATER
QUALITY
.GENERAL GUIDELINES
AND
MAINTENANCE
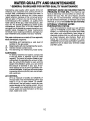
FOR WATER QUALITY MAINTENANCE
Maintaining water quality within specific limits will
enhance your enjoyment and prolong the lIfe of
the spa. Safe, comfortable and clean spa water is
a fairly simple task. to achieve, but it does require
regutar attention because of the numerous factors
that can alter it. There is no one formula to be followed because of the variables, i.e. quality of the
water used to fill the spa, water temperature, user
load, etc. For specific guidelirles for water quality
maintenance, consult your VITA SPA dealer who
can assist you to develop a program based or1 your
specific needs. Disregard for water maintenance
wm result In poor soaking conditions, damage your
spa investment and possibly void your warranty.
IMPORTANT: NEVER USE CHLORINE TABLETS
(TRICHLOR) IN YOUR SPA. This chemical can
have an extremely corrosive effect on certain ma"
terials in the spa. Also, the use of liquids. chlorine
or acid, are not recommended. Damage caused
by use of these chemicals. or improper use of any
chemical, Is not covered under the spa warranty.
OPTIONAL
VITAZONE
WATER
PURIFtCA'tION
SYSTEM
It you have e1ected to equip your spa with the
optional VITAZONE ozone water purification
system, you will find that your water stays fresh
and cjean wIth signfficantly
Jess usage of
chemical sanitizer and you wIll also be able to
go longer between spa draining. Read artd
follow the instructions
!ncfud$d with your
V[TAZONE ozone water purification system to
determine how to adjust your chemical usage
and filter cyc}es.
Spa water maintenance consists of three separate,
easIly developed programs:
2.
3.
Sanitizing and maintaining a safe level of
sanitil.er in the spa water.
Balancing the pH and maintaining the recom~
mended mineral content level.
And achieving and maintaining water clarity.
SANITI~ING
To destroy bacteria and organic compounds
in the spa water, a sanitizer must be used
regularly. The use of a bromine floater is rec.
ommended. By regulating the amount of tab.
lets, the amount the floater is open and the
length of the filtration cycles, you can control
the amount of bromine in your spa. A bromine residual of 2 to 3 ppm Is generally considered desirable. A two.part bromine system
or granular chlorine (dichlor) are also accept~
able sanitizers.
pH CONTROL
pH is a measure of acidity and alkalinity of
the spa water. The recommended pH for spa
water 1$ 7.4 to 7.6 ppm. Below 7.0 (considered neutral), the spa water is acidic and can
cause damage to the heating system. Above
7.8 the water is too alkaline and can result In
cloudy water and scale fom1ation on the spa
shell, heater and cover.
10
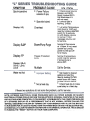
SYMPTOM
Spa inoperative
PROBABLE
*
Pov.;er
Failure
outside
*
Display:
HILI
Display: BJ2P
Spa
CAUSE
of spa
side
locked
* Check power source
Breaker and GFCI;
Reset breaker/GFCI.
Call Electrician if it
will not reset.
* Lockout light is
flashing. Unlock.
* Let water Temperature
cool down to 104F and
reset by hotding HEATER
switch for 5 seconds,
or until display returns
to normal. If HIU
message returns, call
for service.
Overheat
Blower/Pump
SOLUTION
Purge
t"'ormal if .this occurs
at 1 :OOpm. If not, reset
system by turning
power to the spa off
for 2 hours.
Display:
FP
Display: SS=O;
SS=S; LS=O;
LS=S
Freeze Protection
is on. .
Normal if temperature
is 40F. Call for service
if temperature is
above 60F.
Multiple
Car! for Service.
*
,
Set heater to
setting and start
filter by holding
switch down for
to start a 6~hour
Water not hot
*
Not
a heat
day
*
Check
desired
the
FIL TEA
5 secs.
period.
heat day to make
sure today is a heat day.
If these two solutions do not solve t,ie problem, call for service.
NOTE: EXTREME ELECTRICAL
'.~OISE PROBLEMS
SUCH AS POWE;R SURGES OR NEARBY
ElecTRICAL
STORMS COULD DISTURB THE SIELECTRON'S INTERNAL COMPUTER IN iHESAME
WAVAS YOUR HOME COMPUTER. IF YOu suspecT
A PROBLEM WITH THE COMPUTER BECAUSE
OF A STRANGE D1SPLAY OR A PERFORMANCE THAT IS NOT NORMAL, BEFORE CALLING FOR
)EAVICE, DISCONNECT THE SPA BY TURNING OFF YOUR $RUKER
AND ALLOW THE eAr:rERY
TO RuNDOWNFOA
AT LEAST 2 HOURS. TURN THE powERaA:oKoN
AND THE SEL.EqTRoN'wrLL
AUTOMATICAlly
CLEAR ITS 'MEMORY AND RETURN TO fTS OAAGINAlOPERATlON.
"fHIS 1SSIMlLAR
TO PUSHING THE ..ResET" BUTTON ON YOUR HOME COMPUTER.
c :
.
,
.c
"