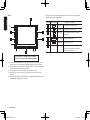
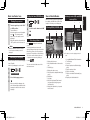
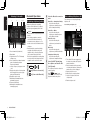
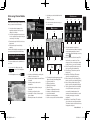
1
QUICK START GUIDE & Installation Manual GUIDE DE DÉMARRAGE RAPIDE et guide d'installation KURZANLEITUNG und Montageanleitung GUIDA DI AVVIO RAPIDO e manuale di installazione BEKNOPTE HANDLEIDING & installatiehandleiding GUÍA DE INICIO RÁPIDO y Manual de instalación SNABBGUIDE OCH BRUKSANVISNING PODRĘCZNIK WPROWADZAJĄCY i podręcznik użytkownika ΟΔΗΓΟΣ ΓΡΗΓΟΡΗΣ ΕΚΚΙΝΗΣΗΣ & Εγχειρίδιο εγκατάστασης NX503E FX503E DVD MULTIMEDIA STATION WITH BUILT-IN NAVIGATION & 6.2-INCH TOUCH PANEL CONTROL MULTIMEDIA STATION & 6.2-INCH TOUCH PANEL CONTROL S-GPF_EUR_QSG.indb 1 2013/03/15 14:27:48 CAUTIONS: This appliance contains a laser system and is classified as a “CLASS 1 LASER PRODUCT”. To use this model properly, read this Owner’s Manual carefully and keep this manual for your future reference. In case of any trouble with this player, please contact your nearest “AUTHORIZED service station”. To prevent direct exposure to the laser beam, do not try to open the enclosure. !CAUTION OBS! Apparaten innehåller laserkomponenten som avger laserstrålning överstigande gränsen för laserklass 1. VAROITUS Suojakoteloa si saa avata. Laite sisältää laserdiodin, joka lähettää näkymätöntä silmille vaarallista lasersäteilyä. NX503E USE OF CONTROLS OR ADJUSTMENTS OR PERFORMANCE OF PROCEDURES OTHER THAN THOSE SPECIFIED IN THE OWNER’S MANUAL MAY RESULT IN HAZARDOUS RADIATION EXPOSURE. ADVARSEL. Denne mærking er anbragt udvendigt på apparatet og indikerer, at apparatet arbejder med laserstråler af klasse 1, hvilket betyder, at der anvendes laserstråler af svageste klasse, og at man ikke på apparatets yderside kan blive udsat for utilladelig kraftig stråling. FX503E This guide is intended to guide you through the basic functions of the unit. Contents PRECAUTIONS��������� 1 Operation Panel/Generalities����� 1 Linking-compatible applications���� 7 Procedure up to Smartphone linking�� 8 Trademarks����������� 2 Names and functions of parts��� 3 Basic method of use������� 5 For iPhone������������� 8 For Android smartphones������� 8 Turning the power on�������� 5 Switching the language������� 5 Setting the time (FX503E only)���� 5 Selecting a Source��������� 5 Source Media Modes������� 5 Viewing DVDs (NX503E only)���� 5 Listening to microSD card/USB memory files�������������� 5 Listening to the radio�������� 6 Bluetooth Operations������� 6 Registering cellphones (pairing)��� 6 Screen during a telephone call���� 6 Entering a number to make a call�� 7 Receiving telephone calls������ 7 Using Smart Access������� 7 What is Smartphone linking?���� 7 Starting up applications������� 8 Start using Clarion Mobile Map�� 9 Selecting the destination of a route�� 9 Map screen������������ 9 Quick menu������������ 9 INSTALLATION AND WIRE CONNECTION MANUAL���� 10 1. SAFETY PRECAUTIONS����� 2. PACKAGE CONTENTS������ 3. GENERAL CAUTIONS������ 4. CAUTIONS ON INSTALLATION��� 5. INSTALLING THE MAIN UNIT��� 6. REMOVING THE MAIN UNIT���� 7. CAUTIONS ON WIRING������ 8. INSTALLING THE GPS ANTENNA (NX503E ONLY)�������� 9. WIRE CONNECTION������� 10 11 11 11 12 13 13 14 15 APPARATET BØR KUN ÅBNES AF FAGFOLK MED SÆRLIGT KENDSKAB TIL APPARATER MED LASERSTRÅLER! Indvendigt i apparatet er anbragt den her gengivne advarselsmækning, som advarer imod at foretage sådanne indgreb i apparatet, at man kan komme til at udsaætte sig for laserstråling. ●● For details of functions and operation of this product, refer to “Owner’s manual”. ●● The screens shown in the examples may differ from actual screens. Actual screens may be changed without notice for performance and function improvements. S-GPF_EUR_QSG.indb 2 2013/03/15 14:27:50 PRECAUTIONS •For your safety, the driver should not watch the DVD video/movie data or operate the controls while driving. Please note that watching and operating the DVD video/movie data while driving are prohibited by law in some countries. Also, while driving, keep the volume to a level at which external sounds can be heard. 1.When the inside of the car is very cold and the player is used soon after switching on the heater, moisture may form on the disc (DVD/CD) or the optical parts of the player and proper playback may not be possible. If moisture forms on the disc (DVD/CD), wipe it off with a soft cloth. If moisture forms on the optical parts of the player, do not use the player for about one hour. The condensation will disappear naturally allowing normal operation. 2.Driving on extremely bumpy roads which cause severe vibration may cause the sound to skip. 3.This unit uses a precision mechanism. Even in the event that trouble arises, never open the case, disassemble the unit, or lubricate the rotating parts. 4.Insert and remove the microSD card after turning off the unit, because the microSD card might get damage. CHANGES OR MODIFICATIONS TO THIS PRODUCT NOT APPROVED BY THE MANUFACTURER WILL VOID THE WARRANTY. Operation Panel/Generalities For a longer service life, be sure to read the following cautions. ●● Do not allow any liquids on the set from drinks, umbrellas, etc. Doing so may damage the internal circuitry. ●● Do not disassemble or modify the set in any way. Doing so may result in damage.Also, subjecting the operation panel to shocks may result in breakage, deformation, or other damage. ●● Do not let cigarettes burn the display. Doing so may damage or deform the cabinet. ●● If a problem should occur, have the set inspected at your store of purchase. ●● The optional remote control unit may not work if the remote control sensor is exposed to direct sunlight. ●● In extremely cold weather, the display movement may slow down and the display may darken, but this is not a malfunction. The display will work normally when the temperature increases. ●● Small black and shiny spots inside the operation panel are normal for LCD products. ●● The touchkeys on the display operate when slightly touched. Do not press the touchkey screen with much force. ●● Do not push the case surrounding the touchkey panel with much force. This may cause malfunctioning of the touchkeys. English WARNING ■■ INFORMATION FOR USERS: NX503E/FX503E S-GPF_EUR_QSG.indb 1 2013/03/15 1 14:27:51 Trademarks English ●● This product incorporates copyright protection technology that is protected by U.S. patents and other intellectual property rights. Use of this copyright protection technology must be authorized by Rovi Corporation, and is intended for home and other limited viewing uses only unless otherwise authorized by Rovi Corporation. Reverse engineering or disassembly is prohibited. Use of this product by the customer is restricted to play program materials to which the Rovi copyright protection process has been applied. (NX503E only) ●● Manufactured under license from Dolby Laboratories. “Dolby” and the double-D symbol are trademarks of Dolby Laboratories. (NX503E only) is the trademark of DVD Format/ ●● Logo Licensing Corporation. (NX503E only) ●● “SDHC memory card,” “SD memory card,” “miniSDTM”, and “microSDTM” are registered trademarks of the SD Card Association. ●● “Made for iPod” and “Made for iPhone”mean that an electronic accessory has been designed to connect specifically to iPod, or iPhone, respectively, and has been certified by the developer to meet Apple performance standards. Apple is not responsible for the operation of this device or its compliance with safety and regulatory standards. Please note that the use of this accessory with iPod or iPhone may affect wireless performance. iPhone, iPod, iPod classic, iPod nano, iPod touch, and iTunes are trademarks of Apple Inc., registered in the U.S. and other countries. ® ® ●● DivX , DivX Certified and associated logos are trademarks of Rovi Corporation or its subsidiaries and are used under license. DivX Certified® to play DivX® video, including premium content. Covered by one or more of the following U.S. patents:7,295,673; 7,460,668; 7,515,710; 7,519,274 (NX503E only) ® ●● The Bluetooth word mark and logos are registered trademarks owned by Bluetooth SIG, Inc. and any use of such marks by Clarion Co.,Ltd, is under license. ●● The terms HDMI and HDMI HighDefinition Multimedia Interface, and the HDMI Logo are trademarks or registered trademarks of HDMI Licensing LLC in the United States and other countries. ●● Android is the trademark of Google Inc. ●● How to get source code that is considered open source This unit uses open source software. If you want to get this software’s source code, you can download it from our website. Refer to the following website about getting the source code. http://www.clarion.com/xe/en/support/ index.html 2 NX503E/FX503E S-GPF_EUR_QSG.indb 2 2013/03/15 14:27:54 Names and functions of parts This document uses the following inline graphics and conventions to indicate operations using the buttons on the operation panel. NX503E ✽7 5 ✽1 1 Number Inline graphic 1 MENU 2 NAVI AV 3 — 4 Smart Access Description of operation Short press This displays the main menu screen. Short press This switches between the current position map screen and currently selected audio screen. Turn ✽2 2 6 3 4 6 ✽5 ✽6 This is the rotary volume key. Use this to adjust the volume of audio-visual functions or the route audio guidance, etc. Short press This turns off the screen. 5 ✽3 English The following describes the button names on the operation panel of the unit and their functions. Short press This starts up Smart Access. Short press This ejects the disc inserted in the unit. — Touch This is the monitor and touch panel. This functions as a touch panel by touching the screen when it is displayed. ✽4 Insert and remove the microSD card after turning off the unit, because the microSD card might get damage. ✽✽ 1 This is the built-in microphone. This is used as the microphone for the hands free function when the unit is connected to a Bluetooth compatible cellphone by a wireless connection. ✽✽ 2 This is the remote control sensor. This receives the signal from the remote control (sold separately). ✽✽ 3 This is the AUX terminal. Audio and video from external devices connected to this terminal can be played when the audio mode is switched to AUX. ✽✽ 4 This is the Antitheft Indicator. This light blinks when the Antitheft Activation setting is set to “ON” to indicate that the antitheft function is activated. ✽✽ 5 This is where the microSD card is inserted to enjoy data in microSD cards. ✽✽ 6 The map microSD is housed in here. To update the map, open this cover, and remove and insert the card. Do not open the cover for other operations. ✽✽ 7 This is where DVD video, CD, MP3, WMA, and DivX discs are inserted. NX503E/FX503E S-GPF_EUR_QSG.indb 3 2013/03/15 3 14:27:54 FX503E This document uses the following inline graphics and conventions to indicate operations using the buttons on the operation panel. 6 English ✽1 4 1 Number Inline graphic 1 MENU 2 DISP Short press This switches to the audio screen. 3 VOL+ Short press Use this to adjust the volume of the audiovisual function. VOL- 5 2 ✽2 ✽3 3 ✽4 ✽5 4 Smart Access 5 POWER 6 — Description of operation Short press This displays the main menu screen. Short press This starts up Smart Access. Short press This turns off the screen. Touch This is the monitor and touch panel. This functions as a touch panel by touching the screen when it is displayed. Insert and remove the microSD card after turning off the unit, because the microSD card might get damage. ✽✽ 1 This is the built-in microphone. This is used as the microphone for the hands free function when the unit is connected to a Bluetooth compatible cellphone by a wireless connection. ✽✽ 2 This is the AUX terminal. Audio and video from external devices connected to this terminal can be played when the audio mode is switched to AUX. ✽✽ 3 This is where the microSD card is inserted to enjoy data in microSD cards. ✽✽ 4 This is the remote control sensor. This receives the signal from the remote control (sold separately). ✽✽ 5 This is the Antitheft Indicator. This light blinks when the Antitheft Activation setting is set to “ON” to indicate that the antitheft function is activated. 4 NX503E/FX503E S-GPF_EUR_QSG.indb 4 2013/03/15 14:27:55 Basic method of use 1 Turn the engine key to the “ACC” or “ON” position. The unit turns on. After the opening screen is displayed, touch OK . The current position map screen or the audio screen is displayed. When the engine key is turned to the “OFF” position, the unit is turned off. MEMO •When the Antitheft Activation function is set, the password entry screen is displayed. Switching the language When the unit turns on, the default language is set to English. Switch to your language to use the unit. 1 2 3 4 MENU System Language Select the language you use. OK When you switch the language, the unit is automatically restarted and the language is switched to the selected language. Source Media Modes 1 When you select the desired source mode (for example, the DVD Video, USB or iPod mode), the following screen will appear. MENU 2 3 Time 4 Set Set the hour, the minute and AM/ PM. Listening to microSD card/USB memory files 1 English Turning the power on Setting the time (FX503E only) 2 Viewing DVDs (NX503E only) 1 2 3 Selecting a Source Press MENU to display the main menu screen. Touching the main menu screen and quickly sliding your finger up or down then removing it, moves you to the previous or next page. This operation is called flicking. The screen can be switched to the next or previous menu screen by flicking or . touching You can select the desired source in the main menu screen. 3 4 5 6 7 8 ✽✽ The above screen is for playing a microSD card. 4 5 6 7 8 9 1.Display the disc menu 2.Play status/Information of the monitor size 3.Trick Play key 4.Display the option screen 5.Play the previous chapter/Rewind (long press) 6.Play/Pause 7.Stop play 8.Play the next chapter/Fast forward (long press)/Slow play (long press while pausing) 9.Display the operation key to operate the disc menu. 1.Song/Artist/Album/Folder information 2.Trick Play key 3.Scan key 4.Play the previous track/Rewind (long press) 5.Play the previous folder 6.Play the next folder 7.Play the next track/Fast forward (long press) 8.Display the folder list/track list NX503E/FX503E S-GPF_EUR_QSG.indb 5 2013/03/15 5 14:27:56 Bluetooth Operations Listening to the radio English 1 2 3 4 5 4 Registering cellphones (pairing) Hands Free + Smartphone Linking: Select this when using the cellphone as a hands free phone and for Smartphone linking. When using a Bluetooth-compatible cellphone for the first time, the cellphone must be registered (paired) with the unit. •Also, pairing sometimes cannot be executed if the Bluetooth function is not enabled on the cellphone, too. For details, refer to the User’s Manual for the cellphone. 7 8 9 1. Preset channel list (Station list) 2. Band switch 3.Lights when the PTY or TA interrupt settings are on. 4.Stereo status/Preset channel number/ name of broadcasting station/ Frequency information ✽✽ Only the frequency is displayed for AM radio. 5.Display a description of the broadcast that is currently being received (only during an FM broadcast) 6. Display the option screen 7.Manual tune backward/Auto tune backward (long press) 8.Frequency setting bar 9.Manual tune forward/Auto tune forward (long press) 6 •During hands free operations (making outgoing calls, taking incoming calls, telephone calls), connection (telephone calls, communications) with other Bluetooth-compatible devices and pairing are not possible. Also, during hands free operation, audio sound is not output. 1 2 3 MENU Set at [BT Devices Connection] ON at [Connect with Bluetooth] Screen during a telephone call The following screen is displayed during a telephone call: Screen during a telephone call 1 2 Hands Free + Music: Select this when using the cellphone as a hands free phone and for Bluetooth Audio. Notice •Pairing cannot be executed while you are driving. 6 Select the Bluetooth connection mode. Hands Free Only: Select this when using the cellphone only as a hands free phone. Music Only: Select this when using the cellphone only for Bluetooth Audio. Smartphone Linking Only: Select this when using the cellphone for Smartphone linking. 5 Select “CAR-BT” (default) from the cellphone, and enter the PIN “1234” (default). The cellphone searches for the unit to complete pairing. When MENU Phone is next touched, the screen changes to the telephone number entry screen. 3 4 5 6 1.The call time/The name registered in the hands free phonebook/Telephone number information 2.Enter the numbers for the password, etc. during the telephone call when the number entry screen is displayed 3. Display the option screen 4. Mute the phone outgoing volume 5.Switch to telephone calls on the cellphone unit 6. End the telephone call NX503E/FX503E S-GPF_EUR_QSG.indb 6 2013/03/15 14:27:56 Entering a number to make a call Notice •Always input the area code when calling a land-line phone. CAUTION •When you receive a call while you are driving, be sure to check the safety around you before taking the call. 1 : Put your response on hold. •With some cellphones, you may not be able to redial immediately after hanging up a call you dialed. Wait a while before dialing the number again. 1 2 3 MENU Phone Enter the telephone number. The telephone number is dialed and the other party is called. 4 To end a telephone call You can make calls from the outgoing/incoming calls log or the registered phonebook. When you have an incoming call : Touching this during an incoming call, rejects the call. 2 To end a telephone call Using Smart Access Smart Access is a telematics service provided by Clarion so that all automobile users can enjoy comfortable, safe and convenient driving. By “linking” vehicles to Smart Access by smartphone, etc., Smart Access provides customers in vehicles with various conveniences such as entertainment, driving related information and Internet information. What is Smartphone linking? You can connect the unit to your smartphone and operate the various applications that run on your smartphone from the unit. For example, you can output audio that is played from the speakers connected to the unit or display images displayed in applications on the unit. This is called “Smartphone linking.” The following lists the smartphones that can be linked to the unit: ® ●● Covered models: iPhone 4, iPhone 4S, Android smartphones ✽✽ iPhone and iPad other than the above are not supported. ●●Covered OS: iOS 5 or later, Android OS4.0 or later (as of January 2013) Also, with this function, only applications compatible with Smartphone linking can be used. This User’s Manual refers to these as “linking-compatible applications.” Attention •Use of Smartphone linking function is charged to smartphone communications fees. Charges are borne by the person contracted to the smartphone being used. Charges billed from the cellphone carrier may be expensive depending on the method of use. Before use, check the price plans and methods of use with the cellphone carrier you are contracted to. We recommend using the optimum price plan, such as a flat-rate data plan based on the frequency of use. Notice •While you are driving, some applications cannot be operated so as to prevent obstruction to driving. •Information content that is distributed in real time belongs to third parties having the rights concerned. The content of services might be changed or suspended for reasons of third parties having the rights concerned. Linking-compatible applications To use Smartphone linking, linkingcompatible applications and application management software “Smart Access” must be installed on the software. First, search for “Smart Access” from the App Store or Google Play Store and install this. Next, install the linking-compatible applications. Start up Smart Access on the smartphone and download the linkingcompatible applications from recommended lists. Linking-compatible applications are scheduled to be added as they become available. NX503E/FX503E S-GPF_EUR_QSG.indb 7 English Attention •While you are driving, you cannot enter telephone numbers to make a call. Always stop at a safe location before making a telephone call. Receiving telephone calls 2013/03/15 7 14:27:57 English For details on how to use applications, refer to the Help for each application that is started up on the smartphone. Procedure up to Smartphone linking The Smartphone linking procedure is as follows. (For iPhone) Start up Smart Access on the 1. smartphone. 2.Connect the unit to the smartphone. Use CCA-750 (sold separately) and VTR cable. 3.Start Smartphone linking on the unit. (For Android smartphones) Start up Smart Access on the 1. smartphone. 2.Connect the unit to the smartphone. There are two methods of connection as follows depending on the smartphone model. Connect to the cigarette lighter port, etc. on the vehicle to supply power. The unit HDMI cable HDMI/MHL conversion cable HDMI/MHL conversion adapter The unit Smartphone HDMI cable Smartphone Attention •For the HDMI/MHL convertion adapter, only an adapter that supports EDID transfer can be used. 8 Connect a smartphone that supports the following Bluetooth profile via Bluetooth for use. ●● SPP (Serial Port Profile) ●● HID (Human Interface Device Profile) 3. Start Smartphone linking on the unit. Starting up applications Notice •The unit sometimes does not support smartphone multi-touch or flicking functions. •Applications cannot be added or deleted from the unit. Execute addition or deletion of applications on the smartphone. •During Smartphone linking, do not set the smartphone to a sleep state. Doing so might prevent the smartphone from functioning properly. MEMO •When Smart Access is used for the first time, the Terms of Use confirmation screen is displayed. Check the terms of use, and touch Check . •“!” will be displayed when there is a new version of Smart Access available. To update Smart Access, remove the smartphone from the unit, and execute the update by operating the application on the smartphone. For iPhone For Android smartphones Preparations Preparations on the ●● Set “Connection Method” of iPod video screen to “USB + VTR”. and then set ●● Select MENU “Linked device” to “iPhone”. ●● Start up Smart Access on the smartphone. Notice •During Smartphone linking, operations on the smartphone are not possible. 1 Connect the smartphone to the unit. Connect iPhones with the video jack of CCA-750 (sold separately) still connected to the VTR cable. 2 Smart Access , or MENU Smart Access Start up Smart Access. The list of linking-related applications installed on the smartphone is displayed. When an application is started up on the smartphone, the screen is switched to the application screen. 3 Select the application you want to start up. The application starts up. The application can be operated from screens on the unit as if you are operating the smartphone. To end an application, touch MENU Smart Access . ●● Select MENU and then set “Linked device” to “Android”. ●● Register (pair) the smartphone to the unit. P.6 ●● Start up Smart Access on the smartphone. MEMO •With some smartphone models, the HDMI output setting on the smartphone must be enabled. •When you connect an Android smartphone, the unit can display pictures of the following formats by Smartphone linking. -- the HDMI output resolution of smartphones: 480p (720×480/640×480), 576p (720×576) 1 Connect the smartphone to the unit. Connect the smartphone by HDMI cable and enable the connection via Bluetooth. P.6 From here on, operations are the same as from step 2 of the procedure for “For iPhones”. NX503E/FX503E S-GPF_EUR_QSG.indb 8 2013/03/15 14:27:57 Start using Clarion Mobile Map When Clarion Mobile Map is started the first time, you need to do the following: 1.Select the written language of the application interface. Later you can change it in Settings. 2.Select the language and speaker used for voice guidance messages. Later you can change it in Settings. 3.Read and accept the End User Licence Agreement. 4.Read and accept the road safety warning. After this, the Navigation menu appears and you can start using Clarion Mobile Map. 15 27 28 29 30 19 3 4 5 6 22.The Quick menu is a selection of controls and functions that are frequently needed during navigation. It can be opened directly from the Map screen by . tapping 20 11 21 14 1.If you are on the Map screen, tap to return to the Navigation 1 26 12 13 7 22 25 Map screen 16 To enter an address as the destination, do as follows: . 24 ✽✽ For the information about other ways, see the user manual. Selecting the destination of a route menu. 2.In the Navigation menu, tap Quick menu 23 8 11 9 10 3.Selecting a destination by entering the address or the postal code 4.Selecting the destination from the Places of Interest 5.Selecting a map location as the destination 6.Selecting the destination from your Favourites 7.Selecting your Home location 8.Searching for a Place of Interest by its phone number 9.Entering the name of the destination 17 18 12.To enlarge this small map and open the Map screen, tap [Show Map] button 13. Zooming in and out 14. Tilting up and down 15. Rotating left and right 16. 2D or 3D view 17. Compass in 2D map view mode 18. Compass in 3D map view mode 19. Location information 20. Return to normal navigation 21. Set the cursor position as the destination 23.Find / Find Places /Quick Search (This function lets you search for a Place along your route or around your current location if there is no route calculated) 24.Find / Favourite (This button opens the list of your Favourite destinations) 25.Find / History (This button opens the History list.) 26.My Route / Edit Route (This button opens the route editing function) 27.More / Settings / Route Settings (This button opens the route related settings) 28.More / Settings / Map Settings (This button opens the map related settings) 29.Tap the Current Street field on the Map screen (This button opens a special screen with information about the current position and a button to search for nearby emergency or roadside assistance. 30.My Route / Cancel Route (This button cancels the route and stops navigation. The button is replaced with the next one if waypoints are given) NX503E/FX503E S-GPF_EUR_QSG.indb 9 English 10.Selecting a recent destination from the History 11.Additional options 2 2013/03/15 9 14:27:58 INSTALLATION AND WIRE CONNECTION MANUAL English 1. SAFETY PRECAUTIONS Symbol Identification This manual uses symbols and icons to indicate safety precautions and concerns during the installation procedure. Be sure to carefully read and understand each precaution prior to beginning the installation. Before Use CAUTION WARNING •Confirm the battery voltage of the vehicle to be installed. This unit is designed only for vehicles with DC 12V power supply. •Disconnect the negative terminal of the battery before connecting wires, otherwise an electric shock, injury by short circuit may occur. WARNING •This symbol is intended to alert the user to the presence of important operating instructions. Failure to heed the instructions may result in severe injury or death. CAUTION •This symbol is intended to alert the user to the presence of important operating instructions. Failure to heed the instructions can result in injury or material damage. Car battery Installation Precautions WARNING •When installing the unit to a vehicle with an airbag system, never install it in a place where it may affect the operation of the airbag. •Do not install this unit in the following locations: A location interfering with the driver’s visual range or operation. A location where the gear shift or brake pedal are hindered. A location where passengers are at risk. An unstable location, or where the system may fall. 10 •Do not install the system in the locations described below. This may cause a fire, accident or electrical shock: A location exposed to rain or dust. An unstable location, or where the system may fall. •Do not install this unit in a place exposed to direct sunlight, heat or a place where the vent holes or heat radiation holes are covered. •When you install the antenna, mount it in a place where the elements of the antenna do not protrude beyond the edge of the front, back, left and right of the vehicle. If it comes in contact with pedestrians, it may cause an accident. •Ensure a minimum distance around the apparatus for sufficient ventilation. •Do not place naked flame sources, such as lighted candles on the apparatus. Installation Notes WARNING •Please note the position of pipes, tanks and electrical wirings before installing the unit into the vehicle; failure in avoiding these may cause a fire or malfunction. CAUTION •Use only the supplied parts. If unspecified parts are used, they may cause damage. •Any holes made in the body of the vehicle should be sealed with a silicon adhesive. If exhaust fumes or water penetrates into the vehicle, this may cause an accident. •Fasten the bolts securely when installing the unit. If the bolts are loose an accident or malfunction could occur. •Use the apparatus only in moderate climates (not in tropical climates). NX503E/FX503E S-GPF_EUR_QSG.indb 10 2013/03/15 14:28:01 Connection Notes •Loom all cables according to the instruction manual, so as not to hinder operation. •Wire the connecting cords/cables away from high temperature areas. If the coatings of the cables melt, it could cause an accident/fire by a short circuit. Take care when wiring in the engine compartment. •When wiring the connecting cables in a vehicle with an airbag system, never feed the cables through a place where it may affect the operation of the airbag. An airbag not operating correctly in an emergency may cause increased injury. •Verify wires with a digital multi-meter prior to making any connections. Many new vehicles use multiplexed and/or low voltage circuits that can be damaged if a test light or logic probe is used. •Connect cables appropriately. If a wrong connection is made, this may cause a fire or accident. •When passing cables through the body of the vehicle, use nonconductive grommets. If the coatings of the cables are worn out by rubbing, this may cause an accident, fire or a short circuit. •After wiring cables, fix them with insulation tape. •Be sure to switch off the vehicle when connecting or disconnecting cables to/from the unit, otherwise an electric shock, injury or accident may occur. 2. PACKAGE CONTENTS Main unit Quick Start Guide & Installation Manual CD-ROM •Owner's manual •Owner's manual - Navigation (NX503E only) Power supply cable RCA pin cable (6ch) RCA pin cable (Rear AUX-IN/Rear Video Out) Bag for accessories •Flat head screw (M5 × 8 mm) ������������������������������������������������������������8 •Hexagonal bolt (M5 × 8 mm) ������������������������������������������������������������8 •Electro tap������������������������������������������1 •Rubber cap (for RCA pin cable) ����������������������������������������������������������10 •Cable holder (NX503E only)����������������3 •Double-sided tape for fastening GPS antenna (NX503E only)�����������������������1 •Cable tie����������������������������������������������1 Warranty card GPS antenna (NX503E only) Notice •The provided disc (CD-ROM manual) cannot be played back on this unit. 3. GENERAL CAUTIONS ●● Do not open the case. There are no userserviceable parts inside. If you drop anything into the unit during installation, consult your dealer or an authorized Clarion service center. English WARNING CAUTION 4. CAUTIONS ON INSTALLATION ●● Prepare all articles necessary for installing the main unit before starting. ●● Install the unit within 30° of the horizontal plane. (Figure 1) Max. 30° Figure 1 ●● If you have to do any modification on the car body, such as drilling holes, consult your car dealer beforehand. ●● Use the included screws for installation. Using other screws can cause damage. (Figure 2) Chassis Chassis Damage Max. 3 mm (M4 screw)/ Max. 8 mm (M5 screw) Figure 2 NX503E/FX503E S-GPF_EUR_QSG.indb 11 2013/03/15 11 14:28:02 5. INSTALLING THE MAIN UNIT English This unit is designed for fixed installation in the dashboard. ●● When installing the main unit in NISSAN vehicles, use the parts attached to the unit and follow the instructions in Figure 3. When installing the main unit in TOYOTA vehicles, use the parts attached to the vehicle and follow the instructions in Figure 4. ●● Wire as shown in Section 9. P.15 ●● Reassemble and secure the unit in the dashboard and set the face panel and center panel. ■■ Mounting Screw Holes (Side View of the Main Unit) Installing the Main Unit in a NISSAN Vehicle Main Unit 6-Spacer (thickness: 1 mm) For NISSAN vehicle For TOYOTA vehicle Mounting bracket (1 pair for the left and right sides) Figure 3 12 6-Flat head screw (M5 x 8) (attached to the main unit) NX503E/FX503E S-GPF_EUR_QSG.indb 12 2013/03/15 14:28:03 Installing the Main Unit in a TOYOTA Vehicle Install by using parts attached to the vehicle. (Screws marked are attached to the vehicle.) Vehicles other than NISSAN and TOYOTA 6. REMOVING THE MAIN UNIT •After connecting the HDMI and USB cables to the unit, use a cable tie to tie them down. (Figure 6) English In some cases the center panel may require modification. (Trimming, filing, etc.) CAUTION Cable tie When the main unit is to be removed, disassemble it in the reverse of the order in “INSTALLTING THE MAIN UNIT”. P.12 Main Unit 7. CAUTIONS ON WIRING 8-Hexagonal screw (M5 x 8) Mounting bracket (1 pair for the left and right sides) *2 Center Panel *1 Figure 4 *1Some panel openings are too small for the unit depending on the vehicle type and model. In such a case, trim the upper and lower sides of the panel frame by about 0.5 to 1.5 mm so the unit can be inserted smoothly. *2If a hook on the installation bracket interferes with the unit, bend and flatten it with a nipper or similar tool. ■■ Typical Mounting Brackets ●● Be sure to turn the power off before wiring. Be particularly careful where you route the wires. ●● Keep them well away from the engine, and exhaust pipe, etc. Heat may damage the wires. ●● If the fuse should blow, check to see if the wiring is correct. If a fuse is blown, replace it with a new one of the same specification as the original. ●● To replace the fuse, remove the old fuse of the power supply cable and insert the new one. (Figure 5) HDMI Cable USB Cable Figure 6 Fuse (15A FUSE) Fuse holder Figure 5 Example 1 Example 2 Affix the screws to the Example 3 ●● There are various types of fuse holder. Do not let the battery side touch other metal parts. marks. NX503E/FX503E S-GPF_EUR_QSG.indb 13 2013/03/15 13 14:28:05 8. INSTALLING THE GPS ANTENNA (NX503E ONLY) English WARNING •Do not install the GPS antenna in a place where it may interfere with the operation of the airbag or hinder the driver’s visual range. ●● Mount the GPS antenna. Stick it surely on a flat plane of the passenger-side dashboard where GPS signal interruption is minimized. ●● Wire the GPS antenna cable. Fasten the cable using the Cable holders. •Do not use the navigation system with the GPS antenna cable cut off. The power line in the cable may be short-circuited. ●● The supplied GPS antenna is for installing inside the vehicle. Do not install it outside the vehicle. ●● Install the GPS antenna more than 50 cm away from the main unit, other audio devices such as CD player, and a radar detector. If it is installed near these devices, GPS reception may be impaired. ●● To improve the GPS signal reception, install the GPS antenna horizontally on a flat plane. ●● Do not wax or paint the cover of the GPS antenna. This may reduce the performance of the GPS antenna. ●● Install the GPS antenna at least 10 cm away from the windshield. ●● Wipe off the dirt of the mounting surface before installing the GPS antenna. GPS antenna Cable holder ●● Stick the double-sided tape to the bottom face of the GPS antenna. Double-sided tape (Shows an example in case of the left-hand traffic.) Bottom face of the GPS antenna 14 NX503E/FX503E S-GPF_EUR_QSG.indb 14 2013/03/15 14:28:05 9. WIRE CONNECTION USB terminal GPS antenna jack (NX503E only) Rear Vision Camera terminal English Refer to the following page. Radio antenna jack Android HDMI/MHL conversion adapter smartphone HDMI/MHL conversion cable HDMI cable (sold separately) or No. Android smartphone Description REAR RIGHT REAR RIGHT FRONT RIGHT FRONT RIGHT FRONT LEFT FRONT LEFT Microphone (sold separately) Steering wheel remote control terminal (sold separately) REAR LEFT REAR LEFT +12 V MAIN POWER (*1) Auto antenna ILLUMINATION Gray Black Purple Red Right Left White Red Right Left Rear audio output terminal Right Left Subwoofer output terminal (MONO 2ch) White Red Gray White Yellow Black Yellow External Amplifier Front audio output terminal video input terminal GROUND ISO CONNECTOR Spare terminal (Yellow) Parking brake (Grass-green) Remote terminal (Blue/White) (*2) Reverse gear terminal (Purple/White) Rear Monitor iPod®/iPhone video output terminal +12 V ACCESSORY (*1) Connection cable (CCA-750) *1In certain vehicles - Volkswagen/Opel/Vauxhall - it is necessary to exchange the accessory <<Red>> and the main power <<Yellow>> connection, to avoid overload and loss of memory. *2When the unit is installed in a 1998 or later Volkswagen model, make sure to interrupt the <<Remote>> output. Disconnect the <<blue/white>> wire and insulate the front ends of this cord. A breakdown may occur if the cord is not disconnected, or front ends are not insulated. Red Right Black White Left audio input terminal See next page for how to connect the parking brake lead. NX503E/FX503E S-GPF_EUR_QSG.indb 15 2013/03/15 15 14:28:07 ■■ Connecting the parking brake lead English Connect the lead to parking brake lamp ground in the meter panel. ●● Connecting the parking brake lead to lamp ground allows you to watch video images when the parking brake is engaged. ●● When the parking brake lead is not connected, the monitor will not display video images. Parking brake lamp + lead to battery Parking brake Electro-tap Parking brake signal lead Parking brake lead (Grass-green) ● How to attach the electro-tap 1.Place the Parking brake lead at the stopper, and fold it back in the direction of the arrow. 2.Pass the Parking brake signal lead through, and fold it back in the direction of the arrow. Parking brake signal lead Stopper Parking brake signal lead Parking brake lead (Grass-green) Connecting the Accessories ■■ Connection to the Rear Vision Camera for vehicle The Rear Vision Camera for vehicle can be connected to optional Rear Vision Camera input cable (CCA-644) with RCA pin cable. For detailed information, refer to the instruction sheet or manual for the Rear Vision Camera. ●● Be sure to connect the reverse gear lead to the vehicle’s relevant terminal. ●● Connect the Rear Vision Camera to the RCA pin cable; if not, the screen turns black while the gearshift lever is in the reverse gear position. 16 NX503E/FX503E S-GPF_EUR_QSG.indb 16 2013/03/15 14:28:07 English: Español: Declaration of conformity Declaración de conformidad We Clarion declares that this model NX503E/ FX503E is following the provision of Directive 1999/5/EC with the essential requirements and the other relevant regulations. Clarion declara que este modelo NX503E/FX503E cumple con los requisitos esenciales y otras disposiciones aplicables descritos en la Directiva 1999/5/CE. Français: Svenska: Déclaration de conformité Intyg om överensstämmelse Nous, Clarion, déclarons que ce modèle NX503E/ FX503E est conforme aux exigences essentielles et aux autres dispositions pertinentes de la directive 1999/5/CE. Härmed intygar Clarion att denna modell NX503E/ FX503E uppfyller kraven i direktiv 1999/5/ EG gällande väsentliga egenskaper och övriga relevanta bestämmelser. Deutsch: Polski: Konformitätserklärung Deklaracja zgodności Wir, Clarion, erklären, dass dieses Modell NX503E/ FX503E den Bestimmungen der Richtlinie 1999/5/EG im Hinblick auf die grundlegenden Anforderungen und andere relevante Bestimmungen entspricht. Firma Clarion niniejszym oświadcza, że model NX503E/FX503E jest zgodny z istotnymi wymogami oraz innymi odpowiednimi postanowieniami Dyrektywy 1999/5/WE Ελληνικά: Italiano: Dichiarazione di conformità Clarion dichiara che il presente modello NX503E/ FX503E è conforme ai requisiti essenziali e alle altre disposizioni pertinenti stabiliti dalla direttiva 1999/5/ CE. Δήλωση συμμόρφωσης Εμείς στην Clarion δηλώνουμε ότι αυτό το μοντέλο NX503E/FX503E τηρεί τις διατάξεις της Οδηγίας 1999/5/ΕΚ σχετικά με τις ουσιώδεις απαιτήσεις και τους άλλους σχετικούς κανονισμούς. Nederlands: Conformiteitsverklaring Clarion verklaart dat het model NX503E/FX503E in overeenstemming is met de essentiële eisen en andere relevante voorschriften van de bepalingen van Richtlijn 1999/5/EC. Clarion Europe S.A.S. Z.I. du Pré à Varois, Route de Pompey, 54670 Custines, FRANCE (Γαλλία) All Rights Reserved. Copyright © 2013: Clarion Co., Ltd. 280-9155-00 S-GPF_EUR_QSG.indb 2 Printed in Japan / Imprimé au Japon / Gedruckt in Japan Stampato in Giappone / Gedrukt in Japan / Impreso en Japón Tryckt i Japan / Wydrukowano w Japonii / Τυπώθηκε στην Ιαπωνία QY-1020E/QZ-3020E 2013/4 2013/03/15 14:30:16