1
OWNER ’S GUIDE
INSTALLATION GUIDE
Home Docking Station
MODEL HD1020
© 2006 Directed Electronics N97103 04-06
NON-TRANSFERABLE LIMITED CONSUMER WARRANTY . . . . . . . . . . . . . . . . . . . . . .3
SAFETY INSTRUCTIONS AND CAUTIONS . . . . . . . . . . . . . . . . . . . . . . . . . . . . . . . .4
WELCOME . . . . . . . . . . . . . . . . . . . . . . . . . . . . . . . . . . . . . . . . . . . . . . . . . . . .6
WHAT’S INCLUDED . . . . . . . . . . . . . . . . . . . . . . . . . . . . . . . . . . . . . . . . . . . . . .6
IMPORTANT INFORMATION . . . . . . . . . . . . . . . . . . . . . . . . . . . . . . . . . . . . . . . . .7
Proper Use ...................................................................................................7
Repairs ........................................................................................................7
Radio/TV Tuner Use .......................................................................................7
Installation ..................................................................................................7
Picture Quality..............................................................................................8
FCC Notice ...................................................................................................8
FEATURES . . . . . . . . . . . . . . . . . . . . . . . . . . . . . . . . . . . . . . . . . . . . . . . . . . . .9
DISC NOTES . . . . . . . . . . . . . . . . . . . . . . . . . . . . . . . . . . . . . . . . . . . . . . . . . .10
DVD OPERATION . . . . . . . . . . . . . . . . . . . . . . . . . . . . . . . . . . . . . . . . . . . . . . .12
REMOTE CONTROL . . . . . . . . . . . . . . . . . . . . . . . . . . . . . . . . . . . . . . . . . . . . . .14
BATTERY REPLACEMENT .................................................................................17
DVD OPERATION . . . . . . . . . . . . . . . . . . . . . . . . . . . . . . . . . . . . . . . . . . . . . . .18
SETUP . . . . . . . . . . . . . . . . . . . . . . . . . . . . . . . . . . . . . . . . . . . . . . . . . . . . . .22
DOCK FOR DVD UNIT . . . . . . . . . . . . . . . . . . . . . . . . . . . . . . . . . . . . . . . . . . . .24
TROUBLE SHOOTING . . . . . . . . . . . . . . . . . . . . . . . . . . . . . . . . . . . . . . . . . . . .32
2
© 2006 Directed Electronics—all rights reserved
NON-TRANSFERABLE LIMITED CONSUMER WARRANTY
This product is sold with a LIMITED 90-day manufacturer’s warranty. Directed Electronics ("Directed")
promises to the original purchaser that the product will be free from defects in materials and workmanship
under normal use and condition for a period of ninety (90) days after the date of purchase. A sales receipt
and/or warranty registration card is required to provide proof of date of purchase of the Product.
Product defect occurring within the first 90 days after retail purchase by the end consumer will be repaired or
replaced with new or reconditioned part(s), at Directed’s sole election. To obtain warranty service, the Product
must be returned, postage pre-paid addressed to Directed, along with a legible copy of the receipt and the
following information: Consumer’s name, telephone number and address, authorized dealer/purchase
location name and address and product description. ALL PRODUCTS RECEIVED BY DIRECTED FOR
WARRANTY REPAIR WITHOUT PROOF OF PURCHASE WILL BE DENIED. Note: This warranty does not
cover labor costs for the removal or reinstallation of the Product. Product must be returned to the following
address: ATTN: WARRANTY DEPARTMENT, Directed Electronics, 1 Viper Way, Vista, CA 92081.
This warranty is non-transferable and does not apply to any Product that has been modified or used in a
manner contrary to its intended purpose, and does not cover damage to the Product caused by installation or
removal of the Product. This warranty is VOID if the product has not been purchased from Directed or an
authorized Directed dealer, or if the Product has been damaged by accident, unreasonable use, negligence,
acts of God, neglect, improper service or other causes not arising out of defect in materials or construction.
This warranty does not cover the elimination of externally generated static or noise, or the correction of
antenna problems or weak television reception, damage to tapes, video games, software, camcorders, discs,
speakers, accessories, electrical systems, cosmetic damage or damage due to negligence, misuse, abuse,
failure to follow operating instructions, accidental spills or customer applied cleaners, damage due to
environmental causes such as floods, airborne fallout, chemicals, salt, hail, windstorms, lightning or extreme
temperatures, damage due to accidents, road hazards, fire, theft, loss or vandalism, damage due to
improper connection to equipment of another manufacturer, modification of existing equipment, use of a faulty
tape cartridge or cleaning, or Product which has been opened or tampered with for any reason or which has
been damaged due to alteration or service performed by anyone other than Directed. This warranty is only
valid for sale of Product within the United States of America. Product sold outside of the United States of
America is sold "AS IS," and shall have NO WARRANTY, express or implied
THIS LIMITED WARRANTY IS THE ONLY WARRANTY FOR THIS PRODUCT. ALL OTHER WARRANTIES,
INCLUDING BUT NOT LIMITED TO EXPRESS WARRANTY, IMPLIED WARRANTY, WARRANTY OF
MERCHANTABILITY,
FITNESS
FOR
PARTICULAR
PURPOSE, AND
WARRANTY
OF
NON-INFRINGEMENT OF INTELLECTUAL PROPERTY ARE EXPRESSLY EXCLUDED TO THE MAXIMUM
EXTENT ALLOWED BY LAW, AND DIRECTED NEITHER ASSUMES NOR AUTHORIZES ANY PERSON TO
ASSUME FOR IT ANY LIABILITY IN CONNECTION WITH THE SALE OF THE PRODUCT. DIRECTED HAS
ABSOLUTELY NO LIABILITY FOR ANY AND ALL ACTS OF THIRD PARTIES INCLUDING ITS LICENSED
DEALERS OR INSTALLERS. IN NO EVENT WILL DIRECTED BE LIABLE FOR ANY INCIDENTAL,
SPECIAL OR CONSEQUENTIAL DAMAGES (INCLUDING LOSS OF PROFITS). BY PURCHASING THIS
PRODUCT, THE CONSUMER AGREES AND CONSENTS THAT ALL DISPUTES BETWEEN THE
CONSUMER AND DIRECTED SHALL BE RESOLVED IN ACCORDANCE WITH CALIFORNIA LAWS IN
SAN DIEGO COUNTY, CALIFORNIA.
Some states do not allow limitation on how long an implied warranty lasts. In such states, the limitations or
exclusions of this Limited Warranty may not apply. Some states do not allow the exclusion or limitation of
incidental or consequential damages. In such states, the exclusion or limitation of this Limited Warranty may
not apply to you. This Limited Warranty gives you specific legal rights, and you may have other rights which
vary from state to state.
© 2006 Directed Electronics—all rights reserved
3
SAFETY INSTRUCTIONS AND CAUTIONS
WARNING: TO REDUCE THE RISK OF FIRE OR ELECTRIC SHOCK, DO NOT EXPOSE THIS EQUIPMENT TO RAIN OR MOISTURE. TO REDUCE THE RISK OF FIRE OR ELECTRIC SHOCK AND ANNOYING INTERFERENCE, USE ONLY THE INCLUDED HARDWARE.
THIS MONITOR IS ONLY DESIGNED FOR REAR SEAT PASSENGER VIEWING AND IS NOT INTENDED
FOR VIEWING BY THE DRIVER WHILE THE VEHICLE IS IN MOTION. SUCH USE MAY DISTRACT THE
DRIVER OR INTERFERE WITH THE SAFE OPERATION OF THE VEHICLE, AND MAY ALSO VIOLATE
STATE LAW.
DIRECTED ELECTRONICS DISCLAIMS ANY LIABILITY FOR ANY BODILY INJURY, INCLUDING
FATALITIES, OR PROPERTY DAMAGE THAT MAY RESULT FROM ANY IMPROPER OR UNINTENDED
USES OF THIS PRODUCT.
SHOULD THE LCD PANEL BREAK OR LEAK FLUID, AVOID ALL CONTACT WITH THE UNIT. IF YOU
SHOULD COME IN CONTACT WITH THE LEAKED FLUID, WASH THE AFFECTED AREA THOROUGHLY
WITH WATER AND SEEK IMMEDIATE MEDICAL ATTENTION.
■
During operation, if the unit should over-heat or malfunction, switch off the unit and
see your dealer. Do not disassemble the unit as there are no user-serviceable parts in this
unit and the warranty will be voided.
■
Should there be a need to replace a blown fuse, turn off the unit and disconnect all
power to the player. Use only the correct rating fuse to avoid electrical damage to the unit.
■
Only operate the monitor as described in this guide. Attempts to use or modify this
monitor contrary to the descriptions in this guide may cause damage and void the warranty.
■
Extremes in temperature can cause abnormal display operation. This monitor has an
optimal operating temperature range between 32–120 degrees Fahrenheit. If the vehicle
interior is outside this range, do NOT operate the monitor until the temperature is within its
operating range.
■
Exposure to moisture or dust can cause harmful damage to the internal electronics. Do
not mount near cup holders or in areas where spills may occur.
■
This monitor is designed for use in vehicles with standard (-) 12 volt ground electrical
systems.
■
Do not operate for an extended period of time without the engine running or the
vehicle’s battery voltage may drop to levels precluding engine starting.
■
Do not drop the LCD panel or subject it to direct impact. This will damage the panel
and/or the back light element.
■
When operating the unit, avoid contact with the LCD panel.
■
Prevent metal or foreign objects being locked between the LCD screen and the
enclosure.
■
4
Keep unit away from equipment with strong magnets such as large loudspeakers.
© 2006 Directed Electronics—all rights reserved
■
Use the Proper Power Supply This product is designed to operate with a 12 volt DC, negative ground battery system.
■
Protect the Disc Mechanism
■
Avoid inserting any foreign objects into the disc driver of this player. Failure to observe
this may cause malfunction due to the precise mechanism of this unit.
■
Use Authorized Service Centers
■
Do not attempt to disassemble or adjust this precision product. Please refer to the
Service Center list that is included with this product for service assistance.
CAUTION: MOBILE DVD PLAYER IS A CLASS I LASER PRODUCT. HOWEVER THIS MOBILE DVD
PLAYER USES A VISIBLE/INVISIBLE LASER BEAM WHICH COULD CAUSE HAZARDOUS
RADIATION EXPOSURE IF VIEWED DIRECTLY. BE SURE TO OPERATE THE MOBILE DVD PLAYER
CORRECTLY AS PER THE INSTRUCTIONS.
USE OF CONTROLS OR ADJUSTMENTS OTHER THAN THOSE SPECIFIED HEREIN MAY RESULT IN
HAZARDOUS RADIATION EXPOSURE.
DO NOT OPEN COVERS AND - DO NOT REPAIR YOURSELF. REFER SERVICING TO QUALIFIED
PERSONNEL.
WARNING:
.. TO REDUCE THE RISK OF FIRE OR ELECTRIC SHOCK, DO NOT EXPOSE THIS EQUIPMENT TO
RAIN OR MOISTURE.
.. TO REDUCE THE RISK OF FIRE OR ELECTRIC SHOCK, AND RADIO INTERFERENCE, USE ONLY
THE RECOMMENDED ACCESSORIES.
.. THIS DEVICE IS INTENDED FOR CONTINUOUS OPERATION.
This product incorporates copyright protection technology that is protected by method
claims of certain U.S. patents and other intellectual property rights owned by Macrovision
Corporation and other rights owners. Use of this copyright protection technology must be
authorized by Macrovision Corporation, and is intended for home and other limited viewing
uses only unless otherwise authorized by Macrovision Corporation. Reverse engineering or
disassembly is prohibited.
Region Management Information
Region Management Information: This Mobile DVD Player is designed and manufactured to
respond to the Region Management Information that is recorded on a DVD disc. If the Region
number described on the DVD disc does not correspond to the Region number of this Mobile
DVD Player, this Mobile DVD Player cannot play this disc.
© 2006 Directed Electronics—all rights reserved
5
WELCOME
Thank you for your purchase of Directed’s Dockable / Portable. Prior to operating
this unit, please fully read this instruction manual and retain it for future reference.
Congratulations on your purchase of the world’s finest video entertainment system.
At Directed we are committed to bringing you the most technologically advanced
products available. We are pleased that you chose a Directed Mobile Media product.
Through years of critical testing and hand craftsmanship, we have created a wide
range of video entertainment products for your viewing pleasure.
The 10.2" Dockable / Portable Video System can provide all the functions of a
television as well as the functionality of a DVD player for your viewing pleasure.
This system incorporates the use of on screen display menu controls that allow you
to configure the system to suit your own personal preferences. For your listening
flexibility, audio can be heard by included infrared (wireless) headphones or the built
in wireless FM transmitter.
To view other great products from Directed Electronics, please visit the Directed
Mobile Media page at www.directedmobilemedia.com
WHAT’S INCLUDED
The following items are included with your purchase of the DP1020:
z AC/DC power adapter
z Carry Case
z AV Cable
z Remote Control
z Car adapter
z Headrest mounting bag
z Owner’s Manual
Home docking station (HD1020) with:
1) AM antenna
2) FM antenna
3) AC to DC power adaptor
4) Remote Control
6
© 2006 Directed Electronics—all rights reserved
IMPORTANT INFORMATION
PROPER USE
Do not touch the screen. Do not pull or hang from the fold down monitor door.
REPAIRS
If the monitor stops working for any reason, discontinue use immediately and consult with
your retailer about any necessary repairs.
RADIO/TV TUNER USE
When the unit is used in conjunction with a Radio/TV tuner, please assure that the receiver
is manufactured to receive television broadcast signals that are transmitted via terrestrial
radio waves. Reception quality will change and vary according to vehicle location and
weather conditions.
INSTALLATION
Avoid installing the monitor at a location, where it will be under direct sunlight or a hot air
vent. The operating temperature of the unit is from 32–120°F (0–50°C). Install the unit at
a dry location, where it is away from condensation.
Use only the correct size fasteners and cables during installation. Failure to do so may cause
a mechanical or electrical failure and create a fire hazard. The installation should be done
by an authorized Directed dealer.
NOTE: If the internal temperature of the vehicle is higher than the normal operating temperature, please allow the vehicle to cool down (or warm up if temperature is below
normal operating temperature) prior to operating the unit.
© 2006 Directed Electronics—all rights reserved
7
PICTURE QUALITY
The picture quality of this LCD unit depends strictly on its installed location. To
achieve the best picture quality, adjust the brightness control or viewing angle of
the unit until the optimum viewing is achieved.
FCC NOTICE
This device complies with Part 15 of FCC rules. Operation is subject to the following two conditions: (1) This device may not cause harmful interference, and (2) this
device must accept any interference received, including interference that may cause
undesirable operation.
Changes or modifications not expressly approved by the party responsible for compliance could void the user's authority to operate this device.
8
© 2006 Directed Electronics—all rights reserved
FEATURES
Features of the DP1020
Compatible with PAL DVD (Video CD)NTSC DVD (Video CD) and MP3
Rechargeable, battery powered DVD with 10" wide screen
10.2 Inch Color TFT Monitor Selectable Aspect Ratio 16:9, 4:3 & Screen Off
On Screen Display
Headphone Jack
Full Function Remote Control
IR headphone transmitter
FM radio transmitter for audio
Home dock (HD1020) with:
TV tuner
Radio (AM/FM) tuner
Clock / Alarm Clock
A/V interface
Speakers and amplifier
Battery charging station for DVD when docked.
© 2006 Directed Electronics—all rights reserved
9
DISC NOTES
Disc formats supported by this player
DVD
Video CD
CD
MP3
..
..
..
..
..
Handling and Cleaning
Dirt, dust, scratches and warped discs will cause misoperation.
Do not place stickers or make scratches on discs.
Do not warp discs.
A disc should always be kept in its case when not in use to prevent damage to
disc.
.. Do not place discs in the following places:
1. Direct sunlight.
2. Dirty, dusty and damp areas.
3. Near any heat sources.
4. On the seats or dashboard.
Disc Cleaning
Use a dry soft cloth to wipe the surface. If the disc is quite dirty, use a soft cloth
slightly moistured with isopropyl (rubbing) alcohol. Never use solvents such as
benzine, thinner or conventional record cleaners as they may mar the surface of the
disc.
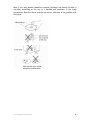
Preparing New Discs with Rough Spots
A new disc may have rough edges on its inside and outside edges. If a disc with
rough edges is used, disc may not be clamped correctly and the player will not play
the disc. Therefore, remove the rough edges in advance by using a ballpoint pen or
pencil as shown below. To remove the rough edges, run the side of the pen or
pencil around the inside and outside diameters of the disc.
10
© 2006 Directed Electronics—all rights reserved
Note: A disc may become somewhat scratched (although not enough to make it
unusable) depending on the way it is handled and conditions in the usage
environment. Note that these scratches are not an indication of any problem with
the player.
© 2006 Directed Electronics—all rights reserved
11
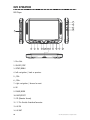
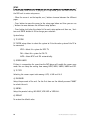
DVD OPERATION
DVD Player
13
14
15
16
1
2
3
4
5
8 6 12 7
9
10 17
11
1. Disc Slot
2. ON-OFF/STOP
3. SETUP/MENU
4. left navigation / back or previous
5. /VOL6. /VOL+
7. right navigation / forward or next
8. OK
9. PAUSE/MODE
10. MUTE/EJECT
11. IR (Remote Sensor)
12. 17 Pin Shuttle InterfaceConnector
13. AV IN
14. AV OUT
12
© 2006 Directed Electronics—all rights reserved
15. Earphone Jack
16. DC 12V IN
17. IR transmitters for IR headphones
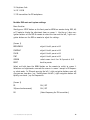
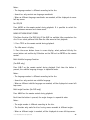
Portable DVD main unit system settings:
Menu Function
Shortly press SETUP button on the front panel or MENU on remote during DVD, AV,
or TV mode to display the adjustment items on screen 1. Use the up / down navigation buttons on the DVD or remote to select the item and the left / right navigation buttons on the DVD or remote to adjust the settings.
(Screen 1)
BRIGHTNESS
adjust 0 to 63 preset at 32
CONTRAST
adjust 0 to 63 preset at 32
COLOR
adjust 0 to 63 preset at 32
TINT
adjust 0 to 63 preset at 32
SCREEN
select screen size 4:3 or 16:9 preset at 16:9
RESET
back to presets
Select and hold down the MENU button on the remote to switch to screen 2.
Selections and adjustments are made the same as in screen 1 except in FM frequency select mode. In FM mode pressing the left / right navigation buttons once will
give you one step down / up. Holding down the left / right navigation button will
quickly scan down / up the frequencies.
(Screen 2)
IR
ON / OFF
3D(sound enhancement)
ON / OFF
FM
(Select frequency for FM transmitter.)
© 2006 Directed Electronics—all rights reserved
13
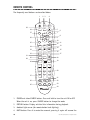
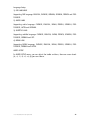
REMOTE CONTROL
The frequently used buttons are described below.
1
2 3
4
SOURCE
MUTE
DISPLAY
39
PIP
38
IR
37
TITLE
SETUP
ENTER
35
AUDIO
34
33
32
PROG
ANGLE
30
REPEAT
ZOOM
28
SLOW
27
MENU
1
2
3
4
5
6
7
8
9
MENU
PBC
0
10+
26
25
<
29
TV/AV
A-B
GOTO
DSP
CH+
BAND
AS/PS
AUTO
TV TUNER
8
10
12
14
16
CH-
11
13
15
17
<
31
SUB-T
6
7
9
36
5
FM
18
19
20
21
22
23
24
1. POWER and video SOURCE button: Press and hold to turn the unit ON or OFF.
When the unit is on, press SOURCE button to change the mode.
2. DISPLAY button: Display satistical disc information during playback.
3. Ambient light sensor (for remote button back lighting)
4. MUTE button: Press it to mute the surround, pressing it again will resume the
14
© 2006 Directed Electronics—all rights reserved
sound.
5. PIP button (Picture in Picture): This key is not used.
6. Select UP button: In case of menu mode, this button serves as cursor button
to select item ahead.
7. SETUP button: Display the SETUP menu.
8. ENTER button: Confirm the Track/Chapter selected with the numeric buttons or
selected with thecursor buttons on screen display.
9. Select RIGHT button (or increase): In case of menu mode, this button serves as
cursor button to select item right.
10. Select DOWN button: In case of menu mode, this button serves as cursor
button to select item back.
11. AUDIO button: Changing of the AUDIO soundtrack on multi-audio soundtrack
DVD disc. Changing of the sound mode of the VCD discs.
12. PAUSE button: Press it for the first time to pause the playback, press it again
will resume the playback.
13. FAST FORWARD button: Press to search forward rapidly, Press to search reverse
rapidly.
14. STOP button: Press it for the first time to pre-stop the unit playback, press it
again to stop the palyback.
15. NEXT button: Press to skip to the next track & press to skip back one track.
16. ANGLE button: Changing of the view angle on multi-angle DVD disc.
17. UP (display): Change the highlight bar (on screen display) up or down.
18. Quick press to display the screen menu, press and hold MENU button to display
the IR and FM on/off menu.
19. DOWN (display): Change the highlight bar (on screen display) up or down.
20. Numeric: 0-9, Numeric buttons; 10+, Tens digit select button, cooperatively
used with numeric buttons.
21. TV/AV (selects Tuner or Aux input): Shortly press it to select Tuner or Aux
input. In radio mode, press and hold BAND button to change the band
FM1/FM2/FM3/AM.
22. CH+: Channel up
23. CH-: Channel down
24. AUTO (auto programming of TV channels): In TV mode pressing AUTO button to
auto programe TV channels. In radio mode, press and hold AS/PS to enter auto
matic memory storing function.
© 2006 Directed Electronics—all rights reserved
15
25. DSP (channel display): GOTO is disc search button, cooperatively used with
numeric buttons. In TV mode, shortly press DSP to display the channel information.
26. TV Tuner power (A-B): Power function is not used in this model. In DVD mode,
press and hold A-B will allow a passage to be repeated continuously.
27. MENU/PBC: Changing between PBC ON and PBC OFF on the VCD disc.
28. SLOW: Changing for slow forward/reverse playback motion.
29. Image (wide, zoom, full, normal): Changing the image among wide, zoom, full
and normal.
30. REPEAT: Switch the Repeat mode of discs.
31. ZOOM (2, 3, 4, 1/2, 1/3, 1/4, OFF): Allows the picture to be increased in size.
32. PROGRAM: Allows the track played in the order you programmed.
33. BACK: Press to skip to the next track & press to skip back one track.
34. F.REV (Fast Reverse): Press to search forward rapidly, Press to search reverse
rapidly.
35. SUBTITLE (on/off): Display the subtitle language of the DVD disc (if the disc is
created with subtitles). Each time the button is pressed, the subtitle language
will change.
36. LEFT (Cursor): In case of menu mode, this button serves as cursor button to
select item left.
37. TITLE: Display the TITLE menu that is stored in DVD disc.
38. IR (on/off): Switch the infrared transmitting on or off.
39. FM (on/off): Press it to turn FM on/off.
16
© 2006 Directed Electronics—all rights reserved
BATTERY REPLACEMENT
The remote control unit uses (2) AAA batteries.
Inserting the Batteries
1. Open the battery compartment cover.
2. Insert the new battery. Make sure that the positive and negative terminals of
the battery are oriented as indicated.
3. Close the cover.
Using the Remote Control
1. Face the remote control towards the player front face IR mark (remote control
signal receiver).
2. Operation angle: About ±30 degree in each the direction of the front of the IR
mark.
PRECAUTIONS
1. Properly dispose of used battery.
2. Do not misuse battery by shorting the positive “+” and negative “-” terminal
or put it into fire. Overheating may cause the battery to explode and cause a
fire hazard.
3. If the remote is not to be used for a long period, remove the battery from the
remote to prevent damage from battery leakage.
4. To avoid accidents, prevent children from playing with the battery.
© 2006 Directed Electronics—all rights reserved
17
DVD OPERATION
TURN THE UNIT ON/OFF
Turning on the Player
After all connections are completed correctly, press and hold power button on the
front panel or press and hold on the remote control to turn on the power.
Turning off the Player
When the power is on, press and hold power button on the front panel or shortly
press and hold on the remote control to turn off the power.
Remote Sensor (IR)
Point the remote handset to the remote sensor IR on the DVD unit. Receiving the
signal from the remote handset.
Loading a Disc
Insert the disc into the disc slot on the left side of the unit with the printed side
facing up, the player will play the disc automatically.
Removing a Disc
When the disc stops playing, press and hold EJECT button on the front panel to
eject the disc.
BASIC PLAY
Stopping Playback
Shortly press button on the remote control one time to pre-stop the unit playback.
When OK button on the front panel or ENTER on the remote control is pressed,
normal playback will continue. Press button again will stop the playback and go
back to the DVD LOGO.
Pausing Play/Step Play
Shortly pressing on the front panel or on the remote control for the first time
during playback will stop playback temporarily. To return to normal playback, press
again or press ENTER button on the remote control or OK button on the front panel.
If you play a DVD/VCD/SVCD, press again to stop at the next picture (step
function). If you play a CD/MP3/Picture CD, pressing again is ineffective.
Rapid Forward / Rapid Reverse
Press & during playback. Each time the button is pressed, the speed of rapid
forward /reverse changes according to the disc as follows.
DVD/VCD/CD/MP3: Normal playback X2 X4 X8 X20
18
© 2006 Directed Electronics—all rights reserved
Slow Motion Playback (For DVD Only)
Press SLOW button on the remote control during play. Each time the button is
pressed, the speed of slow forward /reverse changes according to the disc as
follows.
DVD: Normal playback SF1/2 SF1/3 SF1/4 SF1/7 SF1/6 SF1/5
In slow motion state, press OK on the front panel or ENTER on the remote control
to recover the normal playback.
Skipping Track
Press / buttons on the remote control or press and hold / on the front panel
during playback. Press to skip to the next track, and press to skip to the previous
track.
Note: For some VCD2.0 discs (PBC-playback control), / buttons may be unavailable.
Volume Level Adjustment
Press and hold VOL+/- button on the front panel to increase or decrease the
volume level. Shortly press on the front panel or MUTE button on the remote
control will mute the sound, shortly press or MUTE again will resume the sound.
DVD Video Menu Play
When playing a DVD disc in the DVD player:
1) The disc will be played automatically and stop at menu picture.
2) Use / , / cursor buttons to move between the highlight bars in the menu.
3) Press OK button on the remote control or ENTER button on the front panel to
confirm the selected item. Mode Selection
Press and hold MODE button on the front panel or press SOURCE button on the
remote control to change the mode.
Menu Function
Shortly press SETUP button on the front panel during DVD, AV, TV mode to display
the adjustment items on the screen.
BRIGHTNESS 32
CONTRAST 32
COLOR 32
TINT 31
RESET
© 2006 Directed Electronics—all rights reserved
19
Press / buttons on the DVD unit or / buttons on the remote control to select among
BRIGHTNESS, CONTRAST, COLOR and TINT (For the unit with NTSC system) items and
etc. Press / buttons on the DVD unit shortly or press / buttons on the remote
control to adjust the corresponding item.
Menu Function
Press the MENU button on the remote control during DVD mode will return to the
MENU stored in the current disc.
PBC FUNCTION (For VCD Disc)
While the VCD disc is playing, press PBC button on the remote control to change
between PBC ON and PBC OFF on the VCD disc.
Repeat Playback
FOR DVD:
Press REPEAT button on the remote control to select repeat mode as follow:
CHAPTER REPEAT ON
TITLE REPEAT ON
REPEAT OFF
FOR VCD/CD:
In stop mode, press REPEAT button to select repeat mode as follow.
REP-ONE
REP-ALL
REPEAT OFF
1. Continuously repeat at the current chapter/track, when selected REP-ONE mode.
2. Select REP-ALL mode to continuously repeat all chapter/track on the current
disc.
3. When the player finish playback the current disc last chapter/track, it will stop
display the elapsed time. When selected REPEAT OFF mode, REP-ONE & REP-ALL
disappear at the screen display.
4. REPEAT feature does not support VCD2.0 (with PBC ON).
A-B
A-B repeat allows a passage to be repeated continuously. Press and hold A-B
button on the remote control at the start of the required passage, then press and
hold A-B button again at the end of the passage. To revert to normal playing, press
and hold A-B button again.
Multi-audio Language Funciton
For DVD
Shortly press AUDIO on the remote control during playback. Each time the button
is pressed, the audio soundtrack language changes on sequential order.
20
© 2006 Directed Electronics—all rights reserved
Notes:
- The language number is different according to the disc.
- Some discs only contain one language soundtrack.
- When no different language soundtracks are recorded, will be displayed at screen
left top corner.
For VCD/CD
Press AUDIO on the remote control during playback. It is possible to switch the
sound between monaural and stereo sound.
MONO LEFT MONO RIGHT STEREO
Title Menu Function (For DVD Only) If the DVD has multiple titles recorded on the
disc. It can select preferred title from the title menu to start playback.
1. Press TITLE on the remote control during playback.
- The title menu is display.
2. Press the cursor button shown in screen display, select preferred title by the
cursor button and confirm by OK button on the DVD unit or ENTER on the remote
control.
Multi-Subtitle Language Function
(For DVD only)
Press SUB-T on the remote control during playback. Each time the button is
pressed, the subtitle language changes in sequential order.
Notes:
- The language number is different according to the disc.
- Some discs only contain one subtitle language.
- When no different subtitle language are recorded, will be displayed at screen left
top corner.
Multi-angle Function (For DVD only)
Press ANGLE on the remote control during playback.
Each time the button is pressed, the angle changes in sequential order.
Notes:
- The angle number is different according to the disc.
- The function only works for discs having scenes recorded at different angles.
- When no different angle is recorded, will be displayed at screen left top corner.
© 2006 Directed Electronics—all rights reserved
21
SETUP
In DVD mode, when the disc is playing or in stop mode, press and hold SETUP on
the DVD unit to enter setup menu.
.. When the cursor is on the topside, use / buttons to move between the different
pages.
.. Press button to move the cursor to the setup page below and then you can use
/ buttons to move between the different setup options.
.. Press button to display the choice list for each setup option and then use / buttons and ENTER button or OK to change your selection.
System Setup
1) TV SYSTEM
TV SYSTEM setup allows to select the system to fit to the color system of the TV to
be connected.
NTSC—Select this system for NTSC TV.
PAL—Select this system for PAL TV.
AUTO—Select NTSC and PAL automatically.
2) SCREEN SAVER
If there is no operation for some time the DVD player will enable the screen saver
mode. You can setup the waiting time among 1MIN, 5MIN, 10MIN, 30MIN and OFF.
3) TV TYPE
Selecting the screen aspect ratio among 4:3PS, 4:3LB and 16:9.
4) PASSWORD
Setup the password of the unit. For the first time use the default password “0000”
to unlock the unit.
5) RATING
Setup the parental rating: NO ADULT, KID SAFE or VIEW ALL.
6) DEFAULT
To restore the default value.
22
© 2006 Directed Electronics—all rights reserved
Language Setup
1) OSD LANGUAGE
Supporting OSD language: ENGLISH, CHINESE, GERMAN, SPANISH, FRENCH and PORTUGUESE.
2) AUDIO LANG
Supporting audio language: CHINESE, ENGLISH, JAPAN, FRENCH, SPANISH, PORTUGUESE, LATIN and GERMAN.
3) SUBTITLE LANG
Supporting subtitle language: CHINESE, ENGLISH, JAPAN, FRENCH, SPANISH, PORTUGUESE, GERMAN and OFF.
4) MENU LANG
Supporting MENU language: CHINESE, ENGLISH, JAPAN, FRENCH, SPANISH, PORTUGUESE, GERMAN and LATIN.
AUDIO SETUP
In AUDIO SETUP menu, you can adjust the treble and bass, there are seven levels
(b, -4, -2, 0, +2, +4, #) you can choose.
© 2006 Directed Electronics—all rights reserved
23
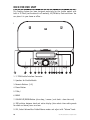
DOCK FOR DVD UNIT
This Docking System has been designed exclusively for the shuttle models with
built-in TV Tuner (not functional in all markets), AF/FM Radio, Clock and Alarm. You
can place it in your home or office.
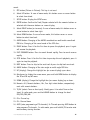
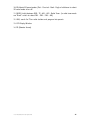
Front View and Keys Location
1
2
3
4
5
6
7
8 9 10 11 12 13
2
14
1. 17 PIN Shuttle Interface Connector
2. Speakers for Shuttle Models
3. Numeric Buttons (1-5)
4. Power Button
5. TUN+/6. BAND
7. VOLUME UP/DOWN Button (also sleep / snooze / and clock - alarm time set)
8. DSP,switches between clock and active display (also selects time setting mode
for clock and alarm) turns on alarm
9. SEL, Select Volume-Bass-Treble-Balance modes and adjust with "Volume" knob.
24
© 2006 Directed Electronics—all rights reserved
10. EQ,Selects EQ preset modes (Flat - Classical - Rock - Pop) or hold down to select
3D sound mode on or off
11. MODE, Switch between DVD - TV - AV1 - AV2 - Radio Tuner (in radio tuner mode
use "Band" switch to select FM1 - FM2 - FM3 - AM)
12. AMS, search for TV or radio stations and program into presets
13. LCD Display Window
14. IR (Remote Sensor)
© 2006 Directed Electronics—all rights reserved
25
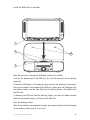
Back View and Connection
1
2
8
3
4
5
6
7
1. Earphone jack.
2. AM ANT—Connect the AM radio antenna to this jack.
3. TV ANT—Connect the coaxial cable from an antenna or cable TV system
to this jack.
4. AV OUT—AUDIO/VIDEO output interface.
5. AV IN—AUDIO/VIDEO input interface.
6. DC 12V IN—DC 12V input interface.
7. Release Button—Press this button to release the shuttle unit.
8. FM antenna—connect the FM radio antenna to this jack.
26
© 2006 Directed Electronics—all rights reserved
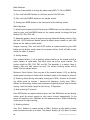
Install the DVD Player to the Dock
1
2
4
3
Note: Be sure to turn the power off before installing the shuttle.
a. Insert the bottom part of the DVD unit (1) into the lower part of the docking
station(2)
b. Center the DVD player in the docking station (refer to the arrowhead instruction).
There are two holes on the bottom of the DVD unit, Gently push the DVD player into
the docking station, the four tabs (2)(4) on the docking station, will buckled with
the DVD unit.
c. Removing the DVD unit from the docking station, just press the Release button
(refer to the previous page), and tack out the DVD unit.
Open the Docking Station
After all connections are completed correctly, press power button on the front panel
of the docking station to turn it on or off.
© 2006 Directed Electronics—all rights reserved
27
Mode Selection
There are three method to change the mode among DVD, TV, AV and RADIO.
1) Press and hold MODE button on the front panel of the DVD unit.
2) Press and hold SOURCE button on the remote control.
3) Shortly press MODE button on the front panel of the docking station.
Radio Operation
1) Selecting the frequency band Shortly press BAND button on the docking station
panel or press and hold BAND button on the remote control to change the band
among: FM1..FM2..FM3..AM.
2) Automatic memory storing & program scanning Automatic memory storing: Press
and hold AS/PS button on remote control for about several seconds or press AMS
button on the docking station panel.
Program scanning: Press and hold AS/PS button on remote control or press AMS
button on the docking station panel to scan preset station. And it will hold at each
station for about 5 seconds.
3) Setting memory
Press numeric buttons (1~5) on docking station panel or on the remote control to
preset stations at radio mode. Each band stores up to five preset stations. The
stations might be FM1, FM2, FM3 and AM. The operation is as below: Store in
Memory: Press and hold several sec onds. The current listening station will be
stored into the number button.
Retrieve a Preset Station: Press any one of the numeric buttons (1~5) on docking
station panel to retrieve a station which had been stored in the memory in advance.
4) Selecting station During radio mode, shortly press TUN+/- buttons on the docking station panel to increase / decrease the frequency, shortly press TUN+/buttons on the docking station panel to decrease frequency by one step of channel
spacing. Hold the button longer for fast tuning. TV Operation
1) Auto searching TV channels
Press AUTO button on remote control or press and hold AMS button on the docking
station panel for several seconds to start search channel automatically. In the
course of searching, press CHbutton on the remote control or TUNon the docking
station panel to stop searching.
2) Selecting channel
Press CH+/- buttons on remote control or TUN+/- buttons on the docking station
panel to choose channel up or down. The numeric buttons (0,1~9) allows to select
28
© 2006 Directed Electronics—all rights reserved
the corresponding channel directly.
3) Screen display
Press DSP button on remote control or on docking station panel to display the
current status such as TVch. If there is no operation for more than five seconds,
the information on the screen will disappear.
Setting the Time
1) Setting the clock
Setting the Clock or Alarm Time (Home Dock must be powered on)
1) Setting the clock
Briefly press DSP button on docking station panel, the time display will appear on
the home dock LCD display. Press SEL button once, the hour will flash. Press SEL
button again the minute will flash. you can adjust the hour or minute's value while
flashing by rotating the VOLUME knob clockwise or counter-clockwise to increase
or decrease the value. Then press DSP again to confirm the change.
2) Setting the alarm time Press and hold DSP button on the docking station panel
will enter the alarm time setting mode. Like setting the clock, press SEL button to
select hour or minute, then rotating VOLUME knob to adjust the hour or minute's
value.
To cancel the alarm, just press and hold DSP button to open the alarm time, then
press and hold DSP again to cancel.
[Alarm icon display is a bell just left of and above the AM/PM indicator of the home
dock LCD display. Be sure icon is displayed or alarm will not function. The alarm
must be set every time you need to use it. It will not automatically repeat.]
Note:
a. When alarming, press any button (except the VOLUME knob) to stop alarming.
b. When alarming, Press SNOOZE (VOLUME) button will stop alarming for three
minutes. After three minutes will alarm will sound again. (NOTE: This will only
function once and the alarm time will be moved forward by 3 minutes.)
AUTO TURN ON (Can only be set while the home dock is powered off)
3) Auto turn on the docking station (wake to music) can only be set when the
docking station is powered off. Briefly press DSP button on the home docking
station panel to set the desired time to auto turning on the home docking station.
Be sure you have set the volume level and source selection (MODE) to the desired
selections.
© 2006 Directed Electronics—all rights reserved
29
[Auto-on icon display is a musical note just left of and above the AM/PM indicator
of the home dock LCD display. Be sure icon is displayed. If the ALARM (bell) icon
is displayed pressing the DSP button will cycle through the modes, but check your
auto-on time after stepping through the modes to make sure the auto-on time did
not clear.]
Note: To set the time to auto turn on the home docking station is the same as
setting the alarm time above. (see step 2)
AUTO TURN OFF / SLEEP (Can only be set while the home dock is powered on)
Auto turn off (Sleep mode) can only be set when the docking station is powered on
and working (except alarming). Press and hold Push SLEEP (VOLUME) button until
15 MIN appears in the home dock screen. Pushing and releasing the VOLUME
button will step through 15, 30, 35, 60, 90, 120 Minutes and OFF
When SLEEP is activated the word SLEEP is displayed in the lower left corner of the
home dock LCD display.
2) Setting the alarm time
Press and hold DSP button on the docking station panel will enter the alarm time
setting mode. Like setting the clock, press SEL button to select hour or minute,
then rotating VOL UME knob to adjust the hour or minute’s value.
To console the alarm, just press and hold DSP button to open the alarm time, then
press and hold DSP again to console.
Note:
a. When alarming, press any button (except the VOLUME knob) to stop alarming.
b. When alarming, Press SNOOZE(VOLUME) button will stop alarming for two seconds. After two seconds will alarm again.
3) Auto turn on/off the docking station
When the docking station is not on working, shortly press DSP button on the docking station panel to set the time of auto turning on the docking station. When the
docking station is on working (except alarming), press and hold Push SLEEP (VOLUME) button on the docking station panel to set the time of auto turning off the
docking station.
Note: To set the time of auto turning on/off the docking station is like to setting
the clock.
Other Operation
1) EQ
Shortly press EQ button on docking station panel to to turn on qualization function
30
© 2006 Directed Electronics—all rights reserved
and to select desired audio mode among CLAS..ROCK..POP..FLAT. Press and hold EQ
button to change the 3D mode ON or OFF.
2) SEL
Press SEL button to select the desired adjustment mode. The adjustment mode will
change in the following order: VOL..BAS..TRE Rotating the volume knob (11)
clockwise or counter-clockwise to adjust the desired sound quality.
© 2006 Directed Electronics—all rights reserved
31
TROUBLE SHOOTING
If it appears that your DVD unit is faulty, first consult this checklist. It may be that
something simple has been overlooked. Under no circumstances should you try to
repair the player yourself, as this will invalidate the warranty. Only qualified
service personnel can remove the cover or service this player.
NO POWER
.. Check if the on/off button on the front of the player is set to on.
.. Check if AC or DC power plug of the mains unit is properly connected.
.. Check if there is power at the AC or DC outlet.
.. Check if the voltage is properly connected to the DVD unit or if the voltage of
the battery is too low.
NO PICTURE
.. Select the correct TV or AV input.
.. Check the video connection.
DISTORTED PICTURE
.. Check the disc for fingerprints and clean with soft cloth, wiping from center to
edge.
.. Sometimes a small amount of picture distortion may appear. This is not a malfunction.
COMPLETELY DISTORTED PICTURE
.. The disc format is not according to the TV-set used (PAL/NTSC).
NO COLOR IN PICTURE
.. The disc format is not according to the TV-set used (PAL/NTSC).
DISC DOES NOT PLAY
.. Ensure the disc label is upwards.
.. Clean the disc.
.. Check if the disc is defective by trying another disc.
NO SOUND
.. Check audio connections.
.. If using a HIFI amplifier, try another sound source.
32
© 2006 Directed Electronics—all rights reserved
.. If there is no sound when using wireless headphone, Check if the IR of/off is set
to ON and make sure the batteries in the headphones are good.
NO RETURN TO START-UP SCREEN WHEN DISC IS REMOVED
.. Press and hold power button to turn off the unit, then press it again to turn on
the unit.
THE PLAYER DOES NOT RESPOND TO THE REMOTE CONTROL
.. Aim the remote control directly at the sensor on the front of the player.
.. Avoid all obstacles which may interfere with the signal path.
.. Inspect or replace the remote control batteries.
DISTORTED OR B/W PICTURE
.. The disc format is not according to the TV-set used (PAL/NTSC).
BUTTONS DO NOT WORK
.. Turn the player off and on with the power on/off button on the front of the
player.
© 2006 Directed Electronics—all rights reserved
33
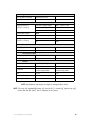
SPECIFICATIONS
Supply voltage: 12V DC (11V-15V), test voltage 14.4V, negative ground
Current consumption: Less than 2A
Battery charge voltage: 12V DC
Signal system: Compositive video 1.0±0.2Vp-p 75.
Discs played:
(1) DVD-VIDEO disc
(2) Compact disc (CD-DA/CD-R/CD-RW/MP3/MP4)
(3) VIDEO CD
Audio output level: 10k. (2 ch 2.0±0.5Vrms)
Audio signal output characteristics:
(1) Frequency response: 20 Hz-20 kHz
(2) S/N ratio: 80 dB (JIS)
(3) Wow and Flutter Below measurable limits
Note:
Specifications and design are subject to modification, without notice, due to
improvements in technology. This product incorporates copyright protection
technology that is protected by method claims of certain U.S. patents and other
intellectual property rights owned by Macrovision Corporation and other rights
owners. Use of this copyright protection technology must be authorized by
Macrovision Corporation, and is intended for home and other limited viewing uses
only unless otherwise authorized by Macrovision Corporation. Reverse engineering
or disassembly is prohibited.
34
© 2006 Directed Electronics—all rights reserved
System
Laser (If DVD is installed)
Semiconductor laser
Signal Formats
NTSC, PAL
Audio Characteristics
Frequency Response
(If DVD is installed)
DVD Video (PCM@ 96kHz)
20 Hz - 40 kHz ± 1dB
DVD Video (PCM@ 48kHz)
20 Hz - 20 kHz ± 1dB
CD
20 Hz - 20 kHz ± 1dB
Signal-to-Noise Ratio
90dB
Harmonic Distortion
0.01%
Dynamic Range
DVD Video
95dB
CD
95dB
(If DVD is installed)
Line level A/V outputs
Audio (RCA jacks)
2 Vrms
Video (RCA jack)
1 V p-p @75 ohms
Line level A/V inputs
Audio (RCA jack)
2 Vrms
Video (RCA jack)
1 V p-p
General
Power Requirements
14.4 VDC, 3.35 amps
5A fuse
Power Consumption
42.6 watts
Dimensions
345 mm x 65 mm x 282 mm
(length/height/width)
15.25 in. x 3 in. x 18.75 in.
(length/height/width)
Mass
2.3 kg
3 lbs
Operating Temperature
0°–50°C
32°–120°F
Operating Humidity
10% to 90%
NOTE: Specifications and design are subject to change without notice.
NOTE: The unit will automatically power off once the ACC is turned off (ignition key off).
Ensure that the RED (+ACC) wire is connected to ACC power.
© 2006 Directed Electronics—all rights reserved
35
36
© 2006 Directed Electronics—all rights reserved
© 2006 Directed Electronics—all rights reserved
37
The company behind this system is Directed Electronics.
Since its inception, Directed has had one purpose, to provide consumers with the finest vehicle security, car stereo
products, rear seat entertainment, and accessories available. The recipient of more than 20 patents in the field of
advanced electronic technology, Directed is ISO 9001 registered.
Quality Directed Electronics products are sold and serviced throughout North America and around the world.
Call (800) 274-0200 for more information about our products and services.
Directed® is committed to delivering world-class quality products
and services that excite and delight our customers.
Directed Electronics
Vista, CA 92081
www.directed.com
© 2006 Directed Electronics—All rights reserved
N97103 04-06