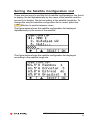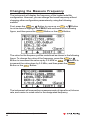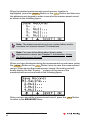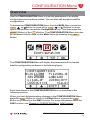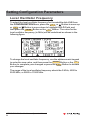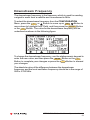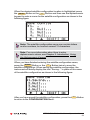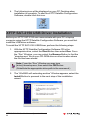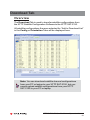
1
XFTP SAT-2150
Satellite Meter
OPERATION
MANUAL
Trilithic Company Profile
Trilithic is a privately held manufacturer founded in 1986 as an engineering
and assembly company that built and designed customer-directed
products for telecommunications, military and industrial customers. From
its modest beginnings as a two-man engineering team, Trilithic grew over
the years and broadened its offerings of RF and microwave components by
adding broadband solutions to its product line. This was accomplished
with the acquisition of components manufacturer Cir-Q-Tel and instruments
manufacturer Texscan.
Today, Trilithic is an industry leader providing telecommunications
solutions for major broadband, RF and microwave markets around the
world. As an ISO 9000:2001 certified company with over 40 years of
collective expertise in engineering and custom assembly, Trilithic is
dedicated to providing quality products, services and communications
solutions that exceed customer expectations.
Trilithic is comprised of three major divisions:
•
Broadband Instruments & Systems
Offers test, analysis and quality management solutions for the
major cable television systems worldwide.
•
RF Microwave Components
Provides components and custom subsystems for companies
specializing in cellular, military and other wireless applications.
•
Emergency Alert Systems
Leading supplier of government-mandated emergency alert
systems used by HFC service providers.
XFTP SAT-2150 Satellite Meter - Operation Manual
2
Table of Contents
1. General Information .......................................................................... 7
Helpful Website ................................................................................. 7
Where to Get Technical Support ........................................................ 7
How this Manual is Organized ........................................................... 8
Conventions Used in this Manual ....................................................... 9
Precautions ....................................................................................... 9
2. Introduction ...................................................................................... 11
What is the XFTP SAT-2150? ........................................................... 11
Supplied Equipment ......................................................................... 11
Mechanical Features ....................................................................... 12
Basic Navigation .............................................................................. 14
Let’s Get Started ............................................................................. 14
Selecting Menu Icons ...................................................................... 15
Using Softkeys ................................................................................ 15
Backlight ......................................................................................... 16
Using the Alphanumeric Keypad ...................................................... 16
Entering Numeric Values ........................................................... 16
Entering Alphanumeric Characters ............................................. 17
Battery Operation and Charging ....................................................... 18
3. Easy Finder Function ...................................................................... 21
Overview .......................................................................................... 21
Using Easy Finder ........................................................................... 21
4. UTILITY Menu ................................................................................... 29
Overview .......................................................................................... 29
Measurement Units ......................................................................... 30
Local Longitude ............................................................................... 30
Local Latitude .................................................................................. 31
Power Saving ................................................................................... 32
5. LOAD Menu ...................................................................................... 33
Overview .......................................................................................... 33
Load Config Function ....................................................................... 34
Sorting the Satellite Configuration List ....................................... 35
Loading a Satellite Configuration ............................................... 36
Load Record Function ...................................................................... 37
XFTP SAT-2150 Satellite Meter - Operation Manual
3
6. OPERATION Menu ............................................................................ 39
Overview .......................................................................................... 39
Orientation Function ........................................................................ 41
Azimuth .................................................................................... 42
Elevation ................................................................................... 44
Polarization ............................................................................... 44
AIM Function ................................................................................... 45
Signal Level ............................................................................... 46
Signal Quality ............................................................................ 46
MEASURE Function ........................................................................ 47
Changing the Measure Frequency ............................................. 48
Saving Measurement Records ................................................... 49
7. CONFIGURATION Menu ................................................................... 51
Overview .......................................................................................... 51
Setting Configuration Parameters ..................................................... 52
Local Oscillator Frequency ........................................................ 52
Downstream Frequency ............................................................. 53
Symbol Rate ............................................................................. 54
LNB Power Supply .................................................................... 55
Satellite Longitude ..................................................................... 55
22 KHz Status Switch ............................................................... 56
DiSEqC Switching Control ......................................................... 57
Saving Configuration Parameters ............................................... 58
8. DOWNLOAD Menu ........................................................................... 61
Overview .......................................................................................... 61
Download Function .......................................................................... 62
Delete Config Function ..................................................................... 63
9. XFTP Satellite Configuration Software ......................................... 65
Overview .......................................................................................... 65
Software Installation Instructions ...................................................... 65
XFTP SAT-2150 USB Driver Installation ............................................ 66
Orientation Tab ................................................................................ 70
Overview .................................................................................... 70
Orientation Display .................................................................... 71
Channel Configuration Table ...................................................... 73
Country and City Tab ....................................................................... 75
Overview .................................................................................... 75
Adding New User Locations ...................................................... 75
Deleting Existing User Locations ............................................... 76
XFTP SAT-2150 Satellite Meter - Operation Manual
4
Config Tab ........................................................................................ 77
Overview .................................................................................... 77
Creating Satellites ..................................................................... 77
Creating Satellite Channels ....................................................... 78
Deleting Satellites & Channels .................................................. 79
Adding to Download List ............................................................ 80
Download Tab .................................................................................. 81
Overview .................................................................................... 81
Exporting Download List ............................................................ 82
Importing Download List ............................................................ 83
Downloading Data to the Satellite Meter .................................... 84
10. Appendix ........................................................................................ 87
Specifications .................................................................................. 87
Warranty Information .............................................................................. 91
XFTP SAT-2150 Satellite Meter - Operation Manual
5
THIS PAGE LEFT INTENTIONALLY BLANK
XFTP SAT-2150 Satellite Meter - Operation Manual
6
1
1. General Information Helpful Website
The following website contains general information which may be of
interest to you:
http://www.trilithic.com
Trilithic’s website contains product specifications and information, tips,
release information, marketing information, Frequently Asked Questions
(FAQs), bulletins and other technical information. You can also check this
website for product updates.
Where to Get Technical Support
Trilithic technical support is available Monday through Friday from 8:00AM
to 5:00PM EST. Callers in North America can dial 1-317-895-3600 or
1-800-344-2412 (toll free). International callers should dial 1-317-895-3600
or fax questions to 1-317-895-3613. You can also e-mail technical support
at [email protected].
For quicker support response when calling or sending e-mail, please
provide the following information:
•
Your name and your company name
•
The technical point of contact (name, phone number, e-mail)
•
The XFTP SAT-2150 serial number and firmware version number
•
A detailed description of the problem you are having, including any
error or information messages
XFTP SAT-2150 Satellite Meter - Operation Manual
7
How this Manual is Organized
This manual is divided into the following chapters:
•
Chapter 1, “General Information” provides Trilithic contact
information and describes how this Operation Manual is
structured.
•
Chapter 2, “Introduction” describes what the XFTP SAT-2150 is
and what it does. This chapter describes the mechanical features
of the instrument, and the equipment that is supplied with the
instrument. This chapter also describes the battery operation and
charging.
•
Chapter 3, “Easy Finder Function” describes how to use the
simplified satellite dish setup function.
•
Chapter 4, “UTILITY Menu” describes how to set your
measurement units, local longitude and latitude, and power saving
feature.
•
Chapter 5, “LOAD Menu” describes how to load saved satellite
configurations and measurement records.
•
Chapter 6, “OPERATION Menu” describes how to orient a satellite
dish, fine tune your satellite reception for the loaded satellite
configuration, and measure the signal reception as well as saving
measurement records.
•
Chapter 7, “CONFIGURATION Menu” describes how to confirm or
manually edit and save satellite configurations.
•
Chapter 8, “DOWNLOAD Menu” describes how to download
satellite configurations to your instrument and how to delete
existing satellite configurations from your instrument.
•
Chapter 9, “XFTP Satellite Configuration Software” describes how
the configuration software works.
•
Chapter 10, “Appendix” shows the technical specifications of the
XFTP SAT-2150.
XFTP SAT-2150 Satellite Meter - Operation Manual
8
Conventions Used in this Manual
This manual has several standard conventions for presenting information.
•
Connections, menus, menu options, and user entered text and
commands appear in bold.
•
Section names, Web and email addresses appear in italics.
Note: A note is information that will be of assistance to
you related to the current step or procedure.
CAUTION: A caution alerts you to any condition that could
cause a mechanical failure or potential loss of data.
WARNING: A warning alerts you to any condition that
could cause personal injury.
Precautions
WARNING: Do not use the XFTP SAT-2150 in any manner
not recommended by the manufacturer.
CAUTION: Since the battery is delivered with the minimum
amount of charge, you should charge the battery before
first use.
CAUTION: Do not use any charger other than the charger
that is supplied with the instrument. Doing so may result in
damage to the instrument and/or battery and will void your
warranty.
XFTP SAT-2150 Satellite Meter - Operation Manual
9
THIS PAGE LEFT INTENTIONALLY BLANK
XFTP SAT-2150 Satellite Meter - Operation Manual
10
2
2. Introduction What is the XFTP SAT-2150?
The XFTP SAT-2150 Satellite Meter makes satellite dish installation and
alignment simple and fast. The satellite meter provides the following
functions:
•
The satellite meter displays the satellite dish orientation (azimuth,
elevation, and polarization) for a selected satellite and dish
location.
•
Provides signal level and quality indicators (bar graphs) along with
an audio tone proportional to signal strength for fine tuning the dish
position.
•
Provides a measurement screen with signal level, C/N, and BER
measurements to confirm a quality signal with the dish setup.
The XFTP SAT-2150 Satellite Meter includes the following features:
•
Provides LNB power for dish alignment without a receiver or TV
connection.
•
Stores up to 80 satellite configurations and 80 measurement
records.
•
XFTP Satellite Configuration Software permits easy download of
satellite configurations.
•
22 KHz and DiSEqC switching.
Supplied Equipment
The XFTP SAT-2150 comes with the following:
•
XFTP SAT-2150 Satellite Meter
•
Instrument Bag
•
XFTP SAT-2150 Battery Charger
•
RF Input Connector
•
USB Data Cable
•
XFTP Satellite Configuration Software CD-ROM
•
Operation Manual
XFTP SAT-2150 Satellite Meter - Operation Manual
11
Mechanical Features
1
2
3
4
5
9
10
11
12
13
6
7
8
14
1. RF Input - BNC or F-Type input connection.
2. LCD Display - Displays the various parameters for the selected
function. The display includes a backlight that can be enabled/
disabled by the user.
3. Function Keys - There are four functions keys that correspond to
the softkey label that appears on the LCD Display directly above
the respective function key.
4. Direction Keys - Use these keys to highlight the desired field on
the LCD Display.
5. Alphanumeric Keypad - Use these keys to input numeric values
as well as alphabetical characters including the decimal point and
positive/negative symbols.
XFTP SAT-2150 Satellite Meter - Operation Manual
12
6. POWER Button - Use this button to turn the instrument on and
off.
7. Charge Indicator Light - This light will be illuminated when the
charger is connected to the instrument and AC power.
8. USB Port - Use this port to connect the instrument to a PC.
9. ENTER Button - Use this button to select the currently highlighted
field on the LCD Display.
10. C/S Button - Use this button to return to the MAIN Menu from any
screen or to backspace when entering numeric values or
alphanumeric characters.
11. LOAD Button - Use this button to directly access the LOAD
Menu.
12. SET Button - Use this button to directly access the
CONFIGURATION Menu from the MAIN Menu. This button is also
used to sort the satellite configuration list by name or longitude.
13. FIND Button - Use this button to access the Easy Finder
Function. This permits the user to step through the dish setup
procedure. For more information on how to use the FIND Function,
see Chapter 3: Easy Finder Function.
14. DC Charge Port - Use this port to connect the XFTP SAT-2150
charger to the instrument.
XFTP SAT-2150 Satellite Meter - Operation Manual
13
Basic Navigation
The instrument is very flexible and easy to use. Using a combination of
Icons and Menus you can navigate through a variety of modes and
functions. It is important that you take a moment to become familiar with
the basic navigational style and conventions of the instrument, so you can
be more efficient using your new instrument.
Let’s Get Started
Turn the instrument power on by pressing the
left of the keypad.
POWER
Button at the bottom
The instrument will briefly display an introduction screen with the model
name, serial number, and firmware version number.
After a few seconds, the instrument will display the Main Menu as shown
in the figure below.
XFTP SAT-2150 Satellite Meter - Operation Manual
14
Selecting Menu Icons
The Main Menu displays a variety of icons which are labeled with a
corresponding title when selected. This is your home page or “Desktop” for
the instrument and will be your starting point. Notice that the currently
selected icon is highlighted and the other icons remain black.
There are five function icons shown on the Main Menu. Selecting these
icons will load the corresponding menu including; OPERATION, LOAD,
CONFIGURATION, UTILITY, and DOWNLOAD.
To select an icon simply press the F1 Button or the
Direction
Button(s) to move left or press the F2 Button or
Direction
Button(s) to move right in the direction toward the icon you wish to select.
With the desired icon highlighted, press the ENTER Button or the F4
Button.
Using Softkeys
Most of the screens in the instrument utilize softkeys to access various
modes, menus, and functions. These softkeys are accessed by simply
using the corresponding button located on the keypad directly below the
display.
Note: The functions on these softkey labels may vary
depending on the instrument’s current operating mode.
XFTP SAT-2150 Satellite Meter - Operation Manual
15
Backlight
The instrument includes a backlight for the LCD Display Screen. To turn on
the backlight from the Main Menu, select the Softkey by pressing the
F3
Button. To turn off the backlight from the Main Menu, select the
Softkey by pressing the F3 Button.
Using the Alphanumeric Keypad
The instrument makes use of an alphanumeric keypad similar to that of a
telephone for entering both numbers and letters.
•
The
•
The
•
The
•
The
•
The
•
The
•
The
•
The
•
The
1
Button supports the number 1.
2
Button supports A, B, C, a, b, c, 2.
3
Button supports D, E, F, d, e, f, 3.
4
Button supports G, H, I, g, h, i, 4.
5
Button supports J, K, L, j, k, l, 5.
6
Button supports M, N, O, m, n, o, 6.
7
Button supports P, Q, R, S, p, q, r, s, 7.
8
Button supports T, U, V, t, u, v, 8.
9
Button supports W, X, Y, Z, w, x, y, z, 9.
ABC
DEF
GHI
JKL
MNO
PQRS
TUV
WXYZ
Note: The upper case characters are not used when
searching for files to load. The instrument defaults to lower
case characters when searching for files.
Entering Numeric Values
Within several screens, you must enter numeric values. Use the
Direction Button(s) to highlight the desired field to change, press
the ENTER Button or the F4 Button to select the OK Softkey, and
then press the alphanumeric buttons to enter the desired value.
For example to enter the number 12.0: Press
F4
+
1
+
2
ABC
+
+
Then press the ENTER Button or the F4 Button to select the OK
Softkey, to enter the value into the instrument.
XFTP SAT-2150 Satellite Meter - Operation Manual
16
0
Entering Alphanumeric Characters
You can enter alphanumeric data, such as Satellite Configuration
Names and Record Names by using the
Direction
Button(s) to highlight the desired field to change, press the ENTER
Button or the F4 Button, and then press the alphanumeric buttons
to enter the desired value.
To enter the next character, you must press the ENTER Button, F4
Button, or Direction Button to shift the cursor to the next character.
For example to enter the text “TEST”, perform the following steps:
•
Use the
field to change.
•
Press the ENTER Button or the F4
Softkey to edit the highlighted field.
•
Press 8 to enter “T” in the field and then press the ENTER
Button, F4 Button, or Direction Button to move the
cursor to the next character.
•
Press
•
Press 7 + 7 + 7 + 7 to enter “S” in the field and then press
the ENTER Button, F4 Button, or Direction Button to
move the cursor to the next character.
•
Press
•
Press the ENTER Button or the
the changes.
Direction Button(s) to highlight the desired
Button to select the OK
TUV
3
+ 3 to enter “E” in the field and then press the
F4
ENTER Button,
Button, or Direction Button to move
the cursor to the next character.
DEF
PQRS
8
TUV
DEF
PQRS
PQRS
PQRS
to enter “T” in the field.
F4
Button twice to accept
Note: If you make an error when entering a number or
name, you can press the C/S Button or Direction
Button to backspace and then re-enter the text.
XFTP SAT-2150 Satellite Meter - Operation Manual
17
Battery Operation and Charging
The XFTP SAT-2150 operates on a high performance built-in 8.4 Volt Ni-MH
battery and will typically provide more than seven (7) hours of operation
(more than three (3) hours with LNB powered) if fully charged.
CAUTION: Since the battery is delivered with the minimum
amount of charge, you should charge the battery before
first use.
The time to fully charge the battery is typically less than four (4) hours
while turned off. When you charge the battery for the first three times, it is
recommended that you charge the battery for five (5) hours.
To charge the battery, connect one end of the charge cube to the DC
Charge Port on the bottom of the instrument and plug the charge cube into
an AC power supply. When the Charge Indicator Light next to the POWER
Button is illuminated, the instrument is charging. The LED on the charger
will illuminate red while fast charging the XFTP SAT-2150. The LED will be
green after full charge and current is reduced to trickle charge.
The instrument has an automatic power saving feature that can be
enabled/disabled from the UTILITY Menu. For more information on the
automatic power saving feature, See Chapter 4: UTILITY Menu,
Power Saving.
XFTP SAT-2150 Satellite Meter - Operation Manual
18
The instrument has a battery voltage indicator that can be found on the top
of the UTILITY Menu as shown in the following figure. When the battery is
below 7.7 Volts (± 0.2 Volts), the instrument will beep. After the instrument
beeps, you must charge the battery or the instrument will automatically
shut down.
CAUTION: Do not use any charger other than the charger
that is supplied with the instrument. Doing so may result in
damage to the instrument and/or battery and will void your
warranty.
XFTP SAT-2150 Satellite Meter - Operation Manual
19
THIS PAGE LEFT INTENTIONALLY BLANK
XFTP SAT-2150 Satellite Meter - Operation Manual
20
3
3. Easy Finder Function Overview
The Easy Finder Function is designed to make satellite finding easy and
fast for beginner’s. This permits the user to step through a satellite dish
setup procedure without selecting each step from the MAIN Menu. The
Easy Finder Function includes the following steps:
•
Loading the satellite configuration.
•
Display of required dish orientation.
•
Signal and quality level meter for fine tuning of the satellite dish
position.
•
Display of measurement screen to confirm setup.
The Easy Finder Function is designed for an instrument that has already
been configured with the local longitude and latitude and the desired
satellite configuration is stored in the instrument.
Note: You must setup your local longitude and latitude
before using the Easy Finder Function, see Chapter 4:
UTILITY Menu for more information.
Using Easy Finder
1. Turn the instrument power on by pressing the
the bottom left of the keypad.
POWER
Button at
2. Press the FIND Button. The instrument will briefly display the
Easy Finder introduction screen.
XFTP SAT-2150 Satellite Meter - Operation Manual
21
3. After a few seconds, the Load Satellite Function will appear as
shown in the figure below. To highlight the desired satellite
configuration, press the F1 or F2 Button to move up and
down through the list one satellite configuration at a time or press
the
or
Direction Button to move up or down the list one page
at a time.
Note: To sort the satellite configuration list by name or
longitude, press the SET Button to switch between
views. For more information, see Chapter 5: LOAD Menu,
Load Config Function, Sorting the Satellite Configuration
List.
4. When the desired satellite configuration is highlighted, press the
F4
ENTER Button or the
Button to load the configuration or
press the F3 Button to exit the Easy Finder Function. When
loading the satellite configuration, the instrument will briefly
display the text “Loading...” in place of the name of the satellite
configuration.
XFTP SAT-2150 Satellite Meter - Operation Manual
22
5. After you have loaded the satellite configuration, the instrument
will display the Orientation Function as shown in the following
figure. Using the parameters shown below, you can position a
satellite dish:
AZ (Azimuth) - This is the compass direction to the location of
your satellite measured from true south (positive values are
East and Negative values are West). This is the left/right
adjustment on the satellite dish.
EL (Elevation) - This is the angle between the satellite and the
horizon from your location. This is the up/down adjustment on
the satellite dish.
PO (Polarization) - This is the correction between where the
satellite dish is located relative to the curvature of the Earth
and the satellite’s signal beam. The satellite is either
horizontally or vertically polarized, but due to the longitude of
the satellite dish, the dish’s feedhorn must be rotated to
correctly match the beam’s polarization. This is the clockwise
or counter-clockwise tilt/skew of the satellite dish LNB
feedhorn.
Note: For more information on how to obtain the best
orientation of your satellite dish, see Chapter 6:
OPERATION Menu, Orientation Function.
6. Once you have adjusted the satellite dish orientation to the values
shown by the Orientation Function, press the ENTER Button or
the F4 Button to proceed to the AIM Function or press the
F3
Button to go back to the Load Satellite Function.
XFTP SAT-2150 Satellite Meter - Operation Manual
23
7. The instrument will display the AIM Function as shown in the
following figure. Using the indicators shown below, you can fine
tune the setup of a satellite dish:
S (Signal Level) - This is the satellite signal level indicated as
a percentage. The bar graph directly corresponds to the
percentage shown to the right.
Q (Signal Quality) - This is the satellite signal quality indicated
as a percentage. The bar graph directly corresponds to the
percentage shown to the right.
In the AIM Function, an audible tone may be heard when the
signal level is greater than approximately 45% signal level (-67
dBm or -20 dBmV or 40 dBμV) with a pitch proportional to signal
strength to aid in fine tuning the dish position. The audio may be
enabled or disabled by pressing the F2 Button.
If the satellite dish is equipped with DiSEqC motor control, press
the or Direction Button once to make the DiSEqC motor move
left or right. Then press the same button again to stop. You can
also press the 0 Button to send the DiSEqC motor to the zero
position.
Align the satellite dish to get the maximum values of signal level
and quality.
When the XFTP SAT-2150 is locked onto the satellite signal, the
text <OK> will appear in the upper right portion of the screen and
the satellite name will be displayed.
Note: For more information on how to obtain the best
signal level and quality, see Chapter 6: OPERATION
Menu, AIM Function.
XFTP SAT-2150 Satellite Meter - Operation Manual
24
8. Once you have fine tuned the satellite dish to acquire the best
signal level and quality, press the ENTER Button or the F4
Button to proceed to the MEASURE Function to view your
measurement results and to save your measurement record or
press the F3 Button to go back to the Orientation Function.
9. The instrument will display the MEASURE Function as shown in
the following figure. When in the MEASURE Function the
instrument will display the name of the loaded satellite
configuration and perform measurements of signal level, bit error
rate, and carrier-to-noise ratio.
When the XFTP SAT-2150 is locked onto the satellite signal, the
text <OK> will appear in the upper right portion of the screen.
The DiSEqC motor control may also be used in the MEASURE
Function if needed. For more information, see Chapter 6:
Operation Menu, AIM Function.
Note: The Signal Level, BER, and C/N measurements are
for reference only and are only to be used to confirm the
quality of your satellite dish setup.
10. To save your measurement results, press the ENTER Button or
the F4 Button to proceed to the Save Record Function or
press the F3 Button to go back to the AIM Function.
XFTP SAT-2150 Satellite Meter - Operation Manual
25
11. The instrument will display the Save Record Function as shown
in the following figure. To select the memory location for your
measurement record, press the F1 or F2 Button to move up
and down through the list one location at a time or press the
or
Button to move up or down the list one page (4 locations) at a
time.
Note: You may select an empty location or write over an
existing measurement record location.
12. When the desired measurement record location is highlighted,
press the ENTER Button or the F4 Button and then use the
alphanumeric keypad to enter a name for the measurement record
as shown in the following figure:
Note: The measurement record can contain letters and/or
numbers, but cannot exceed 12 characters.
Note: For more information about how to enter
alphanumeric values, see Chapter 2: Introduction, Using
the Alphanumeric Keypad.
XFTP SAT-2150 Satellite Meter - Operation Manual
26
13. When you have finished entering the measurement record name,
press the ENTER Button or the F4 Button twice to save the
measurement record or press the F3 Button to exit the Save
Record Function. When saving the measurement record, the
instrument will briefly display the text “Saving...” in place of the
name of the measurement record as shown in the following figure:
14. You have now finished using Easy Finder Function, press the
C/S
Button to exit the Easy Finder Function.
XFTP SAT-2150 Satellite Meter - Operation Manual
27
THIS PAGE LEFT INTENTIONALLY BLANK
XFTP SAT-2150 Satellite Meter - Operation Manual
28
4
4. UTILITY Menu Overview
Once you have charged your battery and have become familiar with the
instrument’s control and navigational features, you are ready to setup your
instrument. The UTILITY Menu allows you to setup your measurement
units, local longitude and latitude, and power saving feature.
Note: You must setup your local longitude and latitude
before trying to perform a satellite dish setup. It is not
required, but is recommended, to setup the measurement
units and power saving feature.
To access the UTILITY Menu from the MAIN Menu, press the F1 , ,
or Button to move left or F2 , , or Buttons to move right in the
direction toward the Utility Icon, and then press the ENTER Button or the
F4
Button.
The UTILITY Menu will appear as shown in the following figure.
The battery voltage is shown at the top right corner of the screen. For more
information about battery charging, see Chapter 2: Introduction, Battery
Operation and Charging.
Each item shown in the UTILITY Menu is described in the following
sections. When you have finished making changes in the UTILITY Menu,
press the F4 Button to return to the Main Menu.
XFTP SAT-2150 Satellite Meter - Operation Manual
29
Measurement Units
To select the measurement units from the UTILITY Menu, press the F1
or
Button to move up or F2 or
Button to move down to highlight
the Unit Field as shown in the following figure.
To change the measurement unit, press the ENTER Button or the F4
Button repeatedly to scroll through the following measurement units; dBm,
dBuV, or dBmV.
Local Longitude
To select the local longitude from the UTILITY Menu, press the F1 or
Button to move up or F2 or
Button to move down to highlight the
Longitude Field as shown in the following figure.
To change the longitude, press the ENTER Button or the F4 Button,
use the alphanumeric keypad to enter the value for the local longitude
where the satellite dish is located, and then press the ENTER Button or
the F4 Button to save your changes.
The range of longitude is from -180º to +180º, where longitude is measured
from the Prime Meridian (which is the longitude that runs through
Greenwich, England), with positive values going east and negative values
going west.
XFTP SAT-2150 Satellite Meter - Operation Manual
30
Local Latitude
To select the local latitude from the UTILITY Menu, press the F1 or
Button to move up or F2 or
Button to move down to highlight the
Latitude Field as shown in the following figure.
To change the latitude, press the ENTER Button or the F4 Button, use
the alphanumeric keypad to enter the value for the local latitude where the
satellite dish is located, and then press the ENTER Button or the F4
Button to save your changes.
The range of latitude is from -180º to +180º, where latitude is measured
from the equator, with positive values going north and negative values
going south.
XFTP SAT-2150 Satellite Meter - Operation Manual
31
Power Saving
To select the power saving feature from the UTILITY Menu, press the
F1
or
Button to move up or F2 or
Button to move down to
highlight the Shutdown Field as shown in the following figure.
To change the power saving setting, press the ENTER Button or the F4
Button repeatedly to scroll through the following options; always, 3m,
10m, or 30m.
When you select always, the instrument will always remain on. When you
select 3m, 10m, or 30m the instrument will shutdown after the specified
amount of time as described below.
When the power saving feature is activated and the user has not performed
any keyboard actions, the instrument will beep three times as the idle time
approaches the user determined shutdown time. If the user doesn’t press
any keyboard buttons and the idle time exceeds the user determined
shutdown time, the instrument will beep three times and then
automatically shut down.
XFTP SAT-2150 Satellite Meter - Operation Manual
32
5
5. LOAD Menu Overview
Once you have setup your local longitude and latitude in the UTILITY
Menu, you are ready to load a satellite configuration using the LOAD
Menu. You can also load a previously saved measurement record using the
LOAD Menu.
Note: You must load a satellite configuration before trying
to perform a satellite dish setup.
The XFTP SAT-2150 will remember the last satellite configuration that was
loaded before the instrument was powered off.
To access the LOAD Menu, press the F1 , , or Button to move left
or F2 , , or Buttons to move right in the direction toward the Load
Icon, and then press the ENTER Button or the F4 Button. The LOAD
Menu can also be accessed directly by pressing the LOAD Button.
The LOAD Menu will appear as shown in the following figure.
XFTP SAT-2150 Satellite Meter - Operation Manual
33
Load Config Function
To access the Load Config Function from the LOAD Menu, press the
F1
or
Button to move up or F2 or
Button to move down to
highlight the Configuration Field as shown in the following figure, and
then press the ENTER Button or the F4 Button.
The Load Config Function will appear as shown in the following figure.
Note: The instrument can store up to 80 pre-configured
satellite configurations.
Satellite configurations may be viewed, changed, and saved using the
CONFIGURATION Menu, see Chapter 7: CONFIGURATION Menu.
New satellite configurations may be downloaded to the satellite
configuration list using the XFTP Satellite Configuration Software. For more
information on how to use this software, see Chapter 9: XFTP Satellite
Configuration Software.
XFTP SAT-2150 Satellite Meter - Operation Manual
34
Sorting the Satellite Configuration List
There are two ways to sort the list of satellite configurations; the first is
to display the list alphabetically by the name of the satellite and the
second is to display the list according to the satellite longitude. To
change the way the satellite configuration list is sorted, press the
SET
Button to switch between views.
The figure below shows the satellite configuration list displayed
alphabetically by the name of the satellite.
The figure below shows the satellite configuration list displayed
according to the satellite longitude.
XFTP SAT-2150 Satellite Meter - Operation Manual
35
Loading a Satellite Configuration
To load a satellite configuration from the Load Config Function
perform one of the following methods:
•
Highlight the desired satellite configuration by pressing the
F1
or F2 Button to move up and down through the list
one satellite configuration at a time or press the
or
Button to move up or down the list one page at a time.
•
When the satellite configuration list is sorted alphanumerically
by the name of the satellite, you can use the alphanumeric
keypad to enter the name (or partial name) of the desired
satellite configuration and then press the ENTER Button or
the F4 Button to directly access the desired satellite
configuration.
When the desired satellite configuration is highlighted, press the
F4
ENTER Button or the
Button to load the configuration. The
instrument will briefly display the text “Loading...” in place of the name
of the satellite configuration and will beep. Once the satellite
configuration has loaded, the configuration details will be displayed as
shown in the following figure.
To complete the loading of the displayed satellite configuration and
return to the Main Menu, press the ENTER Button or the F4
Button.
Note: The satellite configuration will not be loaded unless
it is confirmed by pressing the ENTER Button or the F4
Button.
To discard the selected satellite configuration and choose a different
satellite configuration, press the F3 Button and follow the steps
outlined above.
XFTP SAT-2150 Satellite Meter - Operation Manual
36
Load Record Function
To access the Load Record Function from the LOAD Menu, press the
F1
or
Button to move up or F2 or
Button to move down to
highlight the Record Field as shown in the following figure, and then press
the ENTER Button or the F4 Button.
The Load Record Function will appear as shown in the following figure.
Note: The instrument can store up to 80 measurement
records.
Note: All records will be displayed in alphanumeric order
regardless of the record memory location where they were
stored.
XFTP SAT-2150 Satellite Meter - Operation Manual
37
To load a measurement record from the Load Record Function perform
one of the following methods:
•
Highlight the desired measurement record by pressing the F1
or F2 Button to move up and down through the list one record
at a time or press the
or
Button to move up or down the list
one page (4 records) at a time.
•
Use the alphanumeric keypad to enter the name (or partial name)
of the desired record and then press the ENTER Button or the
F4
Button to directly access the desired record.
When the desired measurement record is highlighted, press the ENTER
Button or the F4 Button to load the record. The instrument will briefly
display the text “Loading...” in place of the name of the measurement
record and will beep. Once the measurement record has loaded, the record
details will be displayed.
To return to the Load Record Function, press the
F4
Button.
ENTER
Button or the
To discard the selected measurement record and choose a different record,
press the F3 Button and follow the steps outlined above.
XFTP SAT-2150 Satellite Meter - Operation Manual
38
6
6. OPERATION Menu Overview
The OPERATION Menu provides the functions needed for performing a
complete satellite dish setup.
1. Measure Function - This function is used to perform
measurements of signal level, bit error rate, and carrier-to-noise
ratio to confirm the signal quality of the satellite dish setup.
2. Aim Function - This function is used to display graphically the
signal strength and quality levels of the satellite signal as well as
to provide an audible tone for easy satellite dish setup.
3. Orientation Function - This function is used to display the
azimuth, elevation, and polarization of the satellite dish for the
selected satellite and dish location.
Note: You must setup your local longitude and latitude
before using the OPERATION Menu, see Chapter 4:
UTILITY Menu for more information.
Note: You must manually load a satellite configuration
before using the OPERATION Menu, see Chapter 5: LOAD
Menu for more information.
XFTP SAT-2150 Satellite Meter - Operation Manual
39
To access the OPERATION Menu from the MAIN Menu, press the F1 ,
, or Button to move left or F2 , , or Buttons to move right in the
direction toward the Operation Icon, and then press the ENTER Button or
the F4 Button.
The OPERATION Menu will appear as shown in the following figure.
XFTP SAT-2150 Satellite Meter - Operation Manual
40
Orientation Function
To access the Orientation Function from the OPERATION Menu, press
the F1 or
Button to move up or F2 or
Button to move down to
highlight the Orientation Field as shown in the following figure, and then
press the ENTER Button or the F4 Button.
The instrument will display the Orientation Function as shown in the
following figure. Using the following parameters, you can set the position of
a satellite dish:
Each item shown in the Orientation Function is described in the following
sections.
While in the Orientation Function, press the ENTER Button or the F4
Button to proceed to the AIM Function, or press the F3 to return to the
OPERATION Menu.
XFTP SAT-2150 Satellite Meter - Operation Manual
41
Azimuth
This is the compass direction to the location of your satellite and is
displayed as AZ on your instrument. This is the left/right adjustment
on the satellite dish.
The electronic compass on the left portion of the screen indicates the
direction that your satellite dish must face. The following guidelines
will help you determine the direction that your satellite dish must face.
•
Northern Hemisphere - If your location is in the northern half of
the earth, the letter displayed on the electronic compass will
be N. The arrow must point to South when you align the
satellite dish. Positive azimuth values are East and negative
azimuth values are West.
•
Southern Hemisphere - If your location is in the southern half
of the earth, the letter displayed on the electronic compass
will be S. The arrow must point to North when you align the
satellite dish. Positive azimuth values are West and negative
azimuth values are East.
Adjusting for Magnetic Declination
Satellites are positioned by true coordinate positions. This is
slightly different than magnetic positions shown by a compass.
When using a compass you must correct your magnetic compass
reading for magnetic deviation by subtracting (west of 0) or adding
(east of 0) the value shown for your area in the figure on the facing
page.
For example, to find a satellite located at 101º longitude:
•
From Indianapolis, Indiana (Latitude: 39.8º, Longitude:
-86.0º) the azimuth will be -22.7º. The compass must be
corrected by adding 4.0º, so the corrected compass
direction is -18.7º or 18.7º West of True South.
•
From Los Angeles, California (Latitude: 34.0º, Longitude: 118.24º) the azimuth will be 29.0º. The compass must be
corrected by subtracting 14.0º, so the corrected compass
direction is 15.0º or 15.0º East of True South.
XFTP SAT-2150 Satellite Meter - Operation Manual
42
XFTP SAT-2150 Satellite Meter - Operation Manual
43
Elevation
This is the angle between the satellite and the horizon from your
location and is displayed as EL on your instrument. This is the up/
down adjustment on the satellite dish. All commercial satellites in
geostationary orbit are located 22,300 miles above the Earth. The
curvature of the Earth means that the farther you advance East or
West from the satellite orbital location, the more you will need to
adjust your elevation. For example, if the satellite orbital location is
located directly over the state of Texas, your elevation in New York will
be lower than that of someone living in Texas.
Polarization
This is the correction between where the satellite dish is located
relative to the curvature of the Earth and the satellite’s beam. The
satellite signal is either horizontally or vertically polarized, but due to
the longitude of the satellite dish location, the satellite dish’s feedhorn
must be rotated to correctly match the beam’s polarization. This is the
clockwise or counter-clockwise tilt/skew of the satellite dish LNB
feedhorn and is displayed as PO on your instrument. A negative
polarization is in a clockwise direction from vertical and a positive
polarization is in a counterclockwise direction from vertical.
XFTP SAT-2150 Satellite Meter - Operation Manual
44
AIM Function
To access the AIM Function from the OPERATION Menu, press the F1
or
Button to move up or F2 or
Button to move down to highlight
the Aim Field as shown in the following figure, and then press the ENTER
Button or the F4 Button.
The instrument will display the AIM Function as shown in the following
figure. Using the indicators shown below, you can fine tune the setup of a
satellite dish:
In the AIM Function, an audible tone may be heard when the signal level is
greater than approximately 45% signal level (-67 dBm or -20 dBmV or 40
dBμV) with a pitch proportional to signal strength to aid in fine tuning the
dish position. The audio may be enabled or disabled by pressing the F2
Button.
If the satellite dish is equipped with DiSEqC motor control, press the or
Direction Button once to make the DiSEqC motor move left or right.
Then press the same button again to stop. You can also press the 0
Button to send the DiSEqC motor to the zero position.
XFTP SAT-2150 Satellite Meter - Operation Manual
45
Align the satellite dish to get the maximum values of signal level and
quality.
When the XFTP SAT-2150 is locked onto the satellite signal, the text
<OK> will appear in the upper right portion of the screen and the satellite
name will be displayed.
Each item shown in the AIM Function is described in the following
sections.
While in the AIM Function, press the ENTER Button or the F4 Button
to proceed to the MEASURE Function, or press the F3 to return to the
OPERATION Menu.
Signal Level
This is the satellite’s RF signal level indicated as a percentage and is
displayed as S on your instrument.
To obtain a better signal level, adjust the Azimuth and Elevation of your
satellite dish. Using the bar graph and speaker tone, you can easily
find the maximum signal level. When the bar graph is longer and the
speaker’s tone is higher, the signal level is stronger.
Signal Quality
This is the satellite signal quality indicated as a percentage and is
displayed as Q on your instrument.
To obtain a better signal quality, adjust the polarization (tilt/skew) of
the satellite dish. Using the bar graph, you can easily find the
maximum signal quality. When the bar graph is longer, the signal
quality is better.
XFTP SAT-2150 Satellite Meter - Operation Manual
46
MEASURE Function
To access the MEASURE Function from the OPERATION Menu, press the
F1
or
Button to move up or F2 or
Button to move down to
highlight the Measure Field as shown in the following figure, and then
press the ENTER Button or the F4 Button.
The instrument will display the MEASURE Function as shown in the
following figure. When in the MEASURE Function the instrument will
display the frequency of the loaded satellite configuration and perform
measurements of signal level, bit error rate, and carrier-to-noise ratio for
the designated frequency.
When the XFTP SAT-2150 is locked onto the satellite signal, the text
<OK> will appear in the upper right portion of the screen.
The DiSEqC motor control may also be used in the MEASURE Function if
needed. For more information, see Chapter 6: Operation Menu, AIM
Function.
Each item shown in the MEASURE Menu is described in the following
sections. While in the MEASURE Function, press the F3 to return to
the OPERATION Menu.
Note: The Signal Level, BER, and C/N measurements are
for reference only and are only to be used to confirm the
quality of your satellite dish setup.
XFTP SAT-2150 Satellite Meter - Operation Manual
47
Changing the Measure Frequency
The instrument will display the frequency of the loaded satellite
configuration. However, you can change the tuned frequency without
changing other configuration parameters by using the following
method.
First, press the F1 or
Button to move up or F2 or
Button
to move down to highlight the FREQ Field as shown in the following
figure, and then press the ENTER Button or the F4 Button.
The value for the frequency will be underlined as shown in the following
figure. To change the value of the frequency, press the F1 or
Button to increment the value up by 0.5 MHz or F2 or
Button to
increment the value down by 0.5 MHz, and then press the ENTER
Button or the F4 Button.
The instrument will now perform measurements of signal level, bit error
rate, and carrier-to-noise ratio for the designated frequency.
XFTP SAT-2150 Satellite Meter - Operation Manual
48
Saving Measurement Records
To access the Save Record Function from the MEASURE Function,
Button to move up or F2 or
Button to
press the F1 or
move down to highlight the <Save> Field as shown in the following
figure, and then press the ENTER Button or the F4 Button.
The instrument will display the Save Record Function as shown in
the following figure. To select the memory location for your
measurement record, press the F1 or F2 Button to move up and
down through the list one location at a time or press the
or
Button to move up or down the list one page (4 locations) at a time.
Note: You may select an empty location or write over an
existing measurement record location.
XFTP SAT-2150 Satellite Meter - Operation Manual
49
When the desired measurement record memory location is
highlighted, press the ENTER Button or the F4 Button and then use
the alphanumeric keypad to enter a name for the measurement record
as shown in the following figure:
Note: The measurement record can contain letters and/or
numbers, but cannot exceed 12 characters.
Note: For more information about how to enter
alphanumeric values, see Chapter 2: Introduction, Using
the Alphanumeric Keypad.
When you have finished entering the measurement record name, press
the ENTER Button or the F4 Button twice to save the measurement
record. When saving the measurement record, the instrument will
briefly display the text “Saving...” in place of the name of the
measurement record as shown in the following figure:
After you have saved the measurement record, press the
to return to the MEASURE Menu.
XFTP SAT-2150 Satellite Meter - Operation Manual
50
F3
Button
7
7. CONFIGURATION Menu Overview
Use the CONFIGURATION Menu to view the parameters of a satellite
configuration that has been loaded. You can also edit and save satellite
configurations.
To access the CONFIGURATION Menu from the MAIN Menu, press the
F1
, , or Button to move left or F2 , , or Buttons to move
right in the direction toward the Configuration Icon, and then press the
F4
ENTER Button or the
Button. The CONFIGURATION Menu can also
be accessed directly while on the Main Menu by pressing the SET
Button.
The CONFIGURATION Menu will display the parameters of the loaded
satellite configuration as shown in the following figure.
Each item shown in the CONFIGURATION Menu is described in the
following sections.
When you have finished making changes in the CONFIGURATION Menu,
press the F3 Button to return to the Main Menu or press the F4
Button to go directly to the AIM Function. For more information about the
AIM Function, see Chapter 6: OPERATION Menu, AIM Function.
XFTP SAT-2150 Satellite Meter - Operation Manual
51
Setting Configuration Parameters
Local Oscillator Frequency
To select the local oscillator frequency for the satellite dish LNB from
Button to move up
the CONFIGURATION Menu, press the F1 or
or F2 or
Button to move down to highlight the LO Field, and
then press the ENTER Button or the F4 Button. The value for the
local oscillator frequency (in MHz) will be underlined as shown in the
following figure.
To change the local oscillator frequency, use the alphanumeric keypad
to enter the new value, and then press the ENTER Button or the F4
Button to complete your changes or press the F3 Button to discard
your changes.
The range of the local oscillator frequency should be 0 MHz, 4500 to
5500 MHz, or 9500 to 11500 MHz.
XFTP SAT-2150 Satellite Meter - Operation Manual
52
Downstream Frequency
The downstream frequency is the frequency which is used for sending
a signal to earth from a satellite and is measured in MHz.
To select the downstream frequency from the CONFIGURATION
Menu, press the F1 or
Button to move up or F2
Button to
move down to highlight the F Field, and then press the ENTER Button
or the F4 Button. The value for the downstream frequency will be
underlined as shown in the following figure.
To change the downstream frequency, use the alphanumeric keypad to
enter the new value, and then press the ENTER Button or the F4
Button to complete your changes or press the F3 Button to discard
your changes.
The absolute value of the difference between the downstream
frequency and the local oscillation frequency should be in the range of
950 to 2150 MHz.
XFTP SAT-2150 Satellite Meter - Operation Manual
53
Symbol Rate
The symbol rate is the speed of the data transmission. It is the bit rate
of the digital signal and is measured in Mb/s.
To select the symbol rate from the CONFIGURATION Menu, press the
F1
or
Button to move up or F2 or
Button to move down to
highlight the SR Field, and then press the ENTER Button or the F4
Button. The value for the symbol rate will be underlined as shown in
the following figure.
To change the symbol rate, use the alphanumeric keypad to enter the
new value, and then press the ENTER Button or the F4 Button to
complete your changes or press the F3 Button to discard your
changes.
The symbol rate should be in the range of 1000 to 45000 Mb/s.
XFTP SAT-2150 Satellite Meter - Operation Manual
54
LNB Power Supply
The LNB power supply is the power supplied from the instrument to
the satellite dish LNB and is measured in Volts.
To select the LNB power supply from the CONFIGURATION Menu,
press the F1 or
Button to move up or F2 or
Button to
move down to highlight the LNB Field.
To change the LNB power supply, press the ENTER Button or the
F4
Button to choose from 0V, 13V, or 18V.
Satellite Longitude
The satellite longitude is the position of the satellite over the earth.
To select the satellite longitude from the CONFIGURATION Menu,
press the F1 or
Button to move up or F2 or
Button to
move down to highlight the L Field, and then press the ENTER Button
or the F4 Button. The value for the satellite longitude will be
underlined as shown in the following figure.
To change the satellite longitude, use the alphanumeric keypad to
enter the new value, and then press the ENTER Button or the F4
Button to complete your changes or press the F3 Button to discard
your changes.
The satellite longitude is from -180° to +180°, where east longitude is
positive and west longitude is negative.
XFTP SAT-2150 Satellite Meter - Operation Manual
55
22 KHz Status Switch
The 22 KHz status switch is sometimes used when the satellite dish
being used has multiple LNBs. If there is only one LNB being used,
the switch should be Off.
To select the status of the 22 KHz switch from the CONFIGURATION
Menu, press the F1 or
Button to move up or F2 or
Button
to move down to highlight the 22KHz Field.
To change the status of the 22 KHz switch, press the
or the F4 Button to choose from Off or On.
XFTP SAT-2150 Satellite Meter - Operation Manual
56
ENTER
Button
DiSEqC Switching Control
The DiSEqC switching control permits the user to control the state of 2
or 4 position DiSEqC switches at the satellite dish.
To select the DiSEqC switching control from the CONFIGURATION
Menu, press the F1 or
Button to move up or F2 or
Button
to move down to highlight the DiSEqC Field.
To change the DiSEqC switching control status, press the ENTER
Button or the F4 Button to set to OFF or to select one of the
following switch positions: 1/2, 2/2, 1/4, 2/4, 3/4, or 4/4.
XFTP SAT-2150 Satellite Meter - Operation Manual
57
Saving Configuration Parameters
If any parameter is changed in the CONFIGURATION Menu, it is
enabled when using the AIM or MEASURE Functions. However, if you
wish to recall your new configuration at a later time, you must save
your configuration changes.
To save your configuration changes from the CONFIGURATION Menu,
press the F1 or
Button to move up or F2 or
Button to
move down to highlight the <Save> Field as shown in the following
figure, and then press the F3 Button.
The instrument will display the Save Config Function as shown in the
following figure. To highlight the desired memory location for your
satellite configuration, press the F1 or F2 Button to move up
and down through the list one location at a time or press the
or
Button to move up or down the list one page at a time.
Note: You may select an empty location or write over an
existing configuration location.
XFTP SAT-2150 Satellite Meter - Operation Manual
58
When the desired satellite configuration location is highlighted, press
the ENTER Button or the F4 Button and then use the alphanumeric
keypad to enter a name for the satellite configuration as shown in the
following figure:
Note: The satellite configuration name can contain letters
and/or numbers, but cannot exceed 12 characters.
Note: For more information about how to enter
alphanumeric values, see Chapter 2: Introduction, Using
the Alphanumeric Keypad.
When you have finished entering the satellite configuration name,
press the ENTER Button or the F4 Button twice to save the
satellite configuration. When saving the satellite configuration, the
instrument will briefly display the text “Saving...” in place of the name
of the satellite configuration as shown in the following figure:
After you have saved the satellite configuration, press the
to return to the CONFIGURATION Menu.
F3
Button
XFTP SAT-2150 Satellite Meter - Operation Manual
59
THIS PAGE LEFT INTENTIONALLY BLANK
XFTP SAT-2150 Satellite Meter - Operation Manual
60
8
8. DOWNLOAD Menu Overview
Use the DOWNLOAD Menu to download satellite configurations from the
XFTP Satellite Configuration Software. You can also delete existing
satellite configurations from your instrument using the DOWNLOAD Menu.
Note: Before you can download satellite configurations to
your XFTP SAT-2150, you must perform the following tasks
in this order:
1. Install the XFTP SAT-2150 USB Driver.
2. Connect the instrument to your PC or laptop
computer using the included USB cable.
3. Turn the instrument on.
4. Start the XFTP Satellite Configuration Software.
To access the DOWNLOAD Menu from the MAIN Menu, press the F1 ,
, or Button to move left or F2 , , or Buttons to move right in the
direction toward the Download Icon, and then press the ENTER Button or
the F4 Button.
The DOWNLOAD Menu will appear as shown in the following figure.
XFTP SAT-2150 Satellite Meter - Operation Manual
61
Download Function
To access the Download Function from the Download Menu, press the
F1
or
Button to move up or F2 or
Button to move down to
highlight the Download Field, and then press the ENTER Button or the
F4
Button as shown in the following figure.
The Download Function will appear as shown in the following figure.
Note: Now, you can use the XFTP Satellite Configuration
Software to download the new satellite configurations, see
Chapter 9: XFTP Satellite Configuration Software,
Download Tab.
XFTP SAT-2150 Satellite Meter - Operation Manual
62
Delete Config Function
To access the Delete Config Function from the DOWNLOAD Menu,
press the F1 or
Button to move up or F2 or
Button to move
down to highlight the Delete Config Field as shown in the following figure.
The Delete Config Function will appear as shown in the following figure.
To highlight the desired satellite configuration, press the F1 or F2
Button to move up and down through the list one satellite configuration at a
or
Button to move up or down the list one page at
time or press the
a time.
When the desired satellite configuration is highlighted, press the ENTER
Button or the F4 Button to delete the file. When deleting the satellite
configuration, the instrument will briefly display the text “Deleting...” in
place of the name of the satellite configuration.
After you have deleted the satellite configuration, press the
return to the DOWNLOAD Menu.
F3
Button to
XFTP SAT-2150 Satellite Meter - Operation Manual
63
THIS PAGE LEFT INTENTIONALLY BLANK
XFTP SAT-2150 Satellite Meter - Operation Manual
64
9
9. XFTP Satellite Configuration Software
Overview
This chapter will explain how to install the XFTP Satellite Configuration
Software as well as how to use the software to create and edit satellite
configurations to download to your XFTP SAT-2150.
Software Installation Instructions
To install your XFTP Satellite Configuration Software, perform the following
steps:
1. Insert the XFTP Satellite Configuration Software CD in the
appropriate drive.
2. If you have Autorun enabled for the CD-ROM drive, the XFTP
Satellite Configuration Software setup program will start
automatically. Otherwise, select the Start Button then select Run.
From the “Run” Window, you may select the Browse Button to
find the “Setup.exe” file on your CD-ROM drive or other location
where the file has been stored.
Note: From the “Run” Window you may type
[drive]:\Setup.exe, then select the OK Button. (Substitute
the appropriate drive path in the command.)
3. The “WinRAR self-extracting archive” Window appears, select the
Install Button to proceed to the next step of the installation
wizard.
XFTP SAT-2150 Satellite Meter - Operation Manual
65
4. The following icon will be displayed on your PC Desktop when
installation is complete. To start the XFTP Satellite Configuration
Software, double-click this icon.
XFTP SAT-2150 USB Driver Installation
Before your XFTP SAT-2150 can communicate with your PC or laptop
computer using the XFTP Satellite Configuration Software, you must first
install the USB driver software.
To install the XFTP SAT-2150 USB Driver, perform the following steps:
1. With the XFTP Satellite Configuration Software CD in the
appropriate drive, select the Start Button then select Run. From
the “Run” Window, you may select the Browse Button to find the
“drvsetup.exe” file on your CD-ROM drive or other location where
the file has been stored.
Note: From the “Run” Window you may type
[drive]:\drvsetup.exe, then select the OK Button.
(Substitute the appropriate drive path in the command.)
2. The “WinRAR self-extracting archive” Window appears, select the
Install Button to proceed to the next step of the installation
wizard.
XFTP SAT-2150 Satellite Meter - Operation Manual
66
3. Connect the XFTP SAT-2150 to the PC or laptop computer with the
included USB cable, and then turn the instrument on. A notification
icon will appear in the lower right corner of your computer screen
to indicate that your computer has “Found New Hardware”.
4. The “Found New Hardware Wizard” Search Window appears,
select the “Yes, this time only” radio button, and then select the
Next Button to continue with the installation.
XFTP SAT-2150 Satellite Meter - Operation Manual
67
5. The “Found New Hardware Wizard” Installation Window appears,
select the Next Button to continue with the installation.
6. The “Hardware Installation” Window appears, select the Continue
Anyway Button to continue with the installation.
XFTP SAT-2150 Satellite Meter - Operation Manual
68
7. The “Found New Hardware Wizard” Completion Window appears,
select the Finish Button to complete the installation.
8. A notification icon will appear in the lower right corner of your
computer screen to indicate that “Your new hardware is installed
and ready to use”. Select the “X” to close the notification icon. The
XFTP SAT-2150 USB Driver is now installed and ready to use.
XFTP SAT-2150 Satellite Meter - Operation Manual
69
Orientation Tab
Overview
The Orientation Tab is used to graphically and numerically display
the orientation of your satellite dish when you have specified a
particular satellite and user location as shown in the following graphic.
You can also view individual satellite configuration parameters and add
to your download list from the Channel Configuration Table at the
bottom of the screen.
1
2
3
1. Orientation Tab - Select this tab to view the Orientation
Display and Channel Configuration Table.
2. Orientation Display - This area of the window allows you to
select the location for the satellite dish and the satellite that
you wish to aim your satellite dish at. Once you have selected
these parameters, the software will graphically and
numerically display the correct orientation for your satellite
dish.
3. Channel Configuration Table - This area of the window
allows you to view the channels associated with the selected
satellite. Channels may be selected and edited for your
download list from this table.
XFTP SAT-2150 Satellite Meter - Operation Manual
70
Orientation Display
The Orientation Display is shown in the following graphic:
•
Local Longitude - This is your local east-to-west position on
the Earth. The range of longitude is from -180º to +180º, where
longitude is measured from the Prime Meridian (which is the
longitude that runs through Greenwich, England), with positive
values going east and negative values going west.
•
Local Latitude - This is your local north-to-south position on
the Earth. The range of latitude is from -180º to +180º, where
latitude is measured from the equator, with positive values
going north and negative values going south.
•
Satellite Longitude - This is the position of the satellite over
the earth. The satellite longitude is from -180° to +180°, where
east longitude is positive and west longitude is negative.
•
Azimuth - This is the compass direction to the location of
your satellite and is the left/right adjustment on the satellite
dish. This value is shown as both a numerical and a graphical
representation.
•
Elevation - This is the angle between the satellite and the
horizon from your location and is the up/down adjustment on
the satellite dish.
•
Polarize - This is the correction that compensates for the
curvature of the Earth relative to the satellite signal for linearly
polarized satellites and is also known as tilt or skew.
XFTP SAT-2150 Satellite Meter - Operation Manual
71
Selecting Country & City
To select the country & city, select the drop-down arrow next to
the Country&City Field as shown in the following graphic:
Note: After selecting your country & city, the software will
provide the appropriate satellite selection list and
automatically display the correct orientation for your
satellite dish both graphically and numerically for the
chosen satellite.
Note: See the Country and City Tab Section of this
chapter to add new locations.
Selecting Satellite
To select the satellite, select the drop-down arrow next to the
Satellite Field as shown in the following graphic:
Note: After selecting your satellite, the software will
automatically display the correct orientation for your
satellite dish both graphically and numerically for the
chosen user location.
Note: See the Config Tab Section of this chapter to add
new satellites.
XFTP SAT-2150 Satellite Meter - Operation Manual
72
Channel Configuration Table
The Channel Configuration Table is shown in the following graphic:
This table shows a detailed list of the channel configurations for the
currently selected satellite. You can use the scroll bar to the right in
order to display the full list of channels. You can also access the
same information using the Config Tab, see the Config Tab Section in
this chapter.
Adding to Download List
To add a satellite channel to your download list, double-click on
any one of the channels listed in the Channel Configuration Table.
The “Add to download list” Window will appear as shown in the
following graphic:
The Config Name, Frequency, Pol, Symbol Rate, and
Longitude settings correspond to the configuration of the
specified satellite. To verify the current configuration of the
specified satellite go to http://www.lyngsat.com.
XFTP SAT-2150 Satellite Meter - Operation Manual
73
The L.O. FREQ and 22kHz settings correspond to the
configuration of the satellite dish that you are installing. To verify
the configuration of your satellite dish, see the OEM manual that
came with your satellite dish.
22KHz - This is the status of the 22 KHz switch. You can
choose between ON and OFF.
DiSEqC - This permits the user to control the state of 2 or 4
position DiSEqC switches used at the satellite dish. You can
choose from the following options; OFF, 1/2, 2/2, 1/4, 2/4, 3/
4, and 4/4.
After making any necessary modification to the channel
configuration, you can add the channel configuration to your
download list by selecting the OK Button or you can select the
Cancel Button to exit without saving to the download list.
XFTP SAT-2150 Satellite Meter - Operation Manual
74
Country and City Tab
Overview
The Country and City Tab is used to add or delete user locations.
Adding New User Locations
To add a new user location perform the following steps:
1. Enter the country and city name of the new user location in
the Country&City Field.
2. Enter the corresponding Longitude and Latitude of the new
user location in the Longitude and Latitude Fields.
3. Select the Add Button to add the new location to the user
location list.
XFTP SAT-2150 Satellite Meter - Operation Manual
75
Deleting Existing User Locations
To delete an existing user location perform the following steps:
1. Click the desired user location to highlight it.
2. Select the Delete Button.
3. A window will appear asking you “Are you sure you want to
delete?”, select the OK Button to delete the user location or
press the Cancel Button to escape without deleting the user
location.
XFTP SAT-2150 Satellite Meter - Operation Manual
76
Config Tab
Overview
The Config Tab is used to select satellite configurations for your
download list and add or delete satellite and channel configurations.
You can choose which satellites to view based on the area in which
you are located or you can view all satellites by choosing the
corresponding radio button below the Satellite Name List.
Creating Satellites
To create a new satellite perform the following steps:
1. Enter the name of the new satellite in the Name Field.
2. Enter the corresponding Longitude of the new satellite in the
Longitude Field.
3. Select the Add Satellite Button to add the new satellite to
the Satellite Name list.
XFTP SAT-2150 Satellite Meter - Operation Manual
77
Creating Satellite Channels
To create a new satellite channel perform the following steps:
1. Select the satellite that you would like to add new channels to
by clicking on the desired satellite name in the Satellite
Name list.
2. Enter the name of the new channel in the Channel Name
Field.
3. Select the type of polarization by selecting the down arrow on
the drop-down list and choosing from the following options:
Blank - This is a signal with no polarization. When you
choose this option, the LNB power will be set to 0 V.
V - This is a vertically polarized signal. When you choose
this option, the LNB power will be set to 13 V.
H - This is a horizontally polarized signal. When you
choose this option, the LNB power will be set to 18 V.
L - This is a left-hand circular polarized signal. When you
choose this option, the LNB power will be set to 18 V.
R - This is a right-hand circular polarized signal. When
you choose this option, the LNB power will be set to 13 V.
4. Enter the corresponding downstream frequency of the new
channel in the Frequency Field.
1000 - 9499 MHz - This corresponds to the C Band signal
spectrum. When you choose a frequency within this
range, the Band will automatically be set to C and the
L.O. FREQ will automatically be set to 5500.
9500 - 60000 MHz - This corresponds to the Ku Band
signal spectrum. When you choose a frequency within
this range, the Band will automatically be set to Ku and
the L.O. FREQ will automatically be set to 11300.
Note: The difference between the Frequency and the
satellite dish L.O. Frequency must be in the range of 950
to 2150 MHz for the SAT-2150 configuration.
XFTP SAT-2150 Satellite Meter - Operation Manual
78
5. Enter the corresponding symbol rate of the new channel in the
Symbol Rate Field.
6. Select the Add Channel Button to add the new channel to
the channel list.
Deleting Satellites & Channels
To delete an existing satellite or channel perform the following steps:
1. Click the desired satellite or channel to highlight it.
2. Select the satellite or channel Delete Button.
3. A window will appear asking you “Are you sure you want to
delete?”, select the OK Button to delete the satellite or
channel or press the Cancel Button to escape without
deleting the satellite or channel.
XFTP SAT-2150 Satellite Meter - Operation Manual
79
Adding to Download List
To add a satellite channel to your download list, right-click on the
desired channel and select Add to download list or double-click on
the desired channel. The “Add to download list” Window will appear as
shown in the following graphic:
The Config Name, Frequency, Pol, Symbol Rate, and Longitude
settings correspond to the configuration of the specified satellite. To
verify the current configuration of the selected satellite go to
http://www.lyngsat.com.
The L.O. FREQ and 22kHz settings correspond to the configuration of
the satellite dish that you are installing. To verify the configuration of
your satellite dish, see the OEM manual that came with your satellite
dish.
22KHz - This is the status of the 22 KHz switch. You can choose
between ON and OFF.
DiSEqC - This permits the user to control the state of 2 or 4
position DiSEqC switches used at the satellite dish. You can
choose from the following options; OFF, 1/2, 2/2, 1/4, 2/4, 3/4, and
4/4.
After making any necessary modification to the channel configuration,
you can add the channel configuration to your download list by
selecting the OK Button or you can select the Cancel Button to exit
without saving to the download list.
XFTP SAT-2150 Satellite Meter - Operation Manual
80
Download Tab
Overview
The Download Tab is used to transfer satellite configurations from
the XFTP Satellite Configuration Software to the XFTP SAT-2150.
All satellite configurations the were selected for “Add to Download List”
in the Config or Orientation Tabs will be displayed here.
Note: You can download satellite channel configurations
from your PC or laptop to your XFTP SAT-2150, but you
cannot upload satellite configurations from your XFTP
SAT-2150 to your PC or laptop.
XFTP SAT-2150 Satellite Meter - Operation Manual
81
Exporting Download List
To export (save) your download list to your PC or laptop hard drive,
perform the following steps:
1. Select the Export Button. The “Save As” Window will appear
as shown in the following figure:
2. Select the desired drive path and enter a file name, and then
select the Save Button. The download list is now saved.
XFTP SAT-2150 Satellite Meter - Operation Manual
82
Importing Download List
To import (open) an existing download list from your PC or laptop hard
drive, perform the following steps:
1. Select the Import Button. The “Open” Window will appear as
shown in the following figure:
2. Select the desired drive path and file name, and then select
the Open Button. The imported download list is now
displayed.
XFTP SAT-2150 Satellite Meter - Operation Manual
83
Downloading Data to the Satellite Meter
Note: Before you can download satellite configurations to
your XFTP SAT-2150, you must perform the following tasks
in this order:
1. Install the XFTP SAT-2150 USB Driver.
2. Connect the instrument to your PC or laptop
computer using the included USB cable.
3. Turn the instrument on.
4. Start the XFTP Satellite Configuration Software.
Note: Before you download the new satellite configurations
to your XFTP SAT-2150, you must first access the
DOWNLOAD Menu from your XFTP SAT-2150, see
Chapter 8: DOWNLOAD Menu, Download Function.
Note: You must add satellite channel configurations to the
download list, see Orientation Tab, Adding to Download
List and Config Tab, Adding to Download List in this
chapter for more information about how to add to the
download list.
To perform a download of your satellite channel configurations to your
XFTP SAT-2150, perform the following steps:
1. Select the country & city by selecting the drop-down arrow
next to the Country&City Field.
2. Select the correct port by selecting the drop-down arrow next
to the port Field. Select USB for the XFTP SAT-2150.
XFTP SAT-2150 Satellite Meter - Operation Manual
84
3. Select the configuration record number by typing the number
or using the up and down arrows next to the Start Number
Field. This value can be between 1 and 80.
CAUTION: Use the Delete Config Function of the
DOWNLOAD Menu on your XFTP SAT-2150 to verify the
configuration memory location(s) in your XFTP SAT-2150
for the new satellite configurations. If the correct record
start number is not used, you will write over other stored
configurations.
Note: If the replace check box is checked on the
Download Tab, all memory locations after the selected
download loactions will be emptied.
4. From the XFTP SAT-2150, select the OK softkey by pressing
the ENTER Button or the F4 Button as shown in the
following figure.
5. From the XFTP Satellite Configuration Software, select the
Start Download Button. The progress bar at the bottom of
the Download Tab will advance as the satellite configurations
are transferred. The XFTP SAT-2150 will also indicate
“Downloading...” in the DOWNLOAD Menu.
XFTP SAT-2150 Satellite Meter - Operation Manual
85
6. When the download is complete, the XFTP Satellite
Configuration Software will display a window with the message
“Complete!”. The XFTP SAT-2150 will also indicate
“COMPLETE” in the DOWNLOAD Menu.
7. From the XFTP Satellite Configuration Software, select the OK
Button to confirm completion of the download process.
XFTP SAT-2150 Satellite Meter - Operation Manual
86
10
10. Appendix Specifications
Frequency Range:
950 MHz to 2,150 MHz
Signal Level Range:
-65 dBm to -25 dBm
RF Input Connector Type:
F Type
Input Resistance:
75 Ω
Measurements:
QPSK Signal Level, Bit Error Rate, Carrier-to-Noise
Storage:
80 measurement files and 80 satellite configuration files
LNB Power Supply:
Horizontal Polarization / LHCP
+18 V, ≤ 500 mA
Vertical Polarization / RHCP
+13 V, ≤ 500 mA
Power:
Total Power:
8 Watts
Rechargeable NiMH batteries
Fast charge in less than 4 hours
Provides more than 3 hours of operation with LNB power
Provides more than 7 hours operation without LNB power
Connector:
USB
Miscellaneous:
Dimension:
8.84” H x 4.23” W x 1.96” D
(excluding removable F connector)
Weight:
2 lbs
Display:
128 x 64 LCD with backlight
Working Temperature: 0 °C to 60 °C
Storage Temperature: -20 °C to 70 °C
Charger:
US Plug (100 - 240 VAC)
XFTP SAT-2150 Satellite Meter - Operation Manual
87
Notes:
XFTP SAT-2150 Satellite Meter - Operation Manual
88
Notes:
XFTP SAT-2150 Satellite Meter - Operation Manual
89
THIS PAGE LEFT INTENTIONALLY BLANK
XFTP SAT-2150 Satellite Meter - Operation Manual
90
Warranty Information
Trilithic, Inc. warrants that each part of this product will be free from
defects in materials and workmanship, under normal use, operating
conditions and service for a period of one (1) year from date of delivery.
Trilithic, Inc.’s obligation under this Warranty shall be limited, at Trilithic,
Inc.’s sole option, to replacing the product, or to replacing or repairing any
defective part, F.O.B. Indianapolis, Indiana; provided that the Buyer shall
give Trilithic, Inc. written notice.
Batteries are not included or covered by this Warranty.
The remedy set forth herein shall be the only remedy available to the Buyer
under this Warranty and in no event shall Trilithic, Inc. be liable for
incidental or consequential damages for any alleged breach of this
Warranty. This Warranty shall not apply to any part of the product which,
without fault of Trilithic, Inc., has been subject to alteration, failure caused
by a part not supplied by Trilithic, Inc., accident, fire or other casualty,
negligence or misuse, or to any cause whatsoever other than as a result of
a defect.
Except for the warranty and exclusions set forth above, and the warranties,
if any, available to the Buyer from those who supply Trilithic, Inc., there are
no warranties, expressed or implied (including without limitation, any
implied warranties of merchantability of fitness), with respect to the
condition of the product or its suitability for any use intended for it by the
Buyer or by the purchaser from the Buyer.
XFTP SAT-2150 Satellite Meter - Operation Manual
91
9710 Park Davis Drive
Indianapolis, IN 46235
(317) 895-3600
www.trilithic.com
P/N 0010277000
Rev. 11/07