1
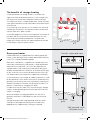
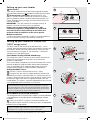
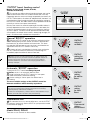
 Contact Details Please note that some of the contact details on this PDF document may not be current. Please use the following details if you need to contact us: Telephone: 0844 879 3588 Email: [email protected] The customer support section of our website also features a wide range of information which may be of use to you and is available 24 hours a day. It includes: • Operating and installation instructions • Easy ‘How to use’ guides for storage heaters • Service and repairs • Where to buy our products • Literature downloads • Heating requirement calculator Visit ‐ www.dimplex.co.uk/support A division of GDC Group Ltd
Millbrook House Grange Drive Hedge End Southampton SO30 2DF
www.dimplex.co.uk
Registered No: 1313016 England
VAT GB 287 1315 50004
EEE Producer Registration Number –
WEE/GE0057TS
Paper from sustainable sources
Operating Instructions
These instructions should be read carefully and
retained for future reference. Note also the
information given on the appliance.
Storage heaters
XLN manual
Models: XL6N
XL12N
XL18N
XL24N
XLSN automatic
XLS6N
XLS12N
XLS18N
XLS24N
Issue 1
January 2011
1224-XLN/XLSN STORAGE HEATER INSTRUCTIONS.indd 2
14/01/2011 10:36
IMPORTANT
SETTING UP YOUR NEW HEATER
These instructions
should be read
carefully and retained
for future reference.
Note also the
information given on
the appliance.
Setting up your new heater, called ‘commissioning’ is simple as instructed on
page 3. Please note that the new materials in the heater will produce a slight
smell for the first few days of operation. Rooms must be well ventilated
and persons with respiratory complaints, young children or caged
birds must not remain in close proximity to the heater for a minimum
of the first 48 hours of the set-up period. If several new heaters have been
installed it’s recommended that the set-up for each one (commissioning) is
phased over several days.
WARNING - THE SURFACE OF THIS HEATER CAN BE HOT.
•The surface temperatures of this heater are within the requirements of
EN60335-2-61, the European Standard covering the safety requirements
for Electric Storage Heaters, and momentary contact with any part of the
heater should not cause injury. However, in order to be effective, heaters of
any type do get hot, especially around the air outlet grille.
•If aged or infirm persons, or young children, are likely to be left unsupervised in
the vicinity of a heater precautions should be taken to ensure that prolonged
contact with the heater cannot occur. We recommend that a guard is fitted
around the heater, as is normal with some types of heating appliances in similar
circumstances. A range of guards specially designed for Dimplex storage
heaters is available. If you require further information on these guards, please
see contact details on back page.
•This appliance is not intended for use by persons (including children) with
reduced physical, sensory or mental capabilities, or lack of experience and
knowledge, unless they have been given supervision or instruction concerning use of the appliance by a person responsible for their safety.
•Children should be supervised to ensure that the do not play with
the appliance.
CAUTION: DO NOT COVER SURFACES OF THE HEATER AND DO NOT
OBSTRUCT AIR OUTLET GRILLES.
•Surfaces of the heater should not be covered or obstructed as this can
cause excessive temperatures that can be hazardous and may cause
safety cut-outs to operate.
•Do not put clothes, fabrics or any combustible materials on the heater.
•Do not allow curtains to come within 75mm (3”) of the top and ends of the
heater.
•DO NOT SIT OR STAND ON THE HEATER.
•DO NOT PLACE OBJECTS IN CONTACT WITH THE HEATER.
PLEASE NOTE: YOUR HEATER IS VERY HEAVY AND MUST BE SECURELY FIXED TO A SOUND WALL.
•No attempt should be made to move the heater without first seeking
specialist advice. If you are not happy that the heater has been securely
fixed, please inform your installer.
•If, during any reassembly of the heater, a part of the thermal insulation
shows damaged or deterioration which may impair safety, it should be
replaced with an identical part.
•UNDER NO CIRCUMSTANCES SHOULD THE WALL FIXINGS BE
LOOSENED ON THIS HEATER BEFORE THE BRICKS HAVE BEEN REMOVED FROM ITS CORE.
2
1224-XLN/XLSN STORAGE HEATER INSTRUCTIONS.indd 3
14/01/2011 10:36
The benefits of storage heating
One of the benefits of storage heaters is that after their
night-time intake of off-peak electricity i.e. the ‘charge’ they
will always emit some heat throughout the day and night.
This helps to maintain a steady temperature so that the room
never gets cold, because the whole fabric of the room retains
some warmth.
In the morning, when the core is at its hottest, the amount of
heat being transmitted is at its greatest and the heater feels
hot over most of its upper surfaces.
As the day progresses, heat is transmitted from the heater to
the room and the surface of the heater becomes less hot.
If the amount of emitted heat becomes insufficient the
output of the heater and thus the room temperature may be
increased by using the Output Control.
Know your heater
Off-peak electricity is supplied from the national grid to your
house, usually overnight, when national demand for electricity
is low. This is called the off-peak period.
Because it is off-peak it is supplied at a cheaper price than
normal day rate electricity and requires a separate off-peak
electrical circuit and meter. This circuit only operates the
storage heaters, and switches on automatically during the
off-peak time period which will occur at set times of the night
or day. If you are unsure which off-peak tariff you have, you
will need to contact your electricity supplier for clarification.
Controls: output and input
Output
Input
Identity
label
Front
panel
In the same way as you charge up a battery, electricity is used
to heat elements in your heater, which over a number of hours,
gradually transfer the heat to a very high density material that
absorbs and stores the heat for use during the next day. This
process is referred to as ‘charging’ the heater.
In order to ensure your room stays warm overnight, storage
heaters are designed to give out some heat even when the
heater is ‘charging’.
When the off-peak ‘charging’ period finishes the heat is
gradually released in a controlled way over the course of
the day.
Storage heating can be used to provide all of your room
heating or as background heating which can be easily
topped up with supplementary heating as required.
Heat outlet
grille
Feet
Wall mounted switch
[off-peak circuit]
3
1224-XLN/XLSN STORAGE HEATER INSTRUCTIONS.indd 4
14/01/2011 10:36
Setting up your new heater
1 The controls
There are two simple controls located at the top right of the heater.
User adjustable controls are not provided on models XL6N or XLS6N.
2 To commission a new heater set both the input and
output controls to ‘MAX’ and leave for a minimum of 48 hours.
After this period the controls should be adjusted for everyday use.
Please remember that any changes you make will take at least 24
hours to take effect.
IMPORTANT - The new materials in the heater are likely to
produce a smell for the first few days of operation.
Rooms must be well ventilated and persons with
respiratory complaints, young children or caged birds
must not remain in close proximity to the heater for a
minimum of the first 48 hours of the set-up period.
Multiple installations
If several new heaters have been installed it’s recommended that
the set up (commissioning) is phased over several days.
1
Output
Input
2
Output
Input
Setting up your heater for normal use
‘INPUT’ energy control
The INPUT controls the amount of off-peak electricity – i.e. the
‘charge’, going into the heater at night, and therefore it controls how
much heat is stored within the heater ready for use the next day.
The more electricity that goes in, the more heat is stored and
available for use the following day.
‘Auto’ Models XLS12N, XLS18N, XLS24N only.
The setting of the INPUT controls on these models automatically
determines the temperature of the room at the end of the
off-peak charge period.
This is measured by a temperature sensor on the heater which senses
both the temperature inside the heater and the room temperature.
Once a comfortable INPUT setting has been found, the XLS will
compensate for changes in weather conditions automatically.
Setting the INPUT control
3 The INPUT control should initially be set as shown.
4 During the day after the first charge period the comfort level
provided by the heater should be noted. If it is felt that the level of
heating is either too high or too low, then the INPUT control should
be adjusted slightly up or down as appropriate before the next
charge period. This process should be repeated each day until the
most acceptable comfort conditions are arrived at.
3
Input
INPUT
Minimum
position
Maximum
position
4
INPUT
control
TIP The INPUT control can be left at the established comfort setting
and the heater will automatically vary the charge taken to maintain
the setting. BUT the actual setting will be influenced by the prevailing
weather conditions, the room size and insulation levels of your home.
The most suitable settings will be found by experience.
Manual Models XL12N, XL18N, XL24N only
The setting of the INPUT control on these models is manually operated.
It will need to be manually adjusted and set depending on weather
conditions.
5 Initially set the INPUT as shown. If the level of heating is too
high or too low, adjust the INPUT control up or down as appropriate
before the next charge period.
TIP The INPUT control should be set to ‘max’ for Winter but if the
heater is too warm adjust down by a small amount at a time.
Remember any changes will take 24 hours to take effect.
5
INPUT
control
Please note: Model XL6N and XLS6N has no user controls
4
1224-XLN/XLSN STORAGE HEATER INSTRUCTIONS.indd 5
14/01/2011 10:36
T
‘OUTPUT’ boost heating control
Models XL12N, XL18N, XL24N, XLS12N,
XLS18N, XLS24N only.
6 This controls the airflow release through the heater and can be
used to release heat faster or as a boost of heat later in the day.
Depending upon the amount of charge accepted by the heater, the
Output control allows the release of additional heat,’the boost’, by
increasing the air flow through the heater. By altering the setting of
the Output control, the airflow release can be opened and closed
manually, or can be set to open automatically.
Because the manual or automatic opening of the airflow release is
primarily dependent on how much heat remains in the heater, the
amount of charge the heater has taken has a bearing on the time
at which it opens. The boost will not operate and the internal flap
will not open if the output of the heater is already high enough, or if
there is insufficient heat available from the product.
Manual ‘BOOST’ operation
7 With the OUTPUT control set on minimum (anticlockwise) the
airflow release [boost] remains closed, and heat is released from
the heater only by normal radiation and convection. This alone
may provide sufficient heat on many occasions and therefore no
adjustment of the OUTPUT control is necessary.
8 If a boost of heat is required later in the day, then moving the
OUTPUT control to maximum (clockwise) in the evening will
immediately open the airflow to release more heat.
6
OUTPUT
control
Output
Input
Output
7
(Boost closed)
Input
OUTPUT
setting for
no Boost
Output
(Boost open)
Input
8
OUTPUT
setting for
immediate
Boost
TIP When the next charging period starts the airflow release will
automatically close. If you want to retain the optimum amount of
heat for a boost the next day, ensure you reset the output to
minimum before the start of the next charging period which is
normally overnight.
Output
Automatic ‘BOOST’ operation
Turning the OUTPUT control to settings beyond
minimum, results in an automatic boost of heat.
9 A high setting on the output control i.e. max opens
the airflow release early afternoon/evening.
10 A lower setting as shown opens the airflow later in
the evening.
The most suitable settings of the Output control for
different conditions will be found by experience.
TIP Remember - a high setting of the OUTPUT control early in the
day may leave too little heat stored in the heater for the evening,
especially during cold weather conditions.
If a boost is not required, e.g. when a room is unoccupied for a long
period, set the OUTPUT control to min (anticlockwise).
(Boost open)
Input
9
OUTPUT
setting
for earlier
Boost
Output
(late boost)
10
Input
OUTPUT
setting
for later
Boost
Output
Commercial use
11 For commercial use i.e. normal office hours, set the OUTPUT
to maximum (clockwise). Set the INPUT for your particular model
as described on page 3.
Model XL6N, XLS6N
(Boost open)
11
Input
OUTPUT
Commercial
setting
earlier Boost
There are no user controls on these models.
5
1224-XLN/XLSN STORAGE HEATER INSTRUCTIONS.indd 6
14/01/2011 10:36
Seasonal settings
Summer
Summer
1
In summer when you hopefully don’t need
any heat you can switch the heater off at the
wall socket. Turn it on again when you need
heating.
1
TIP Remember there will be a delayed reaction
from the heater until the beginning of the charge
period when you switch on again.
X
OFF
3
ON
Preparing for colder weather
Remember to turn the heater on at
the wall switch.
2
2
• Allow 24 hours for the heater
to ‘charge’.
• Adjust the controls as necessary.
• The input control for XLS models should
not need to be seasonally adjusted.
TIP The INPUT control for XL (manual models)
should be set to max for Winter but a lower
setting should be sufficient during Spring and
Autumn. But if the heater is not providing the
correct level of heat it should be adjusted slightly
up or down as appropriate. Remember, any
changes will take 24 hours to take effect.
TIP If the external temperature falls below – 3°C
it is likely that you will need supplementary heating
to maintain the normal temperature in the room.
Holidays – Summer
In the summer the heater can be turned
off at the wall switch.
3
3
X
OFF
Holidays – Winter
In the winter set the controls as shown to
protect the room from frost.
4
Output
4
(late boost)
Input Output
OUTPUT
(late boost)
Input
INPUT
TIP Remember to first switch on at the socket.
When you switch the heater on again it may need
a ‘charge ‘before heat is available. There may be
a delay of 24-48 hours before heat is available.
6
1224-XLN/XLSN STORAGE HEATER INSTRUCTIONS.indd 7
14/01/2011 10:36
Troubleshooting guide
Please note this guide refers to heaters being operated individually. If a central control system is installed some issues may require
that you refer to the instructions provided with the system controlling the heaters.
ISSUE
SOLUTION
My heater is too cold •
Has there been an interruption to mains power? A power cut during the off-peak period could affect the charge taken by the heater.
•
Ensure that the off-peak circuit is working, the wall switch is on, fuse is ok and consumer unit or fuse
box is switched on.
•
Turn up the INPUT control (this may take up to 24hrs to take effect).
•
Has the heater been inadvertently covered? If so, the safety cut-out may have operated.
Please call Customer Services if this is the case.
•
My heater is too hot
Do you have another heater nearby? If so please see ‘One of my heaters is colder than the
other’ below.
•
Is the room cold? If you have an automatic (XLS) heater the room temperature will have an effect on the charge taken, therefore if the room is already warm the heater will not take an unnecessary charge.
•
Turn the INPUT control down (this may take up to 24hrs to take effect).
Turn the OUTPUT control to minimum.
One of my heaters is
•
If two automatic (XLS) heaters are fitted in one area, they may affect each others’ operation.
colder than another •
Set one heater higher as a ‘primary’ source of heat, and the other lower to provide ‘supporting’ heat
to avoid the heaters cancelling each other out and taking a reduced charge.
My room is not warm
•
Turn the INPUT control up. Turn the OUTPUT control down. (This may take up to 24hrs to take effect).
enough in the evening
•
Alternatively, set the OUTPUT control to minimum, turning it to maximum in the evening when you want more heat. Return it to minimum before you go to bed so that the heater can take a full charge.
•
If adjacent rooms are not heated, this will affect the temperature of the room you are heating.
My heater smells, •
Apart from the commissioning period and an accumulation of dust within the heater (e.g. after long other than that caused periods of inactivity) no smells should be present. One exception is when decoration is being
during commissioning carried out, especially if the substances used have a petrochemical base.
If decorating is to be carried out, turn off the storage heater and ensure the room is well ventilated •
before the heater is turned back on again.
The storage heater Lit cigarettes, candles and oil burners, combined with the convection effect of a storage heater can
•
has left black marks
on the wall cause soot deposits to build up on the surface directly above and to the sides of the heater.
• Installing a shelf above the heater is one solution, as the heat rising above the heater will be diverted away from the wall and into the centre of the room. Please ensure a minimum of 250mm clearance between the top of the heater and the shelf.
If the above guides do not resolve your problem you may need to get in touch with our Customer Services Department on the details provided
on the back page. Before doing this, please ensure that you have access to the heater and have made a note of the model number,
manufacturers date code, series letter (found on the heater) and date of purchase (if known).
7
1224-XLN/XLSN STORAGE HEATER INSTRUCTIONS.indd 8
14/01/2011 10:36
Cleaning
To maintain the external appearance of the radiator it need only be wiped over
occasionally with a dry duster. During the summer months, or at other times when the
appliance is not in use and is completely cold, the opportunity should be taken to wipe
over with a damp cloth. Do not use abrasive cleaning powders or furniture polish.
Discoloration of wall finishes can sometimes occur immediately above a storage heater
due to the properties of some paints and decorating materials or the presence of
environmental impurities in the air (such as soot or incense generated from the
burning of candles, etc.) A suitable shelf (available from Dimplex) may be fitted to limit
the extent of any wall discoloration.
After sales service
Your product is guaranteed for two years from the date of purchase.
Within this period, we undertake to repair this product free of charge provided it has
been installed and operated in accordance with these instructions.
Your rights under this guarantee are additional to your statutory rights, which in turn
are not affected by this guarantee.
Should you require after sales information please go to www.dimplex.co.uk
where you will find our self help guides and videos by clicking on ‘Customer
Support’. If you cannot find the information you need, a simple online form is
provided for your convenience, or contact the number below.
You will need the model number, serial number and series, date of purchase, and nature
of the fault to complete the online form or before contacting us.
Please do not return a faulty product to us in the first instance as this may result in loss
or damage and delay in providing you with a satisfactory service.
Please retain your receipt as proof of purchase.
Spare parts
Spare parts information is available on the website www.dimplex.co.uk, and the customer
services help desk will be able to advise you should you need to purchase any spares.
You will need the model number, serial number and series, date of purchase, and nature
of the fault before contacting us.
Protective guards
A range of protective guards designed for Dimplex storage heaters is available to order.
For more information contact Norfolk Industries on 01603 667957.
Recycling
For electrical products sold within the European Community.
At the end of the electrical products useful life it should not be disposed of with
household waste. Please recycle where facilities exist. Check with your Local Authority
or retailer for recycling advice in your country.
This product complies with the European Safety Standards EN60335-2-30 and the European Standard Electromagnetic
Compatibility (EMC) EN55014, EN60555-2 and EN60555-3.
These cover the essential requirements of EEC Directives 2006/95/EC and 2004/108/EC
© GDC
Dimplex, a division of GDC Group Limited, Millbrook House, Grange Drive, Hedge End, Southampton SO30 2DF
Email [email protected] Website www.dimplex.co.uk
Customer Help Line 0845 600 5111
1224-XLN/XLSN STORAGE HEATER INSTRUCTIONS.indd 1
Fax 01489 773050
14/01/2011 10:36