1
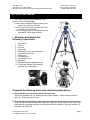
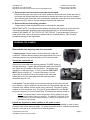
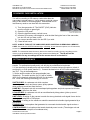
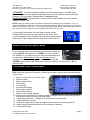
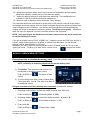
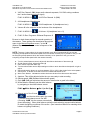
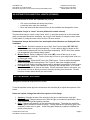
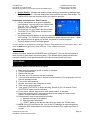
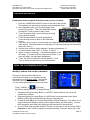
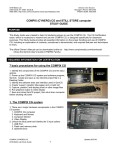
UHM Media Lab 2350 DOLE ST. KHET Studio B WEB SITE: http://www.communications.hawaii.edu/mlab/about.htm CANON XA10 Camcorder Director’s Phone: 956-3358 FRONT DESK: 956-3355 CANON XA10 HD CAMCORDER STUDY GUIDE PURPOSE PURPOSE This Study Guide was created to help students prepare for the Canon XA10 HD Camcorder Certification Exam, which is necessary to reserve and use the Canon XA10 HD Camcorder, specifically for classroom purposes. This Study Guide provides all essential information on the proper handling and use of the Canon XA10 HD Camcorder, including an explanation of contents, procedures to demonstrate, and required features and techniques to know. REQUIRED INFORMATION FOR CERTIFICATION 1. 2. 3. 4. Recite the “Safety Principles” (or “Golden Rules”) of the Media Lab. Identify all items included in the Canon XA10 HD Camcorder package. Demonstrate safe handling of the camera and tripod. Demonstrate proper set up and “striking” of camcorder equipment. THE “GOLDEN RULES” OF THE UHM MEDIA LAB (REQUIRED INFORMATION) 1. Never force anything! If something you are attempting to do requires any amount of excessive force, STOP and review your methods. 2. Never over tighten! This may cause the stripping of threads. The use of excessive force which can damage the equipment. 3. Never leave the camcorder equipment unattended! Camcorder and other video equipment are prime targets for theft. 4. Never leave the camcorder equipment exposed to any heat source! (e.g., in the trunk of a vehicle). Excessive heat will cause camcorder parts to melt. 5. Never take the Media Lab equipment to the beach or near shorelines! (e.g., where sand and salt air/spray can contact the equipment. Sand and salt air/spray can clog and damage the sensitive equipment.) 6. Never use equipment in “risky” situations/environments! (e.g., any type of airborne devices or locations including airplanes, helicopters, skateboards, motorcycles, rollerblades, etc., night time shoots in low lit and/or unsafe areas, and “remote” areas which require transport of equipment over rough terrain.) 7. Never touch or attempt to clean the lens! There is a high probability of scratching and permanently damaging the lens without the proper cleaning materials. Only use the cleaning cloth provided. 8. Never aim the viewfinder or the LCD screen directly at a strong light source! This will cause permanent damage to the viewfinder/LCD screen. (e.g., the sun, very bright light, or its reflection from an object.) CANON XA10 Camcorder UHM Media Lab Study Guide 8/17/2011 Page 1 UHM Media Lab 2350 DOLE ST. KHET Studio B WEB SITE: http://www.communications.hawaii.edu/mlab/about.htm CANON XA10 Camcorder Director’s Phone: 956-3358 FRONT DESK: 956-3355 WHAT’S IN THE CAMCORDER PACKAGE? Identify and explain all the items in the Camcorder Package Identify all Detachable parts of the CANON XA10 Camcorder Unit 1. 2. 3. 4. 5. 6. Shotgun Microphone (condenser type) Camera Handle unit Lens Cap Lens protection filter Lens Hood Tripod Quick-Release Adapter CANON XA10 Camcorder UHM Media Lab Study Guide 8/17/2011 Page 2 UHM Media Lab 2350 DOLE ST. KHET Studio B WEB SITE: http://www.communications.hawaii.edu/mlab/about.htm CANON XA10 Camcorder Director’s Phone: 956-3358 FRONT DESK: 956-3355 THE TRIPOD AND CAMERA 1. List 3 safety rules for proper handling of the tripod (to avoid costly damage): a. Never lean a collapsed tripod against a wall; always lay it down on the floor. b. Always open tripod legs by pulling all 3 legs outward at the same time. c. Never attempt to pan or tilt the head with the pan and tilt locks tightened down. 2. Memorize and identify the following Tripod Parts: 1. Tripod head 2. Tilt lock 3. Pan lock 4. Pan handle 5. Release lever (for camcorder plate) 6. Camcorder Head Lock 7. Bubble level 8. Leg extensions 9. Leg extension lock 10. Spreaders 11. Spreader lock (for collapsed tripod) 12. Camcorder Wedge Plate (remains attached to the camcorder) Complete the following Camcorder related demonstrations: A. Demonstrate how to properly extend the tripod legs. Unlock the spreader lock (11) holding the tripod legs together. Unlock the leg extension locks (9). Extend legs and re-lock. B. Demonstrate how spread the tripod legs and adjust the head so that the head is level. Drop one leg to the ground and pull on the other 2 legs so that they open evenly. Adjust the tripod head by loosening the head lock (6) and centering the bubble in the level indicator (7). Retighten the head lock. CANON XA10 Camcorder UHM Media Lab Study Guide 8/17/2011 Page 3 UHM Media Lab 2350 DOLE ST. KHET Studio B WEB SITE: http://www.communications.hawaii.edu/mlab/about.htm CANON XA10 Camcorder Director’s Phone: 956-3358 FRONT DESK: 956-3355 C. Demonstrate how to mount the camcorder on the tripod. Before mounting the camcorder to the tripod, make sure that the tilt lock (2) and pan lock (3) are locked and all leg extensions are secured so that the tripod does not move or collapse when mounting the camcorder. After mounting the camcorder to the tripod, be sure to loosen the pan lock (3) in order to avoid accidentally knocking the tripod over. D. Demonstrate this basic safety procedure. Always double check tripod stability prior to mounting the camcorder. IMPORTANT NOTE: To avoid potential accidents with tipping the tripod over, never leave the camcorder unattended, especially when tripod head (tilt lock) is in an unlocked position. ALWAYS BE AWARE OF THE STATUS OF THE TRIPOD! To avoid damage to the tripod head, never force a pan or tilt when the tripod head is in a locked position. This will cause permanent damage to the tripod head! POWERING THE CAMERA Demonstrate two ways to power the camcorder 1. Battery power: Push a battery into the battery slot under the viewfinder. Slide the battery upward (the triangle arrow at the top of the battery points in the correct direction) until it locks into place. Turning the camcorder on. Remove the camcorder lens cap and press the “POWER” button to turn the camera on. A green light will illuminate next to the ON/OFF text. Open the LCD screen to see the picture. The battery level indicator is on the upper right. If it isn’t, push the “DISP. BATT INFO” Button to bring it up. To remove the battery, turn the camcorder off, slide the lever on the bottom of the camcorder toward the front of the camcorder, and then slide the battery downward and pull it out. 2. AC power: To avoid pulling over the camera, start by working from the wall to the camera. Plug an extension cord into the wall. Plug a power strip into the extension cord, making sure the power strip is turned off. Plug the AC power adapter cord into the power strip. Plug the AC power adapter into the “DC IN” plug on the camera. Turn on the power strip. The camera can now be turned on. NOTE: The camera battery can be charged when the AC adapter is plugged into the camera and the camera is turned off. The ON/OFF (CHG) light on the camera blinks red to indicate that the battery is charging and it goes out when the battery is fully charged. Explain the situations in which a battery or AC power is used. Batteries should be used for mobility such as when the camera is handheld or used for short periods of time before setting up again. AC power should be used for extended setups when camera is to be set up in one place for an extended period. CANON XA10 Camcorder UHM Media Lab Study Guide 8/17/2011 Page 4 UHM Media Lab 2350 DOLE ST. KHET Studio B WEB SITE: http://www.communications.hawaii.edu/mlab/about.htm CANON XA10 Camcorder Director’s Phone: 956-3358 FRONT DESK: 956-3355 SD MEMORY CARD INSTALLATION You will be recording to SD memory cards rather than the camcorder’s internal memory. Use a memory card with a class rating of 4 or better for recording speed. Demonstrate how to load memory cards to use them with this camcorder. 1) Turn the camcorder off. The ON/OFF (CHG) indicator must be off with no green light. 2) Open the LCD panel. 3) Open the double memory card slot cover. 4) Insert an SD memory card straight in, with the label facing the front of the camcorder, into slot “A” until you hear a click. 5) You can put another card in the slot “B” if you wish. 6) Close the slot cover. NOTE: ALWAYS TURN OFF THE CAMCORDER WHEN INSERTING OR REMOVING A MEMORY CARD. Also, when the ACCESS indicator light is flashing, do not disconnect power, turn off camcorder, or remove memory cards. NOTE: The camera has internal memory that can be used for recording, but any recordings on this memory must be deleted before returning the camera to the Media Lab. The lab will not be responsible for any recordings left in the camera when it is checked in! SETTING UP AUDIO MICS 1. This camera comes with built-in microphones that are only good for ambient/background sounds. For professional quality audio, we will plug in professional microphones. 2. If the camera isn’t already setup with an external on camera shotgun microphone, attach it and plug it in to CH2 (audio channel 2). Connect the hand mic to an XLR cable and plug that into CH1. Plug in the headphones. 3. Set the audio controls on the camera handle (see illustration). The switch position for CH1 will be middle (MIC) for the hand mic and right (MIC+48) for the lavalier mic. Know the following terminology for our mics: SHOTGUN MIC: A condenser mic which requires electrical power to work and has a narrow pickup pattern which picks up sound best from the front. HAND MIC: A dynamic mic with a cone-shaped pickup pattern and picks up sound a bit better from the front than from the sides. LAVALIER MIC: A condenser mic with an omnidirectional pickup pattern (picks up sound evenly from any direction). LINE LEVEL: A setting on the camera to match the strong electrical audio signal from a device such as audio amplifier or DVD player. MIC LEVEL: A setting on the camera to match the weak electrical audio signal generated by a microphone. DYNAMIC MIC: A microphone that generates its own weak electrical audio signal such as a hand mic. CONDENSER MIC: A microphone that needs electrical power to work. (The shotgun mic and the lavalier mic are examples of condenser mics). CANON XA10 Camcorder UHM Media Lab Study Guide 8/17/2011 Page 5 UHM Media Lab 2350 DOLE ST. KHET Studio B WEB SITE: http://www.communications.hawaii.edu/mlab/about.htm CANON XA10 Camcorder Director’s Phone: 956-3358 FRONT DESK: 956-3355 ATTENUATE: To reduce the signal strength or level by a large degree. The ATT switch position reduces the audio signal strength when the sound is excessively loud and distorted. However, it is not enough to compensate for a line level signal. PHANTOM POWER: Electrical power (+48v) provided to the microphone from the camera through the audio cable. NOTE: Supplying phantom power to dynamic microphones may damage the microphone. Thus, it is important to determine whether or not the mic needs phantom power. Before connecting a mic make sure that the +48V switch is set to OFF. If your audio display and headset do not reveal audio signal, then turn the +48V to ON. Don’t forget to turn the phantom power OFF when not in use. 4. After setting the switches, turn the camera on and use the thumbwheels to adjust the recording levels for the audio. Have someone speak into the microphones and set the recording levels to peak around -10dB. Adjust the audio separately for Ch1 and Ch2. MANUAL VERSUS AUTOMATIC MODE On the opposite side of the camcorder is a switch that enables you to choose AUTO, “M” (Manual), or CINEMA. You may choose to use “AUTO” for your shooting, but you must also understand how to manually set White Balance, Gain, and Exposure to have complete control when necessary. (For information on using the “CINEMA” mode, please consult the Canon Instruction Manual.) Set the switch to “M” for manual control. LCD SCREEN: FUNCTION AND MENU This is the on-screen display for the camcorder in the manual mode. If it isn’t showing, push the DISP. Button on the side of the camera. Explain the function of each of the icons and settings on the screen: 1. 2. 3. 4. 5. 6. 7. 8. 9. 10. 11. 12. 13. 14. 15. Button to touch to go to the FUNC menu Aperture setting Shutter speed setting Gain setting Focus setting Face detection setting White balance setting Audio levels indicator Button to take a digital snapshot Camera mode and number of scenes recorded; Changes to time in the recording mode to indicate how long the recording has been going. Pause/Record indicator – Changes to a red dot when recording video Image Stabilization setting Estimated charge left on battery and approximate of amount of recording time left Memory slot(s) selected and how much recording time remains Video quality setting CANON XA10 Camcorder UHM Media Lab Study Guide 8/17/2011 Page 6 UHM Media Lab 2350 DOLE ST. KHET Studio B WEB SITE: http://www.communications.hawaii.edu/mlab/about.htm CANON XA10 Camcorder Director’s Phone: 956-3358 FRONT DESK: 956-3355 16. Microphone setting to reduce wind noise (cuts out low frequencies) and microphone attenuation indicator; normally set to off and does not appear 17. Setting for audio monitoring or audio and video monitoring; The Headphones icon indicates it is set for monitoring audio with headphones 18. Button to touch to display a screen with zoom control settings. The camcorder features a touch-sensitive screen on the LCD panel for users to review, select and change camcorder settings. Use your finger to navigate through the options by touching the icons or images on the LCD screen. You can also scroll through the menus and settings by swiping your finger up and down or across the screen. Touch the screen gently… sometimes there is a lag or no response if you don’t touch the screen in the right place. NOTE: Keep your fingers and hands clean for better response from the touch screen and to avoid scratching the screen. If you see a notation such as FUNC MENU, etc., it means to touch the FUNC icon (top left of screen), which will then take you to a MENU of options. From that menu, you can choose settings such as White Balance or AGC Limit. Whenever you want to return to the main screen on the LCD panel, touch the “X” icon in the upper right corner. Touching a “go back” arrow returns you to the previous screen. MANUAL CAMERA MENU SETTINGS Demonstrate how to initialize the memory card. (If you have already used the card in a CANON XA10 camera you don’t have to redo it.) NOTE: Initializing or formatting deletes all files on the memory card. 1) To initialize: Turn camera on and use the LCD touchscreen to access the menu system: FUNC MENU Card A. Initialize Mem. 2) If you are using two memory cards, initialize Mem. Card A and Mem. Card B. See Instruction Manual for additional options. Navigate and check or set the following menu selections to operate the camera: 1. Recording mode (quality) normally set to FXP (30 mins. on a 4GB card) FUNC MENU Recording Mode (FXP) 2. Recording media (where your movie files will be recorded): “A” and/or “B” FUNC MENU Rec Media for Movies (“A”) 3. Frame rate: 60i FUNC MENU CANON XA10 Camcorder UHM Media Lab Study Guide 8/17/2011 Frame Rate (60i) Page 7 UHM Media Lab 2350 DOLE ST. KHET Studio B WEB SITE: http://www.communications.hawaii.edu/mlab/about.htm CANON XA10 Camcorder Director’s Phone: 956-3358 FRONT DESK: 956-3355 4. XLR Rec Channel: CH1 (keeps audio channels separate; CH1/CH2 setting combines the 2 audio channels into one signal) FUNC MENU XLR Rec Channel (CH1) 5. AV/Headphones: Headphones FUNC MENU AV/Headphones (Headphones icon) 6. Volume: 8 is the midpoint for the loudness of the headphones 7. FUNC MENU Volume (Headphone icon + 8) 8. FUNC Rec. Programs Manual Exposure Be sure to check these settings for manual operation of the camera. These settings can be adjusted through the menu in the Manual Exposure screen. In the “M” (Manual Exposure) mode, you control all aspects of the exposure. NOTE: There are 3 other options in the manual camera mode: P for Programmed AE (you can set everything except aperture and shutter speed which the camera chooses); Tv for Shutter-Pri.AE (you can set everything except aperture which the camera chooses); Av for Aperture-Pri AE (you can set everything except shutter speed which the camera chooses). a. b. c. d. Touch to select Aperture control; adjust with the slider at the bottom of the screen (d) Shutter Speed control; adjust with slider (d) Gain control; adjust with slider (d) Touch arrows at either end to adjust settings on slider or touch the slider and swipe left or right to adjust e. Zebra level setting: allows you to chose between 70% or 100% video levels for the zebra pattern f. Zebra on/off: A red bar on the side of the icon indicate that zebras are on g. Wave Form Monitor: Indicates the relative luminance levels of the video across the screen 9. Aperture: This will be adjusted at the time you are ready to start recording 10. Shutter speed: 1/60 (Standard video shutter speed) 11. Gain: 0dB (0dB gain minimizes the amount of video noise or grain in the video) 12. White Balance: Manually set the white balance by navigating to the white balance screen. FUNC White Balance Set 1 (or Set 2) 13. Choose one of the 2 icons, or , and shoot a white card in the scene. To set the white balance touch “Set WB”. (Choosing “AWB” lets the camera automatically guess the setting.) Other white balance options include selecting a preset white balance to match the lighting conditions of the scene. (See Instruction Manual for matching white balance to lighting conditions.) CANON XA10 Camcorder UHM Media Lab Study Guide 8/17/2011 Page 8 UHM Media Lab 2350 DOLE ST. KHET Studio B WEB SITE: http://www.communications.hawaii.edu/mlab/about.htm CANON XA10 Camcorder Director’s Phone: 956-3358 FRONT DESK: 956-3355 ADJUSTING FOCUS AND FOCAL LENGTH (ZOOMING) Demonstrate how to focus the viewfinder for your eye • • • Pull out the viewfinder and look at the picture. Locate the lever under the viewfinder. Move the lever back and forth until icons in the viewfinder are sharp and in focus. Demonstrate 3 ways to “zoom” the lens (without the remote control) There are three ways to zoom on the Canon XA10: 1) using the zoom lever on the camcorder (back of camcorder toward the viewfinder, just in front of the handle); 2) using the zoom rocker on the handle; 3) using the zoom control on the LCD touch screen. Demonstrate 4 ways the focus the lens and explain what indicators are displayed in the viewfinder. 1. Auto Focus: Switch the camera to one of the 3 Auto Focus modes (I.AF / MF / AF), and let the camera focus itself automatically. Touch a distinct object or shape on the screen and the camera will focus on that object temporarily. NOTE: Auto focus modes can be selected in the camera menu system. 2. Manual Focus: Switch to Manual Focus mode (MF), zoom all the way in on your subject using the viewfinder. Turn the focus ring to focus on your subject then zoom out to frame your scene. 3. Selected Focus: Select the MF icon in the FUNC menu. Touch a subject that appears inside the rectangular focusing frame. The Touch AF mark (four triangles pointed inward) will flash and the focusing distance will be adjusted automatically to that location. 4. Face Detection: Select Face Detection & Tracking in the camera menu. In AF mode, the camera will focus on faces in the scene. If there are several faces in the scene, you can choose the one on which you want to focus by touching it on the screen. Doublelined box corners shows where you are focused. SETTING MANUAL EXPOSURE Navigate to the Manual Exposure menu screen. Touch the aperture button (a) on the screen and use the slider (d) to adjust the exposure of the scene. Name and explain 4 things that affect the exposure of the image. 1. Aperture: Changes the size of the opening in the lens to admit more or less light. 2. Shutter Speed: Changes the amount of time the light is recorded for each frame. More time allows more light and greater exposure. 3. Gain: Changes the sensitivity of the camera’s light sensor. The higher the sensitivity the less light is needed to record an image. The big draw back to increasing gain is the increase in video noise or grain. Avoid using gain whenever possible to maintain the quality of the picture. CANON XA10 Camcorder UHM Media Lab Study Guide 8/17/2011 Page 9 UHM Media Lab 2350 DOLE ST. KHET Studio B WEB SITE: http://www.communications.hawaii.edu/mlab/about.htm CANON XA10 Camcorder Director’s Phone: 956-3358 FRONT DESK: 956-3355 4. Neutral Density: Changes the amount of light passing to the sensor by placing a dark filter in the light path. A neutral density filter does not affect the color of the image. The CANON XA10 does this electronically as you adjust the aperture. Demonstrate and explain the "Zebra" feature. • Use the zebra pattern as a guide for adjusting your exposure. You can look for two Zebra levels: 70% and 100%. (The Zebra pattern will not appear on your recording.) • Touch the tool icon (e) to select the Zebra levels. • Touch the 70% or 100% button and then touch the “go back” icon. • The Zebra pattern will appear on the areas exposed at 70% or overexposed areas at the 100% setting. The 70% level is useful for setting the proper exposure for faces… when the zebras just start to appear on the face, the person is correctly exposed • Touch (f) again to turn off the Zebra pattern. You can also turn on the waveform monitor (g) to help you judge exposure if you know how to use it. Just touch the WFM button (g) to bring up the wave form. Touch it again to remove it. Other Settings: Infrared Recording. Switch the INFRARED lever to ON and off. (You can choose between a black & white or green cast in the menu system.) The infrared switch greatly increases the camera’s sensitivity in low light situations but the video is monochrome (no colors). RECORDING Demonstrate how to record a series of scenes 1. 2. 3. 4. 5. Make sure your electrical power or battery is attached. Turn on the camcorder. Remove the lens cap. Flip open your LCD screen or use the viewfinder. You have three camera modes to choose from for recording. For our purposes, you will first use the Manual mode. 6. First, set the white balance. 7. Second, focus and frame (compose) a scene. 8. Third, set the correct exposure. 9. Then, press START/STOP to begin recording. Record for 5 to 10 seconds. Press START/STOP again to pause recording. 10. Focus, frame, expose, and record 2 more scenes each 5-10 seconds. 11. Switch the camera to AUTO and shoot another scene, letting the camera focus, expose, and white balance automatically. 12. Demonstrate 3 ways to start and stop recording. a. Button at the back of the camera b. Button on top of the handle c. “START” button on the touch screen when you select the “ZOOM” menu. 13. NOTE: If the LCD is difficult to see, turn on the LCD backlight to make it brighter by holding the DISP button down for more than two seconds. Do it again to go back to normal. CANON XA10 Camcorder UHM Media Lab Study Guide 8/17/2011 Page 10 UHM Media Lab 2350 DOLE ST. KHET Studio B WEB SITE: http://www.communications.hawaii.edu/mlab/about.htm CANON XA10 Camcorder Director’s Phone: 956-3358 FRONT DESK: 956-3355 PLAYBACK AND DELETE Demonstrate how to playback and delete what you have recorded 1. Push the “CAMERA/PLAYBACK” button on the side of the camera. This switches the camera from shooting mode to playback mode. 2. In the playback mode, you’ll see still images of the scenes you just shot. This is the Date/Index screen for playback. Touch a scene to play it back. 3. Touch the screen while a scene is playing to reveal more playback controls. 4. Touch the pause button to pause the playback. Touch the stop button to return to the Date/Index screen. 5. If you have a lot of scenes, you can swipe your finger across the Index screen to reveal other scenes. (Read the manual for other ways to view the scenes and see information about each scene.) 6. Use the zoom control to switch between 6 scenes per page and 15. 7. To delete scenes, touch “Edit” “Delete” “Select” 8. Select a scene by touching it. A checkmark appears on the still image. (You may touch more than one to delete. If you touch one again, the checkmark disappears.) 9. Touch “OK” and a confirmation screen appears. Touch “Yes” to delete (all) the scene(s) you have selected. USING THE CUSTOMIZABLE BUTTONS Identify 3 buttons that can be customized There are 3 camera buttons that can be customized according to your preference when the camera is in the manual mode. They can be shortcuts to the functions you use most often. You can select the settings you want in the menu: FUNC MENU [Custom Key/Dial] or [Assign Button 1] or [Assign Button 2] 1. Suggested setting for Assign Button 1 is AF/MF to switch between auto focus and manual focus controls. 2. Suggested setting for Assign Button 2 is WB Priority to switch between Auto White Balance (AWB) and the white balance setting you manually set. 3. In Manual mode (M) set the Custom Button/Dial to Manual Exposure. This allows you to toggle between the Aperture setting, Shutter Speed setting, and Gain setting. You can then change the each setting by rotating the dial beneath the Custom Button. 4. In one of the manual program modes P, Tv, Av, you may want to set the Custom Dial to Exposure to make it easy to adjust your exposure setting. Exposure allows you to dial CANON XA10 Camcorder UHM Media Lab Study Guide 8/17/2011 Page 11 UHM Media Lab 2350 DOLE ST. KHET Studio B WEB SITE: http://www.communications.hawaii.edu/mlab/about.htm CANON XA10 Camcorder Director’s Phone: 956-3358 FRONT DESK: 956-3355 in exposure compensation (if the automatic exposure is too dark, you can dial in addition exposure compensation to brighten the scene or reduce the exposure compensation to darken the scene.) See page 90 in the CANON XA10 Instruction Manual for other choices. STRIKING / PACKING UP THE CAMERA EQUIPMENT Demonstrate how to “strike” the Camera equipment • • • • • • • • • • Turn off the camera and remove the memory card(s). Return it to the Media Lab Assistant (or put it away if it is yours.) Disconnect the camera power cable. Disconnect the headphones, hand mic, and XLR cable (DO NOT!!! stretch the headphone cable coils) Remove the camera from the tripod. Pack all items neatly in their proper location in the camera bag. All cables must be properly coiled (“over/under”). Tripod legs should be retracted and locked. Head lock should be locked. Pan handle rotated down and tightened down into position along tripod legs. Pan and tilt locks should be unlocked (this prevents possible damage to pan and tilt locks while transporting). For more information about the Canon XA10 HD Camcorder, consult the Instruction Manual online at: www.usa.canon.com/cusa/consumer/products/camcorders/professional_camcorders/ xa10#Overview Or review the Instruction Manual included with the camcorder. CANON XA10 Camcorder UHM Media Lab Study Guide 8/17/2011 Page 12