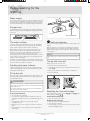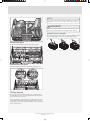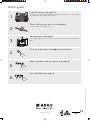
1
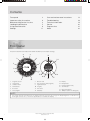
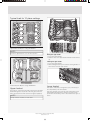
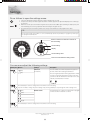
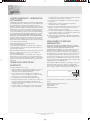
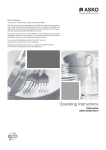
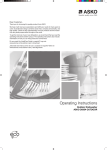
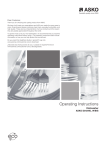
Dear Customer,
Thank you for choosing this quality product from ASKO.
We hope it will meet your expectations and fulfill your needs for many years to
come. Scandinavian design combines clean lines, everyday functionality, and
high quality. These are key characteristics of all our products and the reason
they are greatly appreciated throughout the world.
To get the most out of your new dishwasher, we recommend that you read the
operating instructions before using it. The operating instructions also include
information on how you can help protect the environment.
Do you need this Use&Care Guide in spanish? Log onto
www.askona.com/customer-care to download.
¿Necesita esta Instrucciones de uso y cuidado en español? Entre en
www.askona.com/customer-care y descárguesela.
Operating Instructions
Dishwasher
ASKO D5459XLSOF
Contents
Front panel
Important safety instructions
Before washing for the first time
Loading the dishwasher
Using the dishwasher
Settings
2
3
4
5
8
11
Care and maintenance instructions
Troubleshooting
Technical information
Service
Program chart
Notes
14
16
19
20
21
22
Front panel
The panel is fitted with touch buttons with audible feedback (see the chapter Settings).
4
5
12
6
3
14
START
STOP
7
2
PROG
1
8
11
18
15
16
9
10
13
17
1
Program selector
7
Rinse & Hold
13
Display
2
Heavy wash
8
Time set (for the Time program)
14
Delayed start
3
Sanitation wash
9
High temperature
15
Child lock (button lock)
4
Normal wash
10
Long dry
16
Salt indicator
5
Eco wash
11
Time saver
6
Time program
17
Rinse aid indicator
12
Start/Stop
18
TAB (3-in-1/all-in-one detergent)
NOTE!
• Two minutes after the last button press, the display enters left-on mode to save energy. The display brightness is reduced. Press
the Program selector once, or one of the option buttons, to reactivate the display.
2
Customer Care Center 1-800-898-1879
www.askona.com
Important safety
instructions
SAVE THESE INSTRUCTIONS FOR FUTURE REFERENCE
WARNING!
This manual does not cover all possible conditions and
situations that may occur. Common sense and caution should
always be used when installing, operating, and maintaining
any appliance.
• Read all instructions before using the dishwasher.
• Dishwashers must be electrically grounded. Read the
Installation Instructions for details.
• Use the dishwasher only for its intended purpose.
• Do not run the dishwasher while you are out of the home.
• Use only automatic dishwasher detergents and rinse agents.
• To reduce the risk of injury, keep detergents and rinse aids
out of the reach of children.
• Do not load sharp items near the door; you could damage
the door seal.
• Place sharp knives in the cutlery basket with the sharp ends
down to avoid the risk of cut-type injuries.
• Do not wash plastic items unless they are marked
“dishwasher safe” or the equivalent. For items not marked,
check the manufacturer’s recommendations. Items not
dishwasher safe could become deformed or melt and create
a potential fire hazard.
• Do not operate the dishwasher unless all enclosure panels
are properly in place (i.e., guard plate, access panel, toe
kick, etc.).
• Do not tamper with controls by removing or changing.
• Do not abuse, sit on, or stand on the dishwasher door or
baskets.
• To reduce the risk of injury, do not allow children to play in
or on a dishwasher.
• Under certain conditions, hydrogen gas may be produced
in a hot water system that has not been used for two weeks
or more. HYDROGEN GAS IS EXPLOSIVE. If the hot water
system has not been used for two weeks, before using the
dishwasher turn on all hot water faucets and let the water
flow from each for several minutes. This will release any
accumulated hydrogen gas. As the gas is flammable, do
not smoke or use an open flame during this time.
• When removing an old dishwasher from service or
discarding it, remove the door to the washing compartment.
• Do not store or use combustible materials, gasoline, or other
flammable vapors and liquids in the vicinity of this or any
other appliance.
• Disconnect electrical power to dishwasher before servicing.
• Repairs should be done by a qualified technician.
• Read the grounding instructions in the installation
instructions.
• Should a child swallow dishwasher detergent or rinse aid,
give plenty to drink immediately, i.e., one or two glasses of
milk or water. Do not try to induce vomiting. Seek medical
advice immediately: Call the National Capital Poison Center
at 1-800-222-1222.
• Always close the door and start the dishwasher as soon as
you put in the detergent.
• Always keep small children away from the machine when it is
open. There may be some detergent residue left inside the
machine.
• If dishwasher detergent gets in someone’s eyes, rinse them
with plenty of water for at least 15 minutes.
• Do not allow children to use or play in or on the dishwasher.
• Load sharp objects with the pointed end facing the back of
the dishwasher. Sharp items loaded in the cutlery basket
should be loaded with pointed ends down.
Activate child lock (Kid Safe™)
You can activate the child lock (button lock) to prevent children
from starting the dishwasher (see the section Settings).
Winter storage/Transport
• Store the dishwasher where the temperature remains above
freezing.
• Avoid long transport distances in very cold weather.
• Transport the dishwasher upright or laying on its back.
Overflow guard function
The overflow protection starts pumping out the machine and turns
off the water supply if the water level in the dishwasher exceeds
the normal level. If the overflow protection is triggered, turn off
the water supply and call the Customer Care Center.
Care and maintenance instructions
When cleaning the edge around the door, use only a slightly
damp cloth. Do not spray water around the edge! Moisture can
make its way into the lock, which contains electrical components.
Packing material
Please sort waste materials in accordance with local guidelines.
Disposal
• When the machine has reached the end of its service life and
is to be disposed of, it should immediately be made unusable.
Pull out the power cable and cut it as short as possible.
• The dishwasher is manufactured and labeled for recycling.
• Contact your municipality for information about where and
how your dishwasher can be recycled correctly.
Child safety
TIP!
Dishwasher detergents and rinse aids are corrosive, so always
keep them out of reach of children.
Customer Care Center 1-800-898-1879
www.askona.com
3
Before washing for the
first time
Water supply
The machine can be connected to either a hot (max. 160 °F, 70
°C) or cold water supply. We recommend a cold water supply.
The water pressure should be 4.2-140 psi. See also the section
Economic dishwashing in the chapter Loading the dishwasher.
Program key
Some dishwashers include program keys in different languages.
Attach the program key in the appropriate language to the top
of the door.
Salt compartment lid
Refill salt indicator
The water softener
In order to achieve good dishwashing results, the dishwasher
needs soft water (water with low mineral content). Hard water
leaves a white coating on dishes and the dishwasher.
Water hardness is specified using the following scales: The
German water hardness scale (°dH) and the French water
hardness scale (°fH). A water supply with a water hardness in
excess of 6°dH (9°fH) must be softened. This is done
automatically with the aid of the built-in water softener. In order
for the softener to function optimally, it must be adjusted to the
hardness of the water supply.
Contact the local water utility to check the water hardness in your
area. Once you have adjusted the water softener, use detergent
and rinse aid doses suitable for soft water.
When the salt needs topping up, the above symbol lights on the
display.
When the salt runs out, unscrew the cap and fill the container
with salt. Water is only needed the first time! Wipe clean and
tighten. Run a program to ensure that any salt in the dishwasher
is rinsed away.
NOTE!
After topping up, it may take a while before the symbol goes
out.
Top up with rinse aid
Drying is faster if you use rinse aid.
Adjusting the water softener
1 Open the rinse aid compartment lid.
Chapter Settings, page 13 describes how to adjust the water
softener. Don't forget to fill the salt compartment with salt after
adjusting the water softener.
2 Carefully top up with rinse aid. Only add rinse aid to the level
marked max.
3 Wipe up any spilled rinse aid around the compartment.
4 Close the lid firmly.
Fill up the salt
Before you begin using a dishwasher with a water softener, you
must fill the salt compartment with salt. Use large grain salt or
special dishwasher salt.
WARNING!
Top up the salt just before running a program. To avoid the risk
of rust stains, the dishwasher must be rinsed immediately after
topping up the salt.
Never pour dishwasher detergent into the salt compartment.
This destroys the water softener!
Selecting the rinse aid dosage
Do as follows the first time:
1 Unscrew the lid as illustrated.
Rinse aid dispensing can be set from
dose). (Factory settings:
)
2 Insert the funnel supplied with the dishwasher in the salt
compartment top-up hole. First, pour in about 0,3 gal (1 l) of
water.
Increase the rinse aid dosage:
• If the dishes have water marks.
3 Then add salt, a maximum of 3 lb (1.5 kg), until the
compartment is full.
4 Wipe up any excess salt so that the lid can be screwed on
firmly.
(High
Reduce the rinse aid dosage:
• If the dishes have a sticky white/blue film.
• If the dishes are streaked.
• Heavy foaming. If you have very soft water, the rinse aid can
be diluted 50:50 with water.
5 Run a program to ensure that any salt in the dishwasher is
rinsed away.
4
(Off) to
Customer Care Center 1-800-898-1879
www.askona.com
Loading the dishwasher
Setting the rinse aid dosage
Economic dishwashing
The section Settings describes how to set the rinse aid dosage.
Run programs only with a full load
Wait until the dishwasher is fully loaded before running a program,
this way you save energy. Use the Rinse & Hold program to rinse
the dishes if there are any unpleasant odors while you wait for
the dishwasher to become fully loaded.
Refill rinse aid indicator
When the rinse aid needs topping up, the above symbol lights
on the display.
NOTE!
After topping up, it may take a while before the symbol goes
out.
Run programs at a lower temperature
If the dishes are only lightly soiled, you can select a lower
temperature with certain programs. See also the section Selecting
Options in the chapter Using the dishwasher.
Select a program with Short dry
To save energy, use Short dry. The drying result will be better if,
once the program is finished, you leave the door slightly open.
Do not rinse under running water
Simply scrape off large food particles before loading the
dishwasher.
Choose a green detergent
Read the environmental declaration on the packaging!
Connect to cold water...
If you use oil or electricity to heat your home.
Connect to hot water (max. 160 °F (70 °C))...
If you use district heating, solar power, or geothermal power to
heat your home. Choosing a hot water connection cuts program
times and reduces the dishwasher's electricity consumption.
Fragile dishes
Some cookware is not dishwasher safe. This can be for several
reasons. Some materials cannot withstand high temperatures,
others can be damaged by dishwasher detergent.
Fragile decoration
Porcelain with decoration on top of the glazing (the items feel
rough) should not be washed in a dishwasher.
Crystal/Glass
Position items so that they do not touch each other during the
wash. Use the lowest possible wash temperature and the shortest
possible program. Select Short dry. Antique and very fragile items
should not be washed in a dishwasher.
Glass washed in a dishwasher at high temperatures can gradually
develop a gray film that cannot be removed. Wash fragile glasses
at a low temperature and with a small amount of detergent.
Silver
Silver and stainless steel items should not come into contact, as
the silver can become discolored.
Cutlery with glued handles
Some types of glue are not dishwasher safe. In such cases, the
handles may loosen.
Wood
Wooden items should only be washed in a dishwasher if marked
dishwasher safe.
Aluminum
Aluminum can lose its shine if washed in a dishwasher. However,
good quality aluminum pans can be washed in a dishwasher,
even if some of the shine will be lost.
Plastic items
Avoid washing plastic items that cannot withstand high
temperatures.
Customer Care Center 1-800-898-1879
www.askona.com
5
Typical load for 10 place settings
Upper basket with 10 place settings AHAM DW-1
NOTE!
Ensure the upper basket is set to its lowest position.
Raising the upper basket
1 Pull out the upper basket.
2 Grab the sides of the upper basket with both hands and lift it
up.
Lowering the upper basket
1 Pull out the upper basket.
2 While holding the basket, pull out the two locking handles on
either side to lower the upper basket.
Lower basket with 10 place settings AHAM DW-1
Lower basket
Upper basket
Place plates, side plates, serving dishes, pots, and cutlery (in
the cutlery basket) in the lower basket.
Place glasses, cups, bowls, side plates, and saucers in the upper
basket. Wine glasses are placed on the wine glass shelf and
knives are placed in the knife stand on the right (if equipped).
NOTE!
Place pots and pans in the rear left of the lower basket to best
utilize dishwashing performance from the rear spray nozzle
(Power Zone™ Pot & Pans), which is intended for these types of
dishes.
All dirty surfaces should face in and down!
6
Customer Care Center 1-800-898-1879
www.askona.com
NOTE!
Do not place cutlery made of different materials, such as silver
and stainless steel, in the same place (risk of discoloration).
WARNING!
Knives and other pointed items must be placed with the points
down in the cutlery basket or horizontally in other baskets.
Fold-down section for small items
The cutlery basket has a fold-down section in the middle for small
items, or small shafts, such as electric whisk attachments.
a
b
c
Fold-down plate supports
Lower the fold-down plate supports when washing pots.
1
2
Forward mount for plate support
Used for plates with a diameter greater than 9 3/4" (25 cm).
2
1
3
4
Cutlery basket
Place cutlery with the handles facing down, except for knives,
and spread them out as much as possible. Ensure that spoons
do not stack inside each other.
The cutlery basket is best placed in the middle at the front of the
lower basket to best utilize dishwashing performance from the
unique spray nozzle (Power Zone™ Cutlery), which is intended
for the cutlery basket.
Customer Care Center 1-800-898-1879
www.askona.com
7
Using the dishwasher
Add detergent
NOTE!
Use only dishwasher detergent! Liquid hand-washing detergent
must not be used as the foam that forms prevents the
dishwasher from operating effectively.
Dishwasher tablets
Halve the tablet if it is difficult to close the dispenser lid. There is
a risk that the detergent will not be released properly if the lid is
tight and cannot open correctly.
NOTE!
Dishwasher tablets are not recommended for short programs
(less than 75 minutes). Use powder or liquid dishwasher
detergent instead.
1 Prewash detergent compartment
2 Main wash detergent compartment
We recommend that you use only unscented, granular automatic
dishwashing detergent. Using the wrong detergent could cause
flooding and/or damage your dishwasher. Do not use detergent
that has been wet and is clumped. Also, check the expiration
date on the container.
The amount of detergent needed can vary due to differences in
water hardness. To determine the water hardness in your area,
contact your local water utility or area water softening company.
The harder the water, the more detergent you may need. Refer
to the chart below for the recommended detergent amounts
based on water hardness. Remember, you should adjust the
amount of detergent you use by small amounts until you find the
correct amount. Twelve grains and higher is extremely hard water
and detergent alone may not be enough. You may need to use
a water softener to maximize the performance of your dishwasher.
Also, in areas with hard water (9+) you may need to wash at lower
temperatures to prevent hard water deposits from forming in tank
and wash system. In hard water areas, both the dishes and the
machine can develop a white or gray film after a while. If this
happens, run the Normal wash program with high temperature
and two tablespoons of citric acid or commercially available
dishwasher cleaner in the detergent compartment (with no dishes
in the machine).
3-in-1/All-in-one detergent
Read through the directions for these products carefully. If
anything is unclear, contact the detergent manufacturer.
Program selection
Press the Program selector one or more times until the desired
program symbol lights.
Heavy wash
Program for very dirty dishes, such as pans, casserole dishes,
and oven dishes. If these dishes do not completely fill the
dishwasher, you can add plates and other dishes that can
withstand a Heavy wash to fill out the load.
Sanitation wash
A program with the ability to help with most household germs
and extra dirty dishware. This program will have a high final rinse
temperature for a good drying result and germ treatment.
NOTE! Do not put in dishware that cannot stand high wash or
rinse temperatures.
NOTE!
If you use a dishwashing detergent with a rinse aid additive,
you should not fill the rinse aid dispenser. This could cause a
film on your dishes.
Recommended detergent amounts based on water hardness
Water hardness
Detergent amounts
Soft
(0-3 grains per gallon)
Prewash 1 teaspoon
Main wash 1 to 1-1/2 tablespoons
Medium
(4-8 grains per gallon)
Prewash 1 teaspoon
Main wash 1 to 2 tablespoons
Hard
(9+ grains*)
Prewash 1 teaspoon
Main wash 2 to 3 tablespoons
Normal wash
Use to wash normally soiled dishes, such as plates, serving
dishes, cups, glasses, and so on.
Eco wash
Use when you want to save energy. For normally soiled dishes.
Time program
The program adapts to the specified running time or finish time.
With this program, it is important to choose a time suited to how
dirty the dishes are.
0:30-1:15 Lightly soiled dishes
1:30-2:00 Normally soiled dishes
*12 grains and higher is extremely hard water.
2:15-3:00 Heavily soiled dishes
WARNING!
Children must be supervised – dishwasher detergent is
corrosive!
8
To set the program time, see the section Selecting Options.
Customer Care Center 1-800-898-1879
www.askona.com
Press and hold Start/Stop for five seconds if you want to cancel
the Delayed start option.
Rinse & Hold
Use to rinse dishes while you wait for the dishwasher to become
fully loaded.
Selecting Options
To select an option, press one of the option buttons. The field
next to the button lights when the option is activated. The available
options depend on the selected program. Once you have started
the program, the options you selected are saved for the next time
you use the same program. An exception is the Delayed start
option.
NOTE!
Remember to press the Start/Stop button to start the program.
Start the dishwasher
Press and hold Start/Stop until the display flashes three times
with the remaining time. This indicates that the program has
started. Close the door properly, otherwise the dishwasher will
not start. The display indicates
if the door is open.
NOTE!
Time set
Press the option button several times – or hold it in – to set the
desired program time for Time program. You can choose a
program time between 30 minutes and 3 hours.
If the machine does not start within 2 minutes of the last button
press, the display returns to showing the last program run.
Time remaining
High temperature
Activate this option for improved dishwashing results. The
machine then uses a higher temperature for the main wash. This
option cannot be activated if the Time saver option is selected.
If you want to use the lower temperature, press until the field next
to the button turns off.
You can vary the temperature as shown below:
Sanitation wash: 130 °F (55 °C) / 160 °F (70 °C)
Normal wash:
130 °F (55 °C) / 150 °F (65 °C)
Heavy wash:
140 °F (60 °C) / 150 °F (65 °C)
Eco wash:
120 °F (50 °C) / 140 °F (60 °C)
Long dry
A higher temperature in the final rinse and a longer drying phase
improves the drying result if you activate the Long dry option.
This causes a slight increase in energy consumption. This option
can be used with all programs except Time program. This option
cannot be activated if the Time saver option is selected.
If you want a program with Short dry, press so that the field next
to the button turns off.
Time saver
This option shortens the program time, but uses more energy
and water. This option can be selected with Heavy wash,
Sanitation wash, or Normal wash.
Delayed start
When you select Delayed start, the dishwasher will start 1-24
hours after you press the Start/Stop button.
1 Press the button once to activate Delayed start. Press the
button several times – or hold it in – to set the desired number
of hours.
2 Press Start/Stop and the dishwasher counts down 1 hour at
a time and starts after the selected delay.
Once you have selected a program and options, the display
indicates how long the program took the last time it was used.
Once you have started the dishwasher, the display indicates how
much program time remains. The remaining time is updated after
the water for the final rinse has been heated.
This may differ somewhat from time to time depending on the
temperature of the water supply, the amount of dishes, the
ambient temperature, and other factors.
The time counts down while the program is running and the
remainder of the program is displayed. The remaining time is
displayed, e.g., 1:15, meaning that 1 minute 15 seconds of the
program remains.
NOTE!
During the first run of each program, the remaining time
displayed can be slightly misleading, as the dishwasher is
estimating the time. When you run the program a second time,
the dishwasher will calculate the remaining time based on the
previous duration of the program.
Stopping or changing a program
If you want to change programs after starting the dishwasher,
open the door then press and hold Start/Stop for five seconds.
Add more detergent if the lid of the detergent dispenser has
opened. Then choose a new program, press Start/Stop, and close
the door.
Do you want to add more dishes?
Open the door. The dishwasher stops automatically. Add the
dishes, close the door, and the dishwasher resumes the program.
If the dishwasher is turned off using
the main power switch or due to a
power failure
If the program was not finished, the interrupted program resumes
when power is restored.
NOTE!
During drying, the program is interrupted if the power is cut or
the door is open for more than 2 minutes.
Customer Care Center 1-800-898-1879
www.askona.com
9
Once the program has finished
Once the program has finished, "End" appears on the display.
A buzzer also sounds at the end of the program. See the section
Settings, which describes how to change this function.
Once the dishwasher has finished, it uses only standby power.
Turn off the dishwasher using the main power switch if you want
to completely cut the power. Turn off the water supply valve after
each use.
10
Customer Care Center 1-800-898-1879
www.askona.com
Settings
Do as follows to open the settings menu:
+
1.
Turn off the dishwasher using the main power switch. Wait about five seconds.
2.
Then press the main power switch again. Wait until the numbers appear in the right-hand display before continuing to
the next step.
3.
Within five seconds, press and hold the Program selector (wait for the audible signal confirming the button press) and
then immediately press the Long dry button without releasing the Program selector.
4.
Keep the buttons pressed until the symbols for the Heavy wash and Rinse & Hold programs start to flash.
TIP!
Be sure to press right on the symbols, so as not to inadvertently activate any other button. Try again if you fail to open
the settings menu the first time.
Press to save the set value and continue to
the next setting.
START
STOP
Current setting.
Display
PROG
Current setting value.
Press to browse between setting values.
You can now adjust the following settings:
Button press Options
(Off)
(On)
Settings
Description
Child lock
(Kid Safe™)
You can activate the child lock (button lock) option to
prevent children from starting the dishwasher.
Press the High temperature and Long dry buttons simultaneously to temporarily deactivate the button lock when
you want to start the dishwasher. The button lock is automatically reactivated after 2 minutes.
Press Start/Stop to save the setting value and continue to the next setting.
If you do not want to change any other settings, keep pressing Start/Stop to step through the entire settings menu.
(Off)
Buzzer volume
The dishwasher uses a buzzer to indicate when a program
is finished or when a fault has occurred.
(Low)
(High)
Press Start/Stop to save the setting value and continue to the next setting.
Customer Care Center 1-800-898-1879
www.askona.com
11
Button press Options
(Off)
Settings
Description
Operation volume
This sound is used to confirm each button press.
(Low)
(High)
Press Start/Stop to save the setting value and continue to the next setting.
(Low)
LCD contrast
For adjusting the contrast of the display.
(High)
Press Start/Stop to save the setting value and continue to the next setting.
(Off)
Rinse aid
Rinse aid dosage setting.
(Low dosage)
(High dosage)
Press Start/Stop to save the setting value and continue to the next setting.
(Off)
(On)
TAB
(3-in-1/all-in-one detergent)
This option can be activated when using 3-in-1/all-in-one
detergents. The dishwashing program automatically
adapts to provide the best possible dishwashing and
drying results every time. If you deactivate this option, the
dishwasher will return to ordinary function for all programs.
If this setting is activated, there is no need to add rinse
aid since this option disables rinse aid dispensing. It also
reduces the amount of salt added to the water softener.
NOTE!
In order to achieve good dishwashing results, it is essential to check which type of detergent or all-in-one product
best suits your needs! Read the detergent packaging
carefully for information on proper use. Always follow
the directions for use or information on the detergent
packaging!
12
Customer Care Center 1-800-898-1879
www.askona.com
Button press Options
Settings
Description
Press Start/Stop to save the setting value and continue to the next setting.
(Soft water)
Water hardness
(Hard water)
Adjusting the water softener. Read off the appropriate
setting from the water hardness table below.
°dH
°fH
0-5
0-9
6-8
10-14
9-11
15-20
12-14
21-25
15-19
26-34
20-24
35-43
25-29
44-52
30-39
53-70
40-49
71-88
50+
89+
Press Start/Stop to exit the settings menu.
Customer Care Center 1-800-898-1879
www.askona.com
13
Care and maintenance
instructions
Coarse filter
NOTE!
The coarse filter traps larger food particles, which cannot get
past the drain pump. Empty the coarse filter as necessary.
The dishwasher must not be used without the filters in place!
1 Lift the coarse filter by the handle.
Dishwashing results may be affected if the coarse filter is
incorrectly fitted.
2 Empty the coarse filter. Remember to replace it!
Drain pump
The pump can be accessed from inside the dishwasher.
Coarse filter
1 Cut the power to the dishwasher by unplugging the unit from
the power outlet.
2 Remove the coarse filter and pipe section.
3 Remove the small yellow drain pump access cover at the left
of the bottom drain (see illustration below).
Fine filter
Debris that collects on the fine filter is automatically rinsed away
during each wash. However, the fine filter and its pipe section
should be cleaned a couple of times a year.
1 Turn the handle counterclockwise once.
4 By inserting your finger into the hole, you can turn the pump
blades to release anything blocking the pump.
Fine filter
1x
2 Lift the pipe section straight up by the handle. Free the coarse
filter to clean the pipe section.
3 Remove and clean the fine filter.
5 Reinstall the access cover and filters.
4 Replace in reverse order. Check that the edges seal properly
when replacing the fine filter.
6 Plug the machine in again.
If the dishwasher still does not start and a whirring sound is
heard, the overflow protection has been triggered.
• Shut off the water.
• Unplug the unit from the power outlet.
• Call the Customer Care Center.
Pipe section
NOTE!
Do not forget to reinstall the drain pump access cover.
5 Lock the filter in place by turning the handle clockwise to the
stop position. The handle should point straight out from the
dishwasher.
Lower spray arm
Holes and bearings can sometimes become blocked.
1x
14
1 Pull the lower spray arm straight up to release it.
2 Remove any debris using a needle, toothpick, or some other
similar pointed device. The spray arms also have holes
underneath.
Customer Care Center 1-800-898-1879
www.askona.com
Door
When cleaning the edge around the door, use only a slightly
damp cloth (with a little cleaner if necessary).
WARNING!
Do not use a spray bottle or the like around the door lock. This
is to ensure that water does not penetrate the door catch and
come into contact with the electrical components.
Upper spray arm
1 Pull out the basket.
2 Unscrew the spray arm bearings as illustrated to remove the
spray arm from the upper basket.
Limescale deposits
The dishwasher tub is made of stainless steel and is kept clean
through normal use. However, if you have hard water, limescale
deposits may form in the dishwasher. If this happens, run the
Normal wash program with high temperature and two tablespoons
of citric acid or commercially available dishwasher cleaner in the
detergent compartment (with no dishes in the machine).
Spray arm bearings
Front panel
3 Clean the upper spray arm in the same manner as the lower
spray arm.
4 Replace the spray arm and screw the spray arm bearings
firmly back into place.
Keep the touch buttons clean and free from grease. Wipe them
clean with a dry or slightly damp cloth. Never use cleaners – they
can scratch the surface. Use the main power switch to turn off
the dishwasher before cleaning the touch buttons to avoid
activating any buttons unintentionally.
Customer Care Center 1-800-898-1879
www.askona.com
15
Troubleshooting
Display
Type of fault
Action
Overfilling
Call the Customer Care Center.
Water outlet fault
See "Water remains in the dishwasher above the filters"
in the table below.
Water inlet fault
Check that the water supply valve is on.
Inlet valve leakage
Turn off the water supply valve and call the Customer
Care Center.
Turn off the machine with the main power switch and then turn it on again to clear the error message from the display.
Problem
Possible causes
Action
The dishes are not clean.
The spray arms do not rotate.
Remove the arms and clean them.
Check that the dishes are not blocking the
spray arms.
Detergent is too old. Detergent is a perishable product.
Avoid large packages.
Incorrect detergent dosage.
Dose according to water hardness. Far too
much or far too little detergent can result in
poor dishwashing results.
Dishwashing program too weak.
Select a higher temperature or a more powerful program.
Dishes loaded incorrectly.
Do not cover dishes with large bowls or lids.
Avoid placing very tall glasses in the corners
of the baskets.
Glasses and cups have toppled over during Load the dishes securely.
the program.
Spots or films on the dishes.
The filter is not correctly fitted.
Screw the filter firmly into place. See the
section Care and maintenance instructions.
The water softener is leaking salt.
Check that the salt compartment lid is properly tightened. Otherwise call the Customer
Care Center.
Incorrect water softener setting.
See the section Settings.
Incorrect rinse aid dosage setting.
See the sections Before washing for the first
time and Settings.
Salt compartment empty.
Top up with salt. See the section Before
washing for the first time.
Too high temperature and/or too much deter- Wash crystal at a low temperature and with
gent can cause etching on crystal. Unfortu- a conservative amount of detergent. Contact
nately, this cannot be repaired, only prevent- the detergent manufacturer.
ed.
The dishes have a sticky white/blue film.
16
Rinse aid dosage setting too high.
Customer Care Center 1-800-898-1879
www.askona.com
Reduce the amount. See the sections Before
washing for the first time and Settings. If you
have very soft water, you may want to dilute
the rinse aid 50:50 with water.
Problem
Possible causes
Action
Spots on stainless steel or silver.
Some types of food, such as mustard, may- Rinse off these types of food if not starting
onnaise, lemon, vinegar, salt, and dressings, the dishwasher immediately. Or why not run
can mark stainless steel if left for too long. the Rinse & Hold program?
All stainless steel can cause spots on silver Silver and stainless steel items should not
if they come into contact during dishwashing. come into contact during dishwashing.
Aluminum can also cause spots on dishes.
Spots left after washing.
Lipstick and tea can be difficult to wash off. Use a detergent with a bleaching agent.
Rattling sound when dishwashing.
The dishes are not correctly placed or the
spray arms are not rotating.
The dishwasher does not start.
The Start/Stop start button has been pressed Press and hold Start/Stop until the display
for too short a time.
flashes three times with the remaining time.
Check that the dishes are placed securely.
Spin the spray arms to make sure they can
rotate.
The door is not properly closed.
Check.
A fuse/circuit breaker has been tripped.
Check.
The plug is not plugged into the power outlet. Check.
The water supply valve is turned off.
Check.
Overflow/leaks.
Check.
A whirring sound (the drain pump) is heard Turn off the water supply valve. Pull out the
from the dishwasher and does not stop when plug and call the Customer Care Center.
the main power switch is turned off.
Check that the Delayed start option has not Press and hold Start/Stop for five seconds if
been selected.
you want to cancel the Delayed start option.
1 minute appears on the display.
The program is taking longer than estimated. None. Next time the program is run, the corrected time will be displayed.
Water remains in the dishwasher above the Blocked drain hose.
filters.
Bad odor in dishwasher.
Loosen the drain hose from where it terminates. Check that no debris has clogged the
hose. Is the cone-shaped part of the drain
boot cut to the maximum size of the fitting
where it attaches?
Kink in drain hose.
Check that the hose is free from kinks and
sharp bends.
The filters are blocked.
Clean the coarse and fine filters.
Debris in the drain pump.
Clean the drain pump. See the section Care
and maintenance instructions.
Dirt around the seals and in corners.
Clean with dish brush and low foaming
cleaner.
Low temperature programs have been select- Run a program with a higher temperature
ed for a prolonged period.
about once a month.
Customer Care Center 1-800-898-1879
www.askona.com
17
Problem
Possible causes
Action
The dishes are not dry enough.
Drying power too low.
Activate the Long dry option.
The dishwasher is not fully loaded.
Fully load the dishwasher.
Rinse aid needs topping up or dosage is set Top up with rinse add or increase the rinse
too low.
aid dosage. See the sections Before washing
for the first time and Settings.
Open the door a little once the program has
finished.
Cannot close door.
The baskets are not correctly positioned.
Check that the baskets are correctly positioned horizontally.
Check that the dishes are not blocking the
baskets from sliding properly into place.
The touch buttons do not react when
pressed.
18
You have pressed the touch buttons too soon Wait a moment then try again.
after opening the door.
Dirt on the touch buttons.
Clean with a dry or slightly damp cloth.
Child lock (button lock) activated.
See the section Settings.
Customer Care Center 1-800-898-1879
www.askona.com
Technical information
Technical data
Height:
32-1/4'' - 34'' (819-864 mm)
Width:
24" (610 mm)
Depth:
22-7/8" (581 mm)
Weight:
115 lb (52 kg) 1)
Water pressure:
4.2–140 psi
Electrical connection: See serial number tag and rating plate.
Rated power:
1)
See serial number tag and rating plate.
Weight can vary due to different specifications.
Customer Care Center 1-800-898-1879
www.askona.com
19
Service
LIMITED WARRANTY – RESIDENTIAL
APPLIANCES
ASKO Distribution North America, LLC. (hereinafter “ASKO”) warrants
the original purchaser (the “ASKO Customer”) of the ASKO product
(the “ASKO Product”), who purchased the appliance from a
distributor, dealer, manufactures representative or other seller who
has been authorized by ASKO (“Authorized ASKO Dealer”), that this
ASKO Product is free of defects in material and workmanship, subject
to the terms and conditions set forth herein. The limited warranty
covers parts and labor, except as set forth in this Limited Warranty.
Service must be provided by an ASKO designated service company.
YOUR SOLE AND EXCLUSIVE REMEDY UNDER THIS LIMITED
WARRANTY SHALL BE PRODUCT REPAIR AS PROVIDED HEREIN.
The limited warranty is valid only in the United States or Canada and
applies only when the appliance is used in the country in which it
was purchased. Proof of original purchase date is required to obtain
service under this limited warranty.
Residential ASKO Products Used Exclusively for
Household/Personal Purposes:
Two (2) Years limited Warranty – Any warranty service claims for
residential ASKO Products must be filed with ASKO within two (2)
years from date of purchase.
Residential ASKO Products Not Used Exclusively for House Hold
Purposes, used Commercially or Use in marine, Mobile or
Aeronautical Applications:
One (1) Year limited Warranty – Any warranty service claims for
ASKO Products not used exclusively for household and personal
use, used commercially or used in marine, mobile, or aeronautical
application must be filed with ASKO within One (1) year from date
of purchase.
ITEMS EXCLUDED FROM
WARRANTY
results from defects in material or workmanship and is reported
to ASKO within 5 days from date of purchase.
6 Pickup and delivery. This appliance is intended to be repaired
in your home.
7 Repairs to parts or systems resulting from unauthorized
modifications made to the appliance.
8 Expenses for travel and transportation for product service if your
appliance is located in a remote area where service by an
authorized ASKO servicer is not available.
9 The removal and reinstallation of your appliance if it is installed
in an inaccessible location or is not installed in accordance with
ASKO’s published installation instructions.
10 Replacement parts or repair labor on appliances with original
model/serial numbers that have been removed, altered or cannot
be easily determined.
DISLCAIMER OF IMPLIED
WARRANTIES
YOUR SOLE AND EXCLUSIVE REMEDY UNDER THIS LIMITED
WARRANTY SHALL BE PRODUCT REPAIR AS PROVIDED HEREIN.
ASKO SHALL NOT BE LIABLE FOR INCIDENTIAL OR
CONSEQUENTIAL DAMAGES. Some states and provinces do not
allow the exclusion or limitation of incidental or consequential
damages, so these limitations and exclusion may not apply to you.
This warranty gives you specific legal rights, and you also may have
other rights that vary from state to state or province to province.
If you think you need repair service, first see the “Trouble Shooting”
section of the Use & Care Guide. If you are unable to resolve after
checking “Trouble Shooting” additional help can be found by calling
ASKO Customer Care at 1-800-898-1879
Read chapter Troubleshooting before contacting the Customer
Care Center. Make a note of the details on the rating plate
positioned on the right inside the dishwasher. Make a note of the
service number (1), item number (2) and serial number (3).
This limited warranty does not cover:
1 2
1 Replacement parts or repair labor if this appliance is used in a
manner that is inconsistent to published user or operator
instructions and or/or installation instructions.
Service no.
ART. NO.
2 Service calls to correct the installation of your appliance, to
instruct you on how to use your appliance, to replace or repair
house fuses, or to correct house wiring or plumbing.
SERIAL NO.
3
3 Consumable parts are excluded from warranty coverage.
4 Damage resulting from accident, alteration, misuse, abuse, fire,
flood, acts of God, improper installation, installation not in
accordance with electrical or plumbing codes, or use of products
not approved by ASKO.
5 Cosmetic damage, including scratches, dents, chips or other
damage to the finish of your appliance, unless such damage
20
Should you need further assistance, contact us at the address
below:
ASKO Distribution North America, LLC.
Customer Care Center
PO Box 44848
MADISON WI 53744
Customer Care Center 1-800-898-1879
www.askona.com
1
2
1
Normal wash 4) -
Normal wash
Eco wash
0:04
0.01
0.9
2.9-5.0
3.2
4.7
3.1
5.2
3.5
The energy label performance figures are based on this program.
0.01
0.4-1.2
0.5
0.9
0.5
0.7
0.8
Connection to hot water, approx. 120 °F (50 °C).
0:06
0:30-3:00
2:20
2:10
2:10
3:10
1:40
4)
-
0.6-1.6
0.9
1.6
1.0
1.5
1.4
Connection to cold water, approx. 50 °F (10 °C).
1
0:30-3:00
2:30
2:35
2:30
3:40
2:00
3)
-
max. 150
120
150
120
140
150
Consumption values vary depending on the temperature of the incoming water, room temperature, load size, selected additional options, and more.
0
2-3
2
3
2
3
2
Water consumption
(gallon)
2)
-
Rinse & Hold
max. 150
120
150
130
140
140
Hot water 3)
1)
Wash time
Energy
Wash time
Energy
(approx.
(approx. kWh) (approx.
(approx. kWh)
hours:minutes)
hours:minutes)
Cold water 2)
Consumption values
1)
-
Time program
0-2
2
Sanitation wash -
-
1
Options Prewashes Main wash Number Final rinse
(°F)
of rinses temperature
(°F)
-
Heavy wash
Program
Program chart
Customer Care Center 1-800-898-1879
www.askona.com
21
Notes
22
Customer Care Center 1-800-898-1879
www.askona.com
Notes
Customer Care Center 1-800-898-1879
www.askona.com
23
Quick guide
Load the baskets (see page 5)
1.
Do not rinse dishes under running water before loading them in the dishwasher. Simply scrape off
large food particles before loading the dishwasher.
Check that the spray arms can rotate freely
2.
Check also that the water supply valve is on.
Add detergent (see page 8)
3.
The detergent compartment has one smaller compartment for the prewash and one for the main
wash.
Press the main power switch
and close the door.
4.
Select a program and any options (see page 8)
5.
Press Start/Stop (see page 9)
www.askona.com
en (03-14)
Item No.: 463764. Rev. 02. We reserve the right to make changes.
6.