1
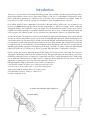
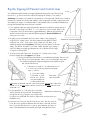
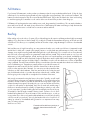
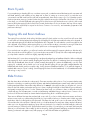
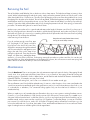
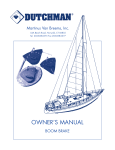
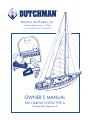
Martinus Van Breems, Inc.
54A Beach Road, Norwalk, CT 06855
Tel. 203-838-0375 Fax 203-838-0377
OWNER’S MANUAL
SAIL FLAKING SYSTEM TYPE A
Halyard Style Topping Lift
Table of Contents
Subject
Page
Introduction ............................................................................................ 1
Components - ............................................................................................. 2
Specifications - ........................................................................................... 2
Definitions - ................................................................................................ 3
Tools and Parts Required - ............................................................................ 3
Installing your Dutchman System ......................................................... 4
Running a Halyard Topping Lift - ................................................................... 4
Rig the Topping Lift Pennant and Control Lines - .............................................. 5
Adjust the Topping Lift Clamps - .................................................................... 6
Adjust the Control Line Length - ..................................................................... 7
Using the Dutchman System ................................................................. 8
Lowering the Sail - ...................................................................................... 8
Large Roach Main - ..................................................................................... 9
Downwind - ............................................................................................... 9
Full Battens - ............................................................................................. 10
Reefing ................................................................................................. 10
Storm Trysails - ......................................................................................... 11
Topping Lifts and Boom Gallows - ............................................................... 11
Slide Friction - .......................................................................................... 11
Removing the Sail - ................................................................................... 12
Maintenance ........................................................................................ 12
Trouble Shooting Guide ....................................................................... 13
Martinus Van Breems, Inc.
54A Beach Road, Norwalk, CT 06855
Tel. 203-838-0375 Fax 203-838-0377
Your Guarantee
Dutchman™ is a trademark of Martinus Van Breems, Inc. The Owners Manual is Copyright 1996 by Martinus Van Breems, Inc., P.O. Box 2875 Saug. Sta., Westport, Connecticut, 06880, U.S.A., 203-838 0375 fax 203 838 0377.
The Dutchman Sail Flaking System is Patented. Construction, purchase, or use of unauthorized systems may result in legal action.
Martinus Van Breems, Inc., reserves the right to change all prices, hardware, and specifications without notice at any time.
The Dutchman™ system is unconditionally guaranteed against defects in materials supplied by Martinus Van Breems, Inc., for a period of five (5) years. Defective items may be
returned to Martinus Van Breems, Inc., and will be replaced or repaired at the option of
Martinus Van Breems, Inc. Return of defective products should be accompanied by a letter
giving name, address, phone number, date of purchase, place of purchase, and identification of installing company, as well as an explanation of the defect or malfunction, and the
conditions under which the product was being used. This warranty does not apply to or
include any product that was improperly installed, or subjected to misuse, negligence, accident, or subjected to unauthorized modification or repair. Normal wear of wire or rope on
all equipment is excluded.
This warranty is in lieu of all other implied, express, and statutory warranties and guarantees, and in no event shall Martinus Van Breems, Inc., be liable for special, incidental or
consequential damages.
Martinus Van Breems, Inc.
54A Beach Road, Norwalk, CT 06855
Tel. 203-838-0375 Fax 203-838-0377
Introduction
Thank you for your purchase of a Dutchman Sail Flaking System. We work hard to produce quality, effective products
and provide excellent customer service. We’re here to help you. Call, fax, or contact Martin van Breems by e-mail.
Bear in mind that we guarantee your satisfaction with our products. See our guarantee for more details. Finally, we
know many of our sales come from customer recommendations, which we appreciate very, very much.
How well the system will work is dependent on how well it’s adjusted, and how stiff the sail is. As we mention in our
brochure, you must read through this manual. Quickly review pages 1-6, and focus on pages 7 and 8 - ‘Adjust the
Topping Lift Clamps’, and ‘Adjust the Control Line Length’. This will take about 20 minutes. The two most common
mistakes we find when checking out a problem is that the control lines are too loose, or that the topping lift clamps are
in the wrong position. After the system is set up, review the rest of the manual to learn how to operate the system.
You have an A system. This means the control lines are fastened to a single topping lift pennant, which can be removed
with the sail. We recommend the A System only for boats with halyard style topping lifts, where the topping lift runs
over a sheave at the top of the mast, like (or can be) a second main halyard. With a halyard topping lift, you only have
to connect the lower end of the topping lift pennant to the boom, hoist up the pennant, and run the lines through the sail
to install the system. To remove the sail, just lower the pennant down and remove it with the sail. If you have a boom
adjusted topping lift (the topping lift is fixed at the top of the mast), use the B or C system, or better yet, add a halyard
topping lift. Otherwise, you will have to go aloft to set up and adjust the system, or replace the control lines.
B and C systems are for boom adjusted topping lifts (the topping lift is fixed to the top of the mast). The Continuous
Topping Lift of the B and C system works like a clothes line loop. The topping lift clamps can be moved up or down from
the deck by rotating the Continuous Topping Lift, to replace the control lines or adjust the clamp positions. The B System
uses a simple jam cleat at the bottom of the Continuous Topping Lift and a regular block up top, fine for occasional
adjustments or replacing the control line. The more expensive C system uses
ball bearing blocks at the top and bottom of the Continuous Topping Lift so
it can be easily rotated. This allows you to slack the control lines to put
on a sail cover or awning without slits, or use a roller reefing boom.
Again, please read this manual. After over 10,000 systems,
we’ve learned a few things. Thank you, and we look
forward to hearing from you.
B System with a Halyard-Style Topping Lift
A System Clamp
Page 1
Components
Check that you have the following parts. Discs may have already been fastened to the tabs. Normally, the sailmaker
will supply a new topping lift pennant, using the mono and donut clamps and fasteners. If you will be making up the
pennant, refer to the specifications for the correct size. The swiveling mono clamps can be used with up to 3/8" or
10mm vinyl coated wire or rope. The lower donut clamps need to be drilled if used with over 1/8" (3mm) wire or 3/
16" (4.5mm) rope.
Item
Description
Quantity per Control Line
Discs
Fasteners
Attach the control lines to the tabs (double qty for A60+)
1/2" 8/32 SS machine screws with locking nuts
2 halves
2 of each
MonoClamp
Fasteners
DonutClamp
Fasteners
Spacer
Used to attach the control lines to the topping lift pennant
1/2" machine screws with locking nuts for mono clamp
Positioned under mono clamp to keep it in position
3/4" machine screws with locking nuts for donut clamp
Use when drilling out Donut clamp
2 halves
2 of each
2 halves
4 of each
2 total
Shackle
Tag
Use to attach topping lift pennant to the end of the boom
Attached to shackle to indicate bottom of pennant
1 total
1 total
Control line and topping lift specs
System Avg boat - ft
Avg boat - m
30-2
20-30
6-9
40-2
28-38
8.5 - 11.5
Mono Control line Specifications
Lb test / ft
300/50'
400/60'
Kgs test / m
140/15
180/18
Dia: mm
1.9
2.0
40-3
34-40
10.5 - 12
50-2
36-48
11 - 14.5
50-3
38-50
11.5 - 15
60-3
48-60
14.5 - 18.5
60-4
50-62
15 - 19
400/80'
180/24
2.0
500/80'
230/24
2.5
500/110'
230/33
2.5
600/140'
270/42
3.0
600/180'
270/54
3.0
Minumum SS Wire Topping Lift Diameter before vinyl coating (must be coated wire)
Dia - inches
1/8
5/32
5/32
5/32
3/16
3/16
Dia - mm
3.5
4
4
4
5
5
1/4
6
The first number of the system refers to the maximum luff length, while the second
number refers to how many control lines the system has. For example, a 30-2
System is for luffs up to 30', with 2 control lines. When ordering replacement
mono, refer to your system number. We also sell mono in economical, 100 yard,
(120m) lengths. The topping lift pennant must be low stretch rope or vinyl coated
wire to prevent wear on the sail.
Mono Clamp
Disc
Donut Clamp
Page 2
Definitions
Boom Topping Lift - A topping lift which is fixed to the top of the mast. There is usually an adjusting line attached to
the boom. If this is what you have, add a halyard topping lift (see page 4) or use the B or C system.
Halyard Topping Lift - Topping lift runs over a sheave at the top of the mast. Can be a second or spare main
halyard, or can be run externally. Needed for the A system.
Pennant - Usually vinyl coated wire, the topping lift pennant is what the control lines are attached to. With a halyard
topping lift, one end is attached to the end of the boom, and the other end is hoisted up by the topping lift line.
Tools and Parts Required
Read through instructions before collecting tools and parts. Depending on what
jobs you need to do, you may need different tools, beyond the basic list below.
If you already have a halyard style topping lift, all you need is;
#2 Philip screwdriver.
Pliers to cut mono, tighten shackles.
Seizing wire or silicone sealant to secure shackles.
If you have a boom topping lift & 2 slots in masthead.
Topping Lift Pennant
Bosun’s chair, vinyl (elec) tape.
Line with eye splice, same length as main
halyard, same diameter or one size smaller.
Fishing weight or bike chain.
Messenger line (about 1/16" - 2mm dia).
Topping Lift Clamps
Sheave (if no sheave in extra slot).
If no spare sheave slot in masthead fitting.
Slotted screwdriver, spare cotter pins, awl, hammer.
Drill and bits, 1/16" - 2mm larger than topping lift.
Fine round file, emery cloth to clean up hole.
Single block w/shackle to attach to masthead fitting.
May also need a halyard exit, a cleat and fasteners.
If Pennant is not yet made up,
Rope or coated SS wire pennant, eyes at each end.
Length - end of boom to masthead, less 3' - 1m.
Diameter - see Specifications.
– and/or topping lift clamps not attached.
Round file or drill and bit 1/16" - 2mm smaller
than the pennant diameter. It helps to drill
the donut clamps beforehand - assemble
with the spacers in a vice and drill.
Boom adjusted topping lift
Page 3
Installing your Dutchman System
These instructions will take you through the entire process of setting up a Dutchman Sail Flaking System. The first
paragraph tells you if you need to do this. The summary briefly describes the steps. The mainsail should be ‘bent on’ at
this point. If the sailmaker has made up the topping lift pennant with the control lines attached (normally the case), and
you already have a halyard style topping lift, skip to ‘Adjust the Topping Lift Clamps’. If not, read on.
Running a Halyard Topping Lift
If you don’t have a halyard style topping lift, add one. This makes taking the sail on and off much easier. You also get
a spare main halyard, which is useful if the main halyard is lost, especially on a fractionally rigged mast with no other
way to get to the top! Here are 3 ways to run a halyard topping lift.
Summary: Review the parts list on the previous page. If you have an extra sheave or space for one in the masthead
fitting, use it. You can also drill a hole 2' down and run the topping lift like a spinnaker halyard. Use a messenger to pull
the line through. Otherwise, run the topping lift externally.
1. Hang a block off the masthead fitting, and run the topping lift externally. Simple and easy. Mount a cleat on the
mast or shroud.
2. Run the topping lift like a spinnaker halyard. Hang a block off the masthead. Punch a set hole with an awl about
2' - 60 cm below the masthead and 1" - 25mm from the track, then drill a
pilot hole . Make sure there are no wires chases inside before drilling the
Backstay
large diameter hole. Since a trysail track is installed about 1" from the
mainsail track, this is usually OK. You can get fancy and install a halyard
fairlead, but we just drill the hole, then slowly swing the drill up to provide a straight run
from the block, and carefully file and sand off the sharp edges. Masts are not highly
loaded above the spreaders - a small hole is OK. The line is led through the block, into
the mast and out an exit down below.
3. If you have 2 slots in the masthead, there may be 2 rear sheaves. Many boats built
after 1980, especially with European masts, are so equipped. Most European
boats built since the mid 70’s have halyard topping lifts. If you have a spare slot
but no sheave, consider a ball bearing main halyard sheave from Harken or
Schaefer for less friction. Go aloft on the main halyard, tie yourself to the
masthead, ease the tension & secure the main halyard. Pull the pin and
carefully add the sheave. Put a line around the sheave to hold it while you
guide it in. On some Selden/Kemp masts, the mast must be unstepped.
On most Isomat/ Francespar masts, the sheave drop in from the top,
after you remove a plate. Most US mast builders make it easy to change
or add a sheave.
A length of bike chain, or a small fishing weight is used to drop a light
messenger line through the mast, which will be used to pull through the
topping lift line. Often, the topping lift is one size smaller than the main
Topping Lift
halyard to save weight.
Main Halyard
Topping Lift run
like a spinnaker halyard
Page 4
Rig the Topping Lift Pennant and Control Lines
3’ / 1m
Your sailmaker may have made up a topping lift pennant and run the control lines through
the sail. If so, go to the next section ‘Adjust the Topping Lift Clamps’. If not, read on.
Summary: You need a vinyl coated SS wire pennant to run from the end of the boom to just below
the mast top. Spectra line can be used instead to save weight aloft. Drill and roughly position the
donut and mono clamps. Count the fairleads, loosely attach the discs to the tabs, thread the lines
through the fairleads and secure the lines to the tabs.
1. If not supplied, make up a topping lift pennant. Measure from the boom end to the top of
the mast for the length, less about 3' - 1m so the boom can be raised. Refer to the
Components section for the minimum suggested diameter. Make an eye at each end.
Attach to the end of the boom and the halyard topping lift. Secure shackles with
seizing wire or Loc-Tite.
2. Roughly position and attach the lower donut clamps to the topping lift,
Pennant on a halyard topping lift
using the 3/4" - 20mm screws. The donut clamps must be drilled or filed if
used with over 3/16" - 5mm rope or vinyl coated wire. File them, or assemble the clamp with the 2 spacers. Drill, then reuse the spacers for the next
clamp. The drill bit should be 1/16"-2mm smaller than the vinyl coating or
rope. The clamp must tightly grip the pennant - do not drill the hole too large
or forget to use the spacers.
3. Tie a fig 8 in the end of the mono. Using the 1/2" (13mm) screws, fasten
the mono clamp above the upper donut clamp.
Assemble clamp with spacers
4. Tie a fig 8 in the other end of the mono. Assemble the next clamp. The mono will
form a loop. Hoist up the pennant, walk or row 2-3 boat lengths away, and
check that the topping lifts clamps are higher than the uppermost grommet (see the next section).
5. Cut the mono so it ends 3' - 1m under the boom. For
3 or more lines, lower the pennant and repeat
steps 3, 4 and 5.
6. Count the number
Even rows –
of fairleads in each
start on tab side
vertical row. All the
rows
are
normally
even
Fig 8 knot in mono
or odd in number. If an
odd number of fairleads, start the control line from the opposite side of the sail as
the tab is on. If an even number, start the control line on the same side of the sail
as the tab is on.
7. Loosely attach the 2" - 5cm nylon discs to the tabs.
Attach discs, insert mono
The nuts face the sail. Drop the sail. Thread the mono
through the sail using 2 people, one on either side.
It’s easy to miss a fairlead - be careful. In light winds, raise the sail as you
thread the mono.
8. Insert the control line into the tab from the top hole. The discs must be
loose. Be sure to get the line between the inner layers of the tab. Stick the
line in from the other direction to open a space between the layers of
fabric. Then thread the line into the tab, pull it tight, and tighten the screws.
Page 5
Adjust the Topping Lift Clamps
This section is extremely important - read and follow carefully. The new topping lift pennant
must be made up with the control lines run through the sail. If not, see the previous section. If it’s
windy, head the boat into the wind and use lots of fenders.
Summary: Rig the new pennant. Raise the sail. Adjust the topping lift clamps so they are
above the uppermost grommet when viewed from 2 boat lengths away.
1. Attach the new pennant. The shackle is attached to the boom end. Attach the other end
to the spare main halyard or halyard topping lift. Secure shackles with seizing
wire or Loc-Tite. Hoist up the pennant.
2. Raise the main up tight. Slacken the topping lift, then pull the mainsheet and
vang in tight, as if you’re sailing upwind in 16 knots. Snug up the topping lift so
it’s just slack.
Hoist the pennant
3. Mark the topping lift (and rigid vang line if fitted), so you can return them to this
position. If a charter boat, or to keep things simple, the topping lift line should
be cleated and tapped off with it just slack. This way, when the sail is raised the last few inches,
the boom will be picked up and the topping lift will be slackened automatically.
4. Walk off the boat and sight up to where the correct topping lift attachment point should be.
You must be 1-2 boat lengths away from the boat to see if the clamp is higher
than the uppermost fairlead - you can not do this while on board. Do not worry about
trying to get the clamp perfectly lined up - as long as the clamp is higher or above the
uppermost grommet, the system will work properly. The clamp must not be below
or under the uppermost fairlead.
5. With large roach mains, (i.e. - the boat does not have a backstay, and the
roach extends out more that 2 feet - 60 cm from the straightline from the headboard to the clew), the uppermost grommets will be outside of the straightline
or topping lift. The clamp must still be above or higher than the uppermost
grommet. Normally, the uppermost grommet is next to a batten, so the clamp
should be just above the batten.
Normal roach main
The topping lift must be on the correct side of the sail. With an even number of fairleads,
the topping lift will lie on the same side of the sail as the tabs are on. With an odd
number, the topping lift will lie on the opposite side of the sail.
6. To adjust the clamps, drop the main (the lines
Large roach main – clamps
should be run through the sail), lower the penabove the straight line from the
nant and loosen the donut clamp screws just
uppermost fairlead to the mast
enough to allow it to move (keep the nuts engaged). Move the clamp and retighten. Again, recheck the position of the
clamps with the sail all the way up and
the main sheet tight by sighting from
1-2 boat lengths away. Repeat
A clamps
as needed for all the clamps.
Leave the sail raised.
Page 6
Adjust the Control Line Length
Again, read and follow this section very carefully. The control lines must be run through the
sail. See page 5 if they are not. You must be certain that the topping lift clamps are above
the uppermost grommet, by sighting the sail from 1-2 boat lengths away (the only way to
check). Read page 6.
Summary Adjust the control lines so they are just slack. With a large roach, the control
lines will be snug. The sail must be all the way up.
1. Raise the main up tight. Slacken the topping lift, then pull the mainsheet and vang all the
way in, as if you’re sailing upwind in 16 knots. Snug up the topping lift so it’s just slack.
The topping lift should be marked (see previous section), so it can be set to this position
before or immediately after the sail is raised. A rigid vang, if fitted, must also be marked,
so it does not push up the boom when the sail is dropped.
Control line just slack
2. Loosen the tab discs. Open the zipper and adjust the control lines until there is under
one inch (2.5cm) of slack in the line. Tighten down the discs. When the sail drops, it will push
the tabs down, tensioning the control line. Basically, the flaked sail hangs off the
control lines. If you lift up the folds where the tabs are, you should find the tab
partially folded, with the top of the tab at least 2" or 5cm above the boom.
3. If a Large Roach Main, the control lines will be snug, not slack. First
carefully read the Large Roach Main instructions in the section ‘Adjust the Topping Lift
Clamps’. The control lines must pull or bow the topping lift out to the uppermost grommets, which they can easily do if the topping lift is slack. The wind will also push the
topping lift aft, and mast bend and sail shape help pull the sail forward. The uppermost grommet in large roach mains is normally a metal grommet in a patch to help
take the extra load. Also, we normally locate the uppermost grommet by a batten, to
prevent sail distortion.
Tab partly folded down
Adjust the tension on the control lines so that, with the topping lift slack, the clamps are above and no
more than 4" or 10cm forward of the uppermost grommet. With sail luffs over 50' or 15m, these
dimensions increase to no more than 8" or 20cm.
4. Tie a knot at the end of the control line to keep it from pulling out of the tab. Coil the mono, put
it into the tab, and close the zipper. The system is ready to use!
Getting the correct adjustment takes a few tries. Once it’s done, the system will need very
little future adjustment, perhaps once a year. You must spend some time to get it correct
initially. Contact us (see introduction of Owners Manual) if you need any assistance.
Topping lift will bend out
with large roach mains.
Page 7
Using the Dutchman System
Using the system quickly becomes second nature, and after a while, you’ll think every main should flake itself! Many
customers tell us you only really appreciate the system after you sail on a boat that doesn’t have it. Just raise the sail and
ease the topping lift as you normally would. If the sail picks up the boom as it’s raised the last few inches, you don’t
even have to slacken the topping lift. The tabs will stand up as the sail is raised, slackening the control lines, so there’s
nothing to adjust. With the control lines and topping lift slack, there is no possibility of chafe. You may want to give a
tug on the control lines after you raise the sail, to free them up. You must read the previous 2 sections on adjusting the
system to check the adjustment, even if someone else set up the system for you.
Lowering the Sail
With a halyard topping lift, when possible, tension the topping lift and raise the
boom as needed before dropping the sail. If a boom topping lift, raise the
boom after the sail is dropped. This makes the control lines tighter as the sail
is dropped, and system will work better. Set the topping lift (and rigid vang if
fitted) to the marks as described in the 2 previous sections on adjusting the
s
y
s
t
e
m
.
Ease the mainsheet until the sail is luffing. The system will only work if the
sail is luffing. Lower the mainsail and straighten the luff (or forward
edge) of the sail as it comes down if possible. Then tug aft on the leech to
straighten it out and adjust the folds so they are neat.
A rigid vang, if fitted, must not allow the boom to kick up when dropping the sail. Adjust the vang so the boom is pulled down, and be sure to
note the correct adjustment with an indelible ink marker, so you can easily
return the vang to this position before you drop the sail.
The system will work better in more wind. Keep the engine
rpm’s up if the wind speed is under 10 knots. If the sail falls off the boom
around the control lines and/or the tab is not standing upright, the system
is not adjusted properly. See the section ‘Adjust the Topping Lift Clamps’,
and ‘Adjust the Control Line Length’ for more information. Especially with
a stiff main, the sail will develop a memory after it’s used for 1-3 months,
and become more automatic. Carefully neaten out the sail the first few
times, and it will ‘learn’ the correct way to flake.
Pull the luff down
to the correct side
of the boom
It helps to initially have someone pull the luff down to the correct side of the boom as the sail is lowered. Look at the tab
to figure out which side of the boom the first flake should fall on (sail should fall away from tab). If the tabs are on the
starboard side of the sail, the first flake should fall to the port side of the boom and vica-versa. The rest of the flakes will
fall to alternate sides of the boom. Straighten out the sail by tugging aft on the leech.
In winds of over 15 knots, you may want to head so the wind is 5 to 10 degrees off the bow. This will keep the boom
out of the cockpit. Our Boom Brake is useful to keep the boom from whipping around. You can also tension the
mainsheet, but keep the sail luffing.
Your sail will last longer if you avoid putting creases into it. The Dutchman allows the sail to flake in large, loose folds,
which is why it’s better for the sail than lazy jacks, which induce many small sharp creases. Sail ties (never use elastic
shock cord) and the sail cover should be snug, not tight, to avoid sharp creases.
Page 8
Large Roach Mains
You need to raise a large roach main a little differently than you do a normal main. By large roach, we
mean a catamaran or Freedom style rig with no backstay, and a full batten sail with a roach extending
out about 2 - 4 feet or 60 -120 cm beyond the straightline from the headboard to the clew.
On a normal main, if the topping lifts gets caught or snagged on the roach, it will clear itself when
the topping lift becomes slack and the sails luffs. If a large roach main, this will not happen. With
a Dutchman, the topping lift will always lie on one side of the sail.
You need to head off, or adjust the traveler, so the sail is blown to the correct side of the
topping lift. The topping lift must lie on the side of the sail that the control lines exit the
uppermost fairlead. If you have an even number of fairleads, this will be the same side of the
sail as the tabs are on. If an odd number, it will be the opposite side.
Let’s say you have an even number of fairleads, and the tabs are on the starboard side of the
sail. You want the topping lift to also lie on the starboard side of the sail. By heading the
boat a few degrees to port as the sail is raised the last few feet, the sail will end up on the
starboard side of the topping lift.
This is a lot easier than trying to raise the sail between a set of lazy jacks, with a foot or so
between the lines that you have to raise the sail between. This difficulty in raising the sail
with lazy jacks is why major boatbuilders are using the Dutchman now on large roach
mains. You must read the large roach mains sections of ‘Adjust the Topping Lift Clamps’,
and ‘Adjust the Control Line Length’ to adjust the system properly. Downwind
Due to the design of sail slides, a sail will drop more easily if you are closer to the
wind, but as long as the sail is luffing, the Dutchman System does not care what
point of sail you are on. If you are below a beam reach, ease the main sheet and
head up until the sail is just off the spreaders and luffing. Sheeting in the jib helps
blow the sail off the spreaders. Don’t sheet the main in until after the sail is secured.
Our reasonably priced ball bearing track system (or any similar ball bearing
track system) will allow you to raise and lower the sail much more easily
on any point of sail.
There is a very remote possibility that when running
downwind, a control line may become snagged on a
spreader tip if the spreader tip is not well faired. If this
Check here
were to happen, the sail could be damaged when it is
sheeted in. Therefore, when initially running downwind,
check how close the control line is to the spreader tip.
We try to keep the lines away from the spreader tips
when building the system into your sail to prevent this
from happening. Avoid uncontrolled jibs (consider our Boom
Brake, which allows you to control the speed of boom or hold
the boom like a preventer from the cockpit), make sure your
spreader tip has nothing that could catch a line and/or cover it
and remove anything that might snag a control line.
Page 9
Even number of
fairleads, tabs on the
starboards side,
head boat to port 5
degrees
Full Battens
If you have a full batten main, make sure that your batten pockets do not protrude beyond the leech. If they do, they
will always foul or catch the topping lift and any other rigging like running backstays, with or without a Dutchman. The
battens must be shortened so they do not protrude beyond the leech. The pockets should also be ‘clean’ with nothing
to catch the topping lift. Sometimes a cover can be sewn over the end of the pocket to clean things up.
Full Battens will push against the mast, and the more roach, the greater the forward thrust. This can make it harder to
raise and lower the sail. We make a very effective line of ball bearing full batten end fittings to help eliminate the
friction. Also see the section on slide friction some more advice and hints.
Reefing
Roller reefing only works with our C system. Jiffy or slab reefing gives far superior sailshape, and we highly recommend
adding it if you don’t have it. Reef normally. You usually do not need the intermediate reef points, as the sail can’t fall
off the boom. This allows you to completely reef the sail from the cockpit, a big advantage for offshore or shorthanded
cruisers.
We’re a little wary of single line reefing, as some systems are hard to use in winds over 30 knots. A separate forward
and aft line for each reef is simpler (can’t tangle), easier to use (the loads are split between two lines), and usually
cheaper, since single line reefing needs ball bearing blocks to work effectively. If you use reef hooks to secure the new
tack of the sail, we strongly advise using separate forward reef lines instead. They are much easier to use. If you reef
at the mast, you only need a pad eye, a cleat, and enough line to run from the pad eye, up to the reef, and back down
to the cleat. The load from the forward reef cringle will angle down and forward at about a 45 degree angle. Figure
out how high the tack reef eye should be. Higher is often better, since this will raise the boom out of the cockpit if the
vang is released. The reef line must hold the sail the correct distance from the mast and above the boom. It takes a few
tries to find the best spot. The pad eye normally will be on one side of the mast, 45
degrees down and forward of the reef, while the cleat will be in about the same
position on the opposite side of the mast. You can move one side up and the other
side down to clear other hardware. If the lines are led aft to the cockpit, the pad
eye should be about level or just under the reef eye when the sail is reefed, while
the line going to the cockpit will run straight down to the base of the mast.
We strongly recommend running the lines to the cockpit. Typically, we will install
one line stopper on the mast just under the halyard exit, so we can raise the sail at
the mast in normal conditions. We then do the final tensioning at the cockpit, and
release the mast line stopper if the wind picks up so we can reef the sail from the
cockpit. You will need to run the halyard, the 2 lines for each reef, and the vang if
the boom is raised by the reef (it normally is). Depending on where you sail, when
you do a new main, consider installing the reefs more deeply into the sail, at say,
20 and 40% of the luff length, instead of having 3 reefs. Contact us for our Shorthanded Sailing Handout for more information on this and other topics, or pick up
a copy at the shows. We not only make sailboat hardware, we also have a sailing
school (to test all our products!). Seriously, the handout has a lot of useful info on
setting up a boat for shorthanded sailing, based on our experience from many
years of setting up boats
and from our school.
Forward reef line led from a pad eye, to
new tack, then down and aft to the
cockpit.
Page 10
Storm Trysails
If you are planning on heading offshore, consider a storm trysail, or make the main a little heavier with some extra reef
and head patching, and installing a very deep reef in place of setting up a storm trysail. If you take the more
conservative route and install a storm trysail with a separate track, there are two ways to go. If you sheet the trysail to
the boom (an easier way to go), make sure the clew picks up the boom enough to slacken the control lines. If you sheet
to the deck, you will need a halyard style topping lift. Drop the boom to the deck and secure it (which is the normal
practice). Bring the topping lift and control lines forward, and tie them off close to the mast. We may offer a simple,
inexpensive storm trysail and/or staysail in the future. Contact us for more info, and remember, preparation and
practice are the keys!
Topping Lifts and Boom Gallows
The topping lift must be slack while sailing. With the topping lift slack, neither it nor the control lines will cause chafe
or restrict the sail. With a halyard style topping lift, the topping lift should be tensioned before the sail is dropped. A
boom adjusted topping lift should be tensioned after the sail is dropped. This will make the control lines tighter as the
sail is dropped. It is possible to set the topping lift up so you do not have to adjust it. It must be low enough so that when
the sail is raised the last 6" (15cm) or so, it picks up the boom so the topping lift becomes just slack.
If you rest the boom in a gallows, you still must lower the sail with the topping lift supporting the boom. After the sail is
down, drop the boom into the gallows. If you lower the boom more than 9" (23cm) with a boom adjusted topping lift,
you may need to ease the control lines slightly, especially the aft line.
We have heard of 2 cases where a topping lift got caught and wedged into an headboard shackle. Without a halyard
style topping lift, which can be lowered, dropping the sail will be very difficult. Contributing factors are a topping lift
which hits the headboard when the sail is raised (normally the topping lift is above the headboard), or a very slack
topping lift, combined with a shackle just loose enough that the topping lift can get tightly wedged between the
headboard and shackle, and (we suspect) a big, clunky aluminum headboard shackle. Try to make this happen. If
needed, add a section of hose or tubing over the topping lift where it hits the headboard, or a SS headboard shackle
with a snug or very loose fit.
Slide Friction
We often hear about sails that do not drop easily. There are several possible solutions. First, be certain that the main
halyard is not binding on something inside of the mast, and that the masthead sheave rotates freely under load. A ball
bearing masthead sheave often makes a big difference. Do not pull in the reef lines after you drop the sail - just tuck
them into the folds. Make sure that the mast groove is clean. Anything like WD40 or Boeshield will gum up the track,
and greatly increases the friction. If such a substance has been used, you will have to clean out the mast track with
solvent and rags. If a full batten main, consider our ball bearing end batten fittings to reduce friction. Contact us for a
brochure. If the lines are led aft, be certain that the halyard turning block is a ball bearing block.
There are two different lubricants that we have had success with. If you live in a fairly clean environment, and it rains
at least once a month, try a dishwashing liquid like Joy. Squirt a little in before you raise the main. Hold a rag under
the bottle to help force the liquid into the mast track. We have also had good success in all areas with dry Teflon/
Silicone lubricants. We use Elmer’s Slide All, which your local hardware store may have. Always test the lubricant to
make sure it is a dry type before applying. Spray a bit onto the back of your hand. It should be totally dry within 30
seconds, leaving no visible oily trace. Spray the entire track if possible, or just as high as you can reach, then spray the
slides as you raise the main. We normally go aloft in the spring, checking the mast and fittings, and at the same time,
cleaning out the track with paper towel, and spraying on some Slide All. Makes a big difference.
Page 11
Removing the Sail
The sail should be stored flaked as it lies on the boom, with no sharp creases. This helps the sail keep its ‘memory’ when
stored. With a halyard topping lift and the A system, simply remove the pennant with the sail. We first pull out the
slides, then slide the foot out of the boom. The sail will now be hanging on the control lines alongside the boom. Lower
the topping lift to drop the sail to the deck. The sail will stay flaked. Unshackle the pennant, tie the top end to the head,
and the bottom end to the clew and lay the rest on top of the sail. Leave the sail flaked, not rolled up if possible (no
creases). If it must be rolled, pull the battens and roll it up, leaving the pennant in the sail. In the spring, just reverse this
procedure. This makes taking the sail on and off much easier.
Another way to remove the sail is to open the tab and measure the length of the extra control line. If you have over 3
feet (1m), tie a figure 8 knot to the end, loosen the discs, pull the line through the sail, and cut the control line 4" (10cm)
above the sail. Use this 4" to tie to a nut or something similar which will prevent this end of the control line from pulling
through the sail. This will keep the sail flaked
when removing it from the boom.
Keep the sail neatly flaked when stored,
and try to avoid sharp creases.
If you do not have enough control line, tape
a 3' (1m) length of 1/8" (3mm) cord with a
figure 8 knot to the end of the control line,
and pull this messenger through the tab and
sail. Disconnect the mono and again tie something to the end of the cord to keep it from
pulling through the sail. Then drop down the
clamps, coil up the mono, and bag the clamps
and mono, or just tie off the control lines. In the spring, reverse this procedure to run the control line. You can also pull
the control lines out of the sail and tape them to the topping lift, however, this will cause more work next spring, and
make it difficult to flake the sail after you remove it from the boom.
Maintenance
Since the Dutchman™ has no moving parts, the only maintenance required is periodic checks of the topping lift and
control wires. It’s a good practice that every time, before or as you head out, the topping lift and all running and
standing rigging is inspected for chafe or deterioration, and all shackles and mechanical fasteners checked and/or
tightened. Shackles, for example, can open if not locked.
Secure shackles with seizing wire, use Loc-Tite or run a bead of silicone sealant around grip.
The monofilament control line should be replaced every 2-3 seasons, when it begins to show some wear. Replace the
control lines as per the size and length given in the specifications section. You can purchase the mono lines from us, one
of our distributors or sailmakers, or a commercial fishing supplier. Only use mono that has UV inhibitors in it (not
weedwacker line).
When you replace your sail, remember that we offer trade in discounts on new systems to existing Dutchman owners.
Contact us, or your local sailmaker. In 1996, the discount was 30% off the price of a new system, if you traded in your
old system. We now have the last of our little free offers for you! Go to any major boat show where we exhibit, say you
read the manual, and you want some free control lines. You’ll get them - just like that! Please - just one set of free lines
per customer. If you don’t do shows, send us $5.- US Dollars for shipping, and we will mail the control lines to you. Let
us know the make and size of your boat, the number of lines, and the mainsail dimensions if an unusual boat. Thanks
again for taking the time to read through this! We do appreciate it.
Page 12
Trouble Shooting Guide
Sail falls off boom around control lines / does not flake neatly. 2 possible causes. Either the topping lift
clamp is below the uppermost grommet, or the control lines are too slack. Start by lifting up the flaked sail and look at
the tabs sewn to the foot of the sail when the main is down. The control line should be tight, with the tab pulled up by
the control line, not falling off the boom. The sail actually hangs off the control lines. If not, check that the topping lift
clamps are in the correct position, above the uppermost grommet. See the section ‘Adjust the Topping Lift Clamps’. If
the clamps are in the correct position, the control lines are too slack. See the section ‘Adjust the Control Line Length’.
You must read and understand both of these sections. Finally, mark the topping lift and vang lines.
Sail falls off boom between control lines. If the control lines are adjusted properly as per the above instructions
(which is the problem over 95% of the time), try the following. Are you allowing the sail to luff as you drop it? Also bear
in mind that the system works better in more wind, so don’t slow down the motor. If the sail is new, see the section below
‘Just installed the system’. Occasionally, the control line spacing is incorrect or you may need an extra control line. The
maximum distance between the control lines should be about 6.5' or 2m, while the typical spacing is around 5' or
1.5m. If the spacing is over the maximum, take a picture of the sail up and down, and measure the distance from the
mast to each control lines, to the clew, and to the upper shroud (stay). Sometimes we can add a third line. If the sail is
soft, it will need more straightening than a stiff sail. A stiff sail, especially if fully battened, will need under 10 seconds
of straightening, while a soft sail will need about 20 seconds of straightening.
Just installed the system, and it’s not working. We sometimes hear from someone who has just installed the
system. They try it out at the dock, without the sail into the wind, and before the sail has any memory. It won’t be that
impressive. Allow the sail to luff when dropping it, and carefully neaten out the sail the first few times. It will ‘learn’ the
correct way to flake. See the section ‘Lowering the Sail’ for more info. The more you use it, the more effectively it will
operate (unlike many other things!).
Sail does not drop easily. This is almost never the fault of the Sail Flaking System, as long as the sail is luffing as
you drop it. To check, pull the lines out of the sail, and try raising and lowering it, or slide a fairlead up or down on the
control line. If the control line is old and dirty, clean or replace it. Also check that the fairleads or uppermost grommets
have no sharp edges or grooves. Friction comes from several sources. If a full batten main, push the batten against the
mast and check that the battens slide up and down easily, and twists around freely. If not (which is very common),
consider our End Batten Fitting, which has ball bearings wheels, a full universal joint, and a reasonable price. Track
Systems also work well, but are heavy and expensive. Friction also comes from the masthead sheave, obstructions
inside the mast which can rub against the halyard, turning blocks, in short, anything the line touches. The sharper the
turn, the more worthwhile a ball bearing block will be. See the section ‘Slide Friction’ for more information.
The lines make the sail dirty. This can happen if the boat is near a source of pollution like an airport or power
plant. Clean the lines periodically by dropping them down and wiping them with silicone spray. This is easy with a
halyard style topping lift. The C system allow you to store the control lines partly under the sail cover, which protects
them, and prevents dirt from running down the lines through the sailcover slit when it rains. You can also do this with
the A system by dropping down the topping lift pennant and storing the pennant and control lines under the sail cover.
Support the boom with a rigid vang, gallows or the main halyard. or have the sailcover slit made more watertight.
Finally we have a rain deflector you can attach to the control lines to help prevent this.
Please, contact us if you have any questions or problems.
Page 13
Licensing Card
Please fill out and return this licensing card.
This licensing card will help us to provide you with product updates.
Thank you very much, and please tell your friends about our products.
Thank you for you selection of a Dutchman product. Please complete and return this
warranty card as soon as possible. Thank you.
I bought a ____________________________________ Date ___________________
Purchased From _________________________________________________________
Make / Size / Year of Boat ______________________________________________
Name / Home Port of Boat _______________________________________________
My Name ______________________________________________________________
Address _______________________________________________________________
______________________________________________________________________
Tel. Number ____________________________________________________________
Comments _____________________________________________________________
______________________________________________________________________
______________________________________________________________________
______________________________________________________________________
Page 14