1
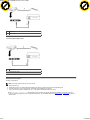
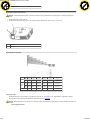
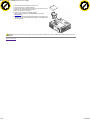
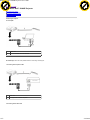
Installation:
Dell 3200MP Projector User's Guide
XCH A
PD
E
H
F-XC A N GE
1 of 5
N
y
bu
to
lic
.d o
o
w
m
C
m
o
.c
Installation:
Dell™ 3200MP Projector
c u-tr a c k
w
w
.d o
w
w
w
k
Back to Contents Page
C
lic
k
to
bu
y
N
O
W
!
NG
F-
O
W
!
PD
c u-tr a c k
.c
Connecting the Projector
Powering On/Off the Projector
Adjusting the Projected Image
Changing the Lamp
Connecting the Projector
A. To Computer
1
Power cord
2&3
M1-A to combination VGA and USB cable
B. To DVD Player: There are three possible methods of connecting to a DVD player.
1. Connecting with component cable:
1
Power cord
2
M1-A signal cable for HDTV/ component
2. Connecting with S-video cable:
2/24/2010
Installation:
Dell 3200MP Projector User's Guide
XCH A
PD
E
H
F-XC A N GE
2 of 5
N
y
bu
to
k
lic
c u-tr a c k
1
Power cord
2
S-video cable
.d o
o
.c
m
C
m
w
o
.d o
w
w
w
w
w
C
lic
k
to
bu
y
N
O
W
!
NG
F-
O
W
!
PD
c u-tr a c k
.c
3. Connecting with composite cable:
1
Power cord
2
Composite video cable
Powering On/Off the Projector
Powering On the Projector
NOTE: Turn on the projector before you turn on the source.
1.
2.
3.
4.
Remove the lens cap.
Ensure that the power cord and appropriate signal cable(s) are securely connected. The power button light blinks green.
Press the power button to turn on the projector. The Dell logo will be displayed for 30 seconds.
Turn on your source (computer, notebook, DVD, etc...). The projector automatically detects your source.
If the "Searching for signal..." message appears on the screen, ensure that the appropriate signal cable(s) are securely connected.
If you are connecting multiple sources to the projector simultaneously, press the Source button on the remote control or control panel to select the
desired source.
2/24/2010
Installation:
Dell 3200MP Projector User's Guide
XCH A
PD
E
H
F-XC A N GE
3 of 5
N
y
bu
to
k
lic
c u-tr a c k
1
Power button
2
Lens cap
.d o
o
.c
m
C
m
w
o
.d o
w
w
w
w
w
C
lic
k
to
bu
y
N
O
W
!
NG
F-
O
W
!
PD
c u-tr a c k
.c
Powering Off the Projector
DO NOT UNPLUG THE PROJECTOR BEFORE PROPERLY SHUTTING DOWN USING THE FOLLOWING STEPS.
1.
2.
3.
4.
Press the power button to turn off the projector. The "Power Off the Lamp?" message appears on the OSD.
Press the power button again. The cooling fans continue to operate for 2 minutes.
If the LAMP light is solid orange, replace the lamp.
If the TEMP light is solid orange, the projector has overheated. The display automatically shuts down. Try turning the display on again after the
projector cools down. If the problem persists, contact Dell.
5. If the TEMP light is blinking orange, a projector fan has failed and the projector will automatically shut down, If this problem persists, contact Dell.
6. Disconnect the power cord from the electrical outlet and the projector.
7. If you press the power button while the projector is running, the "Power Off the Lamp?" message appears on the screen. To clear the
message, press any button on the control panel or ignore the message; the message will disappear after 5 seconds.
Adjusting the Projected Image
Adjusting the Projector Height
To raise the projector:
1. Press the elevator button.
2. Raise the projector to the desired display angle, and then release the button to lock the elevator foot into position.
3. Use the tilt adjustment wheel to fine-tune the display angle.
To lower the projector:
1. Press the elevator button.
2. Lower the projector, and then release the button to lock the elevator foot into position.
Notice: To avoid damaging the projector, make sure that the elevator foot is fully retracted before placing the projector in its carrying case.
1
Elevator button
2
Elevator foot
2/24/2010
Installation:
Dell 3200MP Projector User's Guide
XCH A
PD
E
H
F-XC A N GE
4 of 5
N
y
bu
to
k
lic
o
c u-tr a c k
.c
.d o
m
o
m
w
w
w
.d o
Tilt adjustment wheel
w
w
w
C
3
C
lic
k
to
bu
y
N
O
W
!
NG
F-
O
W
!
PD
c u-tr a c k
.c
Adjusting the Projector Zoom and Focus
CAUTION: To avoid damaging the projector, ensure that the zoom lens is fully retracted before moving the projector or placing the projector in its
carrying case.
1. Rotate the zoom ring to zoom in and out.
2. Rotate the focus ring until the image is clear. The projector focuses at distances from 4.0 ft to 39.4 ft (1.2 m to 12 m).
1
Zoom ring
2
Focus ring
Adjusting Projection Image Size
Max
29.7"
82.5"
135.2"
187.2"
240.0"
292.8"
Min.
24.8"
68.8"
112.7"
156.0"
200.0"
244.0"
Max.
23.8"X17.8 66.0"X49.5"
(WXH)
108.2"X81.1"
149.8"X112.3"
192.0"X144.0"
234.2"X175.7"
Min.
19.8X14.9" 55.0"X41.3"
(WXH)
90.1"X67.6"
124.8"X93.6"
160.0"X120.0"
195.2"X146.4"
18.2'
25.2'
32.3'
39.4'
Screen
(Diagonal)
Screen
Size
Distance
*
4.0'
11.1'
This graph is for user reference only.
Changing the Lamp
Replace the lamp when you see " Lamp is approaching the end of its useful life. Replacement suggested!" message
on the screen by carefully following these instructions. If this problem persists, contact Dell.
CAUTION: The lamp becomes very hot with use. Do not attempt to replace the lamp after use until the projector has been allowed to cool down for at
least 30 minutes.
Lamp Changing Procedure:
2/24/2010
Installation:
Dell 3200MP Projector User's Guide
XCH A
PD
E
H
F-XC A N GE
5 of 5
c u-tr a c k
N
lic
k
to
bu
y
.d o
m
w
o
.c
Turn off the projector and disconnect the power cord.
Let the projector cool for at least 30 minutes.
Lossen the two screws that secure the lamp cover, and remove the cover.
Remove the two screws that secure the lamp.
Pull up the lamp by its metal handle.
Reverse steps 1 through 5 to install the new lamp.
Reset the lamp by selecting the left Lamp Reset icon in the OSD
Management tab.
8. Dell may require that lamps replaced under warranty are returned to Dell.
Otherwise, contact your local waste disposal agency for the address of the
nearest deposit site
C
m
o
.d o
1.
2.
3.
4.
5.
6.
7.
w
w
w
w
w
C
lic
k
to
bu
y
N
O
W
!
NG
F-
O
W
!
PD
c u-tr a c k
.c
CAUTION: Do not touch the bulb or the lamp glass at any time. The bulb may explode due to improper handling, including the touching of the bulb or
the lamp glass.
Back to Contents Page
2/24/2010