1
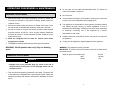
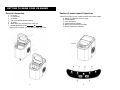
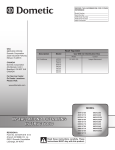
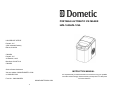
PORTABLE AUTOMATIC ICE MAKER HZB-12A/HZB-12SA USA SERVICE OFFICE Dometic, LLC 2320 Industrial Parkway Elkhart, IN 46516 CANADA Dometic, LLC 46 Zatonski, Unit 3 Brantford, ON N3T 5L8 CANADA Service Center Assistance Visit our website: WWW.EDOMETIC.COM or WWW.RV.COM INSTRUCTION MANUAL It is important that you read these instructions before using your portable ice maker and we strongly recommend that you keep them in a safe place for future reference. Form No.: 106014003DP0 WWW.DOMETICUSA.COM 11 TABLE OF CONTENTS TROUBLESHOOTING IMPORTANT SAFETY INSTRUCTIONS………………………...…….….2 PREPARING YOUR ICE MAKER FOR USE……………………….…….3 IMPORTANT SAFETY TIPS………………………………...………………3 GETTING TO KNOW YOUR ICE MAKER ……………….…………….5 OPERATING PROCEDURES & MAINTENANCE…………………….…7 PROBLEM “Add Water” indicator is on. POSSIBLE CAUSE Stop the ice maker, fill water, and press “ON/OFF” button again to restart the unit. Lack of Water. UNPACKING YOUR ICE MAKER… ……………….…………...…………....7 Remove ice from ice basket. CONNECTING YOUR ICE MAKER… ……………….……….……..……….7 CLEANING AND MAINTAINING YOUR ICE MAKER… ……….….………8 “Ice Full” indicator is on. Ice is full in basket. USING YOUR ICE MAKER……………….……..…………………………8 TROUBLESHOOTING… …………………………….……….……………..10 Ice cubes stick together. Ice making cycle is normal but no ice formed. 1 SOLUTION: Continuous press “Select” button 5 seconds, the unit could make ice 10 cycles even “Ice” indicator is on. The ice making cycle is too long. Stop the ice maker, and restart it when the ice blocks melt. Select the small size ice cube selection. Water temperature in inner tank is too low. Replace the water. Temperature of water recommended at 45-90°F. Room temperature or water temperature in inner tank is too high. The room temperature should be 50-100°F, water temperature should be 45-90°F. Refrigerant in cooling system leaks. Consult a qualified technician. Pipe in the cooling system is blocked. Consult a qualified technician. 10 4. The ice making cycle lasts approx. 5 to 13 minutes, depending on seletion of ice cube size and the room temperature. The recommended room temperature is 50°F to 100°F 5. While the ice maker is on, check water level periodically. If water pump can’t inject water, the ice maker will stop automatically, and the “Add Water” indicator will be on.Press “ON/OFF” button, fill water up to the max. water level mark and press “ON/OFF” button again to turn on the unit again. Allow the refrigerant liquid inside the compressor at least 3 minutes to settle before restarting. 6. The unit stops when the ice basket is full and the “Ice Full” indicator will be on. Warning: Direct sunlight or sunlight reflection may cause infared to activate the “ICE FULL” sensor. If the unit doesn’t stop producing ice even though the ice obstructs sensor, move the unit out of direct sunlight. 7. Change water in the water reservoir every 24 hours to ensure a reasonable hygiene level. If unit isn’t to be used, drain all the water and dry the tank. IMPORTANT SAFETY INSTRUCTIONS Your safety and the safety of others are very important. We have provided many important safety messages manual and your appliance. Always read and obey all safety massages. This is the safety alert symbol: ! All safety messages will follow the safety alert symbol and the word “DANGER” or “WARNING”. You could be seriously injured if you do not follow these safety instructions. All safety messages will tell you what the potential hazard, inform you how to reduce the chance of injury, and indicate what can happen if the instructions are not followed. ! DANGER ! WARNING 9 2 PREPARING YOUR ICE MAKER FOR USE IMPORTANT SAFETY TIPS When using electrical appliances, basic safety precautions should be followed to reduce the risk of fire, electric shock, and injury to persons or property. Read all instructions before using any appliance. Do not operate this,or any other appliance with a damaged cord. If the supply cord is damaged, it must be replaced by the manufacturer or its service agent or a similarly qualified person in order to avoid a hazard. This ice-maker must be positioned so that the plug is accessible . Connect to properly polarized outlets only. No other appliance should be plugged into the same outlet. Be sure that the plug is fully inserted into the receptacle. Do not run the power cord over carpeting or other heat insulators. Do not cover the cord. Keep cord away from traffic areas, and do not submerge in water. We do not recommend the use of an extension cord, as it may overheat and become a risk of fire. If you must use an extension cord, use No. 14 AWG minimum size and rated no less than 16 Amps with a plug. Unplug the ice maker before cleaning or making any repairs or servicing. Exercise caution and use reasonable supervision when appliance is used near children. Place the ice-maker away from direct sunlight and make sure that there is at least 5” of space between the back of your unit and wall. Keep a minimum distance of 5” on each side of your unit free. Do not use other liquids to make ice-cubes other than water. 3 2. Plug your appliance into an exclusive, properly installed, grounding wall outlet. Do not under any circumstances, damage or remove the grounding prong of the plug. Any questions concerning power and/or grounding should be directed toward a certified electrician. 3. This appliance requires a standard 115-120Volt, 60Hz electrical outlet with three-prong ground. CLEANING AND MAINTAINING YOUR ICE MAKER Before using your ice maker, it is strongly recommended to clean it thoroughly. 1. Remove the ice basket. 2. Clean the interior with diluted detergent, warm water and a soft cloth. 3. Use clean water to rinse the inside parts under the top cover, and drain out the water by unplugging the drain cap on front bottom. 4. The outside of the ice maker should be cleaned regularly with a mild detergent solution and warm water. 5. Dry the exterior with a clean soft cloth. 6. When the machine is not to be used for a long time, drain water completely. USING YOUR ICE MAKER This machine is not a freezer, therefore cannot store the mode ice. To store ice and keep frozen, please transfer to a regular freezer. 1. Open the cover, remove the ice basket and pour water into tank. Keep water level below the MAXIMUM water level mark. 2. Plug in the ice maker. Press “ON/OFF” button on the control panel to begin the ice making cycle. 3. Select the ice cube size by pressing the “SELECT” button. If the room temperature is lower than 60°F, it is recommended to select small ice cube in order to avoid ice sticking together. 8 OPERATING PROCEDURES & MAINTENANCE Do not clean your ice maker with flammable fluids. The fumes can create a fire hazard or explosion. UNPACKING YOUR ICE MAKER Do not tip over. 1. Remove the exterior and interior packaging. Check if ice basket and ice scoop are included. If any parts are missing, please contact our customer service. 2. Remove the tapes holding ice shovel, ice basket & ice scoop. Clean the interior tank & ice basket with lukewarm water and a soft cloth. 3. Put the ice maker on a level & flat counter top without direct sunlight and other sources of heat (i.e.: stove, furnace, radiator). Make sure that there is at least 5” of space between the back & sides of the ice maker and the wall. If the ice maker is brought in from outside in winter, give it a few hours to warm up to room temperature before plugging it in. This appliance is not intended for use by persons (including children) with reduced physical, sensory or mental capabilities, or lack of experience and knowledge, unless they have been given supervision or instruction concerning use of the appliance by a person responsible for their safety. Children should be supervised to ensure that they do not play with the appliance. Comply to local regulations regarding disposal of the appliance. 4. Allow the refrigerant fluid to settle for several hours before plugging the ice maker. 5. The appliance must be positioned so that the plug is accessible. WARNING: fill with potable water only. Only use drinking water. CONNECTING YOUR ICE MAKER ! DANGER WARNING: This appliance must be grounded. IMPORTANT: The wires in this power cord are colored in accordance with the following code: Green or Green with a Yellow strip: Ground Blue: Neutral Brown: Live * Improper use of the grounded plug can result in the risk of electrical shock. If the power cord is damaged please call our customer service. 1. This unit should be properly grounded for your safety. The power cord of this appliance is equipped with a grounding plug which mates with standard grounding wall outlets to minimize the possibility of electric shock. 7 4 GETTING TO KNOW YOUR ICE MAKER General Information Postion of control panel & functions 1. Ice scoop. 2. Ice full sensor 3. Ice basket 4. Top cover with transparent window 5. Air outlet 6. Water drain cap: at bottom front of the unit. 7. MAXIMUM WATER LEVEL: ▲ Remove the ice basket, you can see the water level mark. Control Panel: Easy to use, visible functions and 1-touch display. A. Select ice cube size: Small or Large. B. Power indicator C. Ice-Full indicator D .Water shortage indicator E. Button to turn on/off the ice maker. F. Button to select ice cube size. 4 1 2 3 5 6 7 5 6