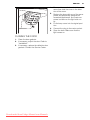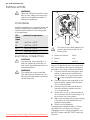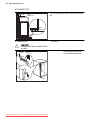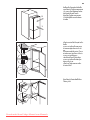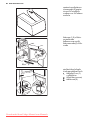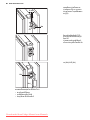
1
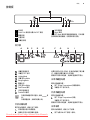
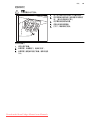
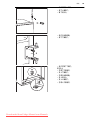
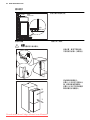
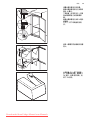
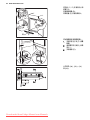
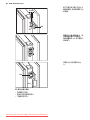
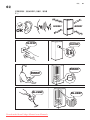
ENN2643AOW .................................................. ZH 冷冻冷藏箱 EN FRIDGE FREEZER TH ตูแชเย็น-แชแข็ง Downloaded from Fridge-Manual.com Manuals ............................................... 用户手册 2 USER MANUAL 24 คูมือการใชงาน 48 2 www.electrolux.com 目录 安全信息 . . . . . . . . . . . . . . . . . . . . . . . . . . . . . . . . . . . . . . . . . . . . . . . . . . . . . . . . . . . . . . . . . . . . . . . . . . . . . . . . . 3 控制板 . . . . . . . . . . . . . . . . . . . . . . . . . . . . . . . . . . . . . . . . . . . . . . . . . . . . . . . . . . . . . . . . . . . . . . . . . . . . . . . . . . . 5 日常使用 . . . . . . . . . . . . . . . . . . . . . . . . . . . . . . . . . . . . . . . . . . . . . . . . . . . . . . . . . . . . . . . . . . . . . . . . . . . . . . . . . 8 实用建议和提示 . . . . . . . . . . . . . . . . . . . . . . . . . . . . . . . . . . . . . . . . . . . . . . . . . . . . . . . . . . . . . . . . . . . . . . . . . . . 10 养护和清洁 . . . . . . . . . . . . . . . . . . . . . . . . . . . . . . . . . . . . . . . . . . . . . . . . . . . . . . . . . . . . . . . . . . . . . . . . . . . . . . 11 如果……应该如何处理 . . . . . . . . . . . . . . . . . . . . . . . . . . . . . . . . . . . . . . . . . . . . . . . . . . . . . . . . . . . . . . . . . . . . . 12 安装 . . . . . . . . . . . . . . . . . . . . . . . . . . . . . . . . . . . . . . . . . . . . . . . . . . . . . . . . . . . . . . . . . . . . . . . . . . . . . . . . . . . . 14 噪音 . . . . . . . . . . . . . . . . . . . . . . . . . . . . . . . . . . . . . . . . . . . . . . . . . . . . . . . . . . . . . . . . . . . . . . . . . . . . . . . . . . . . 21 技术数据 . . . . . . . . . . . . . . . . . . . . . . . . . . . . . . . . . . . . . . . . . . . . . . . . . . . . . . . . . . . . . . . . . . . . . . . . . . . . . . . . 22 环保问题 . . . . . . . . . . . . . . . . . . . . . . . . . . . . . . . . . . . . . . . . . . . . . . . . . . . . . . . . . . . . . . . . . . . . . . . . . . . . . . . . 23 伊莱克斯 - 想你所想! 感谢您选购伊莱克斯器具。您选择的产品身上融合了数十载的专业经验与创新特色。它的设计注重客户体验,兼具 精巧和时尚的特点。无论何时使用,都能确保您获得满意的效果。 欢迎使用伊莱克斯产品。 访问我们的网站以: 获取有用的建议、手册、故障检修工具、检修信息: www.electrolux.com 注册您的产品以获取更好的服务: www.electrolux.com/productregistration 为您的器具购买配件、消耗品和原装备件: www.electrolux.com/shop 客户关怀与服务 我们推荐使用原装备件。 当您联系服务部门时,请确保您可以提供以下数据。 该信息可以在标牌上找到。机型、产品编号、序列号。 警告/注意 - 安全信息。 综合信息和提示 环境信息 如有更改恕不另行通知 Downloaded from Fridge-Manual.com Manuals 中文 3 安全信息 为确保您的安全及正确使用,安装和初次使用本冰 箱之前,请仔细通读本用户手册,包括其中的提示 以及警告。 为了避免不必要的错误和意外,必须确 保所有使用该冰箱的人员完全清楚其操作和安全 性能。 请保管好说明书,搬迁或转售冰箱时,请一 并附上说明书,以便使用该冰箱的所有人都能够正 确了解冰箱的使用和安全信息。 为保障人的生命和财产安全,必须遵守这些用户说 明中的预防措施,因为制造商概不负责疏忽导致的 任何损失。 警告! 无论哪种电气组件(电线、插头或压缩 机),都必须由经认证的维修代理或具备 资格的维修人员更换,以避免发生危险。 儿童和残弱人士安全 • 本冰箱不可由肢体伤残、感觉或精神障碍以及缺 乏相关经验和知识的人(包括儿童)使用,除非 在其安全负责人的看管或指导下才可使用。 请看管好儿童,不让其玩弄冰箱。 • 确保所有包装远离儿童, 以免发生窒息意外。 • 丢弃冰箱时,请拔掉插座,剪去连接电缆(尽可 能靠近冰箱)并卸下门板,以防孩子们玩耍时触 电或把自己关在里面。 • 如果要使用本装有磁条密封门的冰箱换掉门或 盖装有弹簧锁(碰锁)的旧冰箱,请在丢弃旧冰 箱之前,确保弹簧锁已不可用, 以避免其成为 儿童的死亡陷阱。 常规安全 警告! 保持冰箱外壳或者内部结构中的通风口畅通无阻。 • 如本说明手册所述,本冰箱的设计用途是供普通 家庭存放食物和/或饮料。 • 不要使用机械冰箱或任何人为措施加速冷冻过 程。 • 不要在制冷装置内使用任何其他电器装置(例如 冰激凌机),除非制造商认可此用途。 • 不要损坏制冷回路。 • 本冰箱的制冷回路内含有制冷异丁烷 (R600a), 这是一种与环境高度相容的天然气,但可燃烧。 运输和安装冰箱期间,请确保没有损坏制冷回路 的组件。 如果制冷回路被损坏: – 避免明火并远离火源 – 让冰箱所在房间彻底通风 • 无论以任何方式改变本产品规格或改造本产品 都非常危险。损坏电线可能导致短路、火灾和/ 或电击。 Downloaded from Fridge-Manual.com Manuals 不得延长电源线。 确保冰箱背面没有压扁或损坏电源插头。 压扁或损坏的电源插头可能会过热并导致 火灾。 3. 确保您可以触及冰箱的电源插头。 4. 不要拉扯电源电线。 5. 如果电源插头插座松动,请不要插入插头。 否则可能会触电或引发火灾。 6. 不得在没有灯罩(如果事先知道)或内部 照明灯的情况下运行该冰箱。 该冰箱很重。搬动时请务必小心。 如果您的双手潮湿,请不要取出或接触冷冻室内 的物品,因为这可能导致皮肤擦伤或冻伤。 不要让该冰箱长时间受日光直射。 该冰箱使用的灯泡(如果事先知道)属于专用灯 泡,仅供家用电器使用。这些灯泡不可用于家居 照明。 1. 2. • • • • 日常使用 • 不要将热壶置于本冰箱的塑料部件上。 • 不要在本冰箱内存放可燃气体或液体,因为它们 可能会爆炸。 • 不要将食品放在后壁的出风口处。(如果是无霜 冰箱) • 冷冻食品一旦解冻后,就不宜再次冷冻。 • 存放包装好的冷冻食品时请遵守冷冻食品制造 商的说明。 • 必须严格遵守冰箱制造商的存放建议。 具体请 参阅相关说明。 • 不要将碳酸饮料放入冷冻室内,因为这可能导致 饮料容器内产生压力,引起爆炸,损坏本冰箱。 • 如果从冰箱直接取出冰棒就吃,可能导致冻灼。 保养和清洁 • 进行维护之前,请关闭冰箱电源,然后将电源插 头从电源插座上拔下来。 • 不要使用金属制品清洁冰箱。 • 不要使用尖锐物品清除冰箱上的霜。 请使用塑 料铲。 • 经常检查冷藏室中的排水槽有无融霜水。 如果 需要,请清洁排水槽。 如果排水槽堵塞,水将 聚集在冰箱的底部。 4 www.electrolux.com 安装 对于电气连接,请严格遵循具体段落中的 说明。 • 打开冰箱包装并检查其是否有损坏。 如果有损 坏,请不要连接冰箱。 立即向售卖处报告可能 损坏的地方, 并保留包装。 • 建议等待至少四个小时后再连接冰箱,以便油流 回到压缩机中。 • 冰箱周围应该留有足够空间供空气流动,否则, 会导致冰箱过热。 为充分通风,请按照相关说 明进行安装。 • 尽可能将冰箱背靠墙放立,以免碰触到发热的部 件(压缩机、冷凝器),以防灼伤。 • 不得将冰箱放置到靠近取暖器或炉灶的地方。 • 安装冰箱后,确保可以够得到插头。 • 仅限于连接到饮用水源(如果需要连接水源)。 维修 • 维修电气所需的任何电气工作都应该由具备资 格的电气工程师或有相当能力的人员进行。 • 本产品必须由授权的维修中心进行维修,并且只 能使用原装零配件。 环境保护 本冰箱的制冷回路或绝缘材料都不含可 能破坏臭氧层的气体。 本冰箱不应随城 市垃圾和废物一起废弃处理。 绝缘泡沫 含有可燃气体: 本冰箱应该依照当地政府 颁布的适用法规进行处置。 避免损坏冷 却装置,尤其是靠近热交换器后部的冷却 的 装置。 本冰箱上使用的标有符号 材料为可回收利用材料。 Downloaded from Fridge-Manual.com Manuals 中文 5 控制板 1 7 6 5 4 1 显示屏 3 2 6 冷冻室按钮 2 Drink Chill 按钮与冰箱 ON/OFF 按钮 3 降温按钮 7 Mode 按钮 同时按下 Mode 按钮与降温按钮数秒钟,可以调高 预先确定的按钮音量。这种更改是可逆的。 4 升温按钮 5 冷藏室按钮 显示屏 A B C D E F G H I J A) B) C) D) E) F) G) H) I) J) 冷藏室温度标志 冷藏室 OFF 标志 HolidayMode 冷藏室 EcoMode ShoppingMode 警报标志 冷冻室 EcoMode FastFreeze 模式 冷冻室温度标志 DrinksChill 模式 在选择冷藏室或冷冻室后,动画 动。 在选择温度后,动画闪烁数分钟。 如果显示屏上显示 DEMO,则说明冰箱处于演示模 式:请参阅“故障与解决办法”段落。 要选择不同的设定温度,请参阅“温度调节”部分。 关闭冷藏室电源 要关闭冷藏室电源: 1. 按下 Fridge Compartment 按钮数秒钟。 2. 冷藏室 OFF 标志出现。 开启冷藏室电源 启 开启冰箱电源 要开启冰箱电源,请执行以下步骤: 1. 将电源插头插入电源插座。 2. 温度标志显示设定的默认温度。 Downloaded from Fridge-Manual.com Manuals 要开启冷藏室电源: 1. 按下 Fridge Compartment 按钮。 冷藏室 OFF 标志消失。 要选择不同的设定温度,请参阅“温度调节”部分。 关闭电源 要关闭冰箱电源,请执行以下步骤: 1. 按下冰箱 ON/OFF 按钮 3 秒钟。 6 www.electrolux.com 2. 3. 显示屏关闭。 要断开冰箱与电源的连接,请从电源插座拔下 电源插头。 温度调节 选择冷藏室或冷冻室。 按温度按钮可设置温度。 默认设定温度: • 冷藏室 +4°C • 冷冻室 -18°C 温度标志显示设定的温度。 设定温度将在 24 小时内达到。 断电后,设定温度会得以保存。 HOLIDAYMODE 该功能使您可以在长假期间清空并关上冷藏室,而 不会产生异味。 在开启假日功能时,必须清空冷藏室。 要开启该功能: 按下 Mode 按钮,直至相应图标出现。 假日标志闪烁数秒钟。 冷藏室温度标志显示设定的温度。 要关闭该功能: 1. 按下 Mode 按钮,直至假日标志闪烁。 2. 假日标志消失。 1. 通过选择不同的冷藏室设定温度即可关 闭该功能。 针对冷藏室与冷冻室的 ECOMODE 最佳的食品存储方法是选择 EcoMode。 要开启该功能: 1. 选择冷藏室/冷冻室。 2. 按下 Mode 按钮,直至相应图标出现。 EcoMode 标志闪烁数秒钟。 温度标志显示设定的温度: – 冷藏室:+4°C – 冷冻室:-18°C 3. EcoMode 标志出现。 要关闭该功能: 1. 选择冷藏室/冷冻室。 2. 按下 Mode 按钮,直至 EcoMode 标志闪烁。 3. EcoMode 标志消失。 通过选择不同的设定温度即可关闭该功 能。 Downloaded from Fridge-Manual.com Manuals SHOPPINGMODE 如果需要放入大量温度较高的食品,例如从商场买 回大量食品之后,我们建议启动 ShoppingMode 以 便更快地使其冷却,从而避免使已经存放在冰箱中 的其他食品温度升高。 要开启该功能: 1. 按下 Mode 按钮,直至相应图标出现。 ShoppingMode 标志闪烁数秒钟。 ShoppingMode 会在大约 6 小时后自动关闭。 要在该功能自动关闭前将其关闭: 1. 按下 Mode 按钮,直至 ShoppingMode 标志 闪烁。 2. ShoppingMode 标志消失。 通过选择不同的冷藏室设定温度即可关 闭该功能。 FASTFREEZE 模式 要开启该功能: 1. 选择冷冻室。 2. 按下 Mode 按钮,直至相应图标出现。 FastFreeze 标志闪烁数秒钟。 该功能会在 52 小时后自动停止。 要在该功能自动关闭前将其关闭: 1. 选择冷冻室。 2. 按下 Mode 按钮,直至 FastFreeze 标志闪烁。 3. FastFreeze 标志消失。 通过选择不同的冷冻室设定温度即可关 闭该功能。 DRINKSCHILL 模式 DrinksChill 模式可用来设定在所需时间发出声音 警报,例如在以下情况下可以使用:在烹制过程中 需要将某混合物冷却一段时间;或者为了不忘拿出 放置在冷冻室以便快速冷却的饮品而需要得到提 醒。 要开启该功能: 1. 按下 DrinkChill 按钮。 DrinksChill 标志出现。 定时器显示设定的值(30 分钟)。 2. 按降温按钮和升温按钮可以更改定时器设定 的值,该值介于 1 到 90 分钟之间。 3. 定时器开始闪烁(min).。 在倒计时结束时,DrinksChill 标志闪烁,同时发出 声音警报。 1. 取出冷冻室中放置的任何饮品。 2. 按下 DrinkChill 按钮关掉声音并关闭该功能。 可以在倒计时期间的任何时刻解除该功能: 1. 按下 DrinkChill 按钮。 中文 2. DrinksChill 标志消失。 通过按降温按钮和升温按钮可以在倒计时期间或 结束时更改时间。 高温警报 当冷冻室内的温度升高时(例如由于提前断电), 将会通过以下方式指示: • 警报标志与冷冻室温度标志闪烁 • 蜂鸣器发出声音。 要重设警报: 1. 按下任何按钮。 2. 蜂鸣器关闭。 3. 冷冻室温度标志在数秒钟内显示所达到的最 高温度。然后重新显示设定温度。 4. 警报标志继续闪烁,直至恢复正常情况。 当不需要发出警报时,警报标志消失。 开门警报 如果冰箱门打开数分钟,就会发出声音警报。开门 警报状态的指示标志为: • 警报标志闪烁 • 蜂鸣音 当恢复正常情况后(冰箱门关闭),警报将停止。 在发出警报期间,可以通过按任意按钮关闭蜂鸣 器。 Downloaded from Fridge-Manual.com Manuals 7 8 www.electrolux.com 日常使用 清洁内部 初次使用冰箱之前,使用微温的水和中性肥皂清洗 冰箱内部以及所有内部附件,去除新产品特有的味 道,然后彻底干燥。 不要使用去污剂或磨砂粉,这会损坏冰箱 表面。 冷冻过程持续 24 小时:在此期间不要再放入其他 待冷冻的食品。 存放冷冻食品 初次启动时或在停用一段时间后启动时,先让冰箱 以较高设置运行至少 2 小时后再将食品放入冰箱 室内。 如果发生意外解冻(例如因为电源故 障),如果断电时间比技术特征表中“上 升时间”下显示的时间值长,则解冻食品 要尽快食用,或立即烹饪后重新冷冻(待 冷却后)。 如果显示屏上显示 DEMO,则说明冰箱处于演示模 式:请参阅“故障与解决办法”段落。 冷冻新鲜食品 冷冻室适合冷冻新鲜食品和长期存放冷冻及深度 冷冻的食品。 要冷冻新鲜食品,应至少在将待冷冻的食品放置到 冷冻室中 24 小时之前启动 Fast Freeze 功能。 将待冷冻的新鲜食品放在 Fast Freeze 冰箱室,因 为这是温度最低的部分。 铭牌(位于冰箱内部的一个标签)上标示了可在 24 小时内冷冻的最大食品数量。 解冻 深度冷冻或冷冻的食品,在使用之前,可以放入冷 藏室或室温下进行解冻,具体视操作当时的可行性 而定。 小块食品甚至可以从冷冻室取出后直接进行烹煮, 无需解冻: 在这种情况下,可能需要烹煮较长时 间。 可移动搁架 冷藏壁上有一些滑槽,可根据需要安放搁架。 为了更好地利用空间,前半个搁架可以搭在后半个 上。 安放门搁架 为了能够存放不同包装大小的食品,门搁架高低可 调。 请按以下步骤进行调整:沿箭头所示方向缓缓拉出 搁架,直到其完全拉出,然后根据需要重新安放。 Downloaded from Fridge-Manual.com Manuals 中文 9 湿度控制 玻璃搁架包含一个带有缝隙的装置(可通过滑杆进 行调节),使得能够调节蔬菜抽屉的温度。 当通风槽关闭时: 水果和蔬菜隔层中食品的天然含水量可保持较长 时间。 当通风槽打开时: 更多的空气流通会使水果和蔬菜隔层中具有较低 的空气水分含量。 Downloaded from Fridge-Manual.com Manuals 10 www.electrolux.com 实用建议和提示 节能提示 • 不要经常打开冰箱门,若非绝对必要,也不要打 开过长时间。 • 如果在环境温度较高,且温度调节器设定在较低 的温度,而冰箱又装满了食品,那么压缩机有可 能会不停地运转而导致蒸发器结霜或结冰。 如 果发生这种情况,请将温度调节器转向较高设 置,以便进行自动除霜和节省耗电量。 新鲜食品冷藏提示 如欲获得最佳性能: • 不要在冷藏室存放热食或挥发性液体 • 如果食品味道浓烈,请一定要盖上盖子或包裹好 • 摆放好食物,使其周围空气可以自由流通 冷藏提示 实用提示: 肉(所有肉类): 装到保鲜袋中并放到蔬菜抽屉上 的玻璃搁架上。 安全起见,这种方式存放的食品最多只能保存一、 两天。 熟食、凉菜等等: 这些食物应该盖上盖,可以放在 任何搁架上。 水果和蔬菜: 这些食品应该彻底清洗并放在随附的 特定抽屉内。 黄油和奶酪: 这些食品应该放在特制的密封容器内 或裹在铝箔或塑料保鲜袋中,以最大限度地排除空 气。 奶瓶: 这些食品应该盖盖并存放在冰箱门内的瓶架 中。 香蕉、土豆、洋葱和大蒜如果没有包好,不得存放 在冷藏室内。 冷冻提示 为了帮助您最好地利用冷冻过程,特提供一些重要 提示: • 可以在 24 小时内冷冻的最大食品量 显示在定 额牌上; • 冷冻过程需要 24 小时。 在这期间,不得添加更 多要冷冻的食品; • 只可冷冻优质、新鲜和彻底清洁的食品; • 将食物分成小块以便快速、彻底地冷冻,并且以 后解冻时只需取出需要的量; • 将食品裹在铝箔或塑料保鲜膜中,并确保包装密 封; • 不要让新鲜的未冷冻食品接触已冷冻的食品,以 免引起后者温度升高; Downloaded from Fridge-Manual.com Manuals • 相对于肥的食品来说,瘦的食品保存质量更好, 时间更长; 盐会缩短食品的保存时间; • 如果从冷冻室取出冰块后立刻食用,可能导致皮 肤冻伤; • 建议在每个包装上标上冷冻日期以让您记录存 放时间; 冷冻食品存放提示 为了获得最佳性能,您应该: • 确保商业冷冻食品在零售商处存放恰当; • 确保在尽可能短的时间内将冷冻食品从食品店 转到冷藏柜内; • 不要经常打开柜门,若非绝对必要,也不要打开 过长时间。 • 一旦解冻,食品很快就会变质,不宜再冷冻。 • 不要超过食品生产商标示的存放时间。 中文 11 养护和清洁 小心! 执行任何维护操作之前,先拔下冰箱插 头。 本冰箱的冷却装置中含有碳氢化合物; 因 此,维护和充注工作必须由授权的技术人 员进行。 定期清洁 本设备必须要定期清洁: • 使用微温的水和中性肥皂清洁内部及附件。 • 定期检查门密封条并擦抹清洁,确保其干净无 屑。 • 清洗并彻底干燥。 不要拉扯、移动或损坏机体内部的管道 和/线缆。 不得使用去污剂、磨砂粉、浓香型清洁产 品或抛光蜡产品清洁内部,因为这会损坏 表面并留下强烈气味。 使用刷子清洁冷凝器(黑色铁架)和冰箱背后的压 缩机。这会提高冰箱性能并节省耗电量。 小心操作,不要损坏冷却系统。 很多厨房专用的表面清洁剂都含有可能浸蚀/损害 本冰箱塑料的化学成分。 因此,建议在清洁本冰箱 的外壳表面时,使用只加了少许清洁剂的温水。 清洁之后,重新将冰箱连接至电源。 冷藏室除霜 正常使用期间,每当压缩机电机停止运转时,冷藏 室蒸发器上的霜会自动消除。霜融化成的水会顺 着水槽流到冰箱背部压缩机电机上方的一个特别 的容器中,然后逐渐蒸发。 冷藏柜除霜 另一方面,这一型号的冷冻室属于“无霜”型。也就 是说在其运转过程中,内壁或食品上不会结霜。 不结霜的原因是自动控制风扇可以驱动冷空气在 冷冻室内不间断地循环。 闲置期 当冰箱长期不用时,请遵循以下预防措施: • 断开冰箱电源 • 取出所有食品 • 除霜(如果需要),并清洁冰箱和所有配件 • 冰箱门保持微开以防异味。 Downloaded from Fridge-Manual.com Manuals 如果冰箱保持开机,请安排人员偶尔检查一下,以 防里面的食品因为断电而变质。 12 www.electrolux.com 如果……应该如何处理 警告! 排除故障之前,请先从电源插座上拔下电 源插头。 只有具备资格的电工或有相当能力的人 员才可以进行本手册中未述之故障排除 工作。 故障 可能的原因 冰箱不工作。照明灯不亮。 冰箱电源未打开。 照明灯不亮。 压缩机不停运转。 正常使用期间,可能会有响声(压缩机、 制冷剂循环)。 解决办法 开启冰箱电源。 电源插头没有正确连接到电源 插座。 将电源插头正确连接到电源插 座。 冰箱没有电。电源插座没有电 压。 将别的电器连接到该电源插座。 联系具备资格的电工。 照明灯当前处于待命状态。 关闭冰箱门,然后打开。 照明灯有问题。 请参阅“更换照明灯”。 温度设定不当。 设定一个较高的温度。 未正确关闭冰箱门。 请参阅“关门”。 冰箱门打开过于频繁。 冰箱门打开时间不可过久。 食品温度过高。 等待食品的温度降至室温之后再 进行储存。 室温过高。 降低室温。 冰箱背板上面出现水流。 在自动除霜过程中,背板上的霜 这是正常现象。 冻将会溶化。 冰箱内有水。 出水口被堵塞。 清洁出水口。 食品阻碍水流进入集水器。 确保食品与背板互不接触。 地板上面出现水流。 溶水出口未引入压缩机上方的 蒸发盒。 将溶水出口连接到蒸发盒。 冰箱的温度过低。 温度调节器设定不当。 设定一个较高的温度。 冰箱内的温度过高。 温度调节器设定不当。 设定一个较低的温度。 一次储存的食品过多。 减少一次储存的食品数量。 冰箱内的温度过高。 冰箱内部没有冷气流通。 确保冰箱内部有冷气流通。 冷冻室内的温度过高。 食品与食品之间的间隙太小。 储存食品的方式应当确保冷气流 通不受阻碍。 温度显示屏上显示上部方 块或下部方块。 在量温度时发生错误。 请致电您的服务代表(制冷系统 将继续保持食品低温,但无法进 行温度调节)。 DEMO 出现在显示屏上。 冰箱处于演示模式(DEMO).。 按下灯按钮大约 10 秒钟,在蜂鸣 器长时间发出响声,并且显示屏 关闭一小会儿后:冰箱开始正常 工作。 Downloaded from Fridge-Manual.com Manuals 中文 13 更换照明灯 小心! 从电源插座上拔下插头。 1. 2. 3. 4. 5. 关闭冰箱门 1. 2. 3. 清洁冰箱门垫圈。 如果需要,请调整柜门。请参阅“安装”。 如果需要,请更换坏的柜门垫圈。请联系服务 中心。 Downloaded from Fridge-Manual.com Manuals 按下后方挂钩并同时沿箭头方向滑动外盖。 将灯泡更换为相同功率、家用电器专用的新灯 泡。(最大功率请参见灯罩) 将灯罩安装到其原始位置。 将插头连接到电源插座。 打开门。确保照明灯亮起。 14 www.electrolux.com 安装 警告! 安装冰箱之前请仔细阅读"安全信息",以 确保您的安全以及冰箱的正常工作。 安放位置 安装冰箱的地方的环境温度应该与冰箱定额牌上 所示的气候类型相对应: 气候类型 环境温度 (亚温带) +10°C 到 +32°C (温带) +16°C 到 +32°C (亚热带) +16°C 到 +38°C (热带) +16°C 到 +43°C 电气连接 小心! 安装本冰箱所需的任何电气工作都应该 由合格电工或有能力的人员进行。 警告! 此冰箱必须接地。 制造商对于不遵循此安全措施所导致的 任何后果概不负责。 A B 电源线内的电线颜色按照下列规范分配: A 黄绿相间: 地线 C 棕色: 火线 E 蓝色: 零线 由于此冰箱电源线内的电线颜色可能与标识插头 端子的颜色标记不相符,因此请按以下步骤操作: 1. 将黄绿相间的电线连接到标记有字母“E”、地 或黄绿相间颜色的端子。 线标志 2. 将蓝色电线连接到标记有字母“N”或黑色的端 子。 3. 将棕色电线连接到标记有字母“L”或红色的端 子。 4. 检查电线无断丝或散丝现象,并且电线夹 D 固定在外护套上。 5. 确保电源电压与冰箱铭牌上指明的电压相同。 6. 开启冰箱电源。 冰箱配备有 13 amp 的插头(安装于 B 处)。如果 不得不更换所提供插头中的保险丝,则必须使用 ASTA 批准的 (BS 1362) 保险丝。 警告! 将切断的插头插入 13 amp 插座是一个 严重危及安全(触电)的动作。确保安全 地对其进行处理。 门可两边开 冰箱的门为右开。如果您想换为左开,请在安放冰 箱之前执行以下步骤: E C D Downloaded from Fridge-Manual.com Manuals 中文 • 松开并卸下上销钉。 • 卸下上面的门。 • 取下定位片。 • 松开中间的铰链。 • 卸下下面的门。 S • 松开并卸下下销钉。 在对边上 • 拧紧下方的销钉。 • 安上下面的门。 • 拧紧中间的铰链。 • 安上定位片。 • 安上上面的门。 • 拧紧上方的销钉。 Downloaded from Fridge-Manual.com Manuals 15 16 www.electrolux.com 通风要求 6 cm 冰箱后面必须通风良好。 min. 200 cm2 min. 200 cm2 安装冰箱 请执行以下步骤。 小心! 确保电源线可以自由移动。 如有必要,请剪下黏性封条, 并将其贴在冰箱上,如图所示。 x x 2 1 Downloaded from Fridge-Manual.com Manuals 将冰箱安装到橱柜中。 沿箭头 (1) 所示的方向推动冰 箱,直至间隙盖顶到厨柜。 沿箭头 (2) 所示方向把冰箱推 靠在铰链对边的橱柜上。 中文 17 调整冰箱在橱柜中的位置。 确保冰箱和橱柜前边之间的距 离为 44 毫米。 下铰链盖(在附件包中)可确 保冰箱和厨柜之间的距离准 确。 确保冰箱和橱柜之间有 4 毫米 的距离。 打开门。将下铰链盖安放到 位。 4 mm 44 mm 使用 4 颗螺钉将冰箱固定到橱 柜上。 I I 从铰链盖 (E) 上卸下正确部 件。如果是右铰链,确保卸下 DX 部件;如果是左铰链,则 卸下 SX 部件。 Downloaded from Fridge-Manual.com Manuals 18 www.electrolux.com 将护盖(C、D)安装到凸片和 铰链孔上。 安装通风栅格 (B)。 将铰链盖 (E) 安装到铰链上。 C D E E B 将冰箱侧面连接到橱柜壁上: 1. 安装托座 (E) 和 (F),调整 距离。 2. 使用螺钉进行固定(如图 所示)。 3. 安装盖板 (D)。 E F D 分开部件 (Ha)、(Hb)、(Hc) 和 (Hd)。 Downloaded from Fridge-Manual.com Manuals 中文 19 将部件 (Ha) 安装到橱柜内壁 上。 ca. 50 mm 90° 21 mm 90° ca. 50 mm 21 mm 将部件 (Hc) 压到部件 (Ha) 上。 Ha Hc 将冰箱门和橱柜门打开到 90° 位置。 将小方块 (Hb) 插入到导轨 (Ha) 内。 将冰箱门和橱柜门合在一起并 记下孔眼。 8 mm Ha Hb Downloaded from Fridge-Manual.com Manuals 20 www.electrolux.com 取下托座并标记距门外边为 8 毫米的距离,这是安装螺钉 (K) 的位置。 8 mm K Ha 重新将小方块放到导轨上,然 后用随附的螺钉将其固定。 通过调整部件 Hb,对齐橱柜门 和冰箱门。 Hb 将部件 (Hd) 压到部件 (Hb) 上。 Hb Hd 进行最后检查以确保: • 所有螺钉已拧紧。 • 封条已牢牢安装到机壳上。 • 门能够正常开关。 Downloaded from Fridge-Manual.com Manuals 中文 21 噪音 正常使用期间,可能会有响声(压缩机、制冷循 环)。 SSS RRR ! HISSS! OK BRRR! ! BB U BL CLICK! BRRR! BLUBB! Downloaded from Fridge-Manual.com Manuals ! ICK CL CR AC K! CLICK! BRRR! BLUBB! 22 www.electrolux.com HISSS! HISSS! SSSRRR! SSSRRR! CRACK! CRACK! 技术数据 凹进尺寸 高度 1780 毫米 宽度 560 毫米 深度 560 毫米 上升时间 25 小时 电压 230-240 V 频率 50 Hz 技术信息位于冰箱内部左侧的铭牌和能源标签上。 Downloaded from Fridge-Manual.com Manuals 中文 23 环保问题 回收带有该标志 的材料。 把包装材料放入适 用的容器以循环利用。 帮助保护环境和人类健康,促进电器及电子产品的 废物利用。 请勿将带有该标志 的电器与生活 Downloaded from Fridge-Manual.com Manuals 垃圾一起处理。 将产品退回到您当地的回收处,或 联系您所在城市的办事处。 24 www.electrolux.com CONTENTS SAFETY INFORMATION . . . . . . . . . . . . . . . . . . . . . . . . . . . . . . . . . . . . . . . . . . . . . . . . . . . . . . . . CONTROL PANEL . . . . . . . . . . . . . . . . . . . . . . . . . . . . . . . . . . . . . . . . . . . . . . . . . . . . . . . . . . . . DAILY USE . . . . . . . . . . . . . . . . . . . . . . . . . . . . . . . . . . . . . . . . . . . . . . . . . . . . . . . . . . . . . . . . . . HELPFUL HINTS AND TIPS . . . . . . . . . . . . . . . . . . . . . . . . . . . . . . . . . . . . . . . . . . . . . . . . . . . . . CARE AND CLEANING . . . . . . . . . . . . . . . . . . . . . . . . . . . . . . . . . . . . . . . . . . . . . . . . . . . . . . . . WHAT TO DO IF… . . . . . . . . . . . . . . . . . . . . . . . . . . . . . . . . . . . . . . . . . . . . . . . . . . . . . . . . . . . . INSTALLATION . . . . . . . . . . . . . . . . . . . . . . . . . . . . . . . . . . . . . . . . . . . . . . . . . . . . . . . . . . . . . . NOISES . . . . . . . . . . . . . . . . . . . . . . . . . . . . . . . . . . . . . . . . . . . . . . . . . . . . . . . . . . . . . . . . . . . . TECHNICAL DATA . . . . . . . . . . . . . . . . . . . . . . . . . . . . . . . . . . . . . . . . . . . . . . . . . . . . . . . . . . . . ENVIRONMENT CONCERNS . . . . . . . . . . . . . . . . . . . . . . . . . . . . . . . . . . . . . . . . . . . . . . . . . . . . 25 28 31 33 34 35 38 45 46 47 WE’RE THINKING OF YOU Thank you for purchasing an Electrolux appliance. You’ve chosen a product that brings with it decades of professional experience and innovation. Ingenious and stylish, it has been designed with you in mind. So whenever you use it, you can be safe in the knowledge that you’ll get great results every time. Welcome to Electrolux. Visit our website for: Get usage advice, brochures, trouble shooter, service information: www.electrolux.com Register your product for better service: www.electrolux.com/productregistration Buy Accessories, Consumables and Original spare parts for your appliance: www.electrolux.com/shop CUSTOMER CARE AND SERVICE We recommend the use of original spare parts. When contacting Service, ensure that you have the following data available. The information can be found on the rating plate. Model, PNC, Serial Number. Warning / Caution-Safety information General information and tips Environmental information Subject to change without notice. Downloaded from Fridge-Manual.com Manuals ENGLISH 25 SAFETY INFORMATION In the interest of your safety and to ensure the correct use, before installing and first using the appliance, read this user manual carefully, including its hints and warnings. To avoid unnecessary mistakes and accidents, it is important to ensure that all people using the appliance are thoroughly familiar with its operation and safety features. Save these instructions and make sure that they remain with the appliance if it is moved or sold, so that everyone using it through its life will be properly informed on appliance use and safety. For the safety of life and property keep the precautions of these user's instructions as the manufacturer is not responsible for damages caused by omission. CHILDREN AND VULNERABLE PEOPLE SAFETY • This appliance is not intended for use by persons (including children) with reduced physical, sensory or mental capabilities, or lack of experience and knowledge, unless they have been given supervision or instruction concerning use of the appliance by a person responsible for their safety. Children should be supervised to ensure that they do not play with the appliance. • Keep all packaging well away from children. There is risk of suffocation. • If you are discarding the appliance pull the plug out of the socket, cut the connection cable (as close to the appliance as you can) and remove the door to prevent playing children to suffer electric shock or to close themselves into it. • If this appliance featuring magnetic door seals is to replace an older appliance having a spring lock (latch) on the door or lid, be sure to make that spring lock unusable before you discard the old appliance. This will prevent it from becoming a death trap for a child. Keep ventilation openings, in the appliance enclosure or in the built-in structure, clear of obstruction. • The appliance is intended for keeping foodstuff and/or beverages in a normal household as explained in this instruction booklet. • Do not use a mechanical device or any artificial means to speed up the thawing process. • Do not use other electrical appliances (such as ice cream makers) inside of refrigerating appliances, unless they are approved for this purpose by the manufacturer. • Do not damage the refrigerant circuit. • The refrigerant isobutane (R600a) is contained within the refrigerant circuit of the appliance, a natural gas with a high level of environmental compatibility, which is nevertheless flammable. During transportation and installation of the appliance, be certain that none of the components of the refrigerant circuit become damaged. If the refrigerant circuit should become damaged: – avoid open flames and sources of ignition – thoroughly ventilate the room in which the appliance is situated • It is dangerous to alter the specifications or modify this product in any way. Any damage to the cord may cause a shortcircuit, fire and/or electric shock. WARNING! Any electrical component (power cord, plug, compressor) must be replaced by a certified service agent or qualified service personnel to avoid hazard. 1. 2. GENERAL SAFETY WARNING! 3. Downloaded from Fridge-Manual.com Manuals 4. Power cord must not be lengthened. Make sure that the power plug is not squashed or damaged by the back of the appliance. A squashed or damaged power plug may overheat and cause a fire. Make sure that you can come to the mains plug of the appliance. Do not pull the mains cable. 26 www.electrolux.com 5. • • • • If the power plug socket is loose, do not insert the power plug. There is a risk of electric shock or fire. 6. You must not operate the appliance without the lamp cover (if foreseen) of interior lighting. This appliance is heavy. Care should be taken when moving it. Do not remove nor touch items from the freezer compartment if your hands are damp/wet, as this could cause skin abrasions or frost/freezer burns. Avoid prolonged exposure of the appliance to direct sunlight. Bulb lamps (if foreseen) used in this appliance are special purpose lamps selected for household appliances use only. They are not suitable for household room illumination. DAILY USE • Do not put hot pot on the plastic parts in the appliance. • Do not store flammable gas and liquid in the appliance, because they may explode. • Do not place food products directly against the air outlet on the rear wall. (If the appliance is Frost Free) • Frozen food must not be re-frozen once it has been thawed out. • Store pre-packed frozen food in accordance with the frozen food manufacturer's instructions. • Appliance's manufacturers storage recommendations should be strictly adhered to. Refer to relevant instructions. • Do not place carbonated or fizzy drinks in the freezer compartment as it creates pressure on the container, which may cause it to explode, resulting in damage to the appliance. • Ice lollies can cause frost burns if consumed straight from the appliance. CARE AND CLEANING • Before maintenance, switch off the appliance and disconnect the mains plug from the mains socket. • Do not clean the appliance with metal objects. Downloaded from Fridge-Manual.com Manuals • Do not use sharp objects to remove frost from the appliance. Use a plastic scraper. • Regularly examine the drain in the refrigerator for defrosted water. If necessary, clean the drain. If the drain is blocked, water will collect in the bottom of the appliance. INSTALLATION For electrical connection carefully follow the instructions given in specific paragraphs. • Unpack the appliance and check if there are damages on it. Do not connect the appliance if it is damaged. Report possible damages immediately to the place you bought it. In that case retain packing. • It is advisable to wait at least four hours before connecting the appliance to allow the oil to flow back in the compressor. • Adequate air circulation should be around the appliance, lacking this leads to overheating. To achieve sufficient ventilation follow the instructions relevant to installation. • Wherever possible the back of the product should be against a wall to avoid touching or catching warm parts (compressor, condenser) to prevent possible burn. • The appliance must not be located close to radiators or cookers. • Make sure that the mains plug is accessible after the installation of the appliance. • Connect to potable water supply only (If a water connection is foreseen). SERVICE • Any electrical work required to do the servicing of the appliance should be carried out by a qualified electrician or competent person. • This product must be serviced by an authorized Service Centre, and only genuine spare parts must be used. ENGLISH ENVIRONMENT PROTECTION This appliance does not contain gasses which could damage the ozone layer, in either its refrigerant circuit or insulation materials. The appliance shall not be discarded together with the urban refuse and rubbish. The insulation foam contains flammable gases: the appliance shall be disposed according to the applicable regulations to obtain from your local authorities. Avoid damaging the cooling unit, especially at the rear near the heat exchanger. The materials used on this appliance marked by the symare recyclable. bol Downloaded from Fridge-Manual.com Manuals 27 28 www.electrolux.com CONTROL PANEL 1 7 6 5 4 1 Display 3 2 6 Freezer Compartment button 2 Drink Chill button and Appliance ON/ OFF button 3 Temperature colder button 4 Temperature warmer button 5 Fridge Compartment button 7 Mode button It is possible to change predefined sound of buttons to a loudly one by pressing together Mode button and Temperature colder button for some seconds. Change is reversible. DISPLAY A B C D E F G H I J A) B) C) D) E) F) G) H) I) J) Fridge temperature indicator Fridge OFF indicator HolidayMode Fridge EcoMode ShoppingMode Alarm indicator Freezer EcoMode FastFreeze mode Freezer temperature indicator DrinksChill mode After selection of the fridge or freezer compartment the animation starts. After selection of the temperature the animation flashes for a few minutes. Downloaded from Fridge-Manual.com Manuals SWITCHING ON THE APPLIANCE To switch on the appliance do these steps: 1. Connect the mains plug to the power socket. 2. The temperature indicators show the set default temperature. If DEMO appears on the Display, the appliance is in demonstration mode: refer to “WHAT TO DO IF....” paragraph. To select a different set temperature refer to "Temperature regulation". SWITCHING OFF THE FRIDGE To switch off the fridge: 1. Press the Fridge Compartment button for few seconds. 2. The fridge OFF indicator is shown. ENGLISH SWITCHING ON THE FRIDGE To switch on the fridge: 1. Press the Fridge Compartment button. The fridge OFF indicator goes off. To select a different set temperature refer to "Temperature regulation". SWITCHING OFF To switch off the appliance do these steps: 1. Press the Appliance ON/OFF button for 3 seconds. 2. The display switches off. 3. To disconnect the appliance from the power disconnect the mains plug from the power socket. TEMPERATURE REGULATION Select the fridge or freezer compartment. Press the temperature button to set the temperature. Set default temperature: • +4°C for the fridge • -18°C for the freezer The temperature indicators show the set temperature. The set temperature will be reached within 24 hours. After a power failure the set temperature remains stored. HOLIDAYMODE This function allows you to keep the refrigerator closed and empty during a long holiday period without the formation of a bad smell. The fridge compartment must be empty with holiday function on. To switch on the function: 1. Press the Mode button until the corresponding icon appears. The Holiday indicator flashes for few seconds. The fridge temperature indicator shows the set temperature. To switch off the function: 1. Press the Mode button until the Holiday indicator flashes. 2. The Holiday indicator goes off. Downloaded from Fridge-Manual.com Manuals 29 The function switches off by selecting a different fridge set temperature. ECOMODE FOR FRIDGE AND FREEZER COMPARTMENT For optimal food storage select the EcoMode . To switch on the function: 1. Select the fridge/freezer compartment. 2. Press the Mode button until the corresponding icon appears. The EcoMode indicator flashes for few seconds. The temperature indicator shows the set temperature: – for the fridge: +4°C – for the freezer: -18°C 3. The EcoMode indicator is shown. To switch off the function: 1. Select the fridge/freezer compartment. 2. Press the Mode button until the EcoMode indicator flashes. 3. The EcoMode indicator goes off. The function switches off by selecting a different set temperature. SHOPPINGMODE If you need to insert a large amount of warm food, for example after doing the grocery shopping, we suggest activating the ShoppingMode to chill the products more rapidly and to avoid warming the other food which is already in the refrigerator. To switch on the function: 1. Press the Mode button until the corresponding icon appears. The ShoppingMode indicator flashes for few seconds. The ShoppingMode shuts off automatically after approximately 6 hours. To switch off the function before its automatic end: 1. Press the Mode button until the ShoppingMode indicator flashes. 2. The ShoppingMode indicator goes off. The function switches off by selecting a different fridge set temperature. 30 www.electrolux.com FASTFREEZE MODE To switch on the function: 1. Select the freezer compartment. 2. Press the Mode button until the corresponding icon appears. The FastFreeze indicator flashes for few seconds. This function stops automatically after 52 hours. To switch off the function before its automatic end: 1. Select the freezer compartment. 2. Press the Mode button until the FastFreeze indicator flashes. 3. The FastFreeze indicator goes off. The function switches off by selecting a different freezer set temperature. DRINKSCHILL MODE The DrinksChill mode is to be used to set an acoustic alarm at the preferred time, useful for example when a recipe requires to cool down a mixture for a certain period of time, or when a reminder is needed in order not to forget the bottles placed in the freezer for fast cooling. To switch on the function: 1. Press the DrinkChill button. The DrinksChill indicator appears. The Timer shows the set value (30 minutes). 2. Press the Temperature colder button and Temperature warmer button to change the Timer set value from 1 to 90 minutes. 3. The Timer start to flash (min). At the end of the countdown the DrinksChill indicator flashes and an audible alarm sounds: 1. Remove any drinks contained in the freezer compartment. 2. Press the DrinkChill button to switch off the sound and terminate the function. It is possible to deactivate the function at any time during the countdown: 1. Press the DrinkChill button. 2. The DrinksChill indicator goes off. It is possible to change the time during the countdown and at the end by pressing the Downloaded from Fridge-Manual.com Manuals Temperature colder button and the Temperature warmer button. HIGH TEMPERATURE ALARM An increase in the temperature in the freezer compartment (for example due to an earlier power failure) is indicated by: • flashing the alarm and freezer temperature indicators • sounding of buzzer. To reset the alarm: 1. Press any button. 2. The buzzer switches off. 3. The freezer temperature indicator shows the highest temperature reached for a few seconds. Then show again the set temperature. 4. The alarm indicator continue to flash until the normal conditions are restored. When the alarm has returned the alarm indicator goes off. DOOR OPEN ALARM An acoustic alarm will sound if the door is left open for a few minutes. The door open alarm conditions are indicated by: • flashing Alarm indicator • acoustic buzzer When normal conditions are restored (door closed), the alarm will stop. During the alarm, the buzzer can be switched off by pressing any button. ENGLISH 31 DAILY USE CLEANING THE INTERIOR Before using the appliance for the first time, wash the interior and all internal accessories with lukewarm water and some neutral soap so as to remove the typical smell of a brand-new product, then dry thoroughly. Do not use detergents or abrasive powders, as these will damage the finish. If DEMO appears on the Display, the appliance is in demonstration mode: refer to “WHAT TO DO IF...” paragraph. FREEZING FRESH FOOD The freezer compartment is suitable for freezing fresh food and storing frozen and deep-frozen food for a long time. To freeze fresh food activate the Fast Freeze function at least 24 hours before placing the food to be frozen in the freezer compartment. Place the fresh food to be frozen in the Fast Freeze compartment, as this is the coldest point. The maximum amount of food that can be frozen in 24 hours is specified on the rating plate, a label located on the inside of the appliance. The freezing process lasts 24 hours: during this period do not add other food to be frozen. STORAGE OF FROZEN FOOD When first starting-up or after a period out of use, before putting the products in the compartment let the appliance run at least 2 hours on the higher settings. In the event of accidental defrosting, for example due to a power failure, if the power has been off for longer than the value shown in the technical characteristics chart under "rising time", the defrosted food must be consumed quickly or cooked immediately and then refrozen (after cooling). THAWING Deep-frozen or frozen food, prior to being used, can be thawed in the refrigerator compartment or at room temperature, depending on the time available for this operation. Small pieces may even be cooked still frozen, directly from the freezer: in this case, cooking will take longer. MOVABLE SHELVES The walls of the refrigerator are equipped with a series of runners so that the shelves can be positioned as desired. For better use of space, the front halfshelves can lie over the rear ones. Downloaded from Fridge-Manual.com Manuals 32 www.electrolux.com POSITIONING THE DOOR SHELVES To permit storage of food packages of various sizes, the door shelves can be placed at different heights. To make these adjustments proceed as follow: gradually pull the shelf in the direction of the arrows until it comes free, then reposition as required. HUMIDITY CONTROL The glass shelf incorporates a device with slits (adjustable by means of a sliding lever), which makes it possible to regulate the temperature in the vegetable drawer(s). When the ventilation slots are closed: the natural moisture content of the food in the fruit and vegetable compartments is preserved for longer. When the ventilation slots are opened: more air circulation results in a lower air moisture content in the fruit and vegetable compartments. Downloaded from Fridge-Manual.com Manuals ENGLISH 33 HELPFUL HINTS AND TIPS HINTS FOR ENERGY SAVING • Do not open the door frequently or leave it open longer than absolutely necessary. • If the ambient temperature is high and the Temperature Regulator is set to low temperature and the appliance is fully loaded, the compressor may run continuously, causing frost or ice on the evaporator. If this happens, set the Temperature Regulator toward warmer settings to allow automatic defrosting and so a saving in electricity consumption. HINTS FOR FRESH FOOD REFRIGERATION To obtain the best performance: • do not store warm food or evaporating liquids in the refrigerator • do cover or wrap the food, particularly if it has a strong flavour • position food so that air can circulate freely around it HINTS FOR REFRIGERATION Useful hints: Meat (all types) : wrap in polythene bags and place on the glass shelf above the vegetable drawer. For safety, store in this way only one or two days at the most. Cooked foods, cold dishes, etc..: these should be covered and may be placed on any shelf. Fruit and vegetables: these should be thoroughly cleaned and placed in the special drawer(s) provided. Butter and cheese: these should be placed in special airtight containers or wrapped in aluminium foil or polythene bags to exclude as much air as possible. Milk bottles: these should have a cap and should be stored in the bottle rack on the door. Bananas, potatoes, onions and garlic, if not packed, must not be kept in the refrigerator. HINTS FOR FREEZING To help you make the most of the freezing process, are some importantManuals hints: Downloaded from here Fridge-Manual.com • the maximum quantity of food which can be frozen in 24 hrs. is shown on the rating plate; • the freezing process takes 24 hours. No further food to be frozen should be added during this period; • only freeze top quality, fresh and thoroughly cleaned, foodstuffs; • prepare food in small portions to enable it to be rapidly and completely frozen and to make it possible subsequently to thaw only the quantity required; • wrap up the food in aluminium foil or polythene and make sure that the packages are airtight; • do not allow fresh, unfrozen food to touch food which is already frozen, thus avoiding a rise in temperature of the latter; • lean foods store better and longer than fatty ones; salt reduces the storage life of food; • water ices, if consumed immediately after removal from the freezer compartment, can possibly cause the skin to be freeze burnt; • it is advisable to show the freezing in date on each individual pack to enable you to keep tab of the storage time. HINTS FOR STORAGE OF FROZEN FOOD To obtain the best performance from this appliance, you should: • make sure that the commercially frozen foodstuffs were adequately stored by the retailer; • be sure that frozen foodstuffs are transferred from the foodstore to the freezer in the shortest possible time; • not open the door frequently or leave it open longer than absolutely necessary; • once defrosted, food deteriorates rapidly and cannot be refrozen; • do not exceed the storage period indicated by the food manufacturer. 34 www.electrolux.com CARE AND CLEANING CAUTION! Unplug the appliance before carrying out any maintenance operation. This appliance contains hydrocarbons in its cooling unit; maintenance and recharging must therefore only be carried out by authorized technicians. PERIODIC CLEANING The equipment has to be cleaned regularly: • clean the inside and accessories with lukewarm water and some neutral soap. • regularly check the door seals and wipe clean to ensure they are clean and free from debris. • rinse and dry thoroughly. Do not pull, move or damage any pipes and/or cables inside the cabinet. Never use detergents, abrasive powders, highly perfumed cleaning products or wax polishes to clean the interior as this will damage the surface and leave a strong odour. Clean the condenser (black grill) and the compressor at the back of the appliance with a brush. This operation will improve the performance of the appliance and save electricity consumption. Take care of not to damage the cooling system. Many proprietary kitchen surface cleaners contain chemicals that can attack/damage the plastics used in this appliance. For this reason it is recommended that the outer casing of this appliance is only cleaned with warm water with a little washing-up liquid added. After cleaning, reconnect the equipment to the mains supply. DEFROSTING THE REFRIGERATOR Frost is automatically eliminated from the evaporator of the refrigerator compartment every time the motor compressor stops, during normal use. The defrost water Downloaded from Fridge-Manual.com Manuals drains out through a trough into a special container at the back of the appliance, over the motor compressor, where it evaporates. DEFROSTING OF THE FREEZER The freezer compartment of this model, on the other hand, is a "no frost" type. This means that there is no buildup of frost when it is in operation, neither on the internal walls nor on the foods. The absence of frost is due to the continuous circulation of cold air inside the compartment, driven by an automatically controlled fan. PERIODS OF NON-OPERATION When the appliance is not in use for long periods, take the following precautions: • disconnect the appliance from electricity supply • remove all food • defrost (if foreseen) and clean the appliance and all accessories • leave the door/doors ajar to prevent unpleasant smells. If the cabinet will be kept on, ask somebody to check it once in a while to prevent the food inside from spoiling in case of a power failure. ENGLISH 35 WHAT TO DO IF… WARNING! Before troubleshooting, disconnect the mains plug from the mains socket. Only a qualified electrician or competent person must do the troubleshooting that is not in this manual. There are some sounds during normal use (compressor, refrigerant circulation). Problem Possible cause Solution The appliance does not operate. The lamp does not operate. The appliance is switched off. Switch on the appliance. The mains plug is not connected to the mains socket correctly. Connect the mains plug to the mains socket correctly. The appliance has no pow- Connect a different electrical er. There is no voltage in appliance to the mains sockthe mains socket. et. Contact a qualified electrician. The lamp does not work. The compressor operates continually. The lamp is in stand-by. Close and open the door. The lamp is defective. Refer to "Replacing the lamp". The temperature is not set correctly. Set a higher temperature. The door is not closed correctly. Refer to "Closing the door". The door has been opened too frequently. Do not keep the door open longer than necessary. The product temperature is Let the product temperature too high. decrease to room temperature before storage. The room temperature is too high. Decrease the room temperature. Water flows on the rear plate of the refrigerator. During the automatic defrosting process, frost defrosts on the rear plate. This is correct. Water flows into the refrigerator. The water outlet is clogged. Clean the water outlet. Products prevent that water flows into the water collector. Downloaded from Fridge-Manual.com Manuals Make sure that products do not touch the rear plate. 36 www.electrolux.com Problem Possible cause Water flows on the ground. The melting water outlet Attach the melting water does not flow in the evapo- outlet to the evaporative rative tray above the com- tray. pressor. Solution The temperature in the appliance is too low. The temperature regulator is not set correctly. Set a higher temperature. The temperature in the appliance is too high. The temperature regulator is not set correctly. Set a lower temperature. Many products are stored at the same time. Store less products at the same time. The temperature in There is no cold air circulathe refrigerator is too tion in the appliance. high. Make sure that there is cold air circulation in the appliance. The temperature in the freezer is too high. Products are too near to each other. Store products so that there is cold air circulation. Upper or lower square is shown in the temperature display. An error has occurred in Call your service representameasuring the temperature. tive (the cooling system will continue to keep food products cold, but temperature adjustment will not be possible). DEMO appears on the Display. The appliance is in demonstration mode (DEMO). REPLACING THE LAMP CAUTION! Disconnect the plug from the mains socket. Downloaded from Fridge-Manual.com Manuals Keep pressed approximately 10 sec. the Light button since a long sound of buzzer is heard and the Display shut off for a short while: appliance start works regularly. ENGLISH 1. 2. 3. 4. 5. CLOSING THE DOOR 1. 2. 3. Clean the door gaskets. If necessary, adjust the door. Refer to "Installation". If necessary, replace the defective door gaskets. Contact the Service Center. Downloaded from Fridge-Manual.com Manuals 37 Press on the rear hook and at the same time slide the cover in the direction of the arrow. Replace the lamp with one of the same power and specifically designed for household appliances. (the maximum power is shown on the light bulb cover). Fix the lamp cover into its original position. Connect the plug to the mains socket. Open the door. Make sure that the light comes on. 38 www.electrolux.com INSTALLATION WARNING! Read the "Safety Information" carefully for your safety and correct operation of the appliance before installing the appliance. A B POSITIONING Install this appliance at a location where the ambient temperature corresponds to the climate class indicated on the rating plate of the appliance: Climate class Ambient temperature SN +10°C to + 32°C N +16°C to + 32°C ST +16°C to + 38°C T +16°C to + 43°C C E ELECTRICAL CONNECTION CAUTION! Any electrical work required to install this appliance should be carried out by a qualified electrician or competent person. WARNING! This appliance must be earthed. The manufacturer declines any liability should these safety measures not be observed. Downloaded from Fridge-Manual.com Manuals D The wires in the mains lead are coloured in accordance with the following code: A Green and Yellow: Earth C Brown: Live E Blue: Neutral As the colours of the wires in the mains lead of this appliance may not correspond with the coloured markings identifying the terminals in your plug, proceed as follows: 1. Connect the wire coloured green and yellow to the terminal marked either with the letter “E“ or by the earth symbol or coloured green and yellow. 2. Connect the wire coloured blue to the terminal either marked with the letter “N“ or coloured black. 3. Connect the wire coloured brown to the terminal either marked with the “L“ or coloured red. 4. Check that no cut, or stray strands of wire is present and the cord clamp D is secure over the outer sheath. 5. Make sure the electricity supply voltage is the same as that indicated on the appliance rating plate. 6. Switch on the appliance. The appliance is supplied with a 13 amp plug fitted B. In the event of having to change the fuse in the plug supplied, a 13 amp ASTA approved (BS 1362) fuse must be used. ENGLISH WARNING! A cut off plug inserted into a 13 amp socket is a serious safety (shock) hazard. Ensure that it is disposed of safely. DOOR REVERSIBILITY The door of the appliance opens to the right. If you want to open the door to the left, do these steps before you install the appliance: • Loosen and remove the upper pin. • Remove the upper door. • Remove the spacer. • Loosen the middle hinge. • Remove the lower door. S • Loosen and remove the lower pin. On the opposite side: • Tighten the lower pin. • Install the lower door. • Tighten the middle hinge. • Install the spacer. • Install the upper door. • Tighten the upper pin. Downloaded from Fridge-Manual.com Manuals 39 40 www.electrolux.com VENTILATION REQUIREMENTS 6 cm The airflow behind the appliance must be sufficient. min. 200 cm2 min. 200 cm2 INSTALLING THE APPLIANCE Do these steps. CAUTION! Make sure that the mains cable can move freely. If necessary cut the adhesive sealing strip and then apply it to the appliance as shown in figure. x x Downloaded from Fridge-Manual.com Manuals ENGLISH 2 1 41 Install the appliance in the niche. Push the appliance in the direction of the arrow (1) until the upper gap cover stops against the kitchen furniture. Push the appliance in the direction of the arrow (2) against the cupboard on the opposite side of the hinge. Adjust the appliance in the niche. Make sure that the distance between the appliance and the cupboard front-edge is 44 mm. The lower hinge cover (in the accessories bag) makes sure that the distance between the appliance and the kitchen furniture is correct. Make sure that the clearance between the appliance and the cupboard is 4 mm. Open the door. Put the lower hinge cover in position. 4 mm 44 mm Attach the appliance to the niche with 4 screws. I I Downloaded from Fridge-Manual.com Manuals 42 www.electrolux.com Remove the correct part from the hinge cover (E). Make sure to remove the part DX, in the case of right hinge, SX in opposite case. Attach the covers (C, D) to the lugs and the hinge holes. Install the vent grille (B). Attach the hinge covers (E) to the hinge. C D E E B E F D Downloaded from Fridge-Manual.com Manuals Connect the appliance laterally to the kitchen furniture sidewall: 1. Fit the bracket (E) and (F), adjust the distance. 2. Fix using the screws (as in figure). 3. Fit the cover (D). ENGLISH 43 Disconnect the parts (Ha), (Hb), (Hc) and (Hd). Install the part (Ha) on the inner side of the kitchen furniture. ca. 50 mm 90° 21 mm 90° ca. 50 mm 21 mm Push the part (Hc) on the part (Ha). Ha Hc Open the appliance door and the kitchen furniture door at an angle of 90°. Insert the small square (Hb) into guide (Ha). Put together the appliance door and the furniture door and mark the holes. 8 mm Ha Hb Downloaded from Fridge-Manual.com Manuals 44 www.electrolux.com Remove the brackets and mark a distance of 8 mm from the outer edge of the door where the nail must be fitted (K). 8 mm K Ha Place the small square on the guide again and fix it with the screws supplied. Align the kitchen furniture door and the appliance door by adjusting the part Hb. Hb Press the part (Hd) on the part (Hb). Hb Hd Do a final check to make sure that: • All screws are tightened. • The sealing strip is attached tightly to the cabinet. • The door opens and closes correctly. Downloaded from Fridge-Manual.com Manuals ENGLISH 45 NOISES There are some sounds during normal running (compressor, refrigerant circulation). SSS RRR ! HISSS! OK BRRR! ! BB U BL CLICK! BRRR! BLUBB! Downloaded from Fridge-Manual.com Manuals ! ICK CL CR AC K! CLICK! BRRR! BLUBB! 46 www.electrolux.com HISSS! HISSS! SSSRRR! SSSRRR! CRACK! CRACK! TECHNICAL DATA Dimension of the recess Height 1780 mm Width 560 mm Depth 560 mm Rising Time 25 h Voltage 230-240 V Frequency 50 Hz The technical information are situated in the rating plate on the internal left side of the appliance and in the energy label. Downloaded from Fridge-Manual.com Manuals ENGLISH 47 ENVIRONMENT CONCERNS Recycle the materials with the symbol . Put the packaging in applicable containers to recycle it. Help protect the environment and human health and to recycle waste of electrical Downloaded from Fridge-Manual.com Manuals and electronic appliances. Do not dispose appliances marked with the symbol with the household waste. Return the product to your local recycling facility or contact your municipal office. 48 www.electrolux.com สารบัญ ขอมูลเกี่ยวกับความปลอดภัย . . . . . . . . . . . . . . . . . . . . . . . . . . . . . . . . . . . . . . . . . . . . . . . . . . . . . . . . . . . . . . . . . . . แผงควบคุม . . . . . . . . . . . . . . . . . . . . . . . . . . . . . . . . . . . . . . . . . . . . . . . . . . . . . . . . . . . . . . . . . . . . . . . . . . . . . . . การใชงานทั่วไป . . . . . . . . . . . . . . . . . . . . . . . . . . . . . . . . . . . . . . . . . . . . . . . . . . . . . . . . . . . . . . . . . . . . . . . . . . . เคล็ดวิธีและขอแนะนำที่มีประโยชน . . . . . . . . . . . . . . . . . . . . . . . . . . . . . . . . . . . . . . . . . . . . . . . . . . . . . . . . . . . . . . การดูแลรักษาและทำความสะอาด . . . . . . . . . . . . . . . . . . . . . . . . . . . . . . . . . . . . . . . . . . . . . . . . . . . . . . . . . . . . . . . สิ่งที่ตองทำถา... . . . . . . . . . . . . . . . . . . . . . . . . . . . . . . . . . . . . . . . . . . . . . . . . . . . . . . . . . . . . . . . . . . . . . . . . . . . . การติดตั้ง . . . . . . . . . . . . . . . . . . . . . . . . . . . . . . . . . . . . . . . . . . . . . . . . . . . . . . . . . . . . . . . . . . . . . . . . . . . . . . . . เสียง . . . . . . . . . . . . . . . . . . . . . . . . . . . . . . . . . . . . . . . . . . . . . . . . . . . . . . . . . . . . . . . . . . . . . . . . . . . . . . . . . . . . ขอมูลทางเทคนิค . . . . . . . . . . . . . . . . . . . . . . . . . . . . . . . . . . . . . . . . . . . . . . . . . . . . . . . . . . . . . . . . . . . . . . . . . . . ขอมูลเพื่อการรักษาสิ่งแวดลอม . . . . . . . . . . . . . . . . . . . . . . . . . . . . . . . . . . . . . . . . . . . . . . . . . . . . . . . . . . . . . . . . . 49 51 54 56 57 58 60 67 68 69 เราใสใจคุณอยูเสมอ ขอบพระคุณที่ซื้อเครื่องใชไฟฟาจาก Electrolux คุณไดเลือกผลิตภัณฑจากผูผลิตที่ไดสั่งสมประสบการณและนวัตกรรมที่ล้ำ สมัยในวงการมาเปนเวลาหลายสิบป ผลิตภัณฑที่ชาญฉลาดและมีสไตลไดรับการออกแบบเพื่อคุณโดยเฉพาะ ดังนั้นจงมั่นใจได วาทุกครั้งที่ใชงาน คุณจะไดรับความปลอดภัยและประสิทธิภาพที่ยอดเยี่ยมในทุกๆ ครั้ง ยินดีตอนรับสู Electrolux แวะไปยังเว็บไซทของเราำเพื่อ: ขอรับคำแนะนำในการใชงาน โบรชัวร การแกไขปญหา ขอมูลการใหบริการ: www.electrolux.com ลงทะเบียนผลิตภัณฑของคุณเพื่อบริการที่ดีกวา: www.electrolux.com/productregistration ซื้ออุปกรณเสริม วัสดุสิ้นเปลือง และอะไหลของแทสำหรับอุปกรณของคุณ: www.electrolux.com/shop การดูแลลูกคาและการบริการ เราขอแนะนำใหใชอะไหลของแท ในการติดตอฝายบริการ ตรวจสอบใหแนใจวาคุณมีขอมูลตอไปนี้ ขอมูลดังกลาวระบุไวบนปายบอกกำลังไฟ รุน, PNC, หมายเลขเครื่อง คำเตือน / ขอควรระวัง-ขอมูลความปลอดภัย ขอมูลทั่วไปและเคล็ดลับในการใชเครื่อง ขอมูลดานสิ่งแวดลอม เปลี่ยนแปลงได โดยไมตองแจงใหทราบ Downloaded from Fridge-Manual.com Manuals 49 ขอมูลเกี่ยวกับความปลอดภัย เพื่อความปลอดภัยและการใชงานอยางถูกตอง กอน‐ ติดตั้งและใชเครื่องเปนครั้งแรก ขอใหอานคูมือการใช‐ งานเลมนี้ รวมถึงเคล็ดวิธีการใชงาน และคำเตือนตาง ๆ อยางละเอียด เพื่อปองกันความผิดพลาด และอุบัติเหตุ‐ ที่พึงหลีกเลี่ยงได ผูใชควรศึกษาขอมูล เกี่ยวกับการ‐ ทำงาน และคุณสมบัติ ดานความปลอดภัยของเครื่อง อยางละเอียด. โปรดเก็บรักษาคูมือเลมนี้ ไวกับเครื่อง หากมีการเคลื่อนยาย หรือเปลี่ยนมือ เพื่อใหผูใชทราบ‐ ถึง วิธีใชงาน และระบบความปลอดภัย ที่ถูกตอง ตลอด‐ อายุการใชงานของเครื่อง เพื่อความปลอดภัยในชีวิตแลทรัพยสิน กรุณาศึกษาขอ‐ ควรระวังในคูมือผูใชอยาเครงครัด เนื่องจากผูผลิตจะ‐ ไมรับผิดชอบใด ๆ ตอความเสียหายที่เกิดขึ้นเนื่องจาก‐ ความประมาท • สารทำความเย็นไอโซบิวเทน (R600a) มีอยูใน‐ วงจรสารทำความเย็นของเครื่อง โดยเปนกาซ‐ ธรรมชาติที่เปนมิตรกับสิ่งแวดลอมสูงแตติดไฟได ระหวางการเคลื่อนยายและติดตั้งเครื่องใชไฟฟา อยาใหสวนประกอบของสารทำความเย็นไดรับ‐ ความเสียหาย หากวงจรสารทำความเย็นเกิดความเสียหาย: – หลีกเลี่ยงเปลวไฟและแหลงที่มีประกายไฟ – ถายเทอากาศในหองที่มีเครื่องอยูใหทั่ว • การแกไขรายการในขอมูลจำเพาะ หรือดัดแปลง‐ เครื่องดวยวิธีใดก็ตามอาจกอใหเกิดอันตรายขึ้นได สายไฟที่เสียหายอาจทำใหเกิดการลัดวงจร เพลิง‐ ไหมและ/หรือไฟฟาช็อตขึ้นได คำเตือน สวนประกอบทางไฟฟา (สายไฟ ปลั๊ก คอมเพรสเซอร) จะตองเปลี่ยนใหมโดย‐ ตัวแทนใหบริการที่ไดรับการรับรองหรือชาง‐ ผูเชี่ยวชาญเทานั้นเพื่อปองกันอันตรายที่‐ อาจเกิดขึ้น ความปลอดภัยตอเด็กและกลุมเสี่ยง • อุปกรณนี้ไมไดออกแบบมา สำหรับการใชงานโดย‐ ผูใหญ (และเด็ก) ที่มีความบกพรองทางรางกาย ทางประสาทรับรู หรือทางจิตใจ รวมถึงผูที่ขาด‐ ประสบการณ และความรู เวนแตจะมีผูดูแล หรือมีผู‐ ใหคำแนะนำในการใชอุปกรณอยางปลอดภัย เด็กควรมีผูดูแล ในการใชงาน เพื่อใหแนใจวา จะไมเลนกับเครื่อง • เก็บบรรจุภัณฑใหพนมือเด็ก เนื่องจากอาจอุดตัน‐ ระบบทางเดินหายใจได • หากตองการทิ้งเครื่องใชนี้ ใหดึงปลั๊กออกจากเตารับ ตัดสายตอ (ใหใกลกับตัวเครื่องมากที่สุด) จากนั้น‐ ถอดประตูเพื่อปองกันเด็กจากไฟฟาช็อตหรือติดอยู‐ ดานใน • หากเครื่องที่มีซีลประตูแมเหล็กนี้จัดหามาเพื่อใช‐ แทนระบบล็อคสปริง (ตัวล็อค) ที่ประตูหรือชองปด ใหทำใหล็อคสปริงไมสามารถใชงานไดกอนทิ้ง‐ เครื่องใชตัวเดิม เพื่อปองกันเด็กเสียชีวิตเนื่องจาก‐ ติดคางอยูดานใน • ความปลอดภัยทั่วไป • คำเตือน เปดชองถายเทอากาศไวที่จุดที่ติดตั้งเครื่องหรือเฟอรนิ‐ เจอรบิลทอินตาง ๆ อยาใหมีสิ่งกีดขวาง • เครื่องใชไฟฟานี้ผลิตขึ้นสำหรับเก็บผลิตภัณฑ‐ อาหารและ/หรือเครื่องดื่มทั่วไปสำหรับครัวเรือน‐ ตามที่แจงในคูมือผูใชนี้ • หามใชระบบกลไกหรือแนวทางสังเคราะหใด ๆ เพื่อ‐ เรงกระบวนการละลายน้ำแข็ง • หามใชเครื่องใชไฟฟาอื่น (เชน เครื่องทำไอศครีม) ดานในตูเย็น ยกเวนไดรับการรับรองสำหรับใชใน‐ ลักษณะดังกลาวโดยผูผลิต • อยาทำใหวงจรสารทำความเย็นเสียหาย Downloaded from Fridge-Manual.com Manuals หามตอพวงสายไฟ ปลั๊กไฟจะตองไมถูกกดทับหรือไดรับความเสีย‐ หายเนื่องจากดานหลังของเครื่องใชไฟฟากด‐ ทับ ปลั๊กไฟที่ถูกกดทับหรือเสียหายอาจเกิด‐ ความรอนและทำใหเกิดเพลิงไหมได 3. คุณจะตองสามารถเอื้อมถึงจุดเสียบตอไฟหลัก‐ ของเครื่องได 4. หามดึงสายจายไฟ 5. หากเตารับไฟฟาหลวม หามเสียบปลั๊กที่เตาดัง‐ กลาว อาจเกิดไฟฟาช็อตหรือเพลิงไหมขึ้นได 6. หามเปดใชงานเครื่องโดยไมมีฝาครอบปดไฟ‐ สองสวางดานใน (หากทราบอยูแลว) เครื่องมีน้ำหนักมาก จึงควรระมัดระวัง ในการ‐ เคลื่อนยายเครื่อง หามยายหรือสัมผัสสวนประกอบในชองแชแข็งหาก‐ มือชื้น/เปยก เนื่องจากอาจกัดผิวหรือเกิดอาการ‐ ไหมเนื่องจากน้ำแข็ง/ความเย็นได หลีกเลี่ยงอยาใหเครื่องอยูใตแสงแดดเปนเวลานาน หลอดไฟ (ถาทราบอยูแลว) ที่ใชในเครื่องเปน‐ หลอดไฟพิเศษสำหรับใชกับเครื่องใชไฟฟาในครัว‐ เรือนเทานั้น ไมเหมาะสำหรับใชสองสวางภายใน‐ หองของบาน 1. 2. • • การใชงานทั่วไป • อยาวางหมอรอนไวบนสวนประกอบที่เปนพลาสติก‐ ของเครื่อง • อยาเก็บกาซหรือของเหลวไวไฟไวในเครื่อง เนื่องจากอาจจุดระเบิดขึ้นได 50 www.electrolux.com • หามวางผลิตภัณฑอาหารไวใตชองจายอากาศที่‐ ผนังดานหลังโดยตรง (หากเครื่องเปนรุนที่ไมมี‐ น้ำแข็ง) • หามแชอาหารแชแข็งซ้ำหลังจากละลายน้ำแข็งแลว • จัดเก็บอาหารแชแข็งบรรจุสำเร็จตามคำแนะนำของ‐ ผูผลิตอาหารแชแข็ง • ปฏิบัติตามคำแนะนำในการจัดเก็บโดยผูผลิตเครื่อง‐ ใชไฟฟาอยางเครงครัด ตรวจสอบคำแนะนำอื่น ๆ ที่เกี่ยวของเพิ่มเติม • อยาใสเครื่องดื่มฟูซาในชองแชแข็ง เนื่องจากอาจ‐ ทำใหเกิดแรงดันในภาชนะและทำใหเกิดการระเบิด สงผลใหเกิดความเสียหายตอตัวเครื่องได • เกล็ดน้ำแข็งอาจกัดผิวหนังไดหากรับประทาน‐ โดยตรงจากเครื่อง การดูแลและทำความสะอาด • กอนทำการซอมบำรุง ใหปดเครื่องและปลดสายไฟ‐ ออกจากเตารับไฟฟา • อยาทำความสะอาดตัวเครื่องโดยใชวัตถุโลหะ • หามใชของมีคมเพื่องัดน้ำแข็งออกจากเครื่อง ใชแทงขูดพลาสติก • ตรวจสอบระบบระบายของตูเย็นเพื่อตรวจหาน้ำที่‐ ละลายจากน้ำแข็งเปนประจำ ในกรณีที่จำเปน ใหลางจุดระบายใหสะอาด หากจุดระบายอุดตัน น้ำจะสะสมอยูที่ดานลางของเครื่อง การติดตั้ง ในสวนของการเชื่อมตอทางไฟฟา ใหปฏิบัติ‐ ตามคำแนะนำที่ระบุไวโดยเฉพาะ • แกะเครื่องใชไฟฟาออกและตรวจสอบวามีความเสีย‐ หายอยูหรือไม หามตอเครื่องใชไฟฟาที่มีความเสีย‐ หาย แจงความเสียหายที่พบกับรานคาที่จำหนาย กรุณาเก็บบรรจุภัณฑไวในกรณีนี้ • แนะนำใหรออยางนอยสี่ชั่วโมงกอนตอเครื่องเพื่อ‐ ใหน้ำมันไหลกลับเขาไปในคอมเพรสเซอร • รอบเครื่องจะตองมีอากาศถายเทสะดวกไมเชนนั้น‐ อาจทำใหเกิดความรอนขึ้นได เพื่อใหมีอากาศ‐ ถายเทอยางเหมาะสม กรุณาปฏิบัติตามคำแนะนำ‐ ในการติดตั้งที่เกี่ยวของ • หากสามารถทำได ดานหลังของเครื่องควรหันเขา‐ ผนังเพื่อปองกันการสัมผัสหรือโดนสวนประกอบที่มี‐ ความรอน (คอมเพรสเซอร คอนเดนเซอร) ที่อาจ‐ ทำใหผิวไหมได • หามติดตั้งเครื่องใกลกับเครื่องทำความรอนหรือ‐ หมอหุงตม • ปลั๊กไฟจะตองสามารถเขาถึงไดงายหลังการติดตั้ง‐ เครื่อง • ตอกับแหลงจายน้ำแบบพกพาเทานั้น (หากทราบวา‐ มีจุดจายน้ำอยู) Downloaded from Fridge-Manual.com Manuals การใหบริการ • งานระบบไฟฟาในการซอมบำรุงเครื่องใหดำเนิน‐ การโดยชางไฟฟาหรือบุคลากรผูเชี่ยวชาญเทานั้น • ผลิตภัณฑจะตองรับบริการจากศูนยบริการที่ไดรับ‐ อนุญาต และใชเฉพาะชิ้นสวนของแทเทานั้น การปกปองสิ่งแวดลอม เครื่องใชไฟฟานี้ไมมีกาซที่เปนอันตรายตอ‐ ชั้นโอโซนทั้งในวงจรสารทำความเย็นหรือ‐ ในวัสดุที่ใชทำฉนวน หามทิ้งเครื่องพรอมกับ‐ ขยะในครัวเรือนทั่วไป โฟมฉนวนมีกาซ‐ ไวไฟ: ทิ้งเครื่องตามขอบังคับของหนวยงาน‐ ทองถิ่น อยาทำใหระบบทำความเย็นเสียหาย โดยเฉพาะดานหลังใกลกับจุดแลกเปลี่ยน‐ ความรอน วัสดุที่ใชในเครื่องมีสัญลักษณ‐ ระบุวาสามารถรีไซเคิลได กำกับ 51 แผงควบคุม 1 7 6 5 4 1 จอแสดงผล 2 ปุม Drink Chill และปุม ON/OFF ที่ตัวเครื่อง 3 ปุมลดอุณหภูมิ 4 ปุมเพิ่มอุณหภูมิ 5 ปุมชองแชเย็น 3 2 6 ปุมชองแชแข็ง 7 ปุม Mode สามารถเปลี่ยนเสียงของปุมใหดังขึ้นโดยกดปุม Mode และปุมลดอุณหภูมิพรอมกันครูหนึ่ง การเปลี่ยนแปลง‐ ไมสามารถแกไขคืนได จอแสดงผล A B C D E F G H I J A) B) C) D) E) F) G) H) I) J) สวนแสดงอุณหภูมิตูแช สวนแจงการปดทำการทำงานของตูแช โหมดวันหยุด โหมดประหยัดไฟชองแชเย็น ShoppingMode สวนแจงเตือน โหมดประหยัดไฟชองแชแข็ง โหมด FastFreeze สวนแสดงอุณหภูมิชองแชแข็ง โหมด DrinksChill หลังจากเลือกชองแชเย็นและชองแชแข็งแลว แอนิเมชั่น จะเริ่มขึ้น หลังจากเลือกอุณหภูมิแลว แอนิเมชั่นจะ‐ กะพริบอยูครู การเปดใชงานเครื่อง เปดใชงานเครื่องโดยทำตามขั้นตอนตอไปนี้ 1. เสียบปลั๊กเขากับเตารับไฟฟา Downloaded from Fridge-Manual.com Manuals สวนแสดงอุณหภูมิใชระบุอุณหภูมิเริ่มตนที่‐ กำหนดไว หากสัญลักษณ DEMO ปรากฏขึ้นที่จอแสดงผล แสดง‐ วาเครื่องอยูในโหมดสาธิต: ดูในหัวขอ "จะทำ‐ อยางไรถา..." เลือกอุณหภูมิอื่นโดยดูคำแนะนำจากหัวขอ "การ‐ ควบคุมอุณหภูมิ" 2. การปดตูเย็น ปดตูเย็น: 1. โดยกดปุม Fridge Compartment ครูหนึ่ง 2. สวนแสดงผล OFF ของตูเย็นจะปรากฏขึ้น การเปดตูเย็น เปดตูเย็น: 1. โดยกดปุม Fridge Compartment สวนแสดงผล OFF ของตูเย็นจะดับลง เลือกอุณหภูมิอื่นโดยดูคำแนะนำจากหัวขอ "การ‐ ควบคุมอุณหภูมิ" 52 www.electrolux.com การปดใชงาน ปดใชงานเครื่องโดยทำตามขั้นตอนตอไปนี้ 1. กดปุม ON/OFF ของเครื่องประมาณ 3 วินาที 2. จอแสดงผลจะดับลง 3. ปลดสายเครื่องใชไฟฟาโดยถอดปลั๊กจากเตารับ‐ ไฟฟา การควบคุมอุณหภูมิ เลือกชองแชเย็นหรือชองแชแข็ง กดปุมอุณหภูมิเพื่อตั้งอุณหภูมิ กำหนดอุณหภูมิเริ่มตน: • +4°C สำหรับชองแชเย็น • -18°C สำหรับชองแชแข็ง สวนแสดงอุณหภูมิใชระบุอุณหภูมิที่กำหนดไว เครื่องจะสามารถทำอุณหภูมิตามที่กำหนดไดภายใน 24 ชั่วโมง หลังจากมีปญหาที่ระบบจายไฟ อุณหภูมิที่‐ กำหนดไวจะยังคงถูกจัดเก็บไวตามเดิม โหมดวันหยุด ฟงกชั่นนี้ใชในกรณีที่จะไมมีการเปดตูหรือใสของไว‐ ภายในระหวางวันหยุดยาวเพื่อไมใหเกิดกลิ่นอับ ชองแชเย็นจะตองไมมีของแชขณะเปดใช‐ งานฟงกชั่นวันหยุด เปดใชงานฟงกชั่น: 1. โดยกดปุม Mode จนกระทั่งไอคอนการทำงาน‐ ปรากฏขึ้น สวนแสดงผล Holiday จะกะพริบอยูสองถึงสาม‐ วินาที สวนแสดงอุณหภูมิตูเย็นจะแสดงอุณหภูมิที่‐ กำหนดไว ปดฟงกชั่น: 1. โดยกดปุม Mode จนกระทั่งไอคอน Holiday ติด‐ กะพริบ 2. สวนแสดงผล Holiday จะดับลง ฟงกชั่นจะปดการทำงานโดยเลือกอุณหภูมิ‐ อื่นสำหรับตูเย็น ECOMODE สำหรับชองแชเย็นและชอง แชแข็ง เพื่อใหสามารถเก็บอาหารไดอยางมีประสิทธิภาพ ใหเลือก EcoMode เปดใชงานฟงกชั่น: 1. เลือกชองแชเย็น/ชองแชแข็ง 2. โดยกดปุม Mode จนกระทั่งไอคอนการทำงาน‐ ปรากฏขึ้น Downloaded from Fridge-Manual.com Manuals สวนแสดงผล EcoMode จะติดกะพริบสองถึง‐ สามวินาที สวนแสดงอุณหภูมิใชระบุอุณหภูมิที่กำหนดไว: – ชองแชเย็น: +4°C – ชองแชแข็ง: -18°C 3. สวนแสดงผล EcoMode จะปรากฏขึ้น ปดฟงกชั่น: 1. เลือกชองแชเย็น/ชองแชแข็ง 2. โดยกดปุม Mode จนกระทั่งสัญลักษณ EcoMode ติดกะพริบ 3. สัญลักษณ EcoMode จะดับลง ฟงกชั่นจะปดการทำงานโดยเลือกอุณหภูมิ‐ อื่น SHOPPINGMODE หากตองการใสผลิตภัณฑอาหารที่ยังไมเย็นเปน‐ จำนวนมาก เชน หลังซื้อของสดมาใหม ๆ ขอแนะนำ‐ ใหเปดใชงาน ShoppingMode เพื่อทำความเย็นอยาง‐ รวดเร็วและปองกันความรอนที่จะแพรไปยังผลิตภัณฑ‐ อาหารอื่นที่ใสไวในตูเย็นอยูเดิม เปดใชงานฟงกชั่น: 1. โดยกดปุม Mode จนกระทั่งไอคอนการทำงาน‐ ปรากฏขึ้น สวนแสดงผล ShoppingMode จะติดกะพริบสอง‐ ถึงสามวินาที ShoppingMode จะดับลงอัตโนมัติหลังผานไป‐ ประมาณ 6 ชั่วโมง ปดการทำงานดังกลาวกอนเครื่องปดเองอัตโนมัต:ิ 1. โดยกดปุม Mode จนกระทั่งสัญลักษณ ShoppingMode ติดกะพริบ 2. สัญลักษณ ShoppingMode จะดับลง ฟงกชั่นจะปดการทำงานโดยเลือกอุณหภูมิ‐ อื่นสำหรับตูเย็น โหมด FASTFREEZE เปดใชงานฟงกชั่น: 1. เลือกชองแชแข็ง 2. โดยกดปุม Mode จนกระทั่งไอคอนการทำงาน‐ ปรากฏขึ้น สวนแสดงผล FastFreeze จะติดกะพริบสองถึง‐ สามวินาที ฟงกชั่นจะหยุดอัตโนมัติหลังผานไป 52 ชั่วโมง ปดการทำงานดังกลาวกอนเครื่องปดเองอัตโนมัต:ิ 1. เลือกชองแชแข็ง 2. โดยกดปุม Mode จนกระทั่งสัญลักษณ FastFreeze ติดกะพริบ 3. สัญลักษณ FastFreeze จะดับลง ฟงกชั่นจะปดการทำงานโดยเลือกอุณหภูมิ‐ อื่นสำหรับชองแชแข็ง 53 โหมด DRINKSCHILL โหมด DrinksChill ใชเพื่อตั้งเสียงเตือนในเวลาที่‐ กำหนด เหมาะสำหรับกรณีที่ตองการแชสวนประกอบ‐ ของอาหารที่ตองการปรุงและมีการแชไวเพื่อใชงาน‐ ภายในเวลาที่กำหนด หรือหากตองการใหมีการแจง‐ เตือนเพื่อไมใหลืมวาแชขวดไวในชองแชแข็งเพื่อให‐ เย็นอยางรวดเร็ว เปดใชงานฟงกชั่น: 1. โดยกดปุม DrinkChill สัญลักษณ DrinksChill จะปรากฏขึ้น ระบบตั้งเวลาจะแสดงคาที่ปรับตั้งไว (30 นาที) 2. กดปุมลดอุณหภูมิและปุมเพิ่มอุณหภูมิเพื่อแกไข‐ คาเวลาที่กำหนดไวระหวาง 1 ถึง 90 นาที 3. ระบบตั้งเวลาจะเริ่มติดกะพริบ (min). ในตอนทายของการนับถอยหลัง สัญลักษณ DrinksChill จะติดกระพริบพรอมกับสงสัญญาณเสียง‐ เตือน: 1. นำเครื่องดื่มในชองแชแข็งออก 2. กดปุม DrinkChill เพื่อปดเสียงและสิ้นสุดการ‐ ทำงานของฟงกชั่นนี้ สามารถปดการทำงานไดทุกเมื่อระหวางการนับถอย‐ หลัง: 1. โดยกดปุม DrinkChill 2. สัญลักษณ DrinksChill จะดับลง สามารถแกไขเวลาระหวางการนับถอยหลัง และใน‐ ตอนทายโดยกดปุมลดอุณหภูมิหรือปุมเพิ่มอุณหภูมิ สัญญาณเตือนอุณหภูมิสูง การเพิ่มขึ้นของอุณหภูมิในชองแชแข็ง (เชน เนื่องจาก‐ ไฟดับ) สามารถสังเกตไดจาก: • การติดกะพริบของสัญญาณเตือนและสวนแสดง‐ อุณหภูมิชองแชแข็ง • สัญญาณเสียงเตือน รีเซ็ตสัญญาณเตือน: 1. โดยกดปุมใดก็ได 2. สัญญาณเสียงจะปดการทำงาน 3. สวนแสดงอุณหภูมิชองแชแข็งจะแสดงอุณหภูมิ‐ สูงสุดที่ทำไดครูหนึ่ง จากนั้นจะแสดงอุณหภูมิที่‐ ปรับตั้งไวอีกครั้ง 4. สัญลักษณเตือนจะติดกะพริบจนกระทั่งเขาสูภาวะ‐ ปกติ เมื่อสัญญาณเตือนกลับเขาสูภาวะปกติ สัญลักษณเตือน‐ จะหายไป สัญญาณเตือนประตูเปดคาง เสียงเตือนจะดังขึ้นหากประตูเปดคางไวครูหนึ่ง สังเกต‐ การทำงานของสัญญาณเตือนประตูเปดคางไดจาก: • สัญลักษณแจงเตือนติดกะพริบ • เสียงเตือน Downloaded from Fridge-Manual.com Manuals หลังจากเครื่องเขาสูภาวะปกติแลว (ปดประตู) สัญญาณเตือนจะหยุดทำงาน ระหวางการแจงเตือน สามารถปดเสียงเตือนไดโดยกด‐ ปุมใดก็ได 54 www.electrolux.com การใชงานทั่วไป การทำความสะอาดดานใน กอนใชงานเครื่องเปนครั้งแรก ใหทำความสะอาดพื้นที่‐ ดานในและสวนประกอบภายในทั้งหมดดวยน้ำอุน และน้ำสบูออน ๆ เพื่อขจัดกลิ่นใหม จากนั้นเช็ดใหแหง หามใชสารซักฟอกหรือสารที่มีฤทธิ์กัดกรอน เนื่องจากจะทำใหพื้นผิวเสียหาย หากสัญลักษณ DEMO ปรากฏขึ้นที่จอแสดงผล แสดง‐ วาเครื่องอยูในโหมดสาธิต: ดูในหัวขอ "จะทำ‐ อยางไรถา..." การแชแข็งอาหารสด ชองแชแข็งเหมาะสำหรับแชแข็งอาหารสด และเก็บ‐ อาหารแชแข็งเปนเวลานาน แชแข็งอาหารสดโดยเปดใชฟงกชั่น Fast Freeze อยางนอย 24 ชั่วโมงกอนใสอาหารที่จะแชแข็งไวใน‐ ชองแชแข็ง ใสอาหารสดที่จะแชแข็งไวในชอง Fast Freeze เนื่องจากเปนสวนที่เย็นที่สุด ปริมาณอาหารสูงสุดที่สามารถแชแข็งไดใน 24 ชั่วโมงมีระบุไวที่แผนพิกัดดานในของเครื่อง กระบวนการแชแข็งจะทำงานเปนเวลา 24 ชั่วโมง: ระหวางนี้อยาใสอาหารอื่นที่ตองการแชแข็งเขาไป การจัดเก็บอาหารแชแข็ง หลังจากเริ่มการทำงานเปนครั้งแรกหรือหลังจากที่ไม‐ ไดใชงานระยะหนึ่ง กอนใสผลิตภัณฑอาหารในชองแช ใหเครื่องทำงานอยางนอย 2 ชั่วโมงที่ความเย็นเต็มที่‐ กอน ในกรณีที่น้ำแข็งละลายโดยไมไดตั้งใจ เชน ไฟดับ หากไฟดับนานกวาคาที่แสดงในผัง‐ ขอมูลทางเทคนิคในหัวขอ "เวลาที่อุณหภูมิ‐ เพิ่มขึ้น" อาหารที่น้ำแข็งละลายจะตองนำไป‐ บริโภคโดยเร็วหรือปรุงสุกทันทีจึงคอยนำไป‐ แชแข็งซ้ำ (หลังจากเย็นตัวลงแลว) การละลายน้ำแข็ง สามารถละลายน้ำแข็งอาหารแชแข็งกอนใชไดในชอง‐ แชของตูเย็นหรือทิ้งไวที่อุณหภูมิหอง ทั้งนี้ขึ้นอยูกับ‐ เวลาที่สามารถดำเนินการได อาหารชิ้นเล็ก ๆ อาจสามารถปรุงสุกไดแมนำออกมา‐ จากชองแชแข็งโดยที่แข็งตัวอยู: ในกรณีนี้อาจตองใช‐ เวลามากขึ้นในการปรุงสุก ชั้นวางแบบยายได ผนังตูเย็นมีแนวรางที่สามารถใชติดตั้งชั้นวางตาม‐ ความตองการ เพื่อใหใชพื้นที่ไดอยางคุมคา สามารถเลื่อนชั้นวาง‐ แบบครึ่งระยะไวทางดานหลัง Downloaded from Fridge-Manual.com Manuals 55 การกำหนดตำแหนงชั้นวางของที่ประตู เพื่อใหสามารถจัดเก็บบรรจุภัณฑอาหารไดหลายขนาด ชั้นวางที่ประตูควรจัดวางที่ระดับความสูงตางกัน ปรับเปลี่ยนชั้นวางโดยทำตามขั้นตอนตอไปนี้ คอย ๆ ดึงชั้นวางไปในทิศทางตามลูกศรจนกระทั่งหลุดออกมา จากนั้นปรับเปลี่ยนตำแหนงตามความตองการ ระบบควบคุมความชื้น ชั้นวางกระจกมีหนาตัด (ปรับไดโดยใชแปนเลื่อน) เพื่อ‐ ใหสามารถควบคุมอุณหภูมิในชองใสผักได ขณะปดชองอากาศ: ความชื้นโดยธรรมชาติในอาหารในชองผักและผลไม‐ จะถูกรักษาไวยาวนานขึ้น ขณะเปดชองอากาศ: การไหลเวียนของอากาศจะทำใหความชื้นในอากาศ‐ ของชองผักและผลไมลดลง Downloaded from Fridge-Manual.com Manuals 56 www.electrolux.com เคล็ดวิธีและขอแนะนำที่มีประโยชน คำแนะนำในการประหยัดพลังงาน • หามเปดประตูบอยครั้งหรือเปดทิ้งไวนานเกินความ‐ จำเปน • หากอุณหภูมิภายนอกสูงและสวนควบคุมอุณหภูมิตั้ง‐ ไวต่ำโดยที่เครื่องมีของบรรจุอยูมาก คอมเพรสเซอรอาจตองทำงานตอเนื่องทำใหเกิดน้ำ‐ แข็งขึ้นที่ตัวทำระเหย ในกรณีนี้ ใหลดคาตัวตั้ง‐ อุณหภูมิลงเพื่อใหมีการละลายน้ำแข็งอัตโนมัติและ‐ เพื่อประหยัดพลังงาน คำแนะนำในการแชอาหารสด เพื่อใหเกิดประสิทธิภาพสูงสุด: • หามเก็บอาหารที่ยังไมเย็นหรือของเหลวระเหยไว‐ ในตูเย็น • ปดหรือหอหุมผลิตภัณฑอาหาร โดยเฉพาะอยางยิ่ง‐ หากมีกลิ่นหรือรสจัด • จัดวางอาหารเพื่อใหอากาศหมุนเวียนรอบ ๆ ไดสะดวก คำแนะนำในการแชเย็น คำแนะนำที่เปนประโยชน: เนื้อสัตว (ทุกประเภท): หอไวในถุงพลาสติกโพลิเอทิลีน จากนั้นวางไวบนชั้นกระจกเหนือชองผัก เพื่อความปลอดภัย ควรจัดเก็บในลักษณะดังกลาวไม‐ เกินหนึ่งหรือสองวัน อาหารปรุงสุก อาหารเสิรฟเย็น ฯลฯ: ปดฝาแลววางไว‐ บนชั้นวาง ผักและผลไม: ทำความสะอาดใหทั่วจากนั้นใสไวใน‐ ชองลิ้นชักพิเศษที่จัดไวให เนยสดและเนยแข็ง: ใสไวในภาชนะสุญญากาศพิเศษ หรือหอดวยอะลูมิเนียมฟอยลหรือถุงพลาสติกโพลิ‐ เอทิลีนเพื่อไลอากาศออกใหมากที่สุด นมบรรจุขวด: ควรปดฝาและเก็บไวในชั้นวางขวดที่‐ ประตู หามใสกลวย มันฝรั่ง หัวหอมและกระเทียมที่ไมไดแพ็ค‐ ไวในตู คำแนะนำในการแชแข็ง เพื่อใหสามารถแชแข็งไดอยางมีประสิทธิภาพมากที่สุด กรุณาปฏิบัติตามคำแนะนำที่สำคัญตอไปนี้ • ปริมาณอาหารสูงสุดที่แชแข็งไดภายใน 24 ชั่วโมง‐ มีแจงไวในแผนพิกัด • กระบวนการแชแข็งจะใชเวลา 24 ชั่วโมง: หามแช‐ แข็งผลิตภัณฑอาหารเพิ่มเติมระหวางเวลานี้ • แชแข็งเฉพาะผลิตภัณฑอาหารที่มีคุณภาพดี สด‐ ใหมและทำความสะอาดดีแลวเทานั้น • จัดเตรียมผลิตภัณฑอาหารเปนสวนเล็ก ๆ เพื่อให‐ สามารถแชแข็งไดอยางทั่วถึงและรวดเร็ว และเพื่อ‐ Downloaded from Fridge-Manual.com Manuals • • • • • ใหสามารถละลายน้ำแข็งไดเฉพาะในสวนที่‐ ตองการใช หอผลิตภัณฑอาหารดวยอะลูมิเนียมฟอยลหรือ‐ พลาสติกโพลิเอทิลีน เพื่อใหแนใจวาไมมีอากาศ‐ ไหลเวียนภายใน อยาใหอาหารสดที่ยังไมไดแชแข็งสัมผัสกับอาหาร‐ ที่แชแข็งแลว หลีกเลี่ยงอยาใหอาหารแชแข็งมี‐ อุณหภูมิเพิ่มขึ้น อาหารที่มีไขมันนอยจะเก็บไดในสภาพดีและ‐ ยาวนานกวาอาหารที่มีไขมันมาก เกลือจะลดอายุ‐ ในการจัดเก็บของผลิตภัณฑอาหาร น้ำแข็งกอนหากรับประทานทันทีหลังนำออกจาก‐ ชองแชแข็ง อาจทำใหผิวไหมจากความเย็นได แนะนำใหติดปายระบุวันที่แชแข็งในสวนจัดเก็บ‐ แตละสวนเพื่อใหสามารถตรวจสอบระยะเวลาการ‐ จัดเก็บได คำแนะนำในการจัดเก็บอาหารแชแข็ง เพื่อใหเกิดประสิทธิภาพสูงสุดจากเครื่อง ควร: • อาหารแชแข็งที่มีจำหนายทั่วไปจะตองไดรับการจัด‐ เก็บอยางเหมาะสมอยูเดิมโดยผูคา • เคลื่อนยายอาหารแชแข็งจากรานจำหนายไปยังตู‐ แชแข็งโดยใชระยะเวลานอยที่สุด • หามเปดประตูบอยครั้งหรือเปดทิ้งไวนานเกินความ‐ จำเปน • หลังจากละลายน้ำแข็งแลว ผลิตภัณฑอาหารจะ‐ เสื่อมสภาพอยางรวดเร็วและไมสามารถแชแข็ง‐ ซ้ำได • หามจัดเก็บเกินระยะเวลาที่ผูผลิตอาหารแจงไว 57 การดูแลรักษาและทำความสะอาด ขอควรระวัง ถอดปลั๊กเครื่องกอนทำการซอมบำรุง เครื่องใชไฟฟานี้มีสวนประกอบของ‐ ไฮโดรคารบอนในชุดทำความเย็น การดูแล‐ รักษาหรือสงประจุไฟฟาจะตองดำเนินการ‐ โดยชางที่ไดรับการรับรองเทานั้น การทำความสะอาดตามกำหนดเวลา อุปกรณจะตองไดรับการทำความสะอาดเปนประจำ • ทำความสะอาดดานในและสวนประกอบตาง ๆ ดวย‐ น้ำอุนและน้ำสบูออน ๆ • ตรวจสอบซีลประตูและเช็ดใหสะอาดเปนประจำ เพื่อใหมีความสะอาดและไมมีคราบสกปรก • ลางและเช็ดแหงใหทั่ว อยาดึง เคลื่อนยายหรือสรางความเสียหาย‐ กับทอทางและ/หรือสายดานในตู หามใชสารซักฟอก สารที่มีฤทธิ์กัดกรอน หรือน้ำยาทำความสะอาดที่มีสวนประกอบ‐ ของน้ำหอมสูงหรือแว็กซทำความสะอาด‐ ดานใน เนื่องจากจะทำใหพื้นผิวเสียหายและ‐ สงกลิ่นรุนแรง ทำความสะอาดคอนเดนเซอร (แผงดานหลัง) และคอมเพรสเซอรดานหลังเครื่องโดยใชแปรง การ‐ ดำเนินการนี้จะสงผลดีตอการทำงานของเครื่องและ‐ ชวยประหยัดไฟ ระวังอยางใหระบบทำความเย็นไดรับความ‐ เสียหาย น้ำยาทำความสะอาดพื้นผิวหองครัวบางชนิดมีสารเคมี‐ ที่ผานเปนอันตราย/สรางความเสียหายตอพลาสติกที่‐ ใชในเครื่อง ดวยเหตุนี้ แนะนำใหทำความสะอาดดาน‐ นอกของเครื่องโดยใชน้ำอุนและน้ำยาทำความสะอาด‐ เจือจาง หลังทำความสะอาด ใหตอไฟอุปกรณกลับเขาตามเดิม การละลายน้ำแข็งตูเย็น น้ำแข็งจะหายไปอัตโนมมัติจากตัวทำระเหยของชอง‐ แชทุกครั้งที่คอมเพรสเซอรมอเตอรหยุดทำงานระหวาง‐ การใชงานตามปกติ น้ำที่ละลายจะระบายผานรางใน‐ ชองรองรับพิเศษดานหลังของเครื่องเหนือ‐ คอมเพรสเซอรมอเตอรซึ่งเปนจุดที่มีการระเหย การละลายน้ำแข็งชองแชแข็ง ชองแชแข็งของเครื่องรุนนี้เปนแบบ "ไมมีน้ำแข็ง" ซึ่ง‐ หมายความวาจะไมมีน้ำแข็งกอตัวขณะทำงาน ทั้งที่‐ ผนังดานในหรือที่ผลิตภัณฑอาหาร Downloaded from Fridge-Manual.com Manuals น้ำแข็งไมเกิดขึ้นเนื่องจากการหมุนเวียนของอากาศ‐ เย็นดานในชองแชอยางตอเนื่องควบคุมอัตโนมัติดวย‐ พัดลมหมุนเวียนอากาศ ระยะเวลาที่ไมมีการใชงาน หากไมไดใชงานเครื่องเปนเวลานาน ใหทำตามขั้น‐ ตอนปองกันตอไปนี้ • ปลดสายไฟเครื่อง • นำผลิตภัณฑอาหารทั้งหมดออก • ละลายน้ำแข็ง (ถาทราบวามีฟงกชั่นนี้) และทำความสะอาดเครื่องรวมทั้งสวนประกอบ‐ ทั้งหมด • เปดประตูคางไวเพื่อขจัดกลิ่นไมพึงประสงค หากตองการเปดตูคางไว ใหมีคนคอยตรวจสอบเปน‐ ระยะ ๆ เพื่อปองกันอาหารดานในเสียในกรณีที่ไฟฟา‐ ดับ 58 www.electrolux.com สิ่งที่ตองทำถา... คำเตือน กอนแกไขปญหา ใหปลดสายไฟจากเตารับ‐ ไฟฟาออก การแกไขปญหาที่ไมมีแจงในคูมือนี้ให‐ ดำเนินการโดยชางไฟฟาหรือผูเชี่ยวชาญ‐ เทานั้น ปญหา มีเสียงขึ้นระหวางการใชงานตามปกติ (คอมเพรสเซอร ระบบหมุนเวียนสาร‐ ทำความเย็น) สาเหตุที่เปนไปได เครื่องไมทำงาน ไฟไมทำงาน เครื่องปดทำงาน แนวทางแกไข เปดเครื่อง ปลั๊กไมไดเสียบอยูกับเตารับไฟฟา‐ เสียบปลั๊กเขากับเตารับไฟฟาใหถูก‐ อยางถูกตอง ตอง เครื่องไมมีกระแสไฟ ไมมีแรงดัน‐ ไฟฟาที่เตารับไฟฟา ตอเครื่องใชไฟฟาอื่นเขากับเตารับ‐ ไฟฟา ติดตอชางผูชำนาญการ ไฟอยูในโหมดสแตนดบาย ปดและเปดประตู ไฟมีปญหา ดูในหัวขอ "การเปลี่ยนหลอดไฟ" ตั้งอุณหภูมิไมถูกตอง กำหนดอุณหภูมิใหสูงขึ้น ประตูปดไมถูกตอง ดูในหัวขอ "การปดประตู" เปดประตูบอยเกินไป อยาเปดประตูนานเกินความจำเปน อุณหภูมิสูงเกินไป ปลอยใหอุณหภูมิลดลงเทากับ‐ อุณหภูมห ิ องกอนจัดเก็บ อุณหภูมิหองสูงเกินไป ลดอุณหภูมิหอง มีน้ำไหลที่แผนดานหลังของ‐ ตูเย็น ระหวางละลายน้ำแข็งอัตโนมัติ น้ำแข็งจะละลายที่แผนดานหลัง ถูกตอง น้ำไหลเขาตูเย็น ชองจายน้ำอุดตัน ทำความสะอาดชองจายน้ำ ผลิตภัณฑอาหารทำใหน้ำไมไหล‐ เขาที่เก็บน้ำ ตรวจสอบวาผลิตภัณฑอาหารไม‐ สัมผัสกับแผนดานหลัง น้ำไหลลงพื้น ชองจายน้ำทีล่ ะลายไมไหลเขาใน‐ ถาดตัวทำระเหยดานบน‐ คอมเพรสเซอร ยึดชองจายน้ำที่ละลายเขากับถาด‐ ตัวทำระเหย อุณหภูมเิ ครื่องต่ำเกินไป ปรับตัวควบคุมอุณหภูมิไมถูกตอง กำหนดอุณหภูมิใหสูงขึ้น อุณหภูมิเครื่องสูงเกินไป ปรับตัวควบคุมอุณหภูมิไมถูกตอง กำหนดอุณหภูมิใหต่ำลง ผลิตภัณฑอาหารถูกจัดเก็บพรอม‐ กันหลายรายการ จัดเก็บผลิตภัณฑอาหารพรอมกัน‐ ใหนอยลง ไมมีการหมุนเวียนของอากาศเย็น‐ ในเครื่อง ตรวจสอบวามีอากาศเย็นหมุนเวียน‐ ในเครื่อง ไฟไมทำงาน คอมเพรสเซอรทำงานไมหยุด อุณหภูมิตูเย็นสูงเกินไป อุณหภูมิชองแชแข็งสูงเกินไป ผลิตภัณฑอาหารวางชิดกันเกินไป จัดเก็บผลิตภัณฑอาหารเพื่อให‐ อากาศเย็นหมุนเวียนได มีชองสี่เหลี่ยมดานบนและ‐ ดานลางปรากฏที่จอแสดง‐ อุณหภูมิ ติดตอตัวแทนใหบริการ (ระบบ‐ ทำความเย็นจะยังคงรักษาความเย็น‐ ใหกับผลิตภัณฑอาหารไดตอไป แตจะไมสามารถปรับอุณหภูมิได) เกิดขอผิดพลาดในการวัดอุณหภูมิ Downloaded from Fridge-Manual.com Manuals 59 ปญหา สาเหตุที่เปนไปได แนวทางแกไข DEMO ปรากฏขึ้นที่จอแสดง‐ เครื่องอยูในโหมดสาธิต (DEMO). ผล กดปุม Light ไวประมาณ 10 วินาที‐ หลังจากไดยินเสียงเตือนยาว จอแส‐ ดงผลจะปดการทำงานครูหนึ่ง: เครื่องจะเริ่มทำงานตามปกติ การเปลี่ยนหลอดไฟ ขอควรระวัง ถอดปลั๊กจากเตารับไฟฟา 1. 2. 3. 4. 5. ปดประตู 1. 2. 3. ทำความสะอาดปะเก็นที่ประตู ในกรณีที่จำเปน ใหปรับประตูตามความเหมาะสม ดูในหัวขอ "การติดตั้ง" ในกรณีที่จำเปน ใหเปลี่ยนปะเก็นประตูที่เสียหาย ติดตอศูนยบริการ Downloaded from Fridge-Manual.com Manuals กดที่ขอดานหลังพรอม ๆ กับเลื่อนฝาครอบไปใน‐ ทิศทางตามลูกศร เปลี่ยนหลอดไฟที่ใชกำลังไฟเทากันและผลิต‐ สำหรับเครื่องใชไฟฟาในครัวเรือนโดยเฉพาะ (กำลังไฟสูงสุดมีแสดงไวที่ฝาครอบหลอดไฟ) ติดตั้งฝาครอบหลอดไฟเขาในตำแหนงเดิม เสียบปลั๊กเขากับเตารับไฟฟา เปดประตู ตรวจสอบวาไฟติดสวาง 60 www.electrolux.com การติดตั้ง คำเตือน อานรายละเอียดในหัวขอ "ขอมูลดานความ‐ ปลอดภัย" ทั้งหมดเพื่อความปลอดภัยและ‐ เพื่อใหสามารถใชงานเครื่องไดอยางถูกตอง‐ กอนติดตั้งเครื่อง การกำหนดตำแหนง ติดตั้งเครื่องในพื้นที่ที่อุณหภูมิแวดลอมสอดคลองกับ‐ สภาพอากาศที่แจงในแผนพิกัดของเครื่อง: สภาพ‐ อากาศ อุณหภูมิแวดลอม SN +10°C ถึง + 32°C N +16°C ถึง + 32°C ST +16°C ถึง + 38°C T +16°C ถึง + 43°C การเชือ่ มตอทางไฟฟา ขอควรระวัง งานดานไฟฟาที่จำเปน ในการติดตั้งเครื่อง ควรดำเนินการโดยชางไฟที่ผานการอบรม‐ แลว หรือผูที่มีความรูความสามารถ คำเตือน เครื่องจะตองตอสายดิน ผูผลิตไมรับผิดชอบใด ๆ หากไมปฏิบัติตาม‐ มาตรการดานความปลอดภัยนี้ A E B C D Downloaded from Fridge-Manual.com Manuals สายไฟจะตองกำกับสีตามหลักเกณฑตอไปนี้ A เขียวและเหลือง: สายดิน C น้ำตาล: สายไฟ E น้ำเงิน: สายศูนย เนื่องจากสีของสายไฟของเครื่องอาจไมตรงกับสีกำกับ‐ ระบุขั้วที่ปลั๊ก ขอแนะนำใหดำเนินการดังตอไปนี้ 1. ตอสายสีเขียวและเหลืองเขาที่ขั้วตอตัว "E" หรือ‐ หรือสวนที่เปนสีเขียว‐ ที่มีสัญลักษณสายดิน และเหลือง 2. ตอสายสีน้ำเงินเขากับขั้วตอตัว "N" หรือสีดำ 3. ตอสายสีน้ำตาลเขากับขั้วตอตัว "L" หรือสีแดง 4. ตรวจสอบวาไมมีสายภายในขาดหรือรุย และแค‐ ลมปรัดสาย D ที่ปลอกดานนอกแนนหนาดี 5. ระบบจายไฟจะตองเปนไปตามแผนพิกัดที่แจงใน‐ เครื่อง 6. เปดเครื่อง เครื่องใชปลั๊กตัว B ขนาด 13 แอมป ในกรณีที่ตอง‐ เปลี่ยนฟวสที่ปลั๊กที่จัดมาให ใหใชฟวส ASTA ขนาด 13 แอมป (BS 1362) คำเตือน การจัดหัวปลั๊กเพื่อตอกับเตารับไฟฟาขนาด 13 แอมปอาจทำใหเกิดอันตราย (ไฟฟาช็อต) รายแรงได ทิ้งสวนประกอบตาง ๆ อยาง‐ ปลอดภัย การกลับดานประตู ประตูเครื่องเปดไปทางขวา หากตองการเปดไปทางซาย ใหทำตามขั้นตอนนี้กอนติดตั้งเครื่อง: 61 • คลายและนำสลักดานบนออก • ถอดประตูดานบน • ถอดตัวกั้นระยะ • คลายบานพับตัวกลาง • ถอดประตูดานลาง S • คลายและนำสลักดานลางออก ที่ดานตรงขาม: • ขันแนนสลักตัวลาง • ติดตั้งประตูดานลาง • ขันแนนบานพับตัวกลาง • ติดตั้งตัวกั้นระยะ • ติดตั้งประตูดานบน • ขันแนนสลักตัวบน Downloaded from Fridge-Manual.com Manuals 62 www.electrolux.com การถายเทอากาศ 6 cm อากาศดานหลังเครื่องจะตองมีการไหลเวียนอยางเพียง‐ พอ min. 200 cm2 min. 200 cm2 การติดตั้งเครื่อง อยาทับสาย ขอควรระวัง ตรวจสอบวาสายไฟสามารถเคลื่อนไปมาได‐ อยางอิสระ ในกรณีที่จำเปนใหตัดแถบซีล‐ กาวและติดไวที่เครื่องตามภาพ x x Downloaded from Fridge-Manual.com Manuals 63 2 ติดตั้งเครื่องในจุดสำหรับติดตั้ง กดเครื่องเขาในทิศทางของลูกศร (1) จนกระทั่งฝาปดชองดานบน‐ ชนกับเฟอรนิเจอรในครัว ดันเครื่องในทิศทางตามลูกศร (2) ติดกับตูที่ดานตรงขามของ‐ บานพับ 1 ปรับตำแหนงเครื่องในจุดสำหรับ‐ ติดตั้ง ระยะระหวางตัวเครื่องและขอบ‐ ดานบนของตูจะตองเทากับ 44 มม. ฝาครอบบานพับดานลาง (ในถุง‐ สวนประกอบ) ชวยในการรักษา‐ ระยะระหวางเครื่องและ‐ เฟอรนิเจอรในครัวใหถูกตอง ระยะระหวางตัวเครื่องและตูจะ‐ ตองเทากับ 4 มม. เปดประตู ใสฝาครอบบานพับ‐ ดานลางเขาที่ 4 mm 44 mm ยึดเครื่องเขากับชองติดตั้งโดย‐ ใชสกรู 4 ตัว I I Downloaded from Fridge-Manual.com Manuals 64 www.electrolux.com ถอดสวนประกอบที่ถูกตองจาก‐ ฝาครอบบานพับ (E) ถอดสวน‐ ประกอบ DX ในกรณีที่เปน‐ บานพับขวา และ SX ในทิศทาง‐ ตรงกันขาม ยึดฝาครอบ (C, D) เขาที่หวง‐ และชองที่บานพับ ติดตั้งแผงระบายอากาศ (B) ยึดฝาครอบบานพับ (E) เขากับ‐ บานพับ C D E E B ตอเครื่องเขาดานขางกับผนัง‐ ดานขางของเฟอรนิเจอรในครัว: 1. ติดตั้งหูยึด (E) และ (F) จากนั้นปรับระยะ 2. ยึดโดยใชสกรู (ตามภาพ) 3. ติดตั้งฝาครอบ (D) E F D Downloaded from Fridge-Manual.com Manuals 65 ปลด (Ha), (Hb), (Hc) และ (Hd) ติดตั้ง (Ha) ที่ดานในของ‐ เฟอรนิเจอรในครัว ca. 50 mm 90° 21 mm 90° ca. 50 mm 21 mm ดัน (Hc) เขาที่ (Ha) Ha Hc เปดประตูเครื่องและประตู‐ เฟอรนิเจอรครัวที่มุม 90° สอดหัวเหลี่ยมตัวเล็ก (Hb) เขาในตัวนำ (Ha) กดประตูเครื่องและประตู‐ เฟอรนิเจอรเขาหากันเพื่อทำ‐ เครื่องหมายชองเจาะ 8 mm Ha Hb Downloaded from Fridge-Manual.com Manuals 66 www.electrolux.com ถอดหูยึดและทำเครื่องหมาย‐ กำหนดระยะที่ 8 มม. จากของ‐ ประตูดานนอก ในจุดที่ตองตอก‐ ตะปู (K) 8 mm K Ha จัดวางหัวเหลี่ยมตัวเล็กไวที่‐ ตัวนำอีกครั้งและยึดดวยสกรูที่‐ จัดมาให กำหนดแนวประตูเฟอรนิเจอร‐ ครัวและประตูเครื่องโดยปรับ Hb Hb กด (Hd) เขาที่ (Hb) Hb Hd ตรวจสอบขั้นตอนสุดทายเพื่อใหแนใจวา: • สกรูขันแนนดีทั้งหมด • แถบซีลยึดแนนดีเขากับตู • ประตูเปดและปดไดตามปกติ Downloaded from Fridge-Manual.com Manuals 67 เสียง มีเสียงขึ้นระหวางการใชงานตามปกติ (คอมเพรสเซอร ระบบหมุนเวียนสารทำความเย็น) SSS RRR ! HISSS! OK BRRR! ! BB U BL CLICK! BRRR! BLUBB! Downloaded from Fridge-Manual.com Manuals ! ICK CL CR AC K! CLICK! BRRR! BLUBB! 68 www.electrolux.com HISSS! HISSS! SSSRRR! SSSRRR! CRACK! CRACK! ขอมูลทางเทคนิค ขนาดชอง สูง 1780 มม. กวาง 560 มม. ลึก 560 มม. เวลาลดอุณหภูมิ 25 ชม. แรงดันไฟฟา 230-240 V ความถี่ 50 Hz ขอมูลทางเทคนิคมีแจงไวที่แผนพิกัดที่ภายในดานซาย‐ ของเครื่องและที่ฉลากการใชพลังงาน Downloaded from Fridge-Manual.com Manuals 69 ขอมูลเพื่อการรักษาสิ่งแวดลอม รีไซเคิลวัสดุที่มีสัญลักษณ ใสบรรจุภัณฑลงใน ภาชนะบรรจุที่เหมาะสมเพื่อนำไปรีไซเคิล ชวยปกปองสิ่งแวดลอมและสุขภาพของมนุษย และเพื่อ รีไซเคิลขยะอุปกรณไฟฟาและอิเล็กทรอนิกส อยาทิ้ง Downloaded from Fridge-Manual.com Manuals อุปกรณที่มีเครื่องหมายสัญลักษณ รวมกับขยะใน ครัวเรือน สงคืนผลิตภัณฑไปยังโรงงานรีไซเคิลในทอง ถิ่น หรือติดตอสำนักงานเทศบาลของคุณ 70 www.electrolux.com Downloaded from Fridge-Manual.com Manuals 71 Downloaded from Fridge-Manual.com Manuals www.electrolux.com/shop Downloaded from Fridge-Manual.com Manuals 222339067-B-082012