1
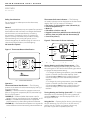
Table of Contents ATA11U03 Safety Considerations 2 General2 Operation2 Thermostat Button Identification 2 Thermostat On-Screen Indicators 2 Setting Heating and Cooling Temperatures 2 Turning the Heating and Cooling System Off 2 Using the Fan 2 Auto Changeover 3 Locked Keypad 3 Power Outage 3 Cleaning3 Revision History Non-Programmable Heat Pump Commercial Thermostat User Operating Instructions 97B0055N10 Revised: 16 September, 2013 FOR END USER 4 WATER-SOURCE HEAT PUMPS ATA11U03 R e v. : 0 9 / 1 6 / 1 3 Safety Considerations Do not attempt to make repairs to this thermostat, contact owner. General Non-programmable heat pump two-speed fan operation thermostats are wall-mounted, low-voltage thermostats which maintain room temperature by controlling the operation of a heating and/or air conditioning system. A variety of features are provided including separate heating and cooling set points, auto or manual changeover, fan selection (high or low auto or continuous), keypad lockout, and backlighting. No batteries required. Thermostat On-Screen Indicators — The following on-screen indicators can be displayed on the thermostat display. See Fig. 2 for location of indicators. • Fan mode - on (LO and HI) or auto (LO and HI) (1) • Current temperature (2) • Mode (3) • Fahrenheit or Celsius units (4) • Keypad is locked (no padlock means unlocked) (5) • Auxiliary heat (not used with this thermostat) (6) • Current set point (7) Figure 2: Thermostat On-Screen Indicators O 3 2 Figure 1: Thermostat Button Identification 1 2 mode heat cool fan 1 O F O C auto off auto fan on set at 3 4 Fig. 1 — Thermostat Button Identification Operation Thermostat Button Identification — The following buttons are located on the thermostat display. See Fig. 1 for button locations. • FAN (1) — Selects how the fan operates continuous (ON) or cycling with compressor (AUTO) and either high (HI) or low (LO) speed • MODE (2) — Selects whether thermostat is set for heating, cooling, auto (heat and cool as needed), or off • UP (3) — Increases the temperature or adjusts the screen selection up when setting advanced features • DOWN (4) — Decreases the temperature or adjusts the screen selection down when setting advanced features 2 auto off auto fan on F C 4 5 actual temp set at actual temp aux heat on 2 heat cool aux heat on 6 7 Fig. 2 — Thermostat On-Screen Indicators Setting Heating and Cooling Temperatures — The thermostat is installed with the heating set at 68 F and the cooling set at 78 F. Perform the following procedure to change the temperature setting: 1. To change the heating temperature, press the mode button on the left until the screen displays “heat”. 2. Press the up or down button located on the right side of the display until the desired temperature is reached. 3. To change the cooling temperature, press the mode button on the left until the screen displays “cool”. 4. Press the up or down button located on the right side of the display until the desired temperature is reached. Turning Heating and Cooling System Off — To use the thermostat to turn the heating and cooling system off, press the mode button until the display shows “off” in the upper left corner. Using the Fan — Pressing the fan button cycles through the four selections; fan on LO, fan on HI, fan auto LO, and fan auto HI. The fan can operate continuously (fan ON) or cycle with compressor (auto fan). THE SMART SOLUTION FOR ENERGY EFFICIENCY ATA11U03 R e v. : 0 9 / 1 6 / 1 3 Auto Changeover — The thermostat displays one of four modes: heat, cool, auto ( heat cool) and off. When the mode selection is in auto mode, the system is allowed to switch from heating to cooling or from cooling to heating to maintain the temperature set points. Locked Keypad — The thermostat is locked when the pad-lock symbol is shown on the thermostat display. A locked thermostat will inhibit making adjustments. Contact owner to unlock. Power Outage — If the building loses electricity, the thermostat will not need to be reprogrammed. The settings are retained in memory. Cleaning — Remove dust from top of thermostat. Clean with damp cloth. Do not use sprays. Manufacturer reserves the right to discontinue, or change at any time, specifications or designs without notice and without incurring obligations. 3 WATER-SOURCE HEAT PUMPS ATA11U03 R e v. : 0 9 / 1 6 / 1 3 Revision History Date: Item: 09/16/13 Miscellaneous 08/27/13 First Published Action: Updated *97B0055N10* 97B0055N10 We work continually to improve our products. As a result, the design and specifications of each product at the time of order may be changed without notice and may not be as described herein. Please contact our Customer Service Department at 1-405-745-6000 for specific information on the current design and specifications. Statements and other information contained herein are not express warranties and do not form the basis of any bargain between the parties, but are merely our opinion or commendation of its products. We are a proud supporter of the Geothermal Exchange Organization - GEO. For more information visit geoexchange.org 4 © LSB, Inc. 2013 Rev.: 16 September, 2013