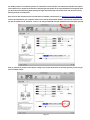
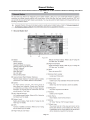
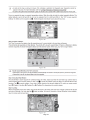
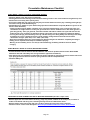
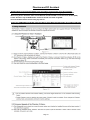
1
Guide to the Phantom 2 Vision & Vision+ V. Dec-04-2014 – By Fantomas What to Do & Not to Do First ..................................................................................................... 2 What to do After any Software/Firmware Update OR After a Crash. ...................................... 4 Good to Know before you Go .................................................................................................... 5 Starting/Stopping the Motors .................................................................................................... 6 DJI Vision Camera & Radar Function........................................................................................ 7 Know your S1/S2 switches ........................................................................................................ 8 Flight Environment Requirements .......................................................................................... 10 Pre-Flight Checklist/Tips & Tricks/Notes................................................................................ 11 Inspection ........................................................................................................................................... 11 Power UP ............................................................................................................................................ 11 DJI Vision Apps.................................................................................................................................. 12 Ready to Fly........................................................................................................................................ 13 Always be prepared for the Worst.................................................................................................... 14 A- Lost Orientation and/or Location...............................................................................................................14 B- Lost Video/Telemetry Feeds.......................................................................................................................14 C- Baby, Come Back ........................................................................................................................................15 D- Failsafe (RTH) ..............................................................................................................................................16 E- GPS Lost.......................................................................................................................................................17 F- Flyaway .........................................................................................................................................................18 G- Vortex Ring State (VRS)..............................................................................................................................18 H- Low Battery ..................................................................................................................................................19 Landing ............................................................................................................................................... 20 Side Notes .......................................................................................................................................... 21 Led Status (Phantom, RC & Extender).................................................................................... 23 Battery Status (RC & Extender & Smart) ................................................................................ 26 Compass Calibration ................................................................................................................ 28 Take Good Care of your Compass .......................................................................................... 29 How to avoid Flyaway............................................................................................................... 30 Recovering from a Flyaway ..................................................................................................... 31 Naza-M and IOC: Why and How ............................................................................................... 32 Failsafe ...................................................................................................................................... 35 IOC Flight - Course Lock & Home Lock .................................................................................. 37 Flight Limits .............................................................................................................................. 40 Ground Station.......................................................................................................................... 41 Preventative Maintenance Checklist ....................................................................................... 45 Lipo Battery – Safety Advisory Notice .................................................................................... 46 Phantom and RC Assistant...................................................................................................... 47 Camera update.......................................................................................................................... 49 Page 1 What to Do & Not to Do First - Never, Never, Never, start flying Right Out of the Box OR after a Firmware Update!!! You WILL Crash, Hit Something, Hurt Someone or Hurt Yourself!! Too many times I’ve heard: “I just bought one, in 15 minutes I was flying and…crashing”. So PLEASE, people! Did I say NEVER? I’m gonna say it again: N . E . V . E . R .! - Start by reading the manuals. I know, it’s no fun but DO IT anyway, at least once…twice…and again! - DJI Phantom Disclaimer - DJI Phantom Quick Start Guide - DJI Phantom User Manual - This Guide - Watch LOTS of Tutorials/Demos/How-to’s Videos. Peruse the Quad’s forums like Phantom Pilots, DJIGuys, RCgroups and the new DJI forum. Familiarize yourself with the Vision assistant software, the aircraft characteristics, the Naza-M and IOC. Learn as much as you can. Be careful, some tutorials are missing some important steps or doing things the wrong way (like calibrating near a car...come on tutorial makers!). Use your good judgment to make sure you understand what to do and when/where to do it. - Write your contact information on your Phantom (in case you lose it). Also, it might be very helpful to label your Sticks\Switches. For already made stickers, have a look at this Phantom Identify Set. - Install the software from DJI Site/Apps Store (Check How-to’s Videos for more info) 1- On your PC/MAC: - Drivers Assistant - Phantom RC Assistant - Phantom Vision Assistant 2- On your Smartphone: - DJI Vision App - Follow ALL the instructions from the “What to do After any Software/Firmware Update OR After a Crash” section. Here are some good tutorials to watch and learn from: - DJI Phantom Vision+ A Beginners How To Guide - DJI Phantom 2, Radio Explained, Complete Tutorial <- A very practical "before taking off" instructions guide! <- A very practical field guide for new pilots! - Zero to Airborne: 1st time DJI Phantom Pilot Tutorial - DJI Phantom 2 Vision Plus Review | with Calibration, Footage and Ground Station Demo - How to Use DJI Phantom Vision + Plus Assistant Software. Calibration, Setup, Change to Naza-M - Switches & Mode Setup Tutorial - DJI Phantom 2 Transmitter Calibration Tutorial & Setup - How to Calibrate DJI Phantom 2 Remote Control and Gimbal - Calibrating the IMU - DJI Phantom 2 Vision The basics of Flying, Recording & Sharing - DJI Phantom 2 - FIRMWARE Update, Quick Tutorial - DJI FIRMWARE 3.08 - Official Guide - What's new? - DJI Phantom 2 Vision/Vision+ - New Remote Control and Firmware 3.08 - Tutorial - How to bind/rebind a transmitter / remote controller to your DJI Phantom, Vision+ - How to bind/rebind the range extender / camera on DJI Vision+ or Phantom Vision Page 2 You are now ready, but please allow yourself some flight training before attempting more advanced or adventurous flight maneuvers. Start out in a wide open field, far from trees, buildings and power lines. Run through the DJI Pilot Training Guide and get all of the techniques down. The important part here is to learn what the sticks will do in every flying directions. After some good practice, turn on the Naza-M and IOC(Intelligent Orientation Control). This guide is assuming you already have switched your Phantom to Naza-M (don’t forget to also turn IOC on...) and have S1 bottom position set to FAILSAFE and NOT Manual. Practice, Practice and Practice again! I like this quote from Gaelmart on why training is so essential: “When my “very expensive” Phantom is facing me and 1 foot from side impact with wall, I don't want to have to think about which way to put the control stick, I want training to take over. Yes anyone can fly the Phantom - it just requires practice. I've had it km out over mountains having a blast. That ain't the problem or why people smash 'em. It’s when it's 2 feet from your face and you panic… that's the problem.” Good tip from FAQstech : “Before you ever even purchase a Phantom 2 as your first aerial vehicle, I’d suggest: Buy a cheap quad to learn on (and crash). You’ll save yourself a considerable amount of money and still learn the basics of flight. If you get good at flying a cheap heli or quad, then flying the Phantom 2 should be a breeze with its stabilization and self-centering sticks. Just let go of the sticks and it should hover in place given a good GPS lock. Something like the Hubsan X4 H107L, the H107D or the Walkera QR Ladybird V2 is a good starter quad. I bought an X4 after I started flying the Phantom 2 to have something to fly in the house when there was bad weather in order to keep my hands on sticks. It’s a blast indoors and can even be flow outdoors in lite wind.” In the same vein, have a look here: Don't Buy a DJI Phantom! - (before you watch this) I also like this other quote found somewhere on the Net: “It’s better to be on the ground wishing you were in the air than in the air wishing you were on the ground!!” Remember: Practice Make Perfect! Common Acronyms ATTI BLOS CAA CL CSC ESC FAA FPV FS GPS HL IMU IOC LIPO LOS MC POI RTF RTH Rx Tx UAV VLOS VRS VRx VTx PITCH ROLL YAW = = = = = = = = = = = = = = = = = = = = = = = = = = = = = Attitude Beyond Line of Sight Civil Aviation Authority (UK Regulator) Course Lock Combination Stick Command Electronic Speed Controller Federal Aviation Administration (US Regulator) First Person View Failsafe Global Positioning System Home Lock Inertial Measurement Unit Intelligent Orientation Control Lithium-Polymer (battery) Line of Sight Main controller. Point of Interest Ready to fly Return To Home Receiver Transmitter Unmanned Aerial Vehicle Visual Line of Sight Vortex Ring State Video Receiver Video Transmitter Moving Forward or Backward Moving Left or Right Rotating Left or Right Page 3 What to do After any Software/Firmware Update OR After a Crash. Don’t forget to ALWAYS Remove the Propellers/Gimbal Clamp and Camera Lens Cap when using the assistants. For obvious reason, make sure all your batteries are fully charged before doing any firmware update. 1- Start Phantom RC Assistant Software: - Turn On Remote Control & Range Extender - Connect Remote Control to PC/MAC using USB cable. - Update Firmware as needed. - Calibrate the Sticks/Switches (follow on screen instructions). - Close the Software BEFORE disconnecting the USB cable. 2- Start Phantom Vision Assistant Software: - Turn On Remote Control & Range Extender - Turn On and Connect Phantom to PC/MAC using USB cable. - Update Firmware(s) as needed. - Here also you need to Calibrate the Remote Control sticks (follow on screen instructions). - Out the box, Calibrate the IMU. After an update, check the Status and Calibrate if necessary. It is recommended to always do the Advanced Calibration. It takes longer but it’s more thorough. Note: If you get the warning about IMU/Controller being too hot or the IMU Calibration seems to take forever or looks stalled: turn off the Phantom and wait until it has completely cooled down (20-30 min), then fire it up and immediately begin calibration when it is cool. If the Master Controller board = MC = Phantom is hot, it can throw out the IMU's sensors which cause issues with Calibration. Also, make sure the unit is level, that nothing ferromagnetic is in the vicinity and that there are no movements and/or vibrations during the calibration process. - Close the Software BEFORE disconnecting the USB cable. 3- Do the Compass Calibration. Check out the “Compass Calibration” Section for more details. 4- Power Cycle everything. Page 4 Good to Know before you Go Flight Control System IMU or Inertial Measurement Unit An inertial measurement unit, or IMU, is an electronic device that measures and reports on a craft's velocity, orientation, and gravitational forces, using a combination of accelerometers and gyroscopes, sometimes also magnetometers. IMUs are typically used to maneuver aircraft, including unmanned aerial vehicles (UAVs). The altitude part is the barometric altimeter that measures altitude based on air pressure. The IMU works by taking readings from ACCELEROMETER (this is movement in straight lines (forward, backward, side to side, and up and down ) and also takes readings from GYROSCOPE (spinning or rotating, and pitching movement ), and finally GPS (where the phantom a located in space) (latitude, longitude, altitude). Some Specs (1m = 3.28084ft) - Communication Distance (Open Area): Remote Control in CE/FCC mode: 400m/800m / Range Extender: 500-700m - Vertical hover accuracy is +/- .8m (GPS/ATTI); Horizontal hover accuracy is +/- 2.5m (GPS only) - Max Ascent Speed: 6m/s - Max Descent Speed: 2m/s - Max Flight Speed: 15m/s (not recommend) Communication (5.8Ghz/2.4Ghz) explained 1. Your RC Controller and the Phantom do not talk to each other – that is, the RC Controller controls the Quadcopter mostly in a one-way fashion. This occurs on one particular wireless frequency – 5.8Ghz. Most other multirotors use 2.4Ghz, but DJI uses the 5.8Ghz so that it won’t interfere with the second video/telemetry channel – which is what your smart phone and the DJI repeater use! 2. The second channel – which allows video/telemetry – is a constant connection between your smartphone/tablet, the DJI repeater/range-extender (small box on the RC Controller handle) and the Phantom. This channel is at 2.4Ghz. 3. In addition to the above, the Phantom is also constantly receiving signals from GPS satellites – all of this data combines with #1 and #2 above to provide the information for safe and effective flight. The reason for the repeater/range-extender is to amplify the wireless signal so that the range is increased. As you know, your home wireless network can max out at 46m indoors/92m outdoors or so. DJI claims a range of 500-700m for the Phantom telemetry, although this can vary with the terrain, weather, interference, etc. The control signal is more or less line of sight though it extends far beyond where one could actually see the Phantom. And, of course, the signal does get through "open" objects (like winter trees) and bends (somewhat) around solid objects but be careful anyway as it might not always be the case; it depends a lot of your actual surrounding. Need to Know: You’ll get a “Control Signal Lost” warning if you lose the First Channel - 5.8 Ghz: this will activate the FAILSAFE mode. You’ll get a “Phantom Connection Lost” warning if you lose the Second Channel - 2.4Ghz: in which case, you will lose Video and Telemetry feeds. Be sure to check the “Be prepared for the Worst” section. Page 5 Starting/Stopping the Motors Need to Know: You DO NOT have to worry about pulling the throttle all the way down for more than 3 sec while in the Air (not recommended anyway because of VRS, more on that later): so NO, it won’t shut down the motors if you do it while flying. The Phantom will NOT shut down until it feels it's not losing altitude for about 3-5 seconds (aka it's on ground now). The only thing I wouldn’t try is to execute CSC while in the air. If you do a CSC while flying, this will stop the motors and your Phantom will drop like a rock. So be careful with the CSC sequence. For some hard evidence on these theories, watch this: Motors Cut Mid-Flight???. Someone DID test it....both ways! Page 6 DJI Vision Camera & Radar Function The Radar Function is VERY useful to track down where your Phantom is heading or its relative location. Page 7 Know your S1/S2 switches (Naza-M/IOC only) The following only applies if you have switched your Phantom to Naza-M, activate IOC (Intelligent Orientation Control and have S1 bottom position set to FAILSAFE and NOT Manual. See the “Naza-M and IOC: Why and How” section for more info. Good to Know: When both switches, S1 and S2, are in the upper position (THE only position they should be before you start your Phantom, BTW), you are basically flying as if your craft was in the original out-of-the-box “Phantom / Vision” mode. Need to Know: When flipping S1 or S2 switches to any position, always wait a few seconds to make sure the selected mode is activated. S1 Switch : GPS(top) – ATTI(middle) – FAILSAFE(bottom) GPS: In the default top position you are flying in GPS mode, meaning the Phantom will attempt to maintain the same horizontal/vertical position in space (holds the aircraft in a fixed and stabled hover) by automatically compensating for drift and light wind whenever you take your hands off the stick. This mode will probably be preferred by beginners. ATTI: Move the switch to the middle position and you are now flying in ATT mode (Attitude Hold). In this mode, your Phantom will attempt to hold height, orientation and keep itself level by means of the Compass and IMU (the GPS module will only be used to maintain ‘some’ flight stability and allow the Return to Home feature to work in case FAILSAFE activates) but it won’t counteract for any horizontal drift either from wind or stick move. Therefore, your craft may drift with the wind or in the direction it was heading when you switch to ATTI (i.e. no horizontal positioning). You will notice a huge difference in ATTI mode even if there is no wind. In ATTI mode it does not slow down by itself. It has momentum and will continue flying in whatever direction it was moving until you counter that momentum with thrust in the opposite direction. Why would you want to use this? Maybe you have been flying upwind. For an easy return, flip it into Attitude mode and let it drift back to you. Wind direction permitting, it can also be useful for smooth video. Fly upwind, start your video, and then turn on Attitude mode and let the video run as your Phantom is born along on the wind. Need to Know: You should get used to ATTI flying mode as soon as you can because you’ll have greater control of the aircraft rather than relying on automatic systems, which, lets face it, could fail at any time and without warning. A switch to ATTI mode is always a good idea if you think or suspect that the Compass and GPS are out of whack; so be prepared. Need to Know: When the aircraft is entering ATTI mode, either using the S1 switches or because you’ve lost GPS. The Rear Led will start flashing slowly Yellow. FAILSAFE: Move the switch all the way down and you will Initiate FAILSAFE, which means invoking the Return to Home (RTH) feature without having actually lost the control signal. Basically you are telling the Phantom to fly itself directly home, if GPS signal is good OR if GPS signal is lost or bad, to simply land straight down. Need to Know: You must change the S1 bottom position to activate FAILSAFE using the Vision Assistant software, otherwise the default is ATTI. Be careful not to set the switch to Manual Mode by mistake… Need to Know: If you flip S1 to FAILSAFE by mistake, you have less than 3 sec to cancel it by flipping it back up otherwise FAILSAFE is activated. S2 Switch -> Off(top) – Course Lock/CL(middle) - Home Lock/HL(bottom) (Most of the Text is from Visioneer) OFF: In the default top position, the Phantom is directionally operated like any other RC craft, forward is the direction the "nose" is pointed, back is the direction the "tail" is pointed, left is to its left, right is to its right. Page 8 An issue with traditional RC flight is once the craft gets far enough away (or flies into the sun) it’s VERY easy to lose track of how it's oriented...is it facing toward me, or away from me? Once you lose orientation your only recourse is to give a command and see how it reacts - could mean disaster. The other issue with traditional RC flight is reversing your control. When the craft is flying away from you, all's right with the world. If you want to go to your right, you push the right stick right...BUT when the craft is coming toward you and you want to go to your right, you push the right stick left because your right is now its left. This can get very confusing and dangerous, especially when you're about to crash, are in personal panic mode, and are trying to recover. That’s why there are 2 other very interesting modes: Home and Course lock. Home Lock being a very good option if you have no idea where the Phantom is now located OR You can't tell what direction it's facing. Check the “Always be prepared for the worst” section for more info. Need to know: For Home and Course Lock to work, 1) the pre-flight must have been completed (the Phantom got a Home Point and Home Orientation fix), and, this only applies to Home Lock, 2) the Phantom must be flying at least 10 meters (33 feet) away from the Home Point. Need to know: Course Lock can be used in both 'ATTI' Mode and 'GPS' Mode. Course Lock does not require GPS satellite acquisition or establishing a Home Point. Course Lock relies on Orientation information only while Home Lock uses both position (GPS) and Orientation (compass, gyro, accelerometers). Course Lock (CL): Move the switch to the middle and you are now flying in Course Lock Mode. In CL, it doesn't matter which way the craft is oriented (pointing). Now forward is whatever direction the craft was pointed before it took off (the recorded Home Orientation direction). In Short, Course Lock relates to Initial Heading. It's like flying on an invisible, fixed grid. If it took off with the nose pointing north, forward will always send it north, back will always send it south, left will always send it west, and right will always send it east. When flying in IOC Home Lock or Course Lock you can control yaw, while remaining on course. Useful, for example, if you want to track a target by flying “forward” while rotating. Home Lock (HL): Move the switch all the way down and you activate Home Lock Mode. In HL, like in CL, it doesn't matter which way the craft is oriented (pointing). But in Home Lock, back is always back to the Home Point (the Recorded or Dynamic(if activated-see below) Home Point location), forward is always away from the Home Point, right is always 90° to the right of a line from the Home Point to the craft, and left is always 90° to the left of a line from the Home Point to the craft. In short: Home Lock relates to Home Point. Think of the craft as being on the end of a string which is the radius of a circle - shorten, it comes back; lengthen, it goes away; twirl (left or right), it goes in a circle around the home point. Need to Know: When in Home Lock mode, if any of the following situations happen, the system automatically quit Home Lock(HL) and switches to Course Lock(CL): a) The aircraft flies within 10m/33ft range of the Home Point. b) You toggle the S1 to the ATTI Mode. c) The GPS signal becomes bad or is lost. H/L, just like FAILSAFE/RTH, is dependant on having enough satellites to properly triangulate. Need to Know: It’s possible to manually change the Home Point and Course Lock direction after take off and while in flight. Course Lock Direction reset is S2 Top-Middle-Top 3-5 times; Home Point reset is S2 Middle-Bottom-Middle 3-5 times. Make sure you do not cycle through all three positions (Top through Bottom). Doing all three positions may result in the resetting of both CL and HP. Obviously, if you want to manually set a new Home Point, you need to turn off Dynamic Home Point (see below). Be sure to check the IOC section for more info. News to Know: With the latest DJI updates, it is now possible to activate a Dynamic Home Point function. When using a GPS-enabled mobile device and activate the Dynamic Home Point from the VISION app, the Home Point will automatically be reset to the location of the device every 2 seconds during flight. Dynamic Home Point is useful in situations when you are in motion (on a boat, for example) and require a Home Point that is different from the takeoff point. Note: Home Orientation at the point of take off will remain as the reference point. Here are some interesting videos to watch and learn from: (Just forget about the Manual Mode comments. Set S1 bottom position to Failsafe!) - DJI Phantom Flight Modes - DJI Phantom Intro to IOC - DJI Phantom 2 Vision/Vision+ - Phantom- and Naza-Mode - Tutorial - DJI Phantom 2, Vision, Plus: What is ATTI mode? What is Manual Mode? - DJI Phantom - IOC Explained - ATTI, Course Lock, Home Lock, Manual Mode - DJI Phantom 2, Vision, Plus: What is IOC, Course Lock/Home Lock? How do they work? - DJI Phantom Tutorial - IOC Home Lock (HL) explained and demonstrated - DJI Phantom Tutorial - IOC Course Lock (CL) explained and demonstrated - How to manually set a new Home Position on your DJI Vision, Plus, Phantom 2 - How to set new Home Point while in the air Page 9 Flight Environment Requirements - Do not fly inside your house/office/store unless you really want to trash it. Why? Just have a quick look a the “Failsafe” section then measure the height of your ceiling. But if you really need to fly inside, watch this: Flying your DJI Phantom inside? Some things to consider... - Note wind direction and weather conditions (actual and forecast). Do not use the aircraft in severe weather conditions. These include wind (more that moderate breeze), snow, rain and smog. Watch out for wind gusts as they are more of a problem that steady wind, especially when up in the air. To watch: High Wind/Wind Shadow-Flying Tips. - Planning to do some winter flying, watch: Winter R/C Flying Tips and Tips for winter flying with your Phantom - snow, fog, ice, batteries... - Check for any hazards, high buildings, steel structures, constructions, vehicular traffic, personal property that may affect the accuracy of the onboard compass or flight plan. - Be careful when flying near tall structure/building. If you fly behind, you may lose connection. Also air/wind is a matter and if it encounters an obstruction, huge pressure shifts are taking place that might create a vortex big enough to get you into trouble. - Stay away from obstacles, crowds, pets, birds, trees, bushes, or water. Do not fly over people or moving vehicles (the Phantom is heavy; if it drops...) and keep children away. Use common sense to stay safe and protect others from harm. - It is recommended not to take off from any kind of metallic structure like manhole cover, top of your car, reinforced concrete and so on. Best way to take off will always be on a flat surface: ground, grass, portable landing pad… - Reduce the chance of electromagnetic interference (EMI) by not flying in areas with high levels of electromagnetism, including cellular towers, electricity pylons or power lines. Urban environments have more EMI interference. - Avoid interference between the Remote Control or on-board Wi-Fi device and other wireless equipment including your own or nearby houses wireless routers. This explains why it’s not really wise to fly in your backyard. Also, it’s a good idea to ask other persons near you and carrying a smartphone to turn then off. - Watch out for geomagnetic/solar storms. When the K-Index is at higher level(5+), it has a direct impact on GPS and affect radio signals which can cause issues in obtaining lock in regards to satellites. To monitor the K-Index you can use the following website: Planetary K-index or this Estimated 3-hour Planetary K Index. - Check out what are the rules/laws/regulations in your country about flying these “Unmanned Aerial Vehicles” (UAVs). At the same time, check if you need any kind of license, insurance or personal liability insurance, especially if you're planning on flying it commercially. - Verify for airport, air traffic and restricted air space. Do not fly the aircraft within no-fly zones specified by local laws and regulations. If you’re in the US or Canada, a good site to visit is the Don't Fly Drones Here web site. This map represents areas where it is not recommended to fly drones due to regulations. - Planning a trip? Be sure to watch Traveling with your DRONE + New FAA Rules about FPV - For people who have issues with weak GPS satellites locked, someone recommended this nice tool to check and see exactly how many GPS satellites should be visible based on a specified location, the day and time. Have a look: Satellite Predictor Tool (Just make sure “glonass” is unticked, otherwise you will think its fine to fly all day). There are some interesting APPS that shows GPS status, for IOS: GPS Plan and Android: GPS Test / AndroiTS GPS Test - Do not fly if you’re drunk, taking drugs, under the influence of anesthesia, dizziness, fatigue, nausea and any other conditions both physical and mental that could impair your ability. - In case of emergency/problem…DON’T PANIC! Make sure you read the “Always be prepared for the worst” section. - Plan you flight in advance. Where are you going, what are you going to do and so on - Remember, this is literally a “flying camera”, so be sure you protect the privacy of others. - Be sure to watch: Dude where can I fly my drone? - And finally, try to never lose Line of Sight (LOS) with your Phantom. Better Fly Safe Than Sorry! Page 10 Pre-Flight Checklist/Tips & Tricks/Notes (Big thanks to everyone for some very good ideas & additions) Inspection (Someone has to do it) - Remote Control (TX), Smart Battery(Battery), Range Extender(REx) and Smartphone(Phone) are fully charged. - Attach Propellers Guards. Not recommended, unless you have good reasons to use them (they’re “ok” if you are learning to fly); Prop Guards - Pros and Cons. They are known to enhance a wobbling state when hovering or descending effect called Vortex Ring State; DANGER Turbulence Ahead. Also, watch out for the screws. The long ones are ONLY for the Props Guards!!! Short ones are the normal one to use. One last thing to know: Props Guards will reduce your flight time by up to 4 min. - Turn motors shafts with your fingers and verify they are smooth without excessive play or binding. Check the “Preventive Maintenance Checklist” section for more info. - Propellers are mounted correctly: black on the black marked shaft, silver on the silver one. Check if not broken or worn. Run finger along leading and trailing edges. Flex both Blades to check for hairline cracks. NOTE: When installing brand new props, make sure you did not get a defective one: if it seems to go only half way on the shaft, it is defective. Replace it! Check this out: WARNING: Watch for defective Phantom 2 Propellers - Landing Gears are secure; not cracked/broken/loose. Compass is firmly attached, cable in place. - Micro-SD card has been inserted and is formatted. (Do not insert or remove while Phantom battery is On). Optimally, you should use a Class 10 Micro-SD card when filming HD videos. - Damping absorbers are in good condition, not broken or worn. Anti-Drop pins are in place and locked. - Remove Gimbal Clamp and Camera Lens Cap. (ALWAYS Remove Gimbal Clamp BEFORE powering On). - Gimbal is functioning as normal; Camera is secure and moving normally. Camera lens isn't dirty, spotted, smeared. Check condition of Gimbal/Camera black ribbon cables. Look for tears or signs of wear. - Battery is not swollen, leaky or damaged in any way. Contact needles and pads are clean. - Make sure GPS on Phone is ON (to lock the location of Pilot). Set the Phone to “Flight Mode/Do-Not-Disturb” mode, if you like (to block phone calls/texts). It is recommended to “Forget” any other WiFi networks in range, especially when flying in small areas. Also make sure the audio is on: you want to ear the battery low alarm warning! - Note: Some Android devices do not allow for both a Wi-Fi connection and a mobile data connection at the same time. When trying to connect to the Phantom 2 Vision+ Wi-Fi network, most devices will check whether an Internet connection has a certain Wi-Fi setting enabled, e.g. Auto network switch or Test for Internet connection. If no Internet connection is found because the Phantom 2 Vision+ creates a non-routable connection it will drop the Phantom 2 Vision+ Wi-Fi network connection and scan for the next available connection. Example: For the Samsung Note 3, carry out the following procedures to solve this issue. Tap Settings -> Wi-Fi, and then tap the “Menu” button. Select “Advanced” then uncheck the “Auto network switch”. You might see a warning that indicates the Internet connection is unstable this message can be ignored. - Be sure to watch: Pre-Flight Checks on your DJI Phantom - What to look out for. Power UP (You’ve checked all your batteries, right?) - Make sure S1 and S2 are in the Top position AND Gimbal Clamp/Camera Lens Cap have been removed. - Initialize the equipment in the following sequential order (Check for Green Lights). (Be sure you watch: ON and OFF-The Proper Procedure) 1. Range Extender. System is Blinking Green; Power is Solid Green. 2. Remote Control. 1 Beep = CE mode (range ~ 400m) ; 2 Beeps = FCC mode (range ~ 800m). Green light On (not yellow or red). 3. Insert and Start the Phantom Smart Battery. Page 11 Need to Know: Always turn on the Remote Control BEFORE powering on the Phantom and keep it on until the Phantom battery is powered off. After landing, always turn off the Phantom BEFORE turning off the power on the Remote Control. You don’t want the Phantom to think it has lost connection to the Remote Control and take off heading to the last recorded home position. NEVER install or remove the battery when it is turned on. - Watch Phantom LED startup sequence for abnormal indications. See next section for Led status indicators. - Watch Gimbal startup to verify function. Must be in a stable horizontal position after a short while. If it’s not, watch this DJI Phantom 2 Vision+ Gimbal repair or this Phantom 2 Vision Plus camera repair and solution. - Check camera LED indicator. Should be solid green. - Calibrate the Compass of Phantom whenever in new area, after update or after a few flights. Be sure to read the “Compass Calibration” section. - Place Phantom on an open flat ground with Battery indicators facing towards you and +/- 3 meters away from you. - Wait until the Rear Led slowly blink Green for at least 10-15 seconds to make sure Phantom has acquired enough GPS Satellite(6+), has Locked/Marked your Home Point (for FAILSAFE(RTH)/Home Lock(HL) mode) and set Home Orientation (for Course Lock(CL) mode). Best if left standing for 1-2 min to make sure it has a solid and stable GPS satellites lock and Home Point/Orientation are set. - There will be two sets of rapid green flashes: - The first rapid green flashing sequence indicates the Phantom has recorded the Home Orientation. Home Orientation is based on the craft's orientation 30 sec after powering up. Remember that orientation if you plan to fly in Course Lock mode. - The second rapid green flashing sequence indicates it has just recorded Home Point. Home Point is established after 6 or more GPS satellites have been found for 10-15 seconds. - After that, the Rear Led will indicate GPS status. Slow green flashes means 6 satellites or more were found. (Check the “Led Status” section if you are getting something else than Green or Yellow blinks): - Slow Green Flashing: Ready to Fly (GPS) Good to Go: RTH/HL Mode Ok. The Phantom will hover when all sticks are released. It will Return to Home Point(RTH), if Failsafe is activated. - Slow Yellow flashing: Ready to Fly (Non-GPS) You will be able to fly, but GPS is Off so No RTH/HL possible. The Phantom will lock its altitude but will not have horizontal positioning. It will land straight down, if Failsafe is activated. NOTE: Personally, I wouldn’t fly if I only get 6 satellites; way too risky. You lose one and you lose GPS DJI Vision Apps - Connect Phone Wi-Fi to the Range Extender (may take up to 30 secs to see Extender Wi-Fi). If you’re planning to use Ground Station features: Before connecting your Phone to the Extender, load the map of where you'll be flying (scroll to load wider location). Do it on location or in advance. Launch the ‘DJI Vision’ App and : - Check if the WiFi connection is the Phantom-##### and have a Green Dot - Make sure your Settings are the way you want them to be. - Open Camera page and verify connection to Phantom, no on screen errors or warnings, - Check the Number of satellites (must be 6+). Make sure you have a solid & stable GPS satellites lock. - Verify WiFi signal strength indicator and SD card indicator (enough space left?) - Check Status(%) of Phantom and Range Extender Battery. - If needed, verify Camera settings, rate, stills, video, burst, ISO, tilt, etc. - Confirm good video on Phone (if not adjust Preview Quality in Settings). - Set Camera at desired angle. - Verify that both pilot's and aircraft location is the same before take off to ensure that if FAILSAFE is being activated, it will return to your Home Point(RTH) and not 300 miles away... - Check the location of aircraft in ‘Flight Radar’. Is it in right position/direction? If the distance reads N/A it doesn't have a Home Point lock. If distance is 0, it has a Home Point. You could also try to move around the Phantom and check if the Radar is following your moves. OR - Use “Find my Phantom” (under Settings panel) or the “Ground Station Screen” (if you enabled it) to ensure that blue and red dots are on the same current location [Blue: Home Point location; Red: Aircraft Location]). Page 12 Ready to Fly (Are you sure, really sure?) - Ensure the antenna of Remote Control is perpendicular to the ground (pointing upwards) and Range Extender is angled properly (Front Flat Face pointed toward Phantom). Try to always keep them pointed at the Phantom and AVOID Line of Sight obstacles (->Signal Lost) - Phantom is ready to take-off. BUT ONLY if Rear Led are still slowly blinking green and you still have 6+ satellites. Satellites lock drop in and out sometimes until finally staying stable. Do not take off is GPS signal is too unstable. - Start recording. (A Common Mistake is to forget to Start Recording…I know, trust me) - Start the Motors (CSC Command). Make sure they are functioning normally (no unusual noise or vibration and they are all spinning at the same rate/speed). - Double check for nearby obstructions, people, power lines, etc. - Ready, Set, Fly…!! When taking off, don’t be shy about using the throttle to get off the ground a few feet. Trying to throttle up slowly can lead to a tip over where the blades hit the ground causing a crash. If there is a strong wind, a tip over is even more likely. REMEMBER: If you get in trouble, let go of the sticks and it will automatically slow and hover in place OR fly UP fast (watch for trees, power lines, etc). NOTE: Vertical hover accuracy is +/- .8m (GPS/ATTI); Horizontal hover accuracy is +/- 2.5m (GPS only). - Hover at 6-8 feet for a while. Watch closely for loss of GPS Lock; if it happens land and redo the pre-flight steps. Ensure Phantom remains in place without drifting, flying in circles (Toilet bowl effect-TBE) or other signs of erratic/abnormal/unexpected behaviour. Check that the Phantom holds position steady while yawing 360 degrees. Check control response, yaw left-right, pitch forward-backward, roll left-right, throttle up-down. If everything is ok, you're good to go, otherwise LAND IMMEDIATELY. It is recommended you switch to ATTI before Landing, in case the Compass and GPS are out of whack. DO NOT attempt to yaw or move, just get it straight down ASAP and recalibrate the Compass, then power cycle the Phantom. If that doesn't help, Recalibrate everything (check the “After Firmware Update” section for more info). If THAT doesn't work either, DO NOT FLY at all. Try to pin point the issue and ask for help or send the phantom for repair. - During Flight: if Phantom ever seems to behave oddly, feel less responsive, or start moving without input, LAND IMMEDIATELY wherever you are and Recalibrate everything. It is recommended you switch to ATTI before Landing, In case the Compass and GPS are out of whack. Be sure to read the “Always be prepared for the worst” section. - To make absolutely certain the Home Point has been locked (for FAILSAFE(RTH) and to avoid Flyaway): Send the Phantom off about 30m and do a practice Home Lock return by flipping the S2 switch down to “Home Lock”, and pull back on the right stick. No need to return all the way home; if it flies straight back to you or your previously set Home Point, you’re good to go. Flip S2 all the way back up and enjoy what is usually a stress free flight. Warning: HL turns to CL when Phantom is less than 10m/33ft from Home Point (see the section about IOC). - Keep an eye on your flight parameters while flying; control sticks are quite sensitive. Be particularly gentle with the left stick so that you don't accidentally cause elevation gain or loss while you are yawing: don’t assume you’re still at the same altitude you were. - Watch the Rear Led. Should be slowly flashing green(6+ sat). Otherwise check Led Status in the following section. Make sure the number of satellites on the DJI Vision camera screen is always 6+. - Always keep an eye on your batteries status (Smart & Extender). You don’t want to get caught with low battery while being far away! (Check the “Battery Status” section for more info). - Don't go zooming far or high until you feel comfortable with it. Remember that the farther away it is, the harder it will be to see what it’s doing. If you are new at flying this thing, try to always keep the front pointing away from you. That way forward will be away from you, left will be left, right will be right and finally backward will bring it back towards you. Last advices: Always stay in control and fly safely & responsibly! Page 13 Always be prepared for the Worst Besides hardware/software issues, it is YOU, the operator, who is responsible to ensure the system is functioning properly prior to take-off. So, if you did not follow the proper procedures before take-off (described in details earlier), YOU AND ONLY YOU might be the person to blame for any issue occurring while flying! Need to Know: If you’ve switched to Naza-M, enabled IOC and set your S1 switch bottom position to activate FAILSAFE, you have much more options available to recover if something bad happens. Need to Know: In some cases, if you did not or didn’t want to follow the previous Need to Know, your only options will be to either Do Nothing and hope for the best OR activate FAILSAFE by turning your Remote Control Off. Need to Know: When you activate FAILSAFE, either by using the S1 switch or turning off the Remote Control, always wait at least 3 sec before doing anything else (flip S1 out of FAILSAFE or turn the Remote back on), otherwise FAILSAVE is cancelled. Need to Do: It is highly recommended you do some "recovery" practices in a more controlled environment (meaning, you are not in "Panic Mode") before something bad happens. If you can eliminate the confusion of what’s going on when something happen then most of the time it becomes relatively “easy” to deal with. Try to initiate a Manual Failsafe, so you can understand what’s going to happen; same thing if you switch to Home Lock or Course Lock; do some flying/landing practice in ATTI mode so you know what to expect and so on. Feel free to do as much as you can. The better you get at reacting fast under pressure, the better chance you'll be able recover your aircraft intact or with minimum damages! This is a very expensive piece of machinery, so be prepared...for the worst! And always remember this simple rule: Don't trust anything, Test everything! A- Lost Orientation and/or Location 1- Radar Function Your best option when you can’t tell what direction the Phantom is heading (too far, bright sun…) or its current Location (lost Line of Sight), is to simply look at the Radar Function(bottom-left corner) on the DJI Vision Apps Camera screen. If it’s too small, just tap it to bring the Radar on the center of your screen (tap again to remove). Look at “DJI Vision Camera & Radar Function” section for more info. By default, the center of the radar indicated your recorded Home Point. Tap the center of the radar to switch the center to your mobile device’s current location. The Red Arrow indicates the Phantom current heading, direction and approximate distance from the center point. Playing with your Remote sticks and watching the way the aircraft moves on the radar screen might help you regain control of orientation or bring it back in sight. Need to Know: If your mobile device contains a compass, the top portion of the Radar is the direction you are pointing. If not, the radar will be oriented due north. Be careful because this can be misleading. 2- FPV If you know your surrounding very well (near, far and from an "Up in the air, point of view), you might be able to approximate where your aircraft is located or where it is heading just by looking at what’s displayed on your DJI Vision Apps Camera screen. Try to locate some known reference points (like a specific building,stadium,park,etc) to get an idea of where the aircraft might be. If you’re good at this and are using something much bigger than a simple smartphone screen…You could try to move around using only your screen as your guide I.e. flying in FPV or First Person View. Watch out for your aircraft surrounding if you can. Objects(obstacles) are always closer than you might think in FPV, especially for wide-angle. B- Lost Video/Telemetry Feeds If you’ve lost Video link but Telemetry feed is still working, the first thing you should do is take your hands off the sticks and wait for a moment. Sometimes the video link can stutter in and out. If this doesn’t work, try to exit out of the DJI Vision app all together then relaunch it. Page 14 If both Video and Telemetry are off, and your nose was pointing directly at or away from you when it happens, "turn" your phantoms nose left or right a little, even though you can't see it rotating, it is. The Phantom has greater FPV range with it's side facing you and your video/telemetry feeds may return. if nothing happens immediately then fly a little forward or backward, you may just be flying over a small patch of radio interference that once you pass-over the video may return. If still no success, check out the next section. C- Baby, Come Back You find yourself in one of the following situations: - Your Phantom has flown out of effective Extender Wi-Fi range or the signal has been blocked, meaning you’ve lost the “Second Channel - 2.4 GHZ” connection and - You got the “Phantom connection Lost” warning. - You lost Video/Telemetry feeds. And the steps from previous section didn’t work. - If for some reason, you cannot use the Radar Function (previously described) and - Have no idea where the Phantom is now located (lost Line of Sight). - You can't tell what direction it's heading. - Your battery is getting low. - Your phantom seems to be floating away or is not doing what you think it should be doing. - Any other reason you might think of… Now maybe a good time to bring your aircraft back, ASAP. Always give Extra Elevation before doing anything else. Even if you can't tell it's working. This will help avoiding obstacles on the way back. If you can’t see it, just assume it ascends at 6 meters a second. In 10 seconds, it should be 60 meters up. You can now go ahead and do one or more of the following: 1- You could try to get it back using your ability to maneuver the remote control sticks, BUT, if you can’t see where it’s heading or located, it’s going to be very difficult to bring it back safely and in one piece… How to regain orientation without IOC - bring your DJI Phantom back! Since Course Lock (CL) is dependant on Compass only to work and Home Lock (HL) is dependant on GPS&Compass to work correctly, the next options depend on whether you still have GPS signal or not. GPS signal is ok: 2- Flip the S2 down to HL (S1 must be on GPS) and pull down the Right Stick and keep it down till you get back Connection or have the Phantom in sight then Flip S2 to Off. Remember: Home Lock changes to Course Lock if your S1 switch is on ATTI, GPS signal is lost (less than 6 satellites) or not set. So be careful as you might think you’re in HL when in reality you’re in CL. Need to know: When the distance between the Phantom and the Home Point is less than 10m/33ft, HL(Home Lock) turns into CL(Course Lock), so either flip S2 to OFF before the 10m mark or know your Home Orientation direction. Otherwise you might get caught off guard as it might change direction when it reaches that 10m limit. OR 3- Flip the S1 down to FAILSAFE (Just turning off the Remote Control will accomplish the same thing) and wait for the Phantom to come back at Home Point(RTH). When in sight, take back control if you want (Flip S1 to ATTI, then to GPS). More details on Failsafe in the next section. Page 15 Need to Know: In FAILSAFE(3) mode, the aircraft speed is really slow and if you are low on battery it may be an issue, where HL(2) returns much faster. GPS signal is not ok: 2- If you’re not sure you still have GPS signal(no telemetry) but you remember your Home Orientation: flip the S2 switch to CL and maneuver the Right Stick till you get back Connection or have the Phantom in sight then Flip S2 to Off. Be sure you always keep in mind your initial Home Orientation when moving the sticks, otherwise you might get things worse. Tip: Position yourself facing in the same direction will help a lot. Besides option 1 (above), this may well be the “safest” option available to regain some control if you've lost GPS signal (HL won't work and failsafe will make it land straight down) and don't know where your aircraft is now located. Why? Maybe because you flew over water, a forest or a crowd, for example, in which case a straight down landing is not such a good idea. OR (if you really have no choice) 3- Flip the S1 down to FAILSAFE (Just turning off the Remote Control will accomplish the same thing), the Phantom will simply land straight down. In which case, you might need to use DJI Vision “Find my Phantom” function to try locating it or check out the “Recovering from a Flyaway” section. More details on Failsafe in the next section. D- Failsafe (RTH) You are flying and suddenly you get the “Control Signal Lost” warning followed by “Coming Home” (Meaning you’ve lost the “First Channel - 5.8Ghz” connection). You’ve entered the Failsafe mode. Phantom tail lights turned rapid Yellow flashing. Be sure to also check out the “Failsafe” section later in this guide, where you’ll find more detailed information on what’s really happening during a Failsafe. When will Failsafe activate? 1- The Remote Control is Powered off (maybe because of dead batteries) or you have flipped the S1 to the bottom position by mistake or intentionally. 2- The Phantom has flown out of effective Remote Control range (CE mode ~400 / FCC mode ~800m). 3- The signal between the Remote Control and the Phantom has been blocked. 4- There is interference causing a signal problem with the Remote Control. Need to know: if you flip S1 to Failsafe by mistake, you have less than 3 sec to cancel it by flipping it back up otherwise Failsafe is activated. When it activates, you have 2 choices: 1- Let the Phantom do is thing and land by itself: How it will land depends on GPS Status. - If GPS is still Active: The Phantom will either stay at current elevation OR raise up 20m/66ft (or to your manually set RTH altitude (see below)) above your pre-established (auto or manual) home point, whichever is highest, and then make a straight-line course back to your “Home Point” (Return to home (RTH)), pausing for about 15 sec before descending, land and power itself off. Need to know: If there are obstacles, buildings or trees in the way when flying at that elevation on Return to Home, the aircraft WILL hit them on its way back...! Need to know: With the latest DJI’s update, we now have the ability to change the default Return to Home altitude (20m/66ft) using the VISION app or the Assistant software. If you did not update, you won’t be able to adjust the Return to Home elevation height, unless you reset your Home Point. See the “IOC section” to learn how to manually reset the Home Point and why you would want to do that. The main reason being to effectively avoid crashing into obstacle higher than 20m/66ft in case failsafe is activated. - If GPS signal is Lost or not Active: Phantoms simply land straight down. It may be drifting during the descent and landing process (ATTI mode). I hope you’ve bought some spare props… Page 16 Need to Know: The Phantom cannot avoid obstacles during Failsafe. So it might be a good idea to try Regaining Control as soon as you can. Need to Know: In FAILSAFE mode, the aircraft speed is really slow and if you are low on battery it may be an issue! 2- Regain Control: This will depend on the position of the S1 switch (GPS or ATTI) when the Failsafe was triggered. S1 was on ATTI: You will get back control as soon as signal is recovered. S1 was on GPS: You WILL need to toggle the S1 switch to ATTI once to regain control. If the signal is recovered, you will get back control; switch S1 back to GPS. If you do not toggle the S1 switch, you won’t be able to control anything. Why? Because it’s the “Phantom’s Flight Control System” that controls your aircraft now and land it automatically (it will not exit the Failsafe mode by itself even if the signal is restored). So remember to switch S1 from GPS (top) to ATTI (center) then back to top position after you regain control. (The GPS > ATTI > GPS Flipping Sequences). Need to know: What will happen if you have manually reset the Home Point way up in the air and Failsafe activates; will it kill the motor when it reaches the Home Point and crash down? Not to worry! The Phantom will just slowly descend until it cannot descend anymore. Once it feels that the altitude is no longer changing for about 3-5 secs, it will turn off the motors. E- GPS Lost GPS ATTI You are flying in GPS mode (S1 in the upper position) and suddenly the Phantom starts drifting when you let go of the sticks OR you see the Rear Led suddenly slowly flashing Yellow. First thing to do is check the number of satellites on the DJI Vision Camera screen (top right corner). If there are less than 6 sat, you've lost GPS and are now flying in ATTI mode (Note: you won’t get any warning from the DJI Vision App). You WILL have control but it will be a bit harder to fly/land because of the drifting. It’s always a good idea to keep an eye on the number of satellites when flying. Especially if that number changes rapidly over a short period of time meaning, maybe, you have an unstable GPS signal. GPS Lost maybe cause by several factors, like: - You’ve decided to take off even though satellites signal were unstable or merely got 6 satellites. - Flying under or near something that may have blocked the “Line of Sight” between the GPS Module and Satellites: Trees, Buildings… - GPS system might be damaged (after a crash, a hard landing) Best thing to do is to try to stabilize as much as you can and see if you can regain GPS (moving up a bit might also help) OR learn how to fly in ATTI mode...very, very fast. So now might be a good idea to do some ATTI flying\landing practice, just to be prepared for this kind of situation. Need to Know: When GPS is lost, Flipping S2 to H/L won't work because H/L, just like FAILSAFE/RTH, is dependant on having enough satellites to properly triangulate. Flipping S1 to Failsafe will caused it to land straight down; in which case you will have 3 things to remember : obstacle, obstacle and obstacle. On the other hand, if GPS was ok (6+ sat) and the Phantom is still drifting away: Check out the Flyaway section. Page 17 F- Flyaway. The worst nightmare of all pilots...! A flyaway is a scenario where the Phantom pilot will suddenly lose control of the Phantom during a flight resulting in lost or damaged units. If your Phantom starts flying away ignoring your input, try these steps, only progressing if no success: Need to Know: If you lose GPS while flying, the Phantom will enter ATTI mode and MAY get blown away (drifting in the direction it was flying before losing GPS). This is not a Flyaway, it is normal. Just follow the instructions in the GPS Lost section. 1- Immediately switch from GPS to ATTI mode by putting S1 in the middle position. You will be flying without GPS. Meaning the Phantom will not automatically hold its horizontal position and without position hold it will drift. Home Lock(HL) will not work since Home Lock changes to Course Lock if your S1 switch is in ATTI. If the Phantom seems to respond in ATTI mode and you have some control, manually increase altitude quickly to avoid obstacles and try to bring it back. From time to time, retry GPS mode (S1 Up) to see if you have regained control in GPS mode. If the Phantom is out of sight and you are unable to use FPV (DJI Vision Camera feeds has stopped) you won't be able to fly it in ATTI mode (you’ll be blind as a bat), go to step 2. 2- Initiate the FAILSAFE by putting S1 in the down position or by turning off the Remote Control. If GPS is lost, the Phantom automatically switches to ATTI mode. It will attempt to land slowly wherever it is (possibly land in a tree or crash into whatever the wind blows it into). BUT a soft landing is better than a drop. If it has GPS or regains GPS, it may fly home. In which case you might be able to get back control by flipping S1 to ATTI, then to GPS. 3- Send the CSC to kill the motors. You’d rather have a crash landing than a lost Phantom. Very last resort. If it's out of sight this will prevent it from getting further away but if it's out of sight you will not know if Step 2 was effective so be very careful with this one. You should try ATTItude mode before Failsafe, as several people have had no luck with Failsafe even with good satellites connection. If the Failsafe does not work, kill the motors before the Phantom goes out of range. It is unlikely you will be able to search several square miles and find your Phantom when it goes in a changing direction at full throttle. Be sure to read the “How to avoid flyaway / Recover from a flyaway” sections. G- Vortex Ring State (VRS) (Text by damoncooper) If you are a new Phantom pilot and don't know what VRS is or how to avoid it, you may risk losing your investment to a mysterious type of crash that will appear like your quad just dropped from the sky for no good reason. Wind speed and direction, stick inputs (rapid yaw has been implicated on multiple occasions) and a host of other factors make VRS a possibility. The results are frequently a crash or loss, especially if flying long distance or over water. If you want to know more about VRS mechanics: Settling with Power. I think it's critical that pilots (new and old alike) be able to recognize the early signs of VRS and have a VRS "escape plan" they are prepared to execute immediately. Be sure you watch: - Quadcopter "Wobble of Death": VRS Recovery and Avoidance and - How to avoid/recover from Vortex Ring State. Recognizing VRS VRS (Vortex Ring State) is most often caused by descending straight down too quickly. If flying line of sight, it can look like a "wobble" or oscillations around one or more axis. On FPV, the signs are usually the landing gear oscillating in and out of view and/or uncontrolled yaw movements. The first signs can quickly be following by a rapid uncontrolled descent/drop from the sky. Escaping VRS Page 18 At the first signs of VRS something like the following make a good escape plan: 1) Release throttle. 2) Push Forward or Sideway at full thrust to get clean air and try to "punch out" of the vortex. If possible, punch out into or across the wind (upwind or crosswind). 3) Flip to ATTI mode. 4) If uncontrolled yaw/rotation is occurring, apply opposite yaw to stabilize heading. Avoiding VRS Of course, none of this guarantees you WILL escape VRS, so it's highly preferred to avoid VRS altogether if possible. Tips I've gathered from extensive reading on this topic as well as my own sad experience include: 1) Don't fly when wind speed is >13-17mph. DJI is explicit about this in the manual. Beaufort scale 4 for those of you who prefer that sort of thing. Remember that winds aloft can differ greatly from wind speed on the ground. A quick flip to ATTI mode aloft and observing drift or observing the OSD horizon line in GPS mode can help gauge wind speed and direction at your flight altitude. 2) Limit your "straight down" descent speed. 3) Never descend straight down, especially if coming down fast. Maintain lateral movement when descending to keep the quad in "clean air" (zig zag, side-to-side, circle, etc).. Always descend at an angle (preferably into the wind) - Fly forward and down OR while flying a circle - Circling down in small spirals. 4) Avoid fast yaw movements where possible and avoid fast yaw combined with descent. You can enter your own prop wash and provide the conditions for VRS. 5) There have been many reports of users with prop guards and heavily laden quads encountering VRS. Many observers appear to agree that using prop guards appears to increase the chances of invoking VRS. H- Low Battery The Phantom has two levels of battery warnings: Low Battery Level Warning and Critical Battery Level Warning. The battery warning level is no longer set by battery level. It's now controlled by estimated flight time remaining. The thresholds for these warnings are automatically determined based on the current aircraft altitude and its distance from Home Point. The yellow and red zones will grow or shrink depending on how far away your phantom is from home point. Yellow is low battery warning, red is RTH. If you enabled “Low Battery Auto Go Home” (using either the DJI Phantom Assistant or DJI Vision App) and the battery level reaches the Low Battery Level Warning, a message will appear on the DJI Vision app screen. Tap “Go Home” to have the aircraft return to the Home Point(RTH) and land automatically, or “Cancel” to resume normal flight (be sure to land it manually, ASAP). If, after 10 seconds, no action is taken, the aircraft will automatically go home and land. Personally, I have it disabled because RTH flies very slowly and odds are it may not make it back anyway. Home lock and full back on the stick is much faster. Be sure you always keep an eye on your battery status, if you disabled it. When the battery level reaches a Critical Battery Level Warning, the DJI Vision app screen will flash red and the aircraft will automatically land straight down and power off the motors after landing. You may be able to keep it aloft by applying some throttle to manoeuvre to a safer area, but at that point you are flying on borrowed time - you can't really know how quickly the battery will die. If the Phantom happens to be fighting the wind, it could be much quicker than you think. And when the battery is exhausted…well you know what’s gonna happen! With the new firmware: the Phantom has maximum descent speed set to 0.6m/s when the aircraft’s altitude is less than 10m and descending automatically (for example in failsafe mode). The maximum speed of descent remains 2m/s in other flight conditions (DJI way to try minimizing VRS). If you are way up in the air, you might find this painfully(read stressfully) slow... So plan ahead. Remember to always keep an eye on your battery status versus your current aircraft location. Know when it's time to come back safely. Personally, when I'm near 30%, I make sure I'm close to my Landing Location. Better safe than sorry! Need to Know: Avoid Over Flying your Battery. Over flying battery times can damage battery cell and life expectancy. It is recommended to bring your aircraft on the ground when battery level is around 30%. Be sure to check the “Battery Status” Section. Page 19 Landing (What? You are still in the air…You’re Goodddd) Need to Know: Pay particular attention to the Vortex Ring State (VRS) while descending (discussed earlier). - To land, hover over a level surface and gently pull down on the throttle gently to descend. To minimize flip over (especially if it’s windy), try to avoid unnecessary Forward, Backward and Lateral movement when landing. If it’s really too windy, you may want to hand catch the phantom, but please know what you're doing and be very CAREFUL; you could get hurt. - After landing, execute the CSC command or hold the throttle at its lowest position for 3 seconds or more until the motors stop. - Don’t forget to stop recording after you land (wait for the recording to stop before shutting down) - Shut Down the equipment in the following sequential order: (Be sure you watch: ON and OFF-The Proper Procedure) a. Phantom Smart Battery then Remove the Battery (just in case you think it’s Off, while it’s Not…) b. Remote Control c. Range Extender - Before moving/storing away the Phantom: Re-Attach Gimbal Clamp and Camera Lens Cap. Need to Know: Sometimes, it can be hard to pull out the battery (humidity/temperature/slippery fingers...). So I recommend you put the Gimbal Clamp back on before trying to remove the battery to help protect your "very expensive" Gimbal from flopping around when trying to take off that d... battery. Watch this first: Easy & Hard Ways To Remove The LiPo Battery and if you’re still having a hard time removing the battery, someone suggested putting a bit of grease to ease up battery removal, have a look: How to solve stiff/sticking battery. Remember: you have to protect your Gimbal (meaning: treat it with respect), otherwise you'll have issues with it. You may breathe now Page 20 Side Notes - It is recommended to redo the pre-flight inspection again after your last flight of the day just to make sure you'll be ok for your next one. You wouldn't want to drive all the way up to your favorite flying location (1-2 hours away) just to find out something broke during your last flight and...spare parts are back home or you just need to tight up a few screws but...didn't bring a screwdriver. - Take proper care of your battery. Let your battery cool down before charging. For storage of more than a few days, leave them at 40-50% charge; to get that %, you’ll need to recharge until the third led just start to flash (meaning both Led 1 and 2 will turn On if you press the power button once). For more detail about LiPo (Lithium Polymer) battery care, search the Net or have a look at DJI "Smart" Lipo battery - Intro, Pros & Cons, Safety and Storage tips and RC LiPo Battery Storage and this Lipo Storage Tips PDF document. Additionally, except when preparing for flight and (obviously) when flying, do not keep the battery in the Phantom. The spring loaded data contacts will retain their resilience longer if not always compressed. Need to Know: Always store or charge your battery in a suitable container: a metal case or a case/bag made especially for Lipo Batteries. Be sure to read the “Lipo Battery – Safety Advisory Notice” section. With this kind of battery there is a risk of fire or explosion if safety practices are ignored! - Information from a DJI Rep regarding the new battery update: 1. Old batteries can be upgraded to v2.6. There is certain possibility of failure during upgrade for these batteries with loader of 1.3 or firmware of 1.6. The possibility is low but we don’t support these two versions of batteries to eliminate the potential problem. If these users have already successfully upgraded to the v2.6, it’s totally fine. They will have the same feature and functions as others who can upgrade to v2.6. 2. It is true that the “auto-discharge” function will activate automatically after 10 days of storage, given the condition that the battery does NOT operate during this period. This means even if you press the power button of the battery once, the battery will re-clock the time for 10 days. The battery will auto-discharge to 3.88V, corresponding to ~60% SOC. If cells in the battery are already below 3.88V, the auto-discharge will NOT activate. It turns off into deep sleep mode afterwards. If the battery is fully charged, the auto-discharge process will take around 2 days. The user will not notice the whole process cause the battery LEDs will not light up. 3. If the batteries fail with imbalanced cells or electrodes of certain cell detached from the pack, a warning notion will pop out on the camera screen. In the log of the battery, the user can also browse the warning history during the previous use. - Avoid Over Flying your battery. Over flying battery times can damage battery cell and life expectancy. It is recommended to bring your aircraft on the ground when battery level is around 30%. - Flickering when recording video may be caused by the props creating shadows or stripes. If the sun is not at an angle to come down through the props, then this won’t happen. Flying with the sun high in the sky is the worst. Early morning or late evening is the best. A little electrical tape to shield the lens often helps or search the Net for Vision lens hood. - If you forget to stop recording video before turning off the phantom, and subsequently find that the video won't play on your pc, put the SD card back into the slot and power on the craft again. Leave it for about 60 seconds to finalize, then power down. You should be able to watch the video, but may lose a few seconds off the end. Need to Know: This will NOT work every time. I've lost some very good footage because of this. Lesson learned! Note: Apparently someone wrote an application (Mac/PC) for Repairing Corrupt Phantom 2 Vision+ Video Files. (I haven’t tried it yet). - Water Crash (you didn’t read the “Flight Environment Requirements” section, right?): - If you dunk your Phantom in sea water, try these steps (as suggested by singapore_phantom). Otherwise throw it away; little apart from the plastic is worth saving. 1. Remove Battery, Shell, and Camera ASAP. 2. Submerge it fully in fresh water (preferably distilled) for a minute. Sway it back and forth while in the water and turn it over a few times. 3. Submerge in a container filled with rubbing alcohol for a short while. Again, sway it back and forth while in the alcohol and turn it over a few times. 4. Blow out with compressed air. 5. Put everything in a sealed container and cover with uncooked rice. Leave it there for a few days. Shaking the container gently every so often is good. Once done, use an air pump to eliminate the rice grains and rice fragments from the craft. 6. Reassemble, install new battery and try to turn it back on. - If you dunk your Phantom in fresh water, get it out as quickly as possible and take it apart. Use a hair drier liberally and then put everything in a sealed container and cover it in uncooked rice. Leave it there for a few days before attempting to turn it back on. Good Luck! Page 21 If you really, really want to fly over/near water, maybe you should consider buying a “ better safe than sorry” device like the “GetterBack”. Have a look here How To Recover Dji Phantom After Crash Landing In Water? and here Dji Phantom Water Recovery GetterBack, - Beware: The Gimbal System on the Vision+ is ridiculously fragile!! The camera does a fantastic job of stills and video. However, the first hard landing you have or collision with an object, consider the gimbal system and camera toast. It won't stabilize after that and the gimbal doesn't know how to stabilize itself after that, looking like it is having a constant spasm. At that point, the camera becomes unusable. Before giving up and go buy another ($$$) whole assembly, watch this DJI Phantom 2 Vision+ Gimbal repair or this Phantom 2 Vision Plus camera repair and solution. - So, if you want to add some extra protection to your Gimbal/Camera, you might be interested in something like: - Camera Guard (reviewed here: DJI Phantom Camera Guard Demonstration ) - Plexiglass Drone Safety Guard - Original PHANTOM FIX (reviewed here: Gimbal ribbon cable protector for DJI Vision+) - Inertia Guard - Camera Cable Top & Bottom Guard For DJI Phantom 2 Vision Plus - If you’re looking for a nice tracking device, have a look at the Marco Polo Tracking System / RC Model Tracking. - If you want to remove the Fish-Eye effect on your videos, look no further than Prodrenalin. It’s excellent! - It might be a good idea to keep some kind of a log book to keep track of flight performance and conditions, flight times, issues, battery use and photographs/videos, etc. - Remember, this is NOT a toy. So unless you are an expert or have a lot of flying experience, if you don’t get nervous flying this thing: DO NOT FLY. You will make a mistake, hit something/someone or crash it. Even though I have many hours of flight time, my hands are always swelling when I fly near obstacles…but that’s me. You forget something, one little thing, and BANG…you crash into a tree, a house, someone. This is a very expensive piece of machinery so know what you are doing and when/how to do it. AND always be prepared for the worst. This is my own personal advice to you. Take it or Crash it. Page 22 Led Status (Phantom, RC & Extender) Phantom Front/Rear Led Page 23 Remote Control Power Indicator Range Extender Page 24 Phantom/Naza-M (NAZA mode LED light signals - what's the difference?) If the Warm Up waiting is longer that 2 minutes (Green/Yellow Flashing), power off for 10 minutes, cold start, and then connect the assistant software, Enter the “Tools” -> IMU calibration, carry out the Advanced calibration. Page 25 Battery Status (RC & Extender & Smart) Remote Control (old/new) Range Extender Smart Battery Page 26 Page 27 Compass Calibration Compass Calibration is very important; otherwise the flight control system will not work properly. The compass is very sensitive to electromagnetic interference, which can cause abnormal compass data leading to poor flight performance or even flight failure. Regular calibration is required for optimum performance. When to Recalibrate: - After any firmware/software update - After a crash (minor or major) - Flying in different location to last flight (far away) - When drifting occurs in flight, i.e. Phantom does not fly in straight lines. - When hovering, Phantom wants to fly in a circular pattern (Toilet bowl effect-TBE) - When compass data is abnormal, the rear LED flight indicator will blink Red and Yellow (See “Led Status” section). - Something magnetic (screw driver with magnetic tip, speaker, magnet …) got close to your compass/aircraft. - Mechanical structure of the Phantom has changed, i.e. changed mounting position of the compass. - If compass calibration is needed before flight, a prompt will appear on the DJI Vision app’s camera page. Need to Know: You do not have to calibrate your compass before every flight (meaning: don’t become compass calibration crazy); this is not necessary and may actually increase your chance of having a problem. You don't want to risk introducing any issues that weren't there before by recalibrating too often. DJI recommend recalibrating only when moving far away from last flight point. - Do the Calibration in a WIDE open space. Not in your house, your garage, near your car… - DO NOT carry ferro-magnetic materials with you during calibration such as keys or cellular phones. - DO NOT calibrate in areas that could have high magnetic EMI interference such as areas that are close to power lines, cell phone towers, parking structures, reinforced concrete or steel reinforcements underground. - DO NOT calibrate beside massive metal objects (cars, buildings, fences, buried pipes & cables, etc). Note: Compass Calibration can now also be initiated from DJI Vision - Settings page instead of using the S1 Switch. Here are some interesting videos to watch and learn from: - Dji Phantom 2 Compass Calibration Procedure - DJI Phantom Tutorial - Easily calibrate the compass - DJI Phantom 2, Vision, Plus: Compass Calibration. How to, where to and some of the why... Need to Know: (Quote from srandall25) Sometimes the compass can get out of calibration to the point that even the assistant software cannot calibrate the compass (it’s probably magnetized and you need to degauss it). If that’s the case, a manual intervention with a physical magnet is necessary to bring the compass back into range that the assistant software can deal with. This video: DJI Phantom Resetting the Compass when Calibration fails or this one: Compass Calibration Fix does describe in detail how to fix this. Page 28 Take Good Care of your Compass According to DJI one possible cause of a fly-away is a conflict between Compass & GPS data as a result of an improper compass calibration. It's been theorized that the conflict generates an error which accumulates until the Autopilot attempts to reorient and/or reposition the aircraft towards the erroneous "correct direction" or "correct position" resulting in the now infamous spin-out or fly-away. The Compass reads geomagnetic information and assists the GPS (Global Position System) to accurately calculate the position and height of the aircraft. The following discussion will describe in more detail the “intimate” relation between the Compass and the GPS module. This should convince you to make sure you calibrate your Compass and take good care of it by not flying in areas where the surrounding might affect its accuracy. Panamon Creel wrote: The compass identifies the nose position along the vertical axis in reference to earth’s magnetic field and it is needed for the controller to hold position and to fly to waypoints in conjunction with the GPS data since the GPS data alone cannot identify the nose position. E.g. Multirotor with good compass calibration is on position hold in the air, Nose position is North, GPS data shows the unit moved to the South, controller will rev up the rear two rotors to correct the unit forward, unit moves forward back to its original position, controller happy. Lets say the compass is now out of calibration it and says the nose is pointing north but in fact it is pointing more towards the West, again the GPS data says that the unit moved out of position to the South, controller thinks that the nose is pointing North therefore revs the rear two props up, since the nose is actually pointing west the unit will now move to the west, controller will see the GPS data out of position to the west thus will fire up the left props to move to the east, but in fact will move to the North,... the story goes on and on causing the unit to circle around the point it is supposed to be at. Cahutch replied: I found this explanation of the compass function in position hold very enlightening. If the compass is out of calibration in GPS mode, it can cause the Phantom to circle a point in position hold, or if you try to fly it in any direction, it can cause the Phantom to veer off wildly in a random direction. This happened to me once when I accidentally screwed up my compass and it flew off very fast at a high angle and crashed into the street. Unfortunately at the time I didn't know to try switching to ATTI mode to regain control. In ATTI mode it may still use the compass for orientation hold, but if your compass is out of whack, it won't try to thrust in the wrong direction to correct its position. This is probably responsible for many flyaways. If the Phantom is trying stay at a specific position, but is revving up the wrong motors to correct, it will move further and further out of position accelerating away from where it's trying to get back to. The pilot is unable to correct it in GPS mode because the phantom doesn't know it's pointed in the wrong direction. When you give control input in GPS mode you change the GPS coordinates it's attempting to stay at but the original problem is still there so it just continues to fly off in the wrong direction. So many lost or crashed Phantoms all because of a bad compass calibration. And switching to ATTI mode as soon as the problem started might have saved them. Page 29 How to avoid Flyaway A flyaway is a scenario where the Phantom pilot will suddenly lose control of the Phantom during a flight resulting in lost or damaged units. (Quote from Visioneer) “Every new technology must have a boogey-man, and for the Phantoms it's "flyaway". The classic flyaway is described as follows, "I did everything right, and was having a great flight. Then it started acting hinky and I couldn't get it to respond. I tried everything I could think of, and finally switched off the transmitter to activate RTH ... but it just flew off to who knows where". There is much discussion on the cause of flyaway and there's a multitude who blame design faults. There are probably also as many folks who don't buy the design flaw theory and suspect pilot error of some kind, generally in the set up or pre-flight routine. DJI has tweaked the firmware to mitigate some types of interference issues, but the problem is there's been no real study of the failed craft (most are not recovered) so no one really KNOWS what the cause(s) may be. The best (only useful?) advice to date is to make sure you have loaded the best firmware (transmitter and Phantom), follow the pre-flight routine religiously, avoid flying in areas with potential electromagnetic interference, let the Phantom hover a few feet off the ground for several minutes at the beginning of each flight, and watch closely for the loss of GPS lock or any unexpected behaviour (e.g., doing its own thing or not doing what it's told). In the case of any unexpected behaviour, get her down now and start over.” Be sure you watch: How to avoid DJI Phantom Fly-Away and DJI Phantom "Flyaways" - Simon's take on the subject or this DJI Phantom 2 - How-To Avoid Flyaways, Update There are basically 3 main things you need to perform before taking off: 1. Calibrate Your Compass You should always remember to calibrate your compass. DJI will never really know where every Phantom will land in the world, as they shipped to different countries. As you would expect, there are different declinations of Magnetic North around the world. So it is important to calibrate the compass when you first get your DJI Phantom. This process will tell the Phantom exactly where it is in the world. See the “Compass Calibration” Section for details. How to tell if your DJI Phantom needs calibration? 1. The Phantom wants to fly in a circular pattern. For example, if you fly forward and stop but the Phantom then starts to fly in a circle and looks like its looking for an area to stop. It’s time to calibrate 2. If you fly forward but the Phantom flies to the left and if you fly back and it flies to the right. This indicates that the GPS and compass of the DJI Phantom is conflicting with each other. Time to calibrate. 2. Set Home Point Before you take off, be patient and allow the DJI Phantom to find and mark its home point. It needs time to identify satellites in the sky to pinpoints its location. Don’t just plug in the battery and take off. Let it sit on the ground – up to 2 minutes and make sure you see blinking green light for at least 10 to 15 seconds. This tells you that it has successfully received signals from GPS satellites. The DJI Phantom needs a minimum of 6 to 8 satellites detected for a minimum of 10 seconds before it can really marked its home point. When the DJI Phantom flashes rapid green lights after take off, you know that it has marked its home position. 3. Watch out for EMI Be aware of any possible high electromagnetic interference in your location. Before taking off check and look out for high power lines and cell phone towers near you, avoid these at all cost. If something is transmitting a similar frequency (2.4Ghz/5.8Ghz) as your controller and has a higher signal. It will take over the DJI Phantom controls resulting in possible Flyaway. Remember to update your Phantom firmware to the latest version as the software developers at DJI are constantly looking for better ways to provide you with an enjoyable and safe flying experience. Final point is exercise good judgment and common sense. If you notice your Phantom is doing weird things, just be cautious and land as soon as possible. Better be safe than sorry. Page 30 Recovering from a Flyaway (Text from BenDronePilot) So you're flying your Phantom on a nice or not so nice day. Enjoying your flight and suddenly the worst happens. It begins to do things it's not supposed to do and or takes off on its own. Following these helpful tips should set you straight. 1) Take a deep breath 2) Don't panic 3) If it begins to fly away you can panic now. (just kidding) please refer back to steps one and two. 4) If you have Naza-M enabled and your bird begins flying erratically that could be a GPS lock and or a compass problem. Switch to ATTI mode to help stabilize your plane and bring it back IMMEDIATELY to land. 5) When flying, if you see your bird behaving in any other way that feels out of the "norm" for you then immediately fly your bird back, if you have control or land it wherever you can in a safe place and walk to it. 6) Your Phantom will keep a log of its last known GPS position as long as you have stable Wi-Fi. Keep the Wi-Fi range extender pointed as directly as possible towards your Phantom to maintain Wi-Fi and thus GPS location within the DJI app. Also make sure your Remote Control antenna is pointed straight up and not sideways as seen in many people videos. 7) Reference how much battery life is remaining before the crash so you can have an idea of how far it may travel should it be in the process of flying away from you. Also note the Radar screen of where its current position is relative to you, should you not have an actual Visual of your Phantom. Again making sure to try to keep your Wi-Fi range extender pointing in its direction to maintain connection as long as possible. 8) Flip S1 switch down to FAILSAFE or turn off Remote Control at last resort to activate the failsafe return to home function. Keep in mind that if you're below 20m/66ft when hitting Failsafe, the Phantom will climb up to 20m/66ft, so it there are obstacles (higher than 20m/66ft) between you and your Phantom then your Phantom WILL run into said obstacles as by default it flies in a straight line above the home position before descending. That’s why it’s always a good idea to climb up (if possible) before hitting the Failsafe. Your bird is on the ground now. Steps for recovering a downed Phantom once you believe it's on the ground. It is of vital importance you begin your search IMMEDIATELY to take advantage of certain features of your Phantom that you can use as a means to locate it. 1) If you had a Visual of your Phantom as it reached the ground run to it immediately. 2) If you didn't have visual range but had a Wi-Fi connection, refer to the last known position using either the “Radar Screen” or “Find my Phantom” within the DJI app and go to that location as a starting point for your search. 3) Call some friends to help you search. 4) Provided you've not lost power to the Vision Camera in your fly away or crash event, you can take advantage of the Visions Wi-Fi connection as a means to track it from greater distance. It would also have been helpful if the vision's WiFi itself wasn't hidden as it would make this process a bit easier. But what you will do is circle the perimeter of the last known location and cycle the power on the Wi-Fi repeater from time to time, then try to make a connection to your Phantom. Keep doing this at set intervals and with the Wi-Fi repeater antenna pointing in different directions. Wait about 30 seconds to a minute after each power up and then try to connect with your smart phone. If you make the connection it's a simple matter to find your Phantom by using the Find you Phantom function in the app. 5) Continue searching in a grid pattern, fanning out if you have more than one person looking. You should be constantly trying to regain a Wi-Fi connection as you do this. Also ask any bystanders if they saw your Phantom flying and or landing anywhere. Page 31 Naza-M and IOC: Why and How This is one (if not) the best description of Naza-M and IOC. Source: http://www.pattayadays.com/2014/03/naza-mode-on-the-phantom-2-vision/ The Phantom 2 Vision is a fine machine. But the documentation can be sparse in places, and hard to track down. Consequently there is a feature of the machine which you may never have heard about, but which gives you so many more flying options; or you may have heard about it but can either not find out how to enable it, or are keeping away because DJI tells you it is for advanced fliers only. Nonsense; it’s called the Naza-M and your flights will be more pleasurable and safer if you have it enabled. First I will tell you what it does; then if you like the sound of what it can do, I will tell you how to enable it. By default your Phantom is set in Vision 2 mode. In this mode, the two shiny switches on top of the transmitter serve no purpose (apart from the right hand one which you frantically toggle as if attempting to bring it to orgasm in order to initiate the compass calibration mode). So when you fly, it doesn’t matter what position the switches are in. In Naza-M, these 3 position switches offer a number of functions; with “normal” flight being achieved with both switched in the up position. And this is why DJI says that this mode is not for beginners; because apparently beginners are not capable of checking that the switches are up before flying. Assuming you have the intellect to ensure that the switches are in the upright position before flying, then Naza-M may be for you. So, switches up and start to fly, and the Phantom will fly exactly the same in Naza-M as it did in Vision/Phantom mode. Now let’s play with the switches, starting with right hand side (S1). In the default top position you are flying in GPS mode, meaning that the Phantom will attempt to maintain the same position in space when you take your hands off the stick. Move the switch to the middle position and you are now flying in Attitude mode, or Atti for short (or A if you are really trying to abbreviate to the maximum [or max, or M]). In this mode, your Phantom will attempt to maintain height and direction by means of the barometer and compass; but GPS is switched off; so your craft will drift with the wind (if there is no wind at all, you probably won’t notice any difference). Why would you want to use this? Maybe you have been flying upwind. For an easy return, flip it into Attitude mode and let it drift back to you. Wind direction permitting, it can also be useful for smooth video. Fly upwind, start your video, and then turn on Attitude mode and let the video run as your Phantom is born along on the wind. The bottom position of S1 initiates the Failsafe/Return to Home (RTH) procedure; whereby your Phantom climbs to 20 metres if it is lower than that, flies back to the starting point and then gently lands at your feet to the applause of admiring onlookers. Normally, Failsafe triggers on when you have lost contact with your Phantom; but there are times when you may want to initiate it even though you have a connection. The first is to impress those onlookers (I have been guilty of that); and the second maybe when you have had enough flying and just want to let your Phantom come home on its own. The problem is that in Phantom mode, the only way you can trigger Failsafe is to turn off the transmitter. This is all well and good if your Phantom does then return to home and land; but if it decides to bugger off instead, there is nothing you can do to reconnect; and you will left looking like a fool in front of an expectant crowd. In Naza-M, the bottom position of S1 will initiate Failsafe/RTH, but you can regain control by flicking up the switch at any time. Much better. On the left we can find S2, home of the Intelligent Orientation Control (IOC) functions. In the up position (or in Vision 2 mode), IOC is off. And there you are, your Phantom a zillion metres high and a zillion metres away; and you want to bring it home. To do that, you need to know where the front of the craft is pointed so you can bring it back towards you. Unfortunately, given the shape of the thing, it can be impossible to know which is the front just by looking at it, especially from a zillion metres away. So you have to squint at the display on the phone to work out orientation (assuming you haven’t lost WiFi contact) and then mentally calculate which stick to throw to bring it back; by which time the batteries have died and it has landed in a swamp. Hello S2! Flick the switch to the bottom position and you are now in Home Lock mode. Then pull back on the right hand stick and the Phantom will return to its starting point, irrespective of the direction in which it is pointed. I find this massively useful. Whenever I have finished with a flight, I turn on Home Lock and just bring it home; so easy. Page 32 The middle position is less obviously useful. It’s called Course Lock and when it is enabled, the Phantom will respond to the sticks as if it is aligned in the direction it was facing at time of take off. So if your Phantom was facing East when you took off and is now pointing North, pushing the right stick forward will send it north. Flick onto Course Lock and pushing the stick will send it East. Still, access to Atti, Failsafe, Course Lock and Home Lock modes is worth having, so How do you switch to Naza-M? Connect your Phantom to your computer and turn it on. Start up the Assistant software and on the top right hand side you will see a button set to “Phantom”. Click on it to change to Naza-M: read and understand the warning then proceed. Next, as you flick S1 you will see the options change in the control mode switch. In the down position you will see you have selectable choices. Page 33 Make sure you have selected Failsafe; which triggers the Return to Home mode. Another option is Manual, which removes all the limits of the flight system and allows advanced pilots to perform rolls and other aerobatics, and pilots like me to convert my Phantom to a pile of plastic in a couple of seconds. Unless you’re a very experienced flyer, you probably don’t want to try Manual mode. Need to Know: After switching to Naza-M, you must also activate IOC. Select the ADVANCED tab and place a checkmark in the IOC box. Without this step, the S2 switch won’t do squat. Turn off the Assistant software and turn off and disconnect the Phantom. You are now all set to use Naza-M. Just remember to check your switch positions before turning on your Phantom (S1 and S2 must be on TOP position). Look under the “What to do Before your First Flight OR After any Software/Firmware Update OR After a Crash” section for some nice tutorials on how to turn Naza-M /IOC on and to what expect when they are on. Also be sure to read the “Know your S1/S2 switches” section. Page 34 Failsafe Manual Failsafe (Always give extra elevation before you hit Failsafe!!!) Switch S1 into the bottom "Failsafe" position (Just turning off the Remote Control will accomplish the same thing). Phantoms tail lights turned rapid Yellow flashing followed by it ascending to 20m/66 feet or to your manually set RTH altitude (If its height is higher than that, it will stay at that height), flying over its original "Home Point”(RTH), pausing a bit before descending (~15 sec). If Needed: before allowing it to land put S1 switch into the center position(ATTI) to regain control followed by switching S1 to the top position for "GPS" mode. Need to know: With the latest DJI’s update, we now have the ability to change the default Return to Home(RTH) altitude (20m/66ft) using the VISION app or the Assistant software. Page 35 This was taken from the Naza-M Guide. It gives a more detailed description of Failsafe Page 36 IOC Flight - Course Lock & Home Lock Page 37 Page 38 Recap: It’s possible to manually change the Home Point and Course Lock direction after take off and while in flight. Course Lock Direction reset is S2 Top-Middle-Top 3-5 times; Home Point reset is S2 Middle-Bottom-Middle 3-5 times. Make sure you do not cycle through all three positions (Top through Bottom). Doing all three positions may result in the resetting of both CL and HP. Obviously, if you want to manually set a new Home Point, you need to turn off Dynamic Home Point (see below). Real Life example on why a manual Home Point reset might be useful I set a new home position 30m away and 30m high. I initiated Failsafe and the model climbed to 50m and went to the new home location. I will say that it's a bit tricky to set the point, the switch flipping needs to be just right and it's helpful to be able to see the status lights flicker or make sure you do the switch flipping until the distance changes to zero (Radar Function). I tested this to help a guy flying in a golf course around very high trees. He walked under a tree, lost signal, triggered Failsafe, model flew into a tree. Using this method you could set a home point location high above the fairway. If the model then triggers Failsafe, it would climb above all trees, fly over the clear area and land in the fairway, or descend until he could regain control. News to know: With the latest DJI’s update, we now have the ability to change the default Return to Home(RTH) altitude (20m/66ft) using the VISION app or the Assistant software. So there’s no need to manually reset the Home Point way up in the air if your goal is to avoid high obstacles in case Failsafe is triggered; just change your RTH altitude. News to Know: With the latest DJI updates, it is now possible to activate a Dynamic Home Point function. When using a GPS-enabled mobile device and activate the Dynamic Home Point from the VISION app, the Home Point will automatically be reset to the location of the device every 2 seconds during flight. Dynamic Home Point is useful in situations when you are in motion (on a boat, for example) and require a Home Point that is different from the takeoff point. Note: Home Orientation at the point of take off will remain as the reference point. Page 39 Flight Limits (Check User Guide for more info) Page 40 Ground Station You must have the latest Firmware & DJI Vision apps AND have the Ground Station Enabled in Settings to be able to use it. Page 41 Page 42 Page 43 (Text mainly from Bob Asbury) - You have to program the altitudes as you plan your mission and you MUST always be mindful of obstacles and altitudes between waypoints. The aircraft will fly from the ground to the first waypoint (or between waypoints) altitude gradually. I have found that the easiest way to avoid trouble is to make the first waypoint very close to me and very high. If your first waypoint is at 100' altitude and 100' away, you must understand that when you are 50 feet away, your Phantom will only be about 50 feet high, because it moves in a straight line (more or less) from one waypoint to another. Imagine a wire stretched between the waypoints that you have added. If there is a tree or a building on that travel route, the aircraft WILL hit it. So if there is a 90 foot tree at midpoint of your flight to that 100' waypoint, you'll hit it. So the wise pilot will create a waypoint that is BEFORE the tree, and high enough to clear it. THEN make your second waypoint at that 100' point, or wherever your ultimate object is. - You can take back control of the Phantom during a GS mission. You just flip the S1 switch down one click (ATTI) and then back up (GPS) once you regain control. Same steps if the GS app crashes mid-flight. - During a GS mission, you can PAUSE the mission. The Phantom will hover in place. Then, you can move the camera, but you cannot control the Phantom's movement. Simply tap GO to continue your mission. If you used the S1 switch to take back control (instead of using the PAUSE button), you cannot RESUME the GS mission (meaning: if you go back to the GS screen and click GO again, it will go back to the first waypoint). - If DJI Vision App is closed when the aircraft is executing a flight mission, the aircraft will continue with the remaining flight mission. But if DJI Vision App is closed and failed to re-connect with the aircraft within 1 minutes the aircraft will return to home point automatically. - DON’T ever let go of your attention just because the aircraft is flying by itself! You need to always be prepared to get back control if something “unplanned” occurred during the mission. - Some Limits: - Max waypoint height 200m - Max waypoint distance 500m - Max mission distance 5000m Here are some interesting Tutorials/Demos to watch: - DJI Officially releases Ground Station VISION+ with Flight Test - DJI Phantom 2 Vision, Ground Station - Quick Tutorial - DJI Phantom 2 Vision/Vision+ - Waypoint-Setting - Tutorial - Waypoints Ground Station app for DJI Phantom Vision - WAYPOINTS for Rookies - In-depth look at waypoints / ground station for DJI Phantom including first flight - DJI Phantom 2 Vision Plus Ground Station Demonstration - Ground Station for DJI Phantom 2 Vision Plus Page 44 Preventative Maintenance Checklist (Text mainly from Pull_Up) EVERY WEEK or EVERY 10 FLIGHTS, WHICHEVER SOONER: - Check for damage, wear and crack on all the parts. - Check tightness of motor retaining screws and shell retaining screws in case some needed to be tightened up a bit. - Check motors move freely when spun by hand; - Turn motors shafts with your fingers and verify they are smooth without excessive play or binding (missing E clip? Loose bell housing screw? Bad bearings?). - Check batteries for number of cycles and discharge per DJI recommendations if required (Number of cycles can be found in Vision Assistant): - Charge and discharge the battery completely once every 20 charge/discharge cycles. To discharge: when you come back from a flight and the % is fairly low, just hold it off in a hover at about a foot or two off the ground - it goes fairly quickly - when you get to 8%, ease off the throttle and lands it at about 7%. If you land and let it idle, it takes forever. Then recharge it to maximum capacity. This power cycling procedure will optimize the battery. - For long term storage, place the battery with only a 40~50% charge in a strong battery box. Discharge and charge the battery once every 3 months to keep it in good condition. Charge amount should be varied in these maintenance charges - (40%~50%)—0%—100%—(40%~50%). - Purchase a new battery after your current battery has been discharged over 300 times. Completely discharge a battery prior to disposal. Please dispose of batteries properly. - Warning: If current battery level is over 75% (4 Leds On/Flashing), the battery should be turned on before charging. EVERY MONTH or EVERY 40 FLIGHTS, WHICHEVER SOONER: - Link the Phantom to the RC & Vision Assistant Software and check for Updates, Remote Control Sticks & IMU Calibration state and if all battery cells have good balance (repeat for all batteries). - Clean data spring pins and battery contact pads with alcohol and swab or proprietary electrical contact cleaner and cycle spring pins several times to check for spring weakness and full unimpeded travel; - Check the Battery life: ONCE/TWICE A YEAR OR WHEN YOU FEEL IT MIGHT BE NECESSARY (like after a major crash): - Remove upper shell and check state of all wiring - plugs fully seated, condition of all solder joints, condition of visible circuit boards and wiring runs, internals generally clean and no debris/loose items. - Remove motors and check security of E clips, condition of bearings and general visual inspection. - Check this out for a more visual description: How to do preventative maintenance checks, hints and tips Page 45 Lipo Battery – Safety Advisory Notice Be very careful with your LiPo battery and make sure you follow this Safety Advisory Notice. The LiPo is an extremely hazardous battery if mishandled. Not convinced? Watch this: World's Most Dangerous Battery! and this LiPo on fire in a Cashbox. (Text from the Hubsan X4 User’s Guide…) Page 46 Phantom and RC Assistant - ALWAYS Remove the Propellers/Gimbal Clamp and Camera Lens Cap when using the assistants. - For obvious reason, make sure all your batteries are fully charged before doing any firmware update. - When Using Vision+ Assistant, make sure RC/Extender are ON and USB is connected to the Phantom(ON). - For RC Assistant: Only the RC/Extender need to be ON and connected using USB. - Close the Software before disconnecting any devices. AFTER ANY FIRMWARE/SOFTWARE UPDATE ALWAYS RECALIBRATE EVERYTHING (STICKS/IMU/COMPASS) Page 47 Page 48 Camera update Using the DJI Phantom 2 Vision Assistant, check the current firmware version of your FC200 Camera. Then, check if there’s a new firmware update for the Phantom 2 Vision FC200 Camera on DJI web site. If a firmware update is needed, then follow the instructions below to update your firmware. a) Download the latest camera firmware and unzip it. b) Get a clean Micro-SD card (less than or equals to 32GB), and copy the “firmware.bin” file to the root folder of the SD card. c) Make sure the Phantom is turned off, and insert the Micro-SD card into the camera before turning it on. d) Turn on the Phantom. Note: the P2V+ camera does not have an on/off switch. e) The firmware update will begin automatically. A yellow flashing LED on the camera indicates that the camera is updating. f) When the yellow flashing disappears, the firmware has been updated. After a successful update, the “firmware.bin” file name will change to “firmware.bin.bak”. This file on the card can now be deleted. Special Notes: a) During the update, do not turn off the Phantom or take out the SD card. This may prevent your camera from switching on and will need a factory reset. b) A fast red flashing LED on the camera after the update means the update has failed. Please try again. c) You need to use the latest DJI Vision App. Page 49