1
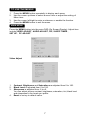
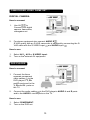
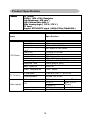
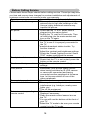
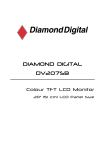
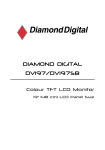
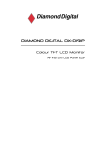
DV321
Wide Screen LCD Flat
Panel Display
32” (81.3 cm) LCD Panel Size
User’s Manual
DV321
USER’S MANUAL
TABLE OF CONTENTS
IMPORTANT SAFETY INSTRUCTIONS --------------------------
1
PREPARATION ----------------------------------------------------------- 3
OPERATING INSTRUCTIONS --------------------------------------Use of the remote control ---------------------------------------To use the menus -------------------------------------------------Main menu -----------------------------------------------------------
5
5
6
6
CONNECT PERIPHERAL EQUIPMENT -------------------------- 10
Front Panel Control Knobs -------------------------------------- 10
Preparation ---------------------------------------------------------- 10
Video recorder ----------------------------------------------------- 11
Camera, camcorder, Video Game set ----------------------- 12
DVD player ---------------------------------------------------------- 12
Digital Set TOP box --------------------------------------------- 13
PC----------------------------------------------------------------------- 13
Tips ------------------------------------------------------------------- 14
PRODUCT SPECIFICATION ---------------------------------------
15
BEFORE CALLING SERVICE --------------------------------------- 17
Glossary ------------------------------------------------------------- 18
Service Contacts -------------------------------------------------- 19
Thank you very much for choosing the DV321 LCD TV.
We recommend that you take a few minutes to read carefully through this
manual before installing and switching on the TV. Please keep this manual in a
safe place for your future reference.
1
IMPORTANT SAFETY INSTRUCTIONS
Read before operating equipment
1.
2.
3.
4.
5.
6.
7.
8.
9.
10.
11.
12.
13.
14.
15.
16.
17.
Read these instructions.
Keep these instructions.
Heed all warnings.
Follow all instructions.
Do not use this apparatus near water.
Clean only with a dry cloth.
Do not block any of the ventilation openings. Install in accordance with the
manufacturers instructions.
Do not install near any heat sources such as radiators, heat registers,
stoves, or other apparatus (including amplifiers) that produce heat.
Do not defeat the safety purpose of the polarized or grounding type plug.
A polarized plug has two blades with one wider than the other. A
grounding type plug has two blades and third grounding prong. The wide
blade or third prong is provided for your safety. When the provided plug
does not fit into your outlet, consult an electrician for replacement of the
obsolete outlet.
Protect the power cord from being walked on or pinched particularly at
plugs, convenience receptacles, and the point where they exit from the
apparatus.
Only use attachments/accessories specified by the manufacturer.
Use only with a cart, stand, tripod, bracket, or table specified by the
manufacturer, or sold with the apparatus. When a cart is used, use
caution when moving the cart/apparatus combination to avoid injury from
tip-over.
The TV should be operated only from the type of power source indicated
on the label. If you are not sure of the type of power supplied to your
home, consult your dealer or local power company.
Unplug this apparatus during lightning storms or when unused for long
periods of time.
Refer all servicing to qualified service personnel. Servicing is required
when the apparatus has been damaged in any way, such as powersupply cord or plug is damaged, liquid has been spilled or objects have
fallen into apparatus, the apparatus has been exposed to rain or moisture,
does not operate normally, or has been dropped.
This product may contain lead or mercury. Disposal of these materials
may be regulated due to environmental considerations. For disposal or
recycling information, please contact your local authority.
Damage Requiring Service – The appliance should be serviced by
qualified service personnel when:
A. The power supply cord or the plug has been damaged; or
B. Objects have fallen, or liquid has been spilled into the appliance; or
C. The appliance has been exposed to rain; or
2
D. The appliance does not appear to operate normally or exhibits a
marked change in performance; or
E. The appliance has been dropped, or the enclosure damaged.
18. Tilt/Stability – All televisions must comply with recommended
international global safety standards for tilt and stability properties of its
cabinets design.
y
Do not compromise these design standards by applying excessive
pull force to the front, or top, of the cabinet, which could ultimately
overturn the product.
y
Also, do not endanger yourself, or children, by placing electronic
equipment/toys on the top of the cabinet. Such items could
unsuspectingly fall from the top of the set and cause product damage
and/or personal injury.
19. Power Lines – An outdoor antenna should be located away from power
lines.
20. Objects and Liquid Entry – Care should be taken so that objects do not
fall and liquids are not spilled into the enclosure through openings.
3
PREPARATION
1.
Place the TV on a solid surface.
Ensure that the TV is placed in a position to allow free flow of air. Do not
cover the ventilation openings on the back cover.
To prevent any unsafe situations, no naked flame sources, such as
lighted candles, should be placed on or in the vicinity.
Avoid heat, direct sunlight and exposure to rain or water. The equipment
shall not be exposed to dripping or splashing.
2. Insert the aerial plug firmly into the aerial socket ANT IN 75Ω at the
back of the TV.
4
3.
Remote control:
Remove the cover of the battery compartment. Insert the 2 batteries
supplied (Type AAA 1.5V).
4.
Power:
Insert the power cord in the wall socket having an AC power supply.
5.
Turn the TV on:
Press the power button at the top of the TV to turn it on.
If the TV is in power off, the indicator in front of the TV illuminates amber.
6.
How to assemble speakers:
Step 1: Ues (in accessory box) lock to TV noumenon
.
Step 2: lock speaker as
Step 3:connect speaker to TV.
Please refer to the graph .
5
.
OPERATING INSTRUCTIONS
USE OF THE REMOTE CONTROL
POWER
MUTE
Press to turn on/off the
TV. The TV is never
completely powered off
unless it is physically
unplugged.
Temporarily interrupt the
sound or restore it.
DISPLAY
(1)
Display Channel number
when use RF input.
(2) Display input source
when use other input
except TV RF input.
CH
Press or (or ▲ or ▼
button) to browse through
the TV channels which
are not erased.
RECALL
To display the previously
selected TV channel.
0~9/100 Digit buttons
To select a TV channel.
TV/VIDEO
VOL
Press + or – (or
or
button) to adjust the
volume.
NICAM
To select Mono
/Stereo/Sound A /Sound
B/Sound AB from TV RF
input.
SLEEP
With this key you can set a
time period after which the
TV should switch itself to
standby. Press the key
repeatedly to select the
number of minutes. The
counter runs from 30, 60, 90,
120 minutes. The timer
begins to count down from
the number of minutes
selected after the display has
disappeared.
PIP
Select PIP on/off.
MENU Press repeatedly
to display OSD menu.
DPF
Select your input source:
press repeatedly to select
TV, AV1, AV2, S-VIDEO or
COMPONENT mode,
according to where you
connected your external
source.
y AV1/AV2 for a VCR
connected to the AV
connectors of the TV.
y S-VIDEO for a S-Video
VCR connected to the SVIDEO connector of the
TV.
y COMPONENT for a
DVD/DTV Set Top Box or
another component video
device connected to Y,
Pb, Pr and to the AV
AUDIO inputs L and R.
WIRELESS
Not support.
Not support.
WIDE
Includes 3 modes: Press
repeatedly to select 4:3
/16:9 /
16:9 non-Linear.
SWAP
Not support.
6
PC
select your input source
to PC.
TO USE THE MENUS
1.
2.
3.
4.
Press the MENU button repeatedly to display each menu
Use the cursor up/down to select a menu item or adjust the setting of
Menu item.
Use the cursor left/right to enter a submenu or enable the function.
Press the MENU button to exit the menu.
MAIN MENU
Press the MENU button into the main OSD (On Screen Display). Adjust item
include VIDEO ADJUST, AUDIO ADJUST, PIP, SLEEP TIMER ,
SET UP,PC ADJUST.
Video Adjust
1.
2.
3.
4.
Contrast, Brightness and Saturation are adjusted from 0 to 100.
Black Level is adjusted from 0 to 100.
Sharpness is adjusted from -5 to+5.
You can adjust picture contrast, brightness, saturation, tint, black level
and sharpness to the levels you prefer.
Reset is set up to default value.
7
When adjust any item sub-OSD will show up like this.
Audio Adjust
1.
2.
Volume is adjusted from 0 to 100.
Bass and Treble are adjusted from 0 to 100.
You can adjust picture Volume, Bass and Treble to the levels you prefer.
When adjust any item sub-OSD will show up like this.
8
PIP (Only available in PC mode)
1. PIP function is turn on /off small picture
2. Position is move for small picture
3. Source is choose from TV /AV1/AV2/S VIDEO
4. Audio select is choose from MAIN/SUB
Sleep Timer is for set a time period after which the TV should switch itself to
standby. The counter runs from 30 > 60 > 90 > 120 minutes.
The timer begins to count down from the number of minutes selected after the
display has disappeared.
Note: To view the remaining time, press the SLEEP button once. To cancel
the sleep time, repeatedly press the SLEEP button until--- APPEARS. If you
turn the TV off after setting the sleep time, the setting will be erased. Set it
again.
Set up
1. Blue screen for when no video input screen will be blue or blank. If it’s
ON, the screen will be in blue. If it’s OFF, the screen will be blank. Preset
is ON.
2. Language for different language OSD MENU includes Simplified
Chinese/ English. Preset is Simplified Chinese.
3. SYSTEM is select the TV broadcasted system.
4. CH SEARCH for search all TV program and storing in memory.
9
5.
6.
CH DEL. /ADD.
If “ DEL” the channel will be masked.
MANU SCAN for search TV Program channel by channel.
After scan a new program, press MENU key, it will be automatically saved
in the last channel.
7. CH SWAP save the location of current channel and destination channel
for each other
8. View Mode : Includes 3 modes: Press repeatedly to select
4:3 /16:9 / non-Linear.
9. Reset is set up to default value of BLUE SCREEN and LANGUAGE .
PC Adjust
1.
2.
Auto tune is the function auto-sizing for VGA input.
Contrast, Brightness, Focus, Clock, H Position, V Position and
Colour are the functions for PC adjustment.
Colour for you can adjust the colour temperature you prefer.
TV and AV colour temperature adjust:
User can select 3 kinds of colour mode on TV or AV to get more suitable
picture which they wished, 3 kinds of mode are cool/warm/standard.
10
Connect Peripheral Equipment
FRONT PANEL CONTROL KNOBS
: Press to turn on or off the TV.
MENU Key : Press to show the OSD menu and exit OSD menu at the TV.
CH Key
: Press to perform select function and channel.
VOL Key
: Press to confirm your function selection and adjustment.
Source Key : Press to select your input source.
There is a wide range of video and audio equipment that can be connected to
your TV. The following connection diagrams show you how to connect them.
PREPARATION
Remove the back plate at the back of the TV as shown on the illustration
opposite.
Lay the LCD TV with the screen down on a table, as it will be easier to
connect your peripheral equipment. Please take your precautions not to
damage the screen.
11
VIDEO RECORDER
How to connect
1.
Connect the supplied
antenna cable
to the
RF IN port of your VCR.
2.
Connect another RF cable from the output RF of your VCR to the
input of your TV. Better quality when playing from your VCR can be
obtained if you also connect the AV (only for stereo equipment)
cables
If your VCR has an S-VHS video jack:
For improved picture quality, connect a S-Video cable with the S-VIDEO input
on the TV instead of connecting the VCR to the VIDEO port.
S-Video does not provide audio, audio cables must still be connected to
provide sound.
Watching VCR
1.
2.
3.
If you use connection , please slecet TV channel auto search on OSD ,
until get the program you need .
If you use connection , please select AV1.AV2
Insert videotape in the VCR and press the PLAY button.
12
CAMCORDER, VIDEO GAME SET …
DIGITAL CAMERA
How to connect
1.
Use AV
to
Connect your digital
camera, camcorder,
videogame set
2.
For stereo equipment also connect AUDIO R .
S-VHS quality with an S-VHS camcorder is obtained by connecting the SVHS cable with the S-VIDEO input
and AUDIO input .
How to use
1.
2.
Select AV1、AV2 or S-VIDEO input .
Turn on the external AV equipment.
DVD PLAYER
How to connect
1.
Connect the three
separate component
video cables
to the
DVD player’s. Y, Pb
and Pr ports and to the
Y, Pb and Pr ports on
the TV.
2.
Connect the audio cables to the DVD player’s AUDIO L and R ports
and to the AUDIO L and R ports on the TV.
How to use
1.
2.
Select COMPONENT.
Turn on the DVD set.
13
DIGITAL SET TOP BOX
Set up box
How to connect
1.
Connect the three separate component video cables
to the DTV
player’s Y, Pb and Pr ports and to the Y, Pb and Pr ports on the TV.
2.
Connect the audio cables to the DTV player’s AUDIO L and R ports
and to the AUDIO L and R ports on the TV.
How to use
1.
2.
Select COMPONENT.
Turn on the DTV Set Top Box set.
Warning: In case you notice scrolling images, wrong colours or no colour,
no picture or even combinations of these, on your screen, check if the
connections are done in the right way. Check if the cable colours match
with the Input connector colours.
PC
How to connect PC input
.
.
please use D-sub signal cable in Accessories plug in D-sub port which
is in TV monitor 's bottom side of back as Graph.
please use Audio Cable in Accessories plug in PC audio connector port
which is in TV monitor’s bottom side of back as Graph.
14
TIPS
Care of the screen
Do not rub or strike the screen with anything hard as this may scratch, mar, or
damage the screen permanently.
Unplug the screen before cleaning the screen. Dust the TV by wiping the
screen and the cabinet with a soft, clean cloth. If the screen requires
additional cleaning, use a clean, damp cloth. Do not use liquid cleaners or
aerosol cleaners.
Mobile telephone warning
To avoid disturbances in picture and sound, malfunctioning of your TV or even
damage to the TV, keep away your mobile telephone from the TV.
End of life directives
We are paying a lot of attention to produce environmentally friendly in green
focal areas. Your new receiver contains materials which can be recycled and
reused.
At the end of its life specialized companies can dismantle the discarded
receiver to concentrate the reusable materials and to minimize the amount of
materials to be disposed of.
Please ensure you dispose of your old receiver according to local regulations.
15
Product Specification
Feature
32” screen
WXGA ( 1366 x 768 ) Resolution
High Brightness ( 550 cd/m2 )
High Contrast Ratio (800:1 )
Wide Viewing Angle ( 170°H / 170°V )
PC Input
Support SDTV/HDTV signal (480i/p,576i/p,720p&1080i )
Items
LCD Panel
Specification
Screen Size
Aspect Ratio
Resolution
Display Area (opening)
HxV
Pixel Pitch
Display colours
Contrast Ratio
Brightness
Viewing Angle
Response Time
32” TFT-LCD Panel
16:9
1366 x 768 (WXGA)
Lamp Type/Life
60000 hr
Colour Temperature
Cool / Warm
TV Standard
PAL B/G ,D/K , I , NTSC M
Sound systems
NICAM ,A2 ,BTSC
AV1
RCA x 1
RCA x 1
S-Video x 1
YPbPr x 1
PAL/SECAM/NTSC
697.68mm x 392.26mm
0.51mm x 0.51mm
16.7 million
800:1 (typical)
550cd / m² (typical)
170° (Horizontal)/ 170° (Vertical)
12ms (gray to gray)
TV Function
Video Inputs
AV2
Component
Colour system
16
Audio L/R x 1
Audio L/R x 1
(Share)
Audio L/R x 1
Analog: D-Sub 15 pin (detachable
cable)
DDC 2B
Analog: FH: 31.5kHz to 50kHz
FV: 60Hz to 75Hz
Signal Input
PnP compatibility
PC Input
Input frequency
Recommended
Analog: 1360x 768 (60Hz)
Headphone Mini-jack for stereo
(3.5ø)
Input Audio
Speaker: Two 10 watt speakers
Headphone Mini-jack for stereo
(3.5ø)
Line Output (RCA L/R)
Audio Output
Audio Output: L / R
OSD language
Simplified Chinese / English (Default Language: Simplified
Chinese)
Table Stand
Included
Wall Mount
VESA 100*100*175 mm
Power Supply
AC100V~240V, 50/60Hz
Power Consumption
<180W
Panel Tilt
Forwards/Backwards/
Rotation
- 5° / + 20° / ± 35°
Environment
operating temp
storage temp
operating humidity
+ 0°C ~ + 40°C
- 25°C ~ + 60°C
10% ~ 85%
Dimension
W x H x D (with stand and
1030 x 572.5 x 260(mm)
speaker)
Power
Weight (net)
Accessories
Kg (w/o Accessories)
22.5 Kg
Remote Controller, Batteries (AAAx2), AC Power Cord, D-sub
Signal Cable, Audio Cable , TV Service Guide for User, TV
Guaranty Card, User’s Manual, Setup Guide
17
Before Calling Service
Please make these simple checks before calling service. These tips may save
you time and money since charges for receiver installation and adjustments of
customer controls are not covered under your warranty.
Symptoms
Items to Check and Actions to follow
“Ghost ” or double image
*This may be caused by obstruction to the
antenna due to high rise buildings or hills.
Using a highly directional antenna may
inprove the picture.
No power
*Check that the TV’s AC power cord is
plugged into the mains socket.
*Unplug the TV, wait for 60 seconds. Then
re-insert plug into the mains socket and
turn on the TV again.
No picture
*Check antenna connections at the rear of
the TV to see if it is properly connected to
the TV.
*possible broadcast station trouble. Try
another channel.
*Adjust the contrast and brightness settings.
*Check the Closed Captions control. Some
TEXT modes could block the screen.
Good picture but no sound
*Increase the VOLUME.
*Check that the TV is not muted; press the
button on the remote control.
Good sound but poor colour
*Adjust the contrast, colour and brightness
settings.
Poor picture
*Sometimes, poor picture quality occurs
when having activated an S-VHS camera
or camcorder connected and having
connected another peripheral at the same
time. In this case switch off one of the
other peripherals
Snowy picture and noise
*Check the antenna connection
Horizontal dotted line
*This may be caused by electrical
interference (e.g. hairdryer, nearby neon
lights, etc.)
*Turn off the equipment.
Television not responding to *Check whether the batteries are working.
remote control
Replace if necessary
*Clean the remote control sensor lens on
the TV.
*You can still use the buttons at the front of
your TV.
*Select the TV mode to be sure your remote
control is in the TV mode.
18
GLOSSARY
Audio / Video Inputs
Located on the rear and the front of the receiver these connectors (RCA
phono type plug) are used for the input of audio and video signals. Designed
for use with VCRs (or other accessories) in order to receive higher picture
resolution and offer sound connection options.
S-Video Input
Allows direct connection of high-resolution video sources, such as a Super
VHS videocassette recorder, Laser Disc player, etc. Provides improved
picture resolution, sharpness, and clarity.
HDTV input
Allow user connect Height definition input , such as DVD player , HDTV TV of
component input , provide better performance and sharpness.
Video outputs
Provide audio output , to use external speaker for Higher voice quality.
Menu
An on-screen listing of feature controls shown on the TV screen that are made
available for user adjustments.
Multichannel Television sound (MTS)
The broadcast standard that allows for stereo sound to be transmitted with the
TV picture.
RF
Radio Frequency or modulated signal design used as the carrier for television
broadcasts.
Second Audio Program (SAP)
Another or additional audio channel provided for in the Multichannel Television
Sound (MTS) broadcast standard. A monaural soundtrack included within the
recorded or video signal (usually containing a second language translation for
the displayed program).
Sleep Timer
Function with which you can set a time period after which the TV should turn
itself off.
19
Service Contacts
If problems remain after checking this manual, please contact your place of
purchase or contact. Australian Service Contacts visit the Mitsubishi Electric
Australia web site at www.mitsubishielectric.com.au for details of your
nearest Mitsubishi Electric Authorised Service Centre or contact the Service
Department for your state:
New South Wales and Australian Capital Territory
348 Victoria Road
Rydalmere, NSW, 2116
Telephone: 1300 651 808
Fax:
(02) 9684-7684
Queensland
12 / 469 Nudgee Road
Hendra, QLD, 4011
(Airlink Business Park)
Telephone: (07) 3623-2000
Fax:
(07) 3630-1888
South Australia and Northern Territory
77 Port Road
Hindmarsh, SA, 5007
Telephone: (08) 8340-0444
Fax:
(08) 8340-0555
Victoria and Tasmania
4 / 303 Burwood Hwy
East Burwood, VIC, 3151
Telephone: (03) 9262-9899
Fax:
(03) 9262-9850
Western Australia
5 / 329 Collier Road
Bassendean, WA, 6054
Telephone: (08) 9377-3411
Fax:
(08) 9377-3499
20