1
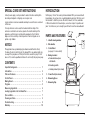
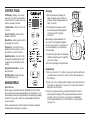
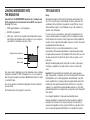
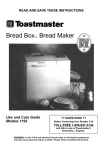
Recipe
Booklet
Reverse Side
INSTRUCTION BOOKLET
Cuisinart® Automatic Bread Maker
CBK-100
For your safety and continued enjoyment of this product, always read the instruction book carefully before using.
IB-8301
IMPORTANT SAFEGUARDS
When using electrical appliances, basic safety precautions should always be
followed including the following:
12. Do not place the appliance near a hot gas or electric burner, or in a
heated oven.
13. Keep power cord away from the hot surface of this bread maker. Do not
put any flammable object on the hot surface of this bread maker.
1. Read all instructions, product labels and warnings
before using this bread maker.
14. Place this bread maker a minimum of 2 inches away from wall or any
other object.
2. Do not touch hot surfaces; carry the unit by handles. Always use oven
mitts when handling hot material, and allow metal parts to cool before
cleaning. Allow the bread maker to cool thoroughly before putting in or
taking off parts.
16. When plugging or unplugging this bread maker, be sure not to touch
the plug blades with your fingers.
3. When unit is not in use and before cleaning, unplug the bread maker
from wall outlet. Let the bread maker cool down thoroughly before
assembling or disassembling it.
4. To protect against risk of electrical shock, do not immerse the appliance
or plugs in water or other liquids.
5. Close supervision is always necessary when this or any appliance is
used near children or incapacitated persons.
6. Do not allow anything to rest on the power cord. Do not plug in cord
where people may walk or trip on it. Unplug this bread maker from the
wall outlet before you go out for a trip or long excursion.
7. Do not operate this or any appliance with a frayed or damaged cord, or
plug, or after the appliance malfunctions or is dropped or has been damaged in any manner. Take appliance to the nearest authorized service
facility for examination, repair or electrical or mechanical adjustment.
8. Do not let the cord dangle over the edge of a table or counter or touch
hot surfaces. Do not place on an unsteady or cloth-covered surface.
9. Avoid contact with moving parts.
10. Do not use attachments not recommended by the manufacturer. They
may cause fire, electric shock or injury.
11. Do not use outdoors or for commercial purposes.
1
15. Do not use this bread maker for other than its intended use.
17. To unplug, press and hold the Stop/Pause button for 1 to 3 seconds,
grip plug and pull from wall outlet. Never pull on the cord.
18. If electric circuit is overloaded with other appliances, your bread maker
may not operate properly. This bread maker should be operated on a
separate electrical circuit from other operating appliances.
19. Extreme caution must be used when moving an appliance containing hot
oil or other hot liquids.
20. Always attach plug to appliance first, then plug cord into the wall outlet. To
disconnect, turn any control to "off", then remove plug from wall outlet.
SAVE THESE
INSTRUCTIONS
FOR HOUSEHOLD USE
ONLY
Special Cord Set Instructions
INTRODUCTION
A short power supply cord is provided to reduce the risks resulting from
becoming entangled in or tripping over a longer cord.
Nothing says "home" like warm, just-baked bread. With your new automatic
bread maker, all you have to do is add ingredients and select the time you'd
like Cuisinart to start the process. We mix it, knead it, let it rise, and bake
it. We've included lots of bread recipes, as well as recipes for pastries and
jams. You'll discover you've bought yourself much more than a beadmaker!
Longer extension cords are available and may be used if care is exercised
in their use.
If a long extension cord is used, the marked electrical rating of the
extension cord must be at least as great as the electrical rating of the
appliance, and the longer cord should be arranged so that it will not
drape over the countertop or tabletop where it can be tripped over or
pulled on by children.
Notice
This appliance has a polarized plug (one blade is wider than the other).
To reduce the risk of electric shock, this plug will fit in a polarized outlet only
one way. If the plug does not fit fully in the outlet, reverse the plug. If it still
does not fit, contact a qualified electrician. Do not modify the plug in any way.
Contents
Important Safeguards . . . . . . . . . . . . . . . . . . . . . . . . . . . . . . . . . . . . . 1
Introduction . . . . . . . . . . . . . . . . . . . . . . . . . . . . . . . . . . . . . . . . . . . . . 2
Parts and Features . . . . . . . . . . . . . . . . . . . . . . . . . . . . . . . . . . . . . . . . 2
Control Panel . . . . . . . . . . . . . . . . . . . . . . . . . . . . . . . . . . . . . . . . . . . . 3
Making Bread . . . . . . . . . . . . . . . . . . . . . . . . . . . . . . . . . . . . . . . . . . . . 3
Programs . . . . . . . . . . . . . . . . . . . . . . . . . . . . . . . . . . . . . . . . . . . . . . . 5
Measuring Ingredients . . . . . . . . . . . . . . . . . . . . . . . . . . . . . . . . . . . . . 6
Loading Ingredients into the Bread Pan . . . . . . . . . . . . . . . . . . . . . . . 7
Tips and Hints . . . . . . . . . . . . . . . . . . . . . . . . . . . . . . . . . . . . . . . . . . . 7
Cleaning and Care . . . . . . . . . . . . . . . . . . . . . . . . . . . . . . . . . . . . . . . . 8
Troubleshooting . . . . . . . . . . . . . . . . . . . . . . . . . . . . . . . . . . . . . . . . . . 9
Warranty . . . . . . . . . . . . . . . . . . . . . . . . . . . . . . . . . . . . . . . . . . . . . . . 10
Parts AND Features
4b
6
1. Lid with viewing window
7
2. Side handles
3. ControlPanel
(see page 3 for more detail)
4a
4. Baking chamber:
a. Removable bread pan
with handle
1
b. Kneading paddle
c. Heating element (not shown)
5. Power Cord (not shown)
3
6. Measuring Spoon
7. Measuring Cup
4
2
2
CONTROL PANEL
Setting Up
LCD Display – Displays your loaf size
and crust color selection along with the
current function. Also used to view menu
selection and delay start timer.
1. R
emove bread pan by grasping the
handle, turning the pan to the left and
pulling up. Attach kneading paddle. (see
figures 1a and 1b).
Loaf Size Button – Selects a 1lb, 1½ lb
or 2lb loaf.
2. P
ut ingredients in bread pan – refer to
the measuring and loading ingredients
section (pages 6-7) for detailed
instructions.
Crust Color Button – Selects a light,
medium or dark crust.
Note: Always put liquid ingredients into
the pan first, followed by dry ingredients.
Be sure to put yeast last, as yeast must not
touch wet ingredients, to avoid activation
before kneading.
Menu Button – Selects program; refer to
the program list for options.
Program List – Lists the first 11 preprogrammed menu selections; use the
menu button to select from this list.
Rapid Bake Button – Selects the 12th
pre-program, Rapid Bake (Please refer
to page 6 for more information on this
setting).
1b
3. Insert the bread pan back into the baking
chamber, turning the pan to the right. Be
sure it locks in place.
4. Close the lid and plug in the bread maker.
B
Delay Start Timer Buttons – Set the
delay start timer.
Start/Stop Button – Starts and stops
the bread making process.
MAKING BREAD
Before First Use
Before using your Cuisinart® Automatic Bread Maker for the first time,
remove all protective paper and wrapping. Be sure that all parts of your
new bread maker have been unpacked before discarding any packaging
materials. You may want to keep the box and packaging materials for
use at a later date.
Wipe housing and inside of lid with a damp cloth and rinse bread pan,
kneading paddle, measuring spoon and cup.
3
1a
Programming
1. S
elect your loaf size (1, 1½ or 2lbs) by pressing the Loaf Size button until
your desired size is selected. Your current selection will be displayed on
the LCD panel.
2. S
elect your crust color (light, medium or dark) by pressing the Crust Color
button until your desired color is selected. Your current selection will be
displayed on the LCD panel.
3. S
elect your program number by pressing the Menu button until your
desired program is displayed. (The pre-programmed menu selections
are listed on the control panel for easy reference.) For Rapid Bake,
press the Rapid Bake button. For more information on each program,
see pages 5-6.
Begin the process
a. S
tart – if you would like the bread making process to start immediately, press the Start/Stop button now.
Knead: Three kneads are standard for most settings. The first knead will
actually mix the ingredients; one or two other short knead cycles will punch
the dough down before the rest and rise cycles.
b. D
elay Start – The delay timer allows you to delay the bread making
process up to 13 hours. The delay start cannot be used with the Rapid
Bake program and is not recommended for use with dough, jam or
gluten free settings.
Rise: These are periods of rising in which the unit will not be active except
for the countdown display.
Note: Do not use perishable ingredients such as milk, eggs, cheese
and yogurt with the delay start function.
To set the Delay Start
1. Add ingredients.
2. Select your loaf size, crust color and program.
3. P
ress the + button repeatedly until the total delay time desired is
displayed. If you go past the required time, press the – button to go
back. The timer will move in 10-minute increments.
Set your time based on when you would like your bread to be complete. If, for example, the time is 1pm and you plan for a finished loaf at 10pm, set your delay timer for 9 hours.
4. Press the Start/Stop button to begin the delay start countdown.
During Bread Making
The Process
Once you start a selected program, the unit will automatically take care of
each step of the bread making process until the loaf finishes baking. An
indicator on the LCD will display the current function: Delay Start, Preheat,
Knead, Rest, Rise, Bake, Keep Warm or End.
Preheat: Some programs require the bread maker to pre-heat. During this
time, the unit is heating up. Note: this function is not required for
all programs.
Rest: These are periods of resting in which the unit will not be active except
for the countdown display.
Bake: The Cuisinart® Automatic Bread Maker will regulate the baking time
and temperature according to the individual recipe.
Keep Warm: Allows you to leave the finished bread in the machine to serve
warm. It also helps to keep the crust from becoming soggy if not removed
from the machine immediately after baking. Some crusts will darken slightly
in Keep Warm.
Options
1.Mix-Ins: During the last 8 minutes of the second kneading cycle with
the Basic/White, Whole Wheat, French/Italian, and Sweet programs,
an audible signal 5 of short beeps will sound to remind you to add any
additional ingredients your recipe requires. To do so, open the lid and
add additional ingredients. Be sure to close the lid, once finished.
2. A
fter mixing/kneading is complete there will be an audible signal of 6
short beeps, before the last rise cycle, indicating the point at which the
mixing/kneading is complete. At this point in the bread making process
you have the option of removing the kneading paddle, to avoid a small
hole in the bottom of your baked loaf, and/or re-shaping the dough,
though neither is necessary. To do so,
a. U
sing oven mitts, open the lid and remove the bread pan by the
handle and close the lid.
b. Take the dough from the pan and remove the kneading paddle
Caution: The kneading paddle may be hot.
c. Form the dough into a neat ball and replace in the center of the
bread pan.
d. Replace the bread pan in the machine and close the lid.
4
Note: If you plan to remove the dough and reshape it in another pan for
baking in your conventional oven, this is the time to do so. Be sure to press
and hold the Start/Stop button to reset the machine so it does not automatically resume the process after 15 minutes.
Also Note: This unit is equipped with a power failure backup system. In case
of any disruption of power supply, the unit will store in memory the stage of
bread making cycle and resume once power is restored. The power backup
feature can maintain memory for a power failure up to 15 minutes.
After Breadmaking
here will be a series of 15 beeps to signal the end of the baking cycle; the
T
bread display window will read 00:00 and the unit will be in the Warm cycle.
Your bread will be kept warm for 60 minutes to prevent it from becoming
soggy. For optimal results, we recommend removing the loaf as soon as the
baking cycle is complete and letting it cool on a baking rack.
To remove bread from the pan,
a. U
sing oven mitts, open the lid and remove the bread pan by the
handle.
b. S
till using the oven mitts hold the bottom of the bread pan, move the
handle aside, and shake until the bread is released.
c. F
or best results, allow the loaf to cool on a wire rack for 20 to 30
minutes prior to slicing.
Note: If you have not removed the kneading paddle before baking, be sure to
remove the kneading paddle from the finished loaf. Use caution; the kneading paddle will be extremely hot.
PROGRAMS
Basic/White – The white bread cycle uses primarily white flour.
French/Italian – French/Italian breads require special timing and
temperatures to achieve that wonderful crispy, nicely browned crust.
5
Whole wheat bread – Whole wheat bread is a yeast bread that is made with
a significant portion of whole wheat flour (50% or more), rather than with all
white bread flour. Breads made from whole wheat flour are more nutritious
because the flour is milled from the entire wheat berry (including the bran
and the germ). Using whole wheat flour produces a bread that is brown to
dark brown in color (when all whole wheat flour is used), and the breads are
more flavorful and healthful than breads made with refined white flours (even
though “lost” nutrients are added back into white flours).
Sweet bread – The sweet bread program is specifically designed to bake
breads with high amounts of sugar, fats and proteins. These added ingredients tend to increase browning of the finished loaves.
Gluten free – One in approximately 100 people has an allergy or sensitivity
to gluten. Since gluten is found in most flours used in traditional bread baking,
the ingredients to create gluten free breads are unique. While they are “yeast
breads,” the doughs are generally wet and have a batter-like consistency. It
is also important not to over-mix or over-knead gluten free doughs. There is
only one rise, and due to the high moisture content, baking time is increased.
Mix-ins must be added at the very beginning of the cycle with other basic
ingredients.
Packaged mix – This program is intended for prepackaged yeast bread
mixes intended for the bread machine. 1½-and 2-pound dough mixes
work best.
Cake/Quick bread – (Referred to as batter breads in some cookbooks.)
Cake-like in texture, they are usually baked in a shaped pan such as a muffin
tin or loaf pan. They are a batter-type bread rather than a yeast dough, and
get their leavening from baking powder, baking soda and eggs. Mix-ins must
be added at the very beginning of the cycle with other basic ingredients.
If a quick bread is a little moist on top when baking is complete (moisture
will depend on ingredients of the quick bread), leave it in the bread maker for
an extra 10 to 15 minutes with no heat, and it will continue baking – this is
called “after cooking.”
Dough –There are two ways to prepare dough in the bread maker if you wish
to bake it in a conventional oven.
One way is by using our Dough cycle. It mixes ingredients, kneads and takes
the dough through the first rise cycle. It is appropriate for almost any dough
recipe (except gluten free) and ideal for pizza dough.
It is intended that dough will be removed, deflated and shaped by hand and
allowed to rise 1 or 2 more times out of the bread maker.
Alternatively, you can choose a specific bread type from the menu options,
and remove the dough when the signal before last rise sounds. This will take
you through two rise cycles.
This method is suitable for any alternate loaf shape, round loaf, dinner rolls,
braided challah bread, and so on. Last rise will take place outside the bread
maker.
Pasta Doughs –The pasta dough program mixes and kneads pasta dough
perfectly. It is intended for the dough to be removed and rested. Once rested
the dough can either be rolled by hand or placed through a pasta roller.
Jams – The bread maker is a great cooking environment for homemade
jams and chutneys. The paddle automatically keeps the ingredients stirring through the process. The heating element is placed in a way that the
contents of the pot will not get burned. We provide recipes starting on page
79 to get you started. They make a wonderful complement to freshly baked
bread!
Bake-Only – This menu setting activates the bread maker for bake function
only, and can be set in 10-minute intervals up to 90 minutes. You can use
this setting if you want the finished loaf to have darker crust color (this will
only require a few extra minutes, so keep your eye on the loaf). Bake Only
can also be used to bake store-purchased doughs.
MEASURING INGREDIENTS
Important note: The most important rule of making bread:
Use exact measurements. This is the key to successful bread baking.
With wet ingredients, use only liquid measuring cups with the cups/ounces
marked clearly on the side. After filling the measuring cup, place it on a flat
surface and view it at eye level to make sure the amount of liquid is exact.
Liquids must be room temperature.
With dry ingredients, fill a dry measuring cup with a spoon and then level
off the measurement with the back of a knife or a spatula to make sure the
measurement is exact. Never use the cup to scoop the ingredients directly
from container (for example, flour). By scooping, you could add up to one
tablespoon of extra ingredients. Do not pack down.
MEASUREMENT/CONVERSION CHART
1½ teaspoons = ½ tablespoon
8 tablespoons =½ cup
3 teaspoons
= 1 tablespoon
12 tablespoons =¾ cup
½ tablespoon
= 1½ teaspoons
16 tablespoons =1 cup
2 tablespoons
= 1⁄8 cup
3
4 tablespoons
= ¼ cup
5
5 tablespoons + 1 teaspoon = 1⁄3 cup
7
⁄8 cup =¼ cup + 2 tablespoons
⁄8 cup =½ cup + 2 tablespoons
⁄8 cup
=¾ cup + 2 tablespoons
Rapid Bake – The time saving is achieved with the use of rapid rise yeast.
The rapid cycle must be used with a recipe using rapid rise yeast, or the
bread will not rise and bake properly. Almost any recipe can be modified by
replacing standard yeast with an equal or larger amount of rapid rise yeast.
There is no need to set your loaf size or crust setting. Simply press the Rapid
Bake button. Settings for this program are set for a 1½lb loaf, with a medium
crust color. This cannot be changed.
6
LOADING INGREDIENTS INTO
THE BREAD PAN
TIPS AND HINTS
Important Note: The SECOND most important rule of making bread:
Put the ingredients into the bread maker in the EXACT order given in
the recipe. This means:
Bread machine baking is affected by the temperature and humidity of the
day – this is often the cause of varied dough consistency and results. On
a humid day, the best method of measuring is to weigh the flour. A cup of
white bread flour weighs 5 ounces/140grams. A cup of whole wheat flour
weighs 4 ounces/120 grams.
— FIRST, liquid ingredients – room temperature
— SECOND, dry ingredients
—LAST, yeast – Yeast must be separate from wet ingredients. Create a
small crater in dry ingredients using your finger or a spoon, and place
yeast within the crater. Make sure yeast is fresh.
Yeast/Baking Powder or Baking Soda
Dry Ingredients
Water or Liquids
Also, make sure ALL ingredients are at room temperature, unless otherwise
noted (that is, between 75˚– 90˚F). Temperatures too cool or too warm can
affect the way the bread rises and bakes. Note: Water should not be warm,
or it will affect rising.
Last, it’s a good idea to start with fresh ingredients. Fresh flour and fresh
yeast are critical.
See troubleshooting section (page 9) to learn more.
Usage
If you do not have a scale (electronic works best for measuring flour), let
your eye and hands guide you in adding more flour or liquid as necessary.
Dough should be smooth and not cling to fingers when touched. Additional
amounts of flour or liquid should be added 1 teaspoon at a time. This should
be judged during the first knead only.
Remember, the key to successful bread making is to use exact
measurements. When measuring ingredients use liquid measuring utensils
for liquids and dry measures for dry ingredients. Stir all flours first, spoon into
dry measure and level off using the flat side of a knife or spatula – do not
pack down.
Giving the kneading paddle a light coating with a nonstick cooking spray,
shortening or vegetable oil may make it easier to remove if it bakes into
a loaf.
Important: If using perishable fresh ingredients such as dairy products,
eggs, chopped fruits or vegetables, do not use the Delay Start Timer feature.
Dried ingredients such as dried egg powders, dried buttermilk, or dry milk
may be substituted for some dairy products and eggs. Add the water to the
machine first, then add the dried substitution after the flour to keep them
separate. If you substitute these dried ingredients and have no other fresh,
perishable ingredients in your bread recipe, you may then use the Delay Start
Timer feature.
Use top quality ingredients to make your bread-machine breads.
Measure all ingredients accurately and have them ready before adding to
bread pan. This is known as mise en place and helps to ensure that you
measure each ingredient correctly, and do not find that you get down to the
last (or nearly last) ingredient and find that it is not available in the pantry.
7
Add ingredients to the pan in this order – liquids, melted or softened butter,
salt and sugars (including honey, molasses, syrup), herbs, flours, dried milk,
vital wheat gluten (if using), yeast. Do not allow the yeast to touch the wet
ingredients. See detailed instructions on page 7.
Amounts/Sizes/Ingredients
Temperature of ingredients is important in bread machine baking. Ideal
temperature is room temperature, between 75°–90°F. Use an instant-read
thermometer to check the temperatures. Cold ingredients should be allowed
to come to room temperature. Liquids and butter may be combined and
placed in a microwave on the defrost setting to warm without heating too
hot. Gently and safely warm cold eggs by placing whole eggs in a bowl and
covering with moderately hot tap water for 10 minutes.
A general formula for a 11⁄2-pound bread machine loaf is: 3 cups bread flour,
11⁄8 to 11⁄4 cups liquid, 1 teaspoon salt, 1 teaspoon sugar, 13⁄4 to 2 teaspoons
yeast. Use this as your basic formula and make adjustments from there.
When adapting a recipe, do not omit the little amounts of 1⁄2 teaspoon or
less – they are essential to the chemical composition of the bread.
Vital wheat gluten can be added to recipes to improve loaf height, texture
and structure – particularly with whole grain flours, or breads using whole
wheat, oat flour or rye flours.
Nuts and seeds, raisins and dried fruits, shredded cheeses, chocolate morsels, and any other additions to the dough should be added when the Mix-in
signal sounds for the appropriate programs.
For white breads and any recipe calling for a white flour (unless it is a quick/
batter bread requiring cake flour), the best flour to use is bread flour, which
has a higher protein content.
In general, a 2-cup flour recipe will produce a loaf that is about 1 pound, a
3-cup flour recipe will produce a loaf that is about 11⁄2 pounds, and a 4-cup
flour recipe will produce a loaf that is about 2 pounds. Some recipes will
have slightly larger or smaller amounts of flour for each size, and with
Mix-ins, they may weigh more than 1 pound, 11⁄2 pounds or 2 pounds.
You should not use more than 5 cups flour total in the bread machine.
If you are adapting a recipe, and your mathematical measurements become
something odd such as half of an egg, use a small egg as a replacement for
half. A large egg is generally equal to about 1⁄4 cup.
For a more uniform loaf of bread, remove the dough when you hear the
remove-paddle signal, then remove the kneading paddle and reshape the
dough into a neat loaf. This will ensure a more uniformly shaped loaf of
bread, particularly with the smaller 1- and 11⁄2-pound loaves.
Use the Whole Wheat program when baking breads containing not only
whole wheat flour, but other heavy flours that will require a longer knead
and rise – for example, pumpernickel bread.
All breads slice best when allowed to cool for a minimum of 30 minutes
(preferably longer) before slicing. If you wish to serve bread warm, wrap
in foil and heat in oven.
For quick breads/batter breads, spray the bottom and halfway up the sides
of the bread pan with cooking spray before adding ingredients, to assist in
release. Loosen the loaf with a plastic spatula before turning out.
CLEANING AND CARE
Always turn the bread maker off, remove the plug from the electrical outlet
and allow the unit to cool before cleaning. Never immerse the unit in water or
other liquid. To clean the housing and control panel, simply wipe with a clean
damp cloth and dry before storing.
Never use rough, abrasive materials or cleansers to clean any part of
the unit.
8
Lid – If you would like to remove the lid for cleaning, open the lid completely
and pull upward. Never put the lid in the dishwasher.
Baking Pan, Kneading Paddle, Measuring Spoon and Measuring Cup –
Wash with warm soapy water and rinse thoroughly, or clean in the upper rack
of the dishwasher. Dry all parts after use. If you have trouble removing the
kneading paddle from the bread pan, soak in warm water for 10 to 15
minutes – this will loosen the blade. Note: Do not use metal utensils with the
baking pan as they will damage the nonstick surface.
Baking Chamber – Remove any bread crumbs by wiping them away with a
slightly damp cloth or clean pastry brush. Be careful not to bend the heating
element when doing so.
TROUBLESHOOTING
Dough Does Not Rise Properly – Check expiration date of yeast.
Make certain yeast is fresh and properly stored (sealed, in a cool dark place).
Liquid may have been too hot and killed yeast, or liquid may have been too
cool and yeast did not activate completely – liquids should be between
75° – 90° for best bread machine results.
Delay Start feature used, but ingredients were in bread pan in improper order.
Short loaves – Not enough sugar in recipe.
Not enough yeast. Yeast was old or improperly stored.
Delay Start feature used and ingredients not placed in bread pan properly.
Salt came into contact with yeast and killed yeast.
Loaves with whole wheat and/or whole grain flours will not be as tall as those
made with bread flour.
Sunken, uneven tops of loaves – High humidity or high room temperature.
Do not place bread machine in sunny window.
On high humidity days, try increasing the flour by one tablespoon per cup of
flour used.
Underbaked, gummy texture – Dough too wet. When baking next loaf of
same bread, watch dough during the first knead and add additional flour 1 to
2 teaspoons at a time.
9
Too much whole grain or whole grain flour used.
Bread pan too small for recipe.
Collapsed loaf – Dough too wet. When baking next loaf of same bread,
watch dough during the first knead and add additional flour 1 to 2 teaspoons
at a time.
Water not proper temperature.
Ingredients not in proper proportions – be sure to measure dry ingredients
correctly by stirring flours first, spooning into measuring cup, then leveling.
Open texture – Dough too wet. When baking next loaf of same bread,
watch dough during the first knead and add additional flour 1 to 2 teaspoons
at a time.
Too much yeast was used.
Salt was omitted or incorrectly under measured.
Dense, heavy texture – Dough too dry. When baking next loaf of same
bread, watch dough during the first knead and add additional water/liquid 1
teaspoon at a time.
This may occur when substituting lowfat products such as fat-free milk or
egg replacers, light butter or margarine, fat-free sour cream or cream cheese.
Not enough sugar in recipe.
Not enough yeast used. May need to add dough enhancer or vital gluten flour.
Kneading paddle embedded in the loaf – If you are nearby when the signal
before last rise sounds, you can remove the kneading paddle, reshape the
loaf and replace.
Small amount of smoke/burning smell from machine – Most often this
is caused by spilled ingredients. If it is bad, unplug machine, clean carefully
(Caution: interior of machine is hot), then plug machine in again to
continue. Program will be stored in memory for a maximum of 15 minutes if
unplugged. Otherwise “flour dust” will burn off on its own. Clean completely
when machine is unplugged and cool.
WARRANTY
Three-Year Limited Warranty
This warranty supersedes all previous warranties on the Cuisinart® Automatic
Bread Maker. This warranty is available to consumers only. You are a consumer if you own a Cuisinart® Automatic Bread Maker that was purchased
at retail for personal, family, or household use. Except as otherwise required
under applicable state law, this warranty is not available to retailers or other
commercial purchasers or owners. We warrant that your Cuisinart® Bread
Maker will be free of defects in material or workmanship under normal home
use for three years from the date of original purchase. We suggest that you
complete and return the enclosed product registration card promptly to
facilitate verification of the date of original purchase. However, return of this
product registration card does not eliminate the need for the consumer to
maintain the original proof of purchase in order to obtain the warranty benefits. In the event that you do not have proof of purchase, the purchase date
for purposes of this warranty will be the date of manufacture.
If your Cuisinart® Automatic Bread Maker should prove to be defective within
the warranty period, we will repair it or, if we think it necessary, replace it.
To obtain warranty service, please call our Consumer Service Center
toll-free at 1-800-726-0190, or write to:
Cuisinart
150 Milford Road
East Windsor, NJ 08520
To facilitate the speed and accuracy of your return, please enclose $10.00
for shipping and handling of the product. Please also be sure to include a
return address, daytime phone number, description of the product defect,
product serial number (stamped on bottom of product base), and any other
information pertinent to the product’s return.
Please pay by check or money order. (California residents need only supply
proof of purchase and should call 1-800-720-0190 for shipping instructions).
NOTE: For added protection and secure handling of any Cuisinart® product
that is being returned, we recommend you use a traceable, insured delivery
service. Cuisinart cannot be held responsible for in-transit damage or for
packages that are not delivered to us. Lost and/or damaged products are
not covered under warranty.
Your Cuisinart® Automatic Bread Maker has been manufactured to strict
specifications and has been designed for use with the Cuisinart® Automatic
Bread Maker accessories and replacement parts. These warranties expressly
exclude any defects or damages caused by accessories, replacement parts,
or repair service other than those that have been authorized by Cuisinart.
These warranties do not cover any damage caused by accident, misuse,
shipment, or other than ordinary household use. These warranties exclude
all incidental or consequential damages. Some states do not allow the
exclusion or limitation of incidental or consequential damages, so the
foregoing limitation may not apply to you.
California Residents Only
California law provides that for In-Warranty Service, California residents have
the option of returning a nonconforming product (A) to the store where it was
purchased or (B) to another retail store which sells Cuisinart brand products
of the same type. The retail store shall then, according to its preferences,
either repair the product, refer the consumer to an independent repair facility,
replace the product, or refund the purchase price less the amount directly
attributable to the consumer’s prior usage of the product. If the above two
options do not result in appropriate relief to the consumer, consumer may
then take the product to an independent repair facility if service or repair
can be economically accomplished.*
Cuisinart and not the consumer will be responsible for the reasonable cost
of such service, repair, replacement, or refund for nonconforming products
under warranty.
California residents may also, according to their preference, return
nonconforming products directly to Cuisinart for repair or, if necessary,
replacement by calling our Consumer Service Center toll-free at
1-800-726-0190. Cuisinart will be responsible for the cost of the repair,
replacement, and shipping and handling for such nonconforming
products under warranty.
10
Before Returning Your Cuisinart Product
If you are experiencing problems with your Cuisinart® product, we suggest
that you call our Consumer Service Center at 1-800-726-0190 before
returning the product for servicing. Often, our Consumer Service
Representatives can help solve the problem without having the product
serviced. If servicing is needed, a representative can confirm whether the
product is under warranty and direct you to the nearest service location.
*Important: If the nonconforming product is to be serviced by someone other
than Cuisinart’s Authorized Service Center, please remind the servicer to call
our Consumer Service Center at 1-800-726-0190 to ensure that the problem
is properly diagnosed, the product is serviced with the correct parts, and to
ensure that the product is still under warranty.
© 2008 Cuisinart
Cuisinart® is a registered trademark of
Cuisinart
150 Milford Road
East Windsor, NJ 08520
Printed in China
08CU178
11