1
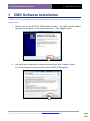
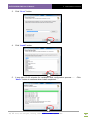
AVTECH CMS-NVR System 36CH CMS User’s Manual Release: VS39.JL12 For CMS V1.6.0.39 and above Table of Contents TABLE OF CONTENTS........................................................................................................................................... 0 SYSTEM REQUIREMENT ...................................................................................................................................... 1 SOFTWARE REQUIREMENT ................................................................................................................................ 1 HARDWARE REQUIREMENT............................................................................................................................... 1 SECTION I INSTALLATION & CONFIGURATION ................................................................................................... 2 1 CMS SOFTWARE INSTALLATION.............................................................................................................. 3 2 REGISTER AND ACTIVATE CMS ............................................................................................................... 6 IF YOU HAVE ALREADY REGISTERED AN E-MAIL ACCOUNT: ........................................................................................ 6 IF YOU DO NOT HAVE A REGISTERED E-MAIL ACCOUNT: ........................................................................................... 8 IF YOU CLOSE THE CMS ACTIVATION DIALOG, OR TRY TO ACTIVATE IT LATER: .............................................................. 11 3 DEVICES CONFIGURATIONS.................................................................................................................. 14 MANUAL ADD DEVICE. .................................................................................................................................. 14 DEVICE TABLE .............................................................................................................................................. 15 AUTO SCAN .............................................................................................................................................. 16 4 CONFIGURE LIVE MONITORING LAYOUT .............................................................................................. 17 SETUP LIVE LAYOUT....................................................................................................................................... 17 LIVE MONITORING DISPLAY SIZE OF ALL SPLIT MODES ............................................................................................ 18 SECTION II 5 OPERATIONS ............................................................................................................................. 19 CMS OVERVIEW................................................................................................................................... 20 LAYOUT VIEW MODE..................................................................................................................................... 21 User Interface .................................................................................................................................... 21 What is “Live Direct Mode”? .............................................................................................................................. 22 Devices List ........................................................................................................................................ 23 Device Information and Configurations ............................................................................................. 24 Live Monitoring.................................................................................................................................. 25 Camera Control Panel ........................................................................................................................ 27 Live Monitoring Layout Buttons......................................................................................................... 28 CMS Tool Bar...................................................................................................................................... 29 LIVE VIEW MODE ......................................................................................................................................... 30 6 SYSTEM CONFIGURATION .................................................................................................................... 31 SYSTEM SETUP ............................................................................................................................................. 31 LANGUAGE SETUP ......................................................................................................................................... 32 How to create a new language option? ................................................................................................................ 33 SYSTEM UPGRADE ........................................................................................................................................ 38 7 PLAYBACK RECORDING VIDEOS ............................................................................................................ 39 PLAYBACK ................................................................................................................................................... 39 Playback Timeline .............................................................................................................................. 41 Playback Player.................................................................................................................................. 42 30 SECONDS PLAYBACK ................................................................................................................................. 43 8 OTHER OPERATIONS OF CMS TOOL BAR ............................................................................................... 44 VIDEO INFORMATION .................................................................................................................................... 44 CLOSE ........................................................................................................................................................ 44 Copyrights © 2012 AVTECH CORPORATION http://www.avtech.com.tw 10F, NO. 19-11, San Chung Rd., Nankang, TAIPEI 115, TAIWAN +886(2)26553866 1 AVTECH 36CH CMS User’s Manual System Requirement System Requirement Software Requirement Software AVTECH 36 Channels CMS Operating System (OS) Microsoft Windows 7 Hardware Requirement Hardware AVTECH 36 Channels CMS CPU Minimum P4 3.0GHz and above, Intel Core i5 is recommended RAM Minimum 1GB , recommend 3GB and above Network Ethernet 1 Gigabit Display Screen A monitor supports 1366x768 or 1920x1080 (1080P) resolutions or above. AVTECH IP Camera Series: Supporting IP Camera Models Push Video Series AVN801; AVN806; AVN808; AVN80X; AVN812 ETS Series AVM217; AVM265; AVM301; AVM317A; AVM328A; AVM357A; AVM365A; AVM400; AVM417A; AVM428A, AVM457A Economic Series AVN211; AVN212; AVN222; AVN244/AVN244V; AVN252; AVN263; AVN284/AVN284V; AVN362/AVN362V; AVN363/AVN363V; AVM722; AVM745; AVN216; AVN257; AVN304, AVM314 AVTECH NVR Series: AVH306 Please visit http://cms.avtech.com.tw to get the up-to-date information or patches to upgrade for new models supported. Copyrights © 2012 AVTECH CORPORATION http://www.avtech.com.tw 10F, NO. 19-11, San Chung Rd., Nankang, TAIPEI 115, TAIWAN +886(2)26553866 1 AVTECH 36CH CMS User’s Manual SECTION I Installation & Configuration SECTION I Installation & Configuration 1 Software Installation 2 Register and Activate CMS If you have already registered an E-mail account If you do not have a registered E-mail account If you close the CMS activation dialog, or try to activate it later 3 Devices Configuration Manual Add Devices Device Table Auto Scan 4 Configure Live Monitoring Layout Setup Live Layout Live monitoring display size of all split modes Copyrights © 2012 AVTECH CORPORATION http://www.avtech.com.tw 10F, NO. 19-11, San Chung Rd., Nankang, TAIPEI 115, TAIWAN +886(2)26553866 2 AVTECH 36CH CMS User’s Manual 1 CMS Software Installation 1 CMS Software Installation Before you start installation process, please make sure your machine meets the system requirements. 1. Double-click on the AVTECH CMS Installer to start. The CMS Installer Wizard appears and will guide you through the process. 2. Click “Next>” button. Use scroll bar to read all the License terms and then click “I Agree” button. You must accept the License terms to use AVTECH CMS system. Copyrights © 2012 AVTECH CORPORATION http://www.avtech.com.tw 10F, NO. 19-11, San Chung Rd., Nankang, TAIPEI 115, TAIWAN +886(2)26553866 3 AVTECH 36CH CMS User’s Manual 1 CMS Software Installation 3. Click “Next>” button. 4. Click “Install” button. 5. It may take 15~20 minutes for installation and configuration process…… Click “Next >” button to continue when install completed… Copyrights © 2012 AVTECH CORPORATION http://www.avtech.com.tw 10F, NO. 19-11, San Chung Rd., Nankang, TAIPEI 115, TAIWAN +886(2)26553866 4 AVTECH 36CH CMS User’s Manual 6. 1 CMS Software Installation Click on the radio button “Reboot now” and then Click “Finish” button to close the Installer dialog. Your computer will restart immediately. A shortcut of AVTECH CMS appears on Windows Desktop. The installation is completed. Copyrights © 2012 AVTECH CORPORATION http://www.avtech.com.tw 10F, NO. 19-11, San Chung Rd., Nankang, TAIPEI 115, TAIWAN +886(2)26553866 5 AVTECH 36CH CMS User’s Manual 2 Register and Activate CMS 2 Register and Activate CMS AVTECH 36CH CMS application is free software. Register and activation of CMS is not only free but also provides users more support. Activate it now! Please make sure your computer is connected to an active network while registering an E-mail account and during CMS activation process. If you have already registered an E-mail account: 1. Run CMS application by clicking on the shortcut, the welcome message pops up. Click on “Free Activate” button. If you want to activate it later, click on “Trial” button. tool bar you can activate it anytime. In “System Config” of CMS 2. The AVTECH CMS Activation dialog pops up. Enter a registered E-mail and password and then click on “Activate” button to continue. during the process…. Make sure your internet is alive Copyrights © 2012 AVTECH CORPORATION http://www.avtech.com.tw 10F, NO. 19-11, San Chung Rd., Nankang, TAIPEI 115, TAIWAN +886(2)26553866 6 AVTECH 36CH CMS User’s Manual 2 Register and Activate CMS If you have already registered an E-mail account: 3. Click on “OK” to close the popup message and continue. 4. The language selection dialog comes after closing the window. Click on a radio button to select a desired language and then click on the check button to apply your selection. 5. CMS main menu will be launched. Now your CMS is run as activated version. Copyrights © 2012 AVTECH CORPORATION http://www.avtech.com.tw 10F, NO. 19-11, San Chung Rd., Nankang, TAIPEI 115, TAIWAN +886(2)26553866 7 AVTECH 36CH CMS User’s Manual 2 Register and Activate CMS If you do not have a registered E-mail account: 1. Run CMS application by clicking on the shortcut, the welcome message pops up. Click on “Activate” button. 2. The AVTECH CMS Activation dialog pops up. Click on the link at the bottom “If you don’t have account to activate, please click here to register”. The AVTECH CMS Support Home Page will be launched. Make sure your internet is alive. AVTECH CMS Support Home Page Copyrights © 2012 AVTECH CORPORATION http://www.avtech.com.tw 10F, NO. 19-11, San Chung Rd., Nankang, TAIPEI 115, TAIWAN +886(2)26553866 8 AVTECH 36CH CMS User’s Manual 2 Register and Activate CMS If you do not have a registered E-mail account: 3. Click on “Create an account” at the webpage. The register page will be launched. 4. Enter your information at this list and then click on “Register” to create your account. An activation link will be sent to your registered E-mail address. 5. Go to your registered E-mail address and check your E-mail box, find an E-mail sent from AVTECH Support. In the E-mail contains an account activation link. Click on the link or copy-paste this link in browser to activate your account. Copyrights © 2012 AVTECH CORPORATION http://www.avtech.com.tw 10F, NO. 19-11, San Chung Rd., Nankang, TAIPEI 115, TAIWAN +886(2)26553866 9 AVTECH 36CH CMS User’s Manual 2 Register and Activate CMS If you do not have a registered E-mail account: 6. Enter the registered E-mail and password at the AVTECH CMS Activation dialog and then click on “Activate” button to continue. the process…. Make sure your internet is alive during 7. Click on “OK” to close the popup message and continue. 8. The language selection dialog comes after closing the window. Click on a radio button to select a desired language and then click on the check button to apply your selection. Copyrights © 2012 AVTECH CORPORATION http://www.avtech.com.tw 10F, NO. 19-11, San Chung Rd., Nankang, TAIPEI 115, TAIWAN +886(2)26553866 10 AVTECH 36CH CMS User’s Manual 2 Register and Activate CMS If you close the CMS activation dialog, or try to activate it later: 9. CMS main menu will be launched. Now your CMS is run as activated version. If you close the CMS activation dialog, or try to activate it later: 1. Open CMS main menu and then click on “System Config”, the system configuration window pops up. 2. Click on the check button. The activation dialog will pop up. Copyrights © 2012 AVTECH CORPORATION http://www.avtech.com.tw 10F, NO. 19-11, San Chung Rd., Nankang, TAIPEI 115, TAIWAN +886(2)26553866 11 AVTECH 36CH CMS User’s Manual 2 Register and Activate CMS If you close the CMS activation dialog, or try to activate it later: 3. Enter the registered E-mail and password at the AVTECH CMS Activation dialog and then click on “Activate” button to continue. Make sure your internet is alive during the process…. 4. Click on “OK” to close the popup message and continue. 5. CMS will ask you to restart for turning to activated version. Click on “OK” button to close the message. Copyrights © 2012 AVTECH CORPORATION http://www.avtech.com.tw 10F, NO. 19-11, San Chung Rd., Nankang, TAIPEI 115, TAIWAN +886(2)26553866 12 AVTECH 36CH CMS User’s Manual 2 Register and Activate CMS If you close the CMS activation dialog, or try to activate it later: 6. Please restart CMS manually by clicking on the “Close” button. Now your CMS will run as activated version. Copyrights © 2012 AVTECH CORPORATION http://www.avtech.com.tw 10F, NO. 19-11, San Chung Rd., Nankang, TAIPEI 115, TAIWAN +886(2)26553866 13 3 Devices Configurations AVTECH 36CH CMS User’s Manual Manual Add Device. 3 Devices Configurations Adding or managing IP cameras is the very first start before using any other features of AVTECH CMS system. In this chapter will show you how to manage IP cameras through Setup Wizard. There are 3 parts contained in AVTECH Camera setting: Manual Add Devices: To add new IP cameras manually. Device Table: To manage and setup devices. Auto Scan: To scan and add connected device, or modify network settings of devices. Click to launch CMS Setup Wizard. CMS Setup Wizard is required login account. Manual Add Device. Template Description Device Name To enter device name of IP cameras. Default value is “Camera”. Host Address To enter the start IP address of IP cameras. The default start IP address is “192.168.0.1”. Port (0~65535) To enter the port number of device. The default port number is “80”. Account To enter the login user account of the device. Password To enter the login user password of the device. “Add Device” button Click to add the device according to your settings. Copyrights © 2012 AVTECH CORPORATION http://www.avtech.com.tw 10F, NO. 19-11, San Chung Rd., Nankang, TAIPEI 115, TAIWAN +886(2)26553866 14 AVTECH 36CH CMS User’s Manual 3 Devices Configurations Device Table Device Table Title Description Check Box Use checkbox to make changes for several devices at the same time. Edit To edit the selected device. ● represents the device is connected successfully. ● represents the device is failed to be added. Please check the Status settings, network, or if the model is supported. Device Name Shows device name of each device. Model Name Shows the model name of each device. Shows the IP address of each device. Please be aware that if the device is NVR(AVH306), it will appear 6 channels with the same IP address but different name. Shows the port number of each device. IP Address Port Shows the login user account of each device. Account Please make sure the account name is correct, or CMS cannot connect or add the device . Contains the login password of each device. Password Configure Please make sure the password is correct, or CMS cannot connect or add the device . Click on the “Configure” button to launch the web setting page of the selected device. Click on the button to show/hide tutorial of “Device Config.” Click to edit a selected device. Click to delete a selected device. Copyrights © 2012 AVTECH CORPORATION http://www.avtech.com.tw 10F, NO. 19-11, San Chung Rd., Nankang, TAIPEI 115, TAIWAN +886(2)26553866 15 3 AVTECH 36CH CMS User’s Manual Devices Configurations AUTO SCAN AUTO SCAN Title Check Box Description Use checkbox to select several devices at the same time. Click to configure a selected device. IP Shows the IP address of each scanned device. Port Shows the port number of each scanned device. Subnet Shows the subnet mask of each scanned device. Gateway Shows the gateway of each scanned device. Rescan Network Click the button to rescan devices. Add Selected Devices Click the button to add the selected devices. Please be aware that you can only add devices which are in the same network section. If CMS cannot scan and find any device, please check the following items: 1. Is the network connection correct and workable? 2. If the devices are connected to the network? 3. 4. Is there more than one NIC (Network Interface Card) installed on your computer? If yes, please contact your service provider. Check the firewall settings of your computer, please close the firewall. Copyrights © 2012 AVTECH CORPORATION http://www.avtech.com.tw 10F, NO. 19-11, San Chung Rd., Nankang, TAIPEI 115, TAIWAN +886(2)26553866 16 4 Configure Live Monitoring Layout AVTECH 36CH CMS User’s Manual Setup Live Layout 4 Configure Live Monitoring Layout Click “Live Monitor” tab at CMS Setup Wizard. At Live Monitor you can set up the Live display layout , and the layout you assign will automatically start in Live monitoring after you save the settings. Setup Live Layout 1 2 4 3 5 NO Options Actions The blocks marked 1~6 indicate the location of Live monitoring display. 1 Block Indicators 2 Click on the button to set a split mode for the selected Split Mode Selections block (NO.1). There are 1/4/9/16 split mode options for one block. 3 Device List 4 Schematic Diagram To add a device into position (see item 2). Click on to remove a device from the display layout. “Clear Block” button Click on the button to clear all devices at this block. The devices will return to device list and available to be set. “Save” button Click on the button to save all the settings or changes you make. Live will re-open automatically. List all IP cameras in Device Config. One device can only be added into layout one time. 5 Copyrights © 2012 AVTECH CORPORATION http://www.avtech.com.tw 10F, NO. 19-11, San Chung Rd., Nankang, TAIPEI 115, TAIWAN +886(2)26553866 17 4 Configure Live Monitoring Layout Live monitoring display size of all split modes AVTECH 36CH CMS User’s Manual Live monitoring display size of all split modes 1 2 3 16-Split Mode 4-Split Mode 16-Split Mode 4 5 6 9-Split Mode 1-Split Mode Copyrights © 2012 AVTECH CORPORATION http://www.avtech.com.tw 10F, NO. 19-11, San Chung Rd., Nankang, TAIPEI 115, TAIWAN +886(2)26553866 9-Split Mode 18 AVTECH 36CH CMS User’s Manual SECTION II 5 SECTION II Operations Operations CMS Overview Layout View Mode Live View Mode 6 System Configuration 7 System Setup Language Setup System Upgrade Activate AVTECH CMS Playback Playback Timeline Playback Player 30 Seconds Playback 8 Other Operations of CMS Tool Bar Snapshot Information Close Copyrights © 2012 AVTECH CORPORATION http://www.avtech.com.tw 10F, NO. 19-11, San Chung Rd., Nankang, TAIPEI 115, TAIWAN +886(2)26553866 19 AVTECH 36CH CMS User’s Manual 5 CMS Overview 5 CMS Overview This chapter introduces you the CMS and Live monitoring. There are two modes in CMS – Layout View mode, and Live View mode. Please refer to the following introductions. Figure 2-1: Layout View Mode displays in 1080P resolutions Figure 2-2: Live View Mode displays in 1080P resolutions Figure 2-3: CMS Menu displays in 1366x768 resolutions Copyrights © 2012 AVTECH CORPORATION http://www.avtech.com.tw 10F, NO. 19-11, San Chung Rd., Nankang, TAIPEI 115, TAIWAN +886(2)26553866 20 5 CMS Overview AVTECH 36CH CMS User’s Manual Layout View Mode Layout View Mode To configure devices, including IP cameras and NVR (AVH306). To setup Live monitoring layout. To operate CMS, the CMS tool bar. To control IP cameras – Pan, Tilt, Zoom. User Interface 1 3 4 2 NO 7 5 6 Options 8 9 10 Actions List all devices added by Setup Wizard. Buttons to operate “Minimize CMS”, “Auto Layout”, “Remove a device from Live”, and “Layout Setting Locker” 1 Devices List 2 Operation Buttons 3 Live Monitoring Playing Live videos. 4 Device Information and Configurations 5 Camera Control Panel Control panel of a selected IP camera. Displays the information of a selected IP camera. To setup a selected IP camera. Live Direct Mode Switch button Live Monitor Layout buttons Tool bar of CMS system, including System Setup, launch Setup Wizard, Playback Videos, Snapshot, Information, and Close CMS. Click on a selected channel of NVR and then the switch button, to enable/disable Live direct mode of it. To set up a Live monitoring display layout. To switch to Live View mode. 9 Resource Monitor Display current system resource status. 10 Live View mode switch button Click to switch to Live View mode. 6 7 8 CMS Tool Bar Copyrights © 2012 AVTECH CORPORATION http://www.avtech.com.tw 10F, NO. 19-11, San Chung Rd., Nankang, TAIPEI 115, TAIWAN +886(2)26553866 21 AVTECH 36CH CMS User’s Manual 5 CMS Overview What is “Live Direct Mode”? What is “Live Direct Mode”? “Live direct mode” allows users to access and receive the streaming from a selected IP camera directly without accessing via NVR – it is only supported for cameras connected to NVR. It can: To play real time Live avoiding jumping issue with the best video resolution. To quickly download playback and play. However to use Live Direct Mode, the devices connection must follow the illustrations below: Connection illustration for Enable “Live Direction Mode” Normal Connection illustration Copyrights © 2012 AVTECH CORPORATION http://www.avtech.com.tw 10F, NO. 19-11, San Chung Rd., Nankang, TAIPEI 115, TAIWAN +886(2)26553866 22 5 CMS Overview Devices List AVTECH 36CH CMS User’s Manual Devices List All devices you added into the CMS system will be listed at the table. At the list displays the device names and IP addresses. For more detail information or to configure a selected device, please use Device Information and Configurations. Icon Operation Description Minimize Click to minimize CMS menu and run it at the background. Auto Layout Click to automatically set the selected devices from device list into Live monitoring layout. Remove Clicking on a device at Live monitoring layout and then clicking this button can remove it. Lock-mode Click to lock Live monitoring layout. In Lock-mode : You can temporarily change the slipt-view without impacting layout settings. To save changes please unlock first. You cannot change the positions of devices at the layout. Click to unlock Live monitoring layout. In Unlock-mode all actions will be saved as what is configured in Setup Wizard >> Live Layout. : To change the split-view and the changes will be saved. To set one or exchange two devices from device list or at the layout by clicking the device first and then the position. Unlock-mode 2 2 1 Copyrights © 2012 AVTECH CORPORATION http://www.avtech.com.tw 10F, NO. 19-11, San Chung Rd., Nankang, TAIPEI 115, TAIWAN +886(2)26553866 23 5 CMS Overview Device Information and Configurations AVTECH 36CH CMS User’s Manual Device Information and Configurations 1 2 3 4 5 NO Options Actions 1 Device Information Displays the device name, IP address, MAC address, and the model name of the selected device. 2 Device Name pane To modify the device name. “Apply” button After you making changes of the selected device at the Configurations table or Device Name, click on “Apply” button to submit your settings. 4 “Get Info” button Clicking on a device from devices list, and then clicking on “Get Info” button to get the information of the selected device. 5 In the table you are able to configure the selected device. The configuration items may vary depending on Configurations table IP camera or NVR(AVH306). Click on “Apply” button to submit your changes. 3 Figure 2-3 : Configuration items of AVH306 Figure 2-4 : Configuration items of IP camera Copyrights © 2012 AVTECH CORPORATION http://www.avtech.com.tw 10F, NO. 19-11, San Chung Rd., Nankang, TAIPEI 115, TAIWAN +886(2)26553866 24 5 CMS Overview Live Monitoring AVTECH 36CH CMS User’s Manual Live Monitoring There are 6 main blocks in Live monitoring area. Each block can be set as 1/4/9/16 splits display. To change split-view, please use Live Monitor Layout buttons. When the locker is “Locked”, changing layout setting will NOT impact default Live monitoring layout settings.. However it will not be saved. To save the layout you must unlock the locker before changing the split setting or use Setup Wizard. 1 2 3 4 5 6 Live Monitoring Layout Buttons You are able to exchange two channels by clicking directly on their locations, even a device from the device list. This action will be automatically saved as default Live monitoring layout settings. NOTE: Please be aware that it works only in “Unlock mode” Copyrights © 2012 AVTECH CORPORATION http://www.avtech.com.tw 10F, NO. 19-11, San Chung Rd., Nankang, TAIPEI 115, TAIWAN +886(2)26553866 25 5 CMS Overview Layout View Mode AVTECH 36CH CMS User’s Manual Double clicking on a channel can enlarge it fitting a block like 1-split display, or revert it as original display size. Clicking on a channel at the Live monitoring layout, the device control panel appears at Camera Control Panel. Use the function icons to control IP cameras. aware that the function icons will be different according to the models. Please be The Live video of a NVR can be set into the layout by total-channel of it or a single channel of a NVR to a display channel. Playing all channels of a NVR Playing a single channel of a NVR Copyrights © 2012 AVTECH CORPORATION http://www.avtech.com.tw 10F, NO. 19-11, San Chung Rd., Nankang, TAIPEI 115, TAIWAN +886(2)26553866 26 5 CMS Overview Camera Control Panel AVTECH 36CH CMS User’s Manual Camera Control Panel Clicking on the icon directly can control a selected IP camera. The function icons may vary by different IP camera models. Function Icon Actions Pan-Tilt-Zoom direction pad Clicking on the arrow can make the selected IP camera changing direction. Normal zoom in. Click to make the selected IP camera zoom in a little. Normal zoom out. Click to make the selected IP camera zoom out a little. Max zoom in. Click to make the selected IP camera zoom in to the max automatically. Max zoom out. Click to make the selected IP camera zoom out to the max automatically. Focus in. Click to make the selected IP camera focus in a little. Focus out. Click to make the selected IP camera focus out a little. Auto pan. Click to make the selected IP camera pan automatically. Auto tracking. Click to make the selected IP camera track automatically. Smart zoom. Click to make the selected IP camera zoom in or zoom out automatically. Smart zoom 10. Click to make the selected IP camera zoom in or zoom out automatically every 10 seconds. Copyrights © 2012 AVTECH CORPORATION http://www.avtech.com.tw 10F, NO. 19-11, San Chung Rd., Nankang, TAIPEI 115, TAIWAN +886(2)26553866 27 5 CMS Overview Layout View Mode AVTECH 36CH CMS User’s Manual Live Monitoring Layout Buttons Clicking on any channel at a selected display block, and then clicking on a layout button can change the split-view for this block. 1 2 Clicking on the button View mode. can switch between Layout View mode and Live Layout View Mode Live View Mode Copyrights © 2012 AVTECH CORPORATION http://www.avtech.com.tw 10F, NO. 19-11, San Chung Rd., Nankang, TAIPEI 115, TAIWAN +886(2)26553866 28 5 CMS Overview CMS Tool Bar AVTECH 36CH CMS User’s Manual CMS Tool Bar Function Icon Actions System Config Click to launch System Config dialog. In System Config you can : Specify the video backup path or the snapshots storage path Select Language Set if the shutdown machine while closing CMS System upgrade Activate CMS Setup Wizard Click to launch Setup Wizard. In Setup Wizard you can manage devices, and setup Live layout. Playback Click to launch Playback Timeline. 30 seconds Playback Click to start playing the previous 30 seconds playback video. Click to show or hide the IP cameras information – frame rate, date and time…etc. The IP camera information will be shown at the top of each Live video which is playing as 1-split display.. Video Information Close Click to close CMS. It may shut down your machine if you enable this feature in System Config. To know more about the features above, please refer to the following chapters. Copyrights © 2012 AVTECH CORPORATION http://www.avtech.com.tw 10F, NO. 19-11, San Chung Rd., Nankang, TAIPEI 115, TAIWAN +886(2)26553866 29 5 AVTECH 36CH CMS User’s Manual CMS Overview Live View Mode Live View Mode Simply to view Live monitoring without any settings. To operate CMS, the CMS tool bar. To control IP cameras – Pan, Tilt, Zoom. 1 3 2 NO 1 Description Live Monitoring 4 5 6 7 Actions Playing Live videos. You can see the maximum 36 channels if you set so. ※ Please be aware that at Live View mode you CANNOT change the display layout or exchange the locations. 2 CMS Tool Bar Tool bar of CMS system, including System Config, launch Setup Wizard, Playback, 30s Playback, Snapshot, Information, and Close CMS. 3 Camera Control Panel Control panel of a selected IP camera. 4 Live Direct Mode Switch button Click to enable or disable Live direct mode of a selected channel. It is only supported for NVR. Browse pane Enter a device name here to find the device. Live view of the wanted device will be enlarged to 1-split display automatically. 5 Browse pans is very convenient when you try to look for a device from 36 channels. 6 System Resource Monitor Display current system resource status. 7 Layout View mode switch button Click to switch to Layout View mode. Copyrights © 2012 AVTECH CORPORATION http://www.avtech.com.tw 10F, NO. 19-11, San Chung Rd., Nankang, TAIPEI 115, TAIWAN +886(2)26553866 30 6 AVTECH 36CH CMS User’s Manual System Configuration System Setup 6 System Configuration Click on System Config icon from tool bar. The setup dialog pops up. In System Config you are able to configure the following items: System Setup NO 1 2 3 Options System Setup: Snapshot Path System Setup: Backup Path System Setup: Enable/Disable Shutdown Actions To specify a folder where you would like to storage snapshot images. Click on “Browse ”>> Click on “Apply To specify a folder where you would like to backup the selected recording videos. Click on “Browse ”>> Click on “Apply ” Click on the check box to enable or disable if you want to “shutdown machine” when clicking on “Close” from CMS tool bar. Click on checkbox >> Click on “Apply 4 ” ” Click on the check box to enable or disable if you System Setup: want CMS being launched automatically with Enable/Disable auto-launch Windows system startup. CMS with system startup Click on checkbox >> Click on “Apply ” Copyrights © 2012 AVTECH CORPORATION http://www.avtech.com.tw 10F, NO. 19-11, San Chung Rd., Nankang, TAIPEI 115, TAIWAN +886(2)26553866 31 6 AVTECH 36CH CMS User’s Manual System Configuration Language Setup Language Setup To change language display for CMS user interface. To create or edit language options. 1. Click on “ ” button. The language option list pops up. 2. Click on a radio button of a language you want, and then click on to apply. CMS will ask you to restart CMS application for applying the language display. Please restart the program. 1 2 3. You can also click on the link below “or you can connect to AVTECH page to add a new language” to create your own language. The following section will show you how to create it. Copyrights © 2012 AVTECH CORPORATION http://www.avtech.com.tw 10F, NO. 19-11, San Chung Rd., Nankang, TAIPEI 115, TAIWAN +886(2)26553866 32 AVTECH 36CH CMS User’s Manual 6 System Configuration Language Setup How to create a new language option? Once when you click on the link “or you can connect to AVTECH page to add a new language”, the AVTECH CMS homepage will be launched. Use the account you create at chapter 2 Register and Activate CMS to log in. If you have not yet created an account, create it now. 1. After log in CMS homepage, click on “Languages”. Copyrights © 2012 AVTECH CORPORATION http://www.avtech.com.tw 10F, NO. 19-11, San Chung Rd., Nankang, TAIPEI 115, TAIWAN +886(2)26553866 33 AVTECH 36CH CMS User’s Manual 2. 6 System Configuration Language Setup The Languages page appears. Click on “Launch Language Editor” and it will be launched to open at a new tab. At here you can view the history of all the languages you have created. 3. The Languages Editor appears. Specify a name and sample words at the pane, and then click on “Add” button. This will be the name of language you create. It will also be displayed as one option at System Config >> Language Setup. Copyrights © 2012 AVTECH CORPORATION http://www.avtech.com.tw 10F, NO. 19-11, San Chung Rd., Nankang, TAIPEI 115, TAIWAN +886(2)26553866 34 6 AVTECH 36CH CMS User’s Manual 4. System Configuration Language Setup At the below lists all language options. Click on a radio button of a selected language to select if you want to activate or edit it. To create or modify, click on the radio button “Editing” and then click on the “Edit” icon. 1 5. At the left lists all pages of CMS user interface that you are able to edit. mouse over the list, each thumbnail appears. then the page shows up.. 2 Move your Click on a page you want to edit and Copyrights © 2012 AVTECH CORPORATION http://www.avtech.com.tw 10F, NO. 19-11, San Chung Rd., Nankang, TAIPEI 115, TAIWAN +886(2)26553866 35 6 AVTECH 36CH CMS User’s Manual 6. System Configuration Language Setup At the page each item available for editing will be displayed overlay. You can also hide the overlay by clicking on “HIDE” at the left list – otherwise “SHOW” is for enabling overlay if you hide it. Move your mouse over each overlay (or each editable item) the edit box appears. Enter the words at the pane below “Original” and then click on “Apply” button to apply your changes. 7. Repeat step 5~6 until you want to finish the editing. 8. After you finished the language editing, click on “CREATE” at the left list. IE browser will ask you if you would like to open or save the file – the naming will be like this – for example, “2012-7-09_LanguagePatch-1341872249186.zip”. Click on “Save” or “Save as” and specify a path for the patch file. Please keep this file for upgrading it to your CMS later. 1 2 Copyrights © 2012 AVTECH CORPORATION http://www.avtech.com.tw 10F, NO. 19-11, San Chung Rd., Nankang, TAIPEI 115, TAIWAN +886(2)26553866 36 6 AVTECH 36CH CMS User’s Manual 9. System Configuration Language Setup A patch file will be created to the path you specified. 10. Click on “Browse ” at “System Config >> System Upgrade” to select the language patch file you just created. 11. Click on “ “ button to processing upgrade. A popup message will ask you to confirm. Click on “OK” to continue. After CMS is restarted, the language you created will be listed at the Language Setup option. CMS Restart… Copyrights © 2012 AVTECH CORPORATION http://www.avtech.com.tw 10F, NO. 19-11, San Chung Rd., Nankang, TAIPEI 115, TAIWAN +886(2)26553866 37 AVTECH 36CH CMS User’s Manual 6 System Configuration System Upgrade System Upgrade 1. Click on “Browse ” to select a patch file which is provided from AVTECH or a language patch file you created. At here displays current CMS version. 2. Click on “Upgrade “button to processing upgrade. A popup message will ask you to confirm. Click on “OK” button to continue. CMS will restart automatically after the upgrade process is completed. Copyrights © 2012 AVTECH CORPORATION http://www.avtech.com.tw 10F, NO. 19-11, San Chung Rd., Nankang, TAIPEI 115, TAIWAN +886(2)26553866 38 7 Playback Recording Videos AVTECH 36CH CMS User’s Manual Playback 7 Playback Recording Videos Please be aware that ONLY NVR(AVH306) can be launched for playback. AVTECH CMS provide users complete playback feature (“Playback”) and also quick playback (“30sec Playback”.) Read the following description to learn more about Playback. Playback 1. To search recording videos from a full-timeline table. To play recording videos from a desired time. To download recording videos. To take snapshots of a playing recording video. Click on a selected NVR, and then click on Playback icon from CMS Tool Bar. The playback timeline is launched to open. 1 2 2. All channels of the selected NVR will appear on top of playback time. Click on a channel you desire to query and then the result shows up. Copyrights © 2012 AVTECH CORPORATION http://www.avtech.com.tw 10F, NO. 19-11, San Chung Rd., Nankang, TAIPEI 115, TAIWAN +886(2)26553866 39 7 AVTECH 36CH CMS User’s Manual 3. Playback Recording Videos Playback The query result is presented in different line indicators on Playback Timeline, showing when there is an alarm trigger, a motion trigger, or a new start of continuously manual recording. There are three types of timeline for users to find a time by clicking-and-dragging on it. They are all available for dragging. Timeline 1 – by Hour Click and drag Timeline 2 – by Date Timeline 3 – by Month Time Intervals Bar 4. Dragging the central asix ( the orange line) to a target time, and then click on the play button from the control bar. The recording video will start playing from the time at an additional Playback Player (see Playback Player). Copyrights © 2012 AVTECH CORPORATION http://www.avtech.com.tw 10F, NO. 19-11, San Chung Rd., Nankang, TAIPEI 115, TAIWAN +886(2)26553866 40 7 AVTECH 36CH CMS User’s Manual Playback Recording Videos Playback Playback Timeline 1 2 3 4 5 NO 6 7 Description Actions Shows current selected device name. Click here to unfold the device list. You are able to change the channel. 1 2 Orange Line The central axis. Indicates the date and time. 3 Query Results Indicates the playback query results during a period. 4 Indicators Filter Options 5 Green line : There are recording videos existed. Blue line : Since when the continuously manual recording was started. Yellow line : There are Motion trigger playbacks existed. Red line : There are Alarm trigger playbacks existed. Click on the check boxes to filter recording videos. They will be indicated in different colors on the timeline. Alarm Trigger 6 Motion Trigger Manual Recording Download button. Click to download a recording video based on Download a time period. Click to go to previous section. Click to launch Playback Player and start playing recording video. 7 Control bar Click to go to next section Click to scale timeline. Click to close Playback Timeline returning to the menu Copyrights © 2012 AVTECH CORPORATION http://www.avtech.com.tw 10F, NO. 19-11, San Chung Rd., Nankang, TAIPEI 115, TAIWAN +886(2)26553866 41 7 Playback Recording Videos AVTECH 36CH CMS User’s Manual Playback Playback Player After clicking on “play” icon at Playback Timeline, it will lunch Playback Player and start playing the recording video. Function Icon Actions Rewind Click to rewind video playing. Play Click to play video. Pause Click to pause video playing. Fast Forward Click to fast forward video playing. Snapshot Click to take a snapshot. Close Click to close Playback Player. Copyrights © 2012 AVTECH CORPORATION http://www.avtech.com.tw 10F, NO. 19-11, San Chung Rd., Nankang, TAIPEI 115, TAIWAN +886(2)26553866 42 7 Playback Recording Videos AVTECH 36CH CMS User’s Manual 30 Seconds Playback 30 Seconds Playback To quick launch and play back the latest 30 seconds video of a selected channel. Click on a selected channel of NVR, and then click on Playback icon from CMS Tool Bar. The latest 30 seconds recording video of the selected channel will start playing at the Live monitoring layout. 1 Playing Here! 2 Buttons Click to minimize the player. Click to full-screen display. Click to close the player. Click to rewind the video playing. Click to play video. Click to pause the video playing. Click to fast forward the video playing. Click to take a snapshot. 30s Playback player is movable. By clicking at the player you are able to drag it. Copyrights © 2012 AVTECH CORPORATION http://www.avtech.com.tw 10F, NO. 19-11, San Chung Rd., Nankang, TAIPEI 115, TAIWAN +886(2)26553866 43 AVTECH 36CH CMS User’s Manual 8 Other Operations of CMS Tool Bar 8 Other Operations of CMS Tool Bar Video Information Click to show or hide the IP cameras information – frame rate, date and time…etc. The IP camera information will be shown at the top of each Live video which is playing as 1split display. Close Click to close CMS application. If you enable “shutdown machine” feature at System Config then the machine will shut down. Copyrights © 2012 AVTECH CORPORATION http://www.avtech.com.tw 10F, NO. 19-11, San Chung Rd., Nankang, TAIPEI 115, TAIWAN +886(2)26553866 44