1
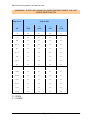
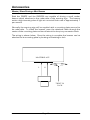
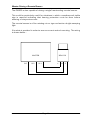
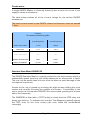
Operating Manual
Noise Activated Warning Sign
GA902
www.castlegroup.co.uk
Thank you for buying a Castle product, I am sure you will find both the goods and
the service to be of the highest quality but if not, then please feel free to write to
me personally and I will ensure that your needs are dealt with immediately.
This manual is designed to show you the operation of the goods you have
purchased and a very brief insight into acoustics itself. If you would like to
become a competent person in the eyes of the law, then you may like to know
more about our Competent Persons training course for Noise at Work
Reulations. You can visit www.castle-training.com to find out more.
It is my intention for Castle Group Ltd to provide a wide range of technical health
and safety products and Services of the highest standard. If you would like to
know more about any of our other products and services then please telephone
on +44(0)1723 584250 or visit www.castlegroup.co.uk
Simon Bull
Managing Director
Copyright
This manual is copyrighted with all rights reserved. Copying in part or in whole is
prohibited without the prior written consent of Castle Group Ltd.
Precautions
• Only operate the instrument as described in this manual.
• These are precision instruments, protect from shocks and vibrations.
• Ambient conditions for the operation of the unit are as follows:Temperature:
-10°C to +50°C
Relative Humidity: 30 to 90%
• Protect the unit from extremes of temperature and humidity, direct sunlight
and air with a high salt or sulphur content.
• Do not use any solvents or cleaning agents on the instrument. Use only a
soft dry cloth or a soft cloth lightly moistened with water when necessary.
• Do not allow any conductive objects, such as wire or metal particles to enter
the unit.
• Do not try to disassemble the instrument or attempt any repairs as this will
invalidate your warranty. Take a note of the condition of the instrument and
contact your authorised Castle service station.
• To ensure continued precision performance of your instrument have it
checked and serviced at regular intervals.
Contacting Castle Group
This manual contains complete operating instructions for the Noise Activated
Warning Sign, read it carefully and you will quickly become familiar with your
instrument and its operation.
If you do encounter problems with the operation of your instrument please feel
free to contact customer support with your enquiry on: Telephone:
Fax:
Website:
Email:
+44 (0)1723 584250
+44 (0)1723 583728
www.castlegroup.co.uk
[email protected]
[email protected]
Contents
Introduction............................................................................................... 1
Instrument Description ........................................................................ 1
Installation ................................................................................................. 2
Remote Microphone Option ................................................................ 2
Controls ...................................................................................................... 3
PCB Identification ................................................................................... 4
Calibration (RV1)............................................................................................................. 4
Trip Time (RV2) ............................................................................................................... 4
Trip Level (SW1) ............................................................................................................. 4
Master Slave Wiring ............................................................................. 6
Master Driving Slave(s) ............................................................................................... 6
Master Driving Master ................................................................................................ 7
Master Driving Dumb Masters ............................................................................... 8
Typical Complex System .............................................................................................. 9
Wiring .................................................................................................................................. 9
Accessories............................................................................................ 10
Master/Slave Driving a Mini Beacon ................................................................ 10
Master Driving a Remote Beacon....................................................................... 11
Combinations................................................................................................................. 12
Stainless Steel Model GA902 SS ........................................................................ 12
Technical Specifications .................................................................... 13
Warranty and After Sales Service ................................................ 14
Instrument Details .............................................................................. 14
Instrument Disposal ........................................................................... 15
Disclaimer ............................................................................................... 15
Introduction
The Castle GA902 instrument is designed to provide a visual warning of high
noise levels requiring some form of action.
In its standard form the sign is blank when OFF and clearly visible as an
illuminated message when ON.
Normally when illuminated the sign informs the viewer ‘Approved Hearing
Protection Must Be Worn’. Other message may be supplied to special order.
It is a design feature of the GA902 that the message can only be read when
the high noise level activates the device, reinforcing the message sign.
The GA902 which is readable in all conditions is available in four versions: GA902
GA902A
GA902SS
GA902SSA
Master 240V/110V
Slave 240V/110V
Stainless steel 240V/110V
Stainless steel slave 240V/110V
All units are sold as 240V or 110V which must be specified at the time of
ordering.
The Slave units are lamp assemblies which are driven from the master
unit(s).
Instrument Description
The instrument is essentially a standard sound level meter which drives a trip
circuit to provide a switch function at a chosen level.
The switch activates the fluorescent light so illuminating the warning
message.
After the noise level falls below the chosen trip level the light is extinguished
after the preset delay time.
Power is provided by the normal mains source and is housed in a tough metal
case similar to the normal EXIT type sign. It is simply either screwed to the
location point or may be hung using the hooks provided on the top of the unit.
The microphone is fitted within the unit.
Page 1
Installation
Choose a suitable location for the GA902 ideally mounted close to the main
noise source on the wall, in a position where operators can easily see the
display.
The white box can be mounted at any convenient point using screws in the
holes provided or alternatively may be hung on chains using the hooks
provided.
Power must be provided from a 3A fused mains supply and the following
connections must be made: Live (240V, 110V)
Neutral
Earth
J6/1
J6/2
J6/3
The unit has a variable overall trip level from 75dB(A) to 112.5dB(A) in 2.5dB
steps. The unit is factory preset at 80dB(A).
Remote Microphone Option
The GA902 can be supplied with a remote microphone (ZL1011-10).
If this option is required the built in microphone must be disconnected by
unscrewing the three PCB terminals (J1/1,2,3) and pulling the microphone
wires out of the terminal block.
These wires should be taped to the inside of the metalwork or alternately cut
out and remove completely.
Note that mains power is in this area and the wires cannot be allowed to
touch any part of the PCB.
Connect the remote microphone by bringing the cable into the box bottom via
one of the cable glands and connecting the wire to the PCB as follows: J1/1
J1/2
J1/3
power (red or brown)
signal (blue or white)
screen
Page 2
Controls
The GA902 is fitted with a TEST pushbutton which when pressed tests the
PCB relay and the illumination of the lamps.
Trip Setting
The GA902 is set to trip at 80dB(A) which is is the required sound pressure
level at the microphone to trip the unit.
This level can easily be adjusted from 75dB(A) to 112dB(A) by the user.
It must be noted that to achieve a warning switch on level of say 80dB(A) at
an operators ear position may mean setting the GA902 to work at a lower
level (or sometimes higher) to compensate for the distance effects.
From this it can be seen that the levels need to be measured both at the
operators position and at the location site for the GA902.
If a sound level meter is not available one may be purchased or hired from
Castle Group Limited.
Page 3
PCB Identification
The diagram below shows the position of the following components on the
PCB.
TRIP INCREASE
RV2
1 Amp Fuse
LK1
OPEN
TRANSFORMER
1
2
3
SW1
4
CLOSE
D
RV1
+
Calibration (RV1)
This potentiometer gives +5dB adjustment to the calibration level and is
factory set to match the microphone supplied. This control should not
require any further adjustment.
Trip Time (RV2)
This potentiometer may be adjusted to control the tripped period (lamp on
period) from 5 seconds to 30 seconds.
Trip Level (SW1)
This switch is used to set the trip level from 75dB(A) to 112.5dB(A) in 2.5dB
increments. The table on the following page shows the switch position
against trip level.
Access to the control board is gained by removing the right hand side end
panel. All adjustments should be done with the power disconnected.
Page 4
Reconnect the power to test the unit.
WARNING: THERE ARE MAINS VOLTAGES PRESENT INSIDE THE UNIT
WHEN SWITCHED ON
Trip Level
Switch SW1
dB
1
20dB
2
10dB
3
5dB
4
2.5dB
75
X
X
O
O
77.5
X
X
O
X
80
X
X
X
O
82.5
X
X
X
X
85
X
O
O
O
87.5
X
O
O
X
90
X
O
X
O
92.5
X
O
X
X
95
O
X
O
O
97.5
O
X
O
X
100
O
X
X
O
102.5
O
X
X
X
105
O
O
O
O
107.5
O
O
O
X
110
O
O
X
O
112.5
O
O
X
X
O – OPEN
X – CLOSED
Page 5
Master Slave Wiring
There are several different types of warning systems that may be put
together using the GA902 meter and the GA902A slave units as shown
below.
Master Driving Slave(s)
A GA902 (master) may drive up to 4 GA902A(s) (slaves) such that if the
master unit switches on then the slave unit(s) will also switch on.
This is particularly useful for situations where the slave unit is placed above a
doorway leading to the noisy environment to give advanced warning that
hearing protection must be worn.
A GA902 Master unit will drive a maximum of 4 GA902A Slave units.
The wiring is shown below: -
J7/1 L OUT
GA902
Master
L
J6/1
N
J7/2 N OUT
E
J7/3 E OUT
L
GA902A
Slave
N
E
J6/2 EARTH
SUPPLY
L
N
E
TO OTHER
SLAVES
Page 6
GA902A
Slave
Master Driving Master
A GA902 (master) may drive up to 10 GA902 master units such that if any
master unit is on then all the masters will also switch on.
This is useful where several units are located around a large factory where
ear protection must be worn if any master unit switches on.
The wiring is shown below: -
J4/1 Slave I/O J4/1
GA902
MASTER
(R32 = 0R)
GA902
MASTER
(R32 = 0R)
J4/2 GND
POWER
SUPPLY
POWER
SUPPLY
J4/1
GA902
MASTER
(R32 = 0R)
J4/2
To other
Masters
POWER
SUPPLY
Up to 10 masters may
be connected together
Page 7
Master Driving Dumb Masters
A GA902 master may be converted to a dumb master by removing the 0R
wire link from position R32 and replacing it with a diode such as a IN4148 or
IN4001 etc.
In this mode the dumb master will only switch on from a local noise (self trip)
but the master will switch on if either unit is switched on.
The wiring is shown below: -
J4/1 Slave I/O J4/1
GA902
MASTER
(R32 = 0R)
GA902 DUMB
MASTER
(R32 = Diode)
J4/2 GND
POWER
SUPPLY
POWER
SUPPLY
J4/1
J4/2
To other
Masters
Page 8
GA902 DUMB
MASTER
(R32 = Diode)
POWER
SUPPLY
Up to 10 masters may
be connected together
Typical Complex System
An example is shown below where there is a mixture of masters, dumb
masters and slaves all connected together to form a warning system: A
B
C
D
E
on when self tripped or B or C on
on when self tripped only
on when self tripped only
on when A, B, or C on
on when B is on only
A
GA902 Master
J7/1
L OUT
L
J7/2
N OUT
E OUT
N
J7/3
J4/1
J4/2
POWER SUPPLY
J7/1
B
GA902
Dumb Master
J7/2
J7/3
G
N
D
S
L
A
V
E
I/
O
E
L OUT L
N OUT N
E OUT E
J4/1
J4/2
D
GA902A
Slave
E
GA902A
Slave
POWER SUPPLY
C
GA902
Dumb Master
J4/1
J4/2
POWER SUPPLY
Wiring
All cables must enter or leave the units via the two cable entry glands at the
bottom right hand side of the unit.
Page 9
Accessories
Master/Slave Driving a Mini Beacon
Both the GA902 and the GA902A are capable of driving a small amber
beacon which attaches to the under-side of the warning sign. The beacon
emits a high intensity pulse of light at a nominal flash rate of approximately 1
per second.
Normally, the warning sign will be supplied with a mounting plate secured to
its under-side. To install the beacon, pass the attached cable through the
centre of the mounting plate and terminate at the lamp tray connector block.
The wiring is shown below. Once the wiring is complete the beacon can be
attached to its mounting plate by locating and twisting to lock.
MASTER/SLAVE
L
N
TWIST TO
LOCK
Page 10
Master Driving a Remote Beacon
The GA902 is also capable of driving a single free-standing remote beacon.
This could be particularly useful for situations in which a weatherproof visible
sign is required indicating that hearing protection must be worn before
entering a noisy environment.
The remote beacon is of the rotating mirror type and emits a bright sweeping
light.
A bracket is provided in order to ensure correct vertical mounting. The wiring
is shown below: -
MASTER
J8/3
J8/2
BEACON
J8/1
L
Page 11
N
E
Combinations
A single GA902 Master is obviously limited by the amount of current it can
supply to slaves and beacons.
The table below outlines all of the current ratings for the various GA902
accessories.
The total current drawn by the GA902, slaves and beacons must not exceed
1 Amp.
GA902
Accessory selection guide
Current (mA)
Current (mA)
UNIT VOLTAGE
110v
240v
MASTER
172
79.5
SLAVE
145
67
MINI BEACON
24
15
REMOTE BEACON
590
280
MAX CURRENT
1000
1000
Stainless Steel Model GA902 SS
The GA902 Stainless Steel is a special product for the food industry which is
substantially splash proof but not totally waterproof to submersion in liquid.
The unit may be wiped clean but care must be taken to avoid damage to the
microphone membrane.
Access to the unit is gained by removing the eight screws holding the front
screen and carefully removing the retainer and screen. Functionality of the
unit is similar to the standard GA902. We recommend greasing the screws
before final assembly.
The GA902SS is fitted with a TEST facility to check that the PCB relay and
lamps are working. To activate this, hold the Test Magnet (supplied) against
the TEST area on the front screen (the area inside the red-bordered
rectangle).
Page 12
Technical Specification
Trip Range:
75dB to 112.5dB in 2.5dB steps switch selectable
+5dB calibration control (factory set)
Trip Time:
5 seconds to 30 seconds user adjustable (potentiometer)
When tripped unit automatically resets after trip time
Frequency Weighting:
A weighted in accordance with BS EN 60651 Type 2
Time Weighting:
Slow 1000mS in accordance with BS EN 60651 Type 2
Microphone:
Type: Electric Condenser
Sensitivity: -65dB (0dB = 1V/μBar 1000Hz)
S/N ratio: 40dB
Calibration:
Factory Calibrated
Illumination:
Two 8W fluorescent tubes
Temperature:
Operating range: -10 to 50C
Effect of temperature: <0.5dB from -10 to 50C
Humidity:
Effect of Humidity: <0.5dB from 30% RH to 90% RH
Overall Dimensions and Weight:
520W x 200H x 120D mm
4.2Kg
In the interest of continued development, Castle Group Ltd reserve the right
to change any specification without due notice.
Page 13
Warranty and After Sales Service
Castle Group Ltd design and manufacture precision instruments, which if
treated with reasonable care and attention should provide many years of
trouble free service. In the event of a fault occurring, during the warranty
period, the instrument should be returned to Castle Group Ltd, in its original
packaging, or to an authorised agent. Please enclose a clear description of
the fault or symptom.
Details of the warranty cover are available from Castle Group Ltd or an
authorised agent.
All instruments are designed to meet rigid British and International
Standards. An annual calibration is recommended to ensure that these high
standards are maintained. This is particularly important for cases in which
instrument readings are to be used in litigation or compliance work.
For warranty and service return to: The Service Department
Castle Group Ltd
Salter Road
Cayton Low Road Industrial Estate
Scarborough
North Yorkshire
YO11 3UZ
Telephone:
Fax:
Email:
Web:
+44 (0)1723 584250
+44 (0)1723 583728
[email protected]
www.castlegroup.co.uk
Any misuse or unauthorised repairs will invalidate the warranty.
Instrument Details
For your records and for future correspondance with Castle Group Ltd
regarding your instrument, please complete the following details: -
Instrument Model
Instrument Serial Number
Purchase Date
Page 14
Instrument Disposal
The symbol shown here can be found on your instrument and
means that the product is classed as electrical or electronic
equipment and should be disposed of at the end of its life separately
to your commercial or household waste.
The Waste of Electrical and Electronic Equipment Directive (2002/96/EC)
has been established to help reduce the influx on landfill sites and effectively
treat hazardous substances by using best practices for the recovery and
recycling of products.
There are various collection systems in place within the EU for the disposal of
your product. To find the nearest UK waste recyling point in your area, enter
your postcode in the website www.recycle-more.co.uk
For more information please contact your local authority, the dealer where
you purchased your product or Castle Group Ltd.
Disclaimer
Whilst every effort is made to ensure the accuracy and reliability of both the
instrument described and the associated documentation, Castle Group Ltd
makes no representation or warranties as to the completeness or accuracy
of this information.
Castle Group Ltd assumes no responsibilty or liability for any injury, loss or
damage incurred as a result of misinterpreted or inaccurate information.
Any documentation supplied with your product is subject to change without
notice.
HB/0902/008/A4 Rev C
Page 15