1
Manual
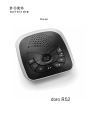
doro R52
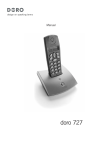
7
1
2
3
6
5
4
1
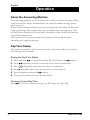
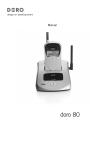
Two-way recording/Memo
5
Stop / On/Off
2
Delete message
6
Set Clock/Skip Message
3
Repeat/OGM record
7
Volume Control
4
Play/Pause
English
Installation
Battery
To ensure that messages and time/date information will be retained during a
possible power cut (max. 16 hours), a 9V – PP3 battery is required (not supplied).
When the battery is running low, the display will flash Lo, change the battery as
soon as possible.
Use only a high quality Alkaline battery.
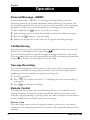
1. Ensure the telephone line cord is disconnected.
2. Remove the battery cover.
3. Connect the battery observing correct polarity.
4. Replace the battery cover.
Connection
Once the back-up battery has been installed.
1. Connect the telephone line cord to the T socket at the rear of the unit.
2. Connect the other end into the telephone network wall socket (using adapter
plug if required).
3. You will hear a click when the modular plug is correctly in place.
4. Connect the mains adapter to the DC 9V socket at the rear of the unit and then
to an electrical wall socket.
5. The unit will enter the initial start mode which takes about 30 seconds. During
this time the display will show Cr . When initialisation is complete the unit will
emit four tones.
6. Before you use the answering machine you should record an outgoing message
(please refer to page 6). You should also set the day/time stamp function (please
refer to page 4).
Warning!
Only use the supplied power adapter (9VDC).
Switching the Answering Machine On/Off
The answering machine can be switched ON or OFF using the ! button. In the
ON position, incoming calls will be answered by the answering machine, in the
OFF position no calls will be answered and the display will be off.
Please note!
Although turned Off, the Answering Machine will answer a call after 16 Rings. This is to allow
the remote ON and other features to be accessed.
www.doro.com
3
English
Operation
About the Answering Machine
The answering machine has to be turned on in order to receive messages. When
a call is received it will be answered after the selected number of rings (please
refer to page 5).
When the answering machine answers an incoming call, the caller will hear your
outgoing message. After a short beep they can then leave a message up to 300
seconds (user selectable 60/300 seconds). Should the caller exceed this limit the
call will be disconnected.
The memory will store approximately 40 minutes of incoming messages
(including the outgoing message).
Day/Time Stamp
The answering machine will announce the day of the week and the time when
each message was recorded.
Setting the Day/Time Stamp
1. Press and hold 9 9, a beep will be heard. Do NOT release the 9 9 button.
2. Press 8 8 repeatedly until the correct day of the week is announced.
3. Press a repeatedly until the correct hour is announced.
4. Press 9 repeatedly until the correct minute/s are announced.
5. Upon completion release the 9 9 button.
6. The selected settings will now be announced.
Checking Current Day/Time
Press 9 9. To hear the current settings, e.g.: Thursday, five fifty PM.
4
www.doro.com
Operation
English
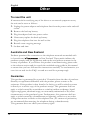
Number of Rings
Use the 2 7 TS switch at the rear of the machine to select after how many rings
the unit will respond to an incoming call.
2 = calls are answered after two rings.
7 = calls are answered after seven rings.
TS (TOLL SAVER) – activates the toll save function.
In Toll Saver mode incoming calls are answered after seven rings until the
first new message has been recorded. Once a message has been recorded the
answering machine will answer after approximately two rings.
This is useful when trying to remotely access the answering machine; if the
answering machine has not answered at the fourth ring, no messages have been
recorded and you can hang up before you are charged for the call.
If the machine answers after two rings new messages have been recorded.
Voice Control (VOX)
The answering machine will record a message as long as the caller keeps
speaking (max. time user selectable 60/300 seconds). If the caller stops
speaking, the answering machine will disconnect after approximately 7 seconds.
www.doro.com
5
English
Operation
Outgoing Message
The outgoing message is your message to an incoming caller and may be up to
30 seconds in length.
You may want the message to tell the caller that they may start speaking once the
beep is heard after your outgoing message.
If you choose not to record your own outgoing message the caller will hear a
prerecorded message.
An example of an outgoing message:
-“Hello we are unable to take your call right now, please leave a message at
the sound of the beep and we’ll return your call as soon as possible. Thanks
for calling.”
Recording an Outgoing Message
1. Press and hold 8 8 . You will hear a short beep, and the display will flash.
2. Record your outgoing message. Speak clearly towards the machine from a
distance of 15-20 cm (6-8 inches).
3. Release 8 8 to stop recording.
4. The outgoing message will be repeated after a few seconds. Repeat this
procedure if you want to change the message, any old outgoing message will
automatically be erased when a new one is recorded.
Checking the Outgoing Message
Press 8 8 . The current outgoing message will now be played.
Please note!
In case of a power failure if no back-up battery is fitted your outgoing message will be erased.
The answering machine will then use the pre-recorded outgoing message.
6
www.doro.com
Operation
English
Playback of messages
The display flashes to show how many new messages have been received. If no
new messages have been received the display shows total messages (old).
Playback will always begin with any new messages, for example if there are three
old messages and two new ones, only the two new ones will be played back,
then the answering machine will return to standby mode.
Press the play button once again to listen to all messages, starting with the
oldest messages.
1. Press 9 to start playback.
2. After each message the day and time the message was received will be
announced, after which a short beep will be heard.
3. When playback is finished you will hear two short beeps, and the machine
will return to standby mode. All incoming messages are saved (unless you
have erased any during playback, see below), new messages will then be
recorded after the old ones.
The following functions are available during playback:
Button
88
Function
Repeat the current message, or hold down until you hear a beep
to step back through the messages.
99
Skip to next message.
n
Stop playback.
C
Erase messages.
{ /}
Increase or decrease the speaker volume.
9 ||
Pause during playback (max. 7 seconds). Press 9 || again to
resume playback.
Delete Incoming Messages
If you want to delete a single incoming message press C while the message is
playing.
To erase all messages after playback, press and hold C until unit beeps.
Please note that new messages cannot be deleted until they have been played.
www.doro.com
7
English
Operation
Personal Message - MEMO
A personal message – MEMO – is a message recorded directly onto the
answering machine (60 seconds maximum) without dialling. This means that
the answering machine may be used as an electronic notebook, where messages,
reminders or other notes to family members or colleagues can be recorded.
1. Press and hold the a button. You will hear a beep.
2. Start speaking clearly towards the machine to record your Memo message.
3. Release the a button to stop recording.
4. Memos are played back in the same way as regular incoming messages.
Call Monitoring
Incoming messages can be heard through the loudspeaker as they are received.
If there is no sound adjust the volume using {}.
You can lift the handset of a parallel telephone and speak directly to the caller.
If the recording does not stop automatically, press ! on the answering machine,
or press # (2 seconds) on the telephone you are using.
Two-way Recording
You can record telephone conversations as they occur. There is approximately
40 minutes available recording time in memory, with the answering machine
handling two-way recordings as a regular incoming call.
1. A call is connected.
2. Press a. The display will show r2 , indicating that two-way recording is
in progress.
3. Press a to terminate recording.
Remote Control
This machine can be remotely controlled using the keys of an ordinary tone
dialling telephone. Call up the answering machine and enter the remote code
while the outgoing message is playing. Once the code is accepted, several remote
control commands are available (please see next page).
Remote Code
This three-digit remote code is required in order to gain access to the remote
functions of the answering machine. The remote code is printed underneath the
machine.
8
www.doro.com
Operation
English
Remote Control
1. Call up the answering machine.
2. While the outgoing message is playing, enter the remote code. If the code is
accepted, you will hear two beeps.
3. Select a remote control command (within 10 seconds) from below.
4. When you have finished accessing the machine replace the handset.
Command
Function
1#........................................ Play new messages
2# ....................................... Play all messages
During playback:
3#........................................ Erase single message during playback
4#........................................ Repeat message/Skip to previous message
5#........................................ Stop playback
6#........................................ Skip to next message
After playback:
7#........................................ Turn the answering machine either On or Off. Two
beeps indicate Off – One beep indicates On.
8#........................................ Record a new outgoing message, to Stop
recording press 5#.
9#........................................ Record a MEMO, to Stop recording press 5#.
0#........................................ Room monitoring (active for 30 seconds press 0#
to continue).
Room Monitoring
This remote access feature enables you to call your home and turn ON the
answering machine’s microphone function, allowing you to monitor sounds in the
room where the answering machine is situated.
Please note!
If the machine doesn’t respond correctly to the remote control commands, try pressing the telephone
buttons for a longer or shorter time. In normal cases, the answering machine should react to tones
approximately 0.5 – 1 seconds in length, but longer tones may be necessary in certain telephone
networks. If you do not enter any remote control command, the answering machine will disconnect
after a few seconds.
If you listen to any incoming messages for more than 2 minutes and 40 seconds, you will hear a
tone. Press any key to continue.
www.doro.com
9
English
Other
Remote Activation
The answering machine can be activated using the remote control functions.
1. Call up the answering machine. After approximately 16 rings, the machine will
answer and emit a long tone.
2. Enter the remote code, printed underneath the unit. If the code is accepted, you
will hear two short beeps.
3. Press 7# . One beep confirms that the answering machine is now on. Replace
the handset.
Out of Memory
The total capacity of the answering machine’s memory is approximately 40 minutes.
The memory space is shared between the outgoing message, personal memos, and
regular incoming messages.
When the memory is full the display will show FL, the answering machine will answer
after 16 rings to allow remote playback and deletion of messages, no new messages
will be accepted until the existing messages have been played and erased.
The display functions
The display on the unit can show the following messages:
The display shows
Function
Cr ....................................... Initialisation process
-- ......................................... Indicates OGM not recorded or day/time not set
Lo ....................................... Indicates battery is low
FL ....................................... Memory full
A1 ........................................ Announcement/Record playback
r1 ........................................ Memo recording
r2 ....................................... 2-way recording
00 ....................................... No message but announcement recorded
P ......................................... Pause in playback mode
No display ........................... Answer off.
10
www.doro.com
Other
English
Troubleshooting
Check that the telephone cord is undamaged and properly plugged in.
Disconnect any additional equipment that may be connected. If the problem is
resolved, the fault is with the other equipment.
Test the equipment on a known working line. If the product works then the
fault is with the line. Please inform your local telephone company.
The Answering Machine Is Not Answering
- Check that the unit is switched on
- Check that the telephone cable and the mains adapter are correctly
connected
The Answering Machine Does Not Respond to Remote Control
- Check that the telephone you are using to remotely access the answering
machine is tone dialling.
- Telephones that generate only a short tone signal when pressing a button
may not allow you to remotely access your machine. In this situation please
use a separate tone transmitter.
- Try holding the buttons down longer, approximately 1 second per digit.
I can’t hear the outgoing message very well
- Record a new outgoing message.
- Speak closer to the unit/microphone when recording.
The line is disconnected when someone leaves a message:
- The incoming message may be over the selected maximum recording time
(60/300 seconds). After this time, the call will be disconnected.
- If an incoming caller pauses for approximately 7 seconds while leaving a
message the call will be disconnected, as the voice control function will
believe that they have hung up.
I hear a tone sequence, but nothing happens when I press the playback
button:
- There are no incoming messages.
If the answering machine still does not work, refer to page 12.
www.doro.com
11
English
Other
To reset the unit
If unsuccessful in rectifying any of the above or an unusual symptom occurs,
the unit can be reset as follows:
1. Unplug the power adaptor and telephone line from the power outlet and wall
socket.
2. Remove the back-up battery.
3. Plug the adaptor back into power socket.
4. If necessary replace the back-up battery.
5. Plug the telephone line into the wall socket.
6. Record a new outgoing message
7. Set date and time.
Australia and New Zealand
Products permitted for connection to the telephone network are marked with
in Australia and
in New Zealand. These marks indicate the
products comply with the regulations and can be used without concern in the
country of purchase. If you believe this product is malfunctioning, please refer
to the relevant section and/or consult the troubleshooting guide in this manual
to ensure that you have followed the instructions carefully. As an alternative you
can visit our web site for FAQ’s or send an e-mail for a prompt reply.
Guarantee
This product is guaranteed for a period of 12 months from the date of purchase.
Should you experience difficulties with the product, please contact us for
assistance. If the product is then found to be faulty you will be asked to return
it directly to us with a copy of the purchase receipt. This guarantee shall not
apply to a fault caused by an accident or a similar incident or damage, liquid
ingress negligence, abnormal usage, not reasonably maintained or any other
circumstances on the purchaser’s part. Furthermore, this guarantee shall not
apply to a fault caused by a thunderstorm or lightning, excessive or any other
voltage fluctuations or faults on the telephone line. (As a matter of precaution,
we recommend disconnecting the telephone during a thunderstorm).
This guarantee does not affect your statutory rights.
12
www.doro.com
Other
AUSTRALIA
DORO Australia Pty Ltd
PO Box 6760
Baulkham Hills BC NSW 2153
Australia
NEW ZEALAND
Atlas Gentech (NZ) Limited
Private Bag 14927
Panmure
Auckland
New Zealand
Consumer Support
Ph:
Ph: 1300 885 023
Fax: (02) 8853-8489
Email: [email protected]
Web site: www.doro.com.au
Consumer Support
Ph: 0900-500-25 (Toll Call)
Fax: (09) 574-2722
Email:
[email protected]
English
REN (RN for New Zealand)
The REN (Ringer Equivalence Number) or (RN) is of significance only if
you wish to connect more than 1 telephone to your telephone line. A standard
telephone line has a maximum REN capacity of 3 (RN of 5). It is possible
to connect 3 devices with a REN of 1 (RN of 1) with no degradation to the
product’s performance. Exceeding this limit may cause the volume of the ringer
in any phone to decrease or not ring at all.
ALL PRODUCTS
The grant of a Telepermit for any item of terminal equipment indicates only
that Telecom has accepted that the item complies with the minimum conditions
for connection to its network. It indicates no endorsement of the product by
Telecom, nor does it provide any sort of warranty. Above all, it provides no
assurance that any item will work correctly in all respects with another item of
Telepermitted equipment of a different make or model, nor does it imply that
any product is compatible with all of Telecom’s network services.
This equipment may not provide for the effective hand-over of a call to another
device connected to the same line.
This equipment should not be used under any circumstances that may constitute
a nuisance to other Telecom Customers.
www.doro.com
13
Australia(English)
Version 1.0