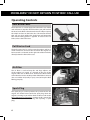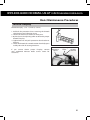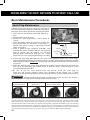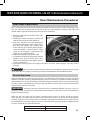
1
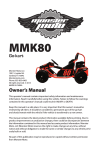
MMB80
Mini Bike
Monster Moto, LLC
1001 South Jupiter Road
Garland, Texas 75042
Phone: 855-833-6483
Monstermoto.com
All rights reserved. © 2014
MADE IN CHINA
Owner’s Manual
This operators manual contains important safety information and maintenance
information. Read it carefully before using this vehicle. Failure to follow the warnings
contained in this operators manual could result in INJURY or DEATH.
Keep this manual in a safe place. It is very important that this owners manual be
reviewed by any rider and it should be considered a permanent part of the mini bike
and should remain with the vehicle when transferred to a new owner.
This manual contains the latest product information available before printing. Due to
improvements or production changes, there could be discrepancies. Monster Moto LLC
(Monster Moto) reserves the right to make changes at any time, without notice and
without obligation to make the same or similar changes to any vehicle previously built
or sold.
No part of this publication may be reproduced or copied without written permission
from Monster Moto.
© Monster Moto LLC, 2014
PROBLEMS? DO NOT RETURN TO STORE! CALL US!
Contents
Warranty
1
Introduction and Safety Messages
2-5
Operating Controls
6-9
Before Riding
10 - 11
Basic Operation & Riding Technique
12 -13
Starting and Stopping the Engine
12
Braking Technique
13
Parking & Post Ride Inspection
13
Maintaining your Mini Bike
14 - 28
Maintenance Schedule
16
Component Locations
17
Fuel & Engine Oil
18 - 20
Air Filter
20
Throttle Freeplay Adjustment
21
Spark Plug
22
Rear Brake Adjustment
23
Tires
23 - 24
Drive Chain
25 - 27
Clutch
28
Appearance & Care
28
Troubleshooting
29 - 32
Resolving the Unexpected
33 - 34
Emissions Control Warranty
35 - 36
2
8
855*833*6483 OR EMAIL US AT [email protected]
Warranty Information
Congratulations on your decision to purchase a Monster Moto Power Sports product! We are
gratified that you have chosen a Monster Moto product, and we are dedicated to supporting your
successful and safe power sports recreation experience!
We are grateful for your business, and in order to assure your quality experience, please review and
make note of the following warranty related issues:
KEEP YOUR RECEIPT: Proof of purchase will be required to substantiate any warranty claim.
WHAT IS COVERED: Monster Moto warrants to the original retail purchaser of this Product that this
Product is free from defects in material or workmanship and agrees, at Monster Moto’s discretion,
to either repair, provide replacement parts for, or replace (without charge or labor) any product
component having a material defect for a period of ninety (90) days from the date of purchase,
except as limited below. Monster Moto may require the purchaser to return to Monster Moto, at
their expense, the part claimed to be defective for Monster Moto’s inspection, at which time the
returned parts or product become property of Monster Moto. This product is also covered by an
Emissions Control System Warranty which is separate from and in addition to this warranty.
WHAT IS NOT COVERED: This warranty does not cover any conditions caused by misuse, neglect,
negligence, accident or operation in any way contrary to the operating instructions located in the
operator’s manual. Normal wear, alteration, modification, improper or inadequate maintenance,
or use of unauthorized replacement parts or service provided by anyone other than an Authorized
Monster Moto Service Center are not covered under this warranty. This warranty does not cover
products used for rental or commercial purposes or used in competition, nor does it cover transportation costs for warranty service. Without limiting the above, this warranty is VOID with respect
to any product that has sustained damage resulting from impacts, accidents, jumping, or any other
uses considered outside of the scope of normal and safe operation.
LIMITATIONS OF LIABILITY: This Warranty is non-transferable after the Product’s initial sale. No
unapproved modifications can be made to the Product, its performance or otherwise, in order for
this Limited Warranty to remain in effect. No reimbursement is provided for towing, loss of time, loss
of use, inconvenience, incidental or consequential damages. This Limited Warranty covers only parts
and labor due to manufacturer defect. This Warranty does not cover minor surface blemishes, rips,
tears, or other cosmetic damages due to normal use, or other intentional or unintentional damage
to Product. This Limited Warranty will not cover any damage which results from the application of
improper cleaners, solvents or chemicals to the Product, or from smoke or soot, or from exposure to
saltwater, sea breeze or salt. This Limited Warranty will not cover any damage resulting from product storage in the elements. This Limited Warranty does not cover improper repair or misdiagnosis
of problem.
OWNER'S RESPONSIBILITIES As the vehicle owner, you are responsible for performing required
maintenance and maintaining a record and all receipts for maintenance performed on your mini
bike. Your warranty claim may be denied solely because of your failure to ensure the performance
of all scheduled maintenance or lack of maintenance records or receipts. As the vehicle owner, you
may be denied your warranty coverage if your vehicle or a part has failed due to abuse, neglect,
improper maintenance, or unapproved modifications.
1
PROBLEMS? DO NOT RETURN TO STORE! CALL US!
Introduction
Your Monster Moto dirt bike was designed as a recreational mini bike for off-road use
only and by a single rider. This mini bike is ideal for younger riders with basic experience.
Avoid operating this vehicle on paved surfaces including, but not limited to highways,
parking lots, sidewalks and driveways. Never operate this or any designated off-road
vehicle on a public street, road or highway where it will be in violation of local traffic
laws and restrictions.
Before riding, please take your time to get acquainted with your dirt bike and how it
works. To protect your investment we urge you to keep it well maintained. In addition
to regular maintenance it is important to observe and perform all pre-ride and periodic
checks outlined in this manual. In this manual you will find helpful safety information,
instructions, facts, and helpful tips. To make it easier to use, there is a table of contents
at the beginning.
As you read through this manual you will find information that is preceded with a
NOTICE symbol. This information is intended to help you avoid damage to your dirt bike
and property around you. This manual covers basic maintenance procedures.
Read the warranty page carefully so that you understand the coverage on your dirt bike
and are aware of your rights and responsibilities.
Whenever you ride, tread lightly by staying on established trails and in approved areas.
Protect the environment and keep off-road riding areas open for future use.
If you have any questions or you need any special service or repair, remember that
your Monster Moto dealer knows your mini bike best and will be dedicated to your
complete satisfaction. Replacement parts and technical support can be obtained online
at www.monstermoto.com or through phone at 855-833-6483. Please be sure to register
your Monster Moto product and notify us of any address changes so we may contact you
in the future with any important product information.
You can also visit our website at www.monstermoto.com to view service videos and
information about all Monster Moto Products.
2
8
855*833*6483 OR EMAIL US AT [email protected]
Important Safety Information
Your personal safety, and the safety of those around you, is extremely important. Operating this
mini bike safely is an important responsibility.
Monster Motor has provided operating procedures and other information on labels and in this
manual to help you make informed decisions about safety. This information will alert you to
potential hazards that could harm you or others.
It is understood that it is not practical or possible to warn you about all possible hazards associated
with operating and maintaining a mini bike. You must use your own good judgment.
Safety information will come in a variety of different forms, including:
t Safety Labels on the mini bike
Safety Messages preceded by a safety symbol
tDANGER,
WARNING or CAUTION.
!
and one of these three signal words:
Below are the definitions of these three words:
!
DANGER
You WILL be KILLED or SERIOUSLY INJURED if you do not follow instructions.
!
WARNING
You CAN be KILLED or SERIOUSLY INJURED if you do not follow instructions.
!
CAUTION
You CAN be INJURED if you do not follow instructions.
t Safety Headings such as important safety reminders and/or precautions.
t Safety Section such as mini bike safety.
t Instruction how to use the mini bike safely and correctly.
This entire manual is filled with important safety information - please read it carefully.
3
PROBLEMS? DO NOT RETURN TO STORE! CALL US!
Important Safety Information
A mini bike can provide many years of service and pleasure, provided you take responsibility for
safety, properly maintain your mini bike and understand the challenges you may encounter while
riding.
This mini bike has been designed for younger riders. However, not all youngsters meet the
physical and emotional levels that are needed for riding. Before parents allow any children to ride this
mini bike, we strongly recommend that both of you read this entire manual so you are fully informed
before deciding if your children are ready to ride. Listed below are some of the most important safety
measures one should take when riding.
! DANGER Never Ride Without a Helmet
The following statement is a proven fact:
``Helmets significantly reduce the number and severity of head injuries.” Never ride your mini bike
without a helmet. Even a crash at slow speed can result in a fatal head injury if you are not wearing
a helmet. Monster Moto recommends wearing helmets that have been certified for safety by helmet
testing organizations whom are independent from the helmet manufacturer. We also recommend
that you wear eye protection, boots, gloves, and other protective gear such as off-road riding pants.
! WARNING Never Carry a Passenger
This mini bike has been designed for ONE rider only.
There are no passenger pegs, footrests, handles or seat room for a passenger. Riding with a passenger
can interfere with your ability to operate and/or control the mini bike and may result in serious injury
or death.
! WARNING Ride Off-Road Only
This mini bike has been designed and manufactured for
off-road use only. The mini bike is not equipped with lights, turn signals, horn and other features
required to drive a mini bike on public roads. The tires are not designed for pavement and will make
the mini bike unstable if it is ridden on pavement. If you have to cross a paved road, dismount and
walk the mini bike across the road.
! WARNING
Ride Within Your Limits Never attempt to ride your mini bike in a manner that is
beyond your skill level. It takes time to learn off-road riding skills. Learn to ride your mini bike step by
step. Start by practicing on safe terrain at slow speeds and gradually build your skill level. Instruction
from an experienced rider(s) is highly recommended. Alcohol, drug use, and fatigue will reduce your
ability to make good decisions and ride safely. Monster Moto does not recommend minibike usage
when influenced by alcohol or drug use or when fatigued.
! WARNING Be Alert for Hazards
The terrain in which you ride can present many hazards.
Always “scan” the terrain ahead of you continually. Watch for unexpected turns, drop-offs, ditches,
rocks and other hazards. Always maintain a speed slow enough to allow you enough time to see and
react to hazards.
! DANGER Do Not Drink and Ride
Even one drink can impair your ability to ride a
mini bike safely. Each drink afterward will make the impairment worse. Do not drink and ride. Do
not let your friend’s drink and ride. Remember, in most states throughout the United States, you can
be arrested and charged with Driving Under the Influence (DUI) if you are riding a mini bike while
intoxicated. This applies to off-road mini bikes as well.
4
8
855*833*6483 OR EMAIL US AT [email protected]
Important Safety Information for Parents
As a parent, your child’s safety is your first priority. Riding an off-road mini bike is very fun.
However, just like riding a bicycle, bad decisions can result in injury. As a parent, you can prevent
accidents by making informed decisions about if, when and how your child will ride. Always
supervise your child when he/she is riding.
Before you allow your child to ride, you need to decide if he/she is capable of riding. Riding readiness
can vary tremendously from one person to another. Age and size are not the only factors that help
determine one’s riding readiness. There are three other factors that you should also consider before
deciding if your child is ready to ride.
First, consider physical ability of your child. Riders must be able to hold the mini bike up, get on,
and sit comfortably with both feet on the ground. The rider must also be able to reach all of the
controls on the handlebars and work the brakes. Second, consider your child’s athletic ability. Your
child should be good at riding a bicycle before riding a mini bike. Determine if your child can judge
speeds and distances while riding a bicycle and react with the proper hand and foot actions. Any
person who does not have good coordination, balance, and agility should not ride this mini bike.
Finally, determine your child’s level of mental and emotional maturity. It is imperative that you are
honest with yourself when you ask yourself the following questions: Does your child think through
problems and come to logical conclusions? Does your child obey your rules when they ride their
bicycle? If your child makes bad judgements, takes unwarranted risks and/or does not obey your
rules, they should not ride this mini bike.
If you have decided that your child is ready to ride, please remember the following points and never
let your child ride without a helmet. It is up to you (parent) to ensure your child’s safety, even if they
learn to ride from another experienced adult. Never push your child to try things faster than they are
willing or capable of doing. Always supervise your child when they are riding and regularly remind
them about safety rules. As a parent it is your responsibility to be sure that the mini bike is properly
maintained and kept in safe operating condition.
Modifying this mini bike or using parts not manufactured by Monster Moto can make your
mini bike unsafe. Before you consider making any modifications or adding an accessory, please read
the following information carefully.
! WARNING
Improper accessories or modifications can cause a crash in which you can be
seriously hurt or killed. Follow all instructions in this owner’s manual regarding modifications and
accessories.
Monster Moto strongly recommends that you do not remove any original equipment or
modify your mini bike in any way that may alter the design and/or operation. Such a change could
drastically impair the stability, handling, acceleration, and braking capabilities of the mini bike and
cause a crash. We also strongly suggest that you do not make any modifications to the exhaust
system components.
5
PROBLEMS? DO NOT RETURN TO STORE! CALL US!
Operating Controls and Component Locations
When you ride a mini bike off-road, you need to be able to operate the throttle, brakes,
and other controls without stopping to look at them. Please read this section carefully
before you ride your mini bike. This section of the manual will describe the function,
location, and operation of all the basic controls of your mini bike.
Engine Kill Switch
Brake Lever
Throttle
Choke Lever
Fuel Cap
Pull Start
Foot Peg
Foot Peg
Kick Stand
Chain Tensioner Fuel Shut Off
Attaching The Handlebars
Your Monster Moto MMB80 is shipped with
the handlebars NOT bolted on.
To attach the handlebars follow the steps below:
Top View
1. After unpacking your mini bike, place it on
Handlebar
the side stand on a flat level surface.
Clamps
2. Unscrew the screws from the handlebar
clamps and set aside. Remove upper clamp.
3. While sitting on the bike, place the handle
bars in the lower clamp in a comfortable position,
being careful to center in the clamps.
4. Replace upper clamps and bolts and tighten to
18 foot lbs with the wrench provided.
Tighten to
18 ft-lbs
6
8
855*833*6483 OR EMAIL US AT [email protected]
Operating Controls
Engine Stop
The engine stop switch is used to turn off the engine.
When the switch is in the “OFF” position it will remove the
spark from the ignition system. To start and ride the mini
bike, push the small red button (top).
This is the “RUN”
position. To shut off the engine, push the large red button
(bottom). This is the “OFF” position.
Fuel Valve
The two way fuel valve is used to control the flow of fuel
from the gas tank to the carburetor. The valve is located
under the gas tank. Turning the fuel valve to the “ON” position before starting the engine allows fuel to flow from the
tank to the carburetor. Turning the fuel valve to the “OFF”
position after shutting off the engine stops the flow of
fuel from the gas tank to the carburetor. Always keep the
fuel valve in the “OFF” position when you are not using the
mini bike.
Choke Lever
The choke lever is used for starting the engine when it is
cold or when you live in a cold weather climate. It is located
above the air filter on the back of the engine. The choke
lever increases the amount of fuel in the air/fuel mixture
that is delivered to the engine. See the photo to the right.
“Start” - Choke Fully ON “Run” - Choke Fully OFF
Throttle
The throttle controls the speed of the engine. To increase
engine speed, twist the throttle grip toward you. To reduce engine speed, twist the throttle grip away from you.
The throttle is spring loaded and will return to the closed
position (engine idle) when you remove your hand.
7
PROBLEMS? DO NOT RETURN TO STORE! CALL US!
Operating Controls
Rear Brake Lever
The brake lever is used to apply the brake to the rear wheel
and will slow or stop the mini bike. When you pull back on
the lever, brake fluid is forced into the brake caliper causing
the caliper to close on the brake disc. The amount of force
that you use when pulling the brake lever will determine
how much braking power is applied. To release the rear
brake, release the brake lever.
Pull Starter Cord
The Pull Starter Cord is used to start the engine and has a
recoil mechanism to retract the cord after the engine has
been started. It is located on the right side of the mini-bike,
directly below the front of the seat.
Air Filter
The air filter is used to keep dirt and large objects out
of the engine’s air supply. It is located at the rear of the
engine under the air filter cover. Examine the filter before
each ride to be sure it is not dirty and/or full of debris. You may
also use air filter oil (usually in spray cans) to keep the filter
flowing properly.
Spark Plug
The spark plug is used to produce the spark that fires the
engine. You should never touch the spark plug when the
engine is running or you will be shocked. Please refer to the
Basic Maintenance Procedures section of this manual for
detailed instructions on cleaning and replacing a spark
plug.
8
8
855*833*6483 OR EMAIL US AT [email protected]
Operating Controls
Kick Stand
The kick stand is used to support the mini bike when it is
parked. To operate, use your foot to lower the stand. Always
raise the stand before riding.
Brake Mechanism
The MMB80 mini bike is equipped with a rear disc brake.
It provides power to safely bring the mini bike to a stop. It
will also hold the mini bike at a stop if the engine is running.
Refer to the Basic Maintenance Procedures section for brake
adjustment instructions.
Chain Tensioner
The Chain Tensioner is located on the frame, near the rear
wheel on the frame. It is used to maintain proper chain
tension. The adjustment screw will increase or decrease
the slack on the chain. Please see Basic Maintenance
Procedures to understand how to determine proper
chain tension and for instructions to make adjustments to
maintain proper tension.
9
PROBLEMS? DO NOT RETURN TO STORE! CALL US!
Before Riding
Before you ride, you must be absolutely sure that you and your mini bike are ready to ride. To help
you get prepared, this section of the manual will discuss how to evaluate your riding readiness and
how to preform our recommended pre-ride inspection of your mini bike. If you are a parent, please
be sure you have read the section Important Message to Parents on page 4.
Are you Ready to Ride?
Before you ride your mini bike for the first time, we strongly recommend the following:
1. Completely read this manual.
2. Be sure you have read and understand all of the safety messages and labels.
3. You know how to operate all of the mini bike’s controls.
Before each ride, we also strongly recommend that you:
1. Are in good physical and mental condition.
2. Are free of alcohol and other drugs.
3. Are wearing an approved mini bike helmet with a tight chin strap, eye protection and other
protective clothing.
Protective Gear & Apparel
For your safety, we strongly recommend that you always wear an approved helmet, eye protection,
boots, gloves, long pants and a long sleeved jersey , shirt or jacket whenever you ride. Although
complete protection is not possible, wearing the proper gear can reduce the chance of and severity
of injuries when you ride.
! WARNING
Not wearing a helmet increases the chance of serious injury or death in a crash. Be
sure you always wear your helmet and other protective apparel when you ride.
Helmets and Eye Protection - Your helmet is your most important piece of riding gear because
it offers the best protection against head injuries. A good helmet will be approved by a testing
organization independent of the helmet manufacturer and will have a chin strap that can be tightened securely. Open-face helmets offer some protection, but a full-face helmet offers the most
protection. When purchasing a helmet, regardless of style, look for a DOT (Department Of Transportation) sticker (USA only). If the helmet has been tested by an independent organization such as the
Snell Institute, you will usually find their logo on a tag inside the padding of the helmet
Additional Riding Gear - In addition to your helmet and eye protection, we also recommend:
1. Sturdy off-road riding boots to help protect your feet, ankles and lower legs.
2. Off-Road riding gloves to protect your hands.
3 Riding pants with knee and hip pads, a riding jersey with elbow pads and a chest/shoulder
protector.
10
8
855*833*6483 OR EMAIL US AT [email protected]
Is the Mini Bike Ready to Ride?
Before each and every ride you take, it is extremely important that you inspect the mini bike and
make sure any problems you find are corrected. A pre-ride inspection is a must because off-road
riding can be very tough on the mini bike and you do not want to have a breakdown far from help.
! WARNING
Improperly maintaining your mini bike or failing to correct a problem before
riding can cause a crash in which you can be seriously hurt or killed. Always preform a pre-ride
inspection before any ride and correct any problems.
Note to Parents: If a youngster will be preforming any of the following pre-ride inspection procedures, it is
your responsibility to provide careful supervision and make sure they are performed correctly.
Pre-ride Inspection
Check the following items before you get on the mini bike:
Tires - Use a tire pressure gauge to check the air pressure (10-15 PSI). Inflate or deflate as needed.
Also check for signs of damage or excessive wear.
Rims - Inspect the rim to be sure it is not bent or damaged.
Leaks - Look under the mini bike for signs of leaking fluid such as engine oil or gasoline.
Engine Oil - Check the level of engine oil and add if needed.
Fuel - Check the level of fuel in the gas tank. Add if needed. Be sure the gas cap is tightened securely.
Drive Chain - Inspect the drive chain condition and slack. Adjust and lubricate if needed. Also check
the chain tensioner for wear and replace when it is worn. For detailed instructions on drive chain
slack adjustment, see the Basic Maintenance Procedures section of this manual.
Brake Cable - Inspect the brake cable for kinks or other damage and replace if needed. Inspect all
accessible nuts and bolts. Tighten them if it is needed.
Spark Plug - Check the spark plug for looseness. Tighten if needed. Be sure the cap is fastened to the
spark plug properly.
Nuts & Bolts - Look over entire mini bike for loose nuts and bolts. Tighten if needed.
Check the following items after you get on the mini bike:
Handle Bars - Be sure mini bike steers freely and handle bars are properly secured.
Throttle - Check the throttle freeplay and adjust if needed. Rotate the throttle to be sure it moves
easily and freely. Make sure that it snaps shut automatically when you release it in all steering
positions.
Brakes - Squeeze the brake lever to be sure the brakes are working properly.
Remember, be sure to take care of any problems you find or have your Monster Moto dealer correct
it before you ride.
11
PROBLEMS? DO NOT RETURN TO STORE! CALL US!
Basic Operation & Riding
This section of the manual gives basic information on how to begin riding your mini bike. In this
section we will cover how to start and stop the engine, how to use the throttle and brakes, and things
you need to do when you are finished riding.
To protect your new engine and enjoy optimum performance and service life, be sure you break-in
your mini bike properly. To do this, avoid full throttle starts and rapid acceleration for the first 15 miles
(25 km) of riding.
Safe Riding Precautions
Before riding this mini bike, be sure you have read this entire manual up to this point including the
section titled Important Safety Information & Before Riding.
Even if you have ridden other mini bikes in the past, take time to get familiar with the way the
Monster Moto mini bike works and handles. Always practice in a safe area until you have built your
skill level to a point at which it is safe to ride.
! CAUTION For your safety, avoid starting or operating the mini bike in an enclosed area with
poor ventilation, such as a garage. The mini bike’s exhaust gas contains poisonous carbon monoxide
which can collect rapidly in an enclosed area and result in illness or death.
!
WARNING Your mini bike is not equipped with lights. Do not ride at night.
Starting & Stopping the Engine
Always follow the proper starting procedure as described below.
Preparation
Check the engine stop switch and switch to “RUN” if needed. Turn the fuel valve to the “ON” position.
Starting Procedure
To restart a warm engine, follow the procedure for high air temperature.
Normal Air Temperature 50 - 95 F (10 - 35 C)
1. Move the choke lever to the right, toward the pull start.
2. Firmly grip the pull start handle and pull.
12
8
855*833*6483 OR EMAIL US AT [email protected]
Starting & Stopping the Engine
Starting Procedure (cont.)
3. Once the engine starts, warm up the engine by opening and closing the throttle slightly.
4. About 15 seconds after the engine starts, push the choke lever all the way to the left (fully off ).
5. If the engine idle is unstable, adjust the choke. The idle will smooth out as the engine gets
warmer. Turn off the choke when idle stabilizes.
Higher Air Temperature 95 F (35 C) or above.
1. Do not use the choke.
2. Start the engine (Follow step 2 under normal air temperature)
Lower Air Temperature 50 F (10 C) or below.
1. Follow steps 1 - 2 under normal air temperature.
2. Warm up the engine by opening and closing the throttle slightly.
3. Continue warming up the engine until it idles smoothly and responds to the throttle with the
choke lever moved all the way to the left (fully off ).
Notice: Extended use of the choke in position A (fully on) may impair piston and cylinder wall lubrication
and damage the engine.
Flooded Engine
If the engine fails to start after repeated attempts, it may be flooded with excess fuel. Follow the steps
below to clear a flooded engine:
1. Push the engine stop switch into the “OFF” position.
2. Push the choke lever completely to the left to the “OFF” position.
3. Open the throttle completely.
4. Crank the engine 10-15 times using the pull starter.
5. Push the engine stop switch into the “ON” position.
6. Follow the high air temperature starting procedure.
How to Stop the Engine
To stop the engine, push the engine stop switch into the “OFF” position.
13
PROBLEMS? DO NOT RETURN TO STORE! CALL US!
Braking Technique
This section will cover basic braking technique for your mini bike. To slow or stop the
mini bike, squeeze the brake lever firmly and smoothly. Gradually increase your braking
pressure as you feel it is needed. When you come to a stop, put your foot down to balance the mini
bike.
Generally, reduce your speed and complete your braking before you begin a turn. Avoid braking or
closing the throttle quickly while turning. Either of these actions may cause one or both of the wheels
to slip. Any wheel slip will reduce your control over the mini bike and could cause a crash.
When riding in wet or rainy conditions, or on loose surfaces such as mud or sand, your ability to
maneuver and stop the mini bike will be reduced. All of your actions should be done in a smooth and
steady manner under these conditions. Rapid acceleration, braking, or turning can cause you to lose
control of the mini bike. For your safety, exercise extreme caution when riding under wet, rainy, and/
or muddy conditions.
Parking & Post Ride Inspection
When you have finished riding, lower the kick stand to support your mini bike. Turn the engine stop
switch to the “OFF” position. If you are through riding for the day, turn the fuel valve to the “OFF”
position. Always park the mini bike on a flat level surface. If you will be storing the mini bike for a
long period of time, turn the fuel valve to the “OFF” position while the engine is still running. Open
and close the throttle repeatedly until the engine stops running on its own. This uses up any fuel that
still remains in the carburetor. This will help you avoid carburetor problems that can occur when your
mini bike is stored for long periods of time with gasoline left in the carburetor.
14
8
855*833*6483 OR EMAIL US AT [email protected]
Maintaining your MMB80 Mini Bike
Keeping your mini bike in perfect operating condition is absolutely essential to your safety. It is also
the best way to protect your investment, get maximum performance, avoid breakdowns, and have
more fun. To help keep your mini bike well maintained, this section includes a maintenance schedule
for required servicing and step-by-step instructions on how to perform specific maintenance tasks. In
this section you will also find important safety precautions, and tips for keeping your Monster Moto
mini bike looking good.
Careful pre-ride inspections and good maintenance are invaluable. The service intervals in this
section are based on average riding conditions. More frequent service is needed if you subject your
mini bike to severe use, or ride in unusually wet and dusty areas. Frequent checks of the air cleaner
are very important to help you avoid engine damage.
! WARNING Improperly maintaining this mini bike or failing to correct a problem before you
ride can cause a crash in which you can be seriously hurt or killed. Always follow the inspection and
maintenance recommendations and schedules in this manual.
Remember, proper maintenance is the responsibility of the owner. Be sure to inspect your mini bike
before each ride and follow the maintenance schedule in this section.
Note to Parents: As a parent, it is up to you to make sure the mini bike is properly maintained and kept
in safe operating condition. For youngsters, learning how to take care of a mini bike and perform basic
maintenance can be an important part of their riding experience. However, if you allow a youngster to
perform or assist in any maintenance task, such as filling the tank with gasoline, you need to provide close
supervision and make sure the task is performed correctly.
! WARNING Failure to properly follow maintenance instructions and precautions can cause you
to be seriously hurt or killed. Always follow the procedures and precautions in this manual.
Important Safety Precautions
Make sure the engine is off before you begin any maintenance or repairs. This will help eliminate the
following hazards:
1. Carbon monoxide poisoning from engine exhaust - Be sure you have adequate ventilation
whenever you operate the engine.
2. Burns from hot mini bike parts - Let the engine and exhaust system cool off before you
touch them.
3. Injury from moving parts - Do not run the engine unless instructed to do so.
Read all instructions before you begin a procedure. Make sure you have all of the tools and skills
required. To help prevent the mini bike from falling over, park it on a firm, level surface, using the
side stand or a maintenance stand to provide support. To reduce the chance of a fire or explosion,
be careful when working around gasoline. Use only a non-flammable (high flash point) solvent such
as kerosene or mineral spirits to clean parts. Keep cigarettes, sparks, and flames away from all fuel
related parts.
15
PROBLEMS? DO NOT RETURN TO STORE! CALL US!
Maintenance Schedule
Regular inspection and service is required to keep your mini bike in safe and reliable riding
condition. Below is a maintenance schedule showing when components need to be inspected or
serviced. Some items on the list can be performed with basic mechanical skills and hand tools; others require more extensive procedures requiring special training, tools and/or equipment. If you do
not feel capable of preforming any of the procedures described in this manual or if you need assistance, contact your nearest authorized dealer. If you decide to do your own maintenance, use only
replacement parts that you have purchased from a Monster Moto dealer or parts purchased directly
from Monster Moto.
Because this mini bike does not have an odometer, service intervals in the maintenance schedule
are expressed in terms of hours ridden. To avoid missing required maintenance, we suggest you
develop a reliable way to record riding time. Always perform the pre-ride inspection at each
scheduled maintenance interval.
Each item on the maintenance schedule requires some mechanical knowledge. You will find that
some items in the table (marked * and **) may require a higher level of mechanical skill and special
tools. If you do not feel capable of preforming any procedure, please consult your nearest Monster
Moto dealer.
Note: Service your mini bike more frequently when you ride in wet or dusty conditions.
* Can be performed by owner with proper tools and knowledge, otherwise consult a service center.
** Recommended to be performed by authorized service center.
SEE MONSTERMOTO.COM FOR SIMPLE HOW-TO VIDEOS FOR ALL BASIC MAINTENANCE PROCEDURES
16
8
855*833*6483 OR EMAIL US AT [email protected]
Component Locations
Throttle Control
Fuel Tank
Fuel Cap
Disk Brake
Assembly
Carburetor
Oil Drain
(Front of Engine)
Brake Lever
Air Filter
Spark Plug
Oil
Fill
Clutch
(Under Chain Guard)
Chain
Tensioner
17
PROBLEMS? DO NOT RETURN TO STORE! CALL US!
Basic Maintenance Procedures
Fuel
Fuel Recommendation
The engine in your mini bike has been designed to run on any gasoline with a pump octane rating
of 86 or higher. Most service stations will display the octane rating above each pump. Although it is
not required, Monster Moto recommends use of gasoline with a 92 octane rating or higher to ensure
maximum performance and reliability. This engine is not designed to work with ethanol blended fuel.
Use of a lower octane gasoline can cause pre-detonation in the engine. When this occurs, you will
hear a persistent “pinging” or “spark knock” which, if severe, can cause engine damage. It is however no cause for concern if you hear light pinging while the engine is under hard acceleration,
such as climbing up a hill. If pinging occurs under normal load and a steady engine speed, switch
brands of gasoline and be sure you are using the proper octane rating. Use of unleaded fuel is
recommended because it produces fewer engine deposits and extends the life of the engine and
exhaust components.
Never use stale or contaminated gasoline. Never use gasoline that has been mixed with oil. Avoid
getting dust, dirt and water into the fuel tank.
Refueling Procedure
1. Twist the fuel tank cap counter-clockwise and remove the cap from the tank.
2. Using a funnel, add fuel to the tank until the level reaches about 2 inches from the top of the
tank.
3. Twist the fuel cap clockwise until it is securely tight.
!
WARNING Gasoline is highly flammable and explosive. You can be burned or seriously injured
when handling gasoline. Always stop the engine. Only handle gasoline outdoors. Clean all spills immediately.
18
8
855*833*6483 OR EMAIL US AT [email protected]
Basic Maintenance Procedures
Engine Oil Recommendation
SAE 10W-30 is recommended for use in most climates. See the oil/air temperature chart to help you
choose the best oil for your climate:
SAE Viscosity Grades
AMBIENT TEMPERATURE
! CAUTION Your mini-bike does not need oil additives. Only use the recommended oil. Do not
use oils with graphite or molybdenum additives or oils displaying the API circular logo that is labeled
“energy conserving”. These engine oils may adversely affect engine performance
Checking and Adding Oil
1.
2.
3.
4.
Park the mini bike on a firm level surface.
Clean around the oil fill cap and any nearby surfaces.
Unscrew the oil fill plug and wipe it clean.
Hold the mini bike upright so that it is not resting
on the kick stand.
5. Insert the oil fill cap back into the engine until it seats,
but do not screw it in.
6. Remove the oil fill cap and check the oil level. If the oil
level is at or near the upper mark (1), you do need to
add oil. If the oil level is below or near the lower level
mark (2), add the recommended oil until it reaches the
upper level mark (1). Do not overfill.
7. Insert the oil fill cap and screw it in tightly.
8. Start the engine and check for oil leaks.
19
PROBLEMS? DO NOT RETURN TO STORE! CALL US!
Basic Maintenance Procedures
Changing Engine Oil
1.
2.
3.
4.
5.
Park the mini bike on a firm level surface.
Remove the oil fill cap/dipstick.
Place an oil drain pan under the engine.
Unscrew and remove the oil drain bolt.
Once most of the oil has drained, move the mini bike
from side to side to drain out any remaining oil.
6. Examine the sealing washer for damage and replace
if any damage is present.
7. Install the oil drain bolt and tighten to the specified
torque of 18 foot pounds.
8. Pour the recommended oil into the engine and fill
until the oil level is correct.
9. Install the oil filler cap/dipstick and tighten securely.
10. Start the engine and let it run for a minute or two.
11. Shut off the engine and check the engine oil level,
add oil if needed. Do not overfill.
12. Check for any oil leaks.
13. Dispose of waste oil in an approved manner.
NOTICE
Always dispose of waste
oil in the proper manner.
Failure to do so is harmful
to the environment and
illegal in most states.
Air Filter
Your air filter is located on the back of the engine in the square plastic case. Proper air filter
maintenance is extremely important for off-road vehicles. Dirty, water-soaked, worn out, or defective
air filters will allow dirt, dust, mud and other impurities to pass into the engine. Always replace the air
filter with a filter of the same size and construction.
1. Unclip the clips holding the air cleaner cover to
the housing
2. Remove the air filter
3. Wearing rubber gloves and eye protection, clean
filter with a non-flammable solvent like mineral
spirits. Squeeze excess solvent from media, taking
care to not damage filter element
4. Inspect foam for cracks or tears and replace if
needed
5. Allow filter to dry completely
6. Soak filter in a quality air filter oil and squeeze out
excess oil
7. Reinstall element and replace cover
20
8
855*833*6483 OR EMAIL US AT [email protected]
Basic Maintenance Procedures
Throttle Freeplay
Throttle Freeplay - 1/16 - 1/4 inch (2 - 6mm)
1. Pull back the protective sleeve covering the throttle
cable lock nut and adjusting sleeve.
2. Loosen the lock nut so sleeve can freely turn.
3. By hand, turn the adjusting collar to obtain the proper
throttle free play.
4. Tighten lock nut and push protective sleeve back over
lock nut.
5. Check the throttle for smooth rotation from fully open
to fully closed in all steering directions.
If you cannot obtain proper freeplay, contact
your authorized Monster Moto service center for
assistance.
Protective
Sleeve
Adjusting
Collar
Throttle
Lock Nut
21
PROBLEMS? DO NOT RETURN TO STORE! CALL US!
Basic Maintenance Procedures
Spark Plug Maintenance
A fouled (dirty) spark plug can cause your mini bike to
run poorly and lose performance. Follow the steps below
to inspect, clean and/or replace the spark plug if needed.
1. Clean any dust and dirt from around the spark plug
base.
2. Disconnect the spark plug cap.
3. Remove the spark plug using a 19mm socket or
wrench.
4. Using the photos below for reference, examine the
plug to determine it’s cleanliness. If the plug is a
normal color, go on to step 6. If the plug is fouled
(dirty), go to step 5.
5. Using a moderate grit sandpaper (220-400), sand
between the center electrode and the side electrode
until all carbon and oil deposits are removed.
Monster Moto recommends that you use a spark
plug cleaner or a new spark plug if the plug is very dirty.
Insulator
Threads
Spark Plug
Gap
Side Electrode
Center Electrode
6. Inspect the spark plug electrodes for wear. The center electrode should have square edges.
The side electrode should not be eroded at all. The insulator should not be cracked or chipped.
Replace the plug with an Autolite 255 spark plug or equivalent if any electrode wear and/or cracks
are present.
7. Check the spark plug gap using a spark plug gapper. Gappers can be purchased at your local auto
parts store. The spark plug gap should be .03 in (0.7mm). Always check the gap of a new
spark plug before you install it.
8. Be sure all dirt has been cleaned from the threads. Install the spark plug by
hand. This will prevent stripping and/or cross threading of the threads. Use a 19mm
socket or wrench to securely tighten the spark plug. Do not over or under tighten the spark plug.
! CAUTION
Improperly tightened spark plugs can damage the engine. Too loose, you can burn a
hole in the piston. Too tight, you can damage the threads of the engine.
Normal Spark Plug
(light brown center)
Lean Spark Plug
(white enter)
Fouled Spark Plug
(heavy carbon buildup)
Fouled Spark Plug
(heavy oil buildup)
When you inspect the spark plug, generally it will fit into one of the four categories shown above. A normal/clean
spark plug will have a light brown center and displays no wear around the electrodes. A spark plug with a bright
white center indicates a lean condition in the engine. If your plug looks like this, have your mini bike serviced by
your Monster Moto dealer immediately. A carbon fouled plug will be completely black with no gloss. An oil fouled
plug will appear a dark shiny brown or shiny black as shown above. An oil fouled plug is caused when the engine oil
seeps by the piston ring and is burned with the fuel. Oil fouled plugs are not uncommon, however, if your mini bike
is consistently oil fouling spark plugs, have it serviced by your local Monster Moto dealer immediately.
22
8
855*833*6483 OR EMAIL US AT [email protected]
Basic Maintenance Procedures
Rear Brake Adjustment
If you are not able to pull your brake handle any farther and your mini-bike is still not stopping properly, you will need to adjust your rear brake so you can stop properly. Over time, your cable will
stretch and this periodic maintenance will need to be conducted.
1. Place the mini-bike on the kick stand with
the engine off.
Adjusting
2. Holding the brake mechanism, loosen the
Nut
adjusting nut to let the cable slide free.
3. Slide the adjusting nut and mechanism
toward the front of the bike until it stops,
then back off slightly. This positions the
brake properly so it will not clamp the disc
when the handle is released. This is called
“drag” and if it happens, it will cause extra
brake wear and reduced power.
4. Tighten the adjusting nut on the cable.
5. Carefully lift up the back of the bike without
tipping it over and see if the wheel spins
freely when the brake is not applied. If there
is drag, re-adjust nut.
6. Lower bike back to ground and apply brake lever to ensure brake engages and stops wheel
securely.
! DANGER Never ride the mini bike when the brakes are not working properly. If you cannot
repair the brakes, have them serviced by your Monster Moto Dealer. DO NOT RIDE the bike.
Tire Air Pressure
Properly inflated tires will provide you with the best combination of handling, tread life, and riding
comfort. Generally speaking, underinflated tires will wear unevenly and adversely affect handling.
Underinflated tires are also more likely to fail from being overheated and can cause wheel damage
on rocky terrain. Overinflated tires will cause the mini bike to ride harshly, are prone to failure from
surface hazards and wear unevenly.
!
WARNING
Using tires that are excessively worn or improperly inflated can cause a crash in
which you can be seriously hurt or killed. Follow all instructions in this owners manual regarding tire
inflation and maintenance.
Make sure the valve stem caps are secure, If needed, install a new cap. Always check air pressure
when your tires are cold. If you check the air pressure when the tires are warm, you will get higher
readings. If you let air out of warm tires to match the recommended cold tire pressure, the tires will
be underinflated. The correct cold tire pressures are listed below. If you replace the tire, follow the tire
pressure marked on the sidewall of the tire.
Front Tire (Cold)
Rear Tire (Cold)
10-15 PSI (69-103 kPa)
10-15 PSI (69-103 kPa)
23
PROBLEMS? DO NOT RETURN TO STORE! CALL US!
Basic Maintenance Procedures
Tire Inspection
A flat tire or tire blowout can be very inconvenient and can even cause you to have an accident. Take
the time to inspect your tires and wheels before you ride. For more information about handling a flat
tire, refer to the section of this manual titled Resolving the Unexpected.
Inspect the tire carefully for bumps or bulges in the sidewall of the tire and inside of the treads.
t Replace
any tires that have bumps or bulges in them.
Look
closely
for cuts, slits or cracks in the tires. Replace any tire if you can see a fabric or cord
t showing through.
Check for rocks, screws, nails or other objects embedded in the tires or tread. Remove any foreign
t objects.
Be sure there are no screws or nails in the tires.
Inspect your rims. If you notice rims are bent or dented, take to your nearest Monster Moto
t Service
Center for assistance in replacing rim.
Measure the tread depth of the tires. Replace all tires before the tread depth gets below 0.16in
t (4mm)
or anytime you notice a reduction in your traction.
Check the position of both valve stems. A tilted valve stem indicates that the tube is slipping
t inside
of the tire or the tire is slipping on the rim. See your Monster Moto dealer for assistance.
! WARNING Never ride with a bent or dented rim. The tire could suddenly lose pressure, resulting in an immediate loss of control which may cause a serious accident.
Tire and Tube Repair
If your tube has been punctured, repair or replace it immediately. You may repair the with a patch,
but it will never be as durable or reliable as a new tube. If you use a repair tube, purchase genuine
Monster Moto parts or another tube the same size.
! WARNING Do not attempt to replace the tube if you do not have the proper tools. Using improper tools can result in damage to the tire, tube or steel rim.
24
8
855*833*6483 OR EMAIL US AT [email protected]
Basic Maintenance Procedures
Drive Chain Inspection
The service life of your drive chain will depend on several factors including proper lubrication,
adjustment, and riding style. Poor maintenance will cause premature wear and/or damage to the
drive chain and sprockets.
Before you service your drive chain, be sure you are parked on a level surface and you turn the
engine OFF. It is not necessary to remove or replace the chain to perform recommended
maintenance service.
1. Check the slack in the drive chain
midway between the sprockets (2). Push
upward on the chain with your finger.
The vertical movement should measure
between 3/8-1/2 in.
Drive Chain
2. Repeat step 1 along several points of the
drive chain. The slack should remain
constant through out. If it is not, some links
may be kinked and binding. Lubricating the
chain will often stop this.
NOTICE
Excessive drive chain slack may allow the drive
chain to damage the engine cases.
3 Inspect the drive chain for the following: damaged rollers, loose pins, dry or rusted links, kinked or
binding links and excessive wear. Replace the chain if it has damaged rollers, loose pins, or
kinks that cannot be freed. Lubricate the drive chain if it appears dry or shows signs of rust.
Lubricate any kinked or binding links and work them free. If the chain has damaged rollers, loose
pins or kinks that cannot be freed, follow replacement procedure outlined later in the manual.
4. You should replace the drive chain once the chain tensioner is moved as far back as possible and
slack still remains. This indicates that the chain is worn beyond it’s service limit.
5. Inspect the front and rear sprockets for excessive wear or damage. Refer to the following
illustration to determine sprocket condition. If needed, replace any worn or damaged sprockets.
See your Monster Moto dealer for assistance.
25
PROBLEMS? DO NOT RETURN TO STORE! CALL US!
Basic Maintenance Procedures
Drive Chain Inspection (cont.)
Use the diagram below to determine if the sprockets need to be replaced. Never use a new chain with
a damaged or worn sprocket.
NOTICE
Use of a new chain on worn sprockets will
cause rapid chain wear.
Damaged Teeth
REPLACE
Worn Teeth
REPLACE
GOOD
Drive Chain Adjustment
Follow the procedure below to adjust the drive chain slack. Be sure that you are parked on a level
surface and the engine is turned OFF.
1 Loosen the axle nut on the chain tensioner.
2. Adjust the chain tensioner – clockwise to tighten,
counter-clockwise to loosen – until there is 3/8-1/2 in
chain slack.
3. Tighten the axle nut on the chain tensioner.
4. Recheck the drive chain slack.
Axle Nut
Chain Tensioner
Adjustment Nut
26
8
855*833*6483 OR EMAIL US AT [email protected]
Basic Maintenance Procedures
Drive Chain Removal, Cleaning & Replacement
If you have been riding in extremely muddy or dusty conditions, the drive chain should be removed
and cleaned before you apply lubricant. Follow the procedure below to remove and clean or replace
the drive chain with a new one.
1. Remove the master link retaining clip (1)
with needle nose pliers. Do not bend or
twist the clip. Remove the master link and
remove the drive chain.
2. Clean the drive chain with a non-flammable
solvent such as kerosene or mineral spirits (1)
not gasoline - and allow it to dry.
3. Inspect the drive chain for possible wear or
damage. Replace the drive chain if it has
any damaged rollers, loose fitting links, or
otherwise appear unserviceable.
4. Inspect the sprockets for wear or damage.
Monster Moto recommends that you
replace the sprockets when you install a new
drive chain.
5. Pass the chain over the sprockets and join the ends of the chain with the master link. For ease of
assembly, hold the chain ends against adjacent rear sprocket teeth while inserting the master link.
Install the master link retaining clip so that the closed end of the retaining clip will face the
direction of forward wheel rotation.
6. Lubricate the chain.
The master link is the most critical element of drive chain security. Master links are reusable, as long
as they are in excellent condition. We recommend installing a new master link when you install a
new drive chain. You may find it easier to install a new chain by connecting it to the old chain using a
master link and pulling the old chain to position the new chain on the sprockets.
27
PROBLEMS? DO NOT RETURN TO STORE! CALL US!
Basic Maintenance Procedures
Clutch Lubrication
Your MMB80 mini bike uses a centrifugal clutch to provide power from the engine to the rear wheel.
It requires periodic maintenance to operate properly. If your clutch becomes “noisy” or it grabs and
kills your engine at low speeds, it is time to service your clutch.
1. Remove the front half of the chain guard.
2. Remove the chain from the drive sprocket
3. Remove the clutch retaining bolt holding the clutch to the engine and slide the clutch assembly off
the shaft.
4. Use snap-ring pliers to remove the clutch retaining clip.
5. Pull the assembly apart and locate the thin shim around the base of the shaft.
Remove and set aside.
6. Clean all parts of clutch assembly, inside and out.
7. Grease the clutch shaft with a generous layer of high-temperature wheel bearing grease.
8. Grease both sides of shim and replace on shaft. Reassemble the clutch.
9. Place clutch assembly back on engine drive shaft.
10. Reinsert socket head cap screw and tighten to 75-90 in-lbs.
4
6
7
Appearance Care
To clean the mini bike you can use any of the following: water, mild neutral detergents, mild
spray and wipe cleaner, mild spray and rinse cleaner/degreaser. Avoid products that contain harsh
detergents or chemical solvents that can damage the metal, paint and plastic on your mini bike.
We recommend that you use a garden hose to wash your mini bike. High pressure washers
(like coin operated car washers) can damage certain parts of the mini bike. If you must use a high
pressure washer, avoid spraying the following areas: Wheel hubs, muffler outlet, underneath the seat,
engine stop switch, underneath the gas tank, drive chain and carburetor.
NOTICE
High pressure water or air can damage certain parts of the mini bike. Never wash the mini bike while the
engine is running. Always lubricate the drive chain after you are finished washing and the mini bike is dry.
28
8
855*833*6483 OR EMAIL US AT [email protected]
Troubleshooting
Engine does not start or is hard to start
1. Examine the Carburetor - Be sure there is fuel flowing into the carburetor.
Is there fuel flowing into the carburetor?
No
- Clogged fuel hose/line or clogged fuel filter
- Clogged or closed fuel valve
- Clogged fuel cap vent
- Sticking or stuck carburetor float
Yes
- SEE STEP 2
2. Examine the Spark Plug - Remove the spark plug and inspect.
Is the spark plug in good working condition?
No
- Flooded engine and/or carburetor
- Choke valve is closed
- Throttle is stuck open
- Dirty or clogged air filter
- Excessively worn piston rings (replace engine)
Yes
- SEE STEP 3
3. Spark Test - Test for ignition spark by removing the spark plug and inserting it into the spark plug cap. Place
the open end of the spark plug on a metal part of the engine and pull start the engine. You should see a nice
blue spark on the end of the spark plug. A faint spark will not start the engine.
! WARNING Do not touch the spark plug or plug cap while pull starting the engine. You will receive and
electrical shock which could result in serious injury or death.
Is there a good spark?
No
- Fouled or faulty spark plug
- Broken or shorted spark plug wire or spark plug cap
- Faulty or shorted magneto assembly
- Broken or shorted engine stop switch
- Loose or corroded wires and/or connectors (always clean bad electrical connections)
Yes
- SEE STEP 4
4. Engine Start Condition - Start the engine by using the normal starting procedure
Does the engine start but then stop quickly afterward?
Yes
- Improper choke operation
- Dirty or improperly adjusted carburetor (Contact your Monster Moto Dealer)
- Intake manifold/pipe leak
- Improper ignition timing (see your Monster Moto Dealer)
- Dirty or contaminated gasoline
29
PROBLEMS? DO NOT RETURN TO STORE! CALL US!
Troubleshooting
Engine Lacks Power
1. Examine the Drivetrain - Raise the wheel of the ground and spin by hand.
Does the wheel spin freely?
No
- Brake dragging, improperly mounted brake pads
- Worn or damaged wheel bearings
- Bent axle
Yes
- SEE STEP 2
2. Check the Tire Pressure - Use a tire pressure gauge to check the tire pressure of each tire
Is the tire pressure correct? (10-15 PSI)
No
- Faulty tire valve
- Punctured tire and/or inner tube
Yes
- SEE STEP 3
3. Engine Performance Inspection - Accelerate lightly.
Does the engine speed increase?
No
- Clogged air filter
- Restricted or clogged fuel line and/or fuel filter
- Clogged muffler/spark arrester
- Choke valve is closed
- Clogged fuel cap vent
Yes
- SEE STEP 4
4. Spark Plug inspection - Remove the spark plug and inspect
Is the spark plug in good working condition?
No
- Spark plug is not serviced frequently enough
- Incorrect spark plug heat range
- Incorrect spark plug gap
Yes
- SEE STEP 5
5. Engine Oil Inspection - Check the oil level and the condition of the oil.
Is the engine oil level correct and in clean condition?
No
- Oil level too high
- Oil level too low
- Contaminated oil
Yes
- SEE STEP 6
6. Cylinder Compression Inspection - Check the cylinder compression.
Is the engine compression normal?
No
- Valve stuck open/seized or improper valve timing (see your Monster Moto dealer)
- Worn cylinder wall and/or piston rings (replace engine)
Yes
- SEE STEP 7
30
8
855*833*6483 OR EMAIL US AT [email protected]
Troubleshooting
Engine Lacks Power (cont.)
7. Carburetor Inspection - Disassemble the carburetor and check for clogs
Was the carburetor clogged and dirty?
No
- SEE STEP 8
Yes
- Carburetor is not serviced frequently enough
- Contaminated fuel
8. Over Heating Inspection - Check the engine for overheating
Is the engine overheating?
No
- GO TO STEP 9
Yes
- Excessive carbon buildup in the combustion chamber
- Use of poor quality fuel
- Clutch slipping
- Lean fuel mixture or improper octane rating of fuel
9. Engine Condition Inspection - Accelerate rapidly and ride at high speed.
Does the engine knock?
No
- See your Monster Moto dealer to have your mini bike serviced.
Yes
- Worn piston and cylinder (replace engine)
- Wrong type of fuel (octane rating)
- Lean fuel mixture
- Excessive carbon buildup in the combustion chamber
Poor Performance at Idle & Low Speed
1. Intake Manifold Inspection - Check the intake manifold for leaks
Is there a leak in the manifold?
No
- SEE STEP 2
Yes
- Loose carburetor mounting bolts
- Damaged insulator/spacer
- Damaged intake manifold gasket
- Cracked or broken intake manifold/pipe
If “YES”
- See your Monster Moto dealer to have your mini bike serviced.
2. Spark Test - Test for ignition spark by removing the spark plug and inserting it into the spark plug cap. Place
the open end of the spark plug on a metal part of the engine and pull start the engine. You should see a nice
blue spark on the end of the spark plug. A faint spark will not start the engine.
! DANGER Do not touch the spark plug or plug cap while pull starting the engine. You will receive an
electrical shock which could result in serious injury or death.
Is there a good spark?
No
- Fouled or faulty spark plug
- Broken or shorted spark plug wire or spark plug cap
- Faulty or shorted magneto assembly
- Broken or shorted engine stop switch
- Loose or corroded wires and/or connectors (always clean bad electrical connections)
Yes
- See your Monster Moto dealer to have your mini bike serviced.
31
PROBLEMS? DO NOT RETURN TO STORE! CALL US!
Troubleshooting
Poor Performance at High Speed
1. Examine the Fuel Line - Disconnect the fuel hose at the carburetor.
Is there fuel flowing freely?
No
- Clogged fuel hose/line or clogged fuel filter
- Clogged Fuel Valve
Yes
- SEE STEP 2
2. Carburetor Inspection - Disassemble the carburetor and check for clogs.
Was the carburetor clogged and dirty?
No
- See your Monster Moto dealer to have your mini bike serviced.
Yes
- Carburetor is not serviced frequently enough, contaminated fuel
Poor Handling
Steering is heavy
- Steering stem nut too tight
- Damaged steering head bearings
Either wheel has a wobble
- Excessive wheel bearing play
- Bent Rim
- Improperly installed wheel hub
- Bent frame
The mini bike pulls to one side
- Damaged fork(s)
- Damaged axle
- Damaged frame
32
8
855*833*6483 OR EMAIL US AT [email protected]
Resolving the Unexpected
General Guidelines
If you encounter trouble during a ride, the first thing you should do is stop as soon as it is safely
possible. Do not continue to ride if you have a flat tire, if you hear an unusual noise, or if your mini
bike just does not feel right. If you continue to ride, you will cause more damage the mini bike and
endanger your own safety.
After you stop, take time to carefully look over your mini bike and identify the problem. Always
consider all of your options before you make a decision. Sometimes a problem can be relatively
minor and can be permanently repaired on the trail provided you have the tools, supplies and skills
needed to do so. In addition, you may be able to make a temporary repair and ride slowly back to
your base where you can get further help and/or supplies.
When a problem appears to be more serious; or you do not have the tools, supplies and skills needed
to make a repair, you will need to choose a safe way to get yourself and the mini bike back to your
base. If you are close enough, you can often push the mini bike back.
Whatever the problem may be, always follow the instructions below:
1. Always put safety first.
2. If the problem is minor and you have the tools, supplies and skills needed to make a temporary
repair, be sure to make permanent repairs as soon as possible.
3. Do not continue riding if you are hurt or if your mini bike is not in safe riding condition.
Recommendations for specific problems follow.
If Your Engine Quits or Will Not Start
If the engine was not making unusual noises before it quit running, and it feels normal when you
operate the pull starter, you can probably rule out a major mechanical problem
First, check the fuel system:
1. Make sure you have fuel in the gas tank and the fuel valve is set to the “ON” position.
2. Turn the fuel valve to the “OFF” position. Disconnect the fuel line from the carburetor and
momentarily turn the fuel valve to “ON”. If fuel does not flow out, there is an obstruction in the fuel
tank, fuel filter, or in the fuel line.
3. Reconnect fuel line to carburetor.
! DANGER
Do not use spark, fire or flame near gasoline or fumes. Fire or explosion may result
in severe injury or death. Do not let gas or fumes come in contact with hot engine parts as fire or
explosion may result.
If the fuel system appears to be okay, check the ignition system after any residue gasoline and fumes
have evaporated and surfaces are dry.
1. Check the spark plug cap. Be sure that it is not loose or disconnected.
2. Disconnect the spark plug cap and remove the spark plug. Connect the spark plug to the plug cap
and place the threaded end of the spark plug on a metal part of the engine.
3. Pull the pull start handle while you watch the spark plug. If it sparks, the ignition system is probably
working. If there is no spark, replace the spark plug with a new one. If there is still no spark, there is
a problem with the ignition system.
If you cannot identify or correct a problem, you will have to push your mini bike back to your base
or get some help.
33
PROBLEMS? DO NOT RETURN TO STORE! CALL US!
Resolving the Unexpected
If You Have a Flat Tire
How you handle a flat tire on the trail will depend on the severity of the damage to the tire and/or
the inner tube and what tools and supplies you keep with you. If you have a slow leak or a minor
puncture, there are two ways you can try to make a temporary repair:
1. Use an aerosol tire sealer to seal the puncture and inflate the tube. You can do this without
removing the wheel.
2. Use a tube repair kit to patch the hole in the inner tube. This requires removal of the wheel and tire.
Do not attempt repair without the proper tools.
If the leak is more severe, or a temporary repair does not hold up, you will need to replace the inner
tube. If the tire is also severely damaged, you will need to replace the tire as well.
If you cannot repair the flat tire on the trail, you will need to push the mini bike back to your base or
send for help. Do not ride on a flat tire. The mini bike will be hard to handle, and if the tire comes off
the rim, it can lock up the wheel and cause you to crash.
If You Crash
Personal safety is the first priority after an accident. If you or anyone else has been injured, take plenty
of time to assess the severity of the injuries and determine if it is safe to continue riding. If you cannot
ride safely, send someone for help. Do not ride if you will risk further injury or if your mini bike has
been damaged too severely.
If you decide you are capable of riding safely, carefully inspect the mini bike for damage. Check the
tightness of critical nuts and bolts such as the handle bars, control levers, brakes and wheels. If there
is minor damage, or you are not sure about possible damage but decide to ride back to your base,
ride slowly and cautiously.
Sometimes crash damage is hidden or not immediately apparent. Once you get home, go over your
mini bike thoroughly and fix any problems that you find. Also, be sure to have your Monster Moto
dealer inspect the frame after a serious crash.
If a Component Fails
The drive chain, master link, control cables, brake controls, and other components can be damaged if
you ride in dense brush or over rocky terrain. As mentioned earlier, making the repair on the trail will
depend on the severity of the damage, tools, supplies, and skills that you have.
1. If the drive chain comes off because the master link clip has been knocked off, you may be able
to repair the chain with a new master link. However, if the chain is broken or causes damage when
it comes off, you may not be able to make a trailside repair.
2. If you damage the throttle cable or some other critical component, the mini bike may be unsafe
ride. Carefully assess the damage and make any repairs that you can. But if you have any doubts, it
is best to be conservative and safe and walk mini bike back to base or have unit picked up.
34
8
855*833*6483 OR EMAIL US AT [email protected]
Emission Control Warranty
YOUR WARRANTY RIGHTS AND OBLIGATIONS
The manufacturer warrants that each new 2014 and later vehicle:
tJTEFTJHOFECVJMUBOEFRVJQQFETPBTUPDPOGPSNBUUIFUJNFPGJOJUJBMSFUBJMQVSDIBTFXJUIBMM
applicable regulations of the United States Environmental Protection Agency.
tJTGSFFGSPNEFGFDUTJONBUFSJBMBOEXPSLNBOTIJQXIJDIDBVTFTVDIWFIJDMFUPGBJMUPDPOGPSNXJUI
applicable regulations of the United States Environmental Protection Agency or the California Air
Resources Board for the periods specified below.
The emission control system warranty period for this vehicle is 30 months, which applies to the
owner and each subsequent purchaser, begins on the date the vehicle is delivered to the first purchaser provided there has been no modification, abuse, neglect or improper maintenance of your
vehicle. Where a warrantable condition exists, the manufacturer will repair your vehicle at no cost to
you, including diagnosis, parts and labor. This is your emission control defects warranty.
EMISSION CONTROL WARRANTY INFORMATION
Your emission control system warranty covers components whose failure would increase an engine’s
emission, including electronic controls, carburetor, the ignition system, or any other system utilized
in this vehicle to control emission if it is originally equipped. Also included may be hoses, connectors
and other emission-related assemblies. Replacing or repairing other components (including parts, labor, and other costs) not covered by this emission control system warranty or the standard warranty
is the responsibility of the owner.
Coverage of repairs under this emissions warranty applies when repairs are completed at a dealer repair facility or person of the owner’s choosing for the maintenance, replacement or repair of
emissions-related devices. The Distributor will not cover repairs performed outside of an authorized
dealer or repair facility. The use of replacement parts not equivalent to the original parts may impair
the effectiveness of your vehicle’s emission control system. If such a replacement part is used and
an authorized dealer determines it is defective or causes a failure of a warranted part, your claim for
repair to bring your vehicle into compliance with applicable standards may be denied.
MODIFICATION OF ANY EMISSION CONTROL COMPONENT OR SETTING IS STRICTLY
PROHIBITED BY LAW AND CAN RESULT IN SUBSTANTIAL PENALTIES AND FINES.
THIS EMISSION CONTROL SYSTEM WARRANTY IS IN ADDITION TO THE
STANDARD PRODUCT WARRANTY.
EMISSIONS CONTROL WARRANTY EXCLUSIONS AND LIMITATIONS
This warranty does not cover the following:
t'BJMVSFTPSNBMGVODUJPOTPGUIFFNJTTJPODPOUSPMTZTUFNTDBVTFECZBCVTFBMUFSBUJPOBDDJEFOU
misuse or the use of leaded gasoline.
t3FQMBDFNFOUPGFYQFOEBCMFNBJOUFOBODFJUFNTVOMFTTUIFZBSFPSJHJOBMFRVJQNFOUEFGFDUJWFJO
material or workmanship under normal use, and the first required replacement interval for the
item has not been reached.
Expendable maintenance items include but are not limited to spark plugs, filters and lubricants.
t3FQMBDFNFOUPGQBSUTBOEPUIFSTFSWJDFTBOEBEKVTUNFOUTGPSSFRVJSFENBJOUFOBODF
t3FQBJSTPSSFQMBDFNFOUTBTBSFTVMUPG
- Accident
- Misuse
- Use of replacement parts or accessories not conforming to the original specifications
which adversely affect performance
- Physical damage, corrosion, or defects caused by fire, explosions or similar causes
beyond the control of the Distributor.
- Failures not caused by a defect in material or workmanship.
t6TFPGUIJTWFIJDMFJOBOZUZQFPGDPNQFUJUJWFSBDJOHSFOUBMPSBOZDPNNFSDJBMVTFDPNQMFUFMZ
voids this and all other warranties.
35
PROBLEMS? DO NOT RETURN TO STORE! CALL US!
Emission Control Warranty
LIMITED LIABILITY
The liability of the manufacturer under this Emission Control System Warranty is limited solely to the
remedying of defects in material workmanship by an authorized dealer at its place of business during
customary business hours. This warranty does not cover inconvenience or loss of use of the vehicle or
transportation of the vehicle to/from the authorized dealer. The Distributor is not liable to any person
for incidental, consequential or special damages of any description, whether arising out of express or
implied warranty or any other contract, negligence or other tort or otherwise.
No express emission control system warranty is given by the manufacturer except as specifically
set forth therein. Any emission control system warranty implied by law, including any warranty of
merchantability or fitness for a particular purpose is limited to the express emission control system
warranty terms stated in this warranty. The foregoing statements of warranty are exclusive and in lieu
of all other remedies. Some states do not allow limitations on how long an implied warranty lasts, so
the above limitations may not apply if it is inconsistent with the controlling state law.
No dealer is authorized to modify this Emission Control System Warranty. If you have any questions
regarding your warranty rights and responsibilities, you should contact Monster Moto by calling
855-833-6483.
Register your Monster Moto MMB80 Mini Bike so that we can provide you with the fastest solutions to any problems you may have
with your product and so we can keep you up to date regarding
any product updates.
Fill out registration form on the next page, and mail it to:
Monster Moto
1100 Valwood Parkway, Suite 112,
Carrollton, Texas 75006
36
Or go online to:
www.monstermoto.com
and fill out the registration form online.
8
855*833*6483 OR EMAIL US AT [email protected]
MMB80
Mini Bike
MMB80
Mini Bike
Product Registration
Please complete and mail this card within 10 days of initial purchase.
Name ___________________________________________Age __________
Address _________________________________________________________
City __________________________________State _____Zip ______________
Email ___________________________________________________________
Home Phone _____________________________________________________
Work Phone _____________________________________________________
Purchase Date ____________ Purchased from _________________________
VIN Number _____________________________________________________
Male ____ Female ____ Occupation __________________________________
Other similar product owned before _________________________________
How did you hear about the product? ________________________________
How do you plan to use your product?
Just for fun _______Work ________Sport _______Commuting _______
After form is complete, please mail to:
Monster Moto
1100 Valwood Parkway, Suite 112
Carrollton, Texas 75006