1
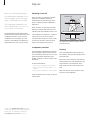
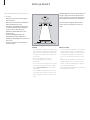
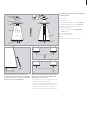
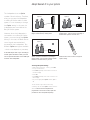
BeoLab 5
Guide
This product fulfils the conditions stated in
the EEU directives 89/336 and 73/23.
CAUTION: To reduce the risk of
electric shock, do not remove
cover (or back).
No User-serviceable parts inside.
Refer servicing to qualified
service personnel.
WARNING: To prevent fire or electric
shock, do not expose this appliance
to rain or moisture. Do not expose
this equipment to dripping or splashing and ensure that no objects filled
with liquids, such as vases, are placed
on the equipment.
To completely disconnect this equipment from the AC Mains, disconnect
the power supply cord plug from the
AC receptacle.
This symbol indicates that a
dangerous voltage constituting a risk of electric shock is
present within this unit.
This symbol indicates that there
are important operating and
maintenance instructions in the
literature accompanying this
unit.
NOTE: This equipment has been tested and found
to comply with the limits for a class B digital device, pursuant to part 15 of the FCC Rules. These
limits are designed to provide reasonable protection against harmful interference in a residential
installation.
This equipment generates, uses and can radiate radio frequency energy and, if not installed and
used in accordance with the instructions, may
cause harmful interference to radio communications. However, there is no guarantee that interference will not occur in a particular installation. If
this equipment does cause harmful interference to
radio or television reception, which can be determined by turning the equipment off and on, the
user is encouraged to try to correct the interference by one or more of the following measures:
– Reorient or relocate the receiving antenna.
– Increase the separation between the equipment
and receiver.
– Connect the equipment into an outlet on a circuit different from that to which the receiver is
connected.
– Consult the dealer or an experienced radio/TV
technician for help.
This class B digital apparatus meets all requirements of the Canadian Interference-Causing
Equipment Regulations.
Contents
This Guide describes how to set up a
pair of BeoLab 5 loudspeakers and
prepare them for use. The Guide
provides useful information when you
set up the loudspeakers for the first
time, and later, if you have to move or
rearrange your setup.
For a description of the Beo4 remote
control (optional accessory), please
refer to the Guide enclosed with the
Beo4 remote control – or to the
Guides for your Bang & Olufsen
audio or video system.
Follow the instructions in this Guide
carefully.
Daily use, 4
Find information about how to use BeoLab 5, about the built-in loudspeaker
protection system, and how to clean BeoLab 5.
Set up BeoLab 5, 6
Important information to consider before setting up BeoLab 5.
Connect cables, 8
Find information about the sockets, and how to connect BeoLab 5 to your audio or
video system.
Adapt BeoLab 5 to your system, 11
Find out how to select an Option setting suitable to your particular setup.
Adapt BeoLab 5 to your room, 12
Read about the unique Adaptive Bass Control system, and how to calibrate BeoLab 5
to your particular room.
Indicator lights, 14
An overview of the indicator lights and the sound signals.
Index, 15
Find the specific subject you want to know more about.
3
Daily use
4
When you have finished setting up
the loudspeaker as described on the
following pages, connect the entire
audio or video system to the mains.
The loudspeaker is designed to be
left in standby when not in use – so
do not switch off the power.
The Adaptive Bass Control system ensures
that the bass level suits the placement of the
loudspeaker. Therefore, if you move the
loudspeaker to a new position, you must
perform a new calibration, as explained in
Adapt BeoLab 5 to your room (pp. 12–13).
Switching on and off
When you switch on your Bang & Olufsen
system, the loudspeaker switches on
simultaneously. The indicator light shines
green*, indicating that the loudspeaker is
switched on.
When you switch off your Bang & Olufsen
system, the indicator light switches to red,
indicating that the loudspeaker is not in use.
If the loudspeaker is connected to a non-Bang &
Olufsen system, refer to the next page for
information about switching on and off, turning
the volume up and down, shifting the sound
balance, and presetting the volume level.
Loudspeaker protection
The loudspeaker is equipped with a thermal
protection system which prevents the units
from overheating. Should an error occur, the
system automatically switches the loudspeaker to standby – and the indicator light
flashes red.
To restore the situation:
> Disconnect the loudspeaker from the mains.
> Allow the system time to reset (approx. 3–5
minutes).
> Reconnect the loudspeaker to the mains again.
Should the problem persist, contact your Bang &
Olufsen retailer.
*NOTE! If the Adaptive Bass Control system has
not yet been calibrated, the indicator light slowly
flashes green. The calibration is explained in
Adapt BeoLab 5 to your room (pp. 12–13).
Indicator light
Do not touch the two speaker domes – they are
very fragile. When cleaning is required, use the
enclosed brush only!
Cleaning
Clean the loudspeaker surfaces using a soft,
lint-free cloth which you have wrung firmly in
lukewarm water.
Never use a vacuum cleaner to clean the two
domes. However, the front speaker cloth may
be cleaned with a vacuum cleaner with a
brush nozzle, and set to the lowest suction
level.
Never use alcohol or other solvents to clean
any parts of the loudspeaker.
5
Use BeoLab 5 with a non-Bang &
Olufsen system
Option 1
Option 4
The loudspeakers must be connected as
explained on page 10, and the Option number
set to 1 or 4, as explained on page 11.
If BeoLab 5 is programmed to Option 1
To switch BeoLab 5 on/off…
> Press RADIO to switch on.
> Press • to switch off.
To turn the volume level up/down…
> Press ∧ to turn the volume up.
> Press ∨ to turn the volume down.
Operate your non-Bang & Olufsen system as you
normally would. However, you will have to use a
Beo4 remote control (optional accessory) to do
the following:
– Switch the loudspeakers on and off;
– Turn the volume level up or down;
– Adjust the left–right sound balance (when you
switch on the loudspeakers, the balance is
always neutral);
– Store and reset sound levels.
Although BASS, TREBLE, LOUDNSS are available in
the Beo4 display you cannot adjust these levels
using Beo4. We recommend that you keep any
tone control settings neutral.
For specific information about the Beo4 remote
control, please refer to its enclosed Guide.
To reset the sound level…
> Press LIST until RESET* is shown in the Beo4
display.
> Press GO to reset sound level.
To shift the left–right sound balance…
> Press ss to shift the sound towards the left, and
press tt to shift the sound towards the right.
To store a new start up sound level…
> Press ∧ ∨ until you reach your preferred start
up sound level.
> Press LIST until A.SETUP* is shown in the Beo4
display.
> Press GO to accept.
> Press LIST until S.STORE is shown in the Beo4
display.
> Press GO to store the new start up level.
*Must be added to the Beo4 LIST-function. To do
so, refer to the Beo4 Guide.
If BeoLab 5 is programmed to Option 4
To switch BeoLab 5 on/off…
> Press LIST until LINK* is shown in the Beo4
display, and then RADIO to switch on.
> Press • to switch off.
To turn the volume level up/down…
> Press ∧ to turn the volume up.
> Press ∨ to turn the volume down.
To reset the sound level…
> Press LIST until RESET* is shown in the Beo4
display.
> Press GO to reset sound level.
To shift the left–right sound balance…
> Press ss to shift the sound towards the left,
press tt to shift the sound towards the right.
To store a new start up sound level…
> Press ∧ ∨ until you reach your preferred start
up sound level.
> Press LIST until A.SETUP* is shown in the Beo4
display.
> Press GO to accept.
> Press LIST until S.STORE is shown in the Beo4
display.
> Press GO to store the new start up level.
Setting up BeoLab 5
6
Handling BeoLab 5: Due to its heavy weight, any
moving or lifting should always be done by two
persons. ‘Safe areas’ to hold when moving/lifting
the loudspeaker are indicated in the illustration.
We recommend that you follow this
procedure:
– Disconnect your audio or video system
from the mains;
– Make all the connections as described in
Cable connections (pp. 8–10);
– Connect the loudspeakers to the mains;
– If necessary, program the loudspeakers
to your audio or video system, as
described in Adapt BeoLab 5 to your
system (p. 11);
– Let the loudspeakers perform the
Adaptive Bass Control calibration, as
described in Adapt BeoLab 5 to your room
(pp. 12–13);
– Connect your audio or video system to
the mains again.
Do not move the loudspeaker without lifting it
clear of the floor, as damage to the floor may
result!
Cautions
– Do not attempt to open the loudspeaker. Leave
such operations to qualified service personnel!
– Make sure that the loudspeaker is placed and
connected in accordance with the instructions
in this Guide.
– Place the loudspeaker on the floor.
– Do not place any items on top of the
loudspeaker.
– Do not touch the two speaker domes! Use the
enclosed brush only when cleaning – please
refer to Cleaning BeoLab 5 (p. 4) for further
information.
– The loudspeaker is designed for indoor use in
dry, domestic environments only, and for use
within a temperature range of 10–40º C (50–
105º F).
Before you start…
– If you connect the loudspeaker to a non-Bang &
Olufsen system, you will need a Beo4 remote
control (optional accessory), in order to be able
to operate the loudspeaker, e.g. switching on
and off, turning the volume level up or down,
etc.
– Volume levels are adjusted in the built-in loudspeaker amplifiers, not in your audio or video
system, and we recommend that you keep any
tone control settings neutral.
– Remember that all loudspeakers in a setup must
be connected to the mains.
7
The illustration to the left shows the placement
of different parts:
1
2
3
1
2
3
4
5
6
7
4
5
6
9
11
10
7
8
Cover for socket panel: To get access to the
sockets and the RIGHT–LEFT switch, you will have
to remove the cover. To do so, pull out the bottom
edge of the cover, as illustrated above.
Power Link connections: Power Link connections
carry both the right and left sound signals. Such
cables may be run in two ways:
1 Run a Power Link cable from the Bang & Olufsen
system directly to each loudspeaker.
2 Run a Power Link cable from the Bang & Olufsen
system to the first loudspeaker. Run another
Power Link cable from the first loudspeaker to
the next (this may help to minimize cable clutter).
Touch field
Indicator light
High frequency speaker dome – do not touch!
Mid frequency speaker dome – do not touch!
Receiver for Beo4 remote control signals
Upper bass speaker unit
Moving microphone for the Adaptive Bass
Control system
8 Lower bass speaker unit
9 Cover for socket panel
10 Base
11 Beo4 remote control (optional accessory)
Connect cables
8
The loudspeaker can be connected to
Bang & Olufsen audio and video
systems as explained on page 9. It
may also be connected to non-Bang &
Olufsen systems as explained on
page 11.
Socket and switch panel
To get access to the panel, remove the cover
on the rear of the loudspeaker as explained
on page 7.
Use the illustrations and the graphics
imprinted on the socket panel when
locating the sockets and the switch.
DIGITAL OUT
Phono socket/RCA socket used to forward the
digital signal from the first loudspeaker to the next
(SP/DIF unbalanced).
Digital connections carry both the right and left
sound channels.
For specific information about the
sockets on your audio or video
system, please refer to the Guide
enclosed with the system.
DIGITAL IN
Phono socket/RCA socket used for connection to a
system with a digital output (SP/DIF unbalanced).
Digital connections carry both the right and left
sound channels.
DIGITAL
OUT
IN
RIGHT
LEFT
1
POWER LINK
2
LINE
'Syncr.'
The ‘Syncr. connection’ is hidden beneath a small
cover. To get access, just pry the cover off.
~
Socket for connection to the mains supply.
RIGHT – LEFT
This switch sets the loudspeaker to play either the
right or the left sound channel. Set this switch to
RIGHT or LEFT respectively, when connecting the
loudspeaker using any of the sockets marked
POWER LINK, or the sockets marked DIGITAL.
When you connect the loudspeaker using the socket
marked LINE only, you may leave the switch in
either position.
POWER LINK 1 – 2
Sockets for connection to Bang & Olufsen audio
or video systems.
Power Link connections carry both the right and
left sound channels.
LINE
Phono socket/RCA socket for connection to nonBang & Olufsen audio or video systems.
The LINE signal must be a non-regulated line signal
(≤ 2 V RMS). If the LINE output level exceeds 2 V
RMS, you must use an optional attenuator on the
LINE input socket of each loudspeaker.
‘Syncr. connection’
Stereo mini-jack socket for connection between
two BeoLab 5 speakers in a setup. Used when
connecting to non-Bang & Olufsen systems only.
The connection ensures that both loudspeakers
always play at the same volume level.
9
Connection to Bang & Olufsen
systems
The loudspeaker can be connected to all
Bang & Olufsen audio and video systems
equipped with Power Link sockets. It can also
be connected to Bang & Olufsen systems that
have a digital output socket.
IN
OUT
IN
Remember to set the switch marked RIGHT–LEFT
to the correct position on each loudspeaker!
POWER LINK
POWER LINK
DIGITAL
DIGITAL
POWER LINK connections
Use the enclosed Power Link cables to connect the
loudspeakers to your system. Power Link connections
may be run in two ways as explained on page 7.
Longer cables are available from your Bang &
Olufsen retailer. However, you should not use
longer cables than necessary.
DIGITAL
POWER LINK
POWER LINK
DIGITAL
For connections in other Bang & Olufsen digital
systems, please refer to the Guide enclosed with
those systems.
OUT
IN
IN
IMPORTANT: Use fully mounted Power Link cables
only – not the very thin type! If the wrong type of
Power Link cables are used, the loudspeaker will
not play. If in doubt, ask your Bang & Olufsen
retailer.
DIGITAL connections
If your Bang & Olufsen system has a digital output
socket, we recommend that you connect the loudspeakers directly to this socket as well. This ensures
optimal sound quality when playing digital sources
(CD’s). Use ordinary phono cables (RCA) to connect
the loudspeakers to your system.
>> Connect cables
10
Connection to non-Bang & Olufsen
systems
IN
The loudspeaker may also be connected to
most systems with a digital output socket
(SP/DIF).
OUT
IN
The loudspeaker may be connected to most
non-Bang & Olufsen audio or video systems
equipped with a non-regulated LINE level
output (volume levels are adjusted in the
built-in loudspeaker amplifiers, not in the
audio or video system).
'Sync.'
LINE
DIGITAL
When connecting to non-Bang & Olufsen systems,
remember to change the ‘Option’ setting to either
1 or 4, as explained in ‘Adapt BeoLab 5 to your
system’ (p. 11).
DIGITAL
LINE
LINE connections
Use ordinary phono cables to connect each loudspeaker directly to your system.
If the LINE output level of your non-Bang & Olufsen
system exceeds 2 V RMS, you must use an optional
attenuator on the LINE input socket of each loudspeaker.
‘Syncr.’ connection
Connection between the two loudspeakers. The
connection ensures that both loudspeakers always
play at the same volume level.
Use a cable with a stereo mini-jack plug in each
end to connect the two loudspeakers in a setup.
DIGITAL connections
If your system has a digital output socket, we
recommend that you connect the loudspeakers to
this socket as well. This ensures optimal sound
quality when playing digital sources.
Use ordinary phono cables to connect the loudspeakers to your system.
When using digital connections, remember to set
the switch marked RIGHT–LEFT to the correct
position on each loudspeaker!
Adapt BeoLab 5 to your system
The loudspeaker is set to Option
number 0 from the factory. Therefore,
when you connect the loudspeaker
to a Bang & Olufsen audio or video
system, it is not necessary to change
the Option setting. In this case, the
loudspeakers are controlled via the
Bang & Olufsen system.
However, when the loudspeaker is
connected to a non-Bang & Olufsen
system, you must change the Option
setting. In this case, the Beo4 remote
control signals are received and
processed by the loudspeakers. Two
different Option settings are available
– which to use depends on your setup.
If the LINE output level of your non-Bang &
Olufsen system exceeds 2 V RMS, you must
use an optional attenuator on the LINE input
socket of each loudspeaker.
Option 0
Option 0 (factory setup): Used if connected to a
Bang & Olufsen audio (or video) system.
11
Option 4
Option 4: Used if connected to a non-Bang &
Olufsen system – and you have an extra Bang &
Olufsen audio system in the same room.
Option 1
Option 1: Used if connected to a non-Bang &
Olufsen system. You may have a Bang & Olufsen
television in the same room, if you wish.
To change the Option setting:
> While holding down the • button, press LIST.
> Let go of both buttons.
> Press LIST repeatedly until OPTION? is shown in
the Beo4 display.
> Press GO.
> Press LIST repeatedly until L.OPT is shown in the
Beo4 display.
> Key in the appropriate Option number (0, 1 or
4).
.
The red indicator light switches off briefly,
confirming that the new Option number has been
stored. To ensure that all loudspeakers are
programmed to the correct number, repeat the
procedure for each loudspeaker separately.
A Beo4 remote control is used to change the
‘Option’ setting.
Adapt BeoLab 5 to your room
12
The ‘Adaptive Bass Control’ calibration ensures
that the bass level suits the placement of the loudspeaker, and thus the surroundings.
The Acoustic Lens Technology system
in BeoLab 5 ensures better balance
between sound in the high and mid
tone frequencies coming directly
from the loudspeaker, and sound
reflected by the room. The Acoustic
Lens Technology system also ensures
correct tonal balance in the whole
area in front of the loudspeaker.
The BeoLab 5 Adaptive Bass Control
system and the Acoustic Lens
Technology system ensures optimum
freedom in the placement of your loudspeakers. Performing a calibration of
the Adaptive Bass Control system
ensures that the loudspeaker is
optimally suited to its placement and
the surroundings – and therefore,
gives the best possible sound quality.
When you switch the loudspeaker on for the first
time, the indicator light flashes slowly green –
signalling that it has not yet been calibrated.
Adaptive Bass Control calibration
Normally, when a loudspeaker is placed in a
corner, the bass level is boosted compared to
the bass level in a loudspeaker placed in a
more freestanding position.
With other speaker systems, you have to
consider this when placing them. With
BeoLab 5, the Adaptive Bass Control system –
when calibrated – filters out this change in the
bass level.
During the calibration, the loudspeaker
generates a series of sound signals and
measures the response from walls, the floor,
the ceiling, large objects and other surfaces
in the room. Based on these measurements,
the loudspeaker automatically calculates
optimal settings for the Adaptive Bass
Control filter.
Acoustic Lens Technology –
manufactured under license
from Sausalito Audio Works.
Important!
– Before you start the calibration, place the loudspeaker where you want it to be.
– Do not calibrate more than one loudspeaker at
a time. Otherwise, the sound emitted from one
loudspeaker interferes with the measurements
done in the other, and vice versa.
– If you, later on, decide to move the loudspeakers,
rearrange your room, carpet the floor, etc., we
recommend that you perform the calibration for
each loudspeaker once again.
– We recommend that you keep any tone control
settings neutral.
Make sure that no noise interferes with the
calibration sounds emitted by the loudspeaker. Such
noise might, for example, be: a running vacuum
cleaner, ventilation or air conditioning systems,
motor sounds nearby, etc. Up to a certain level,
the loudspeaker will try to compensate for this
noise, but eventually, the noise may cause the
calibration to fail – indicated by a slowly flashing
red light. Should this happen, you must restart the
calibration – perhaps later on, when the noise has
stopped…
13
To calibrate BeoLab 5
Perform the calibration for each loudspeaker
in your setup separately. The calibration takes
a couple of minutes for each loudspeaker.
> Make sure that the loudspeaker is in standby, and
that the indicator light shines red. If necessary,
switch the loudspeaker to standby as explained
in ‘Daily use’ (pp. 4–5).
> Press and hold the touch field for more than
three seconds, then let go of the panel.
When the calibration begins, the indicator light
flashes green.
Once started, and during the calibration, the
following occurs:
– The microphone extends a little, and the speaker
generates a series of sound signals, starting with
very low bass tones.
– After a while the microphone extends a little
further, and the sound signals begin again.
– When the calibration is complete, the microphone
retracts and the loudspeaker switches to standby.
The indicator light shines red. You may now
proceed with the next loudspeaker.
If the indicator light flashes red, an error has
occurred during the calibration. To solve this, do
the following:
> Press and hold the touch panel for more than
one second, then let go of the panel.
The loudspeaker will switch to standby, and the
indicator light shines red.
> Press and hold the touch panel for more than
three seconds to start the calibration again.
Press the touch field on the loudspeaker you wish
to calibrate (while you are pressing, the indicator
light quickly flashes red).
If you wish to cancel an ongoing calibration, press
the touch field again – or press EXIT on the Beo4
remote control.
For an overview of the indicator lights, refer to
page 14.
The moving microphone is used during the
calibration. Make sure that there is always free
space in front of the microphone.
Indicator lights and sound signals
14
In daily use, you will see that the
indicator light shines either red
(standby) or green (playing).
In different situations, you may see
other indications, such as a flashing
red or green light, and combinations
of these colours.
These instances are explained in the
relevant chapters throughout this
Guide, but to give you an overview,
all instances are explained on this
page. In the overview, you will find
page references to relevant chapters.
Indicator light:
Loudspeaker status:
Shines RED…
The loudspeaker is in standby (p. 4).
Shines GREEN…
The loudspeaker is on (p. 4).
Flashes intermittently RED/OFF
(1 sec./1 sec.)…
Internal loudspeaker error (p. 4).
Flashes RED (very quickly)…
You are pressing the touch panel.
Flashes intermittently GREEN/OFF
(1 sec./1 sec.)…
Adaptive Bass Control calibration in progress
(pp. 12–13).
Flashes intermittently RED/OFF
(0.5 sec./0.5 sec.)…
An error occurred during Adaptive Bass Control
calibration (pp. 12–13).
Flashes intermittently GREEN/OFF
(2 sec/0.5 sec.)…
Adaptive Bass Control calibration has not yet been
performed (pp. 12–13).
Switches briefly OFF, and then shines red
again…
Option setting has been accepted (p. 11).
Index
15
Acoustic Lens Technology
Cleaning
Adapt BeoLab 5 to your room, 12–13
Cleaning, 4
Adaptive Bass Control
Indicator lights
Adapt BeoLab 5 to your room, 12–13
Daily use, 4
Indicator lights, 14
Adapt BeoLab 5 to your room, 12–13
Adapt BeoLab 5 to your system, 11
Daily use, 4
Indicator lights, 14
Setting up BeoLab 5, 7
Audio or video system
Adapt BeoLab 5 to your system, 11
Connection to Bang & Olufsen systems, 9
Connection to non-Bang & Olufsen systems, 10
Daily use, 4–5
Loudspeaker protection
Cleaning, 4
Indicator lights, 14
Loudspeaker protection, 4
Beo4 remote control
Maintenance
Daily use, 4–5
Adapt BeoLab 5 to your system, 11
Cleaning, 4
Cables and connections
Option settings
Connection to Bang & Olufsen systems, 9
Connection to non-Bang & Olufsen systems, 10
Setting up BeoLab 5, 6–7
Sockets and switch panel, 8
Adapt BeoLab 5 to your system, 11
Indicator lights, 14
Use BeoLab 5 with a non-Bang & Olufsen
system, 5
Calibration
Placement
Adapt BeoLab 5 to your room, 12–13
Daily use, 4
Indicator lights, 14
Adapt BeoLab 5 to your room, 12–13
Setting up BeoLab 5, 7
16
For your information…
Your needs as a user are given careful
consideration during the design and
development process of a Bang & Olufsen
product and we strive to make our products
easy and comfortable to operate.
Therefore, we hope that you will take the
time to tell us about your experiences with
your Bang & Olufsen product. Anything
which you consider important – positive or
negative – may help us in our efforts to refine
our products.
Thank you!
Write to:
Bang & Olufsen a/s
Customer Service, Dept. 7205
Peter Bangsvej 15
DK–7600 Struer
or fax:
Bang & Olufsen
Customer Service
+45 97 85 39 11 (fax)
or Email:
[email protected]
Visit our Web-site on…
www.bang-olufsen.com
Technical specifications, features and the use
thereof are subject to change without notice!
3506353
0303
Printed in Denmark by Bogtrykkergården a-s, Struer