1
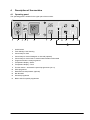
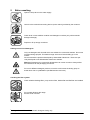
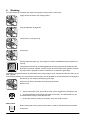
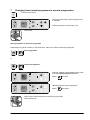
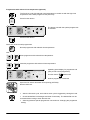
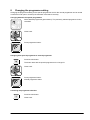
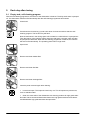
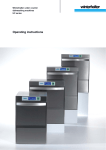
Winterhalter GS 500-Serie
GS 500 Series
Gamme GS 500
Betriebsanleitung
Operating Instructions
Notice d‘utilisation
Sehr geehrte Damen und Herren,
sehr geehrte Kunden!
Dear Customer,
Mesdames, Messieurs,
Chers clients,
»Vertrauen schenken« – »Vertrauen
haben«: Ein Unternehmen zu führen
ohne Vertrauen in die eigenen Talente
und Fertigkeiten, in die Beziehungen
zu Kunden und Lieferanten, ist für
uns undenkbar.
Diese Grundhaltung erlaubt uns Spitzenleistungen. Wir stellen uns täglich
den Herausforderungen, »tüfteln« an
Technik und Design, und entwickeln
neue Konzepte, um unseren Kunden
Sicherheit und Erfolg zu garantieren.
„Giving trust“ – „having trust“: running a company without having faith
in your own abilities and skills, and
in the relationship to customer and
supplier is unthinkable for us.
This guiding company principle allows
us to give our best. We live up to the
challenges on a daily basis, „tinkering“ with technology and design
and developing new concepts that
guarantee our customers‘ safety and
success.
Ich danke Ihnen für Ihr Vertrauen,
das Sie uns mit dem Kauf dieser
Winterhalter Spülmaschine schenken.
I thank you for the trust that you
have placed in us by buying this
Winterhalter product.
«Faire confiance et gagner la confiance», telle est notre devise car il est
impossible de conduire une entreprise
sans faire confiance en nos ressources
créatives, aux relations avec la clientèle et les fournisseurs.
Ce principe nous conduit à des réalisations de pointe et, jour après jour,
nous nous assignons de nouveaux
défis au niveau technique et pour la
conception, que nous maîtrisons par
notre persévérance, dans l’intérêt de
la sécurité et du succès du travail de
nos clients.
Ihr
Yours sincerely
Je vous remercie de la confiance que
vous placez en nous et que vous avez
Mit den besten Grüßen und Wünschen With kind regards and best wishes for illustrée en faisant l‘acquisition de ce
lave-vaisselle Winterhalter.
the future
für die Zukunft
Je vous souhaite un grand succès dans
vos activités.
Toujours à votre service
Jürgen Winterhalter
Jürgen Winterhalter
Jürgen Winterhalter
Operating instructions
for Winterhalter Gastronom dishwasher GS 502 and GS 515
Contents
1
2
3
4
5
6
7
8
9
10
11
12
Intended use---------------------------------------------------------------------------------------------------------------------- 1
Safety instructions--------------------------------------------------------------------------------------------------------------- 1
Before using the machine ----------------------------------------------------------------------------------------------------- 2
Description of the machine---------------------------------------------------------------------------------------------------- 4
Before washing ------------------------------------------------------------------------------------------------------------------ 6
Washing --------------------------------------------------------------------------------------------------------------------------- 9
Changing from normal programme to special programmes -------------------------------------------------------- 10
Changing the programme setting------------------------------------------------------------------------------------------ 12
Each day after rinsing -------------------------------------------------------------------------------------------------------- 13
Maintenance and care ------------------------------------------------------------------------------------------------------- 15
Malfunctions -------------------------------------------------------------------------------------------------------------------- 17
Emissions ----------------------------------------------------------------------------------------------------------------------- 19
1 Intended use
The Winterhalter Gastronom dishwasher GS 502/GS 515 may only be used for washing items from the
catering industry and related trades. The machine may only be used for this purpose and in accordance with
the operating instructions.
The dishwasher is a technical implement for commercial use and is not intended for domestic applications.
Any change in design or use of the utensil washer carried out without the written permission of Winterhalter
Gastronom GmbH leads to the guarantee and product liability becoming null and void. If damage is caused
to the utensil washer due to failure to observe the instructions given in this manual, no claims under guarantee can be made to Winterhalter Gastronom GmbH.
2
Safety instructions
Make sure that you have read and understood the operating instructions before you start to use the washer.
The Winterhalter customer service department can tell you how to operate the washer and how it works.
The following symbols are used in this manual:
Warning: Failure to observe these instructions can lead to danger to life, e.g. from electrical
equipment.
Attention: Failure to observe these instructions can lead to damage to equipment.
No drinking water! The water in the machine is not for drinking.
This sign indicates recommendations and special features.
89005779
1
3
Before using the machine
Before you use the machine in your work, it must be connected on your premises by trained specialists in
conformance with locally effective regulations and then set in operation by the Winterhalter customer service.
Do not expose the machine to freezing temperatures. Freezing can damage running water
systems damaged.
3.1 Setup and hookup
Setting up and hooking up the machine to the customer's supply lines and outlets must
be performed in conformance with specific local and national circumstances by approved fitters.
Completeness check:
After unpacking the machine, first check the delivery against the packing slip to see that it is complete and
has suffered no damage during transportation. Inform the haulage company, the insurance company and the
manufacturer immediately of any damages.
Setting up and aligning the machine
Install supply and drainage tables for pass-through machines and adjust with slight incline to machine or
available sink. Before starting installation, use a spirit level to check that the machine is totally horizontal.
Adjust the machine’s feet to compensate for any unevenness of the floor.
If the machine is installed in a corner, convert the rack carrier to suit the flow direction. The corner guide bolt
required can be found in a small bag with the rack accessories.
Sanitary installations:
Please observe carefully the information in the attached connection diagram!
Make sure that the water pressure and flow capacity demanded by the connection diagram are
present so that the machine will function properly.
•
Install an easily accessible main shutoff valve in the water supply line near the machine. It may not
be located behind the machine.
•
The machine is DVGW and WRC approved, or designed and built according to DVGW and WRC guidelines. It can be connected to the fresh water supply line without any safety device in between.
•
Use the hose and the fine filter in the machine to connect it. The fine filter keeps particles from the
water supply line from getting into the machine and causing extraneous rust to form on the cutlery or
the machine itself. Check that there are no leaks at the connections. The feed pipe may not be shortened or damaged.
•
Use the flexible drain pipe to drain the water. The drain pipe may not be shortened or damaged.
•
Installation of a water treatment system (if not already integrated into the machine) is recommended if
the water hardness exceeds 3°d. This will guarantee optimum washing results. The Winterhalter customer service department will be happy to advise on a suitable system.
•
The machine is equipped with a drain pump. The maximum draining capacity is found on the connection diagram.
2
89005779
Electrical installation:
DANGER! Danger of death due to live components!
Have the electric installation of the washer and the auxiliary devices belonging to it carried out
only by a specialist firm of electricians approved by the responsible electricity board in accordance with the norms.
Observe the technical connection regulations.
Before commissioning the washer, check that all electrical protection systems are working
correctly.
Caution! The machine is only to be considered free from voltage when the mains disconnecting switch (mains switch) provided by the customer is switched off.
The electrician must take note of the following:
•
The total connected load of the machine is stated on the rating plate.
•
Fuse the electrical connection of the machine as a separately fused circuit as part of the building
system using slow-blowing fuses or circuit breakers in accordance with the total connected load (see
rating plate).
•
Install a mains disconnector as well as a residual-current circuit breaker (RCCB) in the electrical
feeder, in accordance with the regulations. These switches must disconnect all poles and must have
the prescribed contact gap. The installation location must be close to the dishwashing machine and
must be easily accessible.
•
Connect the dishwashing machine and the mounted table system to a protective circuit installed and
tested in accordance with the regulations.
•
Connect the machine to your potential equalization system. The screw for this connection is located in
the machine's base.
If you set up the machine on a supporting stand, the potential equalization system must be put between the machine and the stand.
Connecting cable
The connecting cable may only be changed or replaced by the manufacturer, its customer service representative or a similarly qualified person. Use an H07 RN-F type cable or equivalent.
Phase sequence of main power cable
Mains
No. of leads
PE
N
L1
L2
L3
1/N/~
3
green-yellow
blue
brown
-
2/-/~
3
green-yellow
brown
blue
-
3/N/~
5
green-yellow
blue
grey
brown
black
3/-/~
4
green-yellow
brown
grey
black
Final work:
The machine must be entirely connected to the electrical power mains and the fresh water supply and waste
water drain system. The electrical safety system must be tested and fully functional.
A Winterhalter customer service technical performs the initial start-up. In the process, the operator of the
machine is instructed in how the machine works.
3.2 Initial start-up
After the machine has been connected to your supply lines according to regulations, contact the Winterhalter
agent responsible for your locality in order to perform the initial start-up and be instructed in how to run the
machine.
89005779
3
4
Description of the machine
4.1 Operating panel
The operating panel is situated in the upper part of the machine.
DOS
1
2
3 4 5
6
7
8
9
10
11
12
13
14
4
1
On/Off switch
2
Tank drainage / self-cleaning
3
Control lamp for fault
4
Control lamp for lack of detergent or rinse aid (optional)
5
Control lamp for lack of salt or external water treatment exhausted
6
Programme button normal programme
7
Temperature display – Boiler
8
Temperature display – Tank
9
Function button – activates the special programmes (10-13)
10
Short programme
11
Reduced rinse temperature (optional)
12
Not allocated
13
Intensive programme
14
Button area for special programmes
89005779
4.2 Functions of the dishwasher
After the machine is switched on, the dishwasher heats up the water in the boiler. During this heating up
phase, the tank is filled in stages with water which is heated simultaneously. The programme button (6) is lit
red during the heating up phase. As soon as the pre-set target temperatures for the boiler and tank have
been reached, the dishwasher is ready for operation. The programme button (6) is now lit green.
The dishwasher is fitted with an automatic hood start. When closing the hood, the last selected wash programme starts automatically. When the hood is opened, the pre-set wash programme remains stored. Thus
operation can continue immediately with the pre-set wash programme.
An automatic hood opening system is available as a cost option. With this machine version, the hood opens
automatically at the end of the programme. The hood is closed manually.
Warning! Keep head or chin away from top of hood and handles.
Note! Do not place any articles such as towels, equipment, dishes or racks on the hood or
hang them on the handles. Otherwise correct functioning of the hood opening is not guaranteed.
The container for rinse additive is stored separately from the dishwasher. Dosage for the rinse additive is
controlled automatically by the dishwasher.
Detergent must be added by hand (in the form of powder) or by means of a dosing pump in the case of liquid
detergent.
4.3 Wash programmes
The dishwasher can be operated with various wash programmes. The individual programmes are selected
by means of the control panel.
Programme
Normal programme (6)
Short programme (10)
Description
Normally soiled items
Medium drying time
Lightly soiled items.
Short/no drying time
Intensive programme (13)
Heavily soiled items.
Long drying time
3 programmes with reduced
rinse temperature (optional)
For washing glasses
Programme duration: according to selected wash programme
Cleaning the machine:
•
rinse water circulates in the rinsing space
Tank drainage / self-cleaning (2)
•
rinse water is pumped out
•
rinsing space is rinsed out with fresh, hot water
•
used fresh water is pumped out.
When the self-cleaning program is finished, the machine
automatically switches off.
89005779
5
5
Before washing
Open the stop valve on the water supply.
Switch on the mains disconnecting device (mains switch) provided by the customer.
Check level in rinse additive container and detergent container (only with automatic
detergent dosage).
Replace or fill up empty containers.
1
Adding rinse aid and detergent :
Only use detergent and rinse aid which are suitable for commercial washers. Do not use
normal washing-up liquid. This leads to large amounts of foam building up in the
washer.
We recommend the products developed by Winterhalter Gastronom. These are specially developed to suit Winterhalter Gastronom washers.
Warning: Detergents for commercial dishwashers can cause corrosion. Always follow
the instructions on the packaging and drums.
Do not mix different detergent products, since this could cause the dosing pump to
break down due to crystallisation (see Maintenance and care).
Checking the filter system:
Check whether drainage filter, pump suction filter, basket filter and flat filter are installed.
Do not load dishes at this stage.
Ensure Hood is closed.
1
6
Detergent for machines with automatic detergent dosing only.
89005779
Switch on machine:
Press On/Off switch (1), heating up phase begins.
Programme button (6) is lit red: Boiler and tank are both filled and heated up.
Programme button (6) is lit green: Filling and heating up phase completed.
Hood must remain closed during filling / heating up.
Open hood.
Manual detergent pre-dosage:
If the dishwasher is fitted with a built-in or external detergent dosing pump, there is no need for manual dosing. In this case, detergent dosing is carried out automatically by the dishwasher.
With an external detergent dosing pump, please observe the operating instructions supplied with it.
Pour detergent powder into basket filter with cup.
Dosage: Approx. 120g
Only use detergent which are suitable for commercial washers. Do not use normal
washing-up liquid. This leads to large amounts of foam building up in the washer.
We recommend the products developed by Winterhalter Gastronom. These are specially developed to suit Winterhalter Gastronom washers.
Warning: Detergents for commercial dishwashers can cause corrosion. Always follow
the instructions on the packaging and drums.
Close hood.
Start normal programme. For this, press button (6).
Detergent powder is mixed with wash water.
The dishwasher is now ready for operation.
89005779
7
Manual addition of detergent :
Manual addition of the detergent powder must be repeated after approx. every 5 wash
cycles. Pour 60g of detergent powder into the basket filter. Then start the wash programme.
Adding regenerating salt *:
* Only for machines with an integral water softener
The salt container inside the machine must be filled with regenerating salt when the
symbol lights up on the operating panel2.
You can do this while the machine is on: you do not have to switch off the machine or
drain the water.
Open the screw cap on the salt container and insert a funnel into the filler opening.
Fill the salt tank to the top with Winterhalter water softener salt (3x500 gram)
Remove the funnel and remove any salt residues from around the filler opening.
Fill the salt container up to the rim with water (only at the first commissioning), then
tighten the screw cap again ensuring the cap is correctly seated!
Then perform a washing program immediately to flush out any salt residues. Otherwise
there is a risk of rust forming in the filling area.
Only add regenerating salt to the salt tank!
The salt used should be very fine (max. grain size 5 – 7 mm). Salt tablets are not suitable.
Do not add any other chemicals, such as detergent or rinse aid. These will cause damage to the machine.
2
Note:
If the machine does not have an integral water softener and this symbol lights up, the connected external
water treatment system is exhausted and must be regenerated. Follow the instructions in the documentation
supplied with the water treatment system.
8
89005779
6
Washing
Pre-clean dishes (if necessary pre-wash with spraying nozzle), place in wash rack:
Upper surface of plate or tray facing forward.
Cups and glasses, facing down.
Insert cutlery in one layer only.
Close hood.
Press programme button (6). The programme button is lit blue while the programme is
running.
The programme button (6) is flashing green when the programme has ended and the
door has not yet been opened. As soon as the door of the machine is opened, the flashing stops and the programme button 6 switches to a continuous green light.
The flashing programme button (6) indicates that the wash programme is complete and the door has not yet
been opened.
If the flashing disturbs you, the machine control system can be adjusted by an authorised service engineer to
prevent key 6 from emitting the flashing green light.
Open hood or wait for automatic hood opening (OPTION).
Remove rack.
•
After the first wash cycle, each further wash cycle is triggered by closing the hood.
• Check basket filter for blockages and clean if necessary. The basket filter can be
removed without having to drain the tank first.
•
Check tank water for soiling. If necessary, drain and re-fill machine.
Wash pause
Before closing the hood, press function button in order to cancel automatic hood start.
Close hood.
89005779
9
7
Changing from normal programme to special programmes
Press function button.
The button area with the special programmes
is activated.
C
The temperatures are also shown now.
Close hood.
Short programme or intensive programme
Depending on the level of soiling on the wash items, select one of the two special programmes:
+
Short programme
or
+
Intensive programme
Example: Operating panel display during wash
cycle with short programme selected.
C
Button
is lit blue.
Operating panel at end of programme
C
Button
is lit green.
Open hood or wait for automatic hood opening (OPTION).
Remove dish rack.
10
89005779
Programmes with reduced rinse temperature (optional)
The first rinse cycle with reduced rinse temperature is carried out with the high rinse
temperature of the wash programme set previously.
Press function button.
The button area with the special programmes
is activated.
C
Press function button.
Select one of the 3 wash programmes:
Normal programme with reduced rinse temperature.
oder
+
Short programme with reduced rinse temperature.
oder
+
Intensive programme with reduced rinse temperature.
Operating panel display for programme end
(with pre-set normal programme)
C
Function button
flashes until
another programme is selected.
Open hood or wait for automatic hood opening (OPTION).
Remove dish rack.
•
After the first wash cycle, each further wash cycle is triggered by closing the hood.
• Check basket filter for blockages and clean if necessary. The basket filter can be
removed without having to drain the tank first.
•
89005779
Switching between special programmes: see section 8 “Changing the programme
setting“
11
8
Changing the programme setting
Changing the programme setting for the special programmes and for the normal programme can be carried
out with the hood open or closed (if the automatic hood start is inactive).
Changing between the special programmes
Select desired programme (press button). The previously selected programme is thus
cancelled.
Close hood.
Press programme button.
Changing from special programme to normal programme
Press function button.
The button area with the special programmes is no longer lit.
Close hood.
Press programme button.
Normal programme starts.
Cancelling the programme selection
Press function button.
Close hood.
12
89005779
9
Each day after rinsing
9.1 Empty tank; self-cleaning program
With the self-cleaning programme, the interior of the dishwasher is cleaned. The dirty wash water is pumped
off. The dishwasher switches off automatically after the self-cleaning programme has finished.
Close hood.
Press down the function key (2) and hold it down for three seconds to start the selfcleaning program. The function key will flash.
Now the tank water in the rinsing space will circulate for a while before it is pumped out.
Then the interior of the machine will be rinsed out with fresh, hot water, which will also
be pumped out afterward. When the self-cleaning programme is finished, the machine
will switch off automatically. The operating panel will no longer be lit.
Open hood.
Remove and clean basket filter.
Remove and clean flat filter.
Remove and clean drainage filter.
Insert the parts removed again after cleaning.
• Leave hood open. This helps the interior dry out. This is important to prevent rust,
even on stainless steel.
• Clean the outer walls of the dishwasher with cleaning products for high grade stainless steel. We recommend Winterhalter Gastronom high grade stainless steel cleaner
and Winterhalter high grade stainless steel protection.
89005779
13
9.2 Switching off
After the cleaning programme has finished, the control of the dishwasher is switched off.
The machine is not yet safe, however.
Turn water stop valve to closed position.
Switch off the mains disconnecting device (mains switch) provided by the customer.
Now the machine is safe.
14
89005779
10 Maintenance and care
To keep the machine functional for a long time, it should be cared for at regular intervals.
In addition, we recommend have Winterhalter customer service overhaul the machine twice each year.
Do not spray the machine with a high-pressure or steam jet cleaning unit.
10.1 Every day after washing
Open hood.
Remove and clean basket filter.
Remove and clean flat filter.
Fold up or remove rack carrier.
Remove wash arms and check jets for blockages, clean if necessary.
Remove drainage and pump suction filter, check for blockages and clean if necessary.
Use a brush to clean off any deposits which may have formed in the interior of the machine.
When cleaning, make sure that not foreign bodies which could rust remain in the interior of the machine.
These could cause the interior to rust. These foreign bodies could come from rinsing things not made of
stainless steel, from cleaning aids, damaged wire racks or supply lines which are not rustproof.
Insert filters and wash arms again.
Clean the outer walls of the dishwasher with special cleaning products for high grade
stainless steel. We recommend Winterhalter Gastronom high grade stainless steel
cleaner and Winterhalter high grade stainless steel protection.
89005779
15
10.2 As required
FI fault-current circuit-breaker:
Check the required FI-residual current operated device for faults regularly according to
the regulations by pressing the test button.
Changing the detergent type (liquid product)
If changing to a different detergent type (even one by the same manufacturer), you must rinse the suction
and pressure hoses with fresh water before connecting the new detergent container.
Otherwise, the mixing of different types of detergent will cause crystallisation, which may result in a breakdown of the dosing pump.
Failure to observe this rule will lead to the loss of guarantee and product liability claims vis-à-vis Winterhalter
Gastronom GmbH.
Procedure:
•
Remove the suction stick from the empty detergent container and place it in a container filled with fresh
water.
•
Drain the machine completely and refill it. Then drain it again, since no detergent has been dispensed
during this process.
•
Insert the suction stick in the new detergent container
Descaling
Drain machine.
Interrupt detergent supply: Remove suction pipe from the detergent canister.
Re-fill machine.
Addition of the descaling solution according to manufacturer’s instructions.
Observe the printed safety instructions.
Trigger intensive programme once or twice (max. 10 minutes circulation). This loosens the coating of scale.
Drain machine.
Never leave the descaling solution in the machine for a period of several hours.
Put detergent supply into operation again.
Re-fill machine.
Operate machine twice more in intensive programme mode.
Drain machine or use for the current wash programme.
16
89005779
11 Malfunctions
11.1 Malfunctions you can remedy yourself
You can remedy minor malfunctions yourself. See the following table. If you cannot remedy the fault, please
get in touch with the responsible Winterhalter customer service.
Do not open any panels or parts of the machine if you need a tool to do so. You may get an
electric shock.
Only trained specialists are allowed to work on the electrical system. Unplug the machine from
the mains supply beforehand.
Do not switch the machine back on until the cause of the fault has been remedied.
Switch off the main switch on your premises. Only then is the machine no longer live.
Display
The washer
cannot be
switched on
Cause
The mains disconnecting device (mains
Switch on the mains disconnecting device
switch) provided by the customer is not
(mains switch) provided by the customer.
switched on.
Customer’s fuses blown
Wash
programme does Hood is not completely closed
not start
Dishes are not
clean
89005779
Remedy
Replace the customer’s fuses
Close hood completely. Press hood down onto
hood catch
Too low dosage of detergent or detergent container empty
Fill up detergent container or add detergent
powder
Basket filter and/or flat filter blocked
Clean basket filter and flat filter
Wash jets in the wash arms blocked
Clean wash jets
Functional fault in the water treatment
Call Winterhalter service engineer
17
Display
Cause
Remedy
Switch off machine (press on-off switch). Then
Err will appear on the control panel accompanied by a fault code.
Display shows:
Water stop valve closed
Malfunction
If error code 20 is shown, close the water shutoff valve and notify Winterhalter customer service.
If other error codes are displayed, check
whether the water shut-off valve is opened.
Then switch on the machine again.
If the fault message appears again, note the
fault code and get in touch with the appropriate
Winterhalter customer service
•
Key flashes blue
If the cutlery has not been properly
cleared away beforehand, so much dirt •
may have collected on the flat filter and
•
in the filter cassette that the rinsing
program can no longer run properly.
The washing pump switches off and the
program key flashes blue.
•
Switch off machine, the program key will
continue to flash.
Take out filters, clean and replace them.
After two minutes, the flashing will stop.
Switch the machine back on and continue to run it.
Clear away the cutlery more carefully to
avoid further malfunctions.
11.2 Error alarms in machines with optional extras
Display
DOS
18
Possible cause
Remedy
Lack of detergent or rinse additive
Re-fill detergent or rinse additive
Out of regeneration salt
Refill with regeneration salt and run one wash
programme (see also Page 8)
External water treatment system needs
regenerating
Regenerate external water treatment system
Peak load cut-off active
Wait until the peak load cut-off switches on the
machine completely again.
89005779
11.3 Malfunctions calling for the Winterhalter customer service
Red flashing light: Temperature in boiler or tank is greater than 95°C.
Caution: Surface is very hot. The fault (3) symbol appears together with the fault code
Err 2 or Err 3. Switch off main switch.
Notify the Winterhalter service team immediately.
When the machine can no longer be used because of internal faults, the machine turns itself off automatically and displays an error code.
Display
Machine switches
off and displays
Err
1, 11
Machine switches
off and displays
Err
6
Machine switches
off and displays
Err
20
Machine is switched off and displays
Err
21
Machine switches
off and displays
nothing at all
Possible cause
Remedy
Fault inside machine
Notify Winterhalter customer service
Fault inside machine or
water drain is clogged
Notify Winterhalter customer service or remove
cause of clogging.
Magnetic valve not closing
Close the water shut-off valve and notify
Winterhalter customer service.
Magnetic valve not closing
Close the water shut-off valve and notify
Winterhalter customer service.
Fault inside machine
Notify Winterhalter customer service
12 Emissions
Noise
The workplace-related emissions LpAeq as defined in DIN EN ISO 11202 amount to <70dB(A)
89005779
19
Winterhalter Gastronom GmbH
Commercial Dishwashing Systems
Tettnanger Strasse 72
88074 Meckenbeuren · Germany
Telephone +49 (0) 75 42 4 02-0
Telefax
+49 (0) 75 42 4 02-1 87
www.winterhalter.biz
SD 10/08 89005707-05 Technische Änderungen vorbehalten.
Subject to technical modifications.
Sous réserve de modification techniques.
[email protected]