1
Manual
Manuel d’utilisation
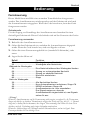
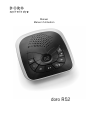
doro R52
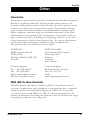
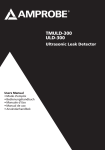
1
2
3
7
6
5
4
Français (voir page 4 à 13)
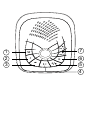
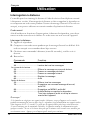
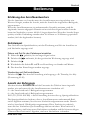
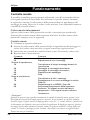
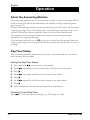
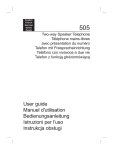
1
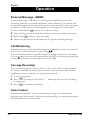
Enregistrer une communication /
mémo
2
Effacer un message
3
Répéter et enregistrer un
message d’accueil
4
Lecture / pause
5
Touche marche/arrêt
6
Régler l’heure / passer au
message suivant
7
Réglage du volume
Deutsch (siehe Seiten 14-21)
1
Gespräch/Memo aufnehmen
5
Ein/Aus-Schalter
2
Nachricht löschen
6
3
Wiederholung und Aufnahme der
Antwort
Uhrzeit einstellen/Nächste
Nachricht
7
Lautstärke
4
Wiedergabe/Pause
Italiano (vedere pagine 22-30)
1
Registra chiamata/Memo
5
Pulsante On/Off
2
Cancella messaggio
6
3
Ripeti e Registra risposta
Imposta orologio/Messaggio
successivo
4
Play/Pausa
7
Controllo volume
English (see page 31-42)
1
Two-way recording/Memo
5
On/Off Button
2
Delete message
6
Set Clock/Skip Message
3
Repeat and OGM record
7
Volume Control
4
Play/Pause
Français
Installation
Raccordement
1. Installez la pile. Voir le paragraphe suivant.
2. Branchez le câble téléphonique à la prise T au dos de l’appareil.
3. Branchez le câble téléphonique du répondeur sur la prise téléphonique murale
et branchez ensuite la prise du téléphone sur celle du répondeur.
4. Un déclic indique que la prise est branchée correctement.
5. Branchez l’adaptateur secteur à la prise électrique et à la prise DC 9V de
l’appareil.
6. Lorsque l’adaptateur secteur est branché, l’appareil effectue un
un test d’environ 20 secondes. Les secondes sont affichées. Puis vous entendez
un signal sonore.
7. Avant la première utilisation du répondeur, vous devez enregistrer un message
d’accueil, voir en page 7. Vous devez aussi régler la fonction d’horodatage,
voir en page 5.
8. Pour les appareils achetés en Suisse, vous avez aussi la possibilité de choisir la
langue affichée. Veuillez voir la page 6.
Attention!
Ce produit ne doit être utilisé qu’avec l’adaptateur secteur fourni (G090030D25 9VDC).
Pile
Afin de concerver en mémoire les messages, la date et l’heure lors d’une coupure
de courant éventuelle (max 16 heures), une pile de 9V est nécessaire (non fournie
avec le l’appareil ). bL s’affiche en clignotant lorsque la pile doit être changée.
Changez la pile le plus tôt possible! Utilisez uniquement des piles de haute qualité.
1. Débranchez l’appareil.
2. Enlevez-la trappe du compartiment.
3. Installez la pile.
4. Remettez en place la trappe.
Dans le cas où vous échangez un pile usagée par une neuve, l’appareil perdra
sa mémoire lorsque vous débrancherez l’adaptateur secteur. Pour des raisons
de sécurité, il est demandé que toute alimentation soit supprimée lors de cette
opération.
4
www.doro.com
Utilisation
Français
Mise en marche/Arrêt du répondeur
La touche ! est utilisée pour mettre le répondeur en marche ou l’arrêter.
En position MARCHE le répondeur répondra à toutes les communications
extérieures, et en position ARRÊT le répondeur ne répond à aucune
communication. Le répondeur est arrêté lorsque -- est affiché.
Utilisation du répondeur
Il faut mettre le répondeur en marche pour qu’il puisse recevoir des messages.
Le répondeur répond aux appels extérieurs après le nombre de sonneries
sélectionné. Lorsque le répondeur répond à un appel extérieur, le correspondant
entend votre message d’accueil, puis un signal sonore lui permet de laisser
un message de jusqu’à 60 secondes maximum. Si ce délai est dépassé, la
communication se termine. La mémoire contient environ 50 minutes de
messages reçus (le message d’accueil inclus).
Uniquement pour la France: Lorsque le répondeur est réglé sur la position
A2 ( répondeur simple ), la personne qui appelle n’a pas la possibilité de laisser
un message après l’annonce, et la communication se termine après votre
message d’accueil.
Horodatage
L’appareil possède une fonction horodatage qui vous indique le jour et l’heure de
réception après chaque message.
Régler le jour et l’heure d’horodatage
1. Maintenez enfoncée la touche 9 9 jusqu’à ce que vous entendiez un long
signal sonore.
2. Appuyez plusieurs fois sur 9 9, jusqu’à ce que le répondeur annonce le jour
correct de la semaine.
3. Appuyez sur 9.
4. Répétez les étapes 2. et 3. pour régler l’heure et les minutes.
5. Le répondeur annonce le réglage actuel.
Contrôlez le jour et l’heure actuels
Appuyez sur 9 9. Le répondeur annonce le réglage actuel, par exemple : Jeudi,
cinq heures cinquante (jeudi 05 :50).
www.doro.com
5
Français
Utilisation
Nombre de sonneries
Le réglage 2 6 ECO/TS au dos de l’appareil vous permet de régler comment et
quand le répondeur va intervenir.
2 = le répondeur intervient après deux sonneries.
6 = le répondeur intervient après six sonneries.
ECO/TS (TOLL SAVER) = la fonction ECO/ TOLL SAVER est activée en cette
position.
La fonction ECO/ TOLL SAVER signifie que le répondeur décroche après six
sonneries tant qu’aucun message n’a été enregistré. À l’appel suivant, il répondra
après deux sonneries. Cette fonction vous permet de savoir, lors de l’écoute
des messages à distance, s’il y a de nouveaux messages. Ainsi, si le répondeur
ne décroche pas au bout de quatre sonneries (ce qui veut dire qu’il n’y a pas de
message enregistré) vous pouvez raccrocher sans frais de communication. Lorsque
le répondeur décroche dès la deuxième sonnerie, cela signifie qu’il y a de nouveaux
messages enregistrés.
Fonction Répondeur simple (ne concerne que la France)
Le réglage A2/a sur le côté de l’appareil vous permet de choisir la fonction
répondeur simple.
= Un message peut être laissé après le message d’accueil.
A2 = Aucun message ne peut être laissé après le message d’accueil.
a
La fonction répondeur simple signifie que la personne qui vous appelle ne peut pas
laisser de message. La communication se termine après votre message d’accueil.
Vous pouvez utiliser cette fonction lorsque vous ne souhaitez pas recevoir de
message. Par exemple lors d’une absence prolongée de la maison, ou pour les
différents types de messages d’information.
Langue (ne concerne que la Suisse)
Sélectionnez la langue affichée par le réglage
répondeur.
6
sur le côté du
www.doro.com
Utilisation
Français
Message d’accueil
Le message d’accueil est le message que votre correspondant entend lorsque le
répondeur prend l’appel extérieur.
Le message d’accueil peut durer jusqu’à 60 secondes.
Si vous n’enregistrez pas votre propre message, le correspondant correspondant
entendra un message enregistré par défaut.
Votre message d’accueil doit donner l’instruction au correspondant de laisser son
message après le signal sonore.
Exemple d’un message d’accueil:
- «Bonjour, ici la famille Dupont. Nous ne pouvons pas vous répondre en
ce moment, mais veuillez nous laisser un message après le bip, et nous vous
rappellerons dès que possible. Merci de votre appel».
Enregistrement d’un message d’accueil
1. Maintenez 8 8 appuyée. Vous entendez un bref signal sonore et l’afficheur
clignote.
2. Enregistrez votre message d’accueil (min. 5 secondes). Parlez clairement et à
une distance d’environ 15 à 20 cm de l’appareil.
3. Relâchez la touche pour terminer l’enregistrement.
4. Le message est répété après quelques secondes. Refaites la procédure si
vous souhaitez changer le message d’accueil. L’enregistrement d’un nouveau
message d’accueil remplace automatiquement l’ancien.
Écoute du message d’accueil
Appuyez sur 8 8 . Vous entendez le message.
Remarque!
S’il n’y a pas de pile dans l’appareil, vous risquez que ce message s’efface lors d’une coupure de
courant. Dans ce cas, le répondeur utilisera le message enregistré par défaut.
www.doro.com
7
Français
Utilisation
Lecture des messages
Le nombre total de messages reçus en mémoire est affiché.
La lecture commence toujours par les messages nouveaux qui n’ont pas encore
été écoutés. S’il y a par exemple trois messages anciens et deux nouveaux sur
le répondeur, vous entendrez uniquement les deux nouveaux, et le répondeur
repasse ensuite en mode repos. Remettez la lecture en marche une deuxième fois
pour écouter tous les messages, en commençant par le plus ancien.
1. Appuyez sur 9 pour commencer la lecture des messages.
2. Après chaque message vous entendrez l’horodatage qui vous indique le jour
et l’heure de réception du message. Un signal sonore court est émis entre
chaque message.
3. Après la lecture des messages vous entendrez deux bips et le répondeur
repasse ensuite en mode repos. Tous les messages sont gardés en mémoire
(si vous ne les effacez pas après leur lecture, voir ci-dessous) et les nouveaux
messages seront enregistrés après les anciens.
Pendant la lecture des messages, vous pouvez choisir entre les fonctions
suivantes :
Touche
88
Fonction
Aller en arrière, ou régler la date et l’heure.
99
Passer au message suivant.
!
Terminer la lecture.
C
Effacer le message actuel.
{/}
Augmenter ou baisser le volume.
9
Insérer une pause en cours de lecture (max. 7 secondes). Appuyez
à nouveau sur 9 pour continuer.
Effacer un message
Appuyez sur C en cours de lecture pour effacer un message unique.
Vous ne pouvez effacer tous les messages en même temps qu’après la lecture :
Appuyez sur C jusqu’à ce que vous entendiez un long signal sonore.
8
www.doro.com
Utilisation
Français
Message personnel - MEMO
Un message personnel dit MEMO, est un message que vous enregistrez directement
sur le répondeur, sans appel depuis l’extérieur. Ceci vous permet d’utiliser le
répondeur comme un carnet électronique où vous enregistrez des messages pour les
membres de la famille ou vos collègues. Le message-MEMO peut durer jusqu’à 60
secondes.
1. Maintenez la touche o jusqu’à ce que vous entendiez un signal sonore.
2. Enregistrez votre MEMO.
3. Relâchez la touche pour terminer l’enregistrement.
4. Vous écoutez les messages-MEMO de la même manière que les messages reçus
normalement.
Filtrage d’appel
La fonction de filtrage d’appel permet d’écouter sur le haut-parleur le message que
votre correspondant est en train de laisser. Si vous n’entendez rien sur le hautparleur, veuillez vérifier que le volume est suffisamment haut.
Si vous décidez de prendre la communication avec votre correspondant, décrochez
simplement un téléphone branché sur la même ligne. Au cas où l’enregistrement ne
serait pas coupé automatiquement, veuillez appuyer sur la touche ! au répondeur ou
sur la touche * de votre téléphone (2 secondes) si vous utilisez un autre téléphone.
Enregistrement d’un appel extérieur
Vous pouvez enregistrer sur le répondeur la communication en cours sur un autre
téléphone connecté sur la même ligne. Le temps d’enregistrement est limité par
à la capacité de mémoire libre (50 minutes au maximum). Le répondeur traite
les communications enregistrées de la même manière que les messages reçus
normalement.
1. Une communication de l’extérieur est en cours.
2. Appuyez sur a . 2r est affiché pour indiquer que l’enregistrement est en
cours.
3. Appuyez sur a pour terminer l’enregistrement.
Mise en marche à distance
Vous pouvez activer le répondeur à l’aide des fonctions de commande à distance.
1. Appelez le répondeur. Après approximativement 10 sonneries vous entendez un
signal sonore.
2. Composez votre code secret ( veuillez voir en page suivante ). Si le code est
accepté vous entendrez deux bip courts.
3. Appuyez sur 9#. Un signal sonore confirme que le répondeur est en fonction.
Raccrochez.
www.doro.com
9
Français
Utilisation
Interrogation à distance
Ce modèle peut être interrogé à distance à l’aide du clavier d’un téléphone normal
à fréquences vocales. L’interrogation à distance se fait en appelant le répondeur et
en composant un code secret pendant l’écoute du message d’accueil. Si le code est
accepté, vous pouvez effectuer un certain nombre d’opérations à distance.
Code secret
Afin d’accéder aux fonctions d’interrogation à distance du répondeur, vous devez
entrer un code secret de trois chiffres. Le code secret est noté sous de l’appareil.
Interroger à distance
1. Appelez le répondeur.
2. Composez votre code secret pendant que le message d’accueil est diffusé. Si le
code est accepté vous entendrez deux bips sonores.
3. Choisissez une commande à distance (avant 20 secondes), veuillez voir cidessous.
4. Raccrochez.
Commande
Fonction
25........................................ Lecture des nouveaux messages
2# ....................................... Lecture de tous les messages
Au cours de la lecture :
3#........................................ Effacer le message en cours de lecture.
6#........................................ Passer au message précédent
7#........................................ Passer au message suivant
8#........................................ Répéter le message
##........................................ Arrêt
Après la lecture:
3#........................................ Effacer tous les messages
7#........................................ Enregistrer un nouveau message d’accueil,
arrêt=7#
8#........................................ Enregistrer un MEMO, arrêt=8#
9#........................................ Arrêter/Mettre en marche le répondeur.
Trois bips indiquent l’arrêt et un bip la mise en
marche de l’appareil.
Remarque!
Si le répondeur ne réagit pas aux appuis-touches à distance, essayez d’appuyer sur les touches
pendant un moment plus court ou plus long. Le répondeur réagit normalement aux appuis-touches
d’une longueur de 0.5 à 1 seconde, il se peut que des appuis-touches plus longs soient nécessaires.
Si vous n’actionnez pas de commande à distance, le répondeur termine la communication après
quelques secondes. Au cas où la lecture dure plus que 2 minutes et 40 secondes vous entendrez un
avertissement sonore. Appuyez sur n’importe quelle touche pour continuer.
10
www.doro.com
Autres
Français
Détection automatique de fin de message
Le répondeur continue l’enregistrement du message jusqu’à ce que le correspondant
arrête de parler (mais 60 secondes au maximum). Lorsque le correspondant arrête
de parler, le répondeur termine la communication après quelques secondes.
Si vous atteignez la limite de capacité de la mémoire
La capacité de mémoire totale du répondeur est d’environ 50 minutes. La mémoire
est utilisée pour le message d’accueil, les messages-MEMOS et les messages
normaux venus de l’extérieur. Lorsque la capacité de mémoire est atteinte, il
faut écouter et effacer les anciens messages avant que les nouveaux puissent être
enregistrés.
Dans le cas où la limite de la mémoire est atteinte, Su s’affiche et le répondeur
décroche après environ 10 sonneries afin de permettre la lecture et l’effacement à
distance.
Garantie et S.A.V.
Cet appareil est garanti un an à partir de sa date d’achat, la facture faisant foi. La
réparation dans le cadre de cette garantie sera effectuée gratuitement, pièces et main
d’oeuvre.
La garantie est valable pour un usage normal de l’appareil tel qu’il est défini dans
la notice d’utilisation.
Les fournitures utilisées avec l’appareil ne sont pas couvertes par la garantie.
Sont exclues de cette garantie les détériorations dues à une cause étrangère à
l’appareil.
En particulier la garantie ne s’appliquera pas si l’appareil a été endommagé à la
suite d’un choc ou d’une chute, d’une fausse manoeuvre, d’un branchement non
conforme aux instructions mentionnées dans la notice ou aux prescriptions de
l’ART (-Autorité de Régulation des Télécommunications), de l’effet de la foudre,
de surtensions électriques ou électrostatiques, d’une protection insuffisante contre
l’humidité, la chaleur ou le gel.
En cas de panne, adressez-vous au S.A.V. de votre revendeur ou installateur.
Pour la France
En tout état de cause, la garantie légale pour vices cachés s’appliquera
conformément aux articles 1641 et suivants du Code Civil.
Si vous avez des soucis d’utilisation, contactez notre Service d’assistance
Téléphonique au 08 92 68 90 18 ( N° Audiotel - 0,34 Euros/mn ).
www.doro.com
11
Français
Autres
Dépannage
Vérifiez que le câble téléphonique est en bon état et qu’il est branché correctement.
Débranchez tout autre matériel, rallonges et téléphones. Si l’appareil fonctionne alors
normalement, la panne est due au matériel additionnel.
Testez le matériel sur une autre ligne téléphonique (comme celle d’un voisin). Si le
matériel fonctionne sur ce raccordement, cela signifie que votre propre raccordement
téléphonique est défectueux. Signalez la panne à votre opérateur de réseau.
Le répondeur fonctionne pas
- Vérifiez qu’il est mis en marche.
- Vérifiez que le câble téléphonique est en bon état et que l’adaptateur est
correctement branché.
Le répondeur ne réagit pas aux commandes d’interrogation à distance
- Vérifiez que le téléphone que vous utilisez pour l’interrogation à distance est de
type fréquences vocales.
- Certains téléphones sont difficiles à utiliser pour l’interrogation à distance,
puisqu’ils n’émettent qu’une tonalité très courte lorsque vous appuyez sur les
touches. Dans ce cas; nous vous conseillons d’utiliser un autre téléphone.
- Essayez d’appuyer sur les touches plus longtemps : environ 1 seconde par
chiffre.
Le message d’accueil s’entend mal
- Enregistrez un nouveau message d’accueil.
- Parlez en face et à 20 cm environ du micro lorsque vous enregistrez le message.
La ligne est coupée lorsque quelqu’un laisse un message:
- Si la fonction A2 Répondeur Simple est active, la personne qui vous appelle ne
peut pas laisser de message et la communication se termine après votre message
d’accueil. (Ne concerne que la France).
- Le message de votre correspondant ne peut dépasser 60 secondes. Lorsque ce
délai est dépassé, la communication se termine.
- Si votre correspondant arrête de parler pendant environ 7 secondes,
vous risquez que la communication se termine, puisque le répondeur interprète
ce silence comme une fin de message
Une suite de tonalités s’entend et rien ne se passe lorsque vous appuyez
sur la touche de lecture :
- Il n’y a pas de message à écouter.
Au cas où les mesures ci-dessus n’ont pas d’effet, veuillez contacter votre revendeur.
12
www.doro.com
Deutsch
Installation
Anschliessen
1. Batterie anschliessen. Siehe unten.
2. Schließen Sie den Stecker des Telefonkabels an den Telefonanschluss T auf
der Rückseite an.
3. Schließen Sie den Zwischenstecker an die Telefonsteckdose an. Schließen Sie Ihr
Telefon mit dem Zwischenstecker an.
4. Sie hören ein Klickgeräusch, wenn die Anschlüsse einrasten.
5. Schließen Sie den Netzadapter an das Stromnetz und an den Anschluss DC 9V
an.
6. Nach Anschluss des Netzadapters führt das Gerät einen Selbsttest durch, der ca.
20 Sekunden dauert. Während dieses Tests zählt das Display vorwärts. Danach
ertönt ein langes Signal.
7. Bevor der Anrufbeantworter benutzt werden kann, muss eine abgehende
Antwort aufgenommen werden, siehe Seite 16. Die Zeitstempelfunktion sollte
ebenfalls eingestellt werden, siehe Seite 14.
8. Für Geräte, die in der Schweiz gekauft wurden, kann auch die Sprache
eingestellt werden, siehe Seite 15.
Batterie
Damit die Nachrichten und die Zeit bzw. das Datum bei einem Stromausfall nicht
gelöscht werden (max. 16 Std.) muss eine 9V Batterie eingesetzt werden (nicht
enthalten). Wenn die Leistung der Batterien nachlässt, blinkt das Display bL .
Tauschen Sie die Batterie möglichst bald aus! Benutzen Sie nur Batterien von guter
Qualität.
1. Ziehen Sie das Telefonkabel ab.
2. Nehmen Sie die Klappe der Batterieklappe ab.
3. Schliessen Sie die Batterie an.
4. Setzen Sie die Klappe wieder auf.
Anrufbeantworter ein- bzw. ausschalten
Mit der Taste ! wird der Anrufbeantworter ein- bzw. ausgeschaltet. Wenn
der Anrufbeantworter auf EIN steht, werden die Anrufe angenommen, bei
AUS werden keine Anrufe beantwortet. Wenn das Display –– anzeigt, ist der
Anrufbeantworter ausgeschaltet.
14
www.doro.com
Bedienung
Deutsch
Erklärung des Anrufbeantworters
Für die Annahme von Anrufen muss der Anrufbeantworter eingeschaltet sein.
Wenn es klingelt, werden die Anrufe, nach der Anzahl der eingestellten Rufsignale,
angenommen.
Wenn der Anrufbeantworter ein ankommendes Gespräch annimmt, wird die
abgehende Antwort abgespielt. Danach ertönt ein kurzes Signal und der Anrufer
kann eine Nachricht von max. 60 Sek. Länge aufsprechen. Wenn der Anrufer länger
spricht, wird die Verbindung unterbrochen. Es können ca. 50 Minuten gespeichert
werden (inkl. der abgehenden Antwort).
Zeitstempel
Das Gerät hat eine Sprachfunktion, mit der Wochentag und Zeit im Anschluss an
jede Nachricht angesagt wird.
Datum und Zeit für den Zeitstempel einstellen
1. Halten Sie 9 9 gedrückt, bis ein langes Signal ertönt.
2. Drücken Sie 9 9 mehrmals, bis der gewünschte Wochentag angesagt wird.
3. Drücken Sie 9.
4. Wiederholen Sie Schritt 2. und 3. zur Einstellung von Stunde und Minute .
5. Die aktuellen Einstellungen werden angesagt.
Wochentag und Zeit kontrollieren
Drücken Sie 9 9. Die aktuelle Einstellung wird angesagt, z.B: Thursday, five fifty
(Donnerstag 05:50).
Anzahl der Rufsignale
Mit dem Schalter 2 6 ECO/TS auf der Unterseite des Telefons kann eingestellt
werden, wie und wann sich der Anrufbeantworter einschalten soll.
2 = der Anruf wird nach 2 Rufsignalen angenommen.
6 = der Anruf wird nach 6 Rufsignalen angenommen.
ECO/TS (TOLL SAVER) = diese Einstellung aktiviert die sog. Sparsignalfunktion.
Die Sparsignalfunktion bedeutet, dass er Anrufbeantworter ankommende Rufe
nach 6 Signalen annimmt, bis eine neue Nachricht aufgenommen wurde. Danach
wird er Anruf nach 2 Rufsignalen angenommen. Diese Funktion ist praktisch,
wenn Sie ihre Nachrichten per Fernabfrage abhören möchten. Wenn mehr als 4
Signale abgehen, sind keine neuen Nachrichten vorhanden und Sie können auflegen.
Antwortet das Gerät nach 2 Signalen, sind neue Nachrichten vorhanden.
www.doro.com
15
Deutsch
Bedienung
Sprache (nur Schweiz)
Wählen Sie die Sprache mit dem Schalter
Geräts.
an der Seite des
Automatikantwort
Die Automatikantwort ist die Nachricht, die bei ankommenden Anrufen abgespielt
wird.
Die Antwort darf bis zu 60 Sekunden lang sein.
Wenn Sie keine Antwort aufspielen, wird eine voreingestellte Antwort abgespielt.
Sagen Sie dem Anrufer in der Automatikantwort, dass nach dem kurzen Piepton
eine Nachricht hinterlassen werden kann.
Beispiel für den Antworttext:
-”Hier ist der Anschluss der Familie Wilke. Wir sind i Moment nicht zu erreichen.
Sprechen Sie eine Nachricht nach dem Piepton. Vielen Dank für den Anruf.”
Automatikantwort aufnehmen
1. Drücken Sie 8 8 und halten Sie die Taste gedrückt. Ein kurzes Signal ertönt und
das Display blinkt.
2. Sprechen Sie die abgehende Antwort auf. Sprechen Sie deutlich ca. 15-20 cm
von der Oberseite des Geräts entfernt.
3. Zum Beenden der Aufnahme lassen Sie die Taste los.
4. Die Nachricht wird nach ein paar Sekunden wiederholt. Wenn Sie die Nachricht
ändern wollen, müssen Sie den Vorgang wiederholen. Die vorhergehende
Antwort wird automatisch gelöscht.
Automatikantwort abhören
Drücken Sie 8 8 . Die Ansage wird abgespielt.
Achtung!
Wenn bei einem Stromausfall keine Batterie eingelegt ist, wird die Automatikantwort unter
Umständen gelöscht. Der Anrufbeantworter spielt dann die voreingestellte Antwort ab.
16
www.doro.com
Bedienung
Deutsch
Wiedergabe der Nachrichten
Das Display zeigt die Gesamtanzahl der Nachrichten im Speicher an.
Die Wiedergabe startet immer mit den neuesten – noch nicht abgehörten
- Nachrichten. Wenn z.B. drei alte und zwei neue Nachrichten vorhanden
sind, werden nur die beiden neuen Nachrichten abgespielt. Danach geht der
Anrufbeantworter in den Bereitschaftsmodus. Starten Sie die Wiedergabe
nochmals, um alle Nachrichten - beginnend mit der ältesten - abzuspielen.
1. Drücken Sie 9 um die Wiedergabe zu unterbrechen.
2. Nach jeder Nachricht wird die Zeit und der Wochentag an dem die Nachricht
einging, angesagt. Zwischen jeder Nachricht ertönt ein kurzes Signal.
3. Nach der Wiedergabe ertönen zwei kurze Signale und der Anrufbeantworter
geht in den Bereitschaftsmodus. Alle Nachrichten werden gespeichert (wenn
keine Nachrichten während der Wiedergabe gelöscht wurden, siehe unten).
Neue Nachrichten werden nach den alten Nachrichten aufgenommen.
Während der Wiedergabe sind folgende Funktionen möglich:
Taste
88
Funktion
Nachricht wiederholen oder gedrückt halten bis ein Signal ertönt,
um zur vorhergehenden Nachricht zu springen.
99
Sprung zur nächsten Nachricht
!
Wiedergabe abbrechen.
C
Aktuelle Nachricht löschen.
{/}
Lautstärke senken bzw. erhöhen.
9
Pause während der Wiedergabe (max. 7 Sekunden).
Drücken Sie 9 nochmals, um die Wiedergabe fortzusetzen.
Nachrichten löschen
Eine einzelne Nachricht wird während der Wiedergabe mit C gelöscht.
Das gleichzeitige Löschen aller Nachrichten kann nur nach der Wiedergabe
gemacht werden:
Halten Sie C gedrückt, bis ein langes Signal ertönt.
Neue Nachrichten können nur nach der Wiedergabe gelöscht werden.
www.doro.com
17
Deutsch
Bedienung
Persönliche Nachricht - MEMO
Eine persönliche Nachricht, ein sog. MEMO, ist eine Nachricht, die direkt in
den Anrufbeantworter eingegeben wird. Der Anrufbeantworter kann so als
elektronisches Notizbuch benutzt werden, auf dem Nachrichten oder andere
Mitteilungen an Familienmitgliedern oder Kollegen aufgenommen werden können.
MEMO-Nachrichten können bis zu 60 Sek. lang sein.
1. Drücken Sie o und halten Sie die Taste gedrückt. Ein Signal ertönt.
2. Sprechen Sie die Nachricht auf.
3. Zum Beenden der Aufnahme lassen Sie die Taste los.
4. Memo-Nachrichten werden wie andere Nachrichten wiedergegeben.
Mithören
Sie können ankommende Nachrichten auch direkt im Telefonhörer mithören. Wenn
durch den Lautsprecher nichts zu hören ist, kontrollieren Sie die Einstellung der
Lautstärke.
Wenn Sie möchten, können Sie den Hörer abheben und mit dem Anrufer sprechen.
Wenn die Aufnahme nicht automatisch beendet wird, drücken Sie ! am Gerät
oder halten Sie * (2 Sekunden) am Telefon gedrückt.
Aufnahme eines Telefongesprächs
Ein laufendes Gespräch kann von einem anderen, parallel geschaltetem, Telefon
mit dem Anrufbeantworter aufgenommen werden. Die Aufnahmezeit ist nicht
begrenzt, sondern die gesamte freie Speicherkapazität (max. ca. 50 Minuten) kann
verwendet werden. Aufgenommene Gespräche werden wie jede andere Nachricht
behandelt.
1. Ein Gespräch findet statt.
2. Drücken Sie a . Das Display zeigt 2r an und die Aufnahme läuft.
3. Drücken Sie a um die Aufnahme zu beenden.
Ferngesteuertes Einschalten
Der Anrufbeantworter kann mit Hilfe der Fernteuerungsfunktionen aktiviert
werden.
1. Rufen Sie den Anrufbeantworter an. Nach cirka 10 Rufsignalen ertönt ein
langes Signal.
2. Geben Sie den Geheimcode ein (siehe folgende Seite). Wenn der Code korrekt
war, sind zwei kurze Signale zu hören.
3. Drücken Sie 9#. Zwei Signale bestätigen, dass der Anrufbeantworter
eingeschaltet ist. Legen Sie den Hörer auf.
18
www.doro.com
Bedienung
Deutsch
Fernsteuerung
Dieses Modell kann mit Hilfe eines normalen Tonwahltelefons ferngesteuert
werden. Der Anrufbeantworter wird angerufen und der Geheimcode wird nach
der Automatikantwort eingegeben. Wenn der Code korrekt war, kann das Gerät
ferngesteuert werden.
Geheimcode
Für den Zugang zur Fernabfrage des Anrufbeantworters brauchen Sie einen
dreistelligen Geheimcode. Dieser Code befindet sich auf der Unterseite des Geräts.
Fernsteuerung verwenden
1. Rufen Sie den Anrufbeantworter an.
2. Geben Sie den Geheimcode ein, nachdem die Automatikantwort abgespielt
wurde. Wenn der Code korrekt war, sind zwei Signale zu hören.
3. Geben Sie einen Fernsteuerungsbefehl ein (innerhalb 20 Sekunden), siehe
unten.
4. Legen Sie den Hörer auf.
Befehl
Funktion
25........................................ Wiedergabe neuer Nachrichten
2# ....................................... Wiedergabe aller Nachrichten
Während der Wiedergabe:
3#........................................ Eine Nachricht während der Wiedergabe löschen
6#........................................ Sprung zur vorhergehenden Nachricht
7#........................................ Sprung zur nächsten Nachricht
8#........................................ Nachricht wiederholen
##........................................ Stopp
Nach der Wiedergabe:
3#........................................ Alle Nachrichten löschen
7#........................................ Neue Automatikantwort aufnehmen, Stopp=7#
8#........................................ MEMO aufnehmen, Stopp=8#
9#........................................ Anrufbeantworter ein- bzw. ausschalten.
Drei Signale zeigen an, dass der
Anrufbeantworter eingeschaltet ist, zwei Signale
stehen für aus.
Achtung!
Wenn der Anrufbeantworter auf die Fernsteuerung nicht reagiert, versuchen Sie, die Tasten etwas
länger oder kürzer zu drücken. Normalerweise reagiert das Gerät auf Töne, die 0,5 – 1 Sekunde
lang sind, es kann jedoch vorkommen, dass längere Töne notwendig sind. Wenn Sie keine Taste
drücken, wird die Verbindung nach einigen Sekunden unterbrochen.
Wenn das Abhören länger als 2 Minuten und 40 Sekunden dauert, ertönt ein Signal. Zum
Fortsetzen drücken Sie eine beliebige Taste.
www.doro.com
19
Deutsch
Allgemeines
Sprachsteuerung
Der Anrufbeantworter nimmt eine Nachricht auf, solange der Anrufer spricht
(jedoch max. 60 Sekunden). Nachdem der Anrufer aufgehört hat zu sprechen,
unterbricht das Gerät nach ein paar Sekunden die Verbindung.
Wenn der Speicher voll ist
Die Speicherkapazität des Anrufbeantworters beträgt ca. 50 Minuten. Der Speicher
enthält die Automatikantwort, persönliche Nachrichten und ankommende
Nachrichten. Wenn der Speicher voll ist, können keine neuen Nachrichten
aufgezeichnet werden, bevor vorhandene Nachrichten abgespielt und gelöscht sind.
Bei vollem Speicher zeigt das Display Su und der Anrufbeantworter antwortet
nach ca. 10 Rufsignalen, damit die Nachrichten per Fernabfrage abgerufen und
gelöscht werden können.
Garantie
Dieses Gerät hat die Warengarantiezeit von einem Jahr. Bei eventuellen
Reklamationen wenden Sie sich bitte an Ihren Händler. Der Garantieservice wird
nur mit gültiger Kaufquittung bzw. Rechnungskopie ausgeführt.
Die Garantie gilt nicht, wenn der Fehler aufgrund eines Unglücks oder ähnlichem
entstanden ist. Weiterhin gilt die Garantie nicht bei Gewaltanwendung,
eingedrungenen Flüssigkeiten, schlechter Wartung, Missbrauch oder anderer
Fehler des Käufers. Die Garantie verfällt auch, wenn die Seriennummer des
Telefons vernichtet wurde sowie bei Schäden die durch Gewitter oder andere
Spannungsvariationen entstanden sind.
Bei Gewitter sollte das Telefon zur Sicherheit von der Steckdose getrennt werden.
20
www.doro.com
Allgemeines
Deutsch
Wenn der Anrufbeantworter nicht funktioniert
Vergewissern Sie sich, dass das Telefonkabel unbeschädigt und korrekt eingesteckt
ist. Entfernen Sie eventuelle Zusatzausrüstung, Verlängerungskabel und andere
Telefone. Wenn das Gerät jetzt funktioniert, liegt der Fehler woanders.
Versuchen Sie, das Telefon z.B. bei einem Nachbarn anzuschliessen. Wenn das
Gerät dort funktioniert, ist Ihr Telefonanschluss vielleicht gestört. Rufen Sie die
Störungsstelle an.
Anrufbeantworter reagiert nicht
- Vergewissern Sie sich, dass der Anrufbeantworter eingeschaltet ist.
- Stellen Sie sicher, dass das Telefonkabel und der Netzadapter angeschlossen
sind.
Anrufbeantworter reagiert nicht auf Fernsteuerung
- Vergewissern Sie sich, dass das verwendete Telefon Tonwahl hat.
- Einige Telefone können Probleme mit der Fernabfrage haben, wenn diese
nur ein kurzes Signal beim Tastendruck generiert. Verwenden Sie in diesem Fall
einen separaten Tonsender.
- Drücken Sie die Tasten etwas länger, ca. 1 Sekunde pro Tastendruck.
Die Automatikantwort ist schlecht zu hören
- Nehmen Sie eine neue Antwort auf.
- Sprechen Sie bei der Aufnahme näher am Mikrofon.
Die Verbindung wird unterbrochen, wenn jemand eine Nachricht
aufspricht:
- Wenn die Antwortfunktion auf A2 steht, kann der Anrufer keine Nachricht
hinterlassen (nur Frankreich).
- Eine Nachricht kann bis zu 60 Sekunden lang sein. Nach dieser Zeit wird die
Verbindung unterbrochen.
- Wenn der Anrufer eine Pause macht, die länger als ca. 7 Sekunden ist, kann das
Gespräch unterbrochen werden, da die Sprachsteuerung dann annimmt, das
der Anrufer aufgelegt hat.
Eine Tonschleife ist zu hören und es passiert nichts, wenn man die
Wiedergabetaste drückt:
- Es gibt keine neuen Nachrichten auf dem Anrufbeantworter.
Wenn das Gerät trotz der obenstehenden Maßnahmen nicht funktioniert, nehmen
Sie Kontakt mit ihrem Händler auf.
www.doro.com
21
Italiano
Installazione
Collegamento
1. Collegare la batteria. Vedere sotto.
2. Collegare la spina del cavo di linea alla presa T sul retro dell’unità.
3. Inserire nella presa della rete telefonica (utilizzando l'adattatore a spina, se
necessario). Collegare il telefono normale sopra il connettore intermedio.
4. Quando la spina modulare è posizionata correttamente, si sente uno scatto.
5. Collegare l’adattatore di rete alla presa di rete e alla presa DC 9V.
6. Una volta collegato l’adattatore di rete, l’unità esegue un auto-test che
richiede circa 20 secondi. In questo intervallo di tempo, il display esegue
il conto in ordine crescente. Viene quindi emesso un segnale acustico
prolungato.
7. Prima di utilizzare la segreteria telefonica, registrare il messaggio in uscita
(pagina 25). Impostare inoltre la funzione Time stamp (pagina 23).
8. Sulle unità acquistate in Svizzera, è possibile selezionare anche la lingua,
vedere pagina 24.
Batteria
Per accertare che messaggi e informazioni su data/ora siano conservate
integralmente in caso di interruzione della corrente (max. 16 ore), è necessaria
una batteria da 9 V (non in dotazione). Quando la batteria si sta scaricando, sul
display lampeggia bL .
Sostituire la batteria appena possibile. Utilizzare unicamente batterie di alta
qualità.
1. Estrarre il cavo della linea telefonica.
2. Rimuovere il coperchio della batteria.
3. Collegare la batteria.
4. Riposizionare il coperchio della batteria.
Accensione/Spegnimento della segreteria telefonica
Il pulsante ! viene utilizzato per accendere e spegnere la segreteria telefonica.
In posizione ON, la segreteria telefonica risponde alle chiamate in entrata,
in posizione OFF non risponde ad alcuna chiamata. Se sul display viene
visualizzato -- , la segreteria telefonica è spenta.
22
www.doro.com
Funzionamento
Italiano
Informazioni sulla segreteria telefonica
Per potere ricevere i messaggi, la segreteria telefonica deve essere sempre
attivata. Se il telefono squilla, l'utente risponderà alle chiamate dopo il numero
di segnali specificati dalle impostazioni.
Quando la segreteria telefonica risponde ad una chiamata in entrata, il
chiamante sente il messaggio in uscita. Il chiamante avverte quindi un breve
segnale acustico e può lasciare un messaggio della durata massima di 60
secondi. Qualora il chiamante superi tale limite, il collegamento verrà interrotto.
La memoria è in grado di contenere circa 50 minuti di chiamate in entrata
(compreso il messaggio in uscita).
Disponibile solo in Francia: se la funzione di risposta è impostata sulla
modalità A2, il chiamante non può lasciare messaggi. La chiamata viene
interrotta quando è stato riprodotto il messaggio in uscita.
Day/Time Stamp
La segreteria dispone di una funzione vocale che comunica il giorno della
settimana e l’ora di registrazione di ogni messaggio.
Impostazione dell’ora Stamp Day/Time
1. Premere e tenere premuto 9 9 finché non viene emesso un segnale acustico
prolungato.
2. Premere più volte 9 9 finché la voce non comunica il giorno della settimana
corretto.
3. Premere 9.
4. Ripetere 2. e 3. per impostare ore e minuti.
5. La voce comunica l’impostazione effettiva.
Controllo data/ora corrente
Premere 9 9. La voce comunica l’impostazione corrente, per esempio: giovedì,
cinque e cinquanta.
www.doro.com
23
Italiano
Funzionamento
Numero di squilli
Utilizzare l’interruttore 2 6 ECO/TS sul didietro della segreteria per impostare
la risposta alle chiamate in entrata.
2 = risponde alle chiamate dopo due squilli;
6 = risponde alle chiamate dopo sei squilli;
ECO/TS (TOLL SAVER) – attiva la funzione Toll save.
La funzione “Toll Saver” (dispositivo di risparmio tariffe) risponde alle chiamate
dopo sei segnali di squillo, finché non viene registrato il primo nuovo messaggio.
Quindi, la segreteria telefonica attiva la risposta dopo circa due segnali. Tale
funzione è utile se si utilizza il controllo remoto; se si chiama la segreteria
telefonica e non vi è risposta dopo quattro squilli, significa che non vi sono
messaggi registrati ed è possibile riagganciare prima dell’addebito della chiamata.
Se invece la segreteria telefonica risponde dopo due squilli, significa che sono
stati registrati nuovi messaggi.
Solo risposta (disponibile solo in Francia)
L’interruttore A2/a sul didietro del telefono viene utilizzato per impostare la
funzione Solo risposta.
= È possibile lasciare messaggi in entrata.
A2 = Solo risposta.
a
Solo risposta significa che il chiamante non può lasciare un messaggio.
La chiamata viene interrotta dopo la riproduzione del messaggio in uscita.
Utilizzare questa funzione quando non si desidera o non si ha necessità di
ricevere messaggi in entrata, per esempio, se si sta trascorrendo un lungo
periodo di vacanza o per vari tipi di messaggi informativi.
Lingua (disponibile solo in Svizzera)
Selezionare la lingua utilizzando l’interruttore
della segreteria.
24
sul didietro
www.doro.com
Funzionamento
Italiano
Messaggio in uscita
Il messaggio in uscita è il messaggio rivolto al chiamante quando viene registrata
una chiamata in entrata.
La lunghezza del messaggio in uscita può essere di massimo 60 secondi.
Se si decide di non registrare il proprio messaggio in uscita, il chiamante
ascolterà un messaggio preregistrato.
È possibile informare il chiamante della possibilità di parlare dopo il segnale
acustico emesso al termine del messaggio in uscita.
Esempio di un messaggio in uscita:
-«Risponde la segreteria telefonica della famiglia Anderson. Al momento non
siamo in casa, vi preghiamo di lasciare un messaggio dopo il segnale acustico e
sarete richiamati al nostro ritorno. Grazie per la telefonata«
Registrazione di un messaggio in uscita
1. Premere e tenere premuto 8 8 . Viene emesso un breve segnale acustico e
il display lampeggia.
2. Registrare il messaggio in uscita (min. 5 secondi). Parlare chiaramente verso
la parte superiore della segreteria ad una distanza di circa 15-20 cm (6-8
pollici).
3. Rilasciare il pulsante per terminare la registrazione.
4. Il messaggio verrà ripetuto dopo pochi secondi. Qualora si desideri
modificare il messaggio, ripetere la medesima procedura. Quando viene
registrato un nuovo messaggio, qualsiasi messaggio in uscita verrà cancellato
automaticamente.
Controllo dei messaggi in uscita
Premere 8 8 per riprodurre il messaggio in uscita.
Attenzione!
In caso di interruzione della corrente e in assenza di batteria, il messaggio rischia di essere
cancellato. La segreteria telefonica utilizza quindi il messaggio preregistrato.
www.doro.com
25
Italiano
Funzionamento
Riproduzione di messaggi
Il display visualizza il numero totale di messaggi in memoria.
La riproduzione comincia sempre con un messaggio nuovo. Se, per esempio, ci sono
tre messaggi vecchi e due nuovi, verranno riprodotti solo questi ultimi, quindi la
segreteria torna in modalità standby. Premere nuovamente il pulsante di riproduzione
per ascoltare tutti i messaggi, partendo dai più vecchi.
1. Premere 9 per avviare la riproduzione.
2. Dopo ogni messaggio, il day/time stamp specifica la data e l’ora in cui è stato
ricevuto il messaggio. Tra un messaggio e l’altro viene emesso un breve segnale
acustico.
3. Terminata la riproduzione, vengono emessi due brevi segnali acustici e la
segreteria torna in modalità standby. Tutti i messaggi vengono salvati (a meno
che non siano stati cancellati durante la riproduzione, vedere sotto) e quelli nuovi
vengono registrati dopo i vecchi.
Durante la riproduzione sono disponibili le seguenti funzioni:
Pulsante
88
Funzione
Per tornare ai messaggi precedenti ripetere o tenere premuto finché
non viene emesso un segnale acustico.
99
Passaggio al messaggio successivo.
!
Interruzione della riproduzione.
C
Cancellazione del messaggio corrente.
{/}
Aumento o diminuzione del volume.
9
Inserimento di una pausa durante la riproduzione (max. 7 secondi).
Premere nuovamente 9 per continuare.
Cancellazione messaggi
Per cancellare un solo messaggio, premere C durante la sua riproduzione.
La cancellazione simultanea di tutti i messaggi è possibile unicamente dopo la
riproduzione:
premere e tenere premuto C finché non viene emesso un segnale acustico
prolungato.
Si osservi che i messaggi nuovi non possono essere cancellati finché non sono stati
riprodotti.
26
www.doro.com
Funzionamento
Italiano
Messaggio personale - MEMO
Un messaggio personale – un MEMO – è un messaggio registrato direttamente
nella segreteria telefonica senza composizione. Ciò significa che è possibile
utilizzare la segreteria telefonica come una agenda elettronica dove è possibile
registrare messaggi, promemoria o altri appunti rivolti ai membri della famiglia o ai
colleghi. Il MEMO può avere una lunghezza massima di 60 secondi.
1. Premere e tenere premuto il pulsante o. Verrà emesso un segnale acustico.
2. Iniziare a parlare e registrare il messaggio.
3. Rilasciare il pulsante e interrompere la registrazione.
4. I memo vengono riprodotti come normali messaggi in entrata.
Ascolto di gruppo
I messaggi in entrata vengono emessi dagli altoparlanti della segreteria appena
ricevuti. In assenza di suono, regolare il volume.
È possibile sollevare il ricevitore e parlare direttamente al chiamante. Se la
registrazione non viene interrotta automaticamente, premere ! sulla segreteria
oppure * (2 secondi) sul telefono utilizzato per rispondere.
Registrazione delle chiamate
È possibile registrare sulla segreteria telefonica le chiamate in uscita da un altro
telefono (collegato in parallelo). Non esiste un limite di tempo determinato. Sono
disponibili circa 50 minuti di tempo di registrazione in memoria. La segreteria
telefonica gestisce le chiamate registrate come normali chiamate in entrata.
1. Il telefono riceve una chiamata.
2. Premere a. Il display visualizza 2r , che indica che la registrazione è in corso.
3. Premere a per terminare la registrazione.
Attivazione remota
La segreteria telefonica può essere attivata utilizzando le funzioni del controllo
remoto.
1. Chiamare la segreteria telefonica. Dopo circa 10 squilli, la segreteria risponde
con un segnale acustico prolungato.
2. Inserire il codice della password, vedere la pagina seguente. Se il codice è
accettato, vengono emessi due segnali acustici brevi.
3. Premere 9#. I due segnali acustici brevi confermano che la segreteria telefonica
è in funzione. Riposizionare il microtelefono.
www.doro.com
27
Italiano
Funzionamento
Controllo remoto
È possibile controllare questa segreteria utilizzando i tasti di un normale telefono
con segnale acustico di linea libera. Per utilizzare il controllo remoto, chiamare
la segreteria e inserire il codice remoto della password dopo la riproduzione del
messaggio in uscita. Dopo che il codice è stato accettato, sono disponibili numerosi
comandi di controllo remoto.
Codice remoto della password
Questo codice remoto della password a tre cifre è necessario per accedere alle
funzioni del controllo remoto della segreteria telefonica. Il codice remoto della
password è stampato sotto la segreteria.
Controllo remoto
1. Chiamare la segreteria telefonica.
2. Inserire il codice remoto della password dopo la riproduzione del messaggio in
uscita. Se il codice viene accettato, vengono emessi due segnali acustici.
3. Selezionare un comando di controllo remoto (entro 20 secondi), vedere sotto.
4. Riposizionare il microtelefono.
Comando
25
2#
Durante la riproduzione:
3#
6#
7#
8#
##
Dopo la riproduzione:
3#
7#
8#
9#
Attenzione!
Funzione
Riproduzione di nuovi messaggi
Riproduzione di tutti i messaggi
Cancellazione di singoli messaggi durante la
riproduzione
Passaggio al messaggio precedente
Passaggio al messaggio successivo
Ripetizione del messaggio
Stop
Cancellazione di tutti i messaggi
Registrazione di un nuovo messaggio in uscita,
Stop=7#
Registrazione di un MEMO, Stop=8#
Accensione/Spegnimento della segreteria
telefonica. Tre segnali acustici indicano lo
spegnimento – Due segnali acustici indicano
l’accensione.
Qualora la segreteria non risponda correttamente ai comandi di controllo remoto, premere i tasti
del telefono per un periodo di tempo superiore o inferiore. In casi normali, la segreteria telefonica
dovrebbe reagire a segnali acustici di lunghezza pari a circa 0,5 – 1 secondi, tuttavia, è possibile che
in determinate reti telefoniche siano necessari toni di segnalazione di lunghezza superiore. Qualora
non venga inserito alcun comando di controllo remoto, la segreteria telefonica si scollega dopo pochi
secondi. Se l’ascolto si prolunga per oltre 2 minuti e 40 secondi, viene emesso un segnale acustico.
Premere un tasto per continuare.
28
www.doro.com
Varie
Italiano
Comando vocale
La segreteria telefonica registra il messaggio mentre il chiamante parla (max.
60 secondi). Quando il chiamante termina di parlare, la segreteria telefonica si
scollega dopo pochi secondi.
Memoria esaurita
La capacità totale della memoria della segreteria telefonica è di circa 50 minuti,
compresi i messaggi in entrata e in uscita. Tale spazio di memoria viene
condiviso da messaggi in uscita, memo personali e normali messaggi in entrata.
Se la memoria è piena, nessuno nuovo messaggio verrà accettato, finché quelli
esistenti non saranno stati riprodotti o cancellati.
Quando la memoria è piena, il display visualizza Su e la segreteria telefonica
risponde dopo 10 squilli per consentire la riproduzione remota e la cancellazione
dei messaggi.
Garanzia
Il presente prodotto è garantito per un periodo di 12 mesi a decorrere dalla
data di acquisto. Qualora il Vostro telefono dovesse mostrare un difetto durante
il periodo di validità della garanzia, riportare l'apparecchio al rivenditore
presentando inoltre una copia della ricevuta d'acquisto. Per avere diritto a
qualsiasi servizio o assistenza durante il periodo di garanzia è necessario
presentare il relativo documento di acquisto.
La presente garanzia non verrà applicata ad eventuali guasti causati da incidenti
o infortuni o danni simili, penetrazione di liquidi, negligenza, uso anomalo o
qualsiasi altra circostanza simile da parte dell'acquirente. Inoltre, la presente
garanzia non verrà applicata ad eventuali guasti causati da temporali o da
qualsiasi altra variazione della tensione.
La presente garanzia non influisce in alcun modo sui diritti legali del
proprietario. (Come misura precauzionale, si consiglia di scollegare il telefono
durante i temporali).
www.doro.com
29
Italiano
Varie
Ricerca e individuazione guasti
Verificare che il cavo telefonico non sia danneggiato e sia inserito in modo
corretto. Scollegare qualsiasi apparecchio aggiuntivo che possa essere collegato. Se il
problema viene risolto, il difetto può essere attribuito all'altro apparecchio.
Provare l’apparecchio con una linea del cui funzionamento si è certi. Se il prodotto
funziona, il difetto può essere attribuito alla linea. Informare la società telefonica
locale
La segreteria telefonica non risponde
- Controllare che l’unità sia attivata
- Controllare che il cavo del telefono e l’adattatore di rete siano collegati in modo
corretto
La segreteria telefonica non risponde al controllo remoto
- Controllare che il telefono in uso per controllare a distanza la segreteria
telefonica sia un telefono con segnale acustico di linea libera.
- Alcuni telefoni possono risultare problematici per il controllo remoto, se si tratta
di telefoni che emettono solo un breve segnale acustico premendo un tasto.
Utilizzare un trasmettitore di segnali acustici separato.
- Inoltre, tenere premuti i tasti più a lungo, circa 1 secondo per cifra.
Impossibile sentire chiaramente il messaggio di uscita
- Registrare un nuovo messaggio di uscita.
- Durante la registrazione parlare più vicino al microfono.
La linea è scollegata quando viene lasciato un messaggio:
- Se la funzione di risposta è impostata sulla modalità A2, il chiamante non può
lasciare alcun messaggio. La chiamata viene terminata dopo avere riprodotto il
messaggio in uscita (disponibile solo in Francia).
- Un messaggio in entrata può avere una lunghezza massima di 60 secondi. Una
volta trascorso questo intervallo di tempo, la chiamata può essere interrotta.
- Se il chiamante fa una pausa nel messaggio di circa 7 secondi, la chiamata
può essere interrotta in quanto la funzione di controllo vocale ritiene che il
chiamante abbia riagganciato.
Viene emesso un segnale acustico, ma non avviene nulla quando si preme
il pulsante di riproduzione:
- Non ci sono messaggi in entrata.
Se la segreteria telefonica continua a non funzionare, fare riferimento a pagina 29.
30
www.doro.com
English
Installation
Battery
To ensure that messages and time/date information will be kept during a
possible power cut (max. 16 hours), a 9V – PP3 battery is required (not supplied).
When the battery is running low, the display will flash bL , change the battery
as soon as possible.
Use only a high quality Alkaline battery.
1. Ensure the telephone line cord is disconnected.
2. Remove the battery cover.
3. Connect the battery observing correct polarity.
4. Replace the battery cover.
Connection
Once the back-up battery has been installed.
1. Connect the telephone line cord plug to the T socket at the rear of the
unit.
2. Plug the other end into the telephone network socket (using adapter plug
if required).
3. You will hear a click when the modular plug is correctly in place.
4. Connect the mains adapter to the DC 9V socket at the rear of the unit and
then to an electrical mains socket.
5. When the mains adapter has been connected, the unit will perform a self-test
that takes approximately 20 seconds. During this time the display will count
upwards, then a long beep is heard.
6. Before you can use the answering machine you must record an outgoing
message (please refer to page 34). You should also set the day/time stamp
function (please refer to page 32).
Warning!
Only use the supplied power adapter (G090030D25 9VDC).
Switching the Answering Machine On/Off
The answering machine can be switched ON or OFF using the ! button. In the
ON position, incoming calls will be answered by the answering machine, in the
OFF position no calls will be answered and the display will show -- .
www.doro.com
31
English
Operation
About the Answering Machine
The answering machine has to be turned on in order to receive messages. When
a call is received it will be answered after the number of rings selected (please
refer to page 33).
When the answering machine answers an incoming call, the caller will hear your
outgoing message. After a short beep they can then leave a message of up to 60
seconds. Should the caller exceed this limit the call will be disconnected.
The memory will store approximately 50 minutes of incoming messages
(including the outgoing message).
If the answer function is set to A2 mode, the call will be disconnected after the
outgoing message has been played the incoming caller will not be able to leave a
message.
Day/Time Stamp
The answering machine will announce the day of the week and the time when
each message was recorded.
Setting the Day/Time Stamp
1. Press and hold 9 9 until the day is announced.
2. Press 9 9 repeatedly until the correct day of the week is announced.
3. Press 9.
4. Press 9 9 repeatedly until the correct hour is announced.
5. Press 9.
6. Press 9 9 repeatedly until the correct minute/s are announced.
7. Press 9.
8. Upon completion the selected settings will be announced.
Checking Current Day/Time
Press 9 9. To hear the current settings, e.g.: Thursday, five fifty.
32
www.doro.com
Operation
English
Number of Rings
Use the 2 6 TS switch on the side of the machine to select after how many rings
the unit will respond to an incoming call.
2 = calls are answered after two rings.
6 = calls are answered after six rings.
TS (TOLL SAVER) – activates the toll save function.
In Toll Saver mode incoming calls are answered after six rings until the first new
message has been recorded. Once a message has been recorded the answering
machine will answer after approximately two rings.
This is useful when trying to remotely access the answering machine; if the
answering machine answers after four rings no messages have been recorded
and you can hang up before you are charged for the call.
If the machine answers after two rings new messages have been recorded.
Answer Only
The A2/a switch at the rear of the unit is used to select the Answer Only
function.
a = Incoming messages can be left.
A2 = Answer only.
In Answer Only mode the caller will be unable to leave a message. When the
outgoing message has been played, the call will automatically be disconnected.
This feature is useful if you don’t want to or don’t need to receive any incoming
messages. I.e., if you are on holiday, or for different types of information
messages.
www.doro.com
33
English
Operation
Outgoing Message
The outgoing message is your message to an incoming caller and may be up
to 60 seconds in length.
You may want the message to tell the caller that they may start speaking once the
beep is heard after your outgoing message.
If you choose not to record your own outgoing message the caller will hear a
prerecorded message.
An example of an outgoing message:
-“Hello we are unable to take your call right now, please leave a message at
the sound of the beep and we’ll return your call as soon as possible. Thanks
for calling.”
Recording an Outgoing Message
1. Press and hold 8 8 . You will hear a short beep, and the display will flash.
2. Record your outgoing message (min. 5 seconds). Speak clearly towards the
machine from a distance of 15-20 cm (6-8 inches).
3. Release 8 8 to stop recording.
4. The outgoing message will be repeated after a few seconds. Repeat this
procedure if you want to change the message, any old outgoing message will
automatically be erased when a new one is recorded.
Checking the Outgoing Message
Press 8 8 . The current outgoing message will now be played.
Please note!
In case of a power failure if no back-up battery is fitted your outgoing message will be erased.
The answering machine will then use the pre-recorded outgoing message.
34
www.doro.com
Operation
English
Playback of messages
The display will show the total number of messages in memory.
Playback will always begin with any new messages, for example if there are three
old messages and two new ones, only the two new ones will be played back, then
the answering machine will return to standby mode.
Press the play button once again to listen to all messages, starting with the
oldest messages.
1. Press 9 to start playback.
2. After each message the day and time the message was received will be
announced, after which a short beep will be heard.
3. When playback is finished you will hear two short beeps, and the machine
will return to standby mode. All incoming messages are saved (unless you
have erased any during playback, see below), new messages will then be
recorded after the old ones.
The following functions are available during playback:
Button
88
Function
Repeat the current message, or hold down until you hear a beep to
step back through the messages.
99
Skip to next message.
!
Stop playback.
C
Erase messages.
{/}
Increase or decrease the speaker volume.
9
Pause during playback (max. 7 seconds). Press 9 again to resume
playback.
Delete Incoming Messages
If you want to delete a single incoming message press C while the message
is playing.
If you wish to erase ALL incoming messages simultaneously play any incoming
messages, then press and hold C until you hear a long beep.
Please note that new messages cannot be deleted until they have been played.
www.doro.com
35
English
Operation
Personal Message - MEMO
A personal message – MEMO – is a message recorded directly onto the
answering machine (60 seconds maximum) without dialling. This means that
the answering machine may be used as an electronic notebook, where messages,
reminders or other notes to family members or colleagues can be recorded.
1. Press and hold the a button. You will hear a beep.
2. Start speaking clearly towards the machine to record your Memo message.
3. Release the a button to stop recording.
4. Memos are played back in the same way as regular incoming messages.
Call Monitoring
Incoming messages can be heard through the loudspeaker as they are received.
If there is no sound adjust the volume using {}.
You can lift the handset of a parallel telephone and speak directly to the caller.
If the recording does not stop automatically, press ! on the answering machine,
or press * (2 seconds) on the telephone you are using.
Two-way Recording
You can record telephone conversations as they occur. There is approximately
50 minutes available recording time in memory, with the answering machine
handling two-way recordings as a regular incoming call.
1. A call is connected.
2. Press a . The display will show 2r , indicating that two-way recording
is in progress.
3. Press a to terminate recording.
Voice Control
The answering machine will record a message as long as the caller keeps
speaking (max. 60 seconds). If the caller stops speaking, the answering machine
will disconnect after a few seconds.
36
www.doro.com
Operation
English
Remote Control
This machine can be remotely controlled using the keys of an ordinary tone dialling
telephone. Call up the answering machine and enter the remote code while the
outgoing message is playing. Once the code is accepted, several remote control
commands are available.
Remote Code
This three-digit remote code is required in order to gain access to the remote
functions of the answering machine. The remote code is printed underneath the
machine.
Remote Control
1. Call up the answering machine.
2. While the outgoing message is playing, enter the remote code. If the code is
accepted, you will hear two beeps.
3. Select a remote control command (within 20 seconds) from below.
4. When you have finished accessing the machine replace the handset.
Command
Function
25........................................ Play new messages
2# ....................................... Play all messages
During playback:
3#........................................ Erase single message during playback
6#........................................ Skip to previous message
7#........................................ Skip to next message
8#........................................ Repeat message
##........................................ Stop playback
After playback:
3#........................................ Erase all messages
7#........................................ Record a new outgoing message, to Stop
recording press 7# again.
8#........................................ Record a MEMO, to Stop recording press 8#
again.
9#........................................ Turn the answering machine either On or Off.
Three beeps indicate Off – Two beeps indicate
On.
Please note!
If the machine doesn’t respond correctly to the remote control commands, try pressing the telephone
buttons for a longer or shorter time. In normal cases, the answering machine should react to tones
approximately 0.5 – 1 seconds in length, but longer tones may be necessary in certain telephone
networks. If you do not enter any remote control command, the answering machine will disconnect
after a few seconds.
If you listen to any incoming messages for more than 2 minutes and 40 seconds, you will hear a
tone. Press any key to continue.
www.doro.com
37
English
Other
Remote Activation
The answering machine can be activated using the remote control functions.
1. Call up the answering machine. After approximately 10 rings, the machine will
answer and emit a long tone.
2. Enter the remote code, please refer to page 37. If the code is accepted, you will
hear two short beeps.
3. Press 9#. Two beeps confirm that the answering machine is now on. Replace
the handset.
Out of Memory
The total capacity of the answering machine’s memory is approximately 50 minutes.
The memory space is shared between the outgoing message, personal memos, and
regular incoming messages.
When the memory is full the display will show FL or Su, the answering machine will
answer after 10 rings to allow remote playback and deletion of messages, no new
messages will be accepted until the existing messages have been played and erased.
38
www.doro.com
Other
English
Troubleshooting
Check that the telephone cord is undamaged and properly plugged in.
Disconnect any additional equipment that may be connected. If the problem is
resolved, the fault is with the other equipment.
Test the equipment on a known working line. If the product works then the fault
is with the line. Please inform your local telephone company.
The Answering Machine Is Not Answering
- Check that the unit is switched on
- Check that the telephone cable and the mains adapter are correctly
connected
The Answering Machine Does Not Respond to Remote Control
- Check that the telephone you are using to remotely access the answering
machine is tone dialling.
- Telephones that generate only a short tone signal when pressing a button
may not allow you to remotely access your machine. In this situation please
use a separate tone transmitter.
- Try holding the buttons down longer, approximately 1 second per digit.
I can’t hear the outgoing message very well
- Record a new outgoing message.
- Speak closer to the unit/microphone when recording.
The line is disconnected when someone leaves a message:
- If the answering function is set to A2 mode. The call will be terminated
after playing the OGM the caller cannot leave any message.
- The incoming message may be over 60 seconds in length. After this time,
the call will be disconnected.
- If an incoming caller pauses for approximately 7 seconds while leaving a
message the call will be disconnected, as the voice control function will
believe that they have hung up.
I hear a tone sequence, but nothing happens when I press the playback
button:
- There are no incoming messages.
If the answering machine still does not work, refer to page 40.
www.doro.com
39
English
Other
UK
If you cannot resolve the fault using the troubleshooting section, technical
support is available on the Premium Rate Number: 0906 302 0114.
Calls cost 50 pence per minute (prices correct at the time of going to press),
and is operational between 9AM - 5PM Monday-Friday excluding Bank
Holidays. Alternatively,
E-mail on: [email protected]
You can contact us in writing: Consumer Support Group, Doro UK Ltd.,
22 Walkers Road, North Moons Moat, Redditch, Worcestershire, B98 9HE,
(regarding any Spares or Technical query), or Telephoning (Spares only): 01527
584377
Web site: www.doro-uk.com
Guarantee
This product is guaranteed for a period of 12 months from the date of purchase.
Proof of purchase is required for any service or support required during the
guarantee period. This guarantee shall not apply to a fault caused by an accident
or a similar incident or damage, liquid ingress, negligence, abnormal usage or
any other circumstances on the purchaser’s part. Furthermore, this guarantee
shall not apply to a fault caused by a thunderstorm or any other voltage
fluctuations. This guarantee does not in any way affect your statutory rights. (As
a matter of precaution, we recommend disconnecting the telephone during a
thunderstorm.)
Australia and New Zealand
Products permitted for connection to the telephone network are marked with
in Australia and
in New Zealand. These marks indicate the
products comply with the regulations and can be used without concern in the
country of purchase. If you believe this product is malfunctioning, please refer
to the relevant section and/or consult the troubleshooting guide in this manual
to ensure that you have followed the instructions carefully. As an alternative you
can visit our web site for FAQ’s or send an e-mail for a prompt reply.
40
www.doro.com
Other
English
Guarantee
This product is guaranteed for a period of 12 months from the date of purchase.
Should you experience difficulties with the product, please contact us for
assistance. If the product is then found to be faulty you will be asked to return
it directly to us with a copy of the purchase receipt. This guarantee shall not
apply to a fault caused by an accident or a similar incident or damage, liquid
ingress negligence, abnormal usage, not reasonably maintained or any other
circumstances on the purchaser’s part. Furthermore, this guarantee shall not
apply to a fault caused by a thunderstorm or lightning, excessive or any other
voltage fluctuations or faults on the telephone line. (As a matter of precaution,
we recommend disconnecting the telephone during a thunderstorm).
This guarantee does not affect your statutory rights.
AUSTRALIA
DORO Australia Pty Ltd
PO Box 6760
Baulkham Hills BC NSW 2153
Australia
NEW ZEALAND
Atlas Gentech (NZ) Limited
Private Bag 14927
Panmure
Auckland
New Zealand
Consumer Support
Ph:
Ph: 1300 885 023
Fax: (02) 8853-8489
Email: [email protected]
Web site: www.doro.com.au
Consumer Support
Ph: 0900-500-25 (Toll Call)
Fax: (09) 574-2722
Email:
[email protected]
REN (RN for New Zealand)
The REN (Ringer Equivalence Number) or (RN) is of significance only if
you wish to connect more than 1 telephone to your telephone line. A standard
telephone line has a maximum REN capacity of 3 (RN of 5). It is possible
to connect 3 devices with a REN of 1 (RN of 1) with no degradation to the
product’s performance. Exceeding this limit may cause the volume of the ringer
in any phone to decrease or not ring at all.
www.doro.com
41
English
English
ALL PRODUCTS
The grant of a Telepermit for any item of terminal equipment indicates only
that Telecom has accepted that the item complies with the minimum conditions
for connection to its network. It indicates no endorsement of the product by
Telecom, nor does it provide any sort of warranty. Above all, it provides no
assurance that any item will work correctly in all respects with another item of
Telepermitted equipment of a different make or model, nor does it imply that
any product is compatible with all of Telecom’s network services.
This equipment may not provide for the effective hand-over of a call to another
device connected to the same line.
This equipment should not be used under any circumstances that may constitute
a nuisance to other Telecom Customers.
42
www.doro.com
French
Italian
German
English
Version 1.0