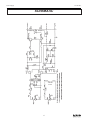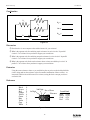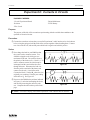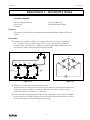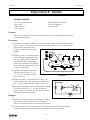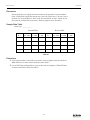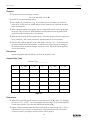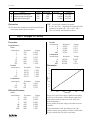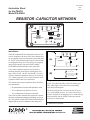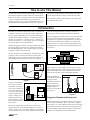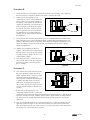
1
012-06263A Instruction Manual for the PASCO scientific Model SF-9584A 10/96 LOW VOLTAGE AC/DC POWER SUPPLY LOW VOLTAGE AC/DC POWER SUPPLY ¨ V A 10 VOLTAGE ADJUST DC + – 0 – 24 V 12 14 8 16 18 6 20 CURRENT ADJUST MAX DC CURRRENT 10 A 4 6A 12 V 24 V OFF AC SF-9584A 2 24 ON 22 RESET 2-24 V 6 A MAX © 1996 PASCO scientific $5.00 ¨ better 10101 Foothills Blvd. • P.O. Box 619011 • Roseville, CA 95678-9011 USA Phone (916) 786-3800 • FAX (916) 786-8905 • email: [email protected] ways to teach science CAUTION RISK OF ELECTRIC SHOCK DO NOT OPEN CAUTION TO PREVENT THE RISK OF ELECTRIC SHOCK, DO NOT REMOVE COVER ON UNIT. NO USER SERVICEABLE PARTS INSIDE. REFER SERVICING TO QUALIFIED SERVICE PERSONNEL. The lightning flash with arrowhead, within an equilateral triangle, is intended to alert the user of the presence of uninsulated “dangerous voltage” within the product’s enclosure that may be of sufficient magnitude to constitute a risk of electric shock to persons. The exclamation point within an equilateral triangle is intended to alert the user of the presence of important operating and maintenance (servicing) instructions in the literature accompanying the appliance. 012-06263A Low Voltage AC/DC Power Supply Table of Contents Section Page Copyright, Warranty, and Equipment Return ...................................................... ii Introduction ....................................................................................................... 1 Operation ....................................................................................................... 1 - 2 Equipment Specifications ................................................................................... 3 Schematics and Parts Lists ............................................................................. 5 - 12 Technical Support ................................................................................... Back Cover i Low Voltage AC/DC Power Supply 012-06263A Copyright, Warranty and Equipment Return Please—Feel free to duplicate this manual subject to the copyright restrictions below. Copyright Notice Equipment Return The PASCO scientific 012-06263A manual is copyrighted and all rights reserved. However, permission is granted to non-profit educational institutions for reproduction of any part of the Low Voltage AC/DC Power Supply manual providing the reproductions are used only for their laboratories and are not sold for profit. Reproduction under any other circumstances, without the written consent of PASCO scientific, is prohibited. Should the product have to be returned to PASCO scientific, for whatever reason, notify PASCO scientific by letter or phone BEFORE returning the product. Upon notification, the return authorization and shipping instructions will be promptly issued. Limited Warranty When returning equipment for repair, the units must be packed properly. Carriers will not accept responsibility for damage caused by improper packing. To be certain the unit will not be damaged in shipment, observe the following rules: NOTE: NO EQUIPMENT WILL BE ACCEPTED FOR RETURN WITHOUT AN AUTHORIZATION. ä PASCO scientific warrants the product to be free from defects in materials and workmanship for a period of one year from the date of shipment to the customer. PASCO will repair or replace, at its option, any part of the product which is deemed to be defective in material or workmanship. The warranty does not cover damage to the product caused by abuse or improper use. Determination of whether a product failure is the result of a manufacturing defect or improper use by the customer shall be made solely by PASCO scientific. Responsibility for the return of equipment for warranty repair belongs to the customer. Equipment must be properly packed to prevent damage and shipped postage or freight prepaid. (Damage caused by improper packing of the equipment for return shipment will not be covered by the warranty.) Shipping costs for returning the equipment, after repair, will be paid by PASCO scientific. ➀ The carton must be strong enough for the item shipped. ➁ Make certain there is at least two inches of packing material between any point on the apparatus and the inside walls of the carton. ➂ Make certain that the packing material can not shift in the box, or become compressed, thus letting the instrument come in contact with the edge of the box. Credits Author: Editor: Hans Frederiksen Sunny Bishop ii Address: PASCO scientific 10101 Foothills Blvd. P.O. Box 619011 Roseville, CA 95678-9011 Phone: (916) 786-3800 FAX: (916) 786-8905 email: [email protected] 012-06263A Low Voltage AC/DC Power Supply Introduction The Low Voltage AC/DC Power Supply is intended for supervised classroom use. The PASCO scientific Model SF-9584A Low Voltage AC/DC Power Supply provides two outputs: a regulated DC output and an unregulated AC output. The DC output can be delivered in two modes: constant voltage mode and constant current mode. Operation DC Output, Limitations DC Output Operation: ➀ Flip the power ON/OFF switch to OFF. The DC output is regulated for both constant-voltage and constant–current operation. ➁ Plug the power cord into a grounded outlet of the appropriate voltage : Model SF-9584A, 115 V AC (78–130 V AC), 60 Hz or Model SF-9584A-230, 230 V AC (200 –242 V AC), 50 Hz. Constant Voltage mode: The voltage is continuously variable from 0 –24 V DC. The maximum load drawn in the range from 0–12 V DC is 10 A. In the 12 - 24 V range, a load of 10–6 A may be drawn as the maximum load. At 24 V, the maximum is 6 A. (See the illustration printed on the front panel, “Max. DC Current,” or Figure 1.) ➂ Connect the 0 –24 V DC OUTPUT terminals of the power supply to the circuit. (Connecting wires are not provided with the power supply.) Constant Current mode: The load may be varied from 1–10 A in the 1–12 V DC range. At 12 V, the DC range is variable from 1–10 A. At 24 V, the range decreases to 0–6 A. (See the illustration printed on the front panel, “Max. DC Current,” or Figure 1.) A digital meter allows monitoring of both voltage and current for the DC output. ➃ Rotate the DC VOLTAGE ADJUST knob and the DC CURRENT ADJUST knob fully counterclockwise. ➄ Flip the power ON/OFF switch to ON. The switch will light to show that the power supply is on. ➅ Constant Voltage Mode: Turn the DC CURRENT ADJUST knob fully clockwise. Then adjust the DC VOLTAGE ADJUST knob to obtain the desired output voltage, as indicated on the meter. The output current is displayed on the current meter. MAX DC CURRRENT ➆ Constant Current Mode: Turn the DC VOLTAGE 10 A ADJUST knob fully clockwise. Adjust the DC CURRENT ADJUST knob to obtain the desired output current, as indicated on the meter. The output voltage is displayed on the voltage meter. 6A 12 V 24 V Figure 1. Maximum DC Current 1 Low Voltage AC/DC Power Supply 012-06263A AC Output Operation: AC Output Limitations ➀ Flip the power ON/OFF switch to OFF. The AC output is unregulated and is adjustable in 2-V increments from 2 to 24 V AC, with a maximum output current of 6 amperes. This output is protected by a 6-amp circuit breaker. If the maximum current output is exceeded, the circuit breaker button below the power switch will pop out. (See Figure 2.) ➁ Plug the power cord into a grounded outlet of the appropriate voltage : Model SF-9584A, 115 V AC (78 - 130 V AC), 60 Hz or Model SF-9584A-230, 230 V AC (200 - 242 V AC), 50 Hz. ➂ Connect the 2–24 V AC OUTPUT terminals of the power supply to the circuit. (Connecting wires are not provided with the power supply.) OFF AC 10 ➃ Rotate the AC VOLTAGE ADJUST knob to the 12 14 8 2–V position. 20 6 4 ➄ Flip the power ON/OFF switch to ON. The switch 2 24 2-24 V 6 A MAX will light to show that the power supply is on. power switch 16 18 ON 22 RESET circuit breaker button ➅ Set the AC VOLTAGE ADJUST knob to the desired setting. Figure 2. Location of Circuit Breaker Button The circuit breaker can be reset by simply pushing the button back in. It may be necessary to reduce the AC output voltage or the load connected to the AC output in order to resume operation. NOTE: If at any time the power supply fails to come on, or if it shuts down during operation due to excessive current, check the following: If the ON/OFF switch does not light when unit is plugged into the appropriate power source and the switch is turned ON, check the fuse on the back of the unit. If it is blown, replace it only with a similarly rated fuse (Model SF-9584A— 8A Slo-Blo fuse, Model SF-9584A-230— 4A Slo-Blo fuse). ä 2 012-06263A Low Voltage AC/DC Power Supply Equipment Specifications Specifications: Outputs: Ripple and Noise: Less than 25 mV pp on DC output. DC: regulated for both constant–voltage and constant–current operation. Both current and voltage continuously variable over the range 0–24 V DC and 0–10 amperes maximum. Independent floating ground reference. Metering: DC voltage and DC current Accuracy is +1% ± 2 L.S.D. Line Voltage Requirement: 78–130 V AC, 60 Hz (model SF-9584A) 200–242 V AC, 50 Hz (model SF-9584A - 230) AC: 2 to 24 V (rms) AC, unregulated, selectable in 2–V increments, current up to 6 amperes. Output protected from overload by a 6-amp thermally-activated circuit breaker. Independent floating ground reference. Power Requirement: DC and AC: Maximum 350 W DC only: Maximum 175 W AC only: Maximum 175 W NOTE: Both DC and AC outputs are available simultaneously on separate floating output terminals. Either one of the DC output terminals can be connected to either one of the AC output terminals to form a composite signal without damage to the unit. ä Fuse: 8 A Slo-Blo—(model SF-9584A) 4 A Slo-Blo—(model SF-9584A-230) Line Regulation: Size: Less than 1% change in DC output voltage or current for full range change in line voltage. AC output not regulated. 118 x 298 x 229 mm (H x W x D including controls) Load Regulations: Better than 1% no-load to full-load on the DC output voltage or current. AC output not regulated. 3 Low Voltage AC/DC Power Supply 012-06263A Notes: 4 012-06263A Low Voltage AC/DC Power Supply Schematics and Parts Lists ä Caution: If repairs are needed, they should be performed only by experienced personnel. Figure 2. Schematic Overview 5 Low Voltage AC/DC Power Supply 012-06263A Figure 3. Main Board 6 012-06263A Low Voltage AC/DC Power Supply Parts List – Main Board Item 1 2 3 4 5 6 7 8 9 10 11 12 13 14 15 16 17 18 19 20 21 22 23 24 25 26 27 28 29 30 31 32 33 34 35 36 37 38 39 40 41 42 43 44 45 46 Reference R201 R204R206 R220-221 R205 R216 R219 R211 R214 R217 R227 R228 R218 R223 R226 R207 R230 R212 R213 R229 R222 R202-203 R208 R224 R210 R215 TR201-202 TR203-205 C229-234 C243-244 C213 C215 C235 C237-238 C240-241 C224-227 C214 C216-223 C228 C239 C211-212 C207-210 C236 C201-205 C206 D203 D205-209 D201-202 D210 Q205 Q203 Q202 Q201 Q204 U204 U201 U202 U205 U207 U206 RE201-202 J202-208 J200 J213 Part Name Value RESISTOR RESISTOR RESISTOR RESISTOR RESISTOR RESISTOR RESISTOR RESISTOR RESISTOR RESISTOR RESISTOR RESISTOR RESISTOR RESISTOR RESISTOR RESISTOR RESISTOR TRIMPOT HORIZ TRIMPOT HORIZ CERAMIC CAP CERAMIC CAP 4K7 10K 10K 47K 100K 100R 150R 390R 470R 680R IK0 4K7 10K 100K 180K IM0 0.01R 220R 10K 1.0nF 10nF 250V 250V 250V 250V 250V 250V 250V 250V 250V 250V 250V 250V 250V 250V 250V 250V 20mV 250V 250V 63V 63V STACK FOIL CAP STACK FOIL CAP 100nF 100nF STACK FOIL CAP ELECTROLYT CAP ELECTROLYT CAP ELECTROLYT CAP DIODE DIODE DIODE ZENER-DIODE NPN TRANSISTOR PNP TRANSISTOR NPN TRANSISTOR Nch MOSFET Nch MOSFET DualOpAmp IC VOLTAGE REGULATOR VOLTAGE REGULATOR VOLTAGE REGULATOR RAIL SPLITTER RELAY 5V CONNECTOR 3M-929 20 PIN STOCKO MKS4 470nF 4.7UF 100UF 1000UF BYV27-200 lN4148 2W04M BZX79-C2V7 BC547B BC557B BC639 BUK456-60A BS170 LTll12 LM614 LM317 LM78L05 LM7805 TLE2426CLP M4-5H 6.3 MM 20 PIN 4 PIN 7 Qty Stock No. 0.4W 0.4W 0.4W 0.4W 0.4W 0.4W 0.4W 0.4W 0.4W 0.4W 0.4W 0.4W 0.4W 0.4W 0.4W 0.4W 2W 0.lW 0.lW 1 2 2 1 2 3 1 1 2 1 2 1 2 1 3 1 2 2 3 8 7 601074 601082 601083 601099 601106 6030701 6030801 6031051 6031101 6031201 6031301 6031701 6031901 6032501 6032651 6033101 604301 605935 605960 611890 612010 400V 63V 4 11 613170 613450 63V 25V 63V 35V 200V 75V 400V 2.7V 50V 50V 100V 60V 60V 30V 36V 40V 35V 35V 40V 125V/30W 2 5 5 1 1 5 2 1 1 1 1 1 1 1 1 1 1 1 1 2 7 1 1 613530 615643 615785 616003 623267 623300 623665 624060 624710 624720 624750 625690 626120 630211 631214 632130 632430 632533 634941 637428 641245 641321 641357 2A 0.2A 2A 0.5W 0.lA 0.2A 1.5A 52A 0.5A 10mA 0.3mA lA 0.1A 1.5A 0.08A 1A Low Voltage AC/DC Power Supply 012-06263A Figure 4. Display Unit 8 012-06263A Low Voltage AC/DC Power Supply Parts List – Display Unit Item Reference 1 2 3 4 5 6 7 8 9 10 11 12 13 14 15 16 17 18 19 20 21 30 R101 R111 R107-108 R117-118 R120 R103 R113 R104 R114 R100 R102 R105-106 R110 R112 R115-116 P1-2 C103 C123 C112 C132 C109-110 C129-130 C102 C104 C106-10 C111 C122 C124 C126-128 C131 C105 C125 C101 C121 D101-102 DS101-108 D103-104 D105-106 U102 U104 U101 U103 SW101 J102-103 J101 U101 U103 Part Name Value Qty Stock No. RESISTOR RESISTOR 330R 1K0 250V 250V 0.4W 0.4W 2 5 6031001 6031301 RESISTOR RESISTOR RESISTOR 6K8 47K 100K 250V 250V 250V 0.4W 0.4W 0.4W 2 2 8 6031801 6032301 6032501 POTMETER CERAMIC CAP CERAMIC CAP CERAMIC CAP 10K 100pF 1.0nF 10nF 300V 63V 63V 63V 1.5W 2 2 2 4 608251 611770 611890 612010 STACK FOILCAP 100nF 63V 12 613450 STACK FOIL CAP ELECTROLYT CAP LED DISPLAY DIODE DIODE VOLTAGE REF. IC SWITCH LOCKING HEADER 3M-929 TULIPAN 470nF 100UF HLMP-1719 HDSP-5301 1N4148 1N4007 LM385 ICL7107 MK2 16 PIN 20 PIN SOK 63V 25V 2V 2V 75V 700V 20mA 9V 120V 500V 20 PIN 40 PIN 2 2 2 8 2 2 2 2 1 2 1 2 9 2mA 20mA 0.2A 1A 250mA 2.5A 613530 616440 622000 622940 623300 623390 631185 635057 638031 641029 641321 635539 Low Voltage AC/DC Power Supply 012-06263A Figure 5. Switch-Mode Regulator 10 012-06263A Low Voltage AC/DC Power Supply Parts List – Switch-Mode Regulator Item Reference Part Name 1 2 3 4 5 6 7 8 9 10 11 12 13 14 15 16 17 18 19 20 21 22 23 24 25 26 27 28 RESISTOR RESISTOR RESISTOR RESISTOR RESISTOR RESISTOR RESISTOR RESISTOR RESISTOR RESISTOR RESISTOR CERAMIC CAP CERAMIC CAP CERAMIC CAP STACK FOIL CAP STACK FOIL CAP ELECTROLYT CAP ELECTROLYT CAP ELECTROLYT DIODE ULTRA FAST DIODE DIODE DIODE BRIDGE ZENER-DIODE ZENER-DIODE NPN TRANSISTOR Pch MOSFET IC R3 Rl-2 R14 R10 R12 R9 R8 R5 R7 R4 R13 R6 Rll CI2 C14 C19 Cll C7-8 C13 C17-18 C2-4 C15 C9-10 C5-6 C16 Cl Dl D2 D4-7 D10 D9 D8 Q2-3 Ql Ul Value 2K2 10K 0R 10R 100R 470R 3K3 4K7 47K IK0 0.01R 1.0nF 4.7nF 10nF 100nF 470nF 2.2UF 100UF CAP BYV27-200 BYV79-100 lN4007 PBU802 BZV85-C15 BZV85-C33 BC639 SMP40P06 LM3524 11 250V 250V 250V 250V 250V 250V 250V 250V 250V 500V 20mV 63V 63V 63V 400V 63V 63V 63V 6800UF 200V 100V 700V 100V 15V 33V 100V 60V 40V 0.4W 0.4W 0.4W 0.4W 0.4W 0.4W 0.4W 0.4W 0.4W 1.6W 2W 63V 2A 14A lA 8A 1.0W 1.0W 1.5A 40A Qty Stock No. 1 2 1 2 1 1 1 1 2 1 1 3 1 3 2 4 2 3 1 1 1 4 1 1 1 2 1 1 601066 601083 6020901 6030101 6030701 6031101 6031601 6031701 6032301 603810 604301 611890 611970 612010 613170 613530 615622 615785 616102 623267 623268 623390 623685 624515 624533 624750 626110 632350 Low Voltage AC/DC Power Supply 012-06263A Figure 6. Filter Board Parts List – Filter Board Item Reference Part Name 1 2 STACK FOIL CAP H1-4 C301-303 Value 100NF 12 Qty 400V 4 3 Stock No. 613170 012-06263A Low Voltage AC/DC Power Supply Technical Support Feedback Contacting Technical Support If you have any comments about the product or manual, please let us know. If you have any suggestions on alternate experiments or find a problem in the manual, please tell us. PASCO appreciates any customer feedback. Your input helps us evaluate and improve our product. Before you call the PASCO Technical Support staff, it would be helpful to prepare the following information: ➤ If your problem is computer/software related, note: Title and revision date of software; To Reach PASCO Type of computer (make, model, speed); For technical support, call us at 1-800-772-8700 (toll-free within the U.S.) or (916) 786-3800. Type of external cables/peripherals. fax: ➤ If your problem is with the PASCO apparatus, note: (916) 786-3292 Title and model number (usually listed on the label); e-mail: [email protected] web: Approximate age of apparatus; www.pasco.com A detailed description of the problem/sequence of events. (In case you can’t call PASCO right away, you won’t lose valuable data.); If possible, have the apparatus within reach when calling to facilitate description of individual parts. ➤ If your problem relates to the instruction manual, note: Part number and revision (listed by month and year on the front cover); Have the manual at hand to discuss your questions. 13 012-05783A 2/95 $1.00 Instruction Sheet for the PASCO Model CI-6552A POWER AMPLIFIER II CAUTION! CI-6552A PLIFIER II POWER AM T PU L OUT SIGNA CI-6552A II LIFIER R AMP ION! POWE CAUT ON 0 V 0 to ±1 AX 1AM IS ON ED. LIGHT RT WHEN IS DISTO DE! FORM WAVE AMPLITU EASE DECR Introduction Filter Select Switch The PASCO CI-6552A Power Amplifier II is an accessory to the PASCO Signal Interfaces, Series 6500 and Mac65. It amplifies the output of the computer, allowing it to be used as a controlled DC power source or an AC function generator. The CI-6552A Power Amplifier II has a filter select switch which is preset for use with the CI-6560 Signal Interface II (Mac65). The bandwidth at that switch position is about 100KHz, limited by the power amplifier’s feedback compensation section and the load. When using the Power Amplifier II with the CI-6510 Signal Interface (Series 6500), the bandwidth needs to be limited to 1.5KHz. To change the switch position push the filter select switch in the back panel slot to the left, as shown in the illustration below. With the Power Amplifier II plugged into one of the analog channels of the Signal Interface, the appropriate software (Power Amplifier for DOS, Power Amplifier for APPLE II, or Science Workshop) can be used to generate the following types of waves (up to ±10V peak at 1A, up to 5,000 Hz): Switch position for CI-6510 Signal Interface • sine, • square, Switch position for CI-6560 Signal Interface II • triangle, and • sawtooth. This means the computer can now be used as an AC signal generator to power external circuits while it monitors its own output current as well as other inputs. The Science Workshop software can also generate a DC output. © 1995 PASCO scientific This instruction edited by Robert Morrison better 10101 Foothills Blvd. • P.O. Box 619011 • Roseville, CA 95678-9011 USA Phone (916) 786-3800 • FAX (916) 786-8905 • email: [email protected] ways to teach physics Power Amplifier II 012-05783A Equipment must be properly packed to prevent damage and shipped postage or freight prepaid. (Damage caused by improper packing of the equipment for return shipment will not be covered by the warranty.) Shipping costs for returning the equipment, after repair, will be paid by PASCO scientific. Using Power Amplifier II To install the Power Amplifier II, plug in its power cord and plug the DIN plug into Channel A, B, or C of the appropriate PASCO Signal Interface box (CI-6510 or CI-6560). Equipment Return ➤ NOTE: Using Power Amplifier II with Series 6500, the Power Amplifier program is calibrated for channel C. The Power Amplifier II can also be plugged into Channel A or B but these channels are not automatically calibrated to read the current as is Channel C. Should this product have to be returned to PASCO scientific, for whatever reason, notify PASCO scientific by letter or telephone BEFORE returning the product. Upon notification, the return authorization and shipping instructions will be promptly issued. To use the output of the Power Amplifier II, connect the load to the banana jacks on the front of the Power Amplifier II. There is a power switch on the back left hand corner of the Power Amplifier II. ➤NOTE: NO EQUIPMENT WILL BE ACCEPTED FOR RETURN WITHOUT AN AUTHORIZATION. ➤ WARNING! Do not turn on the power switch until a program (either Power Amplifier, Data Monitor or Science Workshop) has been run and the desired output voltage has been selected. CAUTION RISK OF ELECTRIC SHOCK DO NOT OPEN When the computer is in DOS, the Power Amplifier will output 10 Volts if the power switch is on and this could overload a circuit that might be connected to it. The software controls this voltage: The Data Monitor Program sets the default voltage to zero and the Power Amplifier Program sets the default AC peak voltage to 5 Volts. CAUTION: TO PREVENT THE RISK OF ELECTRIC SHOCK, DO NOT REMOVE COVER ON UNIT. NO USER SERVICEABLE PARTS INSIDE. REFER SERVICING TO QUALIFIED SERVICE PERSONNEL. When the Power Amplifier II is operating, a green power indicator light on the front panel of the Power Amplifier II will be lit. There is also a red current overload light which comes on whenever the maximum current of 1 A is exceeded. If this warning light is on, the waveform is distorted and you should reduce the output voltage. The lightning flash with arrowhead, within an equilateral triangle, is intended to alert the user of the presence of uninsulated “dangerous voltage” within the product’s enclosure that may be of sufficient magnitude to constitute a risk of electric shock to persons. Limited Warranty PASCO scientific warrants this product to be free from defects in materials and workmanship for a period of one year from the date of shipment to the customer. PASCO will repair or replace, at its option, any part of the product which is deemed to be defective in material or workmanship. This warranty does not cover damage to the product caused by abuse or improper use. Determination of whether a product failure is the result of a manufacturing defect or improper use by the customer shall be made solely by PASCO scientific. Responsibility for the return of equipment for warranty repair belongs to the customer. The exclamation point within an equilateral triangle is intended to alert the user of the presence of important operating and maintenance (servicing) instructions in the literature accompanying the appliance. 2 012-03175E 3/93 Instruction Manual and Experiment Guide for the PASCO scientific Model ES-9054B ELECTROMETER FUNCTION B1 B2 3 D C 10 V O L T S 30 100 Model ES-9054B ELECTROMETER ZERO POWER scientific OFF OUTPUT © 1987 PASCO scientific GND INPUT ADJUST PUSH TO ZERO ON ZERO LOCK $7.50 012-03175E Electrometer Table of Contents Section Page Copyright and Warranty ..................................................................................ii Equipment Return ...........................................................................................ii Introduction ..................................................................................................... 1 Operation ......................................................................................................... 1 Setup .......................................................................................................... 2 Measuring Charge ..................................................................................... 3 Measuring Voltage .................................................................................... 4 Measuring Current .................................................................................... 4 Using a Projection Meter .......................................................................... 5 Maintenace ...................................................................................................... 5 Battery Installation .................................................................................... 6 MOS-FET Replacement ............................................................................ 6 Schematic ........................................................................................................ 7 Parts List.......................................................................................................... 8 Technical Support ............................................................... Inside Back Cover i Electrometer 012-03175E Copyright, Warranty, and Equipment Return Please—Feel free to duplicate this manual subject to the copyright restrictions below. Copyright Notice Equipment Return The PASCO scientific 012-0xxxy Model Name manual is copyrighted and all rights reserved. However, permission is granted to non-profit educational institutions for reproduction of any part of the manual providing the reproductions are used only for their laboratories and are not sold for profit. Reproduction under any other circumstances, without the written consent of PASCO scientific, is prohibited. Should the product have to be returned to PASCO scientific for any reason, notify PASCO scientific by letter, phone, or fax BEFORE returning the product. Upon notification, the return authorization and shipping instructions will be promptly issued. ä NOTE: NO EQUIPMENT WILL BE ACCEPTED FOR RETURN WITHOUT AN AUTHORIZATION FROM PASCO. Limited Warranty PASCO scientific warrants the product to be free from defects in materials and workmanship for a period of one year from the date of shipment to the customer. PASCO will repair or replace at its option any part of the product which is deemed to be defective in material or workmanship. The warranty does not cover damage to the product caused by abuse or improper use. Determination of whether a product failure is the result of a manufacturing defect or improper use by the customer shall be made solely by PASCO scientific. Responsibility for the return of equipment for warranty repair belongs to the customer. Equipment must be properly packed to prevent damage and shipped postage or freight prepaid. (Damage caused by improper packing of the equipment for return shipment will not be covered by the warranty.) Shipping costs for returning the equipment after repair will be paid by PASCO scientific. ii When returning equipment for repair, the units must be packed properly. Carriers will not accept responsibility for damage caused by improper packing. To be certain the unit will not be damaged in shipment, observe the following rules: ➀ The packing carton must be strong enough for the item shipped. ➁ Make certain there are at least two inches of packing material between any point on the apparatus and the inside walls of the carton. ➂ Make certain that the packing material cannot shift in the box or become compressed, allowing the instrument come in contact with the packing carton. Address: PASCO scientific 10101 Foothills Blvd. Roseville, CA 95747-7100 Phone: FAX: email: web: (916) 786-3800 (916) 786-3292 [email protected] www.pasco.com 012-03175E Introduction The Model ES-9054B Electrometer is an infinite impedance (1014 ý) voltmeter that can be used for direct measurements of voltage, and indirect measurements of current and charge. Because of its high impedance, it is especially suited for measuring charge in electrostatic experiments. It has a sensitivity nearly 1,000 times that of a standard, gold-leaf electroscope, it has a center-zero meter that directly indicates charge polarity, and it measures charges as low as 10-11 coulombs. With these features, you’ll find that your electrostatics demonstrations and labs are easier to perform and, with quantitative data, are more informative as well. The electrometer is battery powered by two 9 volt batteries, and comes complete with the batteries and a shielded test lead. Instructions for inserting the batteries are at the end of this manual. Operation äIMPORTANT: The controls on the front panel of the electrometer are explained in Figure 1. Whether you’re using the electrometer to measure voltage, current, or charge, the following procedure should be followed each time you turn on the electrometer. More information on making accurate measurements is given in the sections that follow. ① Never use the Electrometer for measuring potentials in excess of 100 volts. ② Never connect the electrometer to an electrostatic generator such as a Van de Graff generator or a Wimshurst machine. ③ Never touch the input leads until you have grounded yourself to an earth ground. A person walking across a rug on a cool, dry day can easily pick up a potential of several thousand volts. 1 012-03175E Mechanical zero adjust screw (adjust with power off) FUNCTION B1 B2 3 D C 10 V O L T S 30 100 Select voltage range (3, 10, 30, or 100 volts full scale) or test batteries (B1 and B2) Model ES-9054B ELECTROMETER ZERO POWER scientific OFF OUTPUT GND INPUT ADJUST PUSH TO ZERO ON ZERO LOCK Zero meter (zero switch should be in ZERO LOCK position) Zero Switch: In PUSH TO ZERO setting, pushing knob will discharge the electrometer Connect test lead here Connect to earth ground 0-3.6 volts for driving a projection meter Figure 1 Front Panel Controls Setup ① Before turning on the electrometer, check that the meter reads zero. If not, turn the Mechanical Zero Adjust screw, located just below the meter face, until it does. ② Slide the POWER switch to the ON position. ③ Check the batteries: a. Turn the FUNCTION switch to B1. The meter pointer should read to the left of the B1 line at the bottom of the meter face. If the pointer falls within the area labeled B1, see the battery replacement section at the end of this manual. b. Turn the FUNCTION switch to B2. The meter pointer should read to the right of the B2 line at the bottom of the meter face. If the pointer falls within the area labeled B2, see the battery replacement section at the end of this manual. ④ Zero the meter: a. Turn the FUNCTION switch to 3. b. Turn the Zero Switch to the ZERO LOCK setting. c. Adjust the ZERO ADJUST knob so the meter reads zero volts. ⑤ Turn the Zero Switch to the PUSH TO ZERO setting. ⑥ Connect the test lead to the INPUT connector of the electrometer. ⑦ Connect the GND post of the electrometer to an earth ground. charge or voltage. Set the FUNCTION switch to the desired voltage range. The range setting refers to the voltage input required to produce a full-scale meter deflection (e.g., a setting of 30 means that a full scale meter deflection indicates a voltage of 30 volts). Important Points for General Operation: ① Between measurements, always press the Zero Switch to discharge all current from the electrometer. (The Zero Switch must be in the PUSH TO ZERO setting.) Shorting the test leads together is insufficient. There may still be stray charges within the electrometer circuitry. ② When adjusting the zero point of the electrometer, always turn the Zero Switch to the ZERO LOCK position. ③ For good results, it is essential that the electrometer be connected to an earth ground (a water pipe or the ground wire from a 120 VAC socket). Only an earth ground provides a sufficient drain for excess charges that may build up during an experiment. It is also helpful if the experimenter is grounded. Just touch one hand to a good earth ground while, or just before, making measurements. ä You’re now ready to use the electrometer to measure 2 012-03175E Measuring Charge by Induction Under most conditions, the best way to measure charge is by induction, using a proof plane and a Faraday ice pail such as those included with PASCO’s Demonstration Electrostatics System. The proof plane is simply a small conductive disk on an insulating handle. You can make your own ice pail by mounting a conductive cylinder on an insulating support, and placing a larger conductive cylinder around it as a shield. Connect the test lead of the electrometer probe to the inside cylinder, and connect the ground lead to the outside cylinder (see Figure 4). Measuring Charge Charge measurement with the electrometer is indirect, but simple. It is based on the relationship Q = CV, where Q and V are the charge and voltage across a capacitor and C is the capacitance. The electrometer can be thought of as an infinite impedance voltmeter in parallel with a capacitor, as shown in Figure 2. The capacitor represents the internal capacitance of the Q = CV Q Voltmeter V –Q Internal Capacitance of Electrometer C (30-35 pf without Test Probe; approximately 150 pf with Test Probe) Electrometer Proof Plane Ground lead Figure 2 Ideal Schematic of the Electrometer electrometer, plus the capacitance of the leads. When a charge is placed across the Electrometer leads, a voltage V will read on the meter. If the value C is known, the value of the charge can be calculated as Q = CV. However, when you touch the Electrometer leads to another object to test a charge, the capacitance may change. If the object adds significant capacitance, the situation becomes as shown in Figure 3. The new capacitance (C + Cext) must be determined to accurately calculate the charge from the measured voltage. Faraday ice pail Figure 4 Using a Faraday Ice Pail To sample the charge distribution on a charged object, simply touch it with the proof plane, then place the proof plane inside the inner cylinder of the ice pail, without touching the cylinder. A charge is induced on the inside cylinder that is equal but opposite to that on the proof plane. You can now read the voltage on the electrometer. By always using the proof plane and the ice pail, the capacitance will be the same for all your measurements and the charge on the proof plane will always be proportional to the voltage reading of the electrometer. However, in experiments for which you want to know the absolute charge on the proof plane, you need to know the total capacitance of the electrometer, plus the test probe, plus the ice pail with the proof plane inside it. Fortunately, this is easily measured, as described below. Once you know the capacitance, you can calculate the absolute charge for any measurement as Q = CV. Q + Q' = (C + Cext) V Voltmeter Q' Q V Cext C –Q Test lead –Q' Capacitance of object connected to the Electrometer Figure 3 Change in Capacitance Due to Charged Object 3 012-03175E To measure the total capacitance: inside cylinder of the ice pail, the Electrometer reading will generally remain relatively unchanged. This is because the total capacitance is only negligibly affected by the proof plane. This may not always be the case, however. ① Turn on the Electrometer and zero the meter. Clip the test lead of the probe to the inside cylinder of your ice pail and the ground lead to the outside cylinder (see Figure 4). ② Use a DC power supply or a statically charged object to charge your proof plane. ③ Place the proof plane inside the inner cylinder of the ice pail and adjust the FUNCTION switch to get a meter reading near full scale. (For convenience, you may want to touch the proof plane to the inside of the ice pail and then remove the proof plane. The effect on the voltage reading should be negligible.) Record the voltage as Ve. Do not discharge the Electrometer. ④ Take a capacitor of known capacitance, Ck. Ground the leads of the capacitor to be sure it is fully discharged, then connect the capacitor between the inner and outer cylinder of the ice pail. With the proof plane still inside the ice pail, record the meter reading as Vk. ⑤ The capacitance of the Electrometer, Ce, can now be calculated as: Ce = CkVk/(Ve -Vk). In general, contact measurements can be carried out in much the same way as inductive measurements using the ice pail. Touch the object with the test probe, record the voltage V, and use Q = CV to calculate the charge. However, if you suspect the object for which you are measuring the charge appreciably affects the total capacitance of the system, you will need to remeasure the capacitance as described above. Measuring Voltage Voltage can be measured as with any voltmeter. Connect the leads to the circuit, set the range (3, 10, 30, or 100 volts full scale), and read the voltage on the meter. Measuring Current The Electrometer can be used for indirect current measurements in many situations, though it is no substitute for a good ammeter. Connect the Electrometer leads across a known resistance in the circuit and measure the voltage. Use Ohm’s law (Voltage = Current x Resistance) to determine the current. The effect of the Electrometer on the circuit will be negligible in most circuits due to its exceedingly high input impedance. However, the voltage drop across the resistor must be within the voltage range of the Electrometer. EXPLANATION: This measurement is shown schematically in Figure 3. First the Electometer is charged with an unknown charge Q, that must satisfy the equation Q = CeVe, where Ce is the total capacitance of the system and Ve is the Electrometer reading. Then the second capacitor is connected in parallel with the capacitance of the Electrometer. The total capacitance is now Ce + Ck. The charge Q has not changed, but now satisfies the equation Q= (Ce + Ck)Vk, where Vk is the new Electrometer reading. Combining the two equations gives, CeVe = (Ce + Ck)Vk, or Ce = CkVk/(Ve -Vk). ä If it is not convenient to hook the Electrometer across a known resistance in the circuit, a precision resistor can be connected between the input leads of the Electrometer. The circuit can then be broken, as for connection to a standard ammeter, and connected in series with the precision resistor. Again, measure the voltage across this resistor and calculate the current. (The problem with this technique is that the resistance must be high enough so the voltage drop is easily measured, but low enough so it doesn't significantly affect the current through the circuit.) If you want to use the Electrometer with a different set of test leads, or a different ice pail, or even a different proof plane, the capacitance may be different, and you will need to repeat the above procedure to measure the new capacitance. Using a Projection Meter The OUTPUT connectors on the ES-9054B Electrometer provide an output signal for driving a projection meter, oscilloscope, or other monitoring device. The output is proportional to meter deflection (within 10%) with a ±3.6 VDC output corresponding to a full scale deflection. (The OUTPUT voltage depends only on meter deflection. It is independent of the range setting of the FUNCTION switch.) ä NOTE: The capacitance of the Electrometer is 30-35 pf. With the test probe, the total capacitance is approximately 150 pf. For best results, measure the total capacitance. Measuring Charge by Contact Charges can also be measured by contact. You’ll find, for example, that if you touch the charged proof plane to the 4 012-03175E ② Turn the ZERO ADJUST knob until the meter on the Electrometer reads as close to full scale as possible (either postive or negative). ③ Adjust the CALIBRATE knob on the Projection Meter so that the Projection Meter reads the same as the Electrometer. ④ Turn the ZERO ADJUST knob until the Electrometer and the Projection Meter read zero. PASCO’s Model ES-9065 Projection Meter can be used with an overhead projector to display the Electrometer readings for the whole class. The Projection Meter connects directly to the OUTPUT jacks, red to red and black to black. To calibrate the Projection Meter: ① Set the FUNCTION switch to 3, and the Zero Switch to ZERO LOCK. Maintenance Checking Out Your Electrometer CAUTION: Whenever you open your Electrometer, do not touch any of the components on the printed circuit board other than the battery holders or the trim potentiometers. The printed circuit contains the high impedance MOS-FET input which can be damaged just by touching the wrong lead. ä ① Follow the setup instructions on pages 2-3 of this manual to check the batteries and zero the Electrometer. If the batteries are low, see “Battery Installation.” If the meter cannot be zeroed, see “MOS-FET Replacement.” ② Calibration Test: Set the FUNCTION switch to 30 and connect the input to an accurate 30 VDC source. If the meter does not read 30 volts ±5%, see “Calibration.” Battery 1 (B1) Battery 2 (B2) ③ Input Impedance Test: Set the FUNCTION switch to 30 and connect the input to a 30 VDC source. Disconnect the input cable at the front panel input connector. Record the meter reading and the time. If the input impedance is sufficient, it will take 15 minutes or longer for the meter reading to decrease to 30% of its initial value. If the input impedance is low, see “Repairs.” ④ Zero Drift Test: With the meter zeroed, short the leads of the input cable together. Turn the Zero Switch to PUSH TO ZERO and depress the knob, then release it. The meter should read zero volts and should drift by no more than 75 mV/minute. At any time, depressing the Zero Switch should bring the meter immediately back to zero. If the zero drift is excessive, see “Repairs.” MOS-FET Calibration Potentiometer Zero Calibration Potentiometer Figure 5 Inside the Electrometer Battery Installation To install or replace the batteries, remove the four screws that fasten the front panel to the case, then gently lift the front panel out of the case. Install the batteries as shown in Figure 5. When removing and installing the batteries, be careful not to bend the battery clips or pull the battery wires out of the circuit board. Place the new batteries in the clips with the positive terminal closest to the printed circuit board.Before replacing the front panel, test that the batteries are good and the connections are secure by flipping the FUNCTION switch first to B1 and then to B2. The meter pointer should be deflected out beyond the areas labeled B1 and B2, respectively, at the bottom of the meter face. Replace the front panel. IMPORTANT: A zero drift test is best performed after the Electometer has been left unused with the Zero Switch in the ZERO LOCK position for at least four hours. During use with high voltages, or during battery replacement or other maintenance, charges may be produced on the insulators of the input circuit. The bleeding off of these charges may appear as excessive zero drift. ä 5 012-03175E ④ The replacement MOS-FET will probably come in Calibration an anti-static bag or may be wrapped in aluminum foil. The leads will be protected by a thin ring or spring that is wound around the leads near where they protrude from the base of the transistor. Gently remove the MOS-FET from the bag or foil, but do not remove the thin wire ring that is around the leads. Leave this wire ring in place until after the MOS-FET is seated in the socket. ① Remove the four screws that fasten the front panel to the case, then gently lift the front panel out of the case. ② Turn the POWER switch to ON. ③ Set the FUNCTION switch to 3. ④ Flip the Zero Switch to ZERO LOCK. With the ¯zero adjust knob midway between its extreme cw and ccw positions, adjust the Zero Calibration Potentiometer to zero the meter. ⑤ The MOS-FET has a small metal tab protruding from one side (see Figure 6). The lead directly below the tab (as seen from the top side of the transistor) is lead number 8. Count back to lead number 5, as shown, and gently bend the lead up. ⑤ Set the Function Switch to 30, zero the meter using the zero adjust knob on the front panel, then connect the INPUT of the Electrometer to a known, accurate 30 VDC source. ⑥ Insert the leads of the MOS-FET, except for lead 5, into the socket so that the metal tab lines up with the notch on the side of the socket as shown in the figure. ⑥ Flip the Zero Switch to the PUSH TO ZERO setting. ⑦ Insert lead number 5 into the socket that is con- ⑦ Adjust the Calibration Potentiometer (see Figure 5) nected to the adjacent binding post. This may be done by inserting the lead through the slot in the end of the socket, and then bending the end of the lead back and crimping it tightly. Now gently pull off the thin ring of wire that is wound around the leads. This may require thin nose pliers or "tweezers". until the meter reads 30 volts. ⑧ Press the Zero Switch, then release it. The meter should still read 30 volts. If it doesn’t, readjust the Calibration Potentiometer until it does. MOS-FET Replacement If the meter can’t be zeroed using the ZERO ADJUST knob with the Zero Switch set to ZERO LOCK, the MOS-FET has probably failed. (MOS-FET is an acronym for Metal Oxide Semiconductor-Field Effect Transistor). You can order a replacement from PASCO scientific (Part # 422-001) . When ordering a replacement part, be sure to include the model number of the Electrometer. ⑧ Replace the cover. Repair Should your Electrometer have problems that are not covered in the preceding sections, we strongly suggest you return it to PASCO scientific for repair. MOS-FET To replace the MOS-FET: 2 ① Turn the Electrometer off. ② Remove the four corner screws that fasten the front 1 3 8 4 7 5 6 panel to the case, and gently lift out the front panel. ③ Gently pull the MOS-FET out of its socket (see Fig- Align pin 8, the pin directly below the tab, with the notch in the socket, as shown. ure 5). Avoid yanking or twisting it, as this may damage the transistor socket. Insert pin 5 into this socket Figure 6 MOS-FET Installation 6 012-03175E SCHEMATIC Model ES-9054B Electrometer (Drawing #956-02859) 7 012-03175E Parts List Reference R1,2,5,13, 20,21 R3 R4 R6,24 R7 R8 R9 R10,11,19 R12 R14 R15 R16 R17 R18 R22 R23 C1,3 C2,5 C4 C6 C7 Q1 Q2 U1 U2 S1 S2 M1 Description PASCO Part # Resistor, 10 ký, 1/4 W, 5% 113-103 Resistor, 1 ký, 1/4 W, 5% Resistor, 13 ký, 1/4 W, 5%, C.C. Resistor, 470 ý, 1/4 W, 5% Potentiometer, 10 ký, 1/4 W, 30% Resistor, 330 ý, 1/4 W, 5% Trimpot, 500 ý Resistor, 3.01 ký, 1/8 W, 1%, MF Resistor, 470 ký, 1/4 W, 5% Resistor, 301 ý, 1/8 W, 1% Resistor, 698 ý, 1/8 W, 1%, MF Resistor, 2 ký, 1/8 W, 1%, MF Resistor, 6.98 ký, 6.81 ký, 1/8 W, 1% Potentiometer, 5 ký, 10% Resistor, 100 ý, 1/4 W, 5% Resistor, 100 Mý, 1/2 W, 20% Capacitor, 1.0 µf, 10%, 35 V, Axial Capacitor, 0.1 µf, 25 V, Monolithic Capacitor, 100 pf Capacitor, 0.001µf, 5%, 600 V Capacitor, 24 pf, 5%, 600 V Transitor—2N3906 Transistor—MOS-FET 3N190 IC—TL431 Voltage Regulator IC—LM324N Switch—Slide, 2 Pole, 2 Position Switch—2 Pole, 6 Position, Rotary Meter 113-102 113-133 113-471 140-006 113-331 142-031 124-007 113-474 124-004 124-005 124-006 124-008 142-018 113-101 150-007 220-004 210-018 210-014 216-013 216-003 420-003 422-001 430-083 430-027 512-007 510-019 525-00682 8 012-03175E Electrometer Technical Support Feedback Contacting Technical Support If you have any comments about the product or manual, please let us know. If you have any suggestions on alternate experiments or find a problem in the manual, please tell us. PASCO appreciates any customer feedback. Your input helps us evaluate and improve our product. Before you call the PASCO Technical Support staff, it would be helpful to prepare the following information: ➤ If your problem is with the PASCO apparatus, note: Title and model number (usually listed on the label); To Reach PASCO Approximate age of apparatus; For technical support, call us at 1-800-772-8700 (toll-free within the U.S.) or (916) 786-3800. A detailed description of the problem/sequence of fax: (916) 786-3292 e-mail: [email protected] web: events (in case you can’t call PASCO right away, you won’t lose valuable data); If possible, have the apparatus within reach when calling to facilitate description of individual parts. www.pasco.com ➤ If your problem relates to the instruction manual, note: Part number and revision (listed by month and year on the front cover); Have the manual at hand to discuss your questions. 012-01568C 12/94 $1.00 Instruction Sheet for the PASCO Model ES-9049A POWER SUPPLY Introduction When using the 1000 VDC range use the black and green binding posts. When the green binding post is used there is a 100 MΩ resistor in series with the output. This eliminates the hazard of shock if the green terminal is accidentally touched. However, if one attempts to measure the output of this terminal with a meter having less than several hundred MΩ of input impedance the meter on the ES-9049A and the measuring meter will not read the same. This is due to the voltage drop across the 100 MΩ resistor produced by the current needed to drive the meter. Voltage output is varied by the voltage control knob. Specifications: ➀ Ranges: a) 1000 VDC, less than 2% ripple peak-to-peak, unregulated (maximum short circuit current less than 0.01 mA) b) 30 VDC at 20 mA, 0.3% ripple peak-to-peak, line and load regulation to within 1%. The PASCO Model ES-9049A Power Supply is a two range supply providing all the necessary potentials for PASCO electrostatics equipment. ➁ Meter: Two scale, +/- 3% of full-scale accuracy. ➂ Power: Operating Instructions a) 110-130 VDC, 60 Hz Turn the unit ON by turning the VARIABLE control knob clockwise. b) 220/240 VDC, 50 Hz Select the 30 VDC or 1000 VDC range using the OUTPUT switch. The center position of the switch (STANDBY) will produce a zero output at the terminals, regardless of the voltage control settings. ➃ Fuse: a) 0.2 A, Slo-Blo. (110-130 VDC) b) 0.1 A, Slo-Blo. (220/240 VDC) ➄ Dimensions: 17.5 x 13.5 x 6 cm When using the 30 VDC range use the red and black binding posts. The black binding post is connected to the third prong (ground) on the power cord. © 1989 PASCO scientific This instruction sheet written/edited by: Dave Griffith Power Supply 012-01568C Troubleshooting Tips ➀ No output on any range: CAUTION RISK OF ELECTRIC SHOCK DO NOT OPEN Fuse blown ➁ Low output on 1000 VDC range: CAUTION: TO PREVENT THE RISK OF ELECTRIC SHOCK, DO NOT REMOVE COVER ON UNIT. NO USER SERVICEABLE PARTS INSIDE. REFER SERVICING TO QUALIFIED SERVICE PERSONNEL. Defective capacitor C2, C3, C4, or C5. ➂ No output on 30 VDC range but other range is all right: Defective zener diode CR5 or power transistor Q1. ➃ Proper output, but no meter readings: Defective meter M1. The lightning flash with arrowhead, within an equilateral triangle, is intended to alert the user of the presence of uninsulated “dangerous voltage” within the product’s enclosure that may be of sufficient magnitude to constitute a risk of electric shock to persons. Limited Warranty PASCO scientific warrants this product to be free from defects in materials and workmanship for a period of one year from the date of shipment to the customer. PASCO will repair or replace, at its option, any part of the product which is deemed to be defective in material or workmanship. This warranty does not cover damage to the product caused by abuse or improper use. Determination of whether a product failure is the result of a manufacturing defect or improper use by the customer shall be made solely by PASCO scientific. Responsibility for the return of equipment for warranty repair belongs to the customer. Equipment must be properly packed to prevent damage and shipped postage or freight prepaid. (Damage caused by improper packing of the equipment for return shipment will not be covered by the warranty.) Shipping costs for returning the equipment, after repair, will be paid by PASCO scientific. The exclamation point within an equilateral triangle is intended to alert the user of the presence of important operating and maintenance (servicing) instructions in the literature accompanying the appliance. Maintenance There is no routine maintenance required for the ES9049A Power Supply. However, power line surges can blow the protective fuse without damaging the instrument. Therefore, should the instrument fail to operate and the fuse is blown, replace it with a new fuse of the appropriate value. If the instrument subsequently works properly, no further action is necessary. If the fuse blows again (it may take 15 seconds), refer to the ‘Repairs’ section in this manual. Equipment Return Should this product have to be returned to PASCO scientific, for whatever reason, notify PASCO scientific by letter or phone BEFORE returning the product. Upon notification, the return authorization and shipping instructions will be promptly issued. ➤NOTE: NO EQUIPMENT WILL BE ACCEPTED FOR RETURN WITHOUT AN AUTHORIZATION. Repairs Should the ES-9049A Power Supply require repair, it is strongly recommended that the unit be returned to PASCO scientific. Because PASCO is thoroughly familiar with the instrument and maintains a complete stock of replacement parts, repairs can be made quickly and at low cost. When returning equipment for repair, the units must be packed properly. Carriers will not accept responsibility for damage caused by improper packing. If field repair is desired, a schematic and parts list are included in the following section. A brief list of malfunctions and their probable causes are also given. 2 Power Supply 012-01568C PARTS LIST Specification Resistors: 22K, 1/4W, 5% 18K, 2W, 5% 1K, 2W, 5% 4.7M, 1/4W, 5% 150K, 1/2W, 1% 100M, 1/2W, 5% 4.99M, 1/2W, 1% POT, Two Section Capacitors: 10mF, 450V, Electrolytic .47mF, 400V, Mylar Transformer: Power, 115/230-2X115V Diodes/Semiconductors: 1N4007, 1000PIV, 1A Silicon Rect 1N4753A, 36V, 1W, 5% Zener LED Red Power Transistor RCA40412 NPN Switch: Slide, 4Pole, 3Position Fuse/Meter: .2A SLO-BLO (110-130VDC) .1A SLO-BLO (220/240VDC) Meter Mechanical: Bakelite Case, Black Front Panel Control Knob Binding Post, Red Binding Post, Black Binding Post, Green Fuse Holder Power Cord, Domestic Power Cord, European Dissipater Pasco part no. Reference 113-223 110-183 110-102 113-475 122-064 150-006 150-015 140-032 R1 R2 R3 R4, R5 R6 R7 R8 R9A/B*, S2* 222-003 214-007 C1 C2-C5 322-009 T1 410-002 412-004 527-001 420-005 CR1-CR4 CR5 CR6 Q1 512-016 S1 530-001 530-006 525-00804 F1 F1 M1 650-01462 648-00803 620-002 517-013 517-014 517-015 520-003 516-001 516-003 624-001 ➤NOTE: R9A/B and S2 are concentrically mounted on the Variable Control shaft and comprise a single unit. 3 Power Supply 012-01568C SCHEMATIC 4 Includes Teacher's Notes and Typical Experiment Results Instruction Manual and Experiment Guide for the PASCO scientific Model EM-8622 012-04367E 4/94 BASIC ELECTRICITY L DE MO -8622 EM C B CW A D E - + + C © 1990 PASCO scientific $10.00 better 10101 Foothills Blvd. • P.O. Box 619011 • Roseville, CA 95678-9011 USA Phone (916) 786-3800 • FAX (916) 786-8905 • TWX 910-383-2040 ways to teach physics 012-04367E Basic Electricity Table of Contents Section ...........................................................................................................Page Copyright, Warranty, and Equipment Return ................................................. ii Introduction ..................................................................................................... 1 Equipment ........................................................................................................ 1 Getting Started, The Experiments ................................................................... 2 Comments on Meters ....................................................................................... 3 Notes on the Circuits Experiment Board ......................................................... 4 Experiments Experiment 1: Circuits Experiment Board ....................................... 5 Experiment 2: Lights in Circuits ...................................................... 7 Experiment 3: Ohm's Law ................................................................ 9 Experiment 4: Resistances in Circuits ............................................ 11 Experiment 5: Voltages in Circuits ................................................ 15 Experiment 6: Currents in Circuits ................................................. 19 Experiment 7: Kirchhoff's Rules .................................................... 21 Experiment 8: Capacitors in Circuits.............................................. 23 Experiment 9: Diodes ..................................................................... 25 Experiment 10: Transistors ............................................................... 27 Appendix: Tips and Troubleshooting ........................................................... 29 Replacement Parts List .................................................................................. 31 Teacher's Guide ............................................................................................. 33 Technical Support ................................................................................ Back Cover i Basic Electricity 012-04367E Copyright, Warranty and Equipment Return Please—Feel free to duplicate this manual subject to the copyright restrictions below. Copyright Notice Equipment Return The PASCO scientific Model EM-8622 Basic Electricity manual is copyrighted and all rights reserved. However, permission is granted to non-profit educational institutions for reproduction of any part of this manual providing the reproductions are used only for their laboratories and are not sold for profit. Reproduction under any other circumstances, without the written consent of PASCO scientific, is prohibited. Should this product have to be returned to PASCO scientific, for whatever reason, notify PASCO scientific by letter or phone BEFORE returning the product. Upon notification, the return authorization and shipping instructions will be promptly issued. ➤ NOTE: NO EQUIPMENT WILL BE ACCEPTED FOR RETURN WITHOUT AN AUTHORIZATION. Limited Warranty When returning equipment for repair, the units must be packed properly. Carriers will not accept responsibility for damage caused by improper packing. To be certain the unit will not be damaged in shipment, observe the following rules: PASCO scientific warrants this product to be free from defects in materials and workmanship for a period of one year from the date of shipment to the customer. PASCO will repair or replace, at its option, any part of the product which is deemed to be defective in material or workmanship. This warranty does not cover damage to the product caused by abuse or improper use. Determination of whether a product failure is the result of a manufacturing defect or improper use by the customer shall be made solely by PASCO scientific. Responsibility for the return of equipment for warranty repair belongs to the customer. Equipment must be properly packed to prevent damage and shipped postage or freight prepaid. (Damage caused by improper packing of the equipment for return shipment will not be covered by the warranty.) Shipping costs for returning the equipment, after repair, will be paid by PASCO scientific. ➀ The carton must be strong enough for the item shipped. ➁ Make certain there is at least two inches of packing material between any point on the apparatus and the inside walls of the carton. ➂ Make certain that the packing material can not shift in the box, or become compressed, thus letting the instrument come in contact with the edge of the box. Address: PASCO scientific 10101 Foothills Blvd. P.O. Box 619011 Roseville, CA 95678-9011 Credits This manual authored by: Clarence Bakken This manual edited by: Dave Griffith Teacher’s guide written by: Eric Ayars ii Phone: (916) 786-3800 FAX: (916) 786-8905 012-04367E Basic Electricity Introduction The PASCO Circuits Experiment Board is designed to implement a large variety of basic electrical circuits for experimentation. The Circuits Experiment Board can be used for experiments beginning with a simple complete circuit and continuing on to a study of Kirchhoff’s Laws and characteristics of diodes and transistors. A labeled pictorial diagram of the Experiment Board appears in Figure 1.2 of Experiment 1. Equipment The PASCO Model EM-8622 Circuits Experiment Kit includes the following materials: 012-04367A 3/91 Instruction Manual and Experiment Guide for the PASCO scientific Model EM-8622 (2) Circuits Experiment Boards, (1) Resistor–– 3.3 Ω, 2W, 5% BASIC ELECTRICITY (1) Potentiometer–– 25 Ω, 2W (1) Transistor Socket (32) Springs (1) Battery Holder (3) Light Sockets Copyright © November 1990 (3) #14 Light Bulbs – 2.5 V, 0.3 A* L DE MO -8622 M E (1) Storage Tube $10.00 better 10101 Foothills Blvd. • P.O. Box 619011 • Roseville, CA 95678-9011 USA Phone (916) 786-3800 • FAX (916) 786-8905 • TWX 910-383-2040 ways to teach physics (1) Component Bag Resistors C (2) 10 Ω–– 1 watt B (3) 100 Ω–– 1/2 watt A CW (8) 330 Ω–– 1/2 watt - (3) 560 Ω–– 1/2 watt D (3) 1000 Ω–– 1/2 watt E - + + C (2) 100 K Ω–– 1/2 watt (2) 220 K Ω–– 1/2 watt (2) Diodes 1N-4007 (2) Transistors 2N-3904 Capacitors (2) 100 µ F–– 16 volts (2) 330 µ F–– 16 volts Wire Leads–– 22 ga. (1) Experiment Manual * NOTE: Due to manufacturer's tolerances, wattage may vary by 15-30% from bulb to bulb. 1 Basic Electricity 012-04367E Getting Started ➀ Open the zip-lock bag containing the resistors and Store the remainder of the components in the ziplock bag until needed in future experiments. other components. Distribute the following resistors and wires to each of the boards, storing them in the plastic holder at the top of the board: ➁ Students will need to use the same resistors, same batteries, etc. from one experiment to another, particularly during experiments 4 to 6. Labeling of the boards and your meters will enable students to more easily have continuity in their work. A pad has been included on the board for purposes of labeling individual boards. Use of a removable label or using a permanent marker are two alternatives. (3) 5" Wire Leads (12.7 cm) (4) 10" Wire Leads (25.4 cm) (1) 100 Ω Resistor (brown, black, brown, gold) (3) 330 Ω Resistors (orange, orange, brown, gold) (1) 560 Ω Resistor (green, blue, brown, gold) (1) 1000 Ω Resistor (brown, black, red, gold) The Experiments Additional Equipment needed: The experiments written up in this manual are developmental, starting from an introduction to the Circuits Experiment Board and complete circuits, through series and parallel circuits, ultimately resulting in diode and transistor characteristics. These experiments can be used in combination with existing labs that the teacher employs, or may be used as a complete lab unit. Experiment 1 Circuits Experiment Board Experiment 2 Lights in Circuits Experiment 3 Ohm’s Law Experiment 4 Resistances in Circuits Experiment 5 Voltages in Circuits Experiment 6 Currents in Circuits Experiment 7 Kirchhoff’s Rules Experiment 8 Capacitors in Circuits Experiment 9 Diode Characteristics Experiments 3-10 Digital Multimeter, VOM or VTVM (See discussion on page 3) Experiments 8-10 The Meter needs at least 106 Ω input impedance Experiment 10 Transistor Characteristics 2 Experiment 8 A timing device is needed, 0.1 second resolution. Experiment 9 A.C. Power Supply and an Oscilloscope (optional) 012-04367E Basic Electricity Comments on Meters VOM: VTVM: The Volt-Ohm-Meter or VOM is a multiple scale, multiple function meter (such as the PASCO SB-9623 Analog Multimeter), typically measuring voltage and resistance, and often current, too. These usually have a meter movement, and may select different functions and scales by means of a rotating switch on the front of the unit. The Vacuum Tube Voltmeter or VTVM is a multiple scale, multiple function meter, typically measuring voltage and resistance. They do not usually measure current. The meter is an analog one, with a variety of scales, selected with a rotating switch on the front of the meter. Advantages: VOM’s may exist in your laboratory and thus be readily accessible. A single meter may be used to make a variety of measurements rather than needing several meters. Advantages: VTVM’s have high input resistances, on the order of 106 Ω or greater. By measuring the voltage across a known resistance, current can be measured with a VTVM. Disadvantages: VOM’s may be difficult for beginning students to learn to read, having multiple scales corresponding to different settings. VOM’s are powered by batteries for their resistance function, and thus must be checked to insure the batteries are working well. Typically, VOM’s may have input resistances of 30,000 Ω on the lowest voltage range, the range that is most often used in these experiments. For resistances in excess of 1,000 Ω, this low meter resistance affects circuit operation during the taking of readings, and thus is not usable for the capacitor, diode and transistor labs. Disadvantages: VTVM’s have multiple scales. Students need practice to avoid the mistake of reading the incorrect one. An internal battery provides the current for measuring resistance, and needs to be replaced from time to time. Grounding problems can occur when using more than one VTVM to make multiple measurements in the same circuit. Panelmeters: Individual meters, frequently obtained from scientific supply houses, are available in the form of voltmeters, ammeters, and galvanometers (such as PASCO’s SE-9748 Voltmeter 5 V, 15 V , SE-9746 Ammeter 1 A, 5 A and SE-9749 Galvanometer ± 35 mV). In some models, multiple scales are also available. DMM: The Digital Multimeter or DMM is a multiple scale, multiple function meter (such as the PASCO SB-9624 Basic Digital Multimeter or the SE-9589 General Purpose DMM), typically measuring voltage and resistance, and often current, too. These have a digital readout, often with an LCD (Liquid Crystal Display). Different functions and scales are selected with either a rotating switch or with a series of push-button switches. Advantages: Meters can be used which have the specific range required in a specific experiment. This helps to overcome student errors in reading. Disadvantages: Using individual meters leads to errors in choosing the correct one. With limited ranges, students may find themselves needing to use another range and not have a meter of that range available. Many of the individual meters have low input impedances (voltmeters) and large internal resistances (ammeters). Ohmmeters are almost nonexistent in individual form. Advantages: DMM’s are easily read, and with their typically high input impedances (>106 Ω) give good results for circuits having high resistance. Students learn to read DMM’s quickly and make fewer errors reading values. Reasonable quality DMM’s can be purchased for $60 or less. PASCO strongly recommends the use of DMM’s. Light Bulbs Disadvantages: DMM’s also require the use of a battery, although the lifetime of an alkaline battery in a DMM is quite long. The battery is used on all scales and functions. Most DMM’s give the maximum reading on the selector (i.e., under voltage, “2” means 2-volt maximum, actually 1.99 volt maximum). This may be confusing to some students. The #14 bulbs are nominally rated at 2.5 V and 0.3 A. However, due to relatively large variations allowed by the manufacturer, the wattage of the bulbs may vary by 15 to 30%. Therefore, supposedly “identical” bulbs may not shine with equal brightness in simple circuits. 3 Basic Electricity 012-04367E Notes on the Circuits Experiment Board The springs are securely soldered to the board and serve as a convenient method for connecting wires, resistors and other components. Some of the springs are connected electrically to devices like the potentiometer and the D-cells. In the large Experimental Area, the springs are connected in pairs, oriented perpendicular to each other. This facilitates the connection of various types of circuits. When connecting a circuit to a D-cell, note the polarity (+ or -) which is printed on the board. In some cases the polarity is not important, but in some it will be imperative. Polarity is very important for most meters. Connections are made on the Circuits Experiment Board by pushing a stripped wire or a lead to a component into a spring. For maximum effect, the stripped part of the wire should extend so that it passes completely across the spring, making contact with the spring at four points. This produces the most secure electrical and mechanical connection. If a spring is too loose, press the coils together firmly to tighten it up. The coils of the spring should not be too tight, as this will lead to bending and/or breaking of the component leads when they are inserted or removed. If a spring gets pushed over, light pressure will get it straightened back up. Spring The components, primarily resistors, and small wires can be stored in the plastic container at the top of the board. Encourage students to keep careful track of the components and return them to the container each day following the lab period. Wire (top view) (side view) Figure 1 Diagram of wires and springs 4 012-04367E Basic Electricity Experiment 1: Circuits Experiment Board EQUIPMENT NEEDED: -Circuits Experiment -D-cell Battery -Graph -Board -Wire Leads -Paper Purpose The purpose of this lab is to become familiar with the Circuits Experiment Board, to learn how to construct a complete electrical circuit, and to learn how to represent electrical circuits with circuit diagrams. Background ➀ Many of the key elements of electrical circuits have been reduced to symbol form. Each symbol represents an element of the device’s operation, and may have some historical significance. In this lab and the ones which follow, we will use symbols frequently, and it is necessary you learn several of those symbols. Wire Switch Battery (Cell) Light Resistor Fuse ➁ The Circuits Experiment Board has been designed to conduct a wide variety of experiments easily and quickly. A labeled pictorial diagram of the Experiment Board appears on page 6. Refer to that page whenever you fail to understand a direction which mentions a device on the board itself. ➂ Notes on the Circuits Experiment Board: a) The springs are soldered to the board to serve as convenient places for connecting wires, resistors and other components. Some of the springs are connected electrically to devices like the potentiometer and the D-cells. b) If a spring is too loose, press the coils together firmly to enable it to hold a wire more tightly. If a spring gets pushed over, light pressure will get it straightened back up. If you find a spring which doesn’t work well for you, please notify your instructor. c) The components, primarily resistors, are contained in a plastic case at the top of the board. Keep careful track of the components and return them to the storage case following each lab period. This way you will get components with consistent values from lab to lab. d) When you connect a circuit to a D-cell (each “battery” is just a cell, with two or more cells comprising a battery) note the polarity (+ or -) which is printed on the board. Although in some cases the polarity may not be important, in others it may very important. e) Due to normal differences between light bulbs, the brightness of “identical” bulbs may vary substantially. 5 Basic Electricity 012-04367E Procedure ➀ Use two pieces of wire to make connections between the springs on one of the light bulbs to the springs on the D-cell in such a way that the light will glow. Discuss with your lab partner before you begin actually wiring your circuit which connections you intend to make, and why you think you will be successful in activating the light. If you are not successful, try in order: changing the wiring, using another light, using another cell, asking the instructor for assistance. a) Sketch the connections that the wires make when you are successful, using the symbols from the first page of this lab. b) Re-sketch the total circuit that you have constructed, making the wires run horizontally and vertically on the page. This is more standard in terms of drawing electrical circuits. ➁ Reverse the two wires at the light. Does this have any effect on the operation? Reverse the two wires at the cell. Does this have any effect on the operation? connection such as one of the three around the transistor socket as shown on the right as a “switch.” Connect one lead from the battery to this spring and then take a third wire from the spring to the light. You can now switch the power “on” and “off” by connecting or not connecting the third wire. ➤ ➤ ➂ In the following steps, use a vacant spring Can be removed “Switch” Figure 1.1 ➃ Use additional wires as needed to connect a second light into the circuit in such a way that it is also lighted. (Use a “switch” to turn the power on and off once the complete wiring has been achieved.) Discuss your plans with your lab partner before you begin. Once you have achieved success, sketch the connections that you made in the form of a circuit diagram. Annotate your circuit diagram by making appropriate notes to the side indicating what happened with that particular circuit. If you experience lack of success, keep trying. ➤ NOTE: Is your original light the same brightness, or was it brighter or dimmer that it was during step 1? Can you explain any differences in the brightness, or the fact that it is the same? If not, don’t be too surprised, as this will be the subject of future study. ➄ If you can devise another 1.5 volts D cell Model EM-8622 CIRCUIT EXPERIMENT BOARD 1.5 volts D cell Springs C KIT NO. Box Transistor B Return the components and wires to the plastic case on the Circuits Experiment Board. Return the equipment to the location indicated by your instructor. Storage Socket A ➅ Disconnect the wires. Battery Holder Circuits Experiment Board Model 555-04182-1 2 amp slow blow fuse way of connecting two lights into the same circuit, try it out. Sketch the circuit diagram when finished and note the relative brightness. Compare your brightness with what you achieved with a single light by itself. Light Bulbs Resistor (3.3 Ω) Figure 1.2 6 Potentiometer 012-04367E Basic Electricity Experiment 2: Lights in Circuits EQUIPMENT NEEDED: -Circuits Experiment Board -Wire Leads -Two D-cell Batteries -Graph Paper. Purpose The purpose of this lab is to determine how light bulbs behave in different circuit arrangements. Different ways of connecting two batteries will also be investigated. Procedure PART A ➤ NOTE: Due to variations from bulb to bulb, the brightness of one bulb may be substantially different from the brightness of another bulb in “identical” situations. ➀ Use two pieces of wire to connect a single light bulb to one of the D-cells in such a way that the light will glow. Include a “switch” to turn the light on and off, preventing it from being on continuously. (You should have completed this step in Experiment 1. If that is the case, review what you did then. If not, continue with this step.) ➁ Use additional wires as needed to connect a second light into the circuit in such a way that it is also lighted. Discuss your plans with your lab partner before you begin. Once you have achieved success, sketch the connections that you made in the form of a circuit diagram using standard symbols. Annotate your circuit diagram by making appropriate notes to the side indicating what happened with that particular circuit. ➤ NOTE: Is your original light the same brightness, or was it brighter or dimmer than it was during step 1? Can you explain any differences in the brightness, or why it is the same? ➂ If one of the light bulbs is unscrewed, does the other bulb go out or does it stay on? Why or why not? ➃ Design a circuit that will allow you to light all three lights, with each one being equally bright. Draw the circuit diagram once you have been successful. If you could characterize the circuit as being a series or parallel circuit, which would it be? What happens if you unscrew one of the bulbs? Explain. ➄ Design another circuit which will also light all three bulbs, but with the bulbs all being equally bright, even though they may be brighter or dimmer than in step 4. Try it. When you are successful, draw the circuit diagram. What happens if you unscrew one of the bulbs? Explain. ➅ Devise a circuit which will light two bulbs at the same intensity, but the third at a different intensity. Try it. When successful, draw the circuit diagram. What happens if you unscrew one of the bulbs? Explain. ➤ NOTE: Are there any generalizations that you can state about different connections to a set of lights? 7 Basic Electricity 012-04367E PART B ➆ Connect a single D-cell to a single light as in step 1, using a spring clip “switch” to allow you to easily turn the current on and off. Note the brightness of the light. ⑧ Now connect the second D-cell into the circuit as shown in Figure 2.1a. What is the effect on the brightness of the light? ➤ ➤ ➤ ➤ ➤ ➤ Figure 2.1a Figure 2.1b Figure 2.1c ⑨ Connect the second D-cell as in Figure 2.1b. What is the effect on the brightness? ➉ Finally, connect the second D-cell as in figure 2.1c. What is the effect on the brightness? ➤ NOTE: Determine the nature of the connections between the D-cells you made in steps 8-10. Which of these was most useful in making the light brighter? Which was least useful? Can you determine a reason why each behaved as it did? PART C 11 Connect the circuit shown in Figure 2.2. What is the effect of rotating the knob on the device that is identified as a “Potentiometer?” Light Discussion ➀ Answer the questions which appear during the Potentiometer experiment procedure. Pay particular attention to the “NOTED:” questions. Battery ➁ What are the apparent rules for the operation of lights in series? In parallel? ➂ What are the apparent rules for the operation of batteries in series? In parallel? ➃ What is one function of a potentiometer in a circuit? Figure 2.2 (Not to scale) 8 012-04367E Basic Electricity Experiment 3: Ohm’s Law EQUIPMENT NEEDED: -Circuits Experiment Board -Multimeter -Graph Paper. -D-cell Battery -Wire Leads Purpose The purpose of this lab will be to investigate the three variables involved in a mathematical relationship known as Ohm’s Law. Procedure ➀ Choose one of the resistors that you have been given. Using the chart on the back, decode the resistance value and record that value in the first column of Table 3.1. Red (+) Black (-) Red (+) Black (-) Figure 3.1b Figure 3.1a ➁ MEASURING CURRENT: Construct the circuit shown in Figure 3.1a by pressing the leads of the resistor into two of the springs in the Experimental Section on the Circuits Experiment Board. ➂ Set the Multimeter to the 200 mA range, noting any special connections needed for measuring current. Connect the circuit and read the current that is flowing through the resistor. Record this value in the second column of Table 3.1. ➃ Remove the resistor and choose another. Record its resistance value in Table 3.1 then measure and record the current as in steps 2 and 3. Continue this process until you have completed all of the resistors you have been given. As you have more than one resistor with the same value, keep them in order as you will use them again in the next steps. ➄ MEASURING VOLTAGE: Disconnect the Multimeter and connect a wire from the positive lead (spring) of the battery directly to the first resistor you used as shown in Figure 3.1b. Change the Multimeter to the 2 VDC scale and connect the leads as shown also in Figure 3.1b. Measure the voltage across the resistor and record it in Table 3.1. ➅ Remove the resistor and choose the next one you used. Record its voltage in Table 3.1 as in step 5. Continue this process until you have completed all of the resistors. 9 Basic Electricity 012-04367E Data Processing ➀ Construct a graph of Current (vertical axis) vs Resistance. ➁ For each of your sets of data, calculate the ratio of Voltage/Resistance. Compare the values you calculate with the measured values of the current. Resistance, Ω Current, amp Voltage, volt Voltage/Resistance Table 3.1 Discussion ➀ From your graph, what is the mathematical relationship between Current and Resistance? ➁ Ohm’s Law states that current is given by the ratio of voltage/resistance. Does your data concur with this? ➂ What were possible sources of experimental error in this lab? Would you expect each to make your results larger or to make them smaller? Reference Black Brown Red Orange Yellow Green Blue Violet Gray White 0 1 2 3 4 5 6 7 8 9 2nd Digit 1st Digit No. of Zeros Tolerance Figure 3.2 10 Fourth Band None ±20% Silver ±10% Gold ±5% Red ±2% 012-04367E Basic Electricity Experiment 4: Resistances in Circuits EQUIPMENT NEEDED: -Circuits Experiment Boar - Multimeter -Resistors. Purpose The purpose of this lab is to begin experimenting with the variables that contribute to the operation of an electrical circuit. This is the first of a three connected labs. Procedure ➀ Choose the three resistors having the same value. Enter those sets of colors in Table 4.1 below. We will refer to one as #1, another as #2 and the third as #3. ➁ Determine the coded value of your resistors. Enter the value in the column labeled “Coded Resistance” in Table 4.1. Enter the Tolerance value as indicated by the color of the fourth band under “Tolerance.” ➂ Use the Multimeter to measure the resistance of each of your three resistors. Enter these values in Table 4.1. ➃ Determine the percentage experimental error of each resistance value and enter it in the appropriate column. Experimental Error = [(|Measured - Coded|) / Coded ] x 100%. 1st Colors 2nd 3rd Coded Measured 4th Resistance Resistance % Error Tolerance #1 #2 #3 Table 4.1 ➄ Now connect the three resistors into the SERIES CIRCUIT, figure 4.1, using the spring clips on the Circuits Experiment Board to hold the leads of the resistors together without bending them. Measure the resistances of the combinations as indicated on the diagram by connecting the leads of the Multimeter between the points at the ends of the arrows. 11 Basic Electricity 012-04367E Series R1 R2 R3 R12= R23= ➤ R12 ➤ ➤ ➤ R23 R123= ➤ ➤ R123 Figure 4.1 ➅ Construct a PARALLEL CIRCUIT, first using combinations of two of the resistors, and then using all three. Measure and record your values for these circuits. Parallel R1 ➤ NOTE: Include also R13 ➆ Connect the COMBINATION ➤ CIRCUIT below and measure the various combinations of resistance. Do these follow the rules as you discovered them before? R12 = ➤ R12 R23 = R2 R123 = R3 Combination Figure 4.2 R2 R1 R1 = R3 R23 = ➤ ➤ R1 R123 R2 3 ➤ ➤ R123 = ➤ Figure 4.3 ⑧ Choose three resistors having different values. Repeat steps 1 through 7 as above, recording your data in the spaces on the next page. Note we have called these resistors A, B and C. 12 012-04367E Basic Electricity 1st Colors 2nd 3rd Coded Measured 4th Resistance Resistance % Error A B C Table 4.2 Series RA RB RC RAB = RAB RBC = ➤ RBC ➤ ➤ RABC ➤ ➤ ➤ Figure 4.4 Parallel RA RAB RAB = ➤ ➤ RBC = RB RABC= RC Figure 4.5 ➤ NOTE: Include also RAC 13 RABC= Tolerance Basic Electricity 012-04367E Combination RB RA RA = RC RBC = ➤ ➤ RA ➤ ➤ RBC RABC RABC= ➤ Figure 4.6 Discussion ➀ How does the % error compare to the coded tolerance for your resistors? ➁ What is the apparent rule for combining equal resistances in series circuits? In parallel circuits? Cite evidence from your data to support your conclusions. ➂ What is the apparent rule for combining unequal resistances in series circuits? In parallel circuits? Cite evidence from your data to support your conclusions. ➃ What is the apparent rule for the total resistance when resistors are added up in series? In parallel? Cite evidence from your data to support your conclusions. Extension Using the same resistance values as you used before plus any wires needed to help build the circuit, design and test the resistance values for another combination of three resistors. As instructed, build circuits with four and five resistors, testing the basic concepts you discovered in this lab. Reference Black Brown Red Orange Yellow Green Blue Violet Gray White 0 1 2 3 4 5 6 7 8 9 2nd Digit 1st Digit No. of Zeros Tolerance Figure 4.7 14 Fourth Band None ±20% Silver ±10% Gold ±5% Red ±2% 012-04367E Basic Electricity Experiment 5: Voltages in Circuits EQUIPMENT NEEDED: -Circuits Experiment Board -D-cell Battery -Wire Leads -Multimeter -Resistors Purpose The purpose of this lab will be to continue experimenting with the variables that contribute to the operation of an electrical circuit. You should have completed Experiment 4 before working on this lab. Procedure ➀ Connect the three equal resistors that you used in Experiment 4 into the series circuit shown below, using the springs to hold the leads of the resistors together without bending them. Connect two wires to the D-cell, carefully noting which wire is connected to the negative and which is connected to the positive. ➁ Now use the voltage function on the Multimeter to measure the voltages across the individual resistors and then across the combinations of resistors. Be careful to observe the polarity of the leads (red is +, black is -). Record your readings below. Series + - V1 + R3 R2 R1 ➤ ➤ - + + - + - ➤ V12 ➤ ➤ V23 V123 ➤ Figure 5.1 R1 = V1 = R2 = V2 = R3 = V3 = R12 = V12 = R23 = V23 = R123= V123= 15 ➤ ➤ Basic Electricity 012-04367E ➂ Now connect the parallel circuit below, using all three resistors. Measure the voltage across each of the resistors and the combination, taking care with the polarity as before. ➤NOTE: Keep all three resistors connected throughout the time you are making your measurements. Write down your values as indicated below. Parallel + - ➤ ➤ R1 R1 = V1 = R2 = V2 = R3 = V3 = R123 = V123 = V1 R2 R3 Figure 5.2 ➃ Now connect the circuit below and measure the voltages. You can use the resistance readings you took in Experiment 4 for this step. Combination + - R2 R1 R1 = V1 = R23 = V23 = R123 = V123 = R3 ➤ ➤ V1 V123 V23 ➤ ➤ ➤ ➤ Figure 5.3 ➄ Use the three unequal resistors that you used in Experiment 4 to construct the circuits shown below. Make the same voltage measurements that you were asked to make before in steps 1 to 4. Use the same resistors for A, B and C that you used in Experiment 4. 16 012-04367E Basic Electricity Series + - VA + RA RC RB - + - + - + ➤ ➤ VAB ➤ VBC VABC ➤ ➤ ➤ Figure 5.4 RA = VA = RB = VB = RC = VC = RAB = VAB = RBC = VBC = RABC= VABC= Parallel + - ➤ ➤ RA VA RB RA = VA = RB = VB = RC = VC = RABC= VABC= RC Figure 5.5 17 Basic Electricity 012-04367E Combination + - RA = VA = RBC = VBC = RABC= VABC = RB RA RC ➤ VA ➤ VABC VBC ➤ ➤ ➤ ➤ Figure 5.6 Discussion On the basis of the data you recorded on the table with Figure 5.1, what is the pattern for how voltage gets distributed in a series circuit with equal resistances? According to the data you recorded with Figure 5.4, what is the pattern for how voltage gets distributed in a series circuit with unequal resistances? Is there any relationship between the size of the resistance and the size of the resulting voltage? Utilizing the data from Figure 5.2, what is the pattern for how voltage distributes itself in a parallel circuit for equal resistances? Based on the data from Figure 5.5, what is the pattern for how voltage distributes itself in a parallel circuit for unequal resistances? Is there any relationship between the size of the resistance and the size of the resulting voltage? Do the voltages in your combination circuits (see Figures 5.3 and 5.6) follow the same rules as they did in your circuits which were purely series or parallel? If not, state the rules you see in operation. 18 012-04367E Basic Electricity Experiment 6: Currents in Circuits EQUIPMENT NEEDED: -Circuits Experiment Board -Resistors -Wire Leads. -Digital Multimeter -D-cell Battery Purpose The purpose of this lab will be to continue experimenting with the variables that contribute to the operation of electrical circuits. Procedure ➀ Connect the same three resistors that you used in Experiments 3 and 4 into the series circuit shown below, using the springs to hold the leads of the resistors together without bending them. Connect two wires to the D-cell, and carefully note which lead is negative and which is positive. Series + ➁ Now change the leads in your DMM so that they can be used to measure current. You should be using the scale which goes to a maximum of 200 mA. Be careful to observe the polarity of the leads (red is +, black is -). In order to measure current, the circuit must be interrupted, and the current allowed to flow through the meter. Disconnect the lead wire from the positive terminal of the battery and connect it to the red (+) lead of the meter. Connect the black (-) lead to R1, where the wire originally was connected. Record your reading in the table as Io. See Figure 6.2. R1 - R2 + R3 - + - + - Figure 6.1 - I0 + + R1 + ➂ Now move the DMM to the positions indicated in Figure 6.3, each time interrupting the circuit, and carefully measuring the current in each one. Complete the table on the top of the back page. R3 R2 - + - Figure 6.2 ➤ NOTE: You will be carrying values from Experiments 3 and 4 into the table on the back. 19 + - Basic Electricity 012-04367E - I0 + + R1 - + - I 2 R3 R2 + I1 + - I3 - Figure 6.3 R1 = I0 = V1 = R2 = I1 = V2 = R3 = I2 = V3 = R12 = I3 = V12 = R23 = V23 = R123= V123= ➃ Connect the parallel circuit below, using all three resistors. Review the instructions for connecting the DMM as an ammeter in step 2. Connect it first between the positive terminal of the battery and the parallel circuit junction to measure I0. Then interrupt the various branches of the parallel circuit and measure the individual branch currents. Record your measurements in the table below. Parallel + R1 = I0 = V1 = - + = I1 = V2 R3 = I2 = V3 = R123 = I3 = I4 R1 R2 - I0 = + I1 - + I2 - + I3 - R2 V123 = R3 I4 = Discussion Figure 6.4 On the basis of your first set of data, what is the pattern for how current behaves in a series circuit? At this point you should be able to summarize the behavior of all three quantities - resistance, voltage and current - in series circuits. On the basis of your second set of data, are there any patterns to the way that currents behave in a parallel circuit? At this time you should be able to write the general characteristics of currents, voltages and resistances in parallel circuits. 20 + 012-04367E Basic Electricity Experiment 7: Kirchhoff’s Rules EQUIPMENT NEEDED: -Circuits Experiment Board -Wire Leads -Resistors. -Two D-cell Batteries -Digital Multimeter (DMM) Purpose The purpose of this lab will be to experimentally demonstrate Kirchhoff’s Rules for electrical circuits. Procedure ➀ Connect the circuit shown in Figure 7.1a using any of the resistors you have except the 10 Ω one. Use Figure 7.1b as a reference along with 7.1a as you record your data. Record the resistance values in the table below. With no current flowing (the battery disconnected), measure the total resistance of the circuit between points A and B. R1 A R1 C R2 C A B R2 R4 R3 R5 Wire R3 D D Wire R4 Figure 7.1a Figure 7.1b ➁ With the circuit connected to the battery and the current flowing, measure the voltage across each of the resistors and record the values in the table below. On the circuit diagram in Figure 7.1b, indicate which side of each of the resistors is positive relative to the other end by placing a “+” at that end. ➂ Now measure the current through each of the resistors. Interrupt the circuit and place the DMM in series to obtain your reading. Make sure you record each of the individual currents, as well as the current flow into or out of the main part of the circuit, IT. 21 B R5 Basic Electricity 012-04367E Resistance, Ω Voltage, volts Current, mA R1 V1 I1 R2 V2 I2 R3 V3 I3 R4 V4 I4 R5 V5 I5 RT VT IT Table 7.1 Analysis ➀ Determine the net current flow into or out of each of the four “nodes” in the circuit. ➁ Determine the net voltage drop around at least three (3) of the six or so closed loops. Remember, if the potential goes up, treat the voltage drop as positive (+), while if the potential goes down, treat it as negative (-). Discussion Use your experimental results to analyze the circuit you built in terms of Kirchhoff’s Rules. Be specific and state the evidence for your conclusions. Extension Build the circuit below and apply the same procedure you used previously. Analyze it in terms of Kirchhoff’s Rules. If possible, try to analyze the circuit ahead of time and compare your measured values with the theoretically computed values. R2 R4 R3 R1 V2 R5 V1 Figure 7.2 22 012-04367E Basic Electricity Experiment 8: Capacitors in Circuits EQUIPMENT NEEDED: – Vacuum Tube Voltmeter (VTVM) or Electrometer (ES-9054B) or Digital Multimeter (DMM) that has an input impedance of 10 MΩ or greater. – Circuits Experiment Board – Capacitors, Resistors – Wire Leads – D-cell Battery – Stopwatch or timer with 0.1 sec resolution. Purpose The purpose of this lab will be to determine how capacitors behave in R-C circuits. The manner in which capacitors combine will also be studied. Procedure ➀ Connect the circuit shown in Figure 8.1, using a 100-K Ω resistor and a 100-µF capacitor. Use one of the spring clips from the transistor socket as a “switch” as shown. Connect the VTVM so the black “ground” lead is on the side of the capacitor that connects to the negative terminal of the battery and set it so that it reads to a maximum of 1.5 V DC. ➁ Start with no voltage on the capacitor and the wire from the “switch” to the circuit disconnected. If there is a remaining voltage on the capacitor, use a piece of wire to “short” the two leads together, draining any remaining charge. (Touch the ends of the wire to points B and C as shown in Figure 1 to discharge the capacitor.) “Switch” ➤ A Resistor B Capacitor C ➂ Now close the “switch” by touching the wire to the spring clip. Observe the voltage readings on the VTVM, the voltage across the capacitor. How would you describe the manner in which the voltage changes? + V - Figure 8.1 ➃ If you now open the “switch” by removing the wire from the spring clip, the capacitor should remain at its present voltage with a very slow drop over time. This indicates that the charge you placed on the capacitor has no way to move back to neutralize the excess charges on the two plates. ➄ Connect a wire between points A and C in the circuit, allowing the charge to drain back through the resistor. Observe the voltage readings on the VTVM as the charge flows back. How would you describe the manner in which the voltage falls? (It would be reasonable to sketch a graph showing the manner in which the voltage rose over time as well as the manner in which it fell over time.) ➅ Repeat steps 3-5 until you have a good feeling for the process of charging and discharging of a capacitor through a resistance. ➆ Now repeat steps 3-5, this time recording the time taken to move from 0.0 volts to 0.95 volts while charging, tC, and the time taken to move from 1.5 volts to 0.55 volts while discharging, tD. Record your times along with the resistance and capacitance values in Table 8.1 at the top of the back page. 23 Basic Electricity 012-04367E Trial Resistance Capacitance tC tD 1 2 3 4 5 6 7 8 Table 8.1 ⑧ Replace the 100-µF capacitor with a 330-µF capacitor. Repeat step 7, recording the charging and discharging times in Table 8.1. If a third value is available, include it in the data table, too. ⑨ Return to the original 100-µF capacitor, but put a 220-K Ω resistor in the circuit. Repeat step 7, recording your data in Table 8.1. If a third resistor is provided, use it in the circuit, recording the data. ➤ NOTE: ➀ What is the effect on charging and discharging times if the capacitance is increased? What mathematical relationship exists between your times and the capacitance? ➁ What is the effect on charging and discharging times if the resistance of the circuit is increased? What mathematical relationship exists between your times and the resistance? ➉ Return to the original 100-K Ω resistor, but use the 100-µF capacitor in series with the 330-µF capacitor. Repeat step 7, recording your results in Table 8.2. 11 Now repeat step 7, but with the 100-µF and the 330-µF capacitors in parallel. R = __________ C1 = __________C2 = __________ Type of Circuit tC tD Series Parallel Table 8.2 ➤ NOTE: What is the effect on the total capacitance if capacitors are combined in series? What if they are combined in parallel? (Refer to Table 8.2). 24 012-04367E Basic Electricity Experiment 9: Diodes EQUIPMENT NEEDED: -Circuits Experiment Board -Wire Leads -1000-Ω Resistor -330-Ω Resistor. -Digital Multimeter (DMM) -Two D-cell Batteries -1N4007 Diode Purpose The purpose of this lab will be to experimentally determine some of the operating characteristics of semiconductor diodes. Procedure ➀ Connect the circuit shown in Figure 9.1a using the 1N4007 diode you’ve been supplied and the 1000-Ω resistor. Use Figure 9.1b as a reference along with Figure 9.1a as you record your data. Note the direction that the diode is oriented, with the dark band closer to point B. “Switch” ➁ With the “switch” closed and the current flowing, adjust the potentiometer until there is a voltage of 0.05 volt between points B and C (VBC). Measure the voltage across the diode (VAB). Record your values in the left-hand side of Table 9.1under “Forward Bias”. A Diode B C Resistor ➂ Adjust the potentiometer to attain the following values for VBC: 0.1, 0.2, 0.3,.....2.0 volts. Record the two voltages for each case. Figure 9.1a ➃ Remove the 1000-Ω resistor and replace it with a 330-Ω resistor. Repeat steps 3 & 4, going from a voltage of 0.3, 0.4,.....2.0 volts. Record the two voltages in each case. A ➄ Reverse the orientation of the diode. Set the diode voltage (VAB) to the values 0.5, 1.0,....3.0 volts. Measure the resistor voltage (VBC) in each case. Record these values in the columns labeled “Reverse Bias”. 1N4007 C Analysis R ➀ Determine the current flow (I) in each setting by dividing Figure 9.1b the voltage across the resistor (VBC) by the resistance. Where you switched resistors, be sure to change the divisor. ➁ Construct a graph of Current (vertical axis) vs the Voltage across the diode, with the graph extending into the 2nd quadrant to encompass the negative voltages on the diode. 25 B Basic Electricity 012-04367E Discussion Discuss the shape of your graph and what it means for the operation of a semiconductor diode. Did the diode operate the same in steps 3 and 4 as it did in step 5? In steps 3 and 4 the diode was “Forward Biased”, while it was “Reverse Biased” in step 5. Based on your data, what do you think these terms mean? What use might we have for diodes? Sample Data Table Diode Type ____________ Forward Bias R, Ω VAB, volts VBC, volts Reverse Bias I, mA R, Ω VAB, volts VBC, volts Table 9.1 Extensions ➀ If your instructor has a zener diode, carry out the same investigations that you did above. What differences are there in basic diodes and zener diodes? ➁ Use an LED (light emitting diode) to carry out the same investigations. What differences are there between basic diodes and LED’s? 26 I, mA 012-04367E Basic Electricity Experiment 10: Transistors EQUIPMENT NEEDED: -Circuits Experiment Board -Wire Leads -1000-Ω Resistor -100-Ω Resistor. -Two D-cell Batteries -Digital Multimeter (DMM) -2N3904 Transistor (NPN) Purpose The purpose of this lab will be to experimentally determine some of the operating characteristics of a transistor. Procedure ➀ Connect the circuit shown in Figure 10.1a using the 2N3904 Transistor you’ve been supplied. Resistor R1 = 1000 Ω and resistor R2 = 100 Ω. Use Figure 10.1b as a reference along with Figure 10.1a as you record your data. Note the leads on the transistor as marked next to the socket in the drawing. b Transistor as seen from above c e 2N3904 A Socket R2 R1 C B c R1 b c e b D 2N3904 C A B R2 e Figure 10.1b Figure 10.1a ➁ Adjust the potentiometer carefully until the reading between points A and B is approximately 0.002 volt (2.0 mv). Now read the voltage between points C and D. Record these readings in your data table. Note that VAB divided by R1 gives the current flowing to the base of the transistor, while VCD divided by R2 gives the current flowing in the collector part of the circuit. ➂ Adjust the potentiometer to give VAB the following readings, each time reading and recording the corresponding VCD: 0.006, 0.010, 0.015, 0.020, 0.025, 0.030, 0.035, 0.040, 0.045, 0.050, 0.055, 0.060, 0.080, 0.100, 0.150, 0.200, 0.250 volts. Also set VAB to 0.000 volts. 27 D Basic Electricity 012-04367E Analysis ➀ For each of your sets of readings, calculate: IB = VAB / R1 and IC = VCD / R2 Record all of your current readings in mA. ➁ Plot a graph of IC (vertical axis) vs IB. If you find an area or areas where you need more points to fill out any curves or sudden changes, simply return to step 2 and make the appropriate measurements. ➂ What is the general shape of the graph? Is there a straight-line region? Does it go through the origin? Why or why not? Relate the behavior of the transistor at the beginning of the graph to the behavior of the diode in Experiment 9. ➃ What does the leveling off of the graph indicate? Electronics people refer to the transistor as being “saturated”. How would you describe saturation based on your experiment? ➄ Find the slope of the straight-line region of the graph. This ratio - I C / I B is referred to as the current amplification of the transistor. It describes how many times greater changes in the collector current are than the changes in the base current. Report the current amplification of your transistor. Discussion Discuss the graph and the calculations you did in the Analysis section. Sample Data Table Transistor Type ____________ R1, Ω VAB, volts IB, mA R2, Ω VCD, volts IC, mA Table 10.1 Extensions ➀ What effect would changing the resistance in the collector circuit (R2) make? Try changing the value to 330 Ω or 560 Ω. Does the graph have the same shape? Is the current amplification the same as before? How does the amplification depend on R2? ➁ Obtain a different transistor and repeat the measurements you made in steps 2 & 3. If it is a PNP transistor, you will need to reverse the wires coming from the D-cells as the emitter needs to be positive, not negative, and the collector will be negative. 28 012-04367E Basic Electricity Appendix: Tips and Troubleshooting Correct Circuit, Doesn’t Work The labs asking for relative brightness ask students to judge relative brightness only, not an absolute brightness. This part of the experiment would be aided by having the room mostly darkened. Additional bulbs can be purchased from PASCO, at Radio Shack, an electronics store, at auto supplies stores, or possibly a local discount store. • Check to see if the circuit is indeed connected correctly and completely. • Check to see if the battery is giving full voltage. • Check to see if each wire is making contact with the spring. If magnet wire is used, the enamel coating on the outside will prevent electrical connection and needs to be removed. In some cases, students may try to make a complete circuit through the insulation. Batteries The Circuits Experiment Board is designed to use one or two D-cells. The voltage delivered by a D-cell is 1.5 volts ±. In practice, alkaline cells give the longest life, but the less expensive zinc-carbon cells will give adequate results. A single set of batteries was used successfully by ten different classes to complete labs 1,3,4,5, 6 and 7 before being replaced. Surprising Results In some cases, there will be no difference in the measurements from one point in the circuit to another. This doesn’t mean the measurement is trivial or unimportant, rather it is what we hope the student will learn from his/ her lab work. Not all measurements have to be different. Resistors The resistors supplied are listed under Materials on page 1 of this manual. The values have been chosen for clear results and for helping to extend the life of the D-cells. If resistors are lost or broken, replacements can be purchased from PASCO, or at any electronics store, including Radio Shack. Other values can be substituted, but for Experiments 3 through 7, the values should be between 100 Ω and 1500 Ω for best results. Making a “switch” ➤NOTE: Using the 330 Ω, 560 Ω and 1000 Ω resistors gives approximate ratios of 1:2:3 for working towards semi-quantitative understanding of d.c. circuits. ➤ ➤ In the several labs, students are asked to use a “vacant” spring connection such as one of the three around the transistor socket as shown on the right as a “switch.” By connecting one lead from the battery there and then taking a third wire to the circuit, you can effectively switch the power “on” and “off” by simply connecting or not connecting the third wire. This duplicates the action in a real switch. The diagram below shows the resistor color code. For example, a resistor having the colors Orange-OrangeBrown-Silver has the value 330 Ω ± 10%. Can be removed “Switch” Black Brown Red Orange Yellow Green Blue Violet Gray White Figure 2 Lights and Relative Brightness The lights for this experiment board, #14 bulbs, are designed for 2.5 volts and 0.3 amperes. A single D-cell will not light a bulb to maximum brightness, but two cells in series will give a very bright light. 0 1 2 3 4 5 6 7 8 9 2nd Digit 1st Digit No. of Zeros Tolerance Figure 3 29 Fourth Band None ±20% Silver ±10% Gold ±5% Red ±2% Basic Electricity 012-04367E Wires Pulling the wire away from the stripper (Figure 3c) causes the cut end of the insulation to slip off of the wire, leaving 3/8" of exposed wire. The Circuits Experiment Board can be used with a large variety of wire types and sizes. We recommend 20 or 22 gauge solid wire with colorful insulation. This will help students to follow their work more easily and minimize difficulties in making the transition from paper circuit to actual circuit on the Circuits Experiment Board. Pull wire ➤ Stripping Your Own Wire The wire included with the Basic Electricity Lab is 22 gauge insulated, solid wire in 5" and 10" lengths. The lengths are stripped at each end. Figure 3c If you do not have access to a wire stripper, the wire may also be stripped by carefully using a knife. Place the wire on a solid surface. Set the knife blade on the insulation about 3/8" from the end. With the blade at an angle so it cannot cut downward into the wire, use the knife to shave off the insulation. If you choose to strip your own additional wires, a commercially available wire stripper can be used to remove the insulation from each end. The jaws of the wire stripper are placed on the wire 3/8" from the end. By squeezing the handles together, the jaws will close on the wire and cut only as deep as the insulation. 3/8" ➤ ➤ ➤ Figure 4 After one part of the insulation is removed, turn the wire and continue shaving off the rest of the insulation. Squeeze handles ➤ ➤ Figure 3a Figure 3b 30 012-04367E Basic Electricity Replacement Parts List Item PASCO Part # P.C.B. ASSY, BASIC ELECT 004-04340 MANUAL EM-8622 012-04367 RES, 10 OHM, 1W, 5% 111-100 RES, 100 OHM, 1/2W, 5% 112-101 RES, 1K, 1/2W, 5% 112-102 RES, 100K, 1/2W, 5% 112-104 RES, 220K, 1/2W, 5% 112-224 RES, 330 OHM, 1/2W, 5% 112-331 RES, 560 OHM, 1/2W, 5% 112-561 CAP, ELECT-100mF, 16V AXIAL 222-039 CAP, ELECT 330MF, 16V AXIAL 222-040 DIODE-1N4007, 1000PIV, 1A 410-002 TRANSISTOR-2N3904 NPN 420-002 ➤NOTE: Replacement parts can be purchased from PASCO or at most electronic stores including Radio Shack. 31 Basic Electricity 012-04367E Notes 32 012-04367E Basic Electricity Teacher's Guide Exp 1 - Circuits Experiment Board ➀ With this method, the lights will each be approximately the same brightness as in part 1. Serial: ➁ Reversing things at either end had no effect. ➃➄ There are two different ways of putting two lamps into the circuit: parallel and serial. Parallel: Using this circuit, the lights will be dimmer than in part 1. Exp 2 - Lights in Circuits ➃➄ ➤NOTE: It is best to do these experiments with both batteries, rather than just one. Connect them in series, as shown in figure 2.1a. This will make the lights brighter and easier to see when some of the dimmer circuits are built. Again, the circuit may be series or parallel. Series Procedure Parallel These circuits have the same characteristics as the ones in part 2-3 ➀ ➅ There are two ways of doing this as well. ➁➂ Parallel-in-Series a b Series c There are two ways of making the circuit so that both lights are on with the same intensity. Series-in-Parallel a b c (The parallel portion of the first circuit will be very dim.) What happens if you unscrew one of the bulbs depends on which bulb you unscrew. In the first circuit, unscrewing (a) will turn everything off. Unscrewing (b) or (c) will make (a) dimmer and leave the other one unaffected. In the second circuit, unscrewing (c) will make (a) and (b) brighter; while unscrewing (a) or (b) will make (c) brighter and turn the other one off. ➆-➉ Putting the batteries in series (2.1a) will make things the brightest, because then the voltage to the lights is the highest. Batteries in parallel (2.1b) will have the same effect as one battery. Batteries opposed (2.1c) will have no effect at all unless one of the batteries is nearly dead. 11 The potentiometer, when used this way, adjusts the brightness of the lamp. (For best results, use the batteries in series for this part of the lab.) The lights will be dimmer than in part 1. The electric current must go through one bulb to reach the other, so disconnecting a bulb will cause both to go out. (This is how those maddening “if-one-goes-out-they-all-die-so-Merry-Christmas” lights are wired.) Parallel The lights will show the same intensity as in part 1. The electric current is going through both bulbs at the same time, so disconnecting one does not affect the other. (This is how the Christmas lights you wish you had bought are wired.) 33 Basic Electricity 012-04367E Exp 3- Ohm's Law Procedure 0.16 ➁-➅)Warn the students to be particularly careful when 0.14 setting up the multimeter to measure current. Attaching an ammeter the wrong way can damage the meter. Current 0.12 Data Processing Resistance 100 560 330 1000 10 Current 0.02 0.00 0.00 0.00 0.14 Voltage 1.579 1.582 1.582 1.583 1.549 J V/R % difference 0.02 -1.87% 0.00 -2.73% 0.00 -3.32% 0.00 -9.17% 0.15 -13.31% 0.1 0.08 0.06 0.04 0.02 J J 0 0 200 J 400 600 Resistance J 800 1000 Discussion ➂) The greatest source of error is caused by the meter it- ➀ Current is inversely proportional to R self. Because the ammeter has some internal resistance, the measured current is less than the current when the meter is not there. ➁ Yes. A curve fit of the graph above gives Current = 1.36 x Resistance-0.98, which is quite close to the theoretical equation. Exp 4- Resistances in Circuits Procedure ➀-➃ #1 #2 #3 Colors brown-black-brown-gold brown-black-brown-gold brown-black-brown-gold coded 100 100 100 measured 98.9 99.6 99.7 ➄ Series R12 = R23 = R123 = ➅ Parallel R12 = R23 = R123 = R13 = % error tolerance -1.10% ±0.05% -0.40% ±0.05% -0.30% ±0.05% ⑧ Series 198.3Ω 199.1Ω 298Ω RAB = 428Ω RBC = 891Ω RABC = 989Ω Parallel 76.1Ω RAB = RBC = 207Ω RABC = 67.0Ω RAC = 84.1Ω Combination RA = 98.9Ω 207Ω RBC = 306Ω RABC = 49.7Ω 49.9Ω 33.3Ω 49.8Ω ➆ Combination R1 = 98.9Ω R23 = 49.9Ω R123 = 148.7Ω 34 012-04367E Basic Electricity Colors A brown-black-brown-gold B orange-orange-brown-gold C green-blue-brown-gold coded 100 330 560 measured 98.9 330 561 % error -1.10% 0.00% 0.18% tolerance ±0.05% ±0.05% ±0.05% ➁-➃ In series, the resistances are added. R = R1 + R2 + R3 + ...In parallel, the reciprocals of the resistances are added. 1/R = 1/R1 + 1/R2 + 1/R3 +... This is evidenced in all the data sets above. Discussion ➀ The actual value matches the coded value much more closely than required by the tolerances. Exp 5- Voltages in Circuits Parallel measurement Procedure Equal Resistors: Series 1 2 3 12 23 123 Parallel measurement 1 2 3 123 Combination measurement 1 23 123 Resistance 100 100 100 200 200 300 A B C ABC Voltage 0.523 0.528 0.527 1.051 1.055 1.578 A B C AB BC ABC Voltage 1.574 1.574 1.574 1.574 Resistance A BC ABC 100.00 207.64 307.64 Voltage 0.509 1.07 1.579 Discussion Resistance 33.33 33.33 33.33 33.33 Resistance 100 50 150 Voltage 1.6 1.565 1.565 1.565 1.565 Resistance 100 330 560 430 890 990 J J 1.4 1.2 1 Voltage J 0.8 J 0.6 J 1.049 0.529 1.578 0.4 0.2 J 0 Different Resistors: Series measurement 67.49 67.49 67.49 67.49 Combination measurement Voltage measurement Resistance 0 Voltage 200 400 600 Resistance 800 1000 In any series circuit, the voltage is distributed according to the size of the resistors. (Notice that the graph above, of the data from the second series circuit, shows this direct relationship.) In any parallel circuit, the voltage is the same across all elements. In the combination circuit, the voltage acts as if the parallel resistors were actually one resistor, which is then in series with the first. The rules are the same. 0.157 0.526 0.897 0.685 1.423 1.581 35 Basic Electricity 012-04367E Exp 6- Currents in Circuits ➤NOTE: R1 = R2 = R3 = The resistors used were: Discussion 100Ω 330Ω 560Ω In any resistance circuit—series, parallel, or both—the voltage, current, and resistance are related by Ohm’s Law: V = IR These are the same resistors as were used in the previous lab, and some of the data here originates in lab 5. This pattern, and conclusion, should be apparent in student data. ➤NOTE: The product of the resistances and currents obtained experimentally will generally be lower than the measured voltage. This is due to the non-zero resistance of the ammeter. When the meter is in the circuit, its own resistance lessens the current through that circuit. With most meters, this error should be less than 5% or so. Procedure Series: The current was the same—1.5 mA—no matter where it was measured in the circuit. Parallel: Measurement Resistance 1 100 2 330 3 560 123 67.5 Current 0.0156 0.0047 0.0028 0.0229 Voltage 1.574 1.574 1.574 1.574 Exp 7- Kirchoff's Rules Procedure Second circuit: First circuit: + 2 + 1 + 2 1 + 5 b1 3 1 2 3 4 5 T R (Ω) 100 560 330 100 330 216 + b2 3 + + + + 4 5 + 4 V (V) 0.40 1.17 1.05 0.52 0.65 1.57 1 2 3 4 5 b1 b2 I (mA) 3.9 2.0 3.1 5.1 1.9 7.1 36 R (Ω) 100 560 330 330 100 V (V) 0.27 1.50 0.19 1.07 0.32 1.573 1.588 I (mA) 2.6 2.6 0.5 3.2 3.2 2.6 3.2 012-04367E Basic Electricity Analysis Second circuit: First circuit: ➀ node (2,3,4): ➀ node (1,3): -0.1 mA 0.1 mA node (b1,3,5): 0.1 mA node (1,2,5): 0.0 mA ➁ loop (b1,1,2,3) 0.001 V node (3,4,5): -0.1 mA loop (b2,5,3,4) 0.001 V node (2,4): 0.0 mA loop (b1,1,2,4,b2,5) 0.002 V ➁ loop (1,5,3): 0.001 V loop (1,2,4,3): 0.001 V loop (5,2,4): 0.000 V loop (batt,1,2): 0.001 V loop (batt,3,4): 0.000 V loop (batt,1,5,4): 0.001 V loop (batt,3,5,2): 0.000 V Discussion Within the experimental uncertainty of the measuring device used (a DMM) Kirchoff’s Rules are verified. The net current flowing into or out of any junction is approximately zero, and the sum of the voltages around any loop is approximately zero. Exp 8- Capacitors in Circuits ➆ -11 Procedure ➃ The rate at which the capacitor loses its charge de- 140 pends on the impedance of the meter used to measure the voltage, as well as on the size of the capacitor. For this reason, most analog meters are not sufficient for this lab. 120 1 100,000 Ohm Z 220,000 Ohm Time (s) 100 ➄ Z 80 60 1 1 40 Voltage Charging Z Z 20 Z 1 1 0 0 Voltage Time 50 100 150 200 250 300 Capacitance (µF) 350 400 ➤NOTES: ➀➁ Charging: t = - R C ln(1-V/Vo) Discharging: t = - R C ln(V/Vo) In either case, the time is linearly dependent on both resistance and capacitance. ➂ Parallel: Cp = C1 + C2 Series: 1/Cs = 1/C1 + 1/C2 Discharging Time 37 450 Basic Electricity 012-04367E Exp 9- Diodes Analysis The diode acts as a one-way valve for electricity. Current can flow in one direction, but not in the other. 0.007 Extensions 0.006 0.005 4007 J J LED J O ➀ A zener diode would be similar to the 4007, except that there would be a breakdown point on the reverse biasing, beyond which the current would flow. This makes them useful for power regulation. Current J O 0.004 J 0.003 0.002 0.001 0 J O J O J O -3 J O -2 J O -1 J O O O J O J J O J J J J J J J J J J J J J J J J JJJO 0 Diode Voltage ➁) The LED opens up at a higher voltage than the 4007 O O (and it lights up). O O O O O O O OO O OO 1 2 3 Exp 10- Transistors Analysis ➁ Discussion ➀ This graph shows the results of applying different values for R2. The amplification remains the same in each linear region, but the size of that linear region changes. 2N3904 Transistor 100 Ohm load 16 12 X X XX XX X XX XX XX XX XX X X X 2N3904 Transistor various loads X 10 50 X X 8 X Ñ 10 Ohm load Ç 47 Ohm load Ö 100 Ohm load Ñ Ñ X 6 X X X X 0 0.05 0.1 Base Current (mA) 0.15 0.2 ➂ The linear region does not include the origin, due to the non-zero voltage that the junctions within the transistor require to turn on. (Similar to the effect in lab 9) ➃ Beyond the “saturation point”, the transistor is acting like a short circuit. It offers no resistance to the current; so beyond that point, there is no amplification. The current is limited only by the battery and resistor. ➄ The current amplification of the transistor tested was 249. This value will vary from transistor to transistor; it’s usually between 150 and 250 for the 2N3904 transistors supplied with the lab. á Ñ Ñ Ñ X 2 0 Ñ 40 X 4 Collector Current (mA) Collector Current (mA) 14 Ñ 560 Ohm load Ñ Ñ Ñ Ñ Ñ Ñ Ñ ÑÑ Ñ 30 Ñ Ñ Ñ Ñ Ç Ç Ç Ç Ñ Ç Ç Ç Ç Ñ Ç Ñ 20 Ñ Ç Ç Ç Ç ÇÑ 10 0 ÇÑ Ç Ñ ÖÖ ÖÖ ÖÖ Ö Ç ÖÖ ÖÖ ÖÖ ÇÑ Ö Ö Ö Ö ÑÖ ÇÑÖ Ö ÇÖ Ñ ÇÖ Ñ Ö Ç Ñ ÇÖ Ñ Ö ÑÇ á á á Ö á áá á á á á á á á Çáá ÖáÑ Çá Ñá Ö Ç Ö Ñ 0 0.05 0.1 Ö Ö Ö á á Ö Ö á á 0.15 0.2 0.25 Base Current (mA) á 0.3 Ö á 0.35 0.4 ➁ The gain and/or saturation characteristics of the transistor will vary, although the basic shape of the graph will remain the same. 38 012-04367E Basic Electricity Technical Support Feed-Back Contacting Technical Support If you have any comments about this product or this manual please let us know. If you have any suggestions on alternate experiments or find a problem in the manual please tell us. PASCO appreciates any customer feedback. Your input helps us evaluate and improve our product. Before you call the PASCO Technical Support staff it would be helpful to prepare the following information: • If your problem is computer/software related, note: Title and Revision Date of software. Type of Computer (Make, Model, Speed). To Reach PASCO Type of external Cables/Peripherals. • If your problem is with the PASCO apparatus, note: For Technical Support call us at 1-800-772-8700 (tollfree within the U.S.) or (916) 786-3800. Title and Model number (usually listed on the label). email: [email protected] Approximate age of apparatus. Tech support fax: (916) 786-3292 A detailed description of the problem/sequence of events. (In case you can't call PASCO right away, you won't lose valuable data.) Web: http://www.pasco.com If possible, have the apparatus within reach when calling. This makes descriptions of individual parts much easier. • If your problem relates to the instruction manual, note: Part number and Revision (listed by month and year on the front cover). Have the manual at hand to discuss your questions. 39 012-04221C 11/94 $1.00 Instruction Sheet for the PASCO Model ES-9053A -6 .22 X 10 F 8 .50 X 10 Ω EXT INPUT 8 1.0 X 10 Ω 8 2.0 X 10 Ω RESISTOR -CAPACITOR NETWORK IN OPEN Two resistors and three capacitors are wired into a switching network, which allows selecting three resistance values (50 ΜΩ, 100 MΩ, and 200 MΩ) in series with two selectable capacitance values (0.47 µF and .94 µF). A third capacitor (0.22 µF) can be selected in series or parallel with the other two capacitances. The switches and external connections allow the following combinations: • Six combinations of resistors and capacitors in series. • Two combinations of capacitors in series. • Two combinations of capacitors in parallel. Three slide switches determine the component selection and circuit configuration (charging, discharging, or open circuit). The positions of these slide switches on the front panel diagram indicate the exact component values being used. IN -6 .22 X 10 F 8 .50 X 10 Ω 8 1.0 X 10 Ω EXT INPUT OPEN OUT COMPONENTS: ±5% MAX. 50 VOLTS -6 .47 X 10 F (A) -6 .94 X 10 F The PASCO Model ES-9053A Resistor-Capacitor Network is designed for the study of RC time constants and for investigating capacitors connected in series and parallel. The RC time constants range from 25 to 200 seconds, so charging and decay curves can easily be investigated using an electrometer, such as the PASCO Model ES-9054B Student Electrometer, and a stopwatch. GND 8 2.0 X 10 Ω Introduction COMPONENTS: ±5% MAX. 50 VOLTS -6 .47 X 10 F GND -6 .94 X 10 F OUT ES-9053A RESISTOR - CAPACITOR NETWORK GND GND 8 1.0 x 10 ohms (B) -6 .47 x 10 farads Figure 1: Switch Positions & Equivalent Circuit Figure 1 (A) shows the slide switches in arbitrary positions, while Figure 1 (B) reflects the corresponding equivalent circuit diagram. The three position slide switch on the left (S3) has a very useful OPEN position. It is often convenient to stop the charging or discharging process when making a measurement, and the OPEN position permits the circuit to be disconnected. © 1990 PASCO scientific R-C Network 012-04221C Five binding posts allow a power supply, such as the PASCO Model ES-9049A Power Supply, and/or the electrometer to be connected at every possible component connection in the circuit. Plot time versus capacitor voltage for several values of R and C. What is the shape of the curve? Let us define T as the time required for the capacitor to charge from 10% to 90% of its final value. What is the relation between R,C, and T? (Hint: Convert R to ohms, C to farads, and T to seconds.) ➤IMPORTANT: Never place more than 50 Volts DC across any component in the R-C network. When using the ES-9040A Power Supply, use the 30 VDC range only. ➁ Repeat the same experiment as in (1), but measure the voltage across R as a function of time. (This time opening the switch stops the current flow, hence steady-state readings cannot be made.) The experiment using the R-C network will give only suggested schematics, such as in Figure 1 (B)—and not specific switch settings. According to Ohm’s law, potential is proportional to resistance multiplied by current. Hence, the potential across the resistor is proportional to the charging current. What relation is there between the charging current and the charge on the capacitor? (Hint: Part (1) gives the relation between charge and time, whereas part (2) gives the relation between time and charging current.) Experiment: Capacitors - Charging and Discharging It takes a definite amount of time to charge or discharge a capacitor through a resistance. In this experiment we discover the relationships between capacitance, resistance, and the time required to charge the capacitor. B. Discharging Capacitors: ➀ Set up the circuit in Figure 3. Charge the capacitor to an initial potential of 30 VDC. At time t = 0, close the switch and use the electrometer to measure the voltage across the capacitor. (Use the switch for steady state readings as in part A (1). Equipment Needed: RC Network, DC Power Supply, and Electrometer. The experimental circuits can be easily duplicated by tracing through the schematic on the front of the network and setting the switches accordingly. The battery in the experimental schematics is replaced with the DC Power Supply. Use the electrometer to measure voltages. DO NOT GROUND THE ELECTROMETER. (We want relative voltages.) R Procedure: A. Charging Capacitors: C ➀ Set up the circuit in Figure 2. At time t = 0, the switch is closed and capacitor voltage is recorded at regular time intervals. (A simple way to collect data is to open the switch at regular intervals and record the steady state reading. Why is this possible?) Figure 3 Repeat the experiment with several other values of R and C. Plot time versus capacitor voltage. Does the time constant (T) remain the same for discharging capacitors as it does for charging capacitors? ➁ Using the same circuit as in B (1), charge the capacitor to 30 VDC, and close the switch and measure the voltage across the resistor. Determine the relation between discharging current and capacitor potential. R C Figure 2 2 012-04221C R-C Network Specifications Equipment Return Resistance: Three selectable series values: 50 MΩ, 100 MΩ, and 200 MΩ; ±5% Tolerance Capacitance: Two selectable series values : 0.47 µF and .94 µF; One series/parallel value: 0.22 µF; ±5% Tolerance Should this product have to be returned to PASCO scientific, for whatever reason, notify PASCO scientific by letter or phone BEFORE returning the product. Upon notification, the return authorization and shipping instructions will be promptly issued. Connections: ➤NOTE: NO EQUIPMENT WILL BE ACCEPTED FOR RETURN WITHOUT AN AUTHORIZATION. Five external connections via banana jacks / binding posts allow electrical connections to each circuit node. When returning equipment for repair, the units must be packed properly. Carriers will not accept responsibility for damage caused by improper packing. To be certain the unit will not be damaged in shipment, observe the following rules: Component Selection: Via three slide switches Repairs ➀ The carton must be strong enough for the item shipped. Because of the extreme simplicity of the ES-9053A R-C Network and the fact that each component can be tested from the front panel, this section will only give a list of replaceable parts. Although PASCO scientific will repair the ES-9053A it is highly suggested that repairs be made in the field. Any person with a basic understanding of electronics is capable of making the necessary repairs. ➁ Make certain there is at least two inches of packing material between any point on the apparatus and the inside walls of the carton. ➂ Make certain that the packing material can not shift in the box, or become compressed, thus letting the instrument come in contact with the edge of the box. Replacement Parts PART REF. DESCRIPTION/RATING C1 C2, C3 R1, R2 S1, S2, S3 Capacitor, Mylar, .22 mF, 100 V, ±5% Capacitor, Mylar, .47 mF, 100 V, ±5% Resistor, 100 MΩ, 3/4 W, ±2% Switch, Slide, 2 Pole, 4 Position PASCO scientific warrants this product to be free from defects in materials and workmanship for a period of one year from the date of shipment to the customer. PASCO will repair or replace, at its option, any part of the product which is deemed to be defective in material or workmanship. This warranty does not cover damage to the product caused by abuse or improper use. Determination of whether a product failure is the result of a manufacturing defect or improper use by the customer shall be made solely by PASCO scientific. Responsibility for the return of equipment for warranty repair belongs to the customer. Equipment must be properly packed to prevent damage and shipped postage or freight prepaid. (Damage caused by improper packing of the equipment for return shipment will not be covered by the warranty.) Shipping costs for returning the equipment, after repair, will be paid by PASCO scientific. C1 R1 S3 Limited Warranty R2 S1 S2 C2 C3 PCB Parts Layout ➤NOTE: Complete operational instructions of other PASCO Electrostatic Accessories and directions for demonstrations possible with the complete PASCO Electrostatic System are available in the ES-9051 Accessory and Demonstrations Manual. For a listing of available Electrostatic equipment please refer to your current PASCO catalog. 3 R-C Network 012-04221C IN EXT INPUT EXT OPEN S3 C1 .22 µF ± 5% 100 V R1 100 MΩ GND S1 R2 100 MΩ 200M 100M 50M .22 µF OUT .94µF .47 µF GND C2 .47 µF, ± 5% 100 V GND ES-9053A SCHEMATIC 4 S2 C3 .47 µF, ± 5% 100 V GND Instruction Manual and Experiment Guide for the PASCO scientific Model SF-8616 and 8617 012-03800A 11/89 COILS SET Copyright © November 1989 $15.00 012-03800A How to Use This Manual The best way to learn to use the PASCO Basic Coils Set or the PASCO Complete Coils Set (referred to collectively as PASCO Coils Set) is to spend some time experimenting with it. We’ve organized this manual to get you started as quickly as possible. We strongly recommend that you read the Introduction and Experiments sections first. These are followed by 4 experiments for your students to get started on. The experiments are ready to send to the copy room. The Appendix contains technical data on the construction and operation of the coils. Introduction between the magnet and coil is needed. The effect of moving slow versus moving fast can be demonstrated. The PASCO scientific SF-8616 Basic Coils Set and SF-8617 Complete Coils Set provide necessary parts to experimentally investigate relationships involved with electromagnetism and electromagnetic induction. Coupled with a galvanometer, an accurate A.C. voltmeter, an A.C. ammeter, an oscilloscope and an A.C. power supply, little else is needed to carry out studies in this important area. Finally, changing the number of coils of wire and repeating the process will complete an initial investigation. These investigations are generally semi-quantitative, focusing on relative sizes and directions. Another way to change the magnetic field is to provide an alternating magnetic field through the use of a second coil and an alternating current. See Figure 3. Additional equipment which is recommended includes small but strong magnets such as the ones found in the PASCO SE-8604 Bar Magnet Set, low constant springs, ring stands, a magnetic compass and iron filings. One can study basic electromagnetism. The direction of the windings is shown on the top of each coil, allowing the relationship between current direction and the direction of the resulting magnetic field to be studied. See Figure 1. IN OUT Figure 3 • The Coils Set provides multiple coils and cores to experiment with this principle. These investigations lead to the basic relationships involved in transformers, and lead to more advanced studies of self- and mutual-induction. d.c. power compass amperes With the addition of two magnets and small springs, a classic interaction of induced current and electromagnetic effects, plus simple harmonic motion, can be studied. See Figure 4. Figure 1 Using a coil from either kit, it is easy to demonstrate that a moving coil of wire near a magnet, or a moving magnet near a coil of wire will induce a voltage, and therefore a current. Simply move a magnet into the coil as shown in Figure 2, and a galvanometer will show a current flow. Galvanometer Figure 4 Suggested Experimental Approach Figure 2 Demonstrate the basic principle of using the core and two coils to make a transformer. Show coils, core(s), supplies, loads, meters, etc. Have students develop areas of investigation and then proceed to carry them out. "Research teams" could investigate different factors and then combine their results for a comprehensive look at transformers. Moving the magnet back out will yield a current in the opposite direction. Reversing the magnet will reverse the relative currents, also. Leaving the magnet at rest inside the coil will produce no current. Thus, a change in relationship scientific 1 012-03800A Equipment Supplied Your SF-8616 Basic Coils Set comes with the items shown in Figure 5a: a. (1) SF-8609 200-turn Coil b. (2) SF-8610 400-turn Coils c. (1) SF-8611 800-turn Coil d. (1) SF-8614 U-shaped Core e. (1) Manual Your SF-8617 Complete Coils Set comes with all of the items in the SF-8616 Basic Coils Set along with the following additional items, as shown in Figure 5b: f. (1) SF-8612 1600-turn Coil g. (1) SF-8613 3200-turn Coil h. (2) SF-8615 E-shaped Core a PASCO Manual d b b e c Figure 5a Figure 5b f g h 2 scientific 012-03800A Experiments Nature of Magnetic Field from an Electromagnet The coils from your PASCO Coils Set can be used in conjunction with a d.c. power supply or a battery to produce constant magnetic fields. Three possible experiments are shown below. • Figure 8b d.c. power ALTERNATIVE: Small magnetic compasses can be used to probe around the coil to show its magnetic field. compass amperes Figure 9 shows a current carrying coil with a magnetic field inside. The cross-piece from the U-shaped Core is shown inserted in the coil, although the same experiment can be performed without the core. The strength of the electromagnet thus produced could be tested in a number of ways, including the use of the PASCO SF-8606 Digital Gauss/ Tesla Meter. Note that the dramatic increase in magnetic field strength with the addition of a core can be clearly demonstrated. Figure 6 In Figure 6, a d.c. power supply is connected to the coil. A nearby magnetic compass is used to show the presence of a magnetic field and its direction. By noting the direction of the windings on the coil (See Figure 7), students can develop the rule for current direction and the resulting magnetic field direction. This experimental setup can be quantified, leading to a determination of how much current, through how many turns, is needed to produce a magnetic field equal to the earth’s field. Specifics of the experimental design are left to the teacher and student. 1600 d.c. power Figure 7 amperes Figure 9 Solenoid In Figure 8a and 8b, a coil is shown with its magnetic axis parallel to the table. A piece of cardboard is mounted so that it can be inserted into the center of the coil and extend beyond it on all sides. Iron filings are then sprinkled on the cardboard around the end of the current carrying coil. The magnetic field pattern can be quickly demonstrated. If the cross piece from the U-shaped Core is inserted into a coil, but not centered, it will be pulled into the coil when the alternating current is turned on. This demonstrates the basic action of a solenoid. In experiments with the 400-turn coil, a voltage of 8-10 volts A.C. was successful in demonstrating this principle. See Figure 10. ac power Iron Core Figure 8a scientific Figure 10 3 012-03800A Electromagnetic Induction showed a drop-off to an output voltage of less than 20% from the input voltage when the two 400-turn coils were used in this manner. Use a small, relatively strong bar magnet to demonstrate electromagnetic induction. It is only necessary to move the magnet up and down in the center of the coil. If the coil is attached to a galvanometer, the relative size of the induced current and the direction can be noted. See Figure 11. ac volts ac power Galvanometer Figure 11 Figure 14 To improve the mutual induction, an iron core can be introduced. See Figure 15. Using the cross piece from the U-shaped core, the induced voltage increased to almost 50% of the primary voltage under the same conditions as above. A second way of showing the effect is to connect the coil to an oscilloscope. See Figure 12 Iron Core Figure 15 Figure 12 Primary Secondary Numerous modifications of the cores which are provided can be investigated. In each case, the ratio of secondary voltage to primary voltage is noted. The variables in this situation thus become: Primary Number of Turns, Secondary Number of Turns, Existence of a Core, Shape of the Core, Primary Voltage, Primary Current, Secondary Voltage and Secondary Current. Students can be led on directed studies, or given the materials to develop their own experiments. Some possibilities are shown in Figure 16 below. NOTE: A galvanometer shows the current produced, which should be proportional to the size of the induced voltage. Due to mechanical damping, galvanometers do not rise to the maximum value, but give useful semi-quantitative measurements of the maximum currents. An oscilloscope shows the size of the induced voltage directly, and gives a more instantaneous value. The set-up below gives a method of “automatically” showing the induced voltage. A light spring which gives a nice simple harmonic motion with the attached magnet is needed. Note that the method of attaching the magnet is via a machine nut which is hooked to the spring and held by the magnetic field of the magnet. See Figure 13. ac amperes ac power Without Cross Bar ac amperes Figure 13 ac power With Cross Bar TRANSFORMERS Leading directly to the study of transformers, the setup in Figure 14 allows students to see how induction can proceed by passing magnetic field between the two coils. Using air as the medium between the two coils, PASCO’s experiments Figure 16 Primary 4 Secondary 1 Secondary 2 scientific 012-03800A Experiment 1: Transformer Basics I Introduction When an alternating current passes through a coil of wire, it produces an alternating magnetic field. This is precisely the condition needed for the electromagnetic induction to take place in a second coil of wire. In this lab you will investigate several of the factors influencing the operation of a transformer. Equipment Needed - Supplied 1. 2. 3. The four coils from the PASCO SF-8616 Basic Coils Set The U-shaped Core from the PASCO SF-8616 Basic Coils Set Optional: the additional coils from the PASCO SF-8617 Complete Coils Set Equipment Needed - Not Supplied 1. 2. 3. Low voltage ac power supply 0-6 VAC, 0-1 amp such as PASCO Model SF-9582 AC voltmeter 0-6 VAC Banana connecting leads for electrical connections Procedure 1. Set up the coils and core as shown in Figure 1. In the diagram, the coil to the left will be referred to as the primary coil, and the one to the right will be the secondary coil. Note that we are putting in an alternating current to the primary at one voltage level, and reading the output at the secondary. ac volts ac power Primary Secondary Figure 1 2. With the 400-turn coil as the primary and the 400-turn coil as the secondary, adjust the input voltage to 6 volts a.c. Measure the output voltage and record your results in Table 1.1. 3. Repeat step 2 after inserting the straight cross piece from the top of the U-shaped core. Record your results. (See Figure 2.) Iron Core Primary Secondary Primary Secondary Primary Secondary Figure 2 4. Repeat step 2 after placing the coils on the sides of the open U-shaped core. Record your results. 5. Finally, repeat step 2 after placing the cross piece over the U-shaped core. Record your results. 6. Using the core configuration which gives the best output voltage compared to input voltage, try all combinations of primary and secondary coils. Use a constant input voltage of 6.0 volts a.c. Record your data in Table 1.2. scientific 5 012-03800A Analysis 1. Which core configuration gives the maximum transfer of electromagnetic effect to the secondary coil? Develop a theory to explain the differences between configurations. 2. From your data in table 1.2, for a primary having a constant number of turns, graph the resulting output voltage versus the number of turns in the secondary. What type of mathematical relationship exists between numbers of turns of wire and the resulting output voltage? Is the data ideal? Why or why not? 3. Consider further improvements to your transformer. What additional changes might you make to increase the transfer from one coil to the other? Data and Calculations Table 1.1 Number of Turns Primary Coil Secondary Coil Input V Output V Core Table 1.2 Core Configuration: ______________________________ Number of Turns Primary Coil Secondary Coil Input V 6 Output V Core scientific 012-03800A Experiment 2: Transformer Basics II Introduction In this lab you will investigate several of the factors influencing the operation of a transformer. In Experiment 1, the output factor was voltage as measured when there was nothing connected to the secondary (infinite resistance). In this lab, you will investigate input and output currents, in addition to voltages, with normal sized resistances in the secondary circuit. Equipment Needed - Supplied 1. 2. 3. The four coils from the PASCO SF-8616 Basic Coils Set The U-shaped Core from the PASCO SF-8616 Basic Coils Set Optional: the additional coils from the PASCO SF-8617 Complete Coils Set Equipment Needed - Not Supplied 1. 2. 3. 4. Low voltage ac power supply 0-6 VAC, 0-1 amp such as PASCO Model SF-9582 One or two AC ammeters 0-2 A Three resistors: 10Ω, 2 Watt; 100Ω, 2 Watt; 1000Ω, 2 Watt Banana connecting leads for electrical connections Procedure 1. Set up the coils, core and 1000-Ω load resistor as shown in Figure 1. In the diagram, the coil to the left will be referred to as the primary coil, and the one to the right will be the secondary coil. Note that we provide an alternating current at the primary at one voltage level, and read the output at the secondary at possibly a different value. ac amperes ac amperes ac power R Primary Secondary Figure 1 2. With the 400-turn coil as the primary and the 400-turn coil as the secondary, adjust the input voltage to 6.0 volts a.c. With a load resistance of 1000 Ω connected to the secondary, measure the input current, the output voltage and the output current. Record your results in Table 2.1. 3. Repeat step 2 after connecting in a 100 Ω load resistance. 4. Repeat step 2 after connecting in a 10 Ω load resistance. 5. Finally, repeat steps 2-4 after changing the secondary coil. Continue changing the coils until you have tested all combinations of input and output coils. 6. Replace the secondary coil with a relatively large diameter wire (18-20 gauge) wound around the core 5-6 times. See Figure 2. Again set the input voltage to the primary at 6.0 vac. Connect the ammeter to this new secondary, measuring the current when the resistance is only that of the ammeter. With the ammeter disconnected, measure the output voltage. 7. If you have the SF-8617 Complete Coils Set, arrange the primary and secondary coils as shown in Figure 3. Run the same set of experiments you did in steps 2-4, collecting the same items of data. Figure 2 Secondary Primary Figure 3 scientific 7 012-03800A Note: Other configurations can be investigated once you have the E-shaped core. At your instructor’s direction, investigate other methods of arranging the primary and secondary coils. 8. If there are more than one PASCO Coils Sets in the laboratory, set up a series of transformers such as the one diagrammed below in Figure 4. Measure input and output voltages, input and output currents at various places in the chain. Keep careful track of your measurements and draft your observations based on these measurements. Input Output Primary Secondary Primary Secondary Figure 4 Analysis 1. Calculate the quantities asked for in Table 2.2. Note the suggestion at the bottom of the page. If you were able to carry out the modification in step 7, a separate data table should be constructed. 2. What relationship exists between the output current and the input current for different coils given a constant load resistance? How does varying the load resistance change the output current/input current relationship for a given combination of coils? Is the effect the same for all combinations? Elaborate and make an educated hypothesis on why your experiment behaved the way it did. 3. The ideal voltage gain is equal to the number of turns in the secondary divided by the number of turns in the primary. How did the actual voltage gain (Vout / Vin) compare to the ideal? 4. Ideally, transformers convert alternating current from one voltage to another with very little power loss (almost 100% efficient). Looking at your power gain (Pout / Pin), how did your transformers do compared to ideal transformers? 5. What combination of voltage and current is gained by having few coils of wire in the secondary? (step 6) 6. Analyze the behavior of the coils in the E-shaped core, and compare this to the U-shaped core. Is there a distinct advantage of one over the other? Why? Can an advantage gained be further enhanced by other changes? What might they be? (step 7) 7. If you began and ended with the same number of turns in your coils (step 8), how did the input and output voltages compare? How did the input and output power for the total combination compare? Were principles you experimented with previously in evidence during this part of the lab? 8 scientific 012-03800A Data and Calculations Table 2.1 Number of Turns Trial # Primary Secondary Load R Input V Input I Output V Table 2.2 Trial # Input P Output P Voltage Gain Power Gain NOTE: It is recommended that the data collected above in Table 2.1 be gathered into a spread sheet program. Calculations of the input and output power, the voltage gain and power gain for Table 2.2 can quickly and easily be made using the spread sheet. Additionally, the data can be rearranged quickly to make it easy to analyze. scientific 9 Output I 012-03800A Notes: 10 scientific 012-03800A Experiment 3: Springing into Electromagnetic Induction Introduction In this lab an interesting arrangement will allow you to investigate some of the subtelties of electromagnetic induction. The results will be qualitative, contrary to many of the labs you have done recently! Equipment Needed - Supplied 1. The PASCO Model SF-8616 Basic Coils Set Equipment Needed - Not Supplied 1. 2. 3. 4. 5. Two small, relatively strong magnets Two springs with low force constants Several machine nuts Two ring stands Banana connecting leads for electrical connections Procedure 1. Set up the two 400-turn coils, the magnets, springs and ring stands as shown in Figure 1. See Figure 2 to see how the springs “attach” to the magnets. Spring Nut Magnet Figure 1 Figure 2 2. Move the magnet in one coil upward and then release it so that it sets up simple harmonic motion. Note the reaction of the second magnet. Can you arrive at an explanation as to why this is happening? 3. PREDICTION 1: What will happen if you reverse the leads in one of the two coils and repeat step 2? Try it to see if your prediction is accurate. 4. PREDICTION 2: What will happen if you were to use additional masses on one magnet, thereby increasing its period of SHM? Try this by adding several machine nuts onto the bottom of the magnet. Adjust the height of the ring stand as needed. 5. PREDICTION 3: What will happen if you were to use a different spring on one magnet? Try it. 6. PREDICTION 4: What will happen if you use a different number of coils on one side? Try it. 7. PREDICTION 5: What will happen if you insert another coil into the circuit, as shown in Figure 3? Try it. Does it make a difference if different coils are used? Try it. 8. PREDICTION 6: What will happen if you put a core into the third coil that you used in step 6? Why? Try it. Figure 3 scientific 11 012-03800A Analysis 1. Why did the magnets behave as they did? How does your observation relate to electromagnetic induction? 2. What was the effect of changing the polarity of the leads connecting the two coils? Why? 3. Why did the behavior change as a result of changing the mass of the magnet and/or the spring which was used? 4. Try to develop an explanation to cover the observations you made in steps 6-8. You may wish to begin considering energy! 12 scientific 012-03800A Experiment 4: Intermediate Transformers Introduction In this lab you will continue investigating transformers. You will investigate additional core configurations and work into d.c. power supplies, one of the key applications of transformer technology. Equipment Needed - Supplied 1. The PASCO SF-8617 Complete Coils Set Equipment Needed - Not Supplied 1. 2. 3. 4. 5. 6. 7. 8. Low voltage ac power supply 0-6 VAC, 0-1 amp such as PASCO Model SF-9582 AC voltmeter 0-6 VAC AC ammeter 0-2 A Oscilloscope Two diodes 1 amp, 50 PIV (min) rectifiers such as 2N4007 Resistor 1000Ω, 2 Watt Capacitor 470µF Banana connecting leads for electrical connections Procedure A 1. Set up the coils and core as shown in Figure 1. In the diagram, the coil to the left will be referred to as the primary coil, and the center one will be the secondary coil. 2. With the 200-turn coil as the primary and the 800-turn coil as the secondary, adjust the input voltage to 6.0 volts a.c. With a resistance of 1000 Ω connected to the secondary, measure the input current, the output voltage and the output current. Record your results in Table 4.1. 3. Now replace the 800-turn coil with the two 400-turn coils, stacked on the same arm of the E-shaped core. With the two coils connected as shown in Figure 2, with a load resistance of 1000 ohms, measure the input and output currents and voltages. Record your results in Table 4.1. 4. Reverse the leads to one of the coils and re-measure the currents and voltages. Record your results. How did the results compare with step 3? What did you change and why did you get the results you did? 5. Now move the two 400-turn coils to the third arm of the core. How do the values for current and voltage compare to those seen in the previous position of the coils? How would these values compare with a single 800-turn coil? Set up the single 800-turn coil and test your hypothesis. 6. scientific Primary Measure the individual voltages and currents of the 400-turn coils of the secondary when they are connected to the 1000-Ω resistance in the configuration which gave you the biggest output voltage and current. How do the two values compare with one another? Do they add or subtract to any specific values? Do the values you obtain in the experiment support your understanding of basic series circuits? Change the leads on one coil and re-measure the individual voltages and the total voltage. Why do you get your end result? 13 Secondary Figure 1 Primary Secondary Figure 2 012-03800A Procedure B 7. Set up the 200-turn coil as primary, and the 800-turn coil as the secondary. Put a diode into the circuit as shown in Figure 4, and leave the 1000-Ω resistor in as a load. 8. In this step, set the triggering of your oscilloscope to “LINE”. This stabilizes the sweep so that it is sychronized with the a.c. line voltage. Now connect the ground lead (often a clip lead) from your oscilloscope to point A in Figure 3, and the probe to point B. Note the waveform. With the probe at point C, again note the waveform and also any differences between that and the one found at point A. How would you describe this difference? 9. Diode C B Load Resistor A Primary Figure 3 The waveform seen across the load resistance (A to C) is called a half-wave rectified signal. Half of the full sine wave passes through the diode, with the other half being blocked. This produces a directional current (d.c.) but one that is constantly changing in magnitude. To be useful, the voltage level must be made constant. The addition of an electronic “damper” should accomplish this. 10. Add the 470 µF capacitor as shown in Figure 4. What is the new waveform across the load resistor? Is it still varying as much as it did previously? What is the d.c. level of the resulting voltage? Diode • C B Load Resistor Capacitor 11. Now change the 1000-Ω resistor to a 10-Ω resistor in the same circuit. How does this affect the waveform? How does it affect the d.c. voltage? • Primary A Figure 4 Procedure C 12. Now connect the two 400-turn coils so that they have maximum voltage and current output. With the 1000-Ω resistor as a load, connect the leads of the oscilloscope between points A and B as shown in Figure 5. What is the shape of the wave form? What is the waveform between points A and C? How does the size of the waveform between A and B compare to that between A and C? C Load Resistor B A Primary Secondary 13. In this step, set the triggering of your Figure 5 oscilloscope again to “LINE”. Connect the ground lead (often a clip lead) from your oscilloscope to point B in Figure 5. With the probe at point A, note the waveform. With the probe at point C, again note the waveform and also any differences between that and the one found at point A. How would you describe this difference? 14. Now we will make the difference in waveforms useful to us. Connect two diodes into your apparatus as shown in Figure 6. How does the waveform across the load resistance look? How does it differ from the waveforms you have seen in previous steps? Is this still alternating current, or is it directional (direct) current? 14 scientific 012-03800A 15. The end result in step 14 is the production of a full-wave rectified signal, one which is directional in nature, although it varyies in amplitude over time. We will now add in a 470-µF capacitor as shown in Figure 7. Diode C • Load Resistor B • A Diode 16. What is the new waveform across the load resistor? Do you have d.c., yet? What is the d.c. voltage you’ve produced? Primary Figure 6 Diode 17. Now replace the 1000-Ω load resistance with a 10-Ω resistor. What is the effect on the d.c. voltage compared to the 1000-Ω resistance? What is the effect on the waveform? C • Load Resistor B Capacitor • A Diode Primary Figure 7 Analysis 1. Answer the questions which have been posed along the way during the procedure. 2. Why do you get such different results if you place the secondary coil(s) on the second or third leg of the E-shaped core? Think about the magnetic circulation that must take place within the core. 3. Compare the results of lowering the load resistance on a half-wave rectified circuit with lowering the load resistance on a full-wave rectified circuit. If you were to try to stabilize the output of a power supply, which would be better, a half-wave or full-wave rectified signal? 4. This experiment has introduced the concept of transformers and power supplies. Further reading and experimentation can easily begin from here and lead to profitable new understanding. Data and Calculations Table 4.1 Number of Turns Primary scientific Secondary Input V Input I 15 Load R Output V Output I 012-03800A Appendix Technical Data PASCO Part No. SF-8609 SF-8610 SF-8611 SF-8612 SF-8613 Number of Turns in Coil Wire dia. mm 200 400 800 1600 3200 0.9 0.65 0.45 0.33 0.22 Maximum Current rms Amperes DC Resistance ohms 0.6 2.2 7.7 35.4 151 2A 1A 0.5 A 0.25 A 0.125 A 16 AC Impedance ohms 50 Hz 60Hz 0.64 2.4 8.7 39 164 0.65 2.5 9.1 40.5 170 Selfinductance mH 0.67 3.2 13.5 52 207 scientific 012-04695D Thermal Radiation System Technical Support Feed-Back Contacting Technical Support If you have any comments about this product or this manual please let us know. If you have any suggestions on alternate experiments or find a problem in the manual please tell us. PASCO appreciates any customer feed-back. Your input helps us evaluate and improve our product. Before you call the PASCO Technical Support staff it would be helpful to prepare the following information: To Reach PASCO For Technical Support call us at 1-800-772-8700 (tollfree within the U.S.) or (916) 786-3800. • If your problem is computer/software related, note: Title and Revision Date of software. Type of Computer (Make, Model, Speed). Type of external Cables/Peripherals. • If your problem is with the PASCO apparatus, note: Title and Model number (usually listed on the label). Approximate age of apparatus. A detailed description of the problem/sequence of events. (In case you can't call PASCO right away, you won't lose valuable data.) If possible, have the apparatus within reach when calling. This makes descriptions of individual parts much easier. • If your problem relates to the instruction manual, note: Part number and Revision (listed by month and year on the front cover). Have the manual at hand to discuss your questions. 012-04399C 3/95 $1.00 Instruction Sheet for the PASCO Model SF-8619 MAGNETIC DIP NEEDLE ➃ While in the horizontal position, rotate the entire appa- Introduction This compass needle is used to measure the dip angle of the Earth's magnetic field. However, it may also be used in its horizontal position as a conventional compass. ratus to align the compass needle with the axis of banana plug pivot. ➄ Without changing the orientation of the base, rotate the dip needle at its banana plug connection until the plastic scale is in the vertical plane. Setup Procedure ➀ Assemble the two parts of the dip needle by inserting the banana plug connector into the hole in the black rod on the stand, as shown in equipment setup diagram. Theory The dip needle is a magnetized steel needle which rotates around its center of mass. When no other magnetic fields are present, the dip needle will align itself along the direction of the Earth’s magnetic field. The dip angle, or inclination, is the angle between the horizontal plane and the total Earth magnetic field. By convention, the dip angle is positive when pointing downwards. The dip needle apparatus measures the angle, θ between the vertical plane and the total Earth magnetic field. In order to obtain the dip angle, subtract θ from 90˚. The United States Geological Survey maintains a public domain program for IBM compatible computers which models geomagnetic parameters including dip angle. The user inputs their latitude, longitude and elevation and the program calculates the dip angle. Copies of the program are free of charge and are available over the Internet via the following methods: Equipment Setup ➁ Put the dip needle in a location which is far away from any ferromagnetic materials and other magnetic fields. If you place the dip needle on a table, be sure there are no ferromagnetic supports under the table top. ➂ Rotate the dip needle at its banana plug connection ftp host: ftp.ngdc.noaa.gov gopher host: gopher.ngdc.noaa.gov login anonymous no login necessary www host: http://www.ngdc.noaa.gov no login necessary The appropriate file is pcgeomag.zip which contains the source code, executable and documentation files along with the current magnetic field model. until the plastic scale is in the horizontal plane. © 1990 PASCO scientific This instruction sheet written/edited by: Ann Hanks better 10101 Foothills Blvd. • P.O. Box 619011 • Roseville, CA 95678-9011 USA Phone (916) 786-3800 • FAX (916) 786-8905 • email: [email protected] ways to teach physics Magnetic Dip Needle 012-04399C North Geographic Pole θ South Magnetic Pole Ι S N North Magnetic Pole θ = Angle read from Dip Needle I = Dip Angle = 90° - θ South Geographic Pole Dip Angle for Northern California Copyright Notice Limited Warranty The PASCO scientific Model SF-8619 Magnetic Dip Needle manual is copyrighted and all rights reserved. However, permission is granted to non-profit educational institutions for reproduction of any part of this manual providing the reproductions are used only for their laboratories and are not sold for profit. Reproduction under any other circumstances, without the written consent of PASCO scientific, is prohibited. PASCO scientific warrants this product to be free from defects in materials and workmanship for a period of one year from the date of shipment to the customer. PASCO will repair or replace, at its option, any part of the product which is deemed to be defective in material or workmanship. This warranty does not cover damage to the product caused by abuse or improper use. Determination of whether a product failure is the result of a manufacturing defect or improper use by the customer shall be made solely by PASCO scientific. Responsibility for the return of equipment for warranty repair belongs to the customer. Equipment must be properly packed to prevent damage and shipped postage or freight prepaid. (Damage caused by improper packing of the equipment for return shipment will not be covered by the warranty.) Shipping costs for returning the equipment, after repair, will be paid by PASCO scientific. 2 012-04393B 11/95 $1.00 Instruction Sheet for the PASCO Model ES-9042A FARADAY ICE PAIL Introduction The Ice Pail designed by Faraday is an excellent product for sampling a charge distribution. It operates on the principle that a charge placed inside a conducting surface will induce an equal charge on the outside of that surface. For example, if a charged ball were hung inside a coffee can, the charge on the outside of the can would equal the charge of the ball. The charge can be measured with an electrometer such as the PASCO Model ES-9054B Student Electrometer. Complete instructions for the operation of PASCO Electrostatic equipment can be found in the ES-9051 Accessory and Demonstration Manual (included with the Demonstration System) and the ES-9055 Laboratory Manual (included with the Electrostatic Laboratory System) + + The PASCO Model ES-9042A Faraday Ice Pail is a wire mesh cylinder measuring 10 cm in diameter by 15 cm deep with a wire mesh bottom. It is mounted on three insulating rods along the outer edge of a wire mesh shield. The wire mesh shield not only ensures complete visibility of the experiment but also helps eliminate the problem of stray charges and AC fields. To prevent stray charges from producing erroneous results it is extremely important that the person performing the experiment be continually grounded while performing the experiment. The Ice-Pail needs to be temporarily grounded prior to starting the experiment. A charged object such as the PASCO Model ES-9057A Charge Producers and Proof Plane is placed in the grounded ice pail (without touching it), and the electrometer indicates the potential between the ice pail and ground. The greater the charge the greater the potential. Thus we can easily measure relative charges by varying the charges in the ice pail and observing the potential indicated by the electrometer. Charge Producer Red Clip Electrometer + + + + + + + + + Black Clip + + Faraday Ice Pail + + ++ - + + - ++ + + ++ - - - - - - + - + + + + + + Figure 1 Demonstration: Faraday Ice Pail and Charge Production Since the Faraday Ice Pail is used so frequently in electrostatic demonstrations, one should examine the relationship between the charge induced on the ice pail by an inserted object and the actual charge on that object. Using the ice pail, one can then investigate the nature of charging an object by contact as opposed to charging by induction. Equipment needed: Faraday Ice Pail, charge producing objects (such as ES-9057A Charge Producers), electrometer Setup ➀ Connect the electrometer input lead (red alligator clip) to the ice pail to create a system for measuring charge. The electrometer ground lead (black alligator clip) attaches to the shield. (Setup is shown in Figure 1.) Adjust the sensitivity of the electrometer so that most readings appear in the upper 2/3 of the scale. © 1993 PASCO scientific Faraday Ice Pail 012-04393B ➁ Ground the ice pail (i.e., connect the inner pail to the ➤ NOTE: shield) by touching the inner pail and the outer shield at the same time with the finger of one hand. (See Figure 2) While conducting the experiment it may be convenient to continually rest one hand on the upper edge of the shield. This also grounds the experimenter, providing the electrometer is connected to both ground and shield and it allows the ice pail to be easily grounded whenever necessary. Closed ➀ The charged object must be inserted at least into the lower half of the ice pail. Try inserting it, for example, approximately one centimeter below the top of the pail and attempt to explain your results. ➁ There may be a small charge retained on the exposed plastic between the aluminum disk and the aluminum rod on the charge producers. This residual charge does not transfer readily when the disk is touched to the pail. Therefore, (before starting the experiment) breathe on the exposed plastic of the charge producer so that the moisture in your breath will tend to remove any residual charge. Open Procedure B ➀ Starting with initially uncharged charge producers, rub the blue and white materials together. Using the Faraday Ice Pail, measure the magnitude and polarity of their charges. By using the results from Procedure A it is not necessary to touch the charge producer to the pail. What relationship exists between these charges produced by contact? Figure 2 ➁ Ground the charge producers and rub them together ➤ NOTE: When removing your finger from the inner pail after grounding it, make certain that you are still touching the outer shield. DO NOT remove your hand from the shield before releasing the inner pail, as this sequence will not effectively ground the inner pail. inside the ice pail. What is the reading on the electrometer. Remove one charge producer and note the electrometer reading. Replace this charge producer but remove the other and note the electrometer reading. ➂ Ground the charge producers again. Rub the white material against the aluminum proof plane. Measure the magnitude and polarity of the charges. Now rub the blue material against the aluminum surface and record your measurements. ➂ Make sure the electrometer reads “zero”, indicating that there is no charge on the ice pail. Procedure A ➃ Construct a list of materials such that if a material ➀ Rub two charge producers together to create a charge lower on the list is rubbed against a material higher on the list, the charge on the higher listed material is always positive. Such a list is called an electrostatic series. on them. ➁ Insert one of the wands into the ice pail but do not let it touch the pail. Note the electrometer reading. To Reach PASCO ➂ Remove the object from the pail and again note the For Technical Support call us at 1-800-772-8700 (tollfree within the U.S.) or (916) 786-3800. electrometer reading. ➃ Insert the wand again, allow it to touch the ice pail and email: [email protected] then remove it. Note the electrometer reading. Tech support fax: (916) 786-3292 ➄ Momentarily ground the ice pail and then touch the object to the pail again. Note the electrometer reading. Does any charge remain on the object? What is the conclusion about the induced charge on the ice pail, as compared to the charge on the charge producer? 2 ® 012-05258B 10/94 $1.00 Instruction Sheet for the PASCO Model ES-9057A Charge Producers and Proof Planes Introduction The ES-9057A Charge Producers and Proof Planes are electrostatic components for use with additional equipment from the PASCO Electrostatics System ES-9062A. The two charge producers are used to generate equal positive and negative charges by contact. The two proof planes can be used to measure charge density on a charged object. The Charge Producers • If a zero charge is desirable, discharge the charge producers by touching the conductive disk and handle to ground. To be sure the disk and handle is fully discharged, gently breathe on the non conductive neck. The moisture from your breath will help remove any stray charge. • Avoid touching the neck during normal use. The oils from your hands will provide a path for charges to leak off. Occasionally clean the disk surfaces and the neck with alcohol. • When you first use the charge producers, or just after cleaning, they may not produce charges readily. Rub the white surface vigorously on the conductive proof plane disk. White surface Conductive disk (black) Blue surface Non conductive neck (white) The charge producers consist of two wands, one with blue and one with white material attached to a conductive disk. Briskly rub the blue and white surfaces of the two charge producers together. The disk with the white surface will acquire a positive charge; the disk with the blue surface will acquire a negative charge. Rub the white surface of the one charge producer against one of the proof planes. The white disk will acquire a negative charge, while the other disk will acquire a positive charge. ➤ NOTE: The Charge Producers are designed to be used with an electrometer (ES-9054B). They do not produce sufficient charge for use with a standard electroscope. The Proof Planes The proof planes (set of two wands) are conductive disks attached to insulated handles. They are used to sample the charge density on charged conductive surfaces. Conductive disk (black) ➤ NOTE: Any build-up on the non-conductive neck can affect results. Clean with alcohol before using. Non conductive neck (white) better 10101 Foothills Blvd. • P.O. Box 619011 • Roseville, CA 95678-9011 USA Phone (916) 786-3800 • FAX (916) 786-8905 • TWX 910-383-2040 ways to teach physics 012-05258B Surface of the proof plane disk IS NOT tangent to the surface of the conductor. ➤ NOTE: You can then use an electrometer and a Faraday ice pail (ES-9042A) to measure the charge density on the proof plane, as shown in the following illustration. + Insert charged proof plane into Faraday ice pail Surface of the proof plane disk IS tangent to the surface of the conductor. + + + NO! + + Ground lead Signal lead + + + + + + Electrometer + + YES! + + + + + + + charged conductive sphere Other The conductive disk material is carbon filled black polycarbonate (about 103 Ω). The non-conductive neck is white polycarbonate (about 1014 Ω). Faraday ice pail and shield Limited Warranty PASCO scientific warrants this product to be free from defects in materials and workmanship for a period of one year from the date of shipment to the customer. PASCO will repair or replace, at its option, any part of the product which is deemed to be defective in material or workmanship. This warranty does not cover damage to the product caused by abuse or improper use. Determination of whether a product failure is the result of a manufacturing defect or improper use by the customer shall be made solely by PASCO scientific. Responsibility for the return of equipment for warranty repair belongs to the customer. Equipment must be properly packed to prevent damage and shipped postage or freight prepaid. (Damage caused by improper packing of the equipment for return shipment will not be covered by the warranty.) Shipping costs for returning the equipment, after repair, will be paid by PASCO scientific. By touching the proof plane to a surface, it will acquire the same charge distribution as the surface. By measuring the charge on the proof plane, the charge density on the surface can be determined. The greater the charge on the proof plane, the greater the charge density on the surface where the proof plane made contact. When the proof plane is touched to a conductor, the proof plane becomes part of the conductive surface. If the effect on the shape of the surface is significant, the sampling of the charge density will not be accurate. Therefore, always touch the proof plane to the conductor in such a way as to minimize the distortion of the conductive surface. The following illustration shows the recommended method for using the proof plane to sample the charge on a conductive sphere. ➤ NOTE: To accurately sample charge density, the conductor should be considerably larger than the disk of the proof plane and have a relatively large radius of curvature at the point from which the sample is taken. However, the proof planes can be used to test for charge polarity on conductors of any shape. 2 012-04929A 5/92 Instruction Sheet for the PASCO Model TD-8550A THERMOELECTRIC CONVERTER Introduction The PASCO scientific Thermoelectric Converter consists of a thermoelectric heat pump sandwiched between two aluminum metal legs. Electric current from the thermoelectric heat pump can drive a small motor that has a fan attached to its shaft. The Converter can demonstrate the Seebeck effect (discovered in 1821). In this effect, a temperature difference across the thermoelectric heat pump gives rise to a current that drives the small motor (∆T → E). For example, when one leg is in hot water and the other is in cold water, the small motor turns the fan. The Converter can also demonstrate the Peltier effect (discovered in 1834). When a current is passed through the thermoelectric heat pump, a temperature difference results (E → ∆T). One of the legs becomes warm while the other leg becomes cooler. Finally, the Converter acts as a “thermal capacitor”. After a current is passed through the Converter to create the temperature difference (E → ∆T), flip the switch (∆T → E), and the temperature difference causes a current that drives the small motor. A) ∆ T ➡ E scientific TD-8550A B) E ➡ ∆ T Thermoelectric Converter + 5V 3A – 2min MAX A) ∆ T ➡ E ∆T → E) in order to demonstrate the Seebeck effect (temperature difference causes electric current). Connect a source of electric current to the red and black banana jacks and put the switch in the “down” position (toward E → ∆T) to demonstrate the Peltier effect (current through the thermoelectric heat pump causes a temperature difference). ➧ NOTE: The recommended voltage and current is 5 Volts and 3 Amps (DC). Do not exceed 8 Volts. Do not run the 5 Volt, 3 Amp current through the device for more than 2 minutes. Equipment Needed: • Cups for hot and cold water • DC Power supply capable of 5 Volts and 3 Amps • Patch cords Recommended Equipment: • TD-8556 Steam Generator scientific TD-8550A B) E ➡ ∆ T Thermoelectric Converter + 5V 3A – 2min MAX A) Place one leg in icewater, one in hot water. Fan rotates due to ∆ T. With both legs in same temp water, fan won't rotate. B) Connect 5 V, 3 A DC supply to terminals. One leg warms, one cools. A) Place one leg in icewater, one in hot water. Fan rotates due to ∆ T. With both legs in same temp water, fan won't rotate. B) Connect 5 V, 3 A DC supply to terminals. One leg warms, one cools. DO NOT EXCEED 2 MIN OR 8 V! DO NOT EXCEED 2 MIN OR 8 V! Figure 1 Switch Position Figure 1 shows the top portion of the Thermoelectric Converter. Put the switch in the “up” position (toward • SF-9584 AC/DC Low Voltage Power Supply or SF-9582 12 Volt AC/DC Power Supply • SE-9750 and SE-9751 Banana Plug Patch Cords Optional Equipment: • Digital thermometer (such as PASCO Model SB9631 or Model SE-9086) Theory A transformation whose only final result is to transform into work heat extracted from a source which is at the same temperature throughout is impossible. Lord Kelvin 012-04929A This was Kelvin’s statement of the Second Law of Thermodynamics. The second law has been stated in many, seemingly unrelated ways; but in the end, all have been shown to be different ways of expressing the same basic principle. In its most general form, the Second Law tells us that no physical process will occur if it decreases the disorder—or entropy—of the universe. Conservation of energy, as expressed in the First Law of Thermodynamics, holds for every physical process. But many processes which would conserve energy do not occur. The Second Law describes this phenomenon. PASCO A) ∆T–E scientific B) E–∆T + TD-8550A Thermoelectric Converter – FAN ROTATES PASCO A) ∆T–E scientific TD-8550A Thermoelectric B) E–∆T Converter + – OPERATION FAN DOES NOT ROTATE H2O (COLD) Seebeck Effect: The PASCO Model TD-8550A Thermoelectric Converter is designed to demonstrate this relationship between the First and Second Laws of Thermodynamics. The procedure used directly illustrates Kelvin’s statement of the Second Law. The Converter is used as illustrated in Figure 2. Put the switch in the “up” position. One leg of the unit is placed in a cup of cold water and one in a cup of hot water. (Boiling water and ice water give good results.) Some of the thermal energy from the hot water is converted into work by the Converter, and the fan turns. Then the hot and cold water are mixed together in a larger container. Both legs of the unit are placed into the container. Now the fan does not turn. H2O (HOT) SEEBECK EFFECT (∆T ➞ E) H2O H2O (HOT & COLD MIXED) Figure 2 Th = Tc ➀ The change in entropy of the hot water, ∆Sh = Qh/ Th, is negative, because of the heat transfer from the water into the Converter. The total internal energy of the water is not changed by mixing the hot and cold together, so there must still be sufficient energy in the water to turn the fan. But this would violate the Second Law of Thermodynamics, as stated by Kelvin. ➁ The change in entropy of the cold water, ∆Sc = Qc/Tc, is positive, because of the heat transfer from the Converter into the water. ➂ According to the second law, the total change in entropy, ∆ST = ∆Sc + ∆Sh, must be positive. There- ➦ NOTE: As a further demonstration, place fore, the process will only take place if Qc/Tc > Qh/ Th. one leg in the mixed water (or in ice water) and one in a container of dry ice to demonstrate that there is energy available in the mixed water (and even in ice water). ➃ In order for the fan to be turned, some of the heat transferred from the hot water must be converted into work and will therefore not be available to be transferred back into the cold water. Therefore, whenever the fan turns, Qh > Qc. This violation of the Second Law can also be explained in terms of entropy, using the expression ∆S = Q/T, where ∆S is the change in entropy, Q is the heat transferred, and T is the temperature at which the heat is transferred. Considering only the heat transfer taking place in the cups of water, the following holds: ➄ The equations in steps 3 and 4 can only both be true if Th > Tc. Once the water is mixed, however, Th = Tc. Therefore, if the fan were to turn, it would violate the Second Law of Thermodynamics. 2 scientific 012-04929A Peltier Effect: During the Peltier effect, a current through the thermoelectric heat pump of the Converter causes a temperature difference. Connect a DC power supply capable of 5 Volts and 3 Amps to the red and black terminals on the Converter. Put the switch on the Converter to the E → ∆T (down) position . (For this demonstration, you do not need to immerse the legs of the Converter in water.) Turn on the power supply. In a few moments you should be able to feel the temperature difference of both aluminum legs of the Converter. PASCO A) ∆T–E scientific B) E–∆T + TD-8550A ic Thermoelectr Converter – FAN ROTATES ➧ NOTE: DO NOT LEAVE THE POWER SUPPLY ON FOR MORE THAN TWO MINUTES. DO NOT EXCEED 8 VOLTS. As an optional exercise, begin with the Converter at room temperature. Measure the temperature of both legs. Then, while the current is applied to the Converter, use a digital thermometer to monitor the increase in temperature of the “hot” leg and the decrease in temperature of the “cold” leg. SWITCH IS IN "DOWN" POSITION "THERMAL CAPACITOR" (MODIFIED SEEBECK EFFECT) Description of Seebeck effect The Thermoelectric Converter uses a series of thermoelectric cells to convert thermal energy into electrical energy that will drive the fan. Each cell is a semiconductor device. A simplified diagram of one cell is shown below. PASCO A) ∆T–E scientific B) E–∆T + TD-8550A ic Thermoelectr Converter – HOT H O T TO POWER SUPPLY (5 VDC, 3 A) 2 min, 8 VDC MAXIMUM Thermoelectric Cell C O L D FAN MOTOR COLD PELTIER EFFECT (E ➞ ∆T) Thermoelectric Converter Cell (Seebeck effect) Thermal Capacitor: During the Seebeck effect, the heat entering the cell raises the energy level of some of the electrons in the cell. At the higher energy level, the electrons are no longer bound in the crystal structure of the semiconductor and are free to move. When they do so, they leave a vacant place, or hole, in the crystal. Lower energy electrons, though they can’t move freely within the material, can jump from hole to hole. In this way, the holes can also migrate through the semiconductor material. After demonstrating the Peltier effect, disconnect the power supply from the Converter. Put the switch to the ∆T → E (up) position. The temperature difference caused when the current was applied to the thermoelectric heat pump will now cause the Converter to generate a current to drive the motor. 3 scientific 012-04929A The electrons migrate, as shown, through the N-type semiconductor material and the holes migrate through the P-type material. (N and P type materials are merely silicon that is “doped” with special impurities that enhance electron and hole migration.) The electrons flow through the external circuit and drive the fan motor. At the other end of the circuit they reenter the cell and encounter the holes of the P-type semiconductor. This occurs near the cold end of the cell. The electrons can therefore drop back into holes, giving up any excess energy they still retain as heat. couples, connected in series electrically and in parallel thermally, are integrated into the thermoelectric heat pump. The heat pump is packaged between metallized ceramic plates. Specifications: When using the Thermoelectric Converter as a Peltier device, the power required to produce a given temperature difference depends on the temperature of the hot side. The hot side must never exceed 135 degrees C, the melting point of the solder which bonds the Bismuth Telluride ingots to the plates. Starting at 25 degrees C, the hot leg temperature increases much more than the cold leg temperature decreases (about 40 degrees versus about 8 degrees in 2 minutes). This is because the power dissipated by the hot side is the sum of the supplied power and the heat transferred from the cold side. (If the hot side is held to 25 degrees C, enough power can be applied to create a maximum temperature difference of about 67 degrees C.) As long as the temperature differential is maintained between the two sides of the cell, the electrons and holes continue to migrate, and the fan continues to turn. However, if there is no temperature differential, the electrons can not recombine with the holes because there is no place to give up their excess energy. In this way, the thermoelectric cell is constrained by the Second Law of Thermodynamics. Description of Peltier effect The resistance of the small motor is about 1 ohm. During the Peltier effect, the electric potential difference causes electrons and holes to migrate from one end of the N and P type semiconductor material to the other. The movement of the electrons in the N type semiconductor results in a transfer of internal energy from that end of the semiconductor, and it cools. The same result occurs for the P type semiconductor during hole migration. The heat transfer from the “cold” leg to the “hot” leg is proportional to the carrier current passing through the circuit and the number of thermoelectric cells (couples) making up the thermoelectric pump. Compatible PASCO Equipment PASCO offers a complete line of laboratory and demonstration equipment for thermodynamics. Experiment quantitatively with the mechanical and electrical equivalents of heat, thermal conductivity, heat capacity, phase changes in water, and black body radiation. Check our catalog for these and other products that can bring PASCO quality into your classroom and laboratory. Limited Warranty C O O L I N G (P-type) W A R M I N G PASCO scientific warrants this product to be free from defects in materials and workmanship for a period of one year from the date of shipment to the customer. PASCO will repair or replace, at its option, any part of the product which is deemed to be defective in material or workmanship. This warranty does not cover damage to the product caused by abuse or improper use. Determination of whether a product failure is the result of a manufacturing defect or improper use by the customer shall be made solely by PASCO scientific. Responsibility for the return of equipment for warranty repair belongs to the customer. Equipment must be properly packed to prevent damage and shipped postage or freight prepaid. (Damage caused by improper packing of the equipment for return shipment will not be covered by the warranty.) Shipping costs for returning the equipment, after repair, will be paid by PASCO scientific. DC SUPPLY (N-type) Thermoelectric Converter Cell (Peltier effect) Construction of the Thermoelectric Heat Pump: The PASCO Thermoelectric Converter has 71 thermoelectric cooling “couples”. These are made from two elements of semiconductor, primarily Bismuth Telluride (a quarternary alloy of bismuth, tellurium, selenium and antimony) heavily doped to create either an excess (N-type) or deficiency (P-type) of electrons. The 4 scientific