1
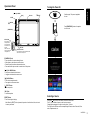
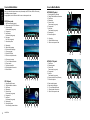
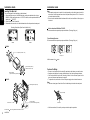
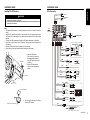
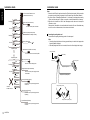
QUICK START GUIDE & Installation Manual
คู่มือการเริ่มต้นใช้งานด่วนและคู่มือติดตั้ง
快速入门指南 & 安装手册
PEDOMAN MULAI CEPAT & Petunjuk Pemasangan
NX502A
DVD MULTIMEDIA STATION WITH BUILT-IN NAVIGATION & 6.2” TOUCH PANEL CONTROL
เครื่องเล่น DVD มัลติมีเดีย พร้อมแผงควบคุมระบบสัมผัสและระบบนำ�ทางในตัวขนาด 6.2”
带内置导航及 6.2 英寸触屏式控制器的多媒体 DVD 播放器
STASIUN MULTIMEDIA DVD DENGAN NAVIGASI DAN KONTROL PANEL SENTUH 6,2" BUILT-IN
Contents
English
This guide is intended to guide you through the basic functions of the unit.
Precautions........................................................................................................................... 2
Operational Panel................................................................................................................. 3
Turning the Power On.......................................................................................................... 3
Selecting a Source............................................................................................................... 3
Source Media Modes............................................................................................................ 4
DVD Video mode............................................................................................................... 4
CD Playback...................................................................................................................... 4
MP3/WMA Playback.......................................................................................................... 4
MP4/DivX Playback........................................................................................................... 4
iPod ® Audio Playback....................................................................................................... 5
iPod Video Playback......................................................................................................... 5
Radio mode....................................................................................................................... 5
Bluetooth Operations........................................................................................................... 6
Pairing............................................................................................................................... 6
Bluetooth Telephone Menu............................................................................................... 6
Making a call..................................................................................................................... 6
Bluetooth Audio Playback................................................................................................. 6
Start using Clarion Mobile Map........................................................................................... 6
Selecting the destination of a route................................................................................... 6
Map Screen....................................................................................................................... 7
Quick Menu....................................................................................................................... 7
Installation Guide................................................................................................................. 7
Before Starting.................................................................................................................. 7
Package Contents............................................................................................................. 7
Cautions On Installation.................................................................................................... 7
Installing The Main Unit..................................................................................................... 8
Cautions On Wiring........................................................................................................... 8
Installing The GPS Antenna.............................................................................................. 9
Wire Connection................................................................................................................ 9
Notes
• F
or details of functions and operation of this product, refer to “Owner’s manual”.
• The screens shown in the examples may differ from actual screens. Actual screens may be
changed without notice for performance and function improvements.
2
NX502A
Precautions
WARNING
For your safety, the driver should not operate the controls while driving.
Also, while driving, keep the volume to a level at which external sounds can be heard.
1.When the interior of the car is extremely cold and the player is used soon after switching
on the heater, moisture may form on the disc or the optical parts of the player and proper
playback may not be possible. If moisture forms on the disc, wipe it off with a soft cloth. If
moisture forms on the optical parts of the player, do not use the player for about one hour.
The condensation will disappear naturally allowing normal operation.
2.Driving on extremely bumpy or rough roads can cause the disc to skip during playback.
3.This unit uses precision parts and components for its operation. In the event that trouble
arises, never open the case, disassemble the unit, or lubricate the rotating parts. Contact your
Clarion dealer or service center.
4.“ Made for iPod,” and “Made for iPhone” mean that an electronic accessory has been
designed to connect specifically to iPod, or iPhone, respectively, and has been certified by the
developer to meet Apple performance standards.
Apple is not responsible for the operation of this device or its compliance with safety and
regulatory standards. Please note that the use of this accessory with iPod or iPhone may
affect wireless performance.
iPhone and iPod are trademarks of Apple Inc., registered in the U.S. and other countries.
5.
Manufactured under license from Dolby Laboratories.
“Dolby” and the double-D symbol are trademarks of Dolby Laboratories.
6.This product incorporates copyright protection technology that is protected by U.S. patents
and other intellectual property rights. Use of this copyright protection technology must be
authorized by Rovi Corporation, and is intended for home and other limited viewing uses only
unless otherwise authorized by Rovi Corporation. Reverse engineering or disassembly is
prohibited.
Use of this product by the customer is restricted to play program materials to which the Rovi
copyright protection process has been applied.
7.The Bluetooth® word mark and logos are registered trademarks owned by Bluetooth SIG, Inc.
and any use of such marks by Clarion Co.,Ltd, is under license.
8.DivX®, DivX Certified® and associated logos are trademarks
of Rovi Corporation or its subsidiaries and are used under
license.
DivX Certified ® to play DivX ® video, including premium
content.
Covered by one or more of the following U.S. patents:
7,295,673; 7,460,668; 7,515,710; 7,519,274
ABOUT DIVX VIDEO: DivX® is a digital video format created
by DivX, LLC, a subsidiary of Rovi Corporation. This is an
official DivX Certified® device that plays DivX video. Visit
divx.com for more information and software tools to convert
your files into DivX videos.
ABOUT DIVX VIDEO-ON-DEMAND: This DivX
Certified ® device must be registered in order to play
purchased DivX Video-on-Demand (VOD) movies. To obtain
your registration code, locate the DivX VOD section in your
device setup menu. Go to vod.divx.com for more information
on how to complete your registration.
Operational Panel
ALL ] ALL MENU
[MIC]
[
Disc Slot
English
[
Turning the Power On
Start the engine. The power is supplied to
this unit.
] EJECT
RESET
[
] NAVI/AV
Press [POWER/VOL] button on the panel to
turn on the unit.
[POWER/VOL]
SD Card Slot
Dummy SD card
already inserted in
this unit for prevent
misinsertion of micro
SD card.
Please remove the
dummy SD card before
inserting SD card. .
AUX Jack
Micro SD card slot
Only navigation map card is available and don't
remove it when unit is power on.
[POWER/VOL] Knob
•Press to power on the system when ignition on.
• When power on, short press to mute the volume.
•Rotate the knob to increase or decrease the volume.
•Press and hold this key more than 1 second to turn off the system.
[ ALL ] ALL MENU Button
• Short press to show/exit shortcut menu.
• Long press to show/exit main source menu.
[
] NAVI/AV Button
•Press to enter navigation mode;
•Press again to return current source.
[ ] EJECT Button
•Press to eject disc.
[ MIC ] Hole
• Internal microphone
[RESET] Button
• Press to load original settings.
Note: When the [RESET] button is pressed, frequencies of radio stations, titles, etc. stored
in memory are cleared.
Selecting a Source
Long press [ ALL ] button on the PANEL to show main source menu.
Touch [ - ] on the bottom of screen to show front zone sources.
Change page by dragging left or right or touching other [ - ] buttons.
Touch the icons on the screen to enter corresponding work mode, such as Disc mode, Tuner
mode, Telephone mode, etc.
NX502A
3
English
Source Media Modes
Source Media Modes
When you select the desired source mode (for example, the DVD Video, USB or iPod mode),
the following screen will appear.
During playback, touch the bottom half of screen to show operation bar.
MP3/WMA Playback
DVD Video mode
1. Play/Pause/Stop(long press)
2. Show cursor keys in DVD title menu
3. Previous chapter
Fast-backward (long press)
4. Progress bar
5. Next chapter
Fast-forward (long press)
6. Root menu
Root Title (long press)
7. Show other options
8. Repeat play
9. Select audio language
10. Select subtitle language
11. Show next page
12. Select DVD angle
13. Back to main operation bar
14. Show previous page
15. Turn on Widescreen mode
16. Direct search
17. Adjust picture effect
18. Show playback information
19. Mute indicator
CD Playback
1. Show track list (Browse)
2. Title/Artist/Album information
3. Play/Pause
4. Repeat play
5. Previous track
Fast reverse (long press)
6. Progress bar
7. Next track
Fast forward (long press)
8. Random play
9. Show other options
Scan: Scan play stored stations
4
NX502A
1. Show folder/file list (Browse)
2. Folder/Title/Artist/Album information
3. Play/Pause
4. Repeat play
5. Previous track
Fast reverse (long press)
6. Progress bar
7. Next track
Fast forward (long press)
8. Random play
9. Show other options
10. Scan play
11. Rotate the album image
12. Back to main operation bar
MP4/DivX Playback
1. Play/Pause
2. Repeat playback
3. Previous file
Fast reverse (long press)
4. Progress bar
5. Next file
Fast forward (long press)
6. Stop and show list menu (Browse)
7. Show other options
8. Select audio language
9. Select subtitle language
10. Turn on Widescreen mode
11. Show playback information
12. Back to main operation bar
Source Media Modes
iPod ® Audio Playback
Radio mode
1. Show file list (Browse)
2. Switch between iPod Audio and Video
3. Song/Artist/Album information
4. Play/Pause
5. Repeat play
6. Previous track
Fast reverse (long press)
7. Progress bar
8. Next track
Fast forward (long press)
9. Random play
10. Show other options
1. Band switch
2. Information area
3. Preset station number
4. Current station frequency
5. Show preset stations list
6. Scan preset stations
7. Manual tune backward
Auto tune backward. (long press)
8. Frequency bar
9. Manual tune forward
Auto tune forward. (long press)
10. Show other options
11. Turn on / off Simple Control
12. Select Audiobook play speed
13. Back to main operation bar
11. Choose local or distant seeking mode
12. Store stations automatically
13. Back to main operation bar
English
Source Media Modes
iPod Video Playback
1. Play/Pause
2. Repeat play
3. Previous file
Fast reverse (long press)
4. Progress bar
5. Next file
Fast forward (long press)
6. Show iPod list menu
7. Show other options
8. Turn on / off Simple Control
9. Turn on Widescreen mode
10. Back to main operation bar
NX502A
5
English
Bluetooth Operations
Start using Clarion Mobile Map
Pairing
When Clarion Mobile Map is started the first time, you need to do the following:
1.Select the written language of the application interface. Later you can change it in Settings.
2.Select the language and speaker used for voice guidance messages. Later you can change it
in Settings.
3.Read and accept the End User Licence Agreement.
4.Read and accept the road safety warning.
After this, the Navigation menu appears and you can start using Clarion Mobile Map.
1.Touch [Custom] on the bottom left of the main menu, then select [Settings] to enter Setting
menu.
2.Touch [Setup], then touch the button to the right of “Bluetooth” to show Bluetooth setting
menu.
3. Select [On] to the right of “Bluetooth”.
4.Turn on Bluetooth function of your mobile phone.
5.Enter mobile phone’s Bluetooth setup menu.
6. Search for new Bluetooth devices.
7.Select NX502A from the pairing list on the mobile phone.
8.Enter the password. (Default password: “0000” )
9.After pairing successfully, icon on the bottom right of the screen turns blue.
Selecting the destination of a route
To enter an address as the destination, do as
follows:
1.If you are on the Map screen, tap
to return to the Navigation
menu.
Bluetooth Telephone Menu
1.Show history categories
2. Backspace
3.Paired device information
4. Number pad
5. Call/Hang up
2.In the Navigation menu, tap the following
buttons:
,
.
Making a call
• Dial Number
1.Input numbers by digit-keys on the screen.
2. Touch [
] button to dial.
Touch [
] button to delete characters.
3. Touch [
] button to terminate call.
You can access Dialled/Missed/Received Call History and your phone book by
touching button.
• Answering a cal
You can answer an incoming call by pressing the [
*Touch [
] button to reject an incoming call.
Bluetooth Audio Playback
1. Title/Artist/Album information
2. Play/Pause
3. Previous track
Fast reverse (long press)
4. Stop
5. Next track
Fast forward (long press)
] button.
3.Selecting a destination by entering the
address or the postal code
4.Selecting the destination from the Places
of Interest
5.Selecting a map location as the destination
6.Selecting the destination from your
Favourites
7.Selecting your Home location
8.Searching for a Place of Interest by its
phone number
9. Entering the coordinate of the destination
10.Selecting a recent destination from the
History
11. Additional options
• For the information about other ways, see the user manual.
6
NX502A
Installation Guide
Map Screen
Before Starting
12.To enlarge this small map and open the
Map screen, tap [Show Map] button
13. Zooming in and out
14. Tilting up and down
15. Rotating left and right
16. 2D or 3D view
17. Compass in 2D map view mode
18. Compass in 3D map view mode
19. Location information
20. Return to normal navigation
21. Select destination
Quick Menu
22.The Quick menu is a selection of controls
and functions that are frequently needed
during navigation. It can be opened
directly from the Map screen by tapping
.
23.Find / Find Places /Quick Search (This
function lets you search for a Place
along your route or around your current
location if there is no route calculated)
24.Find / Favourite (This button opens the
list of your Favourite destinations)
25.Find / History (This button opens the
History list. You can select one of your
previous destinations)
26.My Route / Edit Route (This button
opens the route editing function)
27.More / Settings / Route Settings (This
button opens the route related settings)
28.More / Settings / Map Settings (This
button opens the map related settings)
29.Tap the Current Street field on the Map
screen (This button opens a special
screen with information about the
current position and a button to search
for nearby emergency or roadside
assistance.
30.My Route / Cancel Route (This button
cancels the route and stops navigation.
The button is replaced with the next one
if waypoints are given)
Car battery
1.This set is exclusively for use in cars with a
negative ground, 12 V power supply.
2. Read these instructions carefully.
3.Be sure to disconnect the battery “ ” terminal
before starting. This is to prevent short circuits
during installation.
English
Start using Clarion Mobile Map
Package Contents
Source unit.................................................1
Wiring harness...........................................1
GPS antenna..............................................1
CLAMP for GPS antenna’s cable...............3
DOUBLE FACE TAPE for GPS Antenna...1
Remote control unit....................................1
Battery (CR2025).......................................1
(Installed in remote control)
2Din Trim ring (wide)..................................1
2Din Trim ring (narrow)...............................1
Cleaning cloth.............................................1
Warranty Card............................................1
Quick Start Guide.......................................1
Owner’s manual (CD-R).............................1
Electro tap..................................................2
Flush mount bolts(M5x6)............................8
Hexagon Head Screw(M5x6).....................8
AV cable.....................................................1
Line out cable.............................................1
Rear Zone out cable...................................1
SWC cable.................................................1
External Microphone cable.........................1
Camera Visual IN AUX2 cable...................1
USB cable..................................................1
Cautions On Installation
1.Prepare all articles necessary for installing
the main unit before starting.
2.Install the unit within 30° of the horizontal
plane.
Max. 30°
Chassis
3.If you have to do any modification on the
car body, such as drilling holes, consult
your car dealer beforehand.
4.Use the included screws for installation.
Using other screws can cause damage.
5.This unit has a fan motor in the back
of the main unit so as not to raise the
temperature in the source unit. When
the fan motor vent is covered with cords
or mounting bracket, it may cause a
malfunction. Be sure not to cover it when
wiring cords.
Damage
Max. 6 mm (M5 screw)
Fan motor vent
NX502A
7
English
Installation Guide
Installation Guide
Installing The Main Unit
Note:
This unit is designed for fixed installation in the dashboard.
1.When installing the main unit in NISSAN vehicles, use the parts attached to the unit (see “
NISSAN”). When installing the main unit in TOYOTA vehicles, use the parts attached to the
vehicle (see “ TOYOTA”).
2.Wire as shown in “Wire Connection”.
3.Reassemble and secure the unit in the dashboard and set the face panel and center panel.
Mounting Screw Holes (Side View of the Main Unit)
*1Some panel openings are too small for the unit depending on the vehicle type and model. In
such a case, trim the upper and lower sides of the panel frame by about 0.5 to 1.5 mm so the
unit can be inserted smoothly.
*2If a hook on the installation bracket interferes with the unit, bend and flatten it with a nipper or
similar tool.
Vehicles other than NISSAN and TOYOTA
In some cases the center panel may require modification. (Trimming, filling, etc.)
Typical Mounting Brackets
In some cases the center panel may require modification. (Trimming, filling, etc.)
NISSAN
TOYOTA
NISSAN
6-Spacer (thickness: 1 mm)
Example 1-3
Affix the screws to the
6-Flat head screw (M5 × 6)
(attached to the main unit)
marks.
Cautions On Wiring
•Be sure to turn the power off before wiring. Be particularly careful where you route the wires.
•Keep them well away from the engine, and exhaust pipe, etc. Heat may damage the wires.
•If the fuse should blow, check to see if the wiring is correct. If a fuse is blown, replace it with a
new one of the same specification as the original.
• To replace the fuse, remove the old fuse of the power supply cord and insert the new one.
Mounting bracket
(1 pair for the left and right sides)
TOYOTA
Note:
8-Hexagonal screw (M5 × 6)
• There are various types of fuse holder. Do not let the battery side touch other metal parts.
Fuse (15A FUSE)
Mounting bracket
(1 pair for the left and right sides)
Center Panel *1
Fuse holder
*2
• After the connection, fix the cord by a clamp or insulation tape for protection.
Screws marked
8
NX502A
and mounting bracket are attached to the vehicle.
Installation Guide
NX502A
Installation Guide
Wire Connection
GPS Antenna
Antenna
(Black)
WARNING
•Do not install the GPS antenna in a place where it may interfere with the operation of the
airbag or hinder the driver’s visual range.
•Do not use the navigation system with the GPS antenna cord cut off. The power cables in the
cord may be short-circuited.
(Black)
Black
English
Installing The GPS Antenna
(Black)
Black
External
External Microphone
Microphone
Connection
(Black)
(Black)
Note:
• T
he supplied GPS antenna is for installing inside the vehicle. Do not install it outside the
vehicle.
• Install the GPS antenna more than 50 cm away from the main unit, other audio devices such
as CD player, and a radar detector. If it is installed near these devices, GPS reception may be
impaired.
• To improve the GPS signal reception, install the GPS antenna horizontally on a flat plane.
• Do not wax or paint the cover of the GPS antenna. This may reduce the performance of the
GPS antenna.
• Install the GPS antenna at least 10 cm away from the windshield.
• Wipe off the dirt of the mounting surface before installing the GPS antenna.
Radio Antenna
Antenna
Refer
page.
Refer to
to next
the right.
iPod/iPhone
iPod/iPhone
Red
Red
AUX IN
AUX
IN 22
GPS antenna
Red
White
Video Out
Out
Black
• Mount the GPS antenna.
Stick it surely on a flat plane of
the passengerside dashboard
where GPS signal interruption is
minimized.
• Wire the GPS antenna cord.
Fasten the cord using the cord
holders.
VISUAL
VISUAL IN
IN
CCA-750(sold
(sold separately)
CCA-750
separately)
Yellow
Yellow
Black
CAMERA
CAMERA
Yellow
Yellow
Gray
Gray
Gray
Gray
Video Out
Out
Yellow
Yellow
Black
Black
VIDEO
OUT
VIDEO OUT
Red
Red
Green
Green
Cord holder
2 ZONE
ZONE OUT
OUT
Gray
Gray
Red
Red
White
White
Double-sided tape
Black
Black
Red
White
White
Purple
Purple
•Stick the double-sided tape to the bottom
face of the GPS antenna.
Bottom face of the GPS antenna
Rear
Vision
Rear
VisionCamera
Camera
Steering Wheel
Wheel Remote
Remote Control
Control Terminal
Terminal
Steering
White
White
Video
Video In
In
Rear Zone
Zone
Rear
Monitor
Monitor
Audio In
In
Audio
Line
Line Out
Out
Front Right
Right
Line
Line Out
Out
Front
Front Left
Left
N
In
Line
Line Out
Out
Rear
Rear Right
Right
Line
Line Out
Out
Rear
Rear Left
Left
6-Channel
6-Channel Amplifier
Amplifier
White
White
Subwoofer
Subwoofer11
Red
Red
Subwoofer
Subwoofer22
Black
Black
USB connector
connector
USB
oror
USB Memory
Memory
USB
NX502A
9
Installation Guide
Installation Guide
English
Note:
18-Pin Connector Extension Lead
(attached to the source unit)
Gray
Front Right
Gray/Black
White
Brown wire (Phone mute lead)
Connect to cellular phone mute lead.
Front Left
*1Connect to the AUX audio input terminal and the iPod video input terminal. (Audio connection
is required only when [Analog] is selected for the iPod output signal. See Owner’s Manual.)
*2In certain vehicles - Volkswagen/Opel/Vauxhall - it is necessary to exchange the accessory
<<Red>> and the main power <<Yellow>> connection, to avoid overload and loss of memory.
*3When the unit is installed in a 1998 or later Volkswagen model, make sure to interrupt the
<<Remote>> output.
Disconnect the <<blue/white>> wire and insulate the front ends of this cord. A breakdown may
occur if the cord is not disconnected, or front ends are not insulated.
White/Black
Purple
Rear Right
Yellow wire (Memory back-up lead)
Connect directly to battery
Purple/Black
Green
Rear Left
Note:
Red wire (Power lead)
Accessory
12V
Green/Black
4-Speaker system
Connecting the parking brake cord
Connect the cord to parking brake lamp ground in the meter panel.
• C
onnecting the parking brake cord to lamp ground allows you to watch video images when
the parking brake is engaged.
• When the parking brake cord is not connected, the monitor will not display video images.
Blue/White wire (Amplifier turn-on lead)
Parking brake lamp
or
Connect to remote turn-on lead of amplifier
cord to battery
2-Speaker system
Black wire (Ground lead)
Gray
Parking brake
Electro-tap
Connect to vehicle chassis ground
Front Right
Gray/Black
White
Front Left
White/Black
Parking brake signal cord
Orange/White wire (Illumination lead)
Connect it to the car power supply terminal
for illumination
Parking brake cord (Grass-green)
Purple
Purple/Black
Green
Not used.
Insulate each wire
Blue wire (Auto antenna lead)
Connect it to the car power supply terminal
for antenna
Parking brake signal cord
Green/Black
Fresh Green wire (Parking)
Connect it to the car power supply terminal
for parking
Stopper
Purple/White wire (Reverse)
Connect it to the car power supply terminal
for reverse
10
NX502A
Parking brake cord (Grass-green)
Clarion Co., Ltd.
All Rights Reserved. Copyright © 2012: Clarion Co., Ltd.
Printed in China/พิมพ์ในประเทศจีน/中国印制/Dicetak di Cina
PN: 127075004146