1
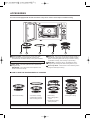
MWA 2434 MM
You can rely on Defy. To simplify.
AIR FRYER MICROWAVE OVEN
Users Manual
Record in the space below the listed information for future reference.
SERIAL NUMBER
DATE OF PURCHASE
PURCHASED FROM
The manufacturer strives for continuous improvement. For this reason, the text and
inllustrations in this manual are subject to change without notice.
Before operating this oven, please read
these manual completely.
PRECAUTIONS TO AVOID POSSIBLE
EXPOSURE TO EXCESSIVE
MICROWAVE ENERGY
(a) Do not attempt to operate this oven with the
door open since open-door operation can result in
harmful exposure to microwave energy. It is
important not to defeat or tamper with the safety
interlocks.
(b) Do not place any object between the oven front
face and the door or allow soil or cleaner residue to
accumulate on sealing surfaces.
(c) WARNING : If the door or door seals are damaged,
the oven must not be operated until it has been
repaired by a competent person : (1) door (bent),
(2) hinges and latches(broken or loosened), (3)
door seals and sealing surfaces.
(d) WARNING : It is hazardous for anyone other than a
competent person to carry out any service or repair
operation that involves the removal of a cover
which gives protection against exposure to
microwave energy.
(e) WARNING : Liquids and other foods must not be
heated in sealed containers since they are liable to
explode.
1
PRECAUTIONS TO AVOID POSSIBLE
EXPOSURE TO EXCESSIVE
MICROWAVE ENERGY
(f) WARNING : This appliance can be used by children
aged from 8 years and above and persons with
reduced physical, sensory or mental capabilities or
lack of experience and knowledge if they have been
given supervision or instruction concerning use of
the appliance in a safe way and understand the
hazards involved. Children shall not play with the
appliance. Cleaning and user maintenance shall not
be made by children unless they are aged from 8
years and above and supervised.
(g) WARNING : When the appliance is operated in the
combination mode, children should only use the
oven under adult supervision due to the
temperature generated.(if provided)
(h) WARNING : The appliance and its accessible parts
become hot during use.
Care should be taken to avoid touching heating
elements.
Children less than 8 years of age shall be kept
away unless continuously supervised.
2
TABLE OF CONTENTS
• INSTALLATION AND EARTHING INSTRUCTIONS ..................................................4
• IMPORTANT SAFETY INSTRUCTIONS .................................................................. 5
• WHICH UTENSILS CAN BE USED IN THE OVEN? ................................................ 8
• What is a function, STANDBY POWER “0”? ..............................................................9
• CONTROL PANEL ...................................................................................................10
• ACCESSORIES....................................................................................................... 11
• How to use the Home Fryer bowl ............................................................................12
• OPERATION ........................................................................................................... 13
MICROWAVE COOKING .........................................................................................13
GRILL COOKING .................................................................................................... 14
CONVECTION COOKING (with pre-heat) .............................................................. 15
CONVECTION COOKING (traditional cooking) ...................................................... 16
COMBINATION COOKING ..................................................................................... 18
DEODORIZATION....................................................................................................19
STEAM CLEANING (with Microwave Feature) .......................................................19
WEIGHT DEFROST................................................................................................ 20
TIME DEFROST...................................................................................................... 20
HOME FRYER ........................................................................................................21
AUTO COOK........................................................................................................... 23
+30sec......................................................................................................................24
TO STOP THE OVEN WHILE THE OVEN IS OPERATING ................................... 24
STAND-BY POWER "0" ..........................................................................................24
ABNORMAL MESSAGES ....................................................................................... 24
WARNING ............................................................................................................... 24
• GENERAL GUIDELINES ........................................................................................ 25
• KEEP THE OVEN CLEAN ...................................................................................... 26
• BEFORE CALLING FOR SERVICE.........................................................................27
• QUESTIONS AND ANSWERS ............................................................................... 28
• SPECIFICATIONS................................................................................................... 29
• DISPOSAL OF USED ELECTRICAL & ELECTRONIC EQUIPMENT .....................29
• COOKING INSTRUCTIONS ....................................................................................30
• SERVICE CENTRES ..............................................................................................31
• WARRANTY ............................................................................................................32
3
INSTALLATION AND EARTHING INSTRUCTIONS
How to examine your microwave oven after unpacking.
Electrical Connection
Unpack oven, remove all packing material, and examine the
oven for any damage such as dents, broken door, latches or
cracks in the door. Do not remove the film from inside the door.
Notify dealer immediately if the oven is damaged. Do not install if
the oven is damaged.
WARNING-THIS APPLIANCE MUST BE EARTHED.
Where to place your microwave oven.
1. Place the oven on a flat and stable surface.
2. The microwave oven shall not be placed in a cabinet unless it
has been tested in a cabinet.
3. Surface of the oven is protected by a plastic film which should
be removed before using.
4. Leave space behind and sides and upper of the oven. All air
vents should be kept a clearance.
If all vents are covered during operation, the oven may
overheat and, eventually, lead to oven failure.
5. Keep away from radio and TV sets. If the oven is located close
to a TV, radio interference may result.
6. Keep away from heating appliances and water taps. Keep the
oven away from hot air, steam or splash when choosing a
place to position it, or the insulation might be adversely
affected and breakdowns occur.
IMPORTANT-The wires in the mains lead fitted to this appliance
are coloured in accordance with the following code
REFER TO RATING PLATE FOR VOLTAGE AND CHECK
THAT THE APPLIANCE VOLTAGE CORRESPONDS WITH
THE SUPPLY VOLTAGE IN YOUR HOME.
GREEN AND YELLOW-EARTH
BLUE-NEUTRAL
BROWN-LIVE
As the colour of the wires in the mains lead of this appliance may
not correspond with the coloured markings identifying the
terminals in your plug, proceed as follows:
Power supply
• Check your local power source. This oven requires a current of
approximately 11 amperes, 230V 50Hz.
• Power supply cord is about 1.2 meters long.
• The voltage used must be the same as specified on this oven.
Using a higher voltage may result in a fire or other accident
causing oven damage. Using low voltage will cause slow
cooking. We are not responsible for damage resulting from use
of this oven with a voltage of ampere fuse other than those
specified.
• If the supply cord is damaged, it must be replaced by the
manufacturer or its service agent or a similarly qualified person
in order to avoid a hazard.
7. The minimum height of
free space necessary
above the top surface of
the oven is minimum
170mm.
The wire which is coloured GREEN AND YELLOW must be
connected to the terminal in the plug which is marked with the
letter “E” or the earth symbol
or coloured GREEN AND
YELLOW, or GREEN.
The wire which is coloured BLUE must be connected to the
terminal which is marked with the letter “N” or coloured BLACK,
or BLUE.
The wire which is coloured BROWN must be connected to the
terminal which is marked with the letter “L” or coloured RED , or
BROWN.
If the terminals in the plug are unmarked or you are in any doubt
as to the correct connections, consult a qualified electrician.
Prior to use (If your oven has a grill element)
In order to protect your oven during transportation and storage,
the grill element is covered with a protective coating. To remove
this coating the grill element must be heated for 5 minutes. This
procedure will produce some bad odours as the protective
coating on the element disappears.
To remove the coating, use the following procedures:
1. Press the convection button.
2. Set the max temperature to 5 minutes.
3. Set the time to 5 minutes.
4. When the 5 minutes has elapsed, an acoustic signal sounds.
5. Open the oven door and remove the bowl with water (use
oven gloves when removing the bowl).
If you do not make the proper electrical connections you will
damage your microwave oven and possibly injure yourself.
Neither the manufacturer nor the supplier are liable if this
happens.
MOULDED PLUGS
Should it be necessary to remove a moulded on plug from the
mains cable, it should be cut off and replaced with a suitable
replacement.
Note:
The protective coating has now been removed and the oven is
ready to use. Please be aware that your oven now is very hot.
The moulded plug cannot be used for any other appliance,
therefore remove the fuse and dispose immediately and safely to
prevent anyone, especially children from plugging it in to a wall
socket, which will create a safety hazard.
- WARNING: Only allow children to use the oven without
supervision when adequate instructions have been given so
that the child is able to use the oven in a safe way and
understands the hazards of improper use.
Should the mains lead ever require replacement, it is essential
that this operation be carried out by a qualified electrician and
should only be replaced with a flexible cord obtained from the
manufacturer.
4
IMPORTANT SAFETY INSTRUCTIONS
READ CAREFULLY AND KEEP FOR FUTURE REFERENCE.
WARNING : To prevent fire, burns, electric shock and other
warnings:
Listed below are, as with all appliances, certain rules to follow
and safeguards to assure high performance from this oven:
packaged and recommended
especially for microwave ovens.
Microwave popped corn produces a
lower yield than conventional
popping; there will be a number of
unpopped kernels. Do not use oil
unless specified by the
manufacturer.
9. Do not cook any food surrounded
by a membrane, such as egg yolks,
potatoes, chicken livers, etc.,
without first piercing them several
times with a fork.
10. Do not pop popcorn longer than
the manufacturer's directions.
(popping time is generally below 3
minutes). Longer cooking does not
yield more popped corn, it can
cause scorchings and fire.
Also, the cooking tray can become
too hot to handle or may break.
11. If smoke is emitted, switch off or
unplug the appliance and keep the
door closed in order to stifle any
flames.
12. When heating food in plastic or
paper containers, keep an eye on
the oven due to the possibility of
ignition.
1. Do not use the oven for any reason
other than food preparation, such
as for drying clothes, paper, or any
other nonfood items or for sterilizing
purposes.
2. Do not use the oven when empty,
this could damage the oven.
3. Do not use the oven cavity for any
type of storage, such as papers,
cookbook, cookware, etc.
4. Do not operate the oven without
the metal tray in place. Be sure it is
properly sitting on the rotating base.
5. Make sure you remove caps or lids
prior to cooking when you cook
food sealed in bottles.
6. Do not put foreign material
between the oven surface and door.
It could result in excessive leakage
of microwave energy.
7. Do not use recycled paper products
for cooking. They may contain
impurities which could cause sparks
and/or fires when used during
cooking.
8. Do not pop popcorn unless popped
in a microwave approved popcorn
popper or unless it's commercially
5
To reduce the risk of injury to
persons:
a) Do not overheat the liquid.
b) Stir the liquid both before and
halfway through heating it
c) Do not use straight-sided
containers with narrow necks.
d) After heating, allow the container
to stand in the microwave oven
for a short time before removing
the container.
e) Use extreme care when inserting
a spoon or other utensil into the
container.
19. This appliance is not intended for
use by persons(including children)
with reduced physical, sensory or
mental capabilities, or lack of
experience and knowledge, unless
they have been given supervision
or instruction concerning use of the
appliance by a person responsible
for their safety.
20. Children should be supervised to
ensure that they do not play with
the appliance.
21. Only use utensils that are suitable
for use in microwave ovens.
22.During use the appliance becomess
hot. Care should be taken to avoid
touching heating elements inside
the oven.
23. Do not use a steam cleaner in the
oven.
13. The contents of feeding bottles and
baby food jars shall be stirred or
shaken and the temperature
checked before consumption, in
order to avoid burns.
14. Always test the temperature of food
or drink which has been heated in a
microwave oven before you give it
to somebody, especially to children
or elderly people. This is important
because things which have been
heated in a microwave oven carry
on getting hotter even though the
microwave oven cooking has
stopped.
15. Eggs in their shell and whole hardboiled eggs should not be heated
in microwave ovens since they may
explode, even after microwave
heating has ended;
16. Keep the waveguide cover clean at
all times. Wipe the oven interior
with a soft damp cloth after each
use. If you leave grease or fat
anywhere in the cavity it may
overheat, smoke or even catch fire
when next using the oven.
17. Never heat oil or fat for deep frying
as you cannot control the
temperature and doing so may lead
to overheating and fire.
18. Microwave heating of beverages
can result in delayed eruptive
boiling, therefore care must be
taken when handling the container.
SAVE THESE INSTRUCTIONS
6
General Use
Listed below are, as with all appliances, certain rules to follow and safeguards to assure top performance from this
oven:
14. Do not attempt to remove covers, panels, etc.
11. Do not use the oven for any reason other than food
preparation, such as for drying clothes, paper, or any
other nonfood items or for sterilizing purposes.
They may catch on fire.
15. Look at the oven from time to time when food is heated or
cooked in disposable containers of plastic, paper or other
combustible materials.
12. Do not use the oven when empty, this could damage the
oven.
16. If smoke is emitted, switch off or unplug the appliance and
keep the door closed in order to stifle any flames.
13. Do not use the oven cavity for any type of storage, such
as papers, cookbook, cookware, etc.
17. Microwave heating of berverages can result in delayed
eruptive boiling, therefore care has to be taken when
handling the container.
14. Do not operate the oven without the turntable tray in
place. Be sure it is properly sitting on the rotating base.
18. Make sure you remove caps or lids prior to cooking when
you cook food sealed in bottles.
15. Be caution when removing the turntable tray after cooking
meats that may have caused an accumulation of grease
in the tray.
19. Do not put foreign material between the oven surface and
door. It could result in excessive leakage of microwave
energy.
16. Unlike microwave-only ovens, this oven may become hot
on the cabinet and oven door.
Always use hot pads or oven mitts when placing or
removing food and/or accessories from the oven.
Be cautions about touching parts other then control panel
during or immediately following grill or combination
cooking.
20. Do not pop popcorn longer than the manufacturer's
directions. (popping time is generally below 3 minutes).
Longer cooking does not yield more popped corn, it can
cause scorchings and fire.
Also, the cooking tray can become too hot to handle or
may break.
17. If the oven is hot from combination cooking, do not use
plastic or Styrofoam cookware for microwave cooking.
They may melt.
21. When heating food in plastic or paper containers, keep an
eye on the oven due to the possibility of ignition.
22. Always test the temperature of food or drink which has
been heated in a microwave oven before you give it to
somebody, especially to children or elderly people. This is
important because things which have been heated in a
microwave oven carry on getting hotter even though the
microwave oven cooking has stopped.
18. Do not use recycled paper products for cooking.
They may contain impurities which could cause sparks
and/or fires when used during cooking.
19. Do not continue to cook with metal utensils if sparking
appears. See “Accessories” section on page 8 for proper
use of cookware.
23. Eggs in their shell and whole hard-boiled eggs should
not be heated in microwave ovens since they may
explode, even after microwave heating has ended;
10. Do not leave the oven unattended during short cooking
times. Overcooking and fire may result.
24. Keep the waveguide cover clean at all times. Wipe the
oven interior with a soft damp cloth after each use. If you
leave grease or fat anywhere in the cavity it may
overheat, smoke or even catch fire when next using the
oven.
11. Do not cook any food surrounded by a membrane, such
as egg yolks, potatoes, chicken livers, etc., without first
piercing them several times with a fork.
12. Do not pop popcorn unless popped in a microwave
approved popcorn popper or unless it's commercially
packaged and recommended especially for microwave
ovens. Microwave popped corn produces a lower yield
than conventional popping; there will be a number of
unpopped kernels. Do not use oil unless specified by the
manufacturer.
25. Never heat oil or fat for deep frying as you cannot control
the temperature and doing so may lead to overheating
and fire.
26. During use the appliance becomes hot. Care should be
taken to avoid touching heating elements inside the oven.
13. Do not attempt to operate this appliance with the door
open.
7
TO AVOID EXPLOSION AND SUDDEN BOILIING
1. Eggs
Never cook eggs in their shells. Steam will build up inside
the shell during cooking and the egg will explode.
If you want to cook or reheat eggs which have not been
broken up by scrambling or mixing, you must always
pierce the yolks or these will also explode. You should
slice shelled hard boiled eggs before you reheat them in
your microwave oven.
2. Piercing
Always pierce food which has a skin or membrane, for
example, potatoes, tomatoes, apples, sausages etc. If you
don't pierce them, steam will build up inside and they may
explode.
3. Lids
Always remove the lids of jars and containers and take
away food containers, before you cook using your
microwave oven. If you don't, then steam and pressure
might build up inside and cause an explosion even after
the microwave cooking has stopped.
WARNING
Liquids, such as water, coffee, or tea are able to be
overheated beyond the boiling point without appearing to be
boiling due to surface tension of the liquid. Visible bubbling
or boiling when the container is removed from the
microwave oven is not always present. this could result in
very hot liquids suddenly boiling over when a spoon or other
utensilis is inserted into the liquid.
To reduce the risk of injury to persons:
a) Do not overheat the liquid.
b) Stir the liquid both before and halfway through heating it
c) Do not use straight-sided containers with narrow necks.
d) After heating, allow the container to stand in the
microwave oven for a short time before removing the
container.
e) Use extreme care when inserting a spoon or other utensil
into the container.
WHICH UTENSIL CAN BE USED IN THE OVEN?
Only use utensils that are suitable for use in microwave ovens.
Before use, the user should check that utensils are suitable for use in microwave ovens.
Material
Glass (general)
Glass (heat resistant)
Glass-ceramic and
ceramic (heat resistant)
Earthenware
China (heat resistant)
Plastic (general)
Plastic (heat resistant)
Aluminium foil containers
/aluminium foil
Metal baking tins
Metal (pots.pans, etc)
Paper
Grill &
Convection
cooking
Microwave
cooking
Utensils made of china and ceramic are excellent to use in
your microwave oven. Most types of glass are also very good.
Lead crystal glass can crack and should therefore, not be
used. Plastics and paper can also be used, provided they can
withstand the temperature of the heated food. For cooking only
use plastics, which will withstand a temperature of over 120ûC,
e.g. polypropene and polyamide. Some plastic materials, e.g.
melamine, will be heated by the microwave, and be damaged.
To find out if a certain container is suitable, the following
simple test can be made:
Place the empty container and a glass of water inside the
microwave oven. The water is needed because the oven must
not be operated empty or with empty containers only.
Let the oven work on full power for one minute. A suitable
container will only be lukewarm.
Combined
cooking
No
Yes
Yes (1)
Yes
No
Yes
Yes
Yes
Yes
No
Yes (2)
Yes (1)
Yes
Yes
Yes (2)
Yes (2)
Yes (1)
Yes
Yes
No
Yes (2)
Yes
Yes (4)
Yes
No
Yes (3)
No
No
Yes
Yes
Yes (4)
No
No
Metal containers, e.g. saucepans or frying pans should not be
used in microwave ovens. Nor should plates or vessels with
decorations be used since metal e.g. gold, might be part of the
decoration and such decorations will be damaged.
Small pieces of aluminiuum foil can be
used, but only to shield the areas that
would over-cook (e.g. for covering chicken
wings, leg tips and fish tails) but the foil
must not touch the side of the oven as
damage may occur.
1. Without metal parts or metal trims.
2. Some plastics are heat-proof only to certain temperatures.
Check carefully!
3. It is possible to use aluminium foil to shield deliate areas of
food (this prevents over-cooking).
4. Metal tins can be used in the combination methods,
however if these are very deep, they will greatly reduce the
efficiency, as metal shields the microwave energy from the
food.
Microwave function only
Utensils and cooking containers used in a microwave oven
should be of a material that does not act as a barrier to
microwave energy. Generally this means that you should cook
in either (paper), plastic, glass or ceramic. Metal pans reflect
microwave energy and inhibit cooking, and should not be used.
In addition to material, the shape of the container should also
be considered. Round oval shapes give the most even
cooking. Square or rectangular containers may over-cook
foods in the corners because more energy is absorbed there.
Shallow containers give more even cooking results.
Caution:
• There are a number of accessories available on the
market. Before you buy, make sure they are suitable
for microwave use.
• When you put food in the microwave oven, make sure
that food, food supports or covering do not come in
direct contact with any of the internal walls or the ceiling
of the cavity since discolouration may take place.
8
What is a function, STANDBY POWER “0”?
• Standby power is the electric power consumed by electronic appliances without operating on inserting the plug into a socket.
• STANDBY POWER “0” is function reducing standby power consumption.
• This product can save energy in a standby mode, by setting the STANDBY POWER "O" mode.
To turn on the oven, press and hold ZERO ON button until display is switched on and a beep sounds after plugging in.
The oven goes to STANDBY POWER “0” mode automatically after 10 minutes without using or press and hold STOP/CLEAR
button until display is turned off.
Press and hold ZERO ON button again until display is switched on and a beep sounds, you can use the oven.
• If you insert plug into a socket, the oven is STANDBY POWER “0” mode. So the display shows nothing. To cancel
STANDBY POWER “0” mode, press and hold ZERO ON button until display is is switched on and a beep sounds.
(Because automatically the oven is powered off after 10 minutes without using.
The display shows nothing.)
9
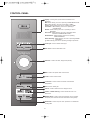
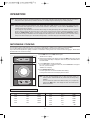
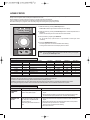
CONTROL PANEL
1 Display : Cooking time, power level and indicators are
displayed.
M/W : When flashing, the oven is operating in MICROWAVE COOK.
Grill : When flashing, the oven is operating in GRILL.
Combi : When flashing, the oven is operating in COMBI.
Convection : When flashing, the oven is operating in
CONVECTION.
Defrost : When flashing, the oven is operating in AUTO
DEFROST.
Auto Cook : When flashing, the oven is operating AUTO
COOK and HOME FRYER COOK.
Deodorization : When Flashing, the oven is operating
DEODORIZATION.
Steam Cleaning : When flashing, the oven is operatng STEAM
CLEANING.
g : When flashing, the oven is operating in weight input mode.
2 Home fryer : Used to select Home fryer.
3 Auto cook : Used to select Auto cook
w Dial knob : Used to set time, weight and quantity.
4 M/W : Used to set power level of microwave.
5 Combi : Used to select combi.
6 Convection : Used to select convection and selected
temperature.
7 Grill : Used to select grill.
8 Defrost : Used to defrost foods for weight or time.
9 Deodor. / Steam cleaning : Used to deodorize oven or to
clean oven.
0 START/+30sec : Used to start a Programme, also for speedy
start(each press adds 30 seconds microwave cooking time).
q STOP/Clear : Used to stop the oven operation or to delete the
cooking data.
10
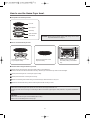
ACCESSORIES
This oven comes equipped with several accessories. They can be used in various ways to facilitate cooking.
1
2
3
4
5
3 Metal Tray - Put food or appropriate cookware directly on
the metal tray and place on the glass turntable and then
place on the roller guide when using convection cooking,
combination cooking, auto cooking or grill cooking.
1 Glass Turntable - Center the tray on the roller guide
when using the microwave features. Place food or
microwave-safe cookware directly on the glass turntable.
NOTE : Glass Turntable is attached to the right cushion pad.
4 Metal Rack - Center the rack on the metal tray when
using the grill cooking and Auto cooking menu 1,2,3,4.
2 Roller Guide - The roller guide must be in place when
using the oven.
IMPORTANT : The roller guide must be placed in the
center of the oven's cavity.
5 Home Fryer Bowl - Center the kit on the metal tray when
using the Home fryer cooking.
■ HOW TO USE THE ACCESSORIES OF COOKING
■ Glass Turntable
• Microwave cooking
■ Metal Tray
■ Metal rack
• Grill cooking
• Auto cooking menu
1,2,3,4
• Convection cooking
(cake,pizza.pie)
• Convection cooking
• Combination cooking
• Auto cooking menu 5
NOTE : Metal Tray must not be used in microwave cooking.
11
■ Home Fryer bowl
• Home fryer cooking.
How to use the Home Fryer bowl.
■ Composition of Home Fryer bowl.
Fryer fan
Fryer support
Metal Tray
Glass Turntable
Roller Guide
CAUTION : Please use the kitchen gloves while taking out the Home
Fryer bowl because it is very hot.
■ How to use the Home Fryer bowl.
Please put the Fryer fan on the
Fryer support solidly.
Please put the foods on the
Fryer fan evenly.
Please use the Home Fryer
bowl after putting on the Metal
tray.
■ Cautions while using the Home Fryer bowl.
1 Please always use the Home Fryer bowl after putting on the Metal tray.
- Never use this bowl with other dishes and trays. Home Fryer and Home Fryer bowl can be damaged.
2 Please place the Fryer fan on the Fryer support solidly.
3 Please place the foods on the Fryer fan evenly.
4 Please use kitchen gloves while taking out the Home Fryer bowl because it is very hot.
5 Please be careful when taking out the Home Fryer bowl after cooking is done.
CAUTION :
Please clean the Home Fryer bowl. Sparks can occur if there are foreign substances on it.
Home Fryer bowl can be used only for "Home Fryer". When it is used for a gas range or other products, it may cause a malfunction
or fire.
CAUTION :
Please wash the Home Fryer bowl immediately after cooking.
Please use a neutral detergent and soft sponge.
12
OPERATION
Tips : Also remember to read this operating instructions for proper safety information and instruction before using the oven. Prior to
setting the controls, place one cup of water in the oven, on a heat-proof glass measuring cup, for testing purposes.
Note : When the cooking time has elapsed the oven beeps three times, “End” appears in the display, the rotating plate stops
turning and the oven light turns off. The oven will continue to beep every 1 minute until the STOP/Clear button is
pressed, or the door is opened.
The cooling fan may operate for 2~5 minutes after cooking for safety.(the display will show “COOL” and “ :0 ”) Opening
the door during cooking will cause the oven to shut off the cooking process and any displayed countdown to pause.
When the START/+30sec button is pressed, the cooking countdown will resume. When the STOP/Clear button is
pressed, the cooking is cancelled. The oven displays the set cooking time in 10 seconds steps (up to 5 minutes cooking
time), in 30 seconds steps (up to 10 minutes cooking time), in 1 minutes steps (up to 60 minutes cooking time).
MICROWAVE COOKING
This microwave cooking method allows you to cook food for a desired time. In addition to the maximum power level(100%),
you can select different microwave power from 9 other levels, 10% to 90% for the foods that require slower cooking.
If you have used the appliance for grilling, convection or combination cooking, let the oven cool down before using again. Never switch
the microwave oven on when it is empty.
1. Press M/W button once. M/W indicator lights.
“ P-HI “ shows in display.
2. Select the appropriate power level by pressing the M/W button again until the
corresponding percentage is displayed. Refer to the power level table below
for further details.
3. Turn the dial knob to set the cooking time.
For a cooking time of 5 minutes 30 seconds, turn the dial knob to the right to
set 5:30. ( up to 60 minutes )
“ 5:30” shows in display.
4. Press START/+30sec button.
The oven light comes on and the turntable starts rotating.
Cooking starts and the time in the display will count down.
Note : The oven will automatically work on 100% microwave power if a
cooking time is entered without the power level previously being
selected.
You can check the power level while cooking is in progress by
pressing the M/W button. The display will show the current power
level for 2 seconds.
Power level table
Power level
percentage
Output
Power level
percentage
Output
P-HI
100%
900W
P-50
50%
450W
P-90
990%
810W
P-40
40%
360W
P-80
980%
720W
P-30
30%
270W
P-70
970%
630W
P-20
20%
180W
P-60
960%
540W
P-10
10%
90W
P-00
90%
900W
13
GRILL COOKING
The grill enables you to heat and brown food quickly, without using microwaves.
1. Press Grill button once. Grill indicator lights. and ":0" is displayed.
2. Turn the dial knob to set the grilling time.
For a grilling time of 11 minutes, turn the dial knob to the right to set 11:00.( up
to 60 minutes )
“11:00” shows in display.
3. Press START/+30sec button.
The oven light comes on and the turntable starts rotating.
Cooking starts and the time in the display will count down.
Note :
The heating element is located in the top of the oven.
Note : When first using the grill heaters, smoke and odour will be given off.
To avoid this happening when food is being cooked, heat the upper
and lower grills without food for approximately 10 minutes.
Place food directly on the rack, in a flat dish or on a heat resistant
plate on the rack.
WARNING :
The temperature inside the oven and window is very high.
Do not touch the oven window and metallic interior of the oven when taking
food out or putting it in the microwave.
Use thick oven gloves while handling food or accessories.
Suggested use
Cookware
This method is ideal for toasting bread or muffins.
Remember the oven will be hot.
Place all food on metal rack.
Use oven-proof cookware.
As there is no microwave energy being used you can place
metal tins directly onto the metal rack with no danger of arcing.
14
CONVECTION COOKING (with pre-heat)
For convection cooking, it is recommended that you preheat the oven to the appropriate temperature before placing the food in the oven.
(except for 40°C convection mode)
The maximum preheating time is 30 minutes. If the cooking is not started immediately after preheating, the convection indicator will
continue to flash and the preheated oven temperature will be displayed.
It is maintained for 15 minutes; it is then switched off automatically.
1. Press Convection button once. Convection indicator lights.
“180C” shows in display.
2. Select the convection cooking temperature by pressing the Convection
button again until the corresponding temperature is displayed.
Temperature sequence
180°C → 190°C → 200°C → 210°C → 220°C → 230°C →
240°C→ 250°C → 110°C → 120°C → 130°C → 140°C →
150°C → 160°C → 170°C
3. Press START/+30sec button. Convection indicator flashes.
Temperature of preheating and “PrE-” blink altematively in the display.
The oven will now preheat. When oven is preheated the oven will beep and
the preheated oven temperature will appear in the display.
Then open the door and place your food in the oven.
Oven temperature shows in display.
4. Turn the dial knob to set the cooking time.
For a cooking time of 11 minutes, turn the dial knob to the right to set
11:00.(up to 60 minutes)
“11:00” shows in display.
5. Press START/+30sec button.
The oven light comes on and the turntable starts rotating.
Cooking starts and the time in the display will count down.
Note: You can check the setting temperature while cooking is in progress by pressing the Convection button.
15
CONVECTION COOKING (traditional cooking)
The convection mode enables you to cook food in the same way as in a traditional oven. Microwaves are not used.
Always use oven gloves when touching the recipients in the oven, as they will be very hot.
1. Press Convection button once. Convection indicator lights.
“180C” shows in display.
2. Select the convection cooking temperature by pressing the Convection
button again until the corresponding temperature is displayed.
Temperature sequence
180°C → 190°C → 200°C → 210°C → 220°C → 230°C →
240°C→ 250°C → 40°C → 110°C → 120°C → 130°C →
140°C → 150°C → 160°C → 170°C
3. Turn the dial knob to set the cooking time.
For a cooking time of 11 minutes, turn the dial knob to the right to set
11:00.(up to 60 minutes)
“11:00” shows in display.
4. Press START/+30sec button.
The oven light comes on and the turntable starts rotating.
Cooking starts and the time in the display will count down.
Note: You can check the temperature setting while cooking is in progress by pressing the Convection button.
Suggested use
Cookware
Use oven-proof cookware.
As there is no microwave energy being used you can place
metal tins directly onto the metal rack with no danger of arcing.
This function is ideal for cooking meringues, cookies, biscuits,
scones, bread, puddings, large fruit cakes and all pastries.
Remember the oven will be hot.
Place all food on metal rack.
16
Convection Cooking Recipe
Manual Cook Menu
MINI SAUSAGE
ROLL
Ingredients
store-bought puff pastry, 50g * 3, Allpurpose flour, for dusting,
sausages 50g *3, 1egg (beaten), freshly
ground black pepper, thyme leaves,
parsley
Method
1. Dust the work surface and place the puff pastry dough.
2. Place the sausages onto the dough.
3. Season with spices and pepper to your liking.
4. Roll the pastry and coat with beaten egg.
5. Cut into 6-8 pieces and place them into the fryer bowl.
6. Without preheating, cook for 20-25 minutes under 200°C until they turn golden
brown.
ASPARAGUS AND 2 strips bacon(cut into 1 inch slices), 1/2
SPINACH QUICHE pound asparagus(trimmed, cleaned and
cut into 1 inch pieces), 1 cloves
garlic(chopped), 1 green onions(sliced), 1
cups spinach, 3 eggs(lightly beaten), 1/2
cup milk, 1/2 cup gruyere(grated), salt and
pepper to taste, 1 batch pastry
dought(chilled)
1. Set the dough onto a 9-inch pie plate and cut the excess off the rim. Use a fork
to pierce holes and cook in the oven that has been preheated to 180°C for 10
minutes.
2. Slice the bacon into 1 inch pieces, cook and remove from the pan. Roast the
asparagus in the same pan and add green onions. Finally add spinach and
roast until they wilt.
3. Mix the egg, milk and grated gruyere cheese.
4. Add the cooked bacon and vegetables into the dough and pour in the egg mix.
5. Place the pie plate onto the metal rack and cook in an oven preheated to
190°C for 50-55 minutes.
CHICKEN POT PIE FOR THE PASTRY: 1cup all-purpose
flour, 1tsp sugar, 1/4 tsp salt, 1/3 cup
unsalted butter, 2~4 tbsp ice water
For the filling: 300g chicken fillets, 1cup
chopped onion, 1cup chopped celery, 1
1/2cup chopped carrots, 1 garlic minced,
1/3cup all-purpose flour, 1 chicken
bouillon cube, 4cup water
1. Making the dough: Using a food processor, mix flour, salt and sugar. Add diced
butter and mix to create a fluffy texture.
2. Beat the dough into a lump by gradually adding ice water and let it rest in the
refrigerator for over 1 hour.
3. Add 4 cups of water and 1 chicken bouillon cube into a pot and boil the chicken
breasts.
4. Remove the chicken breasts and slice into thin slices. Filter any excess from
the stock.
5. In a large pot, melt 3 table spoons of butter and roast onions, carrots and
celery. Once done, add and roast the garlic and coat with flour.
6. Stir while gradually adding the stock, then, simmer until it thickens.
7. Season with salt and pepper. Add the sliced chicken and pour the filling into a
1.5 liter container.
8. Take out the dough from refrigerator and roll it until about 3mm thick. Cover the
container with the dough and shape it by folding the edges inwards. Make a
few, small gashes in the center.
9. Place the container onto the metal rack and cook in an oven preheated to
190°C for 50~55 minutes
MARGHERITA
PIZZA
FOR THE dough300g strong bread flour,
1 tsp instant yeast (from a sachet or a tub),
1 tsp salt, 1 tbsp olive oil, plus extra for
drizzling
FOR THE TOMATO SAUCE100ml
passata, handful fresh basil or 1 tsp dried,
1 garlic clove(crushed),
FOR THE TOPPING125g ball
mozzarella(sliced), handful grated or
shaved parmesan, handful cherry tomatoes
, halved handful basil leaves (optional)
1. Dough: Mix flour, yeast and salt in a bowl, then add olive oil and warm water.
Beat until a smooth texture is gained.
2. Sauce: Mix basil and garlic into the passata.
3. Divide the dough in half. Roll it into a thin, circular shape. Then, place the
dough onto a baking sheet or baking pan. Cover with the sauce.
4. Add toppings onto the sauce and evenly drizzle olive oil.
5. Place the pizza onto the metal rack and cook in an oven preheated to 200°C
for 10~15 minutes.
BROWNIES
21cm cake mold, 150g dark chocolate, 50g
milk chocolate, 90g unsalted butter, 80g
brown sugar, 70g milk, 100g egg, 75g
weak flour, 1/2 tsp baking powder, 60g
chopped walnut FOR TOPPING hazelnut,
coconut, walnut etc
1. Chop the chocolates and melt in a pot on low heat.
2. Once melted, immediately move it to another bowl and stir with butter using a
hand mixer at high speed.
3. Add sugar and warm milk, then mix.
4. Add the eggs in two steps and mix.
5. Sift the powder into the bowl and lightly mix.
6. Add ground walnuts and mix.
7. Lay oil paper on a pan and pour the mix. Add toppings and cook in an oven
preheated to 160°C for approximately 40~45 minutes.
17
COMBINATION COOKING ( Microwave + Convection + Upper Grill )
This function allows you to combine convection operation with microwave to produce traditional baked or roasted results in less time.
Always use microwave-safe and oven-proof cookware. Glass or ceramic dishes are ideal as they allow the microwaves to penetrate the
food evenly.
Always use oven gloves when touching the recipients in the oven, as they will be very hot.
1. Press Combi button once.
Combi indicator light and “C-0” will show in the display.
2. Select the desired power level.
For example : C-HI
Press Combi button once again “C-HI” will show in the display.
Display
MW Power
C-0
40%
C - HI
50%
C - LO
30%
Note : In sequential operation mode, only “C-0” can be selected.
3. Press Convection button once.
“180C” shows in display.
Select the convection cooking temperature by pressing the Convection button
again until the corresponding temperature is displayed.
Temperature sequence
180°C → 190°C → 200°C → 210°C → 220°C → 230°C →
240°C→ 250°C → 110°C → 120°C → 130°C → 140°C →
150°C → 160°C → 170°C
4. Turn the dial knob to set the cooking time.
For a cooking time of 11 minutes, turn the dial knob to the right to set 11:00.
( up to 60 minutes )
“11:00” shows in display.
5. Press START/+30sec button.
The oven light comes on and the turntable starts rotating.
Cooking starts and the time in the display will count down.
Note : You can check the cooking temperature while cooking is in progress by
pressing the Convection button.
The display will show the cooking temperature for 2 seconds.
In sequential operation mode, only “C-0” can be selected.
18
DEODORIZATION
You can use the Deodorization function to remove unpleasant smells from the microwave oven.
1. Press Deodorization/Steam cleaning button once.
The Deodoriziation indicator lights and "CL-1" is displayed.
The oven starts deodorizing for 5 minutes.
STEAM CLEANING (with Microwave Feature)
This function helps you to clean the inside of oven.
1. Put about 200ml water in a mug cup or small bowl in the middle of the
tray in the oven.
2. Press the Deodorization/Steam cleaning button twice.
The Steam Cleaning indicator lights and “ CL-2 ” is displayed.
The oven starts working immediately, and it works for 15 minutes.
3. The display shows “door” and "open" at 5 minute intervals if the operation has
completed.
4. Open the door and wipe out the inner cavity with a dry cloth.
19
WEIGHT DEFROST
Weight Defrost automatically sets the defrosting times and power levels to give even defrosting results for frozen food.
During the defrosting process the oven will beep to remind you to check the food. The oven will beep, open the door, turn the frozen food
over and close the door, press the START/+30sec button.
1. Press Defrost button once. The Defrost indicator lights and remove spaces,
it should be like this: "0" displayed. The “g” indicator blinks.
2. Turn the dial knob to set the weight.
Weight can be set up from 200g to 3000g.
The weight will change in 50g increments or decrements.
For a defrosting weight of 1000 grams, turn the dial knob to the right to set
1000. “1000” shows in display.
3. Press START/+30sec button.
The oven light comes on and the turntable starts rotating. The “g” indicator
goes off.
Cooking starts and the time in the display will count down.
4. The oven will beep, open the door, turn the frozen food over and close the
door, press the START/+30sec button.
Note : WEIGHT DEFROSTING, the defrosting time is automatically determined
by the weight entered.
TIME DEFROST
During the defrosting process the oven will beep to remind you to check the food.
The oven will beep, open the door, turn the frozen food over and close the door, press the START/+30sec button.
1. Press Defrost button twice.
The Defrost indicator lights and “:0” is displayed.
2. Turn the dial knob to set the defrosting time.
For a time of 11 minutes, turn the dial knob to the right to set 11:00.
(up to 60 minutes)
“11:00 “shows in display.
3. Press START/+30sec button.
The oven light comes on and the turntable starts rotating.
Cooking starts and the time in the display will count down.
4. The oven will beep, open the door, turn the frozen food over and close the
door, press the START/+30sec button.
20
HOME FRYER
Convenient function to set the temperature and cooking time automatically and simply by pressing Home Fryer button.
Always use oven gloves when touching the recipients in the oven.
Please repeat the process from the top when you use the Home Fryer sequentially.
User can easily set the cooking time by adjusting the dial when Home Fryer menu 8 is selected.
Even while cooking is in progress, User can easily change the cooking time by adjusting the dial.
1. Select the menu by pressing Home Fryer button.
Auto Cook indicator light and "Fr-1" will show in the display.
2. Select the menu by pressing the Home Fryer button until the required menu is
displayed.
Refer to the Home Fryer menu chart below for further details.
3. Set up the time by adjusting the dial knob.
ex) 10 minutes set up. (this function is only available in Home Fryer menu
number 8)
4. Press the START/+30sec button.
The oven light comes on and the turntable starts rotating.
Cooking starts and the time in the display will count down.
Note : You can check the setting cooking menu while the cooking is in progress
by pressing the Home Fryer button.
Home Fryer Menu Chart
Press home fryer key
Once
Twice
3 times
4 times
5 times
6 times
7 times
8 times
Display
Fr-1
Fr-2
Fr-3
Fr-4
Fr-5
Fr-6
Fr-7
Fry
Home Fryer Menu
FROZEN POTATO CHIPS
BREADED CHICKEN BREAST
FISH FINGERS
CHICKEN NUGGETS
SPRING ROLL
ONION RING
CHEESE STICK
MANUAL COOK
Turn Over
O
O
O
O
O
O
O
Start Temp.
Frozen
Frozen
Frozen
Frozen
Frozen
Frozen
Frozen
-
Weight (g)
300g
400g
400g
400g
300g
300g
400g
-
Time (min.)
20
18
17
15
13
13
15
Max. 30
NOTE
Please turn the food over before 4~5 minutes in advance if the food is needed to be turned over.
In order to cook the food more crisply, please increase the time by adjusting the dial.
A little bit of smell and fume can occur while operation the Home Fryer for the first time. It is not malfunction. Please use it in peace.
The cooling fan might be operated in order to decrease the inside temperature. It is not malfunction. Please use it in peace.
Manual Cooking Recipe
Manual Cook Menu
Ingredients
Method
HOMEMADE
CHIPS
400-500g potatoes, 1 tbsp cooking oil, 1/4
tsp salt, 1/4 tsp paprika, pepper
1. Cut the potatoes into 1cm thick slices and mix with cooking oil, salt, paprika and
pepper.
2. Evenly spread the potatoes in the fryer bowl and cook with home fryer function
for 28~30 minutes. Flip the potatoes over 8~12 minutes before finishing.
BREADED FISH
FILLET
2 Fish fillets (200g~250g), salt, pepper, 1
egg, 3 tbsp flour, 1 cup bread crumbs.
(1.5 tbsp cooking oil)
* Add cooking oil into bread crumbs and
mix.
1. Remove moisture from the fish using kitchen towels and season with salt and
pepper.
2. Evenly coat the fish with flour, egg and bread crumb. Place it in the fryer bowl.
3. Cook with home fryer function for 17~19 minutes.
Flip the food over 6~8 minutes before finishing.
4. Serve with sorrel sauce.
21
Manual Cook Menu
Ingredients
Method
POTATO
CROQUETTES
400g potatoes, 50g ground cheddar
cheese, 50g ground parmesan cheese, 2
chopped spring onions, 50g flour, salt,
pepper, 2 eggs, 100g bread crumbs,
cooking oil
* Add cooking oil into bread crumbs and mix.
1. Boil the potatoes for 20 minutes and mash after removing the skin.
2. Add cheese, 1 egg and spring onions and season with salt and pepper.
3. Shape the mix into oval shapes and coat with flour, beaten egg and bread
crumbs respectively
4. Place the croquettes in the fryer bowl and cook with home fryer function for
16~18 minutes. Flip the food over 6~8 minutes before finishing.
CHICKEN KIEVS
2 Chicken breasts, 3 tbsp garlic & herb
soft cheese, 1 cup bread crumbs, 1.5 tbsp
cooking oil, 1/4 tsp garlic powder, 1/2 tsp
parsley powder, 3 tbsp flour, 1 egg.
1. Mix bread crumbs with cooking oil, garlic powder and parsley.
2. Score into the sides of the chicken breasts make a pocket-like shape.
3. Fill the chicken breasts with cream cheese and coat with flour, beaten egg and
bread crumbs respectively. Place it in the fryer bowl.
4. Cook with home fryer function for 17~19 minutes.
Flip the food over 6~8 minutes before finishing.
BREADED
CHICKEN
FINGERS
2 Chicken breats (250~300g), 2 cups
cereal, 2 tbsp parmesan cheese, 1/4 tsp
pepper, 2 tbsp melted butter, 2 tbsp
mayonnaise
1. Slice the chicken breasts into strips the width of your fingers and stir them with
mayonnaise.
2. Fill a plastic bag with the cereal, parmesan cheese, pepper and melted butter.
Then, crush the mix.
3. Put the chicken breasts into the plastic bag and coat them with cereal mix.
Place it in the fryer bowl.
4. Cook with home fryer function for 11~13 minutes.
Flip the food over 4~6 minutes before finishing.
FRIED CHICKEN
WINGS
500g Chicken wings (separated at joints,
tips discarded), salt, pepper, 1 tbsp hot
sauce, 1/2~1 tbsp cooking oil, 4 tbsp flour
FOR SAUCE 1 tsp crushed garlic, 1.5 tsp
ground ginger, 1 tsp chili sauce, 2 tbsp
vinegar, 2 tbsp brown sugar, 1 tsp soy
sauce
1. Remove moisture from the chicken wings after washing, then, mix with salt,
pepper and hot sauce in a bowl.
2. Coat the chicken wings with flour in a plastic bag. Place them in the fryer bowl
without overlapping.
3. Cook with home fryer function for 23~27 minutes.
Flip the food over 7~9 minutes before finishing.
4. While the chicken wings are being cooked, mix the sauce ingredients and
simmer.
5. Place the chicken in the sauce and mix to finish.
BANANA
FRITTERS
2 large bananas
FOR BATTER 6 tbsp weak flour, 1 tbsp
sugar, 1/4 tsp salt, 1/4 tsp baking powder,
50g coconut slice, 90g milk, 1 tbsp grape
seed oil
1. Remove the skin from the bananas and slice them 2~2.5cm thick.
2. Mix the batter ingredients and let them settle for 5 minutes. Coat the bananas
with the batter and place them in the fryer bowl.
3. Place the bowl in the oven and cook with home fryer function for
13~15 minutes.
4. Flip the food over 4~6 minutes before finishing.
COCONUT
SHRIMP
15 shrimps (approx. 200g peeled and
deveined), 2 tbsp starch, salt, pepper, 1
egg white, 1/2 cup bread crumbs, 1/2 cup
flaked coconut, 1.5 tbsp cooking oil, 1/4
tsp paprika
1. Skin the shrimps and remove moisture.
2. Add salt and pepper to the starch. Whisk the egg whites. Mix bread crumbs,
coconut, cooking oil and paprika.
3. Coat the shrimps with the starch mix, whisked egg whites and bread crumbs
respectively and place them in the fryer bowl.
4. Cook with home fryer function for 11~13 minutes.
Flip the food over 4~6 minutes before finishing.
FRIED CALAMARI 2 squids (body part only, 150-200g), 1
tbsp white wine, 1/4 tsp garlic powder, 3
tbsp flour, 1 cup bread crumbs, 1.5 tbsp
cooking oil, 1 tsp parsley powder, 1 egg, 1
tbsp milk, pepper
FOR TARTAR SAUCE, 1/2 cup mayonnaise,
2 tbsp chopped pickles, 1 tbsp chopped
onion, 1 tbsp chopped caper, 2 tbsp Dijon
mustard, 1 tsp wholegrain mustard, 1 tbsp
lemon juice, 2-3 drops hot sauce, salt, pepper
FRIED
MUSHROOM
14-15 button mushrooms (300g)
FOR BATTER 2 tbsp flour, 1 egg, 1 cup
bread crumbs(1.5 tbsp cooking oil) *Add
cooking oil into bread crumbs and mix.
FOR SAUCE 2 tbsp plain yogurt, 2 tbsp
mayonnaise, 1 tbsp chopped onions, 1/4
tsp garlic, pepper, parsley
1. Remove squid’s organs and slice into 1cm thick rings.
2. Marinate the squid in a bowl with white wine and garlic powder.
3. Mix the bread crumbs with chopped parsley. Mix milk and pepper into beaten
egg.
4. Coat the marinated squid with flour, beaten egg and bread crumbs respectively
and place it in the fryer bowl.
5. Cook with home fryer function for 16~18 minutes.
Flip the food over 6~8 minutes before finishing.
6. Serve with tartar sauce.
1. Wash the button mushrooms. Put them inside a plastic bag with flour and shake.
2. Coat the mushrooms with beaten egg and bread crumbs respectively, then,
place them in the fryer bowl.
3. Place the bowl in the oven and cook with home fryer function for
14~16 minutes.
4. Flip the food over 4~6 minutes before finishing.
5. While the mushrooms are being cooked, make the sauce. Serve mushrooms
with said sauce.
22
AUTO COOK
This function allows you to simply and automatically cook a range of popular foods.
Always use oven gloves when touching the recipients in the oven.
1. Press Auto Cook button once.
Auto Cook indicator light.
“AC-1 “ will show in the display.
2. Select the menu by pressing the Auto Cook button until the required menu is
displayed.
Refer to the auto cook menu chart below for further details.
3. Turn the dial knob to set the cooking weight.
For a cooking weight of 1000 grams, turn the dial knob to the
Right to set 1000 g.( up to 2000 grams )
“1000” shows in display. “g” shows in display.
Refer to the auto cook menu chart below for further details.
4. Press START/+30sec button.
The oven light comes on and the turntable starts rotating.
Cooking starts and the time in the display will count down.
Note : You can check the setting cooking menu while the cooking is in progress
by pressing the Auto Cook button.
Auto Cook Menu Chart
Press auto cook key
Once
Twice
3 times
4 times
5 times
Auto Cook Menu
Display
AC-1
AC-2
AC-3
AC-4
AC-5
Start Temp.
FRESH
VEGETABLES
Maximum Weight
2000 g
2000 g
2000 g
900 g
900 g
Method
Weight Step
100 g
100 g
100 g
100 g
50 g
Cookware
Chilled temp.
Micro and heat proof
dish.
(e.g Pyrex.)
Metal rack
Chilled temp.
1. Wash and dry chicken. Tie the legs loosely together with string.
2. Pierce the skin a couple of times just under the legs.
3. Brush butter mixture all over the chicken on the dish.
4. Place roasts breast-side down on the dish.
5. Cook on “AUTO COOK-ROAST CHICKEN”.
6. Turn over when hearing the beep.
7. Remove from oven. Drain off any excess juices. Season with salt if
required. Stand for 10 minutes in foil before serving.
Micro and heat proof
dish.
(e.g Pyrex.)
Metal rack
Chilled temp.
1. All types of fresh fish(except battered or breadcrumbed fish) can
be cooked whether whole, fillets or steaks.
2. Place the prepared fish in a buttered dish.
3. Season with salt and pepper, sprinkle with lemon juice and dot with
butter. Do not cover dish.
4. Place on dish on the metal rack on the Metal Tray.
5. Cook on “AUTO COOK- BAKED FISH”.
Micro and heat proof
shallow dish.
(e.g Pyrex.)
Metal rack
1. Wash and trim.
2. Place prepared vegetables into a suitable sized container.
3. Sprinkle with 2-3 tbs. of water.
4. Cover with pierced cling film or a lid.
5. Place on dish on the turntable.
6. Cook on “AUTO COOK- FRESH VEGETABLES.
* For best results cut vegetables into similar sized pieces.
Microproof dish.
(e.g Pyrex.)
ROAST BEEF
BAKED FISH
Minimum Weight
500 g
500 g
800 g
300 g
100 g
1. Tie the joint into a neat shape.
2. Place the meat on the dish.
3. Brush with a little oil.
4. Place roasts fat-side down on the dish.
5. Cook on “AUTO COOK-ROAST PORK or ROAST BEEF”.
6. Turn over when hearing the beep.
7. Remove from oven. Drain off any excess juices.
8. Stand for 10 minutes in foil before serving.
ROAST PORK
ROAST CHICKEN
Auto Cook Menu
ROAST PORK
ROAST BEEF
ROAST CHICKEN
BAKED FISH
FRESH VEGETABLE
23
+30sec
The +30sec function allows the oven to being cooking immediately on full power.
The +30sec button has been pre-programmed to increase in increments of 30 seconds up to a maximum time of 5 minutes.
1. Press START/+30sec button.
The oven will be “ : 30” is displayed. M/W indicator lights.
And the oven will start immediately. No need to press START/+30sec button.
The oven light comes on and the turn table starts rotaing and the time in the
display will count down in seconds.
TO STOP THE OVEN WHILE THE OVEN IS OPERATING
1. Open the door.
• Oven stops operating.
• You can restart the oven by closing the door and touching START/+30sec button.
2. Press the STOP/Clear button.
• Oven stops operating.
• If you wish to cancel the cooking settings, press the STOP/Clear button again.
STAND-BY POWER "0"
This function is used for saving energy.
To set Stand-by power "0" mode
1. Push the STOP/CLEAR button.
“ : 0” appears in the display.
2. Press and hold the STOP/CLEAR button until display is turned off.
3. To cancel the stand-by power "0" mode, press and hold ZERO ON button until
display is turned on.
The oven is again available for normal use.
ABNORMAL MESSAGE
• If the inside temperature of the oven is higher than expected or the
temperature sensor doesn't work properly, “Err 2” message will be
shown in the display.
• Unplug the power and call our technical service.
• When the temperature sensor is disconnected, “Err 3” message
will be shown in the display.
• Unplug the power and call our technical service.
WARNING
If you see arcing, press STOP/Clear button and correct the problem.
Arcing is the microwave term for sparks in the oven. Arcing is caused by:
a) Metal or foil touching the side of the oven.
b) Foil not molded to food (upturned edges act like antennas).
c) Metal, such as twist-ties, poultry pins, or gold rimmed dishes, in the microwave.
d) Recycled paper towels containing small metal pieces being used in the microwave.
24
GENERAL GUIDE LINES
Covering food helps:
• To reduce spattering
• To shorten cooking times
• To retain food moisture
All covering, which will allow microwaves to pass through are
suitable-See above “Which utensils can be used in the oven?”
Since microwave cooking to some extent is different from
traditional cooking, the following general guidelines should be
considered whenever you use your microwave oven
If the food is undercooked
Check if:
• You have selected the correct power level.
• The selected time is sufficient-the times given in the recipes
are approximate. They depend on initial temperature,
weight and density of the food etc.
• The container is appropriate.
Releasing pressure in foods
Several foods are tightly covered by a skin or membrane.
These foods should be pricked with a fork or cocktail stick to
release the pressure and to prevent bursting, as steam builds
up within them during cooking. This applies to potatoes,
chicken livers, sausages, egg yolks and some fruits.
If the food is overcooked, i. e. dried out or burnt
Before you cook again, consider whether:
• The power level was too high.
• The set time was too long-the times in the recipes are
approximate. They depend on initial temperature, weight
and density of the food etc.
Standing time
Always allow the food to stand for some time after using the
oven. standing time after defrosting, cooking/reheating
always improves the result since the temperature will then be
evenly distributed through out the food.
In a microwave oven foods continue to cook even when the
microwave energy is turned off. They are no longer cooking
by microwaves, but they are still being cooked by the
conduction of the high residual heat to the centre of the food.
The length of standing time depends on the volume and
density of the food. Sometimes it can be as short as the time
it takes you to remove the food from the oven and take it to
the serving table. However, with larger, denser foods, the
standiing time may be as long as 10 minutes. During
‘standing’, the internal temperature of the food will rise by as
much as 8ûC and the food will finish cooking in this time.
Points to remember when defrosting
• The shape of the package alters the defrosting time.
Shallow rectangular packets defrost more quickly than a
deep block. Separate pieces as they begin to defrost; freef
low slices defrost more easily.
• Shield areas of food with small pieces of foil if they start to
become warm.
• When defrosting, it is better to under thaw the food slightly
and allow the process to finish during the standing time.
The amount of food
The more food you want to prepare the longer it takes. A rule
of thumb is that double amount of food requires almost
double the time. If one potato takes four minutes to cook,
approximately seven minutes are required to cook two
potatoes.
Arranging food
This is done in several ways in microwave cooking to give
more even cooking results.
If you are cooking several items of the same
food such as jacket potatoes, place them in
a ring pattern for uniform cooking. When
cooking foods of uneven shapes or thickness,
place the smaller or thinner area of the food towards the
centre of the dish where it will be heated last.
Starting temperature of food
The lower the temperature of the food which is being put into
the microwave oven, the longer time it takes. Food at room
temperature will be reheated more quickly than food at
refrigerator temperature.
Uneven foods such as fish should be arranged
in the oven with the tails to the centre.
If you are saving a meal in the refrigerator
or ‘plating’ a meal for reheating, arrange the
thicker, denser foods to the outside of the
plate and the thinner or less dense foods
in the middle.
Place thin slices of meat on top of each
other or interlace them. Thicker slices such
as meat loaf and sausages have to be placed
close to each other. Gravy or sauce should be
reheated in a separate container.
Composition of the food
Food with a lot of fat and sugar will be heated faster than
food containing a lot of water. fat and sugar will also reach a
higher temperature than water in the cooking process.
The more dense the food, the longer it takes to heat. “Very
dense” food like meat takes longer time to reheat than lighter,
more porous food like sponge cakes.
Size and shape
Smaller pieces of food will cook more quickly than larger
pieces and uniform pieces of food cook more evenly than
irregularly shaped foods.
With unevenly shaped food, the thinner parts will cook faster
than the thicker areas. Place the thinner chicken wings and
legs to the centre of the dish.
Choose a tall, narrow container rather than a
low and wide container. When reheating
gravy, sauce or soup, do not fill the container
more than 2/3.
Stirring, turning of foods
Stirring and turning of foods are techniques used in
conventional and well as in microwave cooking to distribute
the heat quickly to the centre of the dish and avoid overcooking at the outer edges of the food.
When you cook or reheat whole fish, score
the skin this prevents cracking.
Shield the tail and head with small pieces
of foil to prevent over-cooking but ensure
the foil does not touch the sides of the oven.
25
2/3
KEEP THE OVEN CLEAN
DOOR
While the oven door is still warm, any spatters or food soils
should be wiped off with a damp sudsy cloth or sponge.
Rinse with water and wipe dry with a cloth.
If steam or condensation appears around this area, wipe with
a cloth. This may occur when the oven is operating under
high humidity and with foods containing lots of moisture. This
is a normal part of microwave cooking.
Note:
• Although your oven is provided with safety features, it
is important to observe the following:
1. It is important not to defeat or tamper with safety
interlocks.
2. Do not place any object between the oven front face
and the door or allow residue to accumulate on
sealing surfaces. Wipe the sealing area frequently
with a mild detergent, rinse and dry. Never use
abrasive powers or pads.
3. When opend, the door must not be subjected to strain,
for example, a child hanging on an opend door or any
load could cause the oven to fall forward to cause injury
and also damage to the door. Do not operate the oven
if it is damaged, until it has been repaired by a service
technician. It is particulary important that the oven
closes propery and that there is no damage to the:
1) Door(bent)
2) Hinge and Hookes(broken or loosened)
3) Door seals and sealing surface.
4. The oven should not be adjusted or repaired by
anyone except a properly competent service
technician.
5. The oven should be cleaned regularly and any food
deposits removed;
INSIDE THE OVEN
The interior three side walls and floor are stainless steel.
For easy cleaning, wipe spills and spatters as they occur with
a damp cloth or sponge with water and a mild detergent.
Rinse the cavity of any cleaning residue with a clean damp or
sponge after cleaning. Dry with a soft cloth.
These areas can also cleaned by using plastic or nylon
scouring pads recommended for use of Teflon and
Silverstone*.
For hard to remove soil, use a mild non-abrasive cleaner.
Use on the stainless steel areas, turntable and rotating base
only.
TOP SURFACE
Two quartz grill elements are installed on the top surface. As
they are fragile, be careful not to press or grip them hard. Do
not remove the grill elements to clean the surface.
6. Failure to maintain the oven in a clean condition could
lead to deterioration of the surface that could adversely
affect the life of the appliance and possibly result in a
hazardous situation;
Warning
Just as your traditional oven becomes hot also this oven will
become hot during use of the grill functions or in combination
with microwaves. children should be supervised at all times
when using the oven.
EXTERIOR
TURNTABLE AND ROTATING BASE
These two parts are easily removable for cleaning. The
turntable should be cleaned frequently and is dishwasher proof.
If food spills are accumulated under the rotating base, the
oven will not operate efficiently. Be sure to wipe up any spills
as they occur in this area.
CONTROL PANEL
Excercise care when cleaning this area. To clean, wipe the
panel with a slightly dampened cloth, using only water.
Wipe dry. Do not scrub this area or use any sort of chemical
cleaner. Avoid use of excess water.
Clean these parts as described in by the same method of
cleaning inside the oven. Be sure to properly reinstall these
parts into the cavity affer cleaning.
OUTSIDE SURFACE
The outside surfaces should be cleaned with soap and water,
rinsed and dried with a soft cloth. Do not use any type of
household or abrasive cleanser.
Note:
• DO NOT USE ANY TYPE OF OVEN CLEANER ON
ANY PART OF THE OVEN. It will damage some of the
interior and exterior surfaces of the oven.
• The oven should be cleaned regularly and any food
deposits removed.
• Failure to maintain the oven in a clean condition could
lead to deterioration of the surface that could adversely
affect the life of the appliance and possibly result in a
hazardous situation.
Note:
Do not use any other Turntable in the oven. Do not
operate the oven without the Turntable and Rotating
Base Properly in place.
26
BEFORE CALLING FOR SERVICE
You can often correct operating problems yourself.
If your microwave/grill oven fails to work properly,
locate the operating problem in the chart below and
try the solutions marked for each problems.
Note:
It is quite normal for steam to be emitted around the door
during the cooking cycle. The door is not intended to seal the
oven cavity completely but its special design contributes to
the complete safety of the appliance.
If the microwave/grill oven still does not work
properly, contact the nearest Service Center.
Caution:
1. Do not attempt to operate the oven while empty as this will
cause damage.
2. As an exhaust is located in the rear of the oven, install the
oven so as not to block the outlet.
If the microwave/grill oven still does not work properly,
contact the nearest Service Center.
PROBLEM
X
Oven will not start
X
X
X
X
X
Arcing or sparking
Unevenly cooked foods
X
X
X
X
Overcooked foods
Undercooked foods
X
Improper defrosting
X
X
X
X
X
X
X
X
SOLUTION
Is start button pressed?
Is power cord plugged in?
Is door closed?
Set the cooking time.
Use approved cookware only.
Do not operate with oven empty.
Supplied tray must be used.
Turn or stir food.
Completely defrost food.
Turn correct dial knob / Press correct Function buttons
Check to see that oven ventilation parts are not blocked.
Do “manual cooling” over 10 minutes.
27
X
QUESTIONS AND ANSWERS
* Q : I accidentally ran my microwave oven without any
food in it. Is it damaged?
* A : Running the oven empty for a short time will not damage
the oven. However, it is not recommended.
* Q : What does “standing time” mean?
* A : ”Standing time” means that food should be removed
from the oven and covered for additional time to allow it
to finish cooking. This frees the oven for other cooking.
* Q : Can the oven be used with the tray or tray rack
removed?
* A : No. Both the glass tray and roller guide must always be
used in the oven before cooking.
* Q : Why does my oven not always cook as fast as the
microwave cooking guide says?
* A : Check your cooking guide again, to make sure you’ve
followed directions exactly ; and to see what might
cause variations in cooking time. Cooking guide times
and heat settings are suggestions, to help prevent overcooking... the most common problem in getting used to
a microwave oven.
Variations in the size, shape and weights and
dimensions could require longer cooking time. Use your
own judgement along with the cooking guide
suggestions to check whether the food has been
properly cooked just as you would do with a
conventional cooker.
* Q : Can I open the door when the oven is operating?
* A : The door can be opened anytime during the cooking
operation. Then microwave energy will be instantly
switched off and the time setting will maintain until the
door is closed.
* Q : Why do I have moisture in my microwave oven after
cooking?
* A : The moisture on the side of your microwave oven is
normal. It is caused by steam from cooking food hitting
the cool oven surface.
* Q : Will the microwave oven be damaged if it operates
while empty?
* A : Yes. Never run it empty.
* Q : Does microwave energy pass through the viewing
screen in the door?
* A : No. The metal screen bounces back the energy to the
oven cavity. The holes are made to allow light to pass
through. They do not let microwave energy pass
through.
* Q : Can I operate my microwave oven without the
turntable or turn the turntable over to hold a large
dish?
* A : No. If you remove or turn over the turntable, you will get
poor cooking results. Dishes used in your oven must fit
on the turntable.
* Q : Why do eggs sometimes pop?
* A : When baking or poaching eggs, the yolk may pop due to
steam build-up inside the yolk membrane. To prevent
this, simply pierce the yolk with a toothpick before
cooking. Never cook eggs without piercing their shells.
* Q : Is it normal for the turntable to turn in either
direction?
* A : Yes. The turntable rotates clockwise or
counterclockwise, depending on the rotation of the
motor when the cooking cycle begins.
* Q : Why this standing time recommended after the
cooking operation has been completed?
* A : Standing time is very important.
With microwave cooking, the heat is in the food, not in
the oven. Many foods build up enough internal heat to
allow the cooking process to continue, even after the
food is removed from the oven. Standing time for joints
of meat, large vegetables and cakes is to allow the
inside to cook completely, without overcooking the
outside.
* Q : Can I pop popcorn in my microwave oven? How do I
get the best results?
* A : Yes. Pop packaged microwave popcorn following
manufacture’s guidelines. Do not use regular paper
bags. Use the “listening test” by stopping the oven as
soon as the popping slows to a “pop” every 1 or 2
seconds. Do not repop unpopped kernels. Do not pop
popcorn in glass cookware.
28
SPECIFICATIONS
Power supply
Microwave
230V~, 50Hz
Power consumption
1400W
Output power
900W (IEC 705)
Frequency
2,450MHz
Grill power consumption
2300W
Convection power consumption
2300W
Combination heating power consumption
2500W
Home fryer power consumption
2300W
Outside Dimension(WXDXH)
501(19.7) X 494(19.4) X 319(12.6)mm (inch)
Cavity Dimensions(WXDXH)
310(12.2) X 328(12.9) X 232(9.1)mm (inch)
Net Weight
Approx. 18.5Kg (40.7 lbs.)
Timer
60 minutes
Select function
Microwave / Grill / Convection / Combination / Home fryer
Microwave power level
10 stages
* Microwave oven is a Group 2 ISM equipment in which radio-frequency energy is intentionally generated and used in the form
of electromagnetic radiation for the treatment of material. This oven is a Class B equipment suitable for use in domestic
establishments and in establishments directly connected to a low voltage power supply network which supplies buildings used
for domestic purposes.
* Specifications are subject to change without notice.
DISPOSAL OF USED ELECTRICAL &
ELECTRONIC EQUIPMENT
The meaning of the symbol on the product, its accessory or packaging indicates that this product shall not be
treated as household waste. Please, dispose of this equipment at your applicable collection point for the
recycling of electrical & electronic equipments waste. In the European Union and Other European countries
which there are separate collection systems for used electrical and electronic product. By ensuring the correct
disposal of this product, you will help prevent potentially hazardous to the environment and to human health,
which could otherwise be caused by unsuitable waste handling of this product. The recycling of materials will
help conserve natural resources. Please do not therefore dispose of your old electrical and electronic
equipment with your household waste. For more detailed information about recycling of this product, please
contact your local city office, your household waste disposal service or the shop where you purchased the
product.
29
COOKING INSTRUCTIONS
Only use utensils that are suitable for use in microwave ovens.
To cook food in the microwave oven, the microwaves must be able to penetrate the food, without being reflected or absorbed by
the dish used.
Care must therefore be taken choosing the utensil. If the utensil is marked microwave-safe, you do not need to worry.
The following table lists various of utensil and indicates whether and how they should be used in a microwave oven.
Utensil
Safe
Comments
Aluminium foil
▲
Can be used in small quantities to protect areas against
overcooking. Arcing can occur if the foil is too close to the
oven wall or if too much foil is used.
Crust plate
●
Do not preheat for more than 8minutes.
China and earthenware
●
Porcelain, pottery, glazed earthenware and bone china
are usually suitable, unless deco-rated with a metal trim.
Disposable polyester
cardboard dishes
●
Some frozen foods are packaged in these dishes.
Fast-food packaging
• Polystyrene cups containers
●
• Paper bags or newspaper
• Recycled paper or metal trims
✕
✕
Can be used to warm food. Overheating may cause the
polystyrene to melt.
May catch fire.
May cause arcing.
Glassware
• Oven-to-table ware
• Fine glassware
●
●
• Glass jars
●
Metal
• Dishes
• Freezer bag twist ties
✕
✕
May cause arcing or fire.
●
For short cooking times and warming. Also to absorb
excess moisture.
May cause arcing.
Paper
• Plates, cups, napkins and
Kitchen paper
• Recycled paper
Can be used, unless decorated with a metal trim.
Can be used to warm foods or liquids.
Delicate glass may break or crack if heated suddenly.
Must remove the lid. Suitable for warming only.
✕
Plastic
• Containers
●
• Cling film
●
• Freezer bags
▲
Wax or grease-proof paper
●
Particularly if heat-resistant thermoplastic. Some other
plastics may warp or discolour at high temperatures. Do
not use Melamine plastic.
Can be used to retain moisture. Should not touch the
food.
Take care when removing the film as hot steam will
escape.
Only if boilable or oven-proof. Should not be airtight. Prick
with a fork, if necessary.
Can be used to retain moisture and prevent spattering.
● : Recommended use
▲ : Limited Use
✕ : Not Recommended
30
6(59,&(&(175(6
,I\RXKDYHIROORZHGWKHLQVWUXFWLRQVDQGVWLOOKDYHDSUREOHPFRQWDFWWKHQHDUHVW'HI\6HUYLFH
&HQWUH7KH\ZLOOEHDEOHWRDGYLVH\RXRQDQ\DVSHFWRIWKHSURGXFWRUVHQGDTXDOLILHG
WHFKQLFLDQWRUHSDLULW
6RXWK$IULFDQ6HUYLFH$JHQWV
%/2(0)217(,1
/RQJ6WUHHW+LOWRQ%ORHPIRQWHLQ
7HO
%ORHPIRQWHLQ6HUYLFH#GHI\FR]D
&$3(72:1
$0DUFRQL5G0RQWDJXH*DUGHQV
7HO
&DSH7RZQ6HUYLFH#GHI\FR]D
'85%$1
,QWHUVLWH$YHQXH8PJHQL%XVLQHVV3DUN
'XUEDQ
7HO
'XUEDQ6HUYLFH#GHI\FR]D
($67/21'21
%RZOV5G$UFDGLD(DVW/RQGRQ
7HO
(DVW/RQGRQ6HUYLFH#GHI\FR]D
-2+$11(6%85*
&QU0LPHWHV.UXJHU6WV'HQYHUH[W
-RKDQQHVEXUJ
7HORU
*DXWHQJ6HUYLFH#GHI\FR]D
32/2.:$1(
1HOVRQ0DQGHOD'ULYH6XSHUELD
7HO
3RORNZDQH6HUYLFH#GHI\FR]D
3257(/,=$%(7+
3DWWHUVRQ5RDG1RUWK(QG3RUW(OL]DEHWK
7HO
3RUW(OL]DEHWK6HUYLFH#GHI\FR]D
35(725,$
%ORFN$2OG0XWXDO,QGXVWULDO3DUN
&QU')0DODQ'ULYH0RRW6WU+HUPDQVWDG
7HO
3UHWRULD6HUYLFH#GHI\FR]D
6XE6DKDUDQ$IULFD6HUYLFH$JHQWV
=$0%,$6287+*$7(,19(670(176/7'
3ORW6KHNL6KHNL5RDG
32%R[
/XVDND=DPELD
7HO
)D[
VJLVHUYLFHFHQWUH#PLFUROLQN]P
1$0,%,$$7/$17,&',675,%8725637<
/7'
7LHQLH/RXZ6WUHHW1RUWKHUQ,QGXVWULDO$UHD
32%R[:LQGKRHN1DPLELD
7HO
)D[
DWODQWLF#PZHEFRPQD
=,0%$%:(75$'(&20$)5,&$
7UDGH&RP$IULFD/RUHOH\&UHVFHQW
0VDVD+DUDUH=LPEDEZH
7HO
&HOO
&HOO
%276:$1$5$<025*$1$*(1&,(6
50$6HUYLFH&HQWUH3ORW(DVW*DWH
*DERURQH,QWHUQDWLRQDO&RPPHUFH3DUN
.JDOH9LHZ*DERURQH
%RWVZDQD
7HO
)D[
&HOO
VHUYLFH#UPDFREZUDMD#UPDFREZ
6:$=,/$1'/<1'6',675,%87256
32%R[0EDEDQH6ZD]LODQG+
7HO
)D[
02=$0%,48(&22/:25/'/'$
5XDGD5HVLVWHQFLD1R%5&
&HOO
FRROZRUOGOGD#KRWPDLOFRP
1RVVR6KRZ5RRP
$YGD,QGXVWULDV3DUFHOD1R$
0DFKDYD0DSXWR
27+(5$5($6$5(6(59,&('%<29(5$87+25,6('6(59,&($*(176
3/($6(&2168/77+(1($5(675(*,21$/'()<6(59,&(&(175()25'(7$,/6
31
.)&/
7KLVFHUWLILFDWHLVLVVXHGE\'()<$33/,$1&(637</,0,7('PDQXIDFWXUHUVRI'HI\DQG2FHDQSURGXFWV
KHUHLQDIWHUWKH&RPSDQ\WRWKHRULJLQDOSXUFKDVHURQO\RIWKHDSSOLDQFHGHVFULEHGRQWKHFHUWLILFDWHDQGVKDOO
FRQVWLWXWHWKHRQO\ZDUUDQW\JLYHQLQUHVSHFWRIWKLVDSSOLDQFH
7KH&RPSDQ\ZDUUDQWVWRWKHRULJLQDOSXUFKDVHUWKDWIRUDSHULRGRI7:2<($56IURPGDWHRISXUFKDVHWKH
DSSOLDQFH LV IUHH IURP GHIHFW XQGHU QRUPDO GRPHVWLF XVH ERWK LQ ZRUNPDQVKLS DQG PDWHULDO VXEMHFW WR WKH
IROORZLQJFRQGLWLRQV
5HSDLU RU UHSODFHPHQW RI DQ\ SDUW RI WKLV DSSOLDQFH IRXQG E\ WKH &RPSDQ\ WR EH GHIHFWLYH VKDOO EH DW WKH
HOHFWLRQ RI WKH &RPSDQ\ 7KH &RPSDQ\ UHVHUYHV WKH ULJKW WR HIIHFW VXFK VHUYLFH WKURXJK DQ\ RI LWV 6HUYLFH
'LYLVLRQV RU $XWKRULVHG 6HUYLFH 'HDOHUV 7KH FRVW RI VXFK VHUYLFH VKDOO EH ERUQH E\ WKH &RPSDQ\ LQ IXOO
SURYLGHG WKDW WKH DSSOLDQFH LV ORFDWHG QR IXUWKHU WKDQ NP IURP D &RPSDQ\ 6HUYLFH &HQWUH RU DQ
$XWKRULVHG6HUYLFH'HDOHU:KHUHWKHDSSOLDQFHLVORFDWHGEH\RQGWKHNPUDGLXVWKHSXUFKDVHUVKDOOEH
OLDEOHIRUWKHVWDQGDUGWUDYHOOLQJFKDUJHVDVGHWHUPLQHGE\WKH&RPSDQ\
5XVWHG RU FRUURGHG SODWHV YLWUHRXV HQDPHOZDUH IXVHV DQG ODPSV DUH VSHFLILFDOO\ H[FOXGHG IURP WKHVH
ZDUUDQWLHV,WLVDQH[SUHVVFRQGLWLRQRIWKHVHZDUUDQWLHVWKDWWKHSXUFKDVHUWDNHVGXHFDUHDQGDWWHQWLRQLQ
WKHXVHDQGPDLQWHQDQFHRIWKHDSSOLDQFH$EXVHPLVXVHLQFRQIOLFWZLWKRSHUDWLQJLQVWUXFWLRQVFRQQHFWLRQWR
LQFRUUHFWYROWDJHVDQGVXEMHFWLRQWRFRPPHUFLDOXVHVKDOOUHOHDVHWKH&RPSDQ\IURPLWVREOLJDWLRQV
7KLVZDUUDQW\VKDOOEHFRPHYRLGDQGFHDVHWRRSHUDWHLIWKHDSSOLDQFHLVGLVPDQWOHGE\RUDQ\UHSDLUVWRWKH
DSSOLDQFHDUHHIIHFWHGE\DQ\SHUVRQVQRWGXO\DXWKRULVHGE\WKH&RPSDQ\RULIVXEVWLWXWHSDUWVQRWDSSURYHG
E\WKH&RPSDQ\DUHXVHGLQWKHDSSOLDQFHRULIWKHVHULDOQXPEHURIWKHDSSOLDQFHLVUHPRYHG
7KH&RPSDQ\VKDOOQRWEHUHVSRQVLEOHIRUGDPDJHVUHVXOWLQJIURPILUHIORRGFLYLOGLVWXUEDQFHVRUDQ\$FWRI
*RG7KH&RPSDQ\VKDOOQRWLQWHUPVRIWKHVHZDUUDQWLHVEHUHVSRQVLEOHQRUKHOGOLDEOHIRUDQ\FRQVHTXHQWLDO
ORVVRUGDPDJHRIDQ\NLQGFDXVHGE\RUGXHWRWKHIDLOXUHRUPDOIXQFWLRQRIWKHDSSOLDQFH
7KH &RPSDQ\ VKDOO QRW EH UHVSRQVLEOH IRU WUDQVSRUWDWLRQ RU RWKHUFRVWV RWKHU WKDQ WKRVH LQFXUUHG ZLWKLQ WKH
SURYLVLRQVRI3RLQWRIWKLV&HUWLILFDWH
Republic
of
South
Africa
and
Sub-Saharan
Africa,
please
contact
your
nearest
For warranties
in the
Defy
previous
page for respective
South
African
service
agents and
!
office.
Please
"
refer
to
the
Sub-Saharan
Africa service agents.
:KHUH VHUYLFH LV UHTXHVWHG XQGHU ZDUUDQW\ DQG QR IDXOW RU GHIHFW FDQ EH IRXQG E\ WKH &RPSDQ\ DOO FRVWV
LQFXUUHGZLOOEHIRUWKHSXUFKDVHU
VDFFRXQW
7KLV&HUWLILFDWHDVZHOODV\RXULQYRLFHZLOOVHUYHDVSURRIRISXUFKDVH)RUWKHSXUSRVHRIZDUUDQW\LWZLOOEH
HVVHQWLDOWRSURGXFHWKLV&HUWLILFDWHDQGLQYRLFH)DLOXUHWRGRVRZLOOUHQGHUWKHSXUFKDVHUOLDEOHIRUVHUYLFH
FRVWV
$%%"&'(%&((&%)!*%()+,(%",,,
"-'%,.)&/"-",%
32