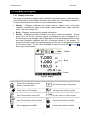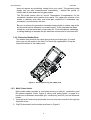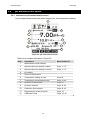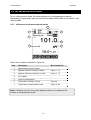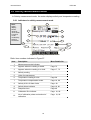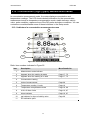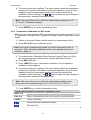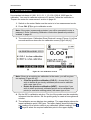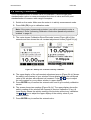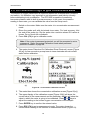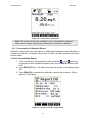
1
Instruction Manual WP PCD 650 Waterproof Handheld pH/Cond/DO Meter 68X415307 Rev. 0 Feb 07 Technology Made Easy ... Preface This manual serves to explain the use of the Waterproof Handheld PCD 650 multi parameter Meter. The manual functions in two ways, firstly as a step by step guide to help the user operate the instrument. Secondly, it serves as a handy reference guide. This instruction manual is written to cover many anticipated applications of the PCD 650 Meter. If you have doubts in the use of the instrument, please do not hesitate to contact the nearest Authorised Distributor. The information presented in this manual is subject to change without notice as improvements are made, and does not represent a commitment on part of Eutech Instruments / Oakton Instruments. Eutech Instruments/ Oakton Instruments cannot accept any responsibility for damage or malfunction of the unit due to improper use of the instrument. Copyright ©2006 All rights reserved. Eutech Instruments Pte Ltd. Oakton Instruments Table of Contents 1. Getting Started ......................................................................................................1 1.1 1.2 1.3 1.4 1.5 1.6 About the Meter...................................................................................................................... 1 Display & Keypad ................................................................................................................... 2 1.2.1 Display Overview........................................................................................................... 2 1.2.2 Key Functions ................................................................................................................ 3 Inserting Batteries .................................................................................................................. 4 1.3.1 Inserting batteries for the first time ................................................................................ 4 1.3.2 Changing batteries subsequently .................................................................................. 5 1.3.3 Connecting DC Power adapter...................................................................................... 5 Attaching Safety Belt .............................................................................................................. 6 Connecting Peripherals.......................................................................................................... 7 1.5.1 Probes (pH/Conductivity/DO) ........................................................................................ 7 1.5.2 Protective Rubber Boot ................................................................................................. 8 1.5.3 Multi Probe Holder......................................................................................................... 8 CyberComm 600 Data Acquisition Software........................................................................ 10 1.6.1 About CyberComm 600 DAS Application.................................................................... 10 1.6.2 Installing CyberComm 600 .......................................................................................... 10 1.6.3 Starting CyberComm 600 for the first time .................................................................. 10 1.6.4 Connecting to the meter .............................................................................................. 12 2. Measurement Mode .............................................................................................15 2.1 2.2 2.3 2.4 2.5 2.6 2.7 About Measurement Mode................................................................................................... 15 2.1.1 Accessing functions..................................................................................................... 15 Taking Measurement............................................................................................................ 17 2.2.1 Prepare the meter for measurement ........................................................................... 17 2.2.2 Taking a reading.......................................................................................................... 17 2.2.3 Stable reading indicator............................................................................................... 17 2.2.4 Holding a reading ........................................................................................................ 17 2.2.5 Automatic Temperature Compensation (ATC) ............................................................ 18 2.2.6 Manual Temperature Compensation (MTC)................................................................ 18 2.2.7 Alarm set point (For pH/conductivity/DO).................................................................... 18 2.2.8 Calibration Due (CAL-DUE) Indicator (For pH/conductivity/DO)................................. 18 2.2.9 Resolution of pH Reading............................................................................................ 18 2.2.10 pH buffer group for calibration and auto-recognition................................................. 18 2.2.11 pH Calibration points ................................................................................................. 19 2.2.12 Conductivity Calibration mode................................................................................... 19 2.2.13 Conductivity calibration points................................................................................... 19 2.2.14 Cell constant.............................................................................................................. 19 2.2.15 Normalization Temperature (°C) ............................................................................... 19 2.2.16 Linear temperature Coefficient .................................................................................. 20 2.2.17 Pure Water Coefficient .............................................................................................. 20 2.2.18 Set Salinity................................................................................................................. 20 2.2.19 Auto Salinity Compensation ...................................................................................... 20 2.2.20 % Saturation Offset Adjustment ................................................................................ 20 2.2.21 Set barometer pressure range and barometric pressure units.................................. 20 2.2.22 Pressure compensation............................................................................................. 20 Multi Display mode .............................................................................................................. 22 pH Measurement Mode........................................................................................................ 23 2.4.1 Indicators in pH measurement screen......................................................................... 23 mV Measurement Mode....................................................................................................... 24 2.5.1 Indicators in mV measurement mode.......................................................................... 24 Ion Measurement Mode ....................................................................................................... 25 2.6.1 Changing unit of measurement ................................................................................... 25 2.6.2 Indicators in Ion measurement mode .......................................................................... 25 Conductivity Measurement Mode......................................................................................... 26 2.7.1 Indicators in Conductivity measurement screen.......................................................... 26 2.8 2.9 2.10 2.11 2.12 2.13 2.14 TDS Measurement Mode ..................................................................................................... 27 2.8.1 Indicators in TDS measurement mode........................................................................ 27 Salinity Measurement Mode................................................................................................. 28 2.9.1 Indicators in salinity measurement mode .................................................................... 28 Resistivity Measurement Mode ............................................................................................ 29 2.10.1 Indicators in Resistivity measurement mode........................................................... 29 Percentage Saturation (%) Measurement Mode................................................................. 30 2.11.1 Indicators in percentage saturation measurement mode .......................................... 30 Concentration (mg/L) (ppm) Measurement Mode................................................................ 31 2.12.1 Indicators in concentration measurement screen ..................................................... 31 Transfer Measured Data to Computer (CyberComm).......................................................... 32 2.13.1 Sending a single reading from multi measurement mode......................................... 32 2.13.2 Sending a single reading from single measurement mode ....................................... 33 2.13.3 Sending readings continuously in single and multi measurement modes ................ 34 2.13.4 Saving data................................................................................................................ 35 Working with Memory functions ........................................................................................... 36 2.14.1 Logging data automatically in meter’s memory......................................................... 36 2.14.2 Storing currently displayed reading in the memory (In IrDA and LED print mode) . 36 2.14.3 Viewing stored data ................................................................................................... 36 2.14.4 Transferring stored data to Computer (CyberComm) through IrDA.......................... 37 3. Calibration Mode .................................................................................................39 3.1 About Calibration.................................................................................................................. 39 3.1.1 About Temperature Calibration ................................................................................... 39 3.1.2 About pH Calibration ................................................................................................... 39 3.1.3 About Ion Calibration ................................................................................................... 40 3.1.4 About Conductivity/Resistivity/TDS/Salinity Calibration .............................................. 40 3.1.5 About DO(%) and DO (mg/L) Calibration .................................................................... 40 3.1.6 Prepare the Meter for Calibration ................................................................................ 41 3.1.7 Accessing Calibration mode ........................................................................................ 42 3.1.8 Accessing Calibration mode when password protection enabled ............................... 42 3.2 Temperature Calibration ...................................................................................................... 44 3.2.1 Temperature Calibration for ATC mode ...................................................................... 44 3.2.2 Temperature Calibration for MTC mode...................................................................... 45 3.3 pH Calibration....................................................................................................................... 46 3.3.1 pH Calibration with a Standard Buffer ......................................................................... 46 3.3.2 pH Calibration with a User-defined Buffer ................................................................... 47 3.3.3 Calibration Report........................................................................................................ 48 3.3.4 Average Slope Indicator of pH Probe.......................................................................... 49 3.4 mV Calibration...................................................................................................................... 51 3.4.1 mV Calibration Report ................................................................................................. 52 3.5 Ion Calibration ...................................................................................................................... 53 3.5.1 Calibration Report........................................................................................................ 54 3.6 Conductivity Calibration ....................................................................................................... 55 3.6.1 Manual Calibration....................................................................................................... 55 3.6.2 Automatic calibration (For Conductivity Calibration) ................................................... 56 3.6.3 Calibration Report........................................................................................................ 58 3.7 Resistivity Calibration ........................................................................................................... 59 3.7.1 Resistivity Calibration Report ...................................................................................... 60 3.8 Salinity Calibration................................................................................................................ 61 3.8.1 Salinity Calibration Report ........................................................................................... 62 3.9 TDS Calibration .................................................................................................................... 63 3.9.1 TDS Calibration Report ............................................................................................... 64 3.10 DO Calibration in % Saturation Mode (with ATC) ................................................................ 65 3.10.1 To calibrate 100% saturation..................................................................................... 65 3.10.2 To calibrate 0% saturation......................................................................................... 67 3.10.3 % DO Calibration Report ........................................................................................... 67 3.11 DO Calibration in mg/L or ppm Concentration Mode ........................................................... 69 3.11.1 Concentration Calibration Report .............................................................................. 70 4. Setup Mode ..........................................................................................................71 4.1 About Setup Mode................................................................................................................ 71 4.1.1 Accessing Setup mode (no password protection enabled) ......................................... 71 4.1.2 Accessing Setup mode when password protection enabled....................................... 73 4.1.3 Modifying Setup parameters........................................................................................ 74 4.2 System Setup ....................................................................................................................... 75 4.2.1 System Settings – Page 1 ........................................................................................... 75 4.2.2 System Settings – Page 2 ........................................................................................... 77 4.2.3 System Settings – Page 3 ........................................................................................... 78 4.2.4 System Settings – Page 4 ........................................................................................... 79 4.2.5 System Settings – Page 5 ........................................................................................... 80 4.2.6 System Settings – Page 6 ........................................................................................... 81 4.3 pH Setup .............................................................................................................................. 82 4.3.1 pH Settings – Page 1................................................................................................... 82 4.3.2 pH Settings – Page 2................................................................................................... 83 4.4 mV setup (no settings available) .......................................................................................... 84 4.5 Ion Setup .............................................................................................................................. 85 4.5.1 Ion Settings Page ........................................................................................................ 85 4.6 Conductivity Setup ............................................................................................................... 86 4.6.1 Conductivity Settings – Page 1.................................................................................... 86 4.6.2 Conductivity Settings – Page 2.................................................................................... 87 4.7 TDS Setup............................................................................................................................ 88 4.7.1 TDS Settings – Page 1 ................................................................................................ 88 4.7.2 TDS Settings – Page 2 ................................................................................................ 89 4.8 Salinity Setup ....................................................................................................................... 90 4.8.1 Salinity Settings – Page 1............................................................................................ 90 4.8.2 Salinity Settings – page 2 ............................................................................................ 90 4.9 Resistivity Setup................................................................................................................... 92 4.9.1 Resistivity Settings – Page 1 ....................................................................................... 92 4.9.2 Resistivity Settings – Page 2 ....................................................................................... 92 4.10 O2 % - DO Saturation Setup................................................................................................ 94 4.10.1 DO (%) – Page 1 ....................................................................................................... 94 4.10.2 DO (%) – Page 2 ....................................................................................................... 95 4.11 O2 mg/L (ppm) – DO Concentration Setup .......................................................................... 96 4.11.1 DO (mg/L) – Page 1 .................................................................................................. 96 4.11.2 DO (mg/L) – Page 2 .................................................................................................. 97 4.12 Temperature Setup .............................................................................................................. 98 4.12.1 Temperature Setting Page ........................................................................................ 98 5. Technical Specifications.....................................................................................99 6. Accessories .......................................................................................................102 6.1 6.2 Replacement Accessories.................................................................................................. 102 Optional Accessories.......................................................................................................... 102 7. APPENDIX ..........................................................................................................104 7.1 7.2 7.3 7.4 Conductivity theory............................................................................................................. 104 Calculating TDS Conversion Factor................................................................................... 106 Calculating Temperature Coefficients ................................................................................ 106 Dissolved Oxygen Probe.................................................................................................... 107 7.4.1 Dissolved Oxygen Principle....................................................................................... 107 7.4.2 Probe Care ................................................................................................................ 107 7.4.3 Membrane Housing Replacement............................................................................. 108 7.4.4 Membrane/O-ring Replacement (Optional Procedure) ............................................. 108 7.4.5 Electrolyte Solution.................................................................................................... 109 8. General Information ..........................................................................................110 8.1 Warranty............................................................................................................................. 110 8.2 8.3 Return of Goods ................................................................................................................. 110 Guidelines for Returning Unit for Repair ............................................................................ 110 Instruction Manual PCD 650 1. Getting Started 1.1 About the Meter Thank you for purchasing the PCD 650 waterproof multi parameter portable series meter. PCD 650 series meter are micro-controller based instruments and are designed with many user friendly features to measure up to 10 parameters including pH/ mV/ ISE/ Conductivity/ TDS /Salinity/ Resistivity/ DO (%)/ DO (mg/L)/ Temperature. This meter can simultaneously measure and displays up to 2 parameters along with the temperature. PCD 650 measures pH range from -2.000 to 19.999 with accuracies up to ±0.002, mV (up to ±2000) and Ion from 0.001 to 19900. pH calibration is capable of up to six calibration points and up to 15 buffer options with auto-buffer recognition of USA, DIN, NIST, and PWB standards. This meter also measures conductivity (up to 500mS), Temperature (-10.0°C to 110.0°C) / units °C or ° F, Total Dissolved Solids (TDS) ( up to 500ppt), Resistivity (up to 20.00MΩ) or Salinity (up to 80ppt) with either a 2- or 4-electrode conductivity cell. This meter also allows you to select cell constants, temperature coefficients, normalised temperature, TDS factor, calibration standard, points and temperature units. PCD 650 also ensures accurate measurement of the Dissolved Oxygen values through its temperature, barometric pressure and salinity compensation features. Special Features: • Displays and measures up to 2 parameters simultaneously. • Automatic temperature compensation. • Large Monochrome graphic display with 110X128 resolution and viewing area of 68X74 mm. • Powered by ARM7TDMI-S cored microcontroller. • Built in memory backup to save calibration and 500 sets of measured data. • Data logging feature date-and-time stamp to meet Good Laboratory Practice (GLP). • One way serial data transmission through IrDA or RS232 through LED. • Features user-selectable ‘CAL-DUE’ and set point alarm functions. • Power source and Battery level indicator. • Designed to work either from mains power or battery and automatically detect and switch to mains if available. • Alkaline Battery can last for more than 200 Hours of continuous operation without Backlight and Serial data transferring. • Water proof casing. • User configurable password protection for calibration & setup data. Useful hints will appear throughout the manual and on-screen to ease user during meter operation. 1 Instruction Manual PCD 650 1.2 Display & Keypad 1.2.1 Display Overview The large monochrome display shows detailed information about measurements, various indicators, annunciators, functions and useful tips. The display consists of 3 main sections when the meter is in the measurement mode: Header – Displays indicators for power source, battery level, pH probe condition, conductivity range of the probe, data transmission mode, real-time clock, user lock/unlock etc. Body – Displays measurement related information. Footer – Displays functions available for a given mode of operation. At any given time, up to four function names are displayed, that correspond to 4 function keys in the keypad. Left & Right arrow icons are displayed when there are more functions available than the 4-functions shown in the display. To access a function, press the corresponding function key (in keypad) just below the function name. To see other available functions, press left or right arrow key in the keypad. Header Body Footer Figure 1: Display Indicators Used in Header Area Power Source & Battery Level: Battery, level 80%-90% Conductivity range of the probe Power Source: DC Adapter Average slope of the pH probe Data Transmission mode: LED Current Time in 24 Hour format Data Transmission mode: Infrared Password Protection: Disable Data Logging Mode: MEM Password Protection: Enable 2 Instruction Manual PCD 650 Refer calibration mode, measurement mode & setup mode for details on indicators shown in body & footer sections. 1.2.2 Key Functions The keypad consists of: 4 – Function keys (F1, F2, F3 & F4) 4 – Navigation key 1 – Enter key Key Function Selects the function shown (in the display) just above the key. Navigates to next available functions Increment/decrement values in Setup & Calibration modes. Navigates to sub groups in Setup selection screen. In Setup mode, confirms selection or modified values In Calibration mode, confirms calibration points or modified values Figure 2 : Display & Keypad 3 Instruction Manual PCD 650 1.3 Inserting Batteries The meter supports multi -power sources. 1. Four ‘AA’ size 1.5 V alkaline batteries (supplied) or, 2. 9V DC power adapter (Optional in some models). Figure 3 : Battery compartment 1.3.1 Inserting batteries for the first time 1. Use a Phillips screw driver to remove four screws holding the battery cover. 2. Remove the battery cover. 3. Follow the polarity indicated in the battery compartment and insert the batteries. 4. Replace the battery cover onto its original position using the four screws. Note the ▲UP symbol marked on the cover. 5. The meter is ready to operate. Use ON (F4) key to switch on the meter. The ON (F4) key has to be kept pressed until the display comes up. 6. Set the system date & time before you start operating the meter for the first time. Refer ‘: System Settings - Page 2’ in page 77 for details on how to set date & time. 4 Instruction Manual PCD 650 1.3.2 Changing batteries subsequently The LCD has battery voltage level indicator. Number of bars indicates the voltage level. See Table 1 for details. When the empty battery indicator starts blinking, it is time to change the batteries. The system time might be automatically reset during the battery change. To prevent that happening, always connect the DC adapter during battery change. Alternatively, if the DC adapter is not available, switch off the meter and change the batteries within 30 seconds to avoid resetting the clock. Number of Bars Approximate battery voltage (V) 4 6.0 to 5.4 3 5.4 to 4.8 2 4.8 to 4.2 1 No bars (Empty battery blinks) 4.2 to 3.8 Below 3.8 Table 1 : Battery level indication 1.3.3 Connecting DC Power adapter Connecting the DC adapter saves battery life. The power adapter indicator appears in LCD when you connect the DC power adapter to the meter. DC Power Adapter (Note the polarity) Figure 4 : Connecting DC power adapter 5 Instruction Manual PCD 650 1.4 Attaching Safety Belt The safety belt provides secured support when you hold the meter on your palm. To attach the safety belt: 1. Use a Phillips screw driver to remove four screws holding the battery cover. 2. Remove the battery cover. 3. Insert the safety belt through the two slots as indicated in the Figure 5. 4. Replace the battery cover onto its original position using the four screws. Note the ▲UP symbol marked on the cover. 5. Insert your palm in between the belt and the body of the meter and adjust the hook & loop fastener. Note the correct side of the belt Battery Cover Hook & Loop fastener Figure 5 : Attaching safety belt 6 Instruction Manual PCD 650 1.5 Connecting Peripherals 1.5.1 Probes (pH/Conductivity/DO) Attach the probes with correct type of connectors as indicated in the figure below. pH Probe (BNC) DO Probe with built in temperature sensor (6-pin Connector) Conductivity Probe with built in temperature sensor (8-pin Connector) Figure 6 : Connecting ph, Cond and DO Probes The PCD 650 meters allows to connect a pH or ISE, DO and a conductivity probe at the same time. Two types of conductivity electrodes: the 2-cell conductivity cell and the 4-cell conductivity cell can be used with this meter and only one can be connected at a time. The meter can also adjust cell constant from 0.010 to 10.000. This electrode features a built-in temperature sensor for Automatic temperature compensation (ATC). It has a specially designed housing that provides fast temperature response and reduces air bubble entrapment, which makes it easy to obtain accurate, stable readings. Figure 7: Probe immersion level Proper use of electrode is essential to ensure that the optimum measurement is taken in a short time. The removable protective plastic electrode guard on the conductivity cell is meant for simple periodic maintenance and it must be kept in tact during measurement and calibration. Always immerse the electrode beyond upper steel band as shown in Figure 7. We recommend that you do not submerge the electrode above the protective yellow cap. You can submerge the cable for brief periods of time, but not continuously. This meter uses a special notched 6-pin connector to attach the DO probe to the meter. The Dissolved Oxygen Probe works on galvanic principle, that is, it 7 Instruction Manual PCD 650 does not require any polarizing voltage from your meter. The galvanic probe design lets you take measurements immediately – without the typical 15 minute wait of other dissolved oxygen probes. The DO probe comes with an in-built Temperature Compensation for the membrane variation and consists of two parts. The upper part consists of an anode, a cathode, and cable, and lower part consists of a membrane cap, membrane, and electrolyte solution. Be sure to remove the protective electrode storage bottle or rubber cap of the pH electrode before calibration or measurement. If the electrode has been stored dry, wet the electrode in clean water for 10 minutes before calibrating or taking readings to saturate the pH electrode surface and to minimize drift. 1.5.2 Protective Rubber Boot The rubber boot protects the meter and gives a good hand grip. It is ideal when you use the meter in the field. For bench top applications, lift up the stand at the back of the rubber boot. Figure 8 : Inserting/removing the rubber boot 1.5.3 Multi Probe Holder Multi probe holder provides a convenient means to hold pH, conductivity and DO probes together. Refer ‘Figure 9: Using multi probe holder’ on page 9 to know how to assemble electrodes (pH, conductivity and DO) into the electrode holder. 1. Insert pH and Conductivity electrodes one at a time from outside in through the electrode cover. 2. Clip DO electrode into the holder as shown in Figure 9. 8 Instruction Manual PCD 650 3. Insert the probes into the multi probe holder as shown in Figure 9. After assembling the electrodes into the electrode holder, ensure that the electrode top surfaces are almost level to the edges of the holder. 4. Align the markings on the holder and the cover before locking the cover onto the holder as shown in the diagram. 5. Push up the electrodes backwards to fix the vertical position of the electrodes into the electrode cover. Note: For pH electrode, the storage solution has to put back after assembling the electrodes. 6. To remove the cover, hold onto the electrodes with one hand and release any two catches from the side of the cover with the other hand as indicated in figure. Figure 9: Using multi probe holder Note: All our conductivity probes have built-in ATC probes. It can also be used for temperature readout and compensation of the pH values. Therefore, there is no need to install a separate ATC probe for pH. 9 Instruction Manual PCD 650 1.6 CyberComm 600 Data Acquisition Software 1.6.1 About CyberComm 600 DAS Application The PCD 650 series meters are shipped with a companion software application called CyberComm 600 Data Acquisition Software (DAS). This is a simple, easy to use, Windows® based PCD compatible software application which lets you download your measurement data, calibration reports & stored data from the PCD 650 series meters and save them in your PCD in text (.txt) files. It automatically recognizes meter’s model number once the connection is established. This software is designed to display data for both single and multi parameter models. CyberComm DAS communicates with the meter through wireless IrDA connection. You need to have a PC or Notebook running Windows® 2000 or Windows® XP with an IrDA port or with USB-IrDA dongle (not supplied) installed into the USB port of your PCD. 1.6.2 Installing CyberComm 600 Make sure to log in to your computer with administrator user account. Insert the supplied software CD into the CDROM drive of your computer. The installation wizard should automatically start. Follow the screen instructions and complete the installation. The software installs CyberComm 600 icon on Desktop and Start menu shortcut at ‘Start > Programs > PC Communication > CyberComm 600’. 1.6.3 Starting CyberComm 600 for the first time 1. Double-click on the CyberComm 600 icon available in the Desktop. 2. CyberComm 600 application starts. The screen lists connection procedure. • Switch on the meter. Make sure that the following settings have been configured in System Settings of the meter Setup. (Refer Figure 71: System Settings - Page 4’ on page 79 for more details.) PRINT MODE : IrDA DATA FORMAT: CyberComm CURRENT DATA SET: TIMED • Make sure the IrDA port of the meter is closer and pointing towards (line-of-sight with) the IrDA port (or USB-IrDA dongle) of the computer. • From measurement mode, press left see PRIN function in the display. • Press PRIN (F3) key. IrDA data communication icon starts animating as the meter sends data to computer through IrDA. or right arrow key until you 3. The Computer recognizes the PCD 650 series meter and you will see ‘Found New Hardware’ message in the Taskbar. (Figure 10) 10 Instruction Manual PCD 650 Figure 10 : Computer recognizes the meter 4. The ‘Found New Hardware Wizard’ starts automatically. Select ‘Yes, this time only’ option for the first screen. (Figure 11) .Click Next to continue. Figure 11 : First screen of ‘Found New Hardware Wizard’ 5. In the second screen (Figure 12), select ‘Install the software automatically (Recommended)’ and click Next to continue. Figure 12 : First screen of ‘Found New Hardware Wizard’ 11 Instruction Manual PCD 650 6. Once the wizard completed the installation (Figure 13), click Finish to close the wizard. Figure 13 : ‘Found New Hardware Wizard’ completed 7. In CyberComm 600 application screen, click Find Device button. The screen shows a message “Finding device”. When CyberComm recognizes the meter it shows “Instrument in Range, click Connect button to establish connection…” Note: If you do not see the above message, re-position the IrDA port of the meter with IrDA port of computer so that they become close to each other and are in-line. 8. Click Connect button. Once the connection is established, the measurement data sent by the meter is shown in the CyberComm screen. 1.6.4 Connecting to the meter Once you successfully established the connection between the meter and CyberComm, for the first time, as described in the above section, the subsequent connections will be established in a few easy steps. Follow the steps below to connect CyberComm to the meter: 1. Start CyberComm by double-clicking on CyberComm 600 Desktop icon. Make sure the IrDA port of the meter is closer and pointing towards (line-ofsight with) the IrDA port (or USB-IrDA dongle) of the computer. 2. In the meter, press PRIN (F3) key. IrDA data communication icon starts animating as the meter sends data to computer through IrDA. 3. In CyberComm, press Find Device button. 12 Instruction Manual PCD 650 (a) (b) Figure 14 : CyberComm finds the meter 4. When CyberComm recognizes the meter it shows “Instrument in Range, click Connect button to establish connection…” Press Connect button. (a) (b) Figure 15 : CyberComm establishing connection with the meter 5. The connection is established and data is transferred. 13 Instruction Manual PCD 650 Notes: The communication between CyberComm and the meter is unidirectional. The connection is initiated by the meter when you press PRIN key. Once CyberComm finds the meter, press Connect button. Once the connection is established the data is transferred to CyberComm and then the IrDA link is disconnected automatically. IrDA link is disconnected after sending single set of data only if ‘SINGLE’ is selected from System Setup (page 78). To re-establish the connection, you need press PRIN key of the meter followed by Connect button from CyberComm. For continuous transfer of measurement readings, set CURRENT DATA SET parameter to ‘TIMED’ in System Setup (page 78). For single transfer of measurement reading, set CURRENT DATA SET parameter to ‘SINGLE’ in System Setup (page 78) 14 Instruction Manual PCD 650 2. Measurement Mode 2.1 About Measurement Mode Following measurement modes are available in PCD 650 models: pH measurement mode mV measurement mode Ion measurement mode Conductivity measurement mode TDS measurement mode Salinity measurement mode Resistivity measurement mode O2 % - DO percentage saturation measurement mode O2 mg/L(ppm) - DO concentration mode When powered-on, the meter goes to any of the above measurement modes, depending on the last selected measurement mode, before the meter was poweredoff. For instance, the meter starts with TDS measurement mode, if the meter was in TDS measurement mode, when you last switched off the meter. Press MODE (F3) key to switch between above measurement modes. 2.1.1 Accessing functions There are many functions available in the measurement mode. You can use the 4function key to access them. These functions are grouped into 4 to share the available 4-function keys. The first group appears when you enter the measurement mode. Press left or right arrow key to navigate to 2nd and 3rd function groups. . 1st function group 3rd function group Figure 16 : Use Left or Right 2nd function group arrow keys to navigate between function groups Function Keys available in measurement screen (1st Group): HOLD (F1) Holds the current reading in the display. The ‘HOLD’ indicator starts blinking. Press HOLD key again to release the reading CAL (F2) Goes to corresponding calibration mode (based on the selected measurement mode) MODE (F3) Switches between measurement modes OFF (F4) Power off the meter (press and hold this key for 3 seconds) Switches between functions groups available in measurement mode ENTER (Not functional) (Not functional) 15 Instruction Manual PCD 650 Function Keys available in measurement screen (2nd Group): SETP (F1) Goes to setup mode MEM (F2) Shows stored data in the memory STOR (F3) Stores the currently displayed reading in the memory ESC (F4) Shows 1st Group of functions Function Keys available in measurement screen (3rd Group): REPO(F2) Shows corresponding calibration report (based on selected measurement mode) PRIN (F3) Sends the currently displayed reading to the computer through IrDA. (This key has to be pressed to establish communication with CyberComm PCD application through IrDA). If data logging mode has been selected in System Setup then it sends data automatically to meter’s memory. ESC (F4) Shows 1st Group of functions Note: If you press a function key that is not relevant to measurement mode (for example ENTER, , ) the meter shows ‘Invalid key!’ message in the footer area of the screen as shown in diagram. Figure 17: Invalid key 16 Instruction Manual 2.2 PCD 650 Taking Measurement 2.2.1 Prepare the meter for measurement Before you start measuring, Make sure you have connected a suitable probe (pH/OPR/ISE), Conductivity probe and DO with in-built ATC to the meter. Make sure the probes are in good working condition & clean. If required, clean (pH/OPR/ISE) probe with clean water, conductivity and DO probe with de-ionized water to remove impurities. For more information on probe’s conditioning refer page 7. Make sure batteries have been installed or the DC adapter is connected to the meter. Perform calibration if you change to a new probe. 2.2.2 Taking a reading 1. Press ON (F4) key to switch on the meter. The ON (F4) key has to be kept pressed until the display comes up. 2. Make sure you are in the required measurement mode. Press MODE (F3) to switch between modes. 3. Dip the appropriate probe with built in ATC probe into the sample solution. Note: When dipping the probe into sample, the sensor or the glass bulb of the probe must be completely immersed into the sample. Stir the probe gently in the sample to create a homogeneous sample. Allow time for the reading to stabilize. 4. The LCD shows ‘Stable’ indicator if this feature is enabled in setup. (See page 75). 5. Note the reading. 2.2.3 Stable reading indicator You can configure the meter so that LCD displays a ‘Stable’ indicator when the reading does not vary for 2 consecutive seconds. The amount of variations allowed can be set as ‘Slow’, ‘Medium’ or ‘Fast’. (See page 75) 2.2.4 Holding a reading In some situations, you may want to freeze (hold) the measured reading in the LCD for a delayed observation. You can hold a reading in two different ways. Manual Hold – Allows you to hold the reading by pressing HOLD (F1) key at any time you want. When you hold a reading, the ‘HOLD’ indicator starts flashing. The readings (including temperature reading) will be held until you press any other key again. Auto-Hold –The meter automatically holds the reading if the reading is ‘Stable’ for 5 consecutive seconds. This feature needs to be enabled in the setup (See page 75). Press HOLD (F1) key to release the reading. 17 Instruction Manual PCD 650 2.2.5 Automatic Temperature Compensation (ATC) Connect an appropriate probe with built in ATC probe to the meter and select ‘ATC mode’ in the temperature setup (See page 98) for the pH/conductivity/DO reading to be automatically compensated for temperature variations. If you select ‘ATC’ without connecting a probe to the meter, the LCD shows ‘UNDER’ for temperature reading. Figure 18: Under range NOTE: The factory default value for normalization temperature is 25 °C. 2.2.6 Manual Temperature Compensation (MTC) If ATC probe is not available, you can choose to manually compensate for temperature. This is suitable when the temperature of your sample is sufficiently stable. Select ‘MTC mode’ in the temperature setup (see page 98). Press CAL (F2) and then press NEXT key. Press TEMP (F1) to go to temperature calibration. Enter the temperature value of your sample. See page 45 for more details on temperature calibration. 2.2.7 Alarm set point (For pH/conductivity/DO) You can set the meter to display an alarm when the pH/conductivity/salinity/resistivity/TDS/DO(%)/DO(mg/L) reading goes higher or lower than predefined set points. Refer Setup of respective modes to set alarm points for pH, conductivity and DO. Figure 19 : Hi alarm 2.2.8 Calibration Due (CAL-DUE) Indicator (For pH/conductivity/DO) You can set a reminder to be displayed in the LCD when the next calibration is due. Set the number of days in the pH/conductivity/DO Setup and the meter will remind you when the days elapse from your last calibration date. 2.2.9 Resolution of pH Reading By default, the resolution is set to 0.00. You can change the resolution in the setup mode. pH resolution can be adjusted from 0.1 to 0.001 pH (See page 83) 2.2.10 pH buffer group for calibration and auto-recognition This option allows you to choose buffer group from four internationally recognized standard buffer groups namely USA, NIST, DIN & PWB. The default buffer group is USA. Refer ‘pH Setup’ section in page 82 for information on how to set the meter to a particular buffer group. 18 Instruction Manual PCD 650 2.2.11 pH Calibration points This option allows you to calibrate up to 6 points, depending on the standard buffer selected. Optionally, you can choose to have custom buffers with 2 to 5 points. When completely re-calibrating the meter, the first point of calibration should be one of the following, depending on your choice of standard buffer group. The meter automatically recognizes and calibrates to the standard pH buffer values, which makes pH calibration faster and easier. 2.2.12 Conductivity Calibration mode This option allows you to select automatic or manual calibration standard. In the automatic calibration mode, the meter automatically detects and verifies the appropriate known calibration standards solutions before accepting these particular calibration standards as one of its calibration values in a specific measurement range. Standard buffer values: 84.0 uS/ 1.413 mS/ 12.88 mS/ 111.8 mS In the manual calibration, non-standard calibration values can be used for calibration. You can manually input the appropriate values as your desired calibration standards in each specific range. The selected calibration standard will be displayed in the bottom of screen. Refer Figure 20. 2.2.13 Conductivity calibration points This option allows you to select single or multi point calibration. Single point calibration refers to calibrating one conductivity value and uses it for the entire 5 conductivity ranges. In multi point calibration, you can calibrate one point in each of the measuring ranges (up to 5 points). The selected calibration point will be displayed in the bottom of screen. For example: If single point calibration is selected it will display ‘SPC’ in the bottom of screen as shown in diagram. Manual calibration standard Single point calibration Figure 20 : Calibration standard & point indicator But if a multi-point calibration option (calibration for different ranges is indicated in the Technical Specifications table on page 99) is chosen, calibration factors are applied only to their respective ranges. 2.2.14 Cell constant This option lets you to adjust cell constant of the conductivity cell that you are using. Cell constant can be adjusted from 0.010 to 10.000. Please refer table on page 106 that lists the optimum conductivity ranges for electrodes with cell constants of 0.1, 1, and 10. 2.2.15 Normalization Temperature (°C) This option will allow you to select a normalized temperature that the meter will use to normalize its conductivity measurements to a standard temperature. NOTE: The factory default value for normalization temperature is 25 °C. 19 Instruction Manual PCD 650 2.2.16 Linear temperature Coefficient The temperature coefficient is a value that reflects the degree to which the conductivity is affected by temperature changes. If you do not know the temperature coefficient of your solution you can determine the correct value using the formula on page 106 “Calculating Temperature Coefficients”. NOTE: Your meter is factory set to a temperature coefficient of 2.1% per °C. 2.2.17 Pure Water Coefficient Pure water coefficient will be calculated and applied automatically for ultra pure water measurement if ‘ENABLE’ at appropriate set up pages. For more information regarding pure water coefficient, please refer page 86. 2.2.18 Set Salinity This option allows you to set the salinity (in ppt) for your solution, as the dissolved salts alter the relationship between the partial pressure of oxygen and the oxygen concentration in water. By setting the salinity, the meter will compensate for the impact of salinity on the partial pressure/oxygen concentration relationship of your sample. The salinity can be set from 0 to 50 ppt. 2.2.19 Auto Salinity Compensation If auto salinity comp. is enabled, the meter will automatically compensate for salinity for determining dissolved oxygen concentration of the sample. Auto salinity compensation will be applicable only in multi measurement mode and only if one of the measurement selected is conductivity related. This option is activated only in CD650 & PCD650. Otherwise, manually set salinity value will be applied. 2.2.20 % Saturation Offset Adjustment This option lets you offset meter’s value when cross referenced with another DO meter. The PCD 650 meter allows to adjust % saturation offset calibration within +/- 10.0% offset. Note: When a user calibration is done, the offset will be reset to zero. 2.2.21 Set barometer pressure range and barometric pressure units The PCD 650 meter is capable of measuring barometric pressure with its built-in pressure sensor. In the event, the pressure reading is inaccurate, you can calibrate the value from the setup menu. For setting barometric pressure range, please refer page 94. 2.2.22 Pressure compensation If pressure comp. is set to ‘ENABLE’, the meter will compensate for the barometric pressure at the location depending on the altitude. For example, if the barometric pressure is 700 mmHg the full scale calibration would be done at 92.1%. This is relative to the pressure at sea level. 20 Instruction Manual PCD 650 If the pressure comp. is set to ‘DISABLE’, then there would be no compensation for the pressure. The calibration would be done at 100% irrespective of the altitude. Note: This is applicable only for the % Saturation mode. For mg/L or ppm mode, pressure compensation would always be applicable. 21 Instruction Manual 2.3 PCD 650 Multi Display mode PCD 650 lets you view multi measurement modes at the same time. The measurement modes available for PCD 650 are pH/ mV/ Ion/Conductivity/Salinity/Resitivity/TDS/ DO(%)/DO (mg/L). The parameters being displayed is based on the settings set in the Display Setup. For more information on multi mode setup, refer ‘System Settings – Page 1’ on page 75 to select modes that you would like to appear on the first, second and third row of the display. Besides displaying the selected range, the meter also simultaneously displays the temperature. The user can also set the meter to display temperature in the multi measurement screen from in-built temperature of the COND & DO probes in the system setup screen. (Refer ‘System Settings – Page 1’ on page 75 to set temperature display) In multi measurement screen, the lower display shows the temperature reading and the measurement mode (from where the temperature is selected in system setup). To display temperature from available modes, refer Page 75. Figure 21: Multi measurement screen Refer respective measurement modes to get detail information on the indicators and function keys that appear on the multi measurement screen. For directions on how to calibrate your meter: • • • • • • • • • • See section 3.2 for Temperature calibration. See section 3.3 for pH calibration. See section 3.4 for mV calibration. See section 3.5 for Ion calibration. See section 3.6 for Conductivity calibration. See section 3.7 for Resistivity calibration. See section 3.8 for Salinity calibration. See section 3.9 for TDS calibration. See section 3.10 for DO(%) calibration. See section 3.11 for DO (mg/L) calibration. 22 Instruction Manual 2.4 PCD 650 pH Measurement Mode 2.4.1 Indicators in pH measurement screen In pH measurement mode, the meter displays pH and temperature reading. 2 3 1 4 5 6 7 8 9 11 10 12 Figure 22 : pH measurement screen Refer item numbers indicated in Figure 22. Item Description More Details On 1 Measurement mode indicator - 2 Appears when the reading is stable Page 17, 75 3 Appears when the reading is on hold Page 17, 75 4 pH reading 5 Units of measurement - 6 Temperature reading & units Page 98 7 Temperature compensation mode Page 18, 98 8 pH HI & LO Alarm limits Page 82 9 pH Alarm indicator Page 18, 82 10 Calibration Due indicator Page 18, 83 11 Response time of the pH probe Page 75 12 Calibrated Points Page 19, 82 23 Instruction Manual PCD 650 2.5 mV Measurement Mode In mV measurement mode, the meter displays mV and temperature reading. Depending on application, you can connect a suitable ORP probe to the meter or use the pH probe. 2.5.1 Indicators in mV measurement mode 2 1 3 4 5 6 7 Figure 23 : mV measurement screen Refer item numbers indicated in Figure 23. Item Description More Details On 1 Measurement mode indicator - 2 Appears when the reading is stable Page 17, 75 3 Appears when the reading is on hold Page 17, 75 4 mV reading - 5 Units of measurement - 6 Temperature reading & units Page 98 7 Temperature compensation mode Page 18, 98 Note: If offset is not zero, the meter displays relative mV reading of the solution in measurement mode. 24 Instruction Manual PCD 650 2.6 Ion Measurement Mode In Ion measurement mode, the meter displays Ion concentration (in ppm, molar or mg/L) and mV reading. Depending on application, you can connect a suitable Ion Selective Electrode (ISE) to the meter. 2.6.1 Changing unit of measurement By default the measuring unit is ppm. You can select either molar or mg/L in the setup mode (See page 85). 2.6.2 Indicators in Ion measurement mode 2 3 1 4 5 6 Figure 24 : Ion measurement screen Refer item numbers indicated in Figure 24. Item Description More Details On 1 Measurement mode indicator - 2 Appears when the reading is stable Page 17, 75 3 Appears when the reading is on hold Page 17, 75 4 Ion reading - 5 Units of measurement Page 85 6 mV reading - Note: If ion calibration has not been done, the display shows ‘- - - ’. 25 Instruction Manual PCD 650 2.7 Conductivity Measurement Mode In conductivity measurement mode, the meter displays conductivity and temperature readings. The LCD shows related information for the conductivity measurement such as temperature compensation mode, stable indicator, probe condition, calibration points, response time of the conductivity probe and conductivity alarm conditions. You can customize or enable/disable some of these indicators in the Setup mode. 2.7.1 Indicators in Conductivity measurement screen 2 Note: Lower display shows ‘2Cell’ or ‘4Cell’ when a 2-cell or 4-Cell conductivity probe is connected. 1 3 4 5 6 7 8 9 11 12 13 Figure 25 : Conductivity measurement screen Refer item numbers indicated in Figure 25. Item Description More Details On 1 Measurement mode indicator - 2 Appears when the reading is stable Page 17,75 3 Appears when the reading is on hold Page 17, 75 4 Conductivity reading - 5 Units of measurement - 6 Temperature reading & units Page 98 7 Temperature compensation mode Page 18, 98 8 Conductivity HI & LO Alarm limits Page 87 9 Conductivity Alarm indicator Page 18, 87 10 Calibration Due indicator Page 18, 86 11 Response time of the CON probe Page 75 12 Conductivity ranges Page 19 13 No of calibration points and method of calibration Page 19, 86 26 Instruction Manual PCD 650 2.8 TDS Measurement Mode In TDS measurement mode, the meter displays TDS and temperature reading. 2.8.1 Indicators in TDS measurement mode 2 Note: Lower display shows ‘2Cell’ or ‘4Cell’ when a 2-cell or 4-Cell conductivity probe is connected. 3 1 4 5 6 6 7 8 9 10 11 12 Figure 26 : TDS measurement screen Refer item numbers indicated in Figure 26. Item Description More Details On 1 Measurement mode indicator - 2 Appears when the reading is stable Page 17, 75 3 Appears when the reading is on hold Page 17, 75 4 TDS reading - 5 Units of measurement - 6 Temperature reading & units Page 98 7 Temperature compensation mode Page 18, 98 8 TDS HI & LO Alarm limits Page 18, 89 9 TDS Alarm indicator Page 18, 89 10 Response time Page 48 11 Calibration Due indicator Page 18, 88 12 No of calibration points and method of calibration Page 19, 88 Note: The factory default setting for the TDS conversion factor is 0.50. If your solution has a different TDS factor, you can improve calibration accuracy by setting the TDS factor prior to calibration. After setting the correct TDS Factor, you can commence calibration in the TDS mode. For more information regarding TDS conversion factor determination, please refer to page 106. 27 Instruction Manual PCD 650 2.9 Salinity Measurement Mode In Salinity measurement mode, the meter displays salinity and temperature reading. 2.9.1 Indicators in salinity measurement mode 2 Note: Lower display shows ‘2Cell’ or ‘4Cell’ when a 2-cell or 4-Cell conductivity probe is connected. 1 3 4 5 6 7 8 9 6 11 10 12 Figure 27 : Salinity measurement screen Refer item numbers indicated in Figure 27. Item Description More Details On 1 Measurement mode indicator - 2 Appears when the reading is stable Page 75 3 Appears when the reading is on hold Page 17, 75 4 Salinity reading - 5 Units of measurement - 6 Temperature reading & units Page 98 7 Temperature compensation mode Page 18, 98 8 Salinity HI & LO Alarm limits Page 90 9 Salinity Alarm indicator Page 18, 90 10 Response time Page 48 11 Calibration Due indicator Page 18, 90 12 No of calibration points and method of calibration Page 19, 90 28 Instruction Manual PCD 650 2.10 Resistivity Measurement Mode In Resistivity measurement mode, the meter displays resistivity and temperature reading. 2.10.1 Indicators in Resistivity measurement mode 2 Note: Lower display shows ‘2Cell’ or ‘4Cell’ when a 2-cell or 4-Cell conductivity probe is connected. 1 3 4 5 6 7 9 8 6 11 10 12 Figure 28 : Resistivity measurement screen Refer item numbers indicated in Figure 28. Item Description More Details On 1 Measurement mode indicator - 2 Appears when the reading is stable Page 75 3 Appears when the reading is on hold Page 17, 75 4 Resistivity reading - 5 Units of measurement - 6 Temperature reading & units Page 98 7 Temperature compensation mode Page 18, 98 8 Resistivity HI & LO Alarm limits Page 92 9 Resistivity Alarm indicator Page 18, 92 10 Response time Page 48 11 Calibration Due indicator Page 18, 92 12 No of calibration points and method of calibration Page 19, 92 29 Instruction Manual PCD 650 2.11 Percentage Saturation (%) Measurement Mode In percentage saturation measurement mode, the meter displays % saturation and temperature reading. The LCD shows related information for the saturation measurement such as temperature compensation mode, stable indicator, barometric pressure, calibration points, probe condition, response time of the DO probe and alarm conditions. You can customize or enable/disable some of these indicators in the Setup mode. 2.11.1 Indicators in percentage saturation measurement mode 2 3 1 4 5 6 7 8 9 11 10 Figure 29 : Percentage saturation measurement screen Refer item numbers indicated in Figure 29. Item Description More Details On 1 Measurement mode indicator - 2 Appears when the reading is stable Page 17, 75 3 Appears when the reading is on hold Page 17, 75 4 Saturation reading - 5 Units of measurement - 6 Temperature reading & units Page 98 7 Temperature compensation mode Page 18, 98 8 Saturation HI & LO Alarm limits Page 18, 95 9 Alarm indicator Page 18, 95 10 Barometric pressure Page 20, 94 11 Calibration points Page 65 30 Instruction Manual PCD 650 2.12 Concentration (mg/L) (ppm) Measurement Mode In concentration measurement mode, the meter displays concentration and temperature readings. The LCD shows related information for the concentration measurement such as temperature compensation mode, stable indicator, salinity value, probe condition, response time of the DO probe and alarm conditions. You can customize or enable/disable some of these indicators in the Setup mode. 2.12.1 Indicators in concentration measurement screen 2 1 3 4 5 6 7 9 8 11 10 Figure 30 : Concentration measurement screen Refer item numbers indicated in Figure 25. Item Description More Details On 1 Measurement mode indicator - 2 Appears when the reading is stable Page 17, 75 3 Appears when the reading is on hold Page 17, 75 4 Concentration reading - 5 Units of measurement Page 96 6 Temperature reading & units Page 18 7 Temperature compensation mode Page 18, 98 8 HI & LO Alarm limits Page 18, 97 9 Alarm indicator Page 18, 97 10 ppt indicator for input of salinity value Page 96 11 DO calibration point - 31 Instruction Manual PCD 650 2.13 Transfer Measured Data to Computer (CyberComm) 2.13.1 Sending a single reading from multi measurement mode 1. Make sure that the CURRENT DATA SET parameter is set to ‘SINGLE’ in the System Setup (Refer ‘System Settings – Page 4’ on page 79). 2. Make sure the CyberComm 600 application is up and running (page 12). 3. Make sure the IrDA port of the meter is closer and in-line with IrDA port of the computer. 4. From multi measurement mode, press PRIN (F3) to send data to CyberComm. 5. In CyberComm screen, press Find Device button. CyberComm starts finding the meter. 6. When CyberComm finds the meter, press Connect button. The IrDA link is established. The currently displayed measurement reading is transferred to CyberComm. (Figure 31) 7. Select Row 1 data, Row 2 data or Row 3 data from below there respective modes for which you wish to transfer data. 8. Once the data transfer is completed, the IrDA link is disconnected automatically. 9. To send another reading, repeat step 3, 4, 5 & 6. Figure 31 : Transferring a single measurement data (Multi measurement mode) 32 Instruction Manual PCD 650 10. To stop data transfer, click Disconnect button. 11. To clear the transferred readings from the screen, select the desired row and click Clear Data button. 2.13.2 Sending a single reading from single measurement mode 1. Make sure that the CURRENT DATA SET parameter is set to ‘SINGLE’ in the System Setup (Refer ‘System Settings – Page 4’ on page 79). 2. Make sure the CyberComm 600 application is up and running (page 12). 3. Make sure the IrDA port of the meter is closer and in-line with IrDA port of the computer. 4. From Single measurement mode, press PRIN (F3) to send data to CyberComm. 5. In CyberComm screen, press Find Device button. CyberComm starts finding the meter. 6. When CyberComm finds the meter, press Connect button. The IrDA link is established. The currently displayed measurement reading is transferred to CyberComm. (Figure 32) 7. Once the data transfer is completed, the IrDA link is disconnected automatically. 8. To send another reading, repeat step 3, 4, 5 & 6. 9. To clear the transferred readings from the screen, click Disconnect button and click Clear Data button. Figure 32 : Transferring a single measurement data 33 Instruction Manual 2.13.3 PCD 650 Sending readings continuously in single and multi measurement modes 1. Make sure that the CURRENT DATA SET parameter is set to ‘TIMED’ in the System Setup. Set the time interval at which you wish to send the data to CyberComm (Refer ‘System Settings – Page 4’ on page 79). 2. Make sure the CyberComm 600 application is up and running (page 12). 3. Make sure the IrDA port of the meter is closer and in-line with IrDA port of the computer. 4. From measurement mode, press PRIN (F3) to send data to CyberComm. 5. In CyberComm screen, press Find Device button. 6. When CyberComm finds the meter, press Connect button. The IrDA link is established. The measurement readings are sent to CyberComm continuously at the specified time interval as long as IrDA link is not disconnected. The transferred readings are displayed in the CyberComm screen (Figure 33). 7. To stop data transfer, click Disconnect button. 8. To clear the transferred readings in single measurement mode, click Clear Data button. To clear data in multi measurement mode, select the desired row and click Clear Data button. (a) Single measurement mode (b) Multi measurement mode Figure 33 : Transferring measurement data continuously 34 Instruction Manual PCD 650 Note: IrDA link may be disconnected if you move/disorient the IrDA ports during data transfer. Re-align the IrDA ports and press Connect button, to re-establish the connection. 2.13.4 Saving data You can save transferred measurement readings as a text file in your computer. Optionally, these text files can further be analyzed by exporting to spreadsheet application such as Microsoft® Excel. To save data: 1. Once you transferred data to CyberComm, click Disconnect button. (if CyberComm is still connected to the meter) 2. Click Save Data button. User Details dialog appears to capture user information, file name and additional notes (if any). (Figure 34) Figure 34 : User Details dialog 3. Enter your name & company name. 4. In Storage Location, specify a folder & file name with .txt extension. Click Browse button. Save As dialog appears. Select a folder and specify a name for the file in File name field. Make sure you type .txt at the end of the file name. If you simply type a file name (example: ‘conductivity readings.txt’) in the Storage Location, the file is saved in the installation folder of CyberComm. Optionally, you may enter any notes or additional information in the Notes field. 5. Click OK button to save the data in the specified location/file. Note: You can open and view the saved file using Windows® Notepad. You need to exit CyberComm before you can open the saved file. 35 Instruction Manual PCD 650 2.14 Working with Memory functions The PCD 650 has a memory capacity to store up to 500 sets of measurement data. The MEM (F2) function key allows you to view stored data. Optionally, you can transfer this data to a Computer using wireless Infrared connection. 2.14.1 Logging data automatically in meter’s memory 1. Make sure that the Print mode is set to data logging mode in the System Setup and you can also specify the time interval in between each transfer. (Refer: ‘System Settings – Page 4’ on page 79) 2. From measurement mode, press PRIN (F3) to start saving data automatically in meter’s memory. The memory location of the transferred reading is shown in the bottom-left of the screen. (Figure 35) NOTE: This symbol will appear if data logging mode has been selected in “System set up’. It will automatically start saving data in meter’s memory, when PRIN (F3) key is pressed. Memory Location where readings are being saved. Figure 35 : Saving a reading 2.14.2 Storing currently displayed reading in the memory (In IrDA and LED print mode) 1. Make sure you are in the measurement mode. 2. Press left or right arrow key to navigate to other available functions until you see STOR function in the LCD. 3. Press STOR (F3) key to store the currently displayed reading. The display briefly shows the memory location where this reading is being saved. (Figure 35) 2.14.3 Viewing stored data 1. Make sure you are in measurement mode. 2. Press left or right arrow key to navigate to other available functions until you see MEM function in the LCD. 36 Instruction Manual PCD 650 3. Press MEM (F2) key to view stored data. The last stored data entry is shown in the display (Figure 36). The memory location of the currently showing data entry is shown in the top-right corner of the screen. (Figure 36). Figure 36 : Viewing stored data 4. To navigate to a particular memory location, press up or down arrow key to select memory location you intend to navigate to and then press ENTER key. The meter shows the stored data in the memory location you selected. 5. Press NEXT (F3) key to return to measurement mode from where you entered to view memory. 6. Press ESC (F4) key to return to main screen of the measurement mode. 2.14.4 Transferring stored data to Computer (CyberComm) through IrDA 1. Make sure the CyberComm 600 application is up and running (page 12). 2. Make sure the IrDA port of the meter is closer and in-line with IrDA port of the computer. 3. Go to ‘stored data viewing’ screen as described in above section (Figure 36). 4. Press PRIN (F2). The screen appears for you to select printing options (Figure 37).This allows you to choose either all memory locations or the current memory location for transfer. 5. Press up or down ENTER key. arrow key to select your choice and then press 6. If you have selected ‘All locations’, then you can specify the time interval in between each transfer. Press up or down arrow key to select time interval (1 to 50 seconds) and press ENTER key. 7. In CyberComm screen, press Find Device button. 8. Once CyberComm finds the meter, click Connect button to establish connection. 37 Instruction Manual PCD 650 9. The CyberComm establishes connection with meter through IrDA and sends the data (Figure 38). The connection stops automatically once the data is transferred. 10. You can save the transferred data to a text file. See ‘Saving data’ section in page 35. Figure 37 : Selecting options for printing memory locations Figure 38 : Transfer Stored data to CyberComm 38 Instruction Manual PCD 650 3. Calibration Mode 3.1 About Calibration PCD 650 series meters are factory calibrated and allows you to measure pH/mV/ion/conductivity/resistivity/TDS/salinity/DO(%)/DO(mg/L). Calibrate to all measurement ranges to ensure the highest accuracy throughout all measurement range. However, it is recommended that, for higher accuracy, you calibrate your meter before you make measurements for the first time. Calibration should be carried out each time a new electrode is attached to the meter or when you suspect that the meter/electrode is out of calibration. 3.1.1 About Temperature Calibration It is important to ensure that temperature calibration is carried out prior to pH, conductivity and DO calibration since temperature readings affect the accuracy of pH, conductivity and DO measurements. You need to perform temperature calibration only if the temperature value displayed on the meter is different from that of a calibrated thermometer or if cell constant setting is changed. A temperature offset calibration of ± 5 °C/± 9 °F from the default reading is allowed for ATC mode. 3.1.2 About pH Calibration When you re-calibrate your meter, previous pH calibration points are replaced on a point by point basis. For example, if you previously calibrated your meter at pH 4.01, 7.00, and 10.01, and you have now re-calibrated at pH 7.00, the meter retains the old calibration data at pH 4.01 and pH 10.01. The meter shows previously calibrated points in the display when the meter is in pH measurement mode. To completely re-calibrate the meter, or when you use a replacement probe, it is best to clear the previous calibration and recalibrate the meter at all points. Refer page 46 for information on how to clear previous pH calibration. The meter supports four internationally recognized standard buffer groups: USA, NIST, DIN & PWB. The default buffer group is USA. Refer page 82 for information on how to set the meter to a particular buffer group The meter is capable of calibrating up to 6 points, depending on the standard buffer selected. When completely re-calibrating the meter, the first point of calibration should be one of the following, depending on your choice of standard buffer group. Buffer Group USA NIST DIN PWB First Point of Calibration (when complete re-calibration) pH 7.00 pH 6.86 pH 6.79 pH 6.97 Other Available Calibration Points pH 1.68, 4.01, 10.01, and 12.45 pH 4.01, 6.86, 9.18, and 12.45 pH 1.09, 3.06, 4.65, 9.23, and 12.75 pH 4.10 Table 2: Buffer Groups and Calibration Points 39 Instruction Manual PCD 650 The meter automatically recognizes and calibrates to these standard pH buffer values, which makes pH calibration faster and easier. 3.1.3 About Ion Calibration The meter supports Ion calibration up to 8 points with minimum of 2-points. The available 8-points are 0.001, 0.01, 0.1, 1, 10, 100, 1000 & 10000. The meter guides your through the calibration process with on-screen instructions and hints. If the second point and subsequent points are not within the allowable calibration window (15mV/decade to 90mV/decade), the meter does not accept the calibration. When you try to re-calibrate the meter with ISE, the meter gives you 2 options: Clear the previous calibration (choose this if you wish to delete all previously calibrated points and re-calibrate with a new type of Ion) Retain the previous calibration (choose this if you wish to retain previously calibrated points and re-calibrate new points or overwrite existing points with same type of Ion). 3.1.4 About Conductivity/Resistivity/TDS/Salinity Calibration Before measuring conductivity, resistivity, TDS or salinity, you will need to calibrate the meter with known conductivity, resistivity, TDS or salinity values. This meter is capable of performing either automatic or manual calibration. In the automatic calibration mode, the meter automatically detects and verifies the appropriate known calibration standards solutions being calibrated before accepting these particular calibration standards as one of its calibration values in a specific measurement range. This automatic calibration mode frees you from cumbersome calibration procedure. This meter can perform a single- or multi-point calibration. You will need to set your meter to single- or multi-point calibration in the Setup mode for conductivity, resistivity, TDS or salinity. Refer to the setup section for the particular mode you will be measuring. Instead of calibrating for TDS directly using TDS calibration standard solutions, you can have TDS calibration by using the conductivity calibration method and enter the appropriate TDS conversion factor into the meter. For more information regarding TDS Conversion Factor determination, please refer to page 106. 3.1.5 About DO(%) and DO (mg/L) Calibration The calibration of % Saturation of DO will linearly affect the measurement for DO in mg/L. The amount of oxygen dissolved in water will depend on its temperature, atmospheric pressure and its salinity. It is therefore very important that the temperature is calibrated if necessary prior to the DO calibration. 40 Instruction Manual PCD 650 Hence calibration in % Saturation of DO should be carried out first. This is described in the following section. 3.1.6 Prepare the Meter for Calibration Before starting calibration, make sure the meter is in the appropriate measurement mode. For pH Connect the pH probe to the BNC connector of the meter. Be sure to remove the protective electrode storage bottle or rubber cap of the electrode before calibration or measurement. If the electrode has been stored dry, wet the electrode in clean water for 10 minutes before calibrating or taking readings to saturate the pH electrode surface and minimize drift. Wash your electrode in clean water after use, and store in electrode storage solution. If storage solution is not available, use pH 4.01 or 7.00 buffer solution. Do not reuse buffer solutions after calibration. Contaminants in the solution can affect the calibration, and eventually the accuracy of the measurements. It is recommended that you perform at least a 2-Point Calibration using standard buffers that adequately cover the expected measurement range, prior to measurement. For Ion Connect the ISE to the BNC connector of the meter. Remove plastic protective cap of ISE. Briefly rinse the electrode with clean clean water to remove any residues. Rinse ISE before and after each calibration or sample measurement to avoid cross-contamination. Ensure that you use new or fresh standard solutions during calibration. Do not reuse Ion standard solution as it may be contaminated and affect the calibration and accuracy of measurements. For Conductivity Connect the conductivity probe with built-in temperature sensor into the 8-pin connector of the meter. For best results, select a standard value close to the sample value you are measuring. Alternatively use a calibration solution value that is approximately 2/3 the full-scale value of the measurement range you plan to use. For example, in the 0 to 2000 µS conductivity range, use a 1413 µS solution for calibration. Perform calibration for all measurement ranges to ensure the highest accuracy throughout all measurement range. Calibration for different ranges is indicated in the Technical Specifications table on page 5, calibration factors are applied only to their respective ranges If you are measuring in solutions with Conductivity lower than 100 µS/cm or TDS lower than 50 ppm, calibrate the meter at least once a week to get good accuracy. If you are measuring in the mid ranges and you wash the electrode in de-ionized water and store it dry, calibrate the meter once a month. If you take measurements at extreme temperatures, calibrate at least once a week. 41 Instruction Manual PCD 650 Ensure that you use new conductivity standard solutions or sachets during calibration. Do not reuse standard solutions as it may be contaminated and affect the calibration and accuracy of measurements. Use fresh calibration solution each time you calibrate your meter. Keep solutions in a dry and cool environment if possible. For DO(%) and DO (mg/L) Calibration Before starting calibration, make sure you are in the correct measurement mode and in the correct calibration sequence. The temperature and the % Saturation calibration must be done first before attempting to do the mg/L (ppm) Concentration calibration. Rinse the probe well in the de-ionized (DI) water or rinse solution and wipe the probe carefully taking care of the membrane. Calibrate the meter in all the modes to ensure the highest accuracy throughout the DO measurement range. In % Saturation, the meter is able to perform either a one point calibration or a 2 point calibration. For one point calibration, it is recommended that you perform a 100% Saturation calibration in saturated air. If you opt for 2 point calibration, you can calibrate for 100% Saturation in saturated air and 0% Saturation using a zero oxygen solution. All new calibration values will automatically override the existing data. It is recommended to calibrate the meter periodically and or if it is suspected to be inaccurate. Always rinse the probe with either DI water or rinse solution before and after each calibration/sample measurement. When calibrating in air, make sure that any water droplets from the probe’s membrane are removed. 3.1.7 Accessing Calibration mode From measurement mode, press CAL (F2) key. The meter goes to corresponding calibration mode, based on the selected measurement mode. If the meter is password protected, you will be prompted to enter password. (Refer the below section) 3.1.8 Accessing Calibration mode when password protection enabled Follow the steps below to access the calibration mode, when password protection is enabled (Refer page 80). 1. Make sure you are in measurement mode. If required, press MODE (F3) to switch to the measurement mode for which you wish to perform calibration. 2. Press CAL (F2) to go to calibration mode. Login Password screen appears (Figure 39). The meter expects the 5-digit password specified in system setup. (Refer ’System Settings – Page 5’ in page 80) 42 Instruction Manual PCD 650 Figure 39 : Login password screen Note: You can enter ‘00000’ (read-only password) if you wish to view the calibration report of the last calibration. You are not allowed to perform calibration when you enter ‘read-only password’. 3. Press up & down arrow keys to enter the first digit of the password and then press NEXT (F3) key to move to the next digit. 4. The next digit is selected. Press up second digit of the password. & down arrow keys to enter the 5. Similarly enter all 5-digits. 6. Press ENTER key to confirm the password. 7. When the correct password is entered, the ‘Calibration – Rinse Electrode’ screen appears (Refer Figure 48-(a)]. Note: If you enter an incorrect password, the screen shows ‘Try again’. If an incorrect password is entered for 3 consecutive times, the meter goes to measurement mode. 43 Instruction Manual PCD 650 3.2 Temperature Calibration The built-in temperature sensor of conductivity and DO probe included with the meter are factory calibrated. The built-in ATC probe of the conductivity cells can be used for temperature readout and compensation of the pH values. DO in mg/L is dependent on temperature, so it is first necessary to calibrate or verify the temperature reading. Calibrate the probes only if you suspect temperature errors may have occurred over a long period of time or if you have a replacement probe. This procedure offers offset adjustment of probe to ensure more accurate temperature measurement. Use a thermometer which is known to be accurate to measure the temperature of your sample. 3.2.1 Temperature Calibration for ATC mode Make sure you have selected ‘ATC’ and required unit of measurement (ºC or ºF) in Temperature settings. Refer ‘Temperature Setup’ section in page 98 for more details. 1. Switch on the meter. Make sure the meter is in measurement mode. 2. Press CAL (F2) to go to calibration mode. Note: If the meter is password protected, you will be prompted to enter a password. Refer ‘Accessing Calibration mode when password protection enabled’ in page 42. 3. The meter shows ‘Calibration-Rinse Electrode’ screen [Figure 48-(a)] for few seconds and then shows the cell constant adjustment screen. 4. Press NEXT (F3) key. 5. Press TEMP (F1) to go to temperature calibration. The temperature calibration screen appears (Figure 40). Figure 40: Temperature calibration screen 44 Instruction Manual PCD 650 6. The screen shows two readings. The upper display shows the temperature reading of the solution with respect to previous calibration (if any) & lower displays shows the temperature reading of the solution without any calibration (default reading). Use & keys to adjust the upper display to the temperature reading of the thermometer. Note: The meter allows you to adjust the upper display reading up to ±5 ºC or ±9 ºF. (Calibration window) 7. Press ENTER key to confirm temperature value. 3.2.2 Temperature Calibration for MTC mode Make sure you have selected ‘MTC’ and required unit of measurement (ºC or ºF) in Temperature settings. Refer ‘Temperature Setup’ section in page 98 for more details. 1. Switch on the meter. Make sure the meter is in measurement mode. 2. Press CAL (F2) to go to calibration mode. Note: If the meter is password protected, you will be prompted to enter a password. Refer ‘Accessing Calibration mode when password protection enabled’ in page 42. 3. The meter shows ‘Calibration-Rinse Electrode’ screen [Figure 48-(a)] for few seconds and then shows the cell constant adjustment screen. 4. Press NEXT (F3) key. 5. Press TEMP (F1) to go to temperature calibration. The temperature calibration screen appears. 6. The screen shows two readings. The upper display shows the temperature reading of the solution with respect to previous calibration (if any) & lower displays shows the temperature reading of the solution without any calibration (default reading). Use & keys to adjust the upper display to the temperature reading of the thermometer. Note: The meter allows you to adjust the upper display reading to any value within the measuring range -10.0 ºC to 110.0 ºC (14.0 ºF to 230.0 ºF). 7. Press ENTER key to confirm temperature value. Function Keys available in temperature calibration screen: NEXT (F3) Goes to measurement mode from where you entered calibration ESC (F4) Goes to measurement mode from where you entered calibration ENTER Confirms calibration Increase/decrease temperature reading (Not functional) 45 Instruction Manual PCD 650 3.3 pH Calibration 3.3.1 pH Calibration with a Standard Buffer Make sure you have selected a standard buffer with which you intend to perform pH calibration. Refer ’pH Setup’ section in page 82 for more details of setting buffer types. To start pH Calibration: 1. Switch on the meter and make sure the meter is in pH measurement mode. 2. Press CAL (F2) to start calibration. Note: If the meter is password protected, you will be prompted to enter a password. Refer ‘Accessing Calibration mode when password protection enabled’ in page 42. 3. The meter shows ‘Calibration-Rinse Electrode’ screen [Figure 41 (a)] for few seconds and then shows the pH calibration screen [Figure 41-(b)]. (a) (b) Figure 41: pH Calibration Screens 4. Rinse the electrode in clean water and prepare electrode for calibration. Refer ‘Prepare the meter for measurement ‘section in page 40. Note: If you wish to completely re-calibrate the meter, you need to clear previous calibration data. Press CLR-C (F2) key to clear previous calibration. The meter shows you confirmation screen. Press ENTER key to confirm deleting previous calibration. Once cleared, you need to calibrate the first point that corresponds to your selected buffer group, as mentioned on page 39. 46 Instruction Manual PCD 650 5. Dip the probe in calibration buffer. The tip of the probe must be completely immersed into the solution. Stir the probe gently to create a homogeneous solution. 6. The display shows the pH reading. The meter scans through all the available (un-calibrated) points for the selected buffer group until it finds a close match within its acceptable calibration window. (Refer Specification section in page 99 for calibration window values). Once found a match, the display shows ‘Stable’ indicator. 7. Press ENTER key to confirm the calibration. 8. Rinse the probe with clean water. 9. Place it in the next buffer and follow the steps 5 and 7 to calibrate other points. Function Keys available in pH Calibration mode: TEMP (F1) Goes to temperature calibration CLR-C (F2) Clears previous calibration (if any) after ENTER key is pressed in confirmation screen NEXT (F3) Shows calibration report ESC (F4) Exits from calibration and goes back to pH measurement mode ENTER Confirms the calibration (Not functional) 3.3.2 pH Calibration with a User-defined Buffer If you selected ‘USER’ (Custom) buffer in the pH Setup, the following screen is shown when you enter calibration mode. You need to prepare at least 2 custom buffers of known pH values. Note: Custom buffer solution values should be at least 1 pH unit apart from each other. Otherwise, the meter will not accept the buffer values. Figure 42: Calibration screen for user-defined buffer 47 Instruction Manual PCD 650 1. Rinse the electrode in clean water and prepare electrode for calibration. Note: If you wish to completely re-calibrate the meter, you need to clear previous calibration data. Press CLR-C (F2) key to clear previous calibration. The meter shows you confirmation screen. Press ENTER key to confirm deleting previous calibration. 2. Dip the probe in custom calibration buffer. The tip of the probe must be completely immersed into the solution. Stir the probe gently to create a homogeneous solution. 3. The screen shows 2 readings. The upper display shows the pH reading of the solution with respect to previous calibration (if any) & lower display shows the pH reading of the solution without any calibration. Use & keys to adjust the upper display to the pH value of your custom buffer. 4. Press ENTER key to confirm the calibration. 5. Rinse the probe with clean water. Place it in the next buffer and follow the steps 2, 3 and 4 to calibrate other points. Function Keys available in pH Calibration mode: TEMP (F1) Goes to temperature calibration CLR-C (F2) Clears previous calibration (if any) after ENTER key is pressed for the confirmation screen NEXT (F3) Shows calibration report ESC (F4) Exits from calibration and goes back to pH measurement mode ENTER Confirms the calibration Increases/decreases pH buffer reading (Not functional) 3.3.3 Calibration Report Calibration report gives you detailed information on calibration. It includes date & time, buffer group, offset, temperature, number of days calibration is over due and slope information. To View calibration Report: 1. From pH measurement mode, press left or right arrow key to navigate to other available functions until you see REPO function in the LCD. 2. Press REPO (F2) key. The first page of calibration report is shown in the display. 3. Press PAGE (F1) to view the second page of the report. 4. Press PRIN (F2) to transfer the calibration report to computer through IrDA. (Refer page 37 to print data). 48 Instruction Manual PCD 650 Figure 43: pH Calibration Report Example: In the given pH calibration report (Refer Figure 43), 4-point calibration has been done for USA buffer group (pH 1.68, pH 4.01, pH 7.00 & pH 12.45). The slope is 93 for the range enveloped from pH 1.68 to pH 4.01. The slope is 88 for the range enveloped from pH 4.01 to pH 7.00. The slope is 94 for the range enveloped from pH 7.00 to pH 12.45 where pH 10.01 calibration point has been skipped. Function Keys available in pH calibration report screen: PAGE (F1) Goes to the second page of the calibration report BACK (F1) Goes to the first page of the calibration report PRIN (F2) Transfers calibration report to Computer through IrDA NEXT (F3) Goes to pH measurement mode ESC (F4) Goes to pH measurement mode ENTER (Not functional) (Not functional) 3.3.4 Average Slope Indicator of pH Probe Each time you perform pH calibration; the meter calculates the average slope of your probe and graphically indicates it in the header section of the LCD screen. Figure 44 : Average slope indicator 49 Instruction Manual PCD 650 Number of bars in the indicator shows the slope value: Number of Bars Average Slope of the pH Probe 4 Above 90% 3 90% to 80% 2 80% to 70% 1 Below 70% 50 Instruction Manual PCD 650 3.4 mV Calibration Use a standard ORP solution of known value for calibration. You need to calibrate only 1-point. 1. Switch on the meter. Make sure the meter is in mV measurement mode. 2. Press CAL (F2) to go to calibration mode. Note: If the meter is password protected, you will be prompted to enter a password. Refer ‘Accessing Calibration mode when password protection enabled’ in page 42. 3. The meter shows ‘Calibration-Rinse Electrode’ screen [Figure 41 (a)] few seconds and then shows the mV calibration screen [Figure 45 (a)]. (a) (b) Figure 45 : mV calibration screen & calibration report 4. The screen shows two readings. The upper display shows the mV reading of the solution with respect to previous calibration (if any) & lower displays shows the absolute mV reading of the solution without any calibration (default reading). Use & keys to adjust the upper display to the mV value of the solution. Note: The meter allows you to adjust the upper display reading up to ±150 mV with respect to the default reading. 5. Press ENTER key to confirm the entered value. 6. The calibration is completed. The meter shows the calibration report [(Figure 45-(b)]. 7. Press ESC (F4) to go to measurement mode. The meter shows the relative mV reading of the solution in measurement mode, if offset is not zero. 51 Instruction Manual PCD 650 Note: The function of the keys available on the mV calibration/ report screen is same as previously described in pH calibration with a userdefined buffer section (page 48). 3.4.1 mV Calibration Report Calibration report gives you information on calibration. It includes date & time on which the last calibration was done and the offset. To View calibration Report: 1. From mV measurement mode, press left or right arrow key to navigate to other available functions until you see REPO function in the LCD 2. Press REPO (F2) key. The calibration report is shown in the display [(Figure 45 (b)]. 3. Press PRIN (F2) to transfer the calibration report to the computer.( Refer page 37 to print data) 52 Instruction Manual PCD 650 3.5 Ion Calibration Use standard solutions of 0.001, 0.01, 0.1, 1, 10, 100, 1000 & 10000 ppm for calibration. You need to calibrate minimum of 2-points. Follow the instruction in ‘Prepare the meter for measurement’ section in page 40. 1. Switch on the meter. Make sure the meter is in Ion measurement mode. 2. Press CAL (F2) to go to calibration mode. Note: If the meter is password protected, you will be prompted to enter a password. Refer ‘Accessing Calibration mode when password protection enabled’ in page 42. 3. The meter shows ‘Calibration-Rinse Electrode’ screen [Figure 41-(a)] few seconds and then shows the Ion calibration screen [Figure 46-(b)] (a) (b) Figure 46 : Ion calibration screens Note: If there is an existing ion calibration in the meter, you will be given two options. [Figure 46-(a)] Clear the previous calibration (CLR-C) – choose this if you wish to delete all previously calibrated points and re-calibrate with a new type of ion. Retain the previous calibration (NEXT) – choose this if you wish to retain previously calibrated points and re-calibrate new points (or overwrite existing points) with same type of ion. 4. Dip the ISE in calibration solution. The tip of the probe must be completely immersed into the solution. Stir the probe gently to create a homogeneous solution. 5. The calibration screen displays two readings. The upper display shows the lowest calibration point 0.001 ppm. The lower display shows the absolute mV reading of the solution without any calibration (default reading). Use & keys to select the required calibration point in the upper display. 53 Instruction Manual PCD 650 6. Allow time for the reading to stabilize. Press ENTER key to confirm the selected point. The meter flashes the upper display to acknowledge the first point calibration. 7. The upper display shows the next calibration point. 8. Rinse the ISE with clean water. Place it in the next calibration solution and follow the steps 4 through 6 to calibrate other points. Note: The meter accepts the second and subsequent points only if the mV readings are within the calibration window (15mV/decade to 90mV/decade). 9. Press ESC (F4) to go to measurement mode. Note: The function of the keys available on the Ion calibration/ report screen is same as previously described in pH calibration with a userdefined buffer section (page 48). 3.5.1 Calibration Report Calibration report gives you detailed information on calibration. It includes date & time, calibration points (Ion concentrations), absolute mV reading for each point and slope. Figure 47 : Ion calibration report Example: In the given Ion calibration report (Refer Figure 47), calibration has been done for 0.01, 0.1 & 10 Ion concentrations. The corresponding absolute mV readings are 0.0mV, 56.0mV & 156mV. The slope is 56 mV/decade for the range enveloped from 0.01 to 0.1 ppm. Similarly, the slope is 50 for the range enveloped from 0.1 to 10ppm where 0.1 calibration point has been skipped. To View calibration Report: 1. From mV measurement mode, press left or right arrow key to navigate to other available functions until you see REPO function in the LCD 2. Press REPO (F2) key. The calibration report is shown in the display. 3. Press PRIN (F2) to transfer the calibration report to computer through IrDA. 54 Instruction Manual PCD 650 3.6 Conductivity Calibration 3.6.1 Manual Calibration Make sure you have selected a standard solution with which you intend to perform conductivity calibration, refer page 86 for more details of setting solution types. To start manual Calibration for conductivity: Following is the procedure for single point calibration: 1. Switch on the meter and make sure the meter is in conductivity measurement mode. 2. Dip the probe into the calibration standard. Immerse the probe tip beyond the upper steel band. Stir the probe gently to create a homogeneous sample. Allow time for the reading to stabilize. 3. Press CAL (F2) to start calibration. Note: If the meter is password protected, you will be prompted to enter a password. Refer ‘Accessing Calibration mode when password protection enabled’ in page 42. 4. The meter shows ‘Calibration-Rinse Electrode’ screen [Figure 48 (a)] for few seconds to prompt user to rinse electrode with de-ionized water before calibration (Refer ‘Prepare the meter for measurement’ section in page 40). (a) (b) Figure 48 : Calibration Screens 5. The meter then shows cell constant adjustment screen [Figure 48-(b)]. The upper display shows the cell constant of the conductivity cell & lower display shows the measured value of the solution with adjusted cell constant with respect to default calibration. Press & keys to adjust the cell constant for your custom solution in upper display. 6. Press ENTER key to confirm the calibration. 55 Instruction Manual PCD 650 Note: If you wish to completely re-calibrate the meter, you need to clear previous calibration data. Press CLR-C (F2) key to clear previous calibration. The meter shows you confirmation screen. Press ENTER key to confirm deleting previous calibration. Figure 49 : Conductivity calibration Screen 7. The upper display shows the conductivity reading of the solution with respect to previous calibration (if any) & lower display shows the conductivity reading of the solution without any calibration. Use & keys to adjust the upper display of the conductivity value of your custom solution. 8. Press ENTER key to confirm the calibration. 9. Press ESC (F4) to go to measurement mode. 10. As for the case of multi point calibration, rinse the probe with de-ionized water, and repeat step 1 to 7 for every calibration using the desired calibration solutions until all points have been calibrated. Function Keys available in Conductivity Calibration mode: TEMP (F1) Goes to temperature calibration CLR-C (F2) Clears previous calibration (if any) after ENTER key is pressed in confirmation screen NEXT (F3) Shows calibration report ESC (F4) Exits from calibration and goes back to conductivity measurement mode ENTER Confirms the calibration Increases/decreases conductivity cell reading (Not functional) 3.6.2 Automatic calibration (For Conductivity Calibration) In the Automatic Calibration mode, the meter is capable of accepting either single-point or up to 5 points for multi-point calibration with maximum of 1 point per specific measurement range. Select automatic calibration mode in the Conductivity Setup screen. See ‘Conductivity Settings – Page 1’ on page 86 for the set up procedure. Press (F2) to start calibration and the meter displays cell adjustment screen as mentioned in the above section. 56 Instruction Manual PCD 650 The following screen is displayed after cell adjustment screen, if you have selected ‘Auto’ in Calibration mode and ‘MULTI’ in Calibration Point: Figure 50 : Conductivity calibration Screen-Auto 1. Rinse the electrode in de-ionized water and prepare electrode for calibration. Refer ‘Prepare the meter for measurement’ section in page 40. Note: If you wish to completely re-calibrate the meter, you need to clear previous calibration data. Press CLR-C (F2) key to clear previous calibration. The meter shows you confirmation screen. Press ENTER key to confirm deleting previous calibration. 2. Dip the probe into the calibration standard. Immerse the probe tip beyond the upper steel band. Stir the probe gently to create a homogeneous sample. Allow time for the reading to stabilize. 3. Press CAL (F2) to go to calibration mode. The screen shows conductivity reading. The meter scans through all the available points for the selected solution group until it finds a close match within its acceptable calibration window. Once found a match, the display shows ‘Stable‘ indicator. 4. Press ENTER key to confirm the calibration. 5. Rinse the probe with de-ionized water. Place it in the next solution and follow the steps 2, 3 and 4 to calibrate other points. Function Keys available in Conductivity Calibration mode: TEMP (F1) Goes to temperature calibration CLR-C (F2) Clears previous calibration (if any) after ENTER key is pressed for the confirmation screen NEXT (F3) Shows calibration report ESC (F4) Exits from calibration and goes back to conductivity measurement mode ENTER Confirms the calibration Not functional 6. Press ESC (F4) to go to measurement mode. 57 Instruction Manual PCD 650 Note: If the user has selected ‘SINGLE’ point calibration and ‘AUTO’ calibration mode, the meter will go to measurement mode after step 4. 3.6.3 Calibration Report Calibration report gives you detailed information on calibration. It includes date & time, calibration points, range, factor and cell constant. To View calibration Report: 1. From conductivity measurement mode, press left or right arrow key to navigate to other available functions until you see REPO function in the LCD. 2. Press REPO (F2) key. The calibration report is shown in the display. 3. Press PRIN (F2) to transfer the calibration report to computer through IrDA. (Refer page 37 to print data). Figure 51: Conductivity Calibration Report Function Keys available in conductivity calibration report screen: PRIN (F2) Transfers calibration report to Computer through IrDA NEXT (F3) Goes to conductivity measurement mode ESC (F4) Goes to conductivity measurement mode ENTER (Not functional) (Not functional) Note: Auto calibration can also be done for electrode with cell constant 0.4 – 2. 58 Instruction Manual PCD 650 3.7 Resistivity Calibration Use a standard solution of known value for calibration. Use the single-point standardization option to measure samples that close in value and multi-point standardization to measure wide range of samples. 1. Switch on the meter. Make sure the meter is in resistivity measurement mode. 2. Press CAL (F2) to go to calibration mode. 3. The meter shows ‘Calibration-Rinse Electrode’ screen [Figure 48-(a)] few seconds and then shows the cell constant adjustment screen [Figure 52(a)]. Note: If the meter is password protected, you will be prompted to enter a password. Refer ‘Accessing Calibration mode when password protection enabled’ in page 42. (a) (b) Figure 52 : Resistivity Cell constant & resistivity calibration 4. The upper display of the resistivity cell constant screen [Figure 52-(a)] shows the resistivity cell constant of your solution & lower display shows the measured value of the solution with adjusted cell constant. Press & keys to adjust the cell constant for your custom solution in upper display. 5. Press ENTER key to confirm the entered value and to go to resistivity calibration screen. 6. The screen shows two readings. The upper display shows the resistivity reading of the solution with respect to previous calibration (if any) & lower display shows the resistivity reading of the solution without any calibration. Use & keys to adjust the upper display of the resistivity value of your custom solution. 7. Press ENTER key to confirm the entered value. 59 Instruction Manual PCD 650 Note: The function of the keys available on the resistivity cell constant/calibration/ report screen is same as previously described in conductivity calibration. 8. Rinse the probe with de-ionized water. Place it in the next solution and follow the steps 2 to 7 to calibrate other points, if ‘MULTI’ point calibration is selected. 9. Press ESC (F4) to go to measurement mode. The meter shows the resistivity reading of the solution in measurement mode. 3.7.1 Resistivity Calibration Report Calibration report gives you information on calibration. It includes date & time on which the last calibration was done and the offset. To View resistivity Report: 1. From resistivity measurement mode, press left or right arrow key to navigate to other available functions until you see REPO function in the LCD 2. Press REPO (F2) key. The calibration report is shown in the display [Figure 53]. 3. Press PRIN (F2) to transfer the calibration report to the computer.( Refer page 37 to print data) Figure 53 : Resistivity report screen 60 Instruction Manual PCD 650 3.8 Salinity Calibration Use a standard solution of known value for calibration. Use the single-point standardization option to measure samples that close in value and multi-point standardization to measure wide range of samples. 1. Switch on the meter. Make sure the meter is in salinity measurement mode. 2. Press CAL (F2) to go to calibration mode. Note: If the meter is password protected, you will be prompted to enter a password. Refer ‘Accessing Calibration mode when password protection enabled’ in page 42. 3. The meter shows ‘Calibration-Rinse Electrode’ screen [Figure 48-(a)] few seconds and then shows the cell constant adjustment screen [Figure 54-(a)]. (a) (b) Figure 54 : Salinity Cell constant & salinity calibration 4. The upper display of the cell constant adjustment screen [Figure 54-(a)] shows the salinity cell constant of your solution & lower display shows the measured value of the solution with adjusted cell constant. Press & keys to adjust the cell constant for your custom solution in upper display. 5. Press ENTER key to confirm the entered value and to go to salinity calibration screen. 6. The screen shows two readings [Figure 54-(b)]. The upper display shows the salinity reading of the solution with respect to previous calibration (if any) & lower display shows the salinity reading of the solution without any calibration. Use & keys to adjust the upper display of the salinity value of your custom solution. 7. Press ENTER key to confirm the entered value. 61 Instruction Manual PCD 650 Note: The function of the keys available on the salinity cell constant/calibration/ report screen is same as previously described in conductivity calibration. 8. Rinse the probe with de-ionized water. Place it in the next solution and follow the steps 2 to 7 to calibrate other points, if ‘MULTI’ point calibration is selected. 9. Press ESC (F4) to go to measurement mode. The meter shows the salinity reading of the solution in measurement mode. 3.8.1 Salinity Calibration Report Calibration report gives you information on calibration. It includes date & time on which the last calibration was done and the offset. To View salinity Report: 1. From salinity measurement mode, press left or right arrow key to navigate to other available functions until you see REPO function in the LCD 2. Press REPO (F2) key. The calibration report is shown in the display [Figure 55]. 3. Press PRIN (F2) to transfer the calibration report to the computer.(Refer page 37 to print data) Figure 55 : Salinity report screen 62 Instruction Manual PCD 650 3.9 TDS Calibration You can commence calibration in the TDS mode by using the conductivity calibration method and after setting the correct TDS factor. For more information regarding TDS conversion factor determination, please refer to page 106. For the rest of the calibration process, follow steps as mentioned in the section of manual calibration on page 55. Use a standard solution of known value for calibration. Use the single-point standardization option to measure samples that close in value and multi-point standardization to measure wide range of samples. 1. Switch on the meter. Make sure the meter is in TDS measurement mode. 2. Press CAL (F2) to go to calibration mode. Note: If the meter is password protected, you will be prompted to enter a password. Refer ‘Accessing Calibration mode when password protection enabled’ in page 42. 3. The meter shows ‘Calibration-Rinse Electrode’ screen [Figure 48-(a)] few seconds and then shows the cell constant adjustment screen for TDS [Figure 56(a)]. (a) (b) Figure 56 : TDS Cell constant adjustment & TDS calibration screen 4. The upper display of the TDS cell constant screen [Figure 56-(a)] shows the TDS cell constant of your solution & lower display shows the measured value of the solution with adjusted cell constant. Press & keys to adjust the cell constant for your custom solution in upper display. 5. Press ENTER key to confirm the entered value and to go to TDS calibration screen. 6. The screen shows two readings [Figure 56-(b)]. The upper display shows the TDS reading of the solution with respect to previous calibration (if any) & lower display shows the TDS reading of the solution without any calibration. Use & keys to adjust the upper display of the TDS value of your custom solution. 7. Press ENTER key to confirm the entered value. 63 Instruction Manual PCD 650 Note: The function of the keys available on the TDS cell constant/calibration/ report screen is same as previously described in conductivity calibration. 8. Rinse the probe with de-ionized water. Place it in the next solution and follow the steps 2 to 7 to calibrate other points, if ‘MULTI’ point calibration is selected. 9. Press ESC (F4) to go to measurement mode. The meter shows the TDS reading of the solution in measurement mode. 3.9.1 TDS Calibration Report Calibration report gives you information on calibration. It includes date & time on which the last calibration was done and the offset. To View TDS Report: 1. From TDS measurement mode, press left or right arrow key to navigate to other available functions until you see REPO function in the LCD. 2. Press REPO (F2) key to go to calibration report screen (Figure 57). 3. Press PRIN (F2) to transfer the calibration report to the computer. (Refer page 37 to print data). Figure 57 : TDS report screen 64 Instruction Manual PCD 650 3.10 DO Calibration in % Saturation Mode (with ATC) The PCD 650 can be calibrated quickly and easily in air. In % Saturation, the meter is able to perform either a one point calibration or a 2 point calibration. For one point calibration, it is recommended that you perform a 100% Saturation calibration in saturated air. If you opt for 2 point calibration, you can calibrate for 100% Saturation in saturated air and 0% Saturation using a zero oxygen solution. The PCD 650 meter is capable of measuring barometric pressure with its built-in pressure sensor. In the event, the pressure reading is inaccurate, you can calibrate the value from the setup menu. For setting barometric pressure range, please refer page 86. 3.10.1 To calibrate 100% saturation 1. Switch on the meter and make sure the meter is in % saturation mode. 2. Hold the probe in the air gently with the sensor facing down and press CAL (F2) to start calibration. Note: If the meter is password protected, you will be prompted to enter a password. Refer ‘Accessing Calibration mode when password protection enabled’ in page 42. 3. The meter shows ‘Dissolved O2 Calibration-Rinse Electrode’ screen [Figure 48-(a)] for few seconds to prompt user to rinse electrode with de-ionized water before calibration (a) (b) Figure 58: Saturation Calibration Screens 4. Rinse the probe well with de-ionized water. For best result, blot the end of the probe dry. Do not touch the membrane. 5. The meter then shows saturation calibration screen [Figure 58-(b)]. The primary display will show the current value of measurement. Wait for the reading to stabilize. 65 Instruction Manual PCD 650 6. Press ENTER key to confirm the calibration. The meter automatically calibrates to 100% air saturation and returns to the measurement mode. Note: If you wish to completely re-calibrate the meter, you need to clear previous calibration data. Press CLR-C (F2) key to clear previous calibration. The meter shows you confirmation screen. Press ENTER key to confirm deleting previous calibration. Figure 59 : Saturation measurement Screen Function Keys available in saturation calibration mode: TEMP (F1) Goes to temperature calibration CLR-C (F2) Clears previous calibration (if any) after ENTER key is pressed in confirmation screen NEXT (F3) Shows calibration report ESC (F4) Exits from calibration and goes back to saturation measurement mode ENTER Confirms the calibration (Not functional) 66 Instruction Manual PCD 650 3.10.2 To calibrate 0% saturation Figure 60 : 0% saturation calibration Screen 1. Press MODE key to select % Saturation mode. 2. Immerse the DO probe in 0% solution. Stir gently to create a homogenous solution. 3. Press CAL key to calibrate the meter. The meter shows ‘Dissolved O2 Calibration-Rinse Electrode’ screen [Figure 48(a)] for few seconds to prompt user to rinse electrode with de-ionized water before calibration. 4. The meter then shows saturation calibration screen [Figure 60]. 5. Wait for the reading to stabilize. 6. The primary display will show the current value of measurement. 7. Press ENTER key to confirm the calibration. The meter automatically calibrates to 0% saturation and returns to the measurement mode [Figure 59]. Note: If you wish to completely re-calibrate the meter, you need to clear previous calibration data. Press CLR-C (F2) key to clear previous calibration. The meter shows you confirmation screen. Press ENTER key to confirm deleting previous calibration. It will clear all the calibration data including mg/L data. Note: The keys that appear in 0% saturation calibration mode functions similar to the one as described in 100% saturation mode. (Refer page 66) 3.10.3 % DO Calibration Report Calibration report gives you detailed information for the % saturation. It includes date & time, 0% and 100% saturation mV value, % saturation offset calibration and barometric pressure at which the solution was measured. 67 Instruction Manual PCD 650 To View calibration Report: 1. From % saturation measurement mode, press left or right arrow key to navigate to other available functions until you see REPO function in the LCD. 2. Press REPO (F2) key. The calibration report is shown in the display. 3. Press PRIN (F2) to transfer the calibration report to computer through IrDA. (Refer page 37 to print data). Figure 61: DO Report in % saturation mode Function Keys available in saturation report screen: PRIN (F2) Transfers calibration report to Computer through IrDA NEXT (F3) Goes to saturation measurement mode ESC (F4) Goes to saturation measurement mode ENTER (Not functional) (Not functional) 68 Instruction Manual PCD 650 3.11 DO Calibration in mg/L or ppm Concentration Mode The amount of oxygen dissolved in a liquid will depend on its temperature, pressure and salinity. It is therefore very important to set temperature and salinity correctly before attempting to do a calibration. The PCD 650 is capable of measuring barometer pressure with its built-in pressure sensor. In the event, the pressure reading is inaccurate, you can calibrate the value from the Setup menu. 1. Switch on the meter. Make sure the meter is in concentration measurement mode. 2. Rinse the probe well with de-ionized rinse water. For best accuracy, blot the end of the probe dry. Dip the probe into a solution whose DO values is known. Do not touch the membrane. 3. Press CAL (F2) to go to calibration mode. Note: If the meter is password protected, you will be prompted to enter a password. Refer ‘Accessing Calibration mode when password protection enabled’ in page 42. 4. The meter shows ‘Dissolved O2 Calibration-Rinse Electrode’ screen [Figure 48-(a)] for few seconds to prompt user to rinse electrode with de-ionized water before calibration. (a) (b) Figure 62 : Concentration calibration screens 5. The meter then shows the concentration calibration screen [Figure 62(a)]. 6. The upper display of the calibration screen [Figure 62(b)] will show the current value of the measurement and the secondary display will show the value to which the meter is going to be calibrated. Press & keys to adjust the reading to the known oxygen concentration of the sample. 7. Press ENTER key to confirm the entered value. 8. Press ESC (F4) to go to measurement mode. The meter shows the concentration reading of the solution in measurement mode (Figure 63). 69 Instruction Manual PCD 650 Figure 63 : Concentration calibration Note: The function of the keys available on the concentration calibration/ report screen is same as previously described in saturation calibration. 3.11.1 Concentration Calibration Report Calibration report gives you information on calibrated temperature and calibration at pressure and salinity. It includes date & time on which the last calibration was done and the offset. To View Concentration Report: 1. From concentration measurement mode, press left or right arrow key to navigate to other available functions until you see REPO function in the LCD. 2. Press REPO (F2) key. The calibration report is shown in the display [Figure 53]. 3. Press PRIN (F2) to transfer the calibration report to the computer. (Refer page 37 to print data) Figure 64 : DO report screen in mg/L mode 70 Instruction Manual PCD 650 4. Setup Mode 4.1 About Setup Mode The setup mode lets you configure various parameters & settings of the meter. You can choose to password-protect your settings, so that other users who may use the meter will not be able to change the settings. Setup mode consists of the following sub-groups: System – General settings of the meter pH/mV/Ion/Conductivity/TDS/Salinity/Resistivity/O2 mg/L (ppm)/ O2 (%) – The pH/mV/Ion/Conductivity/TDS/Salinity/Resistivity’s/O2 mg/L (ppm)/ O2 (%) Setup screen presents many options to control the operating parameters of their respective mode. Temperature - Temperature measurement & calibration related settings. 4.1.1 Accessing Setup mode (no password protection enabled) 1. Switch on the meter. The meter goes to measurement mode. 2. Press left or right arrow key on the keypad to navigate to other available functions until you see SETUP function in the LCD. 3. Press SETP (F1) and Setup Key Function screen appears. This page describes the keys functions for configuring various parameters and settings of the meter. Figure 65: Setup Key Function screen Note: If the meter is password protected, you will be prompted to enter a password before accessing Setup Key Function screen. Refer ‘Accessing Setup mode when password protection enabled’ in page 73 for details. 71 Instruction Manual PCD 650 Function Keys available in setup key function screen: To select individual setup ENTER To select or confirm the selection. NEXT-P To navigate to next page. NEXT To go to next parameter without saving the changed parameter. ESC To go back to measurement mode. 4. Press ENTER key to select Setup Selection screen. 5. Press up or down arrow key to go to required setup sub-group. 6. Press ENTER key to select the currently shown sub-group. Figure 66: Setup Selection screen Function Keys available in setup selection screen: (F1) (Not functional) (F2) (Not functional) (F3) (Not functional) Goes to required setup sub-groups ENTER Selects the current sub-group ESC (F4) Goes to measurement mode from where you entered setup (Not functional) 72 Instruction Manual PCD 650 4.1.2 Accessing Setup mode when password protection enabled Follow the steps below to access the setup mode, when password protection is enabled. 1. Switch on the meter. The meter goes to measurement mode. 2. Press right arrow key to navigate to other functions on the right-side of LCD. 3. Press SETP (F1) to go to Setup mode. Login password screen appears (Figure 67). The meter expects the 5-digit password specified in system setup. (Refer in page 80) Figure 67: Login password screen Note: You can enter ‘00000’ (read-only password) if you wish to view the setup parameters. You are not allowed to modify any parameter when you enter ‘read-only password’. 4. Press up & down arrow keys to enter the first digit of the password and then press NEXT (F3) key to move to the next digit. 5. The next digit is selected. Press up & down second digit of the password. Enter all 5-digits. arrow keys to enter the 6. Press ENTER key to confirm the password. Note: If you enter an incorrect password, the screen shows ‘Try again’. If an incorrect password is entered for 3 consecutive times, the meter goes to measurement mode. If you forget the password there is no way to access the system setting and calibration. 7. When the correct password is entered, the Setup Key Function Screen appears.( Figure 65) 8. Press Enter key to launch Setup Selection Screen. (See Figure 66) 9. Press up or down arrow key to go to required setup sub-group. 10. Press ENTER key to select the sub-group. 73 Instruction Manual PCD 650 4.1.3 Modifying Setup parameters Follow the steps below to modify setup parameters, when you enter a setup sub-group. 1. Press NEXT (F3) key to select individual setup parameters sequentially. 2. Press (Up) or parameter. (Down) arrow key to change the value of a selected 3. Once you changed a value: • Press ENTER key to save the change, or • Press NEXT (F3) key to go to the next parameter without saving the changed parameter. 4. Press NEXT-P (F2) or PRE-P (F1) to navigate to next or previous page. 5. Press ESC (F4) to exit from setup mode. Function Keys available in setup sub-group screens: PRE-P (F1) Goes to the previous page of the same sub-group NEXT-P (F2) Goes to the next page of the same sub-group NEXT (F3) Goes to the next parameter of the same sub-group ESC (F4) Goes to measurement mode Modify the selected parameter value ENTER Confirms/saves the changes made to the currently selected parameter and then goes to the next parameter of the same sub-group (Not functional) 74 Instruction Manual PCD 650 4.2 System Setup System setup sub-group allows you to configure general settings of the meter. The settings are displayed in 6 pages. Press NEXT-P (F2) and PREV-P (F1) to navigate through these pages. 4.2.1 System Settings – Page 1 Figure 68: System Settings - Page 1 Parameter STABLE Indicator Stability Criteria Auto Hold Description ENABLE - The meter displays ‘Stable’ indicator in the measurement screen as per the ‘STABLE CRITERIA’ defined below. DISABLE – ‘Stable’ indicator does not appear. SLOW – The reading is stabilized slowly and exhibits good repeatability MEDIUM – Reading stability is averaged between slow & fast stability FAST – Reading is stabilized quickly at the cost of repeatability. (This parameter has no effect if ‘STABLE’ parameter is disabled) ENABLE - The meter holds the reading in the measurement screen, if the reading is ‘Stable’ for consecutive 5 seconds. If this is enabled, ‘Response time’ appears in the measurement screen, indicating the average response time of the probe. DISABLE – The reading is not held (This parameter has no effect if ‘STABLE’ parameter is disabled. The response time may not work if the system time has not been set as described in page 77) 75 Factory Default ENABLE FAST DISABLE Instruction Manual PCD 650 Tem. Display from Allows to select temperature from pH/COND/DO probes to display in multi measurement screen. Display setting:- For PCD 650-pH/COND->DO Allows to select multi modes that you would like to be displayed on the 1st, 2nd and 3rd row of the measurement screen after calibration. 1st Row : pH/Ion/mV/Conductivity/Salinity/Resitivity/TDS/O2 mg/L (ppm)/ O2 (%) 2nd Row : pH/Ion/mV/Conductivity/Salinity/Resitivity/TDS/O2 mg/L (ppm)/ O2 (%) 3rd Row : pH/Ion/mV/Conductivity/Salinity/Resitivity/TDS/O2 mg/L (ppm)/ O2 (%) 76 - - Instruction Manual PCD 650 4.2.2 System Settings – Page 2 Figure 69 : System Settings - Page 2 This page allows you to set the date & time of the meter. Parameter Year Month Date Hour Minute Second Description Sets the current year Sets the current month Sets the current date Sets the hour (24 Hours) for the current time Sets the minute for the current time Sets the second for the current time Factory Default 2006 Jan 01 00 00 00 Note: The battery or DC adapter must always be connected to the meter for the system clock to run. The system time might be reset during the battery change. To prevent that happening, always connect the DC adapter during battery change. Alternatively, if the DC adapter is not available, switch off the meter and change the batteries within 30 seconds to avoid resetting the clock. 77 Instruction Manual PCD 650 4.2.3 System Settings – Page 3 Figure 70 : System Settings - Page 3 This page allows you to set auto-off and back light related parameters. Parameter Description ENABLE – Turns off the meter automatically if no key is pressed for the time period specified in ‘ON TIME’ below. DISABLE – Does not turns off the meter automatically After the last key is pressed, no. of minutes the meter should wait before automatically shuts down the meter. Maximum range: 30 min (This parameter has not editable if ‘AUTO OFF’ parameter is disabled) ENABLE – Sets the back light always on. DISABLE – Sets the backlight always off. Factory Default ENABLE Back Light ON with (Key press) ENABLE – The back light of the LCD is automatically on when any key is pressed. DISABLE – Does not turn on the back light automatically. DISABLE ON time with (Key press) Sets the meter to wait for specified number of minutes before automatically turning off the back light after the last key is pressed. 1 min Auto OFF ON Time Back Light (permanently ON) 10 min DISABLE (This parameter is not editable when ‘BACK LIGHT (Key press)’ is disabled) (This parameter has no effect if ‘BACK LIGHT (Always)’ parameter is set to ON) Note: The above settings may not work if the system time has not been set as described in page 77. 78 Instruction Manual PCD 650 4.2.4 System Settings – Page 4 Figure 71: System Settings - Page 4 This page allows you to set wireless serial data communication related parameters. Parameter Print Mode Data Format Current Data Set Interval (3 Sec Step) Fixed Setting Description IrDA – Sets serial data communication protocol to IrDA LED – Sets serial data communication protocol to RS232C MEM- Logs data to meter’s memory. CyberComm – Select this format if you use CyberComm Data Acquisition Software (DAS) TEXT – Select this format if you use any other method ® (such as Windows Hyperterminal) This parameter is used when downloading data from the meter through IrDA TIMED – Prints measurement data continuously at the interval specified in ‘INTERVAL’ parameter below. SINGLE – Prints only the currently measured reading This parameter applies when PRIN key is pressed from measurement mode to send the currently measured readings to the computer. Time interval at which the meter should send currently measured data to the printer/CyberComm/PCD Acceptable range : 3 sec to 600 sec (in 3 sec steps) (This parameter is applicable when ‘CURRENT DATA SET’ is set to ‘TIMED’ and this is not editable when ‘CURRENT DATA SET’ is set to ‘SINGLE’) Indicates serial communication settings in the format of ‘Baud rate, Data bits-Parity bits-Stop bits’. This parameter is not editable. 79 Factory Default IrDA CyberComm TIMED 9 Sec 2400 8-N-1 Instruction Manual PCD 650 4.2.5 System Settings – Page 5 This page allows you to enable password protection for the setup mode & calibration mode. Figure 72 : System Settings - Page 5 When you enable password protection, the meter prompts to enter the password whenever you try to access the Setup or Calibration mode. (See Figure 67: Login password screen).The meter does not allow you to edit setup parameters or perform a new calibration unless you enter the correct password. If an incorrect password is entered for 3 consecutive times, the meter goes to measurement mode. Parameter Password Protection Set Pass Word Confirm New Password Description ENABLE – Sets password protection for the setup & calibration mode. If this is enable you need to specify a 5-digit password in the ‘SET PASSWORD’ parameter below DISABLE – Disable password protection of the meter Specify your 5-digit password here. Use (Up) & (Down) key to select a number and then press ENTER key to confirm and move to the next digit. Do not set your password to ‘00000’ as this is reserved for ‘read-only’ password. (This parameter is not editable when ‘PASSWORD PROTECT’ is disabled) YES – Select this if you have made changes to the password and you wish to confirm the changes. NO – Select this if you wish to ignore the changes made to the password and to store the default password. 80 Factory Default DISABLE 88888 NO Instruction Manual PCD 650 Important: 1. Please memorize the password that you have entered after enabling the password protection because without entering password, neither you can disable the password protection or reset the meter to factory defaults. However, if the user forgets his password, he can contact the nearest distributor or Eutech Instruments/Oakton Instruments to request for meter password. This would be unique to each instrument and would be tied to the serial number of the unit. 2. Default password ‘88888’ is valid only if it is not changed with new password. 3. You can enter ‘00000’ (read-only password) if you wish to view the setup parameters. You are not allowed to modify any parameter when you enter ‘read-only password’. 4.2.6 System Settings – Page 6 Figure 73 : System Settings - Page 6 This page allows you to clear the memory and reset the meter to factory defaults. Parameter Clear logged Data Memory Factory Reset Description YES – Select this to clear all the stored data from the meter’s memory NO – Select this if you do not wish to clear the stored data from the meter’s memory YES – Select this if you wish to reset the meter to its factory default settings. This includes: Deleting your calibration data Resetting setup parameters to factory defaults (except date & time) Deleting your stored data in the memory NO – Select this if you do not wish to reset the meter. When ‘YES’ is selected and confirmed by pressing ENETR key, the meter is reset to factory defaults and then the meter goes to measurement mode. 81 Factory Default NO NO Instruction Manual PCD 650 4.3 pH Setup pH setup sub-group allows you to configure pH measurement & calibration related settings of the meter. The settings are displayed in 2 pages. Press NEXT-P (F2) and PREV-P (F1) to navigate through these pages. 4.3.1 pH Settings – Page 1 Figure 74: pH Settings - Page 1 This page allows you to set pH measurement & calibration related settings of the meter. Parameter Buffer Cal points Alarm Set Point Hi pH Lo pH Description Select your preferred pH standard buffer group for calibration & auto-recognition. Available groups: USA, NIST, DIN, PWB & USER Select ‘USER’ if you need to use a custom buffer for calibration. Select the number of calibration points you intend to calibrate the meter using the selected buffer group. Available points: depends on the selected buffer group ENABLE – The measurement screen shows HI or LO alarm indicators when the meter reading is above ‘HI alarm value’ or below ‘LO alarm value’ specified in HI pH & LO pH parameters (below) DISABLE – HI and LO alarms are not shown in the LCD Specify Hi alarm value here. The Hi alarm occurs when the pH reading goes above this value Available range: Hi pH (specified below) to 20.00 (This parameter is not editable when ‘ALARM SET POINT’ is disabled) Specify Lo alarm value here. The Lo alarm occurs when the pH reading goes below this value Available range: 0.00 to Lo pH (specified above) (This parameter is not editable when ‘ALARM SET POINT’ is disabled) 82 Factory Default USA 3 DISABLE 20.00pH 0.00pH Instruction Manual PCD 650 4.3.2 pH Settings – Page 2 Figure 75: pH Settings - Page 2 Parameter Description pH Calibration Due Specify number of days for the pH calibration alarm. The meter shows CAL DUE indicator after calibration due days are passed from the last calibration date. Available range: 0 to 30 pH Resolution Sets the resolution for pH measurement Available range: 0.1, 0.01, 0.001 Factory Default 5 Days 0.00 ) Press (Up) or (Down) arrow key to change pH measurement & calibration related settings of the meter. 83 Instruction Manual PCD 650 4.4 mV setup (no settings available) No settings are available for mV. Figure 76: mV Setting Page Press ESC (F4) to go to measurement mode. 84 Instruction Manual PCD 650 4.5 Ion Setup Ion setup sub-group allows you to configure Ion measurement & calibration related settings of the meter. 4.5.1 Ion Settings Page Figure 77: Ion Settings Page Parameter Ion unit ) Press Description Sets the unit of measurement for Ion. Available units: ppm, molar and mg/L (Up) or Factory Default ppm (Down) arrow key to change the value of a selected parameter. 85 Instruction Manual 4.6 PCD 650 Conductivity Setup Conductivity setup screen present many options to control the operating parameters, which can be controlled and set from the conductivity setup screen. The settings are displayed in 2 pages. Press NEXT-P (F2) and PREV-P (F1) to navigate through these pages. 4.6.1 Conductivity Settings – Page 1 Figure 78 : Conductivity Settings - Page 1 This page allows you to set operating parameters for the conductivity measurement mode: Parameter Description Factory Default Pure water coefficient will be calculated and applied automatically ENABLE Pure water Coeff. for ultra pure water measurement if enabled. (For more information, please refer page 87) Lnr Temp Coefficient Normalization Temp Cell Constant Specify temperature coefficient to measure temperature corrected conductivity Select a default temperature that the meter will use along with the temperature coefficient to calculate a temperature corrected conductivity measurement. Select the appropriate cell constant of the conductivity cell. Available cell constants: 0.1 to 10 2.100 25 1.000 Calibration due Specify number of days for the Conductivity calibration alarm. The meter shows CAL DUE indicator after calibration date. Available range : 0 to 30 (if enabled) DISABLE Calibration points Single - In single point calibration one calibrated conductivity value can be used for the entire 5 conductivity ranges. Multi - In multi point calibration, you can calibrate one point in each of the measuring ranges (up to 5 points.) AUTO- In the automatic calibration mode, the meter automatically detects and verifies the appropriate known calibration standards solutions. Manual- In the manual calibration, you can manually input the appropriate values as your desired calibration standards in each specific range. Single Calibration mode 86 Auto Instruction Manual PCD 650 Note: 1. If pure water coefficient is ‘ENABLE’, the meter will apply pure water compensation automatically below 2 µS and switch back to linear compensation for above 2 µS. 2. If pure water coefficient is ‘DISABLE’, Lnr Temp Coefficient applies throughout the measurement. 4.6.2 Conductivity Settings – Page 2 Figure 79 : Conductivity Settings - Page 2 This page allows you to set alarm limits for the conductivity measurement mode. A visual alarm symbol will appear on the screen, if the conductivity value of the measurement is outside of the boundaries set by the minimum and maximum limits. Parameter Alarm Set Points Hi ms Lo µs Description Set alarm limits for the conductivity measurement mode: ENABLE – The measurement screen shows HI or LO alarm indicators when the meter reading is above ‘HI alarm value’ or below ‘LO alarm value’ specified in HI & LO µS parameters (below) DISABLE – HI and LO alarms are not shown in the LCD Specify Hi alarm value here. The Hi alarm occurs when the conductivity reading goes above this value Available range: Hi µs (specified below) to 2.000 µs (This parameter is not editable when ‘ALARM SET POINT’ is disabled) Specify Lo alarm value here. The Lo alarm occurs when the conductivity reading goes below this value Available range:1.00 µS to Hi mS (specified above) (This parameter is not editable when ‘ALARM SET POINT’ is disabled) 87 Factory Default DISABLE 2.000 µs 1.000 µs Instruction Manual PCD 650 4.7 TDS Setup TDS setup screen present many options to control the operating parameters, which can be controlled and set from the TDS setup screen. The settings are displayed in 2 pages. Press NEXT-P (F2) and PREV-P (F1) to navigate through these pages. 4.7.1 TDS Settings – Page 1 Figure 80 : TDS Settings - Page 1 This page allows you to set operating parameters for TDS measurement mode: Parameter Description Factory Default The Pure water coeff, Lnr Temp Coefficient, normalization temperature, cell constant, calibration due, calibration points are set the same way as previously described in Conductivity set up. See ‘Conductivity Settings – Page 1’ on page 86. TDS factor The TDS conversion factor is the number used by the meter to convert from conductivity to TDS. The TDS conversion factor automatically adjusts the reading. The TDS conversion factor can be set from 0.40 to 1.00. For more information on TDS refer pages 27 and 106 NOTE: The factory default setting for the TDS conversion factor is 0.50. 88 0.500 Instruction Manual PCD 650 4.7.2 TDS Settings – Page 2 Figure 81 : TDS Settings - Page 2 This page allows you to set alarm limits for the TDS measurement mode: Parameter Alarm Set Points Hi ppm Lo ppt Description Set alarm limits for the TDS measurement mode: ENABLE – The measurement screen shows HI or LO alarm indicators when the meter reading is above ‘HI alarm value’ or below ‘LO alarm value’ specified in HI & LO ppm parameters (below) DISABLE – HI and LO alarms are not shown in the LCD Specify Hi alarm value here. The Hi alarm occurs when the TDS reading goes above this value Available range: Hi ppm to 2.00 ppm (This parameter is not editable when ‘ALARM SET POINT’ is disabled) Specify Lo alarm value here. The Lo alarm occurs when the TDS reading goes below this value Available range: 1.00 ppt to Hi ppm (specified above) Factory Default DISABLE 2.00 ppm 1.00 ppt (This parameter is not editable when ‘ALARM SET POINT’ is disabled) ) Press (Up) or (Down) arrow key to set high or low alarm point. 89 Instruction Manual PCD 650 4.8 Salinity Setup Salinity setup screen present many options to control the operating parameters, which can be controlled and set from the salinity setup screen. The settings are displayed in 2 pages. Press NEXT-P (F2) and PREV-P (F1) to navigate through these pages. 4.8.1 Salinity Settings – Page 1 Figure 82: Salinity Settings - Page 1 This page allows you to set operating parameters for salinity measurement. The Pure water coeff, Lnr Temp Coefficient, normalization temperature, cell constant, calibration due, calibration points are set the same way as previously described in Conductivity set up. See ‘Conductivity Settings – Page 1’ on page 86. 4.8.2 Salinity Settings – page 2 Figure 83: Salinity Settings - Page 2 90 Instruction Manual PCD 650 This page allows you to set alarm limits for the salinity measurement mode: Parameter Alarm Set Points Hi ppm Lo ppt Description Set alarm limits for the salinity measurement mode: ENABLE – The measurement screen shows HI or LO alarm indicators when the meter reading is above ‘HI alarm value’ or below ‘LO alarm value’ specified in HI & LO ppm parameters (below) DISABLE – HI and LO alarms are not shown in the LCD Specify Hi alarm value here. The Hi alarm occurs when the salinity reading goes above this value Available range: Hi ppm to 2.00 ppm Specify Lo alarm value here. The Lo alarm occurs when the salinity reading goes below this value Available range:1.00 to Hi ppm (specified above) Factory Default DISABLE 2.00 ppm 1.00 ppt (This parameter is not editable when ‘ALARM SET POINT’ is disabled) ) Press (Up) or (Down) arrow key to set high or low alarm point. 91 Instruction Manual PCD 650 4.9 Resistivity Setup Resistivity setup screen present many options to control the operating parameters, which can be controlled and set from the resistivity setup screen. The settings are displayed in 2 pages. Press NEXT-P (F2) and PREV-P (F1) to navigate through these pages. 4.9.1 Resistivity Settings – Page 1 Figure 84: Resistivity Settings - Page 1 This page allows you to set operating parameters for resistivity measurement mode. The Pure water coeff, Lnr Temp Coefficient, normalization temperature, cell constant, calibration due, calibration points are set the same way as previously described in Conductivity set up. See ‘Conductivity Settings – Page 1’ on page 86. 4.9.2 Resistivity Settings – Page 2 Figure 85: Resistivity Settings - Page 2 92 Instruction Manual PCD 650 This page allows you to select alarm limits for resistivity measurement mode. Parameter Alarm Set Points Hi Ω Lo Ω ) Press Description Set alarm limits for the resistivity measurement mode: ENABLE – The measurement screen shows HI or LO alarm indicators when the meter reading is above ‘HI alarm value’ or below ‘LO alarm value’ specified in HI & LO Ω parameters (below) DISABLE – HI and LO alarms are not shown in the LCD Specify Hi alarm value here. The Hi alarm occurs when the resistivity reading goes above this value Available range: Lo Ω to 20.00 MΩ ohm (This parameter is not editable when ‘ALARM SET POINT’ is disabled) Specify Lo alarm value here. The Lo alarm occurs when the resistivity reading goes below this value Available range:0.000 to Hi Ω (This parameter is not editable when ‘ALARM SET POINT’ is disabled) (Up) or Factory Default DISABLE 2.00 Ω 1.00 Ω (Down) arrow key to set high or low alarm point. 93 Instruction Manual PCD 650 4.10 O2 % - DO Saturation Setup DO saturation (%) setup screen present many options to control the operating parameters, which can be controlled and set from the DO setup screen. The settings are displayed in 2 pages. Press NEXT-P (F2) and PREV-P (F1) to navigate through these pages. 4.10.1 DO (%) – Page 1 Figure 86 : DO (%) – Page 1 Parameter Function Offset Cal Allows to adjust % saturation offset calibration Calibration due Specify number of days for the DO calibration alarm. The meter shows CAL DUE indicator after calibration date. Select Pressure Unit Available range : 0 to 30 Sets the unit for barometric pressure Available units: mmHg and kPa Measured Pressure Barometric pressure as measured by the instrument. Adjusted Pressure Pressure Compensation User adjusted value. ENABLE – The meter will compensate for the barometric pressure at the location depending on the altitude. DISABLE – No compensation for the pressure. Factory Default 0.0 % 5 days mmHg ENABLE (This is applicable only for the % saturation mode. For mg/L or ppm mode pressure comp. would always be applicable) NOTE: During measurement, the PCD 650 will automatically measure and compensate for barometric pressure. However, if the user feels that barometric pressure is inaccurate and needs to be calibrated, it can be adjusted in the DO setup screen. 94 Instruction Manual PCD 650 4.10.2 DO (%) – Page 2 Figure 87: DO (%) - Page 2 This page allows you to set alarm limits for the DO saturation measurement mode. A visual alarm symbol will appear on the screen, if the DO value of the measurement is outside of the boundaries set by the minimum and maximum limits. Parameter Function DO Alarm Set alarm limits for the DO measurement modes: ENABLE – The measurement screen shows HI or LO alarm indicators when the meter reading is above ‘HI alarm value’ or below ‘LO alarm value’ specified in HI & LO % parameters (below) DISABLE – HI and LO alarms are not shown in the LCD Hi DO % Specify Hi alarm value here. The Hi alarm occurs when the DO reading goes above this value Factory Default DISABLE 200.0 % (This parameter is not editable when ‘ALARM SET POINT’ is disabled) Lo DO% Specify Lo alarm value here. The Lo alarm occurs when the DO reading goes below this value (This parameter is not editable when ‘ALARM SET POINT’ is disabled) 95 10.0 % Instruction Manual 4.11 PCD 650 O2 mg/L (ppm) – DO Concentration Setup DO Concentration (mg/L) setup screen present many options to control the operating parameters, which can be controlled and set from the DO setup screen. The settings are displayed in 2 pages. Press NEXT-P (F2) and PREV-P (F1) to navigate through these pages. 4.11.1 DO (mg/L) – Page 1 Figure 88 : DO (mg/L) – Page 1 This page allows you to set operating parameters for the DO Concentration measurement mode: Parameter Select DO Unit Function Sets the unit of measurement for DO Factory Default mg/L Available units: mg/L and ppm Auto Salinity Comp Set Salinity DISABLE – No automatic compensate ENABLE – The meter will apply measured salinity for DO concentration of your sample. Note: This option is activated only in CD650 & PCD650. Allows to set the salinity (in ppt) for your solution DISABLE 0.0 ppt Available range: 0 to 50 ppt NOTE: Auto salinity compensation will be applicable only in multi measurement mode and only if one of the measurement selected is conductivity related. Otherwise, manually set salinity value will be applied. 96 Instruction Manual 4.11.2 PCD 650 DO (mg/L) – Page 2 Figure 89: DO (mg/L) – Page 2 This page allows you to set alarm limits for the DO concentration mode. A visual alarm symbol will appear on the screen, if the DO value of the measurement is outside of the boundaries set by the minimum and maximum limits. Parameter Function DO Alarm Set alarm limits for the DO measurement modes: ENABLE – The measurement screen shows HI or LO alarm indicators when the meter reading is above ‘HI alarm value’ or below ‘LO alarm value’ specified in HI & LO % parameters (below) DISABLE – HI and LO alarms are not shown in the LCD Hi DO mg/L Specify Hi alarm value here. The Hi alarm occurs when the DO reading goes above this value Factory Default DISABLE 20.0 mg/L (This parameter is not editable when ‘ALARM SET POINT’ is disabled) Lo DO mg/L Specify Lo alarm value here. The Lo alarm occurs when the DO reading goes below this value (This parameter is not editable when ‘ALARM SET POINT’ is disabled) 97 1.0 mg/L Instruction Manual PCD 650 4.12 Temperature Setup Temperature setup sub-group allows you to configure temperature measurement & calibration related settings of the meter. 4.12.1 Temperature Setting Page Figure 90 : Temperature Settings Page Parameter Unit Mode Description Sets the unit of measurement for temperature. Available units: ºC and ºF Sets the temperature compensation mode. ATC – Automatic Temperature Compensation MTC – Manual Temperature Compensation ) Press Factory Default ºC ATC (Up) or (Down) arrow key to change unit of measurement and temperature compensation mode. 98 Instruction Manual PCD 650 5. Technical Specifications Model PCD 650 meter pH Range Resolution Relative Accuracy -2.000 to 20.000 pH 0.1/0.01/0.001 pH ± 0.002 pH + 1 LSD 1 (offset) to 6 points 15 User configurable (up to 30 days) User configurable Yes USA : 1.68, 4.01, 7.00, 10.01, 12.45 NIST: 1.68, 4.01, 6.86, 9.18, 12.45 DIN : 1.09, 3.06, 4.65, 6.79, 9.23, 12.74 PWB : 4.10, 6.97 No. of Calibration points No. of Buffer Options Calibration due alarm Set point alarm Auto buffer recognition pH buffer Groups & Calibration Points Calibration Window USA NIST DIN PWB Custom buffer calibration Slope/Offset display ± 1.5 pH (for 7.00pH), ±1 pH (for all other buffers) ± 1.35 pH (for 6.86pH), ±1 pH (for all other buffers) ± 0.8 pH (for 1.09, 3.06, 4.65pH), ±1 pH (for 9.23, 12.74pH), ±1.34 pH (for 6.79pH) ± 0.8 pH Yes (2 to 5) Yes (Display + Icon) mV Range Resolution Relative Accuracy ± 2000.0mV 0.1 mV ± 0.2 mV + 1 LSD Ion Range Units Resolution Relative Accuracy 0.001 to 19900 ppm, molar, mg/L 2 or 3 digits 0.5% FS (monovalent) 1% FS (divalent) Temperature Range Resolution Relative Accuracy Temp. Input Connector -10.0 ºC to 110.0 ºC (14.0 ºF to 230.0 ºF) 0.1 ºC/ 0.1 ºF ± 0.5 ºC / ± 0.9 ºF 8-pin Round Temperature Sensor 30K Thermistor Conductivity Range Measuring ranges Resolution 99 Sub range Accuracy Cal Standards Instruction Manual PCD 650 1 0.050uS to 2.000uS 0.01uS* 1% of FS No 2 2.000uS to 9.990 uS 10.00uS to 99.99uS 100.0uS to 300.0uS 0.01uS* 0.01uS 0.1uS 1% of FS 1% of FS 1% of FS 84.00uS 3 300.0uS to 999.9uS 1.000mS to 4.000mS 0.1uS 0.001mS 1% of FS 1% of FS 1.413mS 4 4.000mS to 9.999mS 10.00mS to 40.00mS 0.001mS 0.01mS 1% of FS 1% of FS 12.88mS 40.00mS to 99.99mS 100.0mS to 500.0mS 0.01mS 0.1mS 1% of FS 1% of FS 111.8mS 5 * Display resolution is 0.001 TDS at TDS factor 1.000 Range Measuring ranges Resolution Sub range Accuracy 1 0.050ppm to 2.000ppm 0.01ppm* 1% of FS 2 2.000ppm to 9.990 ppm 10.00ppm to 99.99ppm 100.0ppm to 300.0ppm 0.01ppm* 0.01ppm 0.1ppm 1% of FS 1% of FS 1% of FS 3 300.0ppm to 999.9ppm 1.000ppt to 4.000ppt 0.1ppm 0.001ppt 1% of FS 1% of FS 4 4.000ppt to 9.999ppt 10.00ppt to 40.00ppt 0.001ppt 0.01ppt 1% of FS 1% of FS 5 40.00ppt to 99.99ppt 100.0ppt to 500.0ppt 0.01ppt 0.1ppt 1% of FS 1% of FS * Display resolution is 0.001 Salinity Range Measuring ranges Resolution Sub range Accuracy 1 0.020ppm to 0.770ppm 0.01ppm* 1% of FS 2 0.770ppm to 9.990 ppm 10.00ppm to 99.99ppm 100.0ppm to 143.3ppm 0.01ppm* 0.01ppm 0.1ppm 1% of FS 1% of FS 1% of FS 3 143.3ppm to 999.9ppm 1.000ppm to 2.138ppt 0.1ppm 0.001ppt 1% of FS 1% of FS 4 2.138ppt to 9.999ppt 10.00ppt to 23.64ppt 0.001ppt 0.01ppt 1% of FS 1% of FS 5 23.64ppt to 80.00ppt 0.01ppt 1% of FS * Display resolution is 0.001 Resistivity Range 5 Measuring ranges Resolution 10.00MΩ to 20.00MΩ 1.000MΩ to 9.999MΩ 0.01MΩ 0.001MΩ 100 Sub range Accuracy 1% of FS 1% of FS Instruction Manual PCD 650 500.0KΩ to 999.9KΩ 0.1KΩ 1% of FS 4 100.0KΩ to 500.0KΩ 10.00KΩ to 99.99KΩ 3.333KΩ to 9.999KΩ 0.1Ω 0.01Ω 0.001Ω 1% of FS 1% of FS 1% of FS 3 1.000KΩ to 3.333KΩ 250.0Ω to 999.9Ω 0.001Ω 0.1Ω 1% of FS 1% of FS 2 100.0Ω to 250.0Ω 25.00Ω to 99.99Ω 0.1Ω 0.01Ω 1% of FS 1% of FS 1 10.00Ω to 25.00Ω 2.000Ω to 9.990Ω 0.01Ω 0.01Ω* 1% of FS 1% of FS * Display resolution is 0.001 Conductivity/ TDS / Salinity/ Resistivity Conductivity Range Salinity Resistivity TDS 0 to 500 mS 80 ppt 0 to 20.00MΩ 500 ppt 0.010 to 10.000 2 & 4 Cell 0.400 to 1.000 Linear & Pure Yes Yes Yes (max-30 days) Yes BNC / 8 Pin Round Conductivity Cell constant Conductivity Cell TDS Conversion Factor Temperature Comp. Cal-Auto/Manual Cal-Single/Multi Cal Due Alarm Set Point Alarm Input Conductivity Display Display type Screen resolution Viewing area Backlit Dot matrix LCD with backlighting 110 x 128 68 x 74 mm Yes Other Data logging Data communication Auto Data logging (only to PC) GLP (Good Lab Practice) Ingress protection Dimensions Weight 500 data sets IrDA / RS232C-Infrared Yes Yes IP 67 95mm (W) x 185mm (L) x 58.5mm (H) - Without Rubber Boot 101mm (W) x 191mm (L) x 61mm (H) - With Rubber Boot 380g (Without Rubber Boot) Power Input Battery Batter Life Power adapter 4 x Alkaline AA size, 1.5 V 200 Hrs (without backlight & serial data transfer) Input: 100-240V AC Output: DC 9-12V, 6W Max 101 Instruction Manual PCD 650 6. Accessories 6.1 Replacement Accessories Eutech Instruments Product Description Rubber Boot for 600 series meters 100-240VAC Power Adapter 6.2 Eutech Instruments Order Code OKRUBBERBT600 01X030132 Optional Accessories Eutech Instruments Product Description Eutech Instruments Order Code 8 pin connector Temperature probe (3m Cable) ECPHWPTEM03J 8 pin connector Temperature probe (1m Cable) ECPHWPTEM01J General Purpose Plastic-Body, Double Junction, Ag/AgCl pH electrode (3m Cable) General Purpose Plastic-Body, Double Junction, Ag/AgCl pH electrode (1m Cable) General Purpose Plastic-Body, 3-in-1,pH/Temp Ag/AgCl pH electrode (1m Cable) 2 Stainless Steel Rings Ultem-body Electrode with ATC (3m cable length) 4-cell, Graphite, Epoxy-body Electrode with ATC (3m cable length) ECFC7252203B Galvanic Dissolved Oxygen probe with ATC (3m cable length) ECDOHANDYNEW Membrane & O-ring (pack of 5) 01X241603 Assembled Membrane Cap Housing 15X241402 Membrane removal tool 15X241502 Electrode Guard Removal Tool 15X241504 DO Refilling electrolyte, 60 mL 01X211226 ECFC7252201B ECFC7352901J ECCONSEN9103J ECCONSEN9203J Oakton Instruments Product Description Oakton Instruments Order Code 8 pin connector Temperature probe (3m Cable) 35418-07 8 pin connector Temperature probe (1m Cable) 35418-05 General Purpose Plastic-Body, Double Junction, Ag/AgCl pH electrode (OKFC7252203B, 3m Cable) 35816-77 102 Instruction Manual PCD 650 35641-51 General Purpose Plastic-Body, Double Junction, Ag/AgCl pH electrode (1m Cable) General Purpose Plastic-Body, 3-in-1,pH/Temp Ag/AgCl pH electrode (1m Cable) 2-cell Electrode with ATC, cell constant K=1.0 (OKCONSEN9103J, 3m cable) 2-cell Electrode with ATC, cell constant K=1.0 35408-52 4-cell Electrode with ATC, cell constant K=0.3 35408-56 2-cell Electrode with ATC, cell constant K=10.0 35408-54 2-cell Electrode with ATC, cell constant K=0.1 35408-50 35816-71 35408-57 Oakton Instruments Product Description (Dissolved Oxygen) Galvanic Dissolved Oxygen probe with ATC with 10-ft cable Galvanic Dissolved Oxygen probe with ATC 25-ft cable Galvanic Dissolved Oxygen probe with ATC 50-ft cable Oakton Instruments Order Code 35640-50 35640-52 Galvanic Dissolved Oxygen probe with ATC 100-ft cable 35640-56 Replacement batteries, AA. Pack of 4 09376-01 Replacement DO membranes, Pack of 5. 35640-74 Replacement DO membranes, Pack of 25. 35640-75 35640-54 Replacement membrane kit; two membrane caps and one bottle 35640-80 of electrolyte solution Assembled Membrane Cap Housing 35640-72 Membrane removal tool 35640-79 Zero oxygen solution, 500 mL 00653-00 DO Refilling electrolyte , 500 mL 35640-71 Electrolyte DO powder (58.5 g) Rubber Boot for 600 series meters 35640-70 35418-86 100-220VAC Power Adapter 35418-83 Carrying Case with 4 sets of empty 60 ml bottle 35632-99 103 Instruction Manual PCD 650 7. APPENDIX 7.1 Conductivity theory Conductance is a quantity associated with the ability of primarily aqueous solutions to carry an electrical current, I, between two metallic electrodes when a voltage E is connected to them. Though water itself is a rather poor conductor of electricity, the presence of ions in the water increases its conductance considerably, the current being carried by the migration of the dissolved ions. This is a clear distinction from the conduction of current through metal, which results from electron transport. The conductance of a solution is proportional to and a good, though nonspecific indicator of the concentration of ionic species present, as well as their charge and mobility. It is intuitive that higher concentrations of ions in a liquid will conduct more current. Conductance derives from Ohms law, E = IR, and is defined as the reciprocal of the electrical resistance of a solution. C = 1/R C is conductance (siemens) R is resistance (ohms) One can combine Ohms law with the definition of conductance, and the resulting relationship is: C = I/E I is current (amps) E is potential (volts) In practice, conductivity measurements involve determining the current through a small portion of solution between two parallel electrode plates when an ac voltage is applied. Conductivity values are related to the conductance (and thus the resistance) of a solution by the physical dimensions - area and length - or the cell constant of the measuring electrode. If the dimensions of the electrodes are such that the area of the parallel plates is very large, it is reasonable that more ions can reside between the plates, and more current can be measured. The physical distance between the plates is also critical, as it affects the strength of the electric field between the plates. If the plates are close and the electric field is strong, ions will reach the plates more quickly than if the plates are far apart and the electric field is weak. By using cells with defined plate areas and separation distances, it is possible to standardize or specify conductance measurements. Thus derives the term specific conductance or conductivity. The relationship between conductance and specific conductivity is: Specific Conductivity, S.C. = (Conductance) (cell constant, k) = siemens * cm/cm2 = siemens/cm C is the Conductance (siemens) k is the cell constant, length/area or cm/cm2 Since the basic unit of electrical resistance is the ohm, and conductance is the reciprocal of resistance, the basic unit of conductance was originally designated a “mho“- ohm spelled backwards - however, this term has been replace by the term “siemen“. Conductivity measurements are reported as Siemens/cm, since the value is measured between opposite faces of a cell of a known cubic configuration. With most aqueous solutions, conductivity quantities are most frequently measured in micro Siemens per cm (µS/cm) or mill Siemens per cm (mS/cm). 104 Instruction Manual PCD 650 The PCD 650 series meter not only measures conductivity readings from micro or milli Siemens but also reads resistivity (Ohms, kOhms and MOhms), TDS (ppm and ppt), and salinity (ppt). The salinity scale which ranges from 0 to 80 ppt is a measure of all salts, not just sodium chloride. This scale was originally devised for seawater, and is based on seawater at 15 degrees Centigrade has a conductivity equivalent to that of a potassium chloride solution of a known concentration. This solution (0.44 molar) is defined as having a salinity of 35 ppt. Note: ppm = parts per million, ppt = parts per thousand, 1000 ppm = 1 ppt The total dissolved solids scale approximates the ppm TDS in surface waters by multiplying the conductivity of a sample by a factor, 0.66. Some users prefer the use of resistivity units to describe their water, particularly where high purity water is involved. The unit most often used to describe resistivity is megohm•cm., which is simply the reciprocal of conductivity (µS/cm). The chart below shows the relationship between these units. Conductivity, µS/cm Resistivity, megohm. cm 0.056 18.0 0.1 10.0 1.0 1.0 2.5 0.4 10.0 0.1 Conductivity and Temperature Conductivity in aqueous solutions reflects the concentration, mobility, and charge of the ions in solution. The conductivity of a solution will increase with increasing temperature, as many phenomena influencing conductivity such as solution viscosity are affected by temperature. The relationship between conductivity and temperature is predictable and usually expressed as relative % change per degree centigrade. This temperature coefficient (% change per degree) depends on the composition of the solution being measured. However, for most medium range salt concentrations in water, 2% per degree works well. Extremely pure water exhibits a temperature coefficient of 5.2%, and concentrated salt solutions about 1.5%. This meter permit you to enter the temperature coefficient which best suits your sample and use an ATC probe to automatically temperature compensate back to the chosen reference temperature. It is important to choose an electrode with an appropriate cell constant. The following table lists the optimum conductivity ranges for electrodes with cell constants of 0.1, 1, and 10. Cell Constant Optimum Conductivity Range, 2-cell Optimum Conductivity Range, 4-cell 0.1 1.0 0.5 to 200 µS/cm Not Available 0.01 to 2 mS/cm 0.01 to 20 mS/cm 10.0 1 to 200 mS/cm 1 to 200 mS/cm 105 Instruction Manual PCD 650 7.2 Calculating TDS Conversion Factor You can calibrate your meter using TDS calibration standard solutions. The calibration standard only needs to give the TDS value at a standard temperature such as 25 °C. To determine the conductivity-to-TDS conversion factor use the following formula: Factor = Actual TDS ÷ Actual Conductivity @ 25 °C Definitions: Actual TDS: Value from the solution bottle label or as a standard you make using high purity water and precisely weighed salts. Actual Conductivity: Value measured using a properly calibrated Conductivity/Temperature meter. Both the Actual TDS and the Actual Conductivity values must be in the same magnitude of units. For example, if the TDS value is in ppm the conductivity value must be in µS; if the TDS value is in ppt the conductivity value must be in mS. Check your factor by multiplying the conductivity reading by the factor in the above formula. The result should be in TDS value. 7.3 Calculating Temperature Coefficients To determine the temperature coefficient of your sample solution use this formula: Where: tc = Temperature coefficient 25 = 25 °C CT1 = Conductivity at Temp 1 CT2 = Conductivity at Temp 2 T1 = Temp 1 T2 = Temp 2 NOTE: A controlled temperature water bath is ideal for this procedure. 1. Immerse the probe into a sample of your solution and adjust the temperature coefficient to 0% 2. Wait for 5 minutes. Note T1 and CT1 (conductivity at T1). 3. Condition the sample solution and probe to a temperature (T2) that is about 5 °C to 10 °C different from T1, and note the conductivity reading CT2. NOTE: Record your results for future reference. Ideally T1 and T2 should bracket your measurement temperature, and should not different by more than 5 °C. 106 Instruction Manual PCD 650 7.4 Dissolved Oxygen Probe 7.4.1 Dissolved Oxygen Principle The probe is a galvanic measuring element which produces an output proportional to the oxygen present in the medium in which it is placed. The galvanic probe design lets you take measurements immediately – without the typical 15 minute wait of other dissolved oxygen probes. The probe consists of two parts: • An upper part consisting of an anode, a cathode, and cable. • A lower part consisting of a membrane cap, membrane, and electrolyte solution. Oxygen diffuses through the membrane onto the cathode, where it is consumed. This process produces an electrical current which flows through the cable to the meter. The electric current produced is proportional to the oxygen that passes through the membrane and the layer of electrolyte. This makes it possible to measure the partial pressure of oxygen in the sample at a given temperature. Since the DO in the sample is consumed by the cathode it is essential that a new sample must flow past the membrane of the probe to prevent the occurrence of false readings. The probe uses very little oxygen for its measurement. This enables it to function correctly with liquid movement as low as 2.5 cm/sec. The permeability of the membrane to oxygen varies greatly with temperature. Therefore compensation is needed for this variation. The DO probe comes with an inbuilt Temperature Compensation for the membrane variation. 7.4.2 Probe Care Under typical operating conditions, the probe should last for several years. Proper care and maintenance will help you receive the maximum probe life and ensure more accurate readings. Since any deposits on the membrane surface act as a barrier to oxygen diffusing through the membrane, the membrane must be cleaned at regular intervals to assure maximum reliability. After using the probe, rinse the probe in clean water and wipe it with a soft cloth or paper to avoid any hardening of deposits. If growth develops on the probe, use a disinfecting chemical to clean. NOTE: Although the membrane is strong and not easily damaged, wipe it gently while cleaning it. If the membrane is damaged or torn, the probe will no longer function. There are no special probe storage requirements. 107 Instruction Manual 7.4.3 PCD 650 Membrane Housing Replacement Replacement of the membrane cap housing/ membrane is required only when you cannot calibrate the probe, or if the membrane is damaged. Typical membrane damages are punctures or wrinkles caused during measurements or cleaning. Your new DO probe comes with replacement membrane housing. To order more replacement membrane housing, see the “Accessories” section page. To replace the membrane cap (with pre-installed membrane) 1. Replacement is much easier with single membrane housing. Unscrew the old membrane cap housing. 2. Hold the probe under hot running water and brush away the white oxide on the cylindrical anode with a stiff plastic brush – do not use metal cleaning material. 3. If the cathode has any deposits, remove them with a light scouring powder. Do not polish the cathode. 4. Fill the new membrane cap housing with electrolyte solution and inspect the bottom for leaks. If the solution drops are leaking from the membrane, use new cap housing. 5. If the assembly is leak-free, fill the membrane cap housing with electrolyte to the brim. Figure 91: Positioning of O-ring & membrane 6. Tap the side of the housing gently to remove any air bubble that may be sticking to the membrane. 7. Screw the cap onto the probe. Excess electrolyte will drain out. 8. Replace probe guard. 9. Calibrate the probe after the % saturation readings have stabilised. 7.4.4 Membrane/O-ring Replacement (Optional Procedure) It is recommended only experienced service personnel can perform this procedure. This procedure is OPTIONAL, and should only be performed if you have new membrane and O-ring. You are also required to have a membrane installation tool. These items are available as optional accessories in the “Accessories” section. Pull off the probe guard. 1. Unscrew the membrane cap from the probe. Figure 92: Positioning of O-ring & membrane 108 Instruction Manual PCD 650 2. Hold the probe under hot running water and brush away the white oxide on the cylindrical anode with a stiff plastic brush – do not use metal cleaning material. 3. If the cathode has any deposits, remove them with a light scouring powder. Do not polish the cathode. 4. Using the installation tool, unscrew and remove the membrane lock from the membrane cap. See Figure 93 on the following page. 5. Remove the membrane and O-ring. Discard both. 6. Rinse the membrane cap and membrane lock in tap water. 7. Install a new O-ring inside the membrane cap. 8. Install a new membrane. Make sure the membrane covers the O-ring all around its circumference. 9. Using the installation tool, screw the membrane lock back into the cap. Tighten the lock firmly over the membrane and O-ring, but do not over tighten. 10. Inspect the membrane for wrinkles. If wrinkles exist, remove the membrane and repeat steps 8 – 11. 11. Fill the membrane cap with water and inspect the bottom for leaks. If water drops are leaking from the membrane, re-seal the membrane on the O-ring (repeat steps 8 – 11, for membrane replacement only). Close Open Installation tool Insert installation tool into slots on membrane lock. Then unscrew membrane lock from membrane cap If the assembly is leak-free, empty the water and fill the membrane cap with electrolyte to the brim. 12. Tap the side of the housing gently to remove any air bubble that may be sticking to the membrane. 13. Screw the cap onto the probe. Excess electrolyte will drain out. Figure 93: Use Tool to take out (or put in) membrane 14. Replace probe guard. 15. Calibrate the probe after the % saturation readings have stabilised. Note: Membranes can only be used once. When a membrane cap is screwed onto the probe, the membrane is stretched by the cathode. If the same O-ring and the membrane is used a second time it will not fit perfectly onto the cathode. This will result in erratic readings. 7.4.5 Electrolyte Solution The electrolyte solution in your probe’s cap will deplete on usage and will need to be replaced periodically. Your new DO probe comes with accessories of one replacement electrolyte solution and a spare membrane cap. The replacement electrolyte comes premixed and ready to use. To order more electrolyte solution, see “Accessories” section. 109 Instruction Manual PCD 650 8. General Information 8.1 Warranty Eutech Instruments supplies this meter with a 3-year warranty and 6-month warranty for electrode against manufacturing defects from the date of purchase. If repair or adjustment is necessary and has not been the result of abuse or misuse within the designated period, please return – freight pre-paid – and correction will be made without charge. Eutech Instruments/ Oakton Instruments will determine if the product problem is due to deviations or customer misuse. Out of warranty products will be repaired on a charged basis. Exclusions The warranty on your instrument shall not apply to defects resulting from: • • • Improper or inadequate maintenance by customer Unauthorized modification or misuse Operation outside of the environment specifications of the products 8.2 Return of Goods Before returning goods for any reason whatsoever, the Customer Service Dept. has to be informed in advance. Items must be carefully packed to prevent damage during shipment, and insured against possible damage or loss. Eutech Instruments/ Oakton Instruments will not be responsible for any damage resulting from careless or insufficient packing. Warning: Shipping damage as a result of inadequate packaging is the user's/distributor’s responsibility. Please follow the guidelines below before shipment. 8.3 Guidelines for Returning Unit for Repair Use the original packaging material if possible when shipping the unit for repair. Otherwise wrap it with bubble pack and use a corrugated box for additional protection. Include a brief description of any faults suspected for the convenience of Customer Service Dept., if possible. 110 For more information on Eutech Instruments’/ Oakton Instruments’ products, contact your nearest distributor or visit our website listed below: Oakton Instruments P.O Box 5136, Vernon Hills, IL 60061, USA Tel: (1) 888-462-5866 Fax: (1) 847-247-2984 E-mail: [email protected] Web-site: www.4oakton.com Eutech Instruments Pte Ltd. Blk 55, Ayer Rajah Crescent, #04-16/24 Singapore 139949 Tel: (65) 6778 6876 Fax: (65) 6773 0836 E-mail: [email protected] Web-site: www.eutechinst.com Distributed by: