1
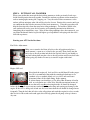
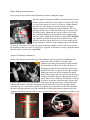
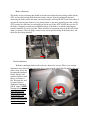
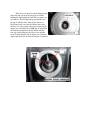
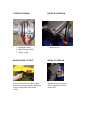
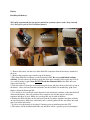
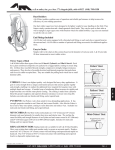
REDCAT KMX-50 MANUAL
REDCAT KMX-50
Congratulations on Purchasing…
One of the best all-around children’s quad’s in the world!
Besides being one of the most powerful, it has loads of unique features, making the Redcat 50
one of the easiest to ride, most exciting quad’s ever.
1. The engine is a four-stroke for reliability, ease of starting and easy maintenance.
2. The Redcat 50 has a headlight and safety features for the early rider.
3. The quad has its own safety keys —just like Dad’s. (Keys can be locked away as an added
safety feature.)
4. The Redcat 50 has a self-starter, so a child can start it himself.
5. One brake stops this little quad —no confusion for the little ones!
6. A governor on the handlebar can be set to allow the Redcat 50 to travel only very slowly for
beginners.
7. To ensure a child’s safety, a parent can walk behind the Redcat 50 holding a cord attached to
the cutout located at the back of the quad. A quick tug on the cord and the quad will cutout
and stop.
8. Its uniquely small size and light-weight make the Redcat 50 easy for a child to handle and
easy to load into the family car.
9. Bouncy tires, rear suspension and various gear options with a strong engine will ensure that
this little bike can go anywhere.
10. The Redcat 50’s low cost, sturdy design and aggressive looks make it an instant hit with
children. The automatic and semi-automatic gear options —both on the same bike —ensure
that the Redcat 50 will always excite your riders as they progress from beginner to expert,
from tiny tot to confident youth.
SAFETY INFORMATION:
Safety is extremely important when allowing young children to ride.
Children of the same age can have different levels of skill and coordination, so only a parent can
understand their child’s capabilities.
If a parent decides to allow a child to ride a motorized vehicle, it is essential that they realize that
the child’s safety rests entirely in their hands. The child must NEVER be unsupervised.
The quad’s power and speed must be set to match the child’s capability at all times.
The parent is the only person responsible for the child’s safety. By allowing the child to ride a
quad, the parent accepts that this is his sole responsibility and risk.
The governor on the quad should be set to allow the child to travel only at a walking pace while
learning to ride.
The area in which the child is allowed to ride must be free of obstacles that could be a danger to
the child and free of people and animals that could be injured.
As the child’s capability increases, the quad’s speed can gradually be increased but always only
to a safe level. The Redcat 50 is unique in that its gearbox can be locked into first gear for
beginners, thereby driving like an automatic vehicle.
When the child has more experience, the gearbox can then be locked into second gear by
replacing the gear lever and moving it into second gear, then removing the lever again. This way
the quad will again function like an automatic vehicle.
For older and more experienced children, the gear lever can be left on, giving the quad four
semi-automatic gears. This unique design will take the child from beginner to expert, at which
time she/he graduates to the next size quad.
Please read and apply all the safety information in this manual and on the quad. This quad is
designed for off-road use only.
ATTENTION:
The Safety Alert Symbol means
ATTENTION! BE ALERT! YOUR SAFETY IS INVOLVED!
WARNING:
Failure to follow WARNING instructions could result in severe
injury or death to the vehicle operator, a bystander or a person
inspecting or repairing the vehicle.
CAUTION:
A CAUTION indicates special precautions that must be taken to
avoid damage to the vehicle.
NOTE:
A NOTE provides key information to make procedures easier or
clearer.
•
•
Failure to follow the warnings in this manual can result in serious injury or death.
WARNING —Safety First —Important Notice.
Remember: you are responsible for your own safety and the safety of those in your care. Redcat
Motors or Lowprice.com cannot be held liable for accidents, no matter what the cause. You are
responsible for checking your vehicle thoroughly for faults and for riding safely.
Operating any motorized vehicle carries an element of risk. By choosing to ride this vehicle, you
have accepted this risk. Redcat and Lowprice.com is not responsible for negligence, speeding,
component failure, inexperience or other unforeseen circumstances that can cause injury or
death.
Remember: Safety First!
To help you ride and operate the quad safely, here is some advice you should heed. Only you
can protect yourself. Your safety and the safety of minors in your care is your responsibility.
1. Pay attention to and obey the warning labels on the vehicle. If they become faded or are
removed, replace them immediately.
2. Take instruction and make certain you are fully aware of – and able to operate – the vehicle’s
controls.
3. Ride under the instruction of a competent teacher until you are an experienced rider.
4. These vehicles are designed and manufactured for off-road use only. It is illegal and unsafe
to use this machine on any public street, road or highway, tarred, dirt, paved or cement.
5. Check local riding laws and regulations before operating this machine.
6. Check local environmental laws and respect them. Redcat urges you to keep the
environment clean, safe and beautiful for all to enjoy, including yourself.
7. Riding an ATV is serious; it can be hazardous to operate. A collision or rollover can occur
quickly, often with serious consequences. Even in routine maneuvers such as turning, riding
over obstacles and on sloping ground or across water, mud or loose surfaces, the quad
handles differently from other vehicles.
8. Never carry passengers, as this alters the handling characteristics dangerously.
9. Never operate the ATV on paved, tarred or cement surfaces.
10. Never exceed the recommended load capacity. Cargo should be properly distributed and
securely attached. If carrying a load, allow greater distances for braking and reduce your
speed, especially if pulling a small trailer. Overloading or improper loading can cause
mechanical failure, loss of control and unnecessary danger.
11. Always keep both hands and both feet securely on the ATV.
12. Never attach unauthorized accessories to the ATV.
13. Never attempt stunts, jumps, wheelies or other tricks.
14. Never ride faster than your skill or conditions permit.
15. Never ride when tired or after consuming alcohol or drugs or while experiencing any
dangerous medical condition.
16. Inspect your ATV each time you use it to make sure there are no mechanical faults or
problems with tires, brakes or controls. Your ATV must be in safe operating condition at all
times, with sufficient oil, gas, and brake fluid and tire pressure.
17. Always follow inspection and maintenance procedures as recommended.
18. Never use your ATV in flowing water or in water deeper than 5 inches.
19. Always use the recommended tires and pressures to reduce the risk of tire failure.
20. Always turn the engine OFF when refueling.
21. Don’t run the engine in an enclosed area —THIS CAN BE FATAL.
22. Always wear an approved helmet that fits snugly as well as eye protection, gloves, a longsleeved jacket and long pants.
23. Engine oil from a recently run motor can be very hot. When draining oil for an oil change,
be careful.
24. Be sure to replace fuses with ONLY the correct ones; using an incorrect fuse can cause a fire.
25. When checking battery fluid, remember that a spark could cause the battery to explode.
Switch the engine and power OFF and avoid sparks.
26. Never put your feet on the ground when the vehicle is starting off or moving.
27. It is your responsibility to ensure that the ATV is properly and safely ridden and maintained.
28. People should not operate an ATV beyond their physical or mental limits or capabilities.
29. Keep the Owner’s Manual in a safe place on the vehicle or under the seat at all times.
30. While you are learning to ride, use an ATV only on level, open ground away from people.
31. Obey government laws at all times.
32. Contact your dealer about anything related to the ATV that you do not understand or need
advice about.
33. If you allow an untrained person to use the ATV, you are endangering his/her life and the
lives of others.
34. Check that the ATV throttle, accelerator and cables are free and working. A jammed throttle
can cause an expensive and injurious accident.
35. REDCAT cannot be held responsible for your lack of knowledge. If you don’t know, ask
your dealer. You ride at your own risk.
36. In some countries ATVs with 50cc or smaller engines cannot be driven by those aged 6 and
under.
37. Riders under age 16 should ride only with adult supervision and only after training.
38. All riders should take a course of safety instruction.
39. Never use gasoline (petrol) to clean the ATV.
40. A slight spark could cause a fatal explosion. Keep a fire extinguisher nearby when working
on the ATV.
41. Excessive “play” or slippage on a chain drive can cause the chain to break which could, in
turn, cause a serious accident.
42. “Grabbing,” shuddering or lack of braking ability could mean there is a serious brake
problem. This must be fixed before riding or serious injury could result.
43. The high-tension wire from the CDI unit to the sparkplug generates extremely high voltage
and can cause a serious or fatal shock if touched with the power on.
44. Don’t touch any part of the engine, exhaust or silencer until it has cooled down.
45. Don’t siphon toxic liquids such as fuel or brake fluid by mouth or allow them to remain on
your skin.
46. Wipe up IMMEDIATELY any oil or grease that could cause you to slip or lose control of the
ATV.
47. Don’t allow animals or children to be around an unattended ATV.
48. Keep loose clothing and long hair well out of the way of moving parts.
49. Remember: MANY PEOPLE HAVE LOST FINGERS OR LIMBS that were pulled into
moving parts, especially chains. DO NOT WORK ON THE ATV WITH THE ENGINE
RUNNING.
50. If, despite following all these precautions, you are injured, seek medical attention
immediately.
*This list of safety precautions was compiled by Redcat to increase your safety awareness
and to improve your safe enjoyment of your ATV.
WHEN SAFETY COMES FIRST, ATV RIDING IS FUN, FUN, FUN!
TEACHING TECHNIQUES:
*This advice especially relates to children on smaller ATVs but applies equally to beginners
of all ages.
*Instructing the rider.
*Important advice to parents, teachers or instructors.
Your student’s safety depends on your commitment to take the time necessary to fully
educate him/her on the proper operation of the ATV. Remember that proper instruction
before your student begins to ride is just as important as proper instruction and supervision
while riding. Please go through this manual with your student page by page. Fully explain
all of the instructions, requirements and warnings it contains. Be sure to put as much
emphasis on safety precautions as on proper operational techniques. Question your student
as you go through the manual to ensure s/he understands what you are saying.
Following is a step-by-step guide to help make your student’s first use of the ATV safe and
enjoyable. Before you begin to use this guide, however, be sure you have reviewed the
vehicle features and riding techniques described in the earlier parts of the manual. REDCAT
strongly urges that you use this guide to teach each student whom you let ride the ATV. Be
sure to take breaks as the student becomes tired or his/her attention starts to wander. Full
attention at all times is needed to safely operate any motorized vehicle, including this ATV.
STEP 1: PROPER CLOTHING & PROTECTIVE GEAR
The first step to safe riding is proper protection of the rider. Your student should always
wear a helmet, eye protection, gloves, long pants, a long-sleeved shirt or jacket and boots.
Make sure your student is not wearing any loose-fitting clothes. Loose belts, scarves, etc.,
can get caught in moving parts and cause personal injury. Even in hot weather, make sure
the student wears long pants and a long-sleeved shirt. These not only protect against abrasive
injuries but also help reduce fatigue which comes from loss of body heat caused by exposure
to the wind.
STEP 2: FAMILIARIZATION WITH THE VEHICLE
Your student should become completely familiar with the names and functions of all
controls. Demonstrate operation of the controls if necessary. Ask the student to do such
things as “Apply the brakes. Turn off the engine,” etc. Practice this exercise until the
student can operate all of the controls without hesitation and without looking at the controls.
Review the instructions with your student until she/he knows all the items that should be
checked. Give specific examples of things to look for.
STEP 3: STARTING OFF AND STOPPING
To help your student develop confidence, she/he should
PRACTICE FIRST WITH THE ENGINE OFF, as follows:
1. Have student sit on ATV.
2. Instruct student to keep his/her eyes straight ahead while you slowly push the vehicle
from behind. This will give the student the “feel” of riding a moving vehicle.
3. As you push the ATV, instruct your student to steer straight ahead and perform
operations such as stopping the vehicle and turning OFF the engine switch while
moving. Watch your student closely to make sure she/he is operating the controls
correctly and without looking at them.
4. As you approach the end of the practice area, tell your student to stop the vehicle.
You should drag the rear end of the ATV around so you can push it straight ahead in
the opposite direction.
5. Practice with the engine OFF until your student gets the “feel” of using the brakes
and can stop the vehicle and turn OFF the engine switch without hesitation and
without looking at the controls.
STEP 4: ADJUST THE SPEED LIMITER TO SLOW NOW.
Next start the ATV’s engine and have the student practice starting off, riding in a straight line
and stopping with the vehicle under power. Walk alongside the ATV and hold the engine
cutout switch cord or have the student ride back and forth between you and another
supervising adult. Make sure your student:
1. Opens the throttle gently when starting off.
2. Releases the throttle and applies the brakes in sequence when stopping.
3. Becomes aware of the distance it takes the vehicle to stop when the engine switch is
turned OFF while the vehicle is moving.
As you approach the end of the practice session, you should again tell the rider to stop the
vehicle and get off so you can turn it around for him/her. Practice this exercise until your
student can start off, accelerate, cruise and stop correctly and confidently.
STEP 5: TURNING:
After your student has learned to ride the ATV in a straight line and can stop it at will, you
should teach the student how to turn the vehicle. Explain the proper body movements for
turning and let the student PRACTICE FIRST WITH THE ENGINE OFF as you push the
vehicle from behind.
When turning, watch to make sure your student:
1. Shifts his/her weight slightly forward and supports his/her weight on the outer
footrest.
2. Leans his/her upper body into the direction of the turn, pressing down with the
opposite leg.
When the rider is able to properly turn the ATV in both directions with the engine OFF,
she/he should practice turning with the vehicle under power. Again, make sure that the
throttle limiter is adjusted to provide a low maximum speed capability. Watch closely to
make sure the rider is using the proper technique. The rider should practice turning until s/he
can do so correctly and confidently.
STEP 6: PUTTING IT ALL TOGETHER
When your student has mastered the basic riding maneuvers in the previously listed steps,
she/he should practice them all together. Instruct the student to perform various maneuvers
such as turning right, turning left, stopping, etc. Vary the order of these maneuvers so the
student will not anticipate what s/he will be asked to do next. Practice this exercise until you
are confident that the rider has mastered all the basic maneuvers. Using this procedure will
help the first-time rider learn the most basic riding techniques. To become a skilled rider,
your student will need a great deal of practice and continuing instruction in addition to
completing these introductory steps. After all the riding techniques have been mastered, you
can adjust the throttle limiter to provide higher speed capabilities in keeping with the rider’s
skill and experience.
Starting your ATV for the first time:
Fuel Valve Adjustment:
Make sure to turn the fuel shut off valve to the off position and place a
small amount ( a quart or so) of fuel in the gas tank. Then slowly turn the
fuel valve to the on position and check for any fuel leaks if you should see
any fuel leaking then turn the valve to the off position and fix any fuel leaks
before going any farther. Do not try to start the engine at this time.
Engine Oil Level:
Next check the engine oil level and if its not full then fill to the proper
level. It is recommended that with the centrifugal clutch not to use
Oil fill plug
synthetic oil or a synthetic blend as it is to slick, and could cause
premature failure of the clutch lining. In the summer
or in hot climate you should use a 15w-40 or 20w-50 motor oil and in
Right hand side
cold or cool climate use a 10w-30 or 10w-40 conventional motor oil.
If the ATV is not kept in an area that will stay above freezing then the oil should be changed
before the first freeze to prevent any condensation from freezing and causing any damage to the
engine. If the ATV is being rode in and out of a lot of water then the oil should be changed more
frequently. Turn the fuel shut off valve to the off position and crank the engine for a few seconds
then let set for 20 seconds and crank again, this will help prime the oil pump to keep it from a
dry start
Engine Starting and Adjustments
Now you are ready to turn the fuel and choke on and try starting the engine.
Once the engine is running it should be warmed up for five to ten
minutes, then the carburetor can be adjusted if needed. The ATV
is set up at the factory at sea level so if your at a higher altitude
then there are a few things you can do to help lean out the
mixture to help keep it running at peak performance. First try
adjusting the fuel screw on the side of the carb (see picture left).
To do this start by turning the fuel screw all the way in (clock
wise) and then backing it out (turning the screw counter clock
Idle screw wise) two turns. Adjust the idle down to around 1400-1500 RPM,
Fuel screw
you will need to balance between the fuel and idle screw This
will take some time, but is the best way to set the engine up for
peak performance. With the engine running depress the throttle
all the way down slow and steady, the engine should not stumble and die if it does you need to
keep turning on the two screws. You know it is properly set when there is only a slight hesitation
then the engine accelerates to a high RPM.
Advanced Carburator Adjustment
Remove the fuel tank to get to the top of the carburetor and remove the top retaining nut and
remove the slide assembly (see picture left).
Compress the spring and remove the cable from the
slide assembly. On the inside of the slide there is a
retaining clip that holds the main fuel needle in the
bottom of the slide (see picture below). By carefully
pushing up on the needle the retaining clip should
come to the top but, make sure not to loose the clip as
it will be reinstalled after the adjustments have been
made. There are five different slots that the c-clip can
be placed (see picture). By moving the clip up away
from the tip this will lean out the mixture, if you move the clip down closer to the tip this will
richen up the mixture. After the adjustment reinstall the needle in the slide assembly and the
retaining clip, use a screw driver to push the retaining clip to the bottom of the slide. Reinstall
the cable and spring into the slide and reinstall the assembly back into the carburetor the slide
assembly will only go into the carb one way so do not force it down; reinstall the fuel tank on the
ATV.
1
2
3
U
4
5
Dow
Cli
Once the fuel tank is installed check for any fuel leaks, and then once there is not any fuel leaks
start the ATV and warm the engine for five to ten minutes. You will still need to adjust the fuel
screw and the idle screw for maxium performance as per the instructions earlier in this section.
The spark plug will let you know if the mixture is running lean or rich by the color on the
tip; the proper color for the tip of the plug is a beer bottle brown. If the engine is running lean the
plug will be a white or light gray in color do not run the engine with it running lean severe
engine damage may result , if it is running rich it will be black with carbon and maybe wet
with fuel. It is better to run the mixture on the richer side than the leaner side. A new plug will be
needed each time the spark plug is found in any one of these conditions, and an adjustment is
needed the only way to tell the condition is with a new plug each time, the plug will still be
useable just not for good for this test.
Throttle Cable Adjustment
The next adjustment is to ensure
that the throttle cable is pulling
full throttle and to set free play in
the thumb throttle lever. There is
a turnbuckle assembly located
under the front panel and under
the front of the fuel tank; (see
picture right) although this
picture is taken with the fuel tank
Turnbuckle /
off this adjustment can be made
jamb nut
with only the front panel
removed. The thumb throttle
should have 2-4mm of free play
before it tightens up and starts to
pull the slide up. Then check the
throttle limit screw and make sure it is not limiting full throttle. NOTE: If the child is young and
inexperienced loosen the jamb nut and turn the screw all the way in (clock wise) to limit top
speed until they are experienced and can handle the speed and can operate the ATV with total
confidence; then back the screw out to the child'
s experience can handle the speed. Make sure
once the screw is in the position you want and then tighten the jamb nut while holding the screw
with a screw driver.
Brake Adjustment
The brakes are the next thing that should be checked and adjusted before letting a child ride the
ATV; and an adult should check the brakes before each use. Start by pushing the unit and
depressing the brake peddle and make sure that the brakes will stop the ATV with little effort, if
not turn the adjusting nut clockwise (see picture below) to put more stopping power but, roll the
ATV to make sure the brake is not dragging or lift the rear of the ATV and roll the rear tires. If
the brake is dragging it could cause premature failure of the brakes, so turn the adjusting nut
counter clockwise to put less pressure. There should be an inspection plug on the flat side of the
drum (see picture). Once the plug is removed you can inspect the lining on the brake shoe, and
check for any foreign material.
Adjusting nut
Inspection
Inspection plug
Adjusting
Clutch Adjustment
With the centrifugal clutch it will need to be adjusted as it wears. There is an external
adjustment screw that will either put more or less tension on the clutch disk. By holding the stud
with a screw driver and
loosening the jamb nut.
Slowly turn the stud
counter clockwise until
there is resistance is
Oil fill
felt. Then turn the stud
1/8 turn clockwise.
Tighten the locknut to
11ft.lb. torque. NOTE:
Turning the adjusting
stud clockwise will
increase the free play
More
Less
(more slipage), and
counter clockwise will
decrease the clutch free
play (less slippage).
Chain Adjustment
After the ATV has been used the chain will stretch as the ATV gets broken in and the
chain will need to be adjusted from time to time. There are two studs that will take up the slack
by rotating the axle housing. Loosen the two bolts by the adjusting nuts then tighten the adjusting
nuts (see picture) evenly one turn at a time until there is only a half an inch of slack in the chain.
If there is more than a half inch of slack then the chain will slap off the guard by the front
sprocket and could cause damage to the chain or guard, or even personal injure or lose of control.
The chain should be inspected and lubricated by an adult every time the ATV is going to be rode.
If the chain adjuster can not be turned in so all the slack is removed then the chain should be
removed and replaced.
Loosen these
Adjusting
Valve Clearance Check
After the first 10-20 hours of riding the
atv; the valve clearence should be checked.
During this time is when the most wear occures.
To check the valve clearance remove the cover
on the the intake valve first (see picture). Check
to see if the rocker arm is loose, if not then
there is a cover on the left hand side of the
engine case if you remove the plug you can
gain access to the crank shaft nut so you can bar
the engine over and loosen the rocker arm (see
the picture on next page). Insert a feeler gauge
that is 0.004 thick and there should be a snug
fit.
Intake valve
adjuster; cover
Exhaust valve
adjuster cover
If the fit is not snug, loosen the adjusting nut
and rotate the stud to the desired gap and while
holding the stud tighten the lock nut (see picture on
next below). Then recheck the gap and make sure
the gap is still the same; then replace the cover.
Next remove the cover for the exhaust valve and
check to see if the rocker arm is loose if not bar the
engine over and check for a 0.006 gap. If not follow
the adjusting instructions for the intake with the
new gap setting. Replace the valve cover and the
cover on the left hand side of engine case. Start the
engine and check for oil leaks and repair as required.
LEFT HANDLEBAR
1. Headlight switch
2. Engine cutout switch
3. Starter switch
RIGHT HANDLEBAR
4. Throttle lever
REAR ENGINE CUTOUT
SPEED GOVERNOR
Can be activated by an adult walking
behind the quad and giving a quick tug
to the cord attached to the cutout
switch.
Tighten the screw pictured
above to restrict the speed
on the ATV.
Foot brake
Fuel Valve
Foot break is on the right side of
The ATV if you are sitting on it.
Fuel Valve has 3 positions.
1. OFF
2. RUN
3. RESERVE
Always turn to OFF when ATV is not in use
Choke Lever (IMPORTANT)
Adding OIL
The choke is located on the left side of the
ATV if you were sitting on it. It is under
the plastic front fender of the ATV. The
choke is as pictured above is in the off position.
To turn the choke on, simply pull It up as far as
it will go. The choke should be used if you have
trouble starting the ATV.
The ATV already has crank case oil
installed. You should periodically check
the consistency of oil and change it ones
every 3 months. You should use
SAE20w /50 x 900ml
Battery
Installing the Battery:
We highly recommend that you put on protective eyewear, gloves and a long sleeved
shirt, during this part of the installation process
1. Remove the battery and the clear white fluid filled container from the box that is attached to
the crate.
2. Remove the protective tape from the top of the battery
3. The white fluid filled container is called electrolyte fluid. Be very careful when working
with this. Slowly remove the black top from the electrolyte container, but keep the top close by,
as we will be using it again. Note; DO NOT break the thin metal foil on the fluid once you
remove the black top.
4. Take the bottle of electrolyte and turn them upside down and place them on the holes on top of
the battery. Once you have done this and made sure that all holes are matched up, push down
firmly to break the thin metal foil.
5. Use a knife to slit a small hole on the bottom of each electrolyte container so that the fluid will
drain into the battery. Once all containers have emptied, you can then remove the plastic
container and throw it away. Make sure you keep this out of reach of children.
6. Replace the black lid that you first removed from the electrolyte container and place it firmly
on top of the battery. Make sure it fits firmly and is securely pushed all the way down onto each
and every hold in the battery.
7. It is best to let the battery sit for about 15 minutes prior to installation into the ATV.
8. The battery will be installed behind the seat and there will be a specific space for placing the
battery.
9. Inside the battery box, there is a small bag of nuts and square bolts. Place the 2 red wires
found behind the seat onto the positive (+) side of the battery. Place the screw through the holes
on the 2 red wires and place the squire nut under the positive connection and screw together
tightly. A lose connection will cause the scooter not to start.
10. Do the same for the black wire (this wire may also be green), but screw it into the negative
(-) side of the battery.
Replenishing the battery fluid:
The battery will corrode and discharge quicker if it is not maintained. The battery fluid should
be checked at least once per month. The fluid level should always be within the upper and lower
levels marked on the battery.
If the battery fluid is low, use only DISTILLED WATER if refilling is necessary.
Maintenance of your REDCAT 50 ATV
Gasoline
The Redcat 50 ATV takes unleaded gasoline. The same gasoline that you put in you car is used
on the REDCAT 50.
Oil
Your new ATV already has oil but we recommend that you drain the oil prior to your first
use and add the following types and quantity.
Engine Oil : SAE20w /50 x 900ml
You should check all oil levels at least once per month. Add oil if needed.
You should drain all oil at least once every 3 months.
Maintenance Check List
After removing from shipping crate:
1.
2.
3.
4.
5.
6.
Battery Installation
Brake adjustment if needed
Oil changed
Unleaded fuel added
Speed limiter adjusted to slowest level
Teach child the basics
After each time the ATV is used
1. Clean the ATV
2. Make sure the key is in the off position
3. Make sure the fuel valve is in the off position
Each 30 Days
1. Oil checked
2. Battery fluid checked
Each 90 Days
1. Oil drained and changed
Hints for new riders:
The REDCAT 50 has a unique transmission. Since the ATV can start in any gear it is
recommended that you start the ATV in second or third gear with the speed limiter set to
the slowest speed. Have you child ride the ATV and DO NOT have them use the foot gear
shifter.
As your child learns control and basics, you should slowly increase the speed limiter to a
speed that you are comfortable with. There is no need to teach the child to use the foot
shifter until they are ready.
Riding the ATV in second or third gear all the time will not hurt the ATV.
It can be used similar to an automatic transmission, while it may not start out very fast,
they can reach your approved speed while staying in any gear. (We do not recommend that
you leave the unit in first gear using this method. We have found that third gear is
optimum).
For children that have little or no experience with ATV riding, it is also recommended that
you remove the gear shift lever altogether. This will prevent your child from accidentally
shifting gears which could cause an accident. You can re-install the gear shifter at a later
date once you feel comfortable with your child’s ability to ride and shift gears.
Storing your ATV
If the ATV is going to be stored for more than 60 days then there are some preventive
things to guard against deterioration. After a good cleaning; the fuel tank, lines and carburetor
float bowl need to be drained of all fuel. Remove the spark plug, pour about one teaspoon of
SAE 10w30 motor oil in the spark plug hole and reinstall the spark plug. Turn the engine over
several times slowly by hand not with the starter with out the plug wire hooked up, this will coat
the cylinder wall with oil to prevent rust and pitting. Lubricate all control cables with a good
quality spray lube. Block up the frame to raise all wheels off the ground with an approved jack
stand or solid blocks and keep the wheels from flat spotting. Tie a plastic bag over the exhaust
pipe with a rubber band to prevent moister from entering. If the ATV is going to be stored in a
humid or sea air atmosphere, coat all exposed metal surfaces with a light oil film. Do not apply
oil to any rubber parts or the seat cover, use an approved vinyl upholstery cleaner to keep the
seat cover pliable and glossy. Remove the battery and apply a full charge. Store the battery in a
dry place and recharge it once a month. Do not store the battery in an excessively warm or cold
place (less than 30deg.F or more than 90deg.F). Make any necessary repairs before storing the
machine this will be less trouble for when the ATV will be used again. Contact your Red Cat
dealer for any parts you may need.