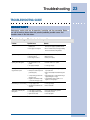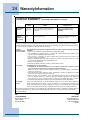
1
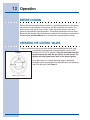
Use & Care Guide
Cooktop
E30GC64ESS
E36GC65ESS
E46GC66ESS
E46GC67ESS
Dishwasher
5995426235
2 Finding Information
PLEASE READ AND SAVE THIS GUIDE
Attach your sales
receipt to this
page for future
reference.
Thank you for choosing Electrolux, the new premium brand in home appliances.
This Use & Care Guide is part of our commitment to customer satisfaction and
product quality throughout the service life of your new cooktop.
We view your purchase as the beginning of a relationship. To ensure our ability to
continue serving you, please use this page to record key product information.
IMPOR
TANT
IMPORT
PLEASE READ all instructions completely before attempting to install or operate the
unit.
Once you have your unit installed, we suggest you keep this manual in a safe
place for future reference. Should any problems occur, refer to the
Troubleshooting section of this manual. This information will help you quickly
identify a problem and get it remedied. In the event you require assistance, please
contact the dealer where you purchased your unit.
MAKE A RECORD FOR QUICK REFERENCE
Whenever you call to request information or service, you will need to know your
model number and serial number. You can find this information on the serial plate
located on the inside wall of your unit and on the product registration card.
©2005 Electrolux Home Products, Inc.
Post Office Box 212378, Augusta, Georgia 30917, USA
All rights reserved. Printed in the USA
Finding Information
PRODUCT REGISTRATION CARD
The package containing this manual also includes your product registration
information. Warranty coverage begins at the time your Electrolux cooktop was
purchased.
If you received a damaged product, immediately contact your dealer or builder. Do
not install or use a damaged appliance.
NO
TE
NOTE
Registering your product with Electrolux enhances our ability to serve you. You can
register online (at the Internet address below) or by dropping your Product Registration
Card in the mail. Complete and mail the Product Registration Card as soon as possible
to validate the registration date.
Please record the purchase date of your Electrolux unit and your dealer’s name,
address and telephone number.
________________________________________________
Purchase Date
________________________________________________
Electrolux Model Number
________________________________________________
Electrolux Serial Number
________________________________________________
Dealer Name
________________________________________________
Dealer Address
________________________________________________
Dealer Telephone
Keep this manual and the sales receipt together in a safe place for further
reference.
QUESTIONS?
For toll-free telephone support in the U.S. and Canada:
1-877- 4ELECTROLUX (1-877-435-3287)
For online support and Internet product information:
www.electroluxusa.com
3
4 Finding Information
TABLE OF CONTENTS
Finding Information ........................................... 2
Please Read And Save This Guide ................... 2
Make A Record For Quick Reference ................ 2
Questions .......................................................... 3
Table Of Contents .............................................. 4
Safety ................................................................... 5
Important Safety Instructions .............................. 5
General Precautions .......................................... 6
Cooktop Features ............................................... 9
Sealed Burners ................................................. 9
Brass Burner Rings ......................................... 10
Burner Igniters ................................................ 10
Sealed Burner Configurations ......................... 10
Knobs and Spill Protector Rings ....................... 11
Selecting the Proper Cookware ........................ 11
Operation ........................................................... 12
Before Cooking ............................................... 12
Operating the Control Valves ........................... 12
Setting the Burner Flame Height ...................... 14
Energy Saving Tips ........................................ 14
Care and Cleaning ............................................ 15
Cleaning Tips .................................................. 15
Cleaning Stainless Steel Surfaces .................... 18
Cleaning Porcelain Grates ............................... 18
Cleaning Knobs and Knob Bezels ................... 19
Cleaning Burner Bases ................................... 19
Cleaning Burner Rings .................................... 20
Cleaning Burner Igniters .................................. 21
Cleaning the Gas Grill ...................................... 21
Troubleshooting ............................................... 22
If Service is Required ...................................... 22
Troubleshooting Guide .................................... 23
Warranty Information ....................................... 24
Safety
IMPORTANT SAFETY INSTRUCTIONS
Safety Precautions
Do not attempt to install or operate your unit until you have read the safety
precautions in this manual. Safety items throughout this manual are labeled with a
Warning or Caution based on the risk type.
Definitions
This is the safety alert symbol. It is used to alert you to potential personal injury
hazards. Obey all safety messages that follow this symbol to avoid possible injury
or death.
!
!
WARNING
WARNING indicates a potentially hazardous situation which, if not avoided, could
result in death or serious injury.
!
CA
UTION
CAUTION
CAUTION indicates a potentially hazardous situation which, if not avoided, may result
in minor or moderate injury.
CA
UTION
CAUTION
CAUTION used without the safety alert symbol indicates a potentially hazardous
situation which, if not avoided, may result in property damage.
IMPOR
TANT
IMPORT
Indicates installation, operation or maintenance information which is important but
not hazard related.
5
6 Safety
General Precautions
IMPOR
TANT
IMPORT
•
Begin by ensuring proper installation and grounding of the appliance by a
qualified technician according to the accompanying Installation Instructions.
Have the installer show you where the fuse or junction box is located so that you
know how and where to turn off power. Also, have the installer show you the
location of the gas supply. If you smell gas, do not use the cooktop. Immediately
turn off the gas supply at the shut off valve, disconnect electrical power to the
unit at the fuse or junction box and contact the gas supplier or qualified
appliance technician.
•
Ensure that the cooktop is used only by those individuals who are able to
operate it properly.
•
Use the cooktop only for cooking tasks expected of a home appliance as outlined
in this manual.
•
Properly clean and maintain as recommended in this manual, cleaning only the
parts listed.
•
Use only dry potholders to avoid steam burns when removing hot cookware.
•
In the event that a burner flame goes out and gas escapes, open a window or
door. Wait at least 5 minutes before attempting to use the cooktop.
•
Select utensils of the proper size, material and construction for the particular
type of cooking being done. Select utensils that are large enough to contain food
without boil-overs or spillovers. Choose pans with easily grasped handles that
will stay cool while cooking. Do not use utensils with loose handles. Avoid using
pans that are too heavy to lift safely. Use cookware only for its intended purpose.
Certain types of glass, ceramic, and earthenware utensils are suitable for use
only in an oven and not in cooktop applications.
•
When cooking, set the burner controls so that the flame heats only the bottom of
the utensil and does not lick at the sides of the utensil.
•
When deep fat frying, be certain that the pan is large enough to contain the
desired volume of food without overflow caused by bubbling of the fat. Never
leave a deep fat fryer unattended. Avoid deep fat frying of moist or frost-covered
foods. Foods with high water content may cause spattering or spilling of the hot
fat. Heat fat slowly and stir together any combinations of oils and fats prior to
applying heat. Utilize a deep fat frying thermometer to avoid heating the fat to
temperatures above the flash point.
•
Always turn pan handles to the side or back of the cooktop. Do not turn handles
towards the room where they are easily hit. Handles should not extend over
adjacent burners.
Safety
IMPOR
TANT
IMPORT
•
Always check the positions of the control knobs to make sure the cooktop is off
when you are finished cooking.
•
Before performing any service, turn off the gas supply by closing the gas shut-off
valve and turning off the electrical power supply.
•
Always light each burner prior to placing a utensil on the burner grate. Also, turn
the control knob to the “off” position before removing a utensil from the burner
grate.
•
Always clean the cooktop cautiously. If using a damp sponge or cloth, wait until
the cooktop has cooled sufficiently to prevent steam burns. Also, some cleaners
can produce harmful or unpleasant fumes if applied to hot surfaces.
•
Keep any ventilation filters clean to avoid grease fires.
•
Always set utensils gently onto the grates and center them so that they are wellbalanced.
•
Always keep the cooktop surface clean and dry.
7
8 Safety
!
CA
UTION
CAUTION
•
Do not use the cooktop for warming or heating the room.
•
Do not leave children alone or unattended in the area where the cooktop is in
use. Never allow children to sit or stand on any part of the cooktop. Do not let
children play with the cooktop.
•
Do not store items of interest to children above the cooktop. Children could be
burned or injured while climbing on the appliance.
•
Do not wear loose or hanging apparel while using the cooktop.
•
Do not repair or replace any part of the cooktop unless specifically
recommended in literature accompanying this appliance. All other service
should be referred to a qualified technician.
•
Do not use water on grease fires. A violent steam explosion may result. Smother
any flames with a lid, cookie sheet or flat tray. Flaming grease can be
extinguished with baking soda or a multipurpose chemical or foam extinguisher.
•
Do not allow potholders to touch gas burners. Do not use a towel or bulky cloth
as a potholder.
•
Do not block or obstruct the holes beneath the control knobs. Blocking these
holes may affect burner operation and may result in a hazard.
•
When using the cooktop, do not touch the grates, burner caps, burner bases, or
any other parts in proximity to the flame. These components may be hot enough
to cause burns.
•
If the cooktop is near a window, do not use long curtains as a window treatment.
They can blow over the cooktop and create a fire hazard.
•
Do not cover the burners and grates with anything except properly selected
utensils. Decorative covers should not be used.
•
Do not heat unopened food containers such as baby food jars and cans.
Pressure buildup may cause the container to burst and cause injury.
•
Do not use abrasive or caustic cleaners or detergents on this appliance, as these
may cause permanent damage. Do not use aerosol cleaners, as these may be
flammable or cause corrosion of metal parts.
•
Do not use or attempt to use this appliance in the event of a power failure.
Cooktop Features
SEALED BURNERS
All Electrolux Icon Cooktops (E30GC64ESS, E36GC65ESS, E46GC66ESS,
E46GC67ESS) are equipped with sealed burners. Burner configurations vary by
cooktop size. See Figure 1 for a detailed burner layout for your model.
Figure 1
9
10 Cooktop Features
BRASS BURNER RINGS
All burners are attached to the cooktop by retaining nuts. Gaskets around the
undersides of the burner cross rings and burner bases ensure that the burners are
sealed, thereby preventing any liquid spills from entering the cooktop chassis. All
spills remain on the surface of the cooktop.
The brass burner heads spread the flame evenly around the burner perimeters.
The burner heads must seat properly in the burner cross rings or burner bases to
enable proper cooktop operation. To ensure proper seating, positioning tabs have
been placed on the bottom of each burner cross ring or burner head to slide into
corresponding notches in the fixed burner base.
BURNER IGNITORS
A burner igniter is located on each gas burner base. When a control
knob is rotated more than 90 degrees counterclockwise, all ignitors
will spark simultaneously, but only the selected burner will ignite.
Additionally, due to Vantage Flame™, the automatic reignition
feature, the igniters will spark automatically if a flame should blow
out or be severely distorted by a draft or by a ventilation system.
Burner igniters must always be kept clean and dry to function
properly. Dirty or wet igniters will result in constant sparking, even if
there is a flame present. See Figure 2.
Figure 2
Burner Assembly
SEALED BURNER CONFIGURATIONS
On E30GC64ESS Cooktop, there are a total of four burners, including one burner
rated at a maximum output of 14,000 BTU/HR, one burner rated at a maximum of
12,500 BTU/HR and two burners rated at a maximum output of 8,500 BTU/HR. The
knobs are grouped in twos. The front two knobs operate the front two burners, and
the rear two knobs control the two rear burners.
On the E36GC65ESS Cooktop, there are a total of five burners, including one
burner rated at a maximum output of 14,000 BTU/HR, two burners rated at a
maximum of 12,500 BTU/HR and two burners rated at a maximum output of 8,500
BTU/HR. The knobs are positioned to correspond with the burner layout.
Cooktop Features
On the E46GC66ESS Cooktop, there are a total of six burners, including two
burners rated at a maximum output of 14,000 BTU/HR, one burner rated at a
maximum of 12,500 BTU/HR and three burners rated at a maximum output of
8,500 BTU/HR. The knobs are grouped in threes. The front three knobs operate the
front three burners, and the rear three knobs control the three rear burners.
On the E46GC67ESS Cooktop, there are a total of five burners, including one
burner rated at a maximum output of 14,000 BTU/HR, one burner rated at a
maximum of 12,500 BTU/HR, two burners rated at a maximum output of 8,500
BTU/HR and one burner rated at a maximum of 9,300 BTU/HR (gas grill burner).
The front two knobs operate the front two burners, and the center knob controls the
gas grill.
KNOBS AND SPILL PROTECTOR RINGS
The control knobs provided with this cooktop are designed for ease of use and
longevity. The “D” shaped design of the knob shaft ensures proper orientation when
reinstalling the knob. Located beneath each knob is a bezel ring that mounts to the
cooktop. The umbrella shaped spill protector ring sits on the valve spindle
underneath the cooktop. The spill protector is made of a silicone rubber material
that is resistant to staining.
SELECTING THE PROPER COOKWARE
Utensils will affect the overall safety and performance of cooktop cooking, so it is
important to select them carefully. An improperly selected utensil will not cook
efficiently or evenly. For best results, follow these guidelines:
1.
Use medium to heavy gauge metal cookware with flat and smooth bottoms
for greatest efficiency.
2.
Use utensils with tight fitting lids to retain heat, odors, and steam.
11
12 Operation
BEFORE COOKING
Ensure that the cooktop has been installed by a qualified individual who has tested
the operation of the cooktop in accordance with the Installation Instructions. The
brass burner rings, burner caps, grates, knobs and spill protectors must be in
place for the cooktop to operate properly. All cooktop components must be clean.
Be certain that the gas and electrical power supplies to the cooktop are operational.
Read this Use and Care Manual in its entirety prior to operating the cooktop.
OPERATING THE CONTROL VALVES
To light a particular burner, press down on the corresponding control knob, then
immediately rotate the knob counterclockwise from the “OFF”
Figure 3
position to the “HI/LITE” position. Only the selected burner will
spark continuously until the gas ignites on that burner. The
igniters will stop sparking as soon as the burner ignites.
Once the burner is lit, reduce the flame height if desired by
rotating the control knob further counterclockwise, then place the
utensil on the grate. See Figure 3.
Burner Control Valve
Operation
!
WARNING
Do not touch any burner cap, burner base, or ignitor while the ignitors are sparking, as
an electrical shock could result.
IMPOR
TANT
IMPORT
•
If the gas does not ignite within four seconds, turn off the valve. Allow at least two
minutes for any gas to dissipate, then repeat the lighting procedure.
•
Burner ignitors must always be kept clean and dry to function properly. Due to
the Vantage-Flame™ reignition feature, dirty or wet ignitors will result in constant
sparking, even if there is a flame present. Additionally, ignitors will spark
automatically if the flame is distorted by a draft or by a cooktop ventilation
system. Eliminate the draft or reduce the ventilation blower speed in this case.
•
When the cooktop is cool and/or more than two burners are in use, the ignitors
may continue to spark if the control knob is set to the “LOW” position. This is
normal until the burner warms up. The tendency to spark under these conditions
can be reduced by operating the burner at a higher flame setting for a short
period of time (normally 60 seconds or less), then adjusting the control knob
down to the “LOW” setting. The burner will also warm up faster if a utensil is
placed on the grate.
•
The flame should be steady and blue in color. Foreign material in the gas line,
especially in new construction, may cause an orange flame during initial
operation. This will disappear with further use.
•
The flame should burn evenly around the perimeter of the burner. If the flame is
uneven, ensure that the brass burner ring and porcelain burner cap are properly
positioned, then check for any foreign material in the burner ring or on the
burner cap. Remove any foreign material with a straightened paper clip, wire, or
needle. Do not use a toothpick to remove clogs, as it could break off. Do not
damage the brass or distort the shape of the burner ring ports.
•
Never light the burners with a match or other open flame. If a burner does not
ignite, refer to the Troubleshooting Guide.
13
14 Operation
SETTING THE BURNER FLAME HEIGHT
Setting the proper burner flame height for the desired cooking process and
selected utensil will result in superior cooking performance, while also saving time
and energy. Follow these recommendations for best results:
1.
Use low or medium flame heights when cooking in utensils that are poor
conductors of heat, such as glass, ceramic, and cast iron cooking vessels.
Reduce the flame height until it covers approximately 1/3 of the utensil
diameter. This will ensure even heating within the utensil and reduce the
likelihood of burning or scorching of food.
2.
Reduce the flame if it is extending beyond the bottom of the utensil. A flame
that licks along the sides of the utensil is potentially dangerous, heats the
utensil handle and kitchen instead of the food, and wastes energy.
3.
Reduce the flame height to the minimum level necessary to perform the
desired cooking process. Remember that food cooks just as quickly at a
gentle boil as it does at a vigorous, rolling boil. Maintaining a higher boil than is
necessary wastes energy, cooks away moisture, and causes a loss in food
flavor and nutrient level.
ENERGY SAVING TIPS
•
Always use utensils with flat, smooth bottoms and tight-fitting lids to retain
heat and moisture.
•
Minimize the amount of liquid or fat to reduce cooking times.
•
Select cookware of the proper size, material and construction for the cooking
process being performed.
•
Adjust the flame height to fit the utensil size.
•
After liquid reaches a boil, reduce the heat to maintain a simmer rather than a
rolling boil.
•
Use a timer rather than repeatedly removing the lid to check food.
•
Thaw foods prior to cooking to reduce cooking time.
Care and Cleaning
CLEANING TIPS
No maintenance, other than the Care and Cleaning identified in this Use & Care
Manual, should be attempted by the owner/operator. All other maintenance and
service must be performed by a qualified appliance technician.
!
WARNING
To avoid electrical shock or burns, turn off all controls and ensure the cooktop is cool
before cleaning.
IMPOR
TANT
IMPORT
Do not use harsh or abrasive cleaning agents, waxes, polishes, or commercial cooktop
cleaners to clean the cooktop.
Read and follow the Care and Cleaning instructions to ensure that proper cooktop
operation and appearance will be maintained throughout the lifetime of the product.
Several materials and finishes are used in the cooktop. Each material and finish
must be properly cleaned according to the following recommendations. Failure to
follow these recommendations may result in permanent damage to the cooktop.
!
WARNING
•
Before cleaning the cooktop, ensure that all burners are turned off and that all
components are cool enough to safely touch.
•
After cleaning, reassemble all components before attempting to operate the
cooktop.
Proper cleaning is necessary to maintain cooktop performance and appearance,
while also ensuring safe operation. The cleaning effort necessary to maintain the
cooktop varies according to the type and amount of cooking. For example, more
frequent cleaning is required if the cooktop is used often for frying or other high
temperature operations.
Clean the cooktop thoroughly prior to operating it the first time. For initial and
everyday cleaning, use a soft cloth or sponge lightly dampened with a solution of
warm water and hand dishwashing liquid to clean all components.
15
16 Care and Cleaning
IMPOR
TANT
IMPORT
•
To keep the cooktop looking its best, clean it after every use as soon as all
components are cool enough to safely touch. Also, quickly wipe up spills that
occur while cooking, being careful not to touch any hot areas. Spills that remain
on hot burner components will be very difficult to clean, especially if allowed to
burn on. Spills of certain foods, such as tomatoes, citrus juices, vinegar, alcohol,
and milk, are very harmful if allowed to stand for any length of time. Therefore,
save time while also maintaining a new appearance by cleaning regularly and
shortly after spills occur.
•
Use the mildest cleaner or procedure available to perform the cleaning
operation.
•
Use only a sponge, soft cloth, fibrous or plastic brush, and nylon pad for
cleaning. Avoid the use of abrasive cleaners and steel wool.
•
Always dry components completely before using the cooktop.
Care and Cleaning
Recommendations for cleaning specific cooktop components are summarized
below:
IMPOR
TANT
IMPORT
The grates and burner caps, unlike other porcelain enamel appliances in your home,
are exposed to extremely high temperatures in a matter of seconds. In addition to this
extreme thermal shock, the grates are subjected to mechanical shock when utensils are
placed on or slid across them. Finally, spillovers introduce foods with high acidity to
all of the porcelain components. Due to these severe operating conditions, all porcelain
enamel components on the cooktop will undergo an inevitable change in appearance
with use. Meticulous care and cleaning will slow but not eliminate this natural and
expected aging process.
Treating the porcelain components with care will slow the natural deterioration that
takes place with cooktop use. Please follow these guidelines to keep the porcelain
parts looking their best:
1.
Do not use utensils having rough bottoms, as this can result in permanent
damage to the top surfaces of the porcelainized grates.
2.
Do not drop utensils onto the grates or drag heavy pots across the tops of the
grates.
3.
Set the grates into the locating dimples gently. Do not drop the grates into
place.
4.
Use caution when cooking to avoid spills as much as possible. Porcelain is
acid-resistant but not acid-proof, so some foods can cause permanent
damage if allowed to remain on porcelain surfaces.
Daily cleaning of the grates, burner heads, and burner caps is best accomplished
with a soft cloth or sponge dampened in a solution of warm water and hand
dishwashing liquid. Grates are dishwasher safe. Burner caps should not be
cleaned in the dishwasher.
Stubborn stains may be removed by applying full-strength, all purpose cleaning
sprays. (If you are unable to locate these cleaning compounds, please phone the
Electrolux Customer Service Department for a referral.)
Mildly abrasive cleaners or applicators, such as soap-filled steel wool pads, may be
used with extreme care on occasion to remove the most serious stains. Exercise
caution – extensive use of abrasives will eventually damage the porcelain
enamel surface.
17
18 Care and Cleaning
CLEANING STAINLESS STEEL SURFACES
Clean these surfaces with the provided Stainless Steel Cleaner. Rinse and dry with
a soft lint-free cloth.
IMPOR
TANT
IMPORT
If commercially available stainless steel cleaners are used, it is important to read the
labels for chlorine compounds. Chlorine is a corrosive substance. If these compounds
are present, rinse thoroughly and dry with a soft lint-free cloth.
Always wipe stainless steel surfaces with the grain.
CLEANING PORCELAIN GRATES
Clean the porcelain grates with a solution of mild detergent and hot water. Rinse
with a soft cloth. Do not use abrasives or commercial oven cleaners.
Stubborn stains may be removed by washing the grates in a dishwasher, using
normal dishwashing detergent.
IMPOR
TANT
IMPORT
Never use the cooktop surface as a cutting board.
Do not use abrasive cleaners or applicators on the cooktop.
Do not try to remove heavy spills with a sharp object such as a knife or metal spatula.
Sharp objects may scratch the cooktop.
A small amount of baby oil may be applied to stainless steel tops to restore the lustre.
Care and Cleaning
CLEANING KNOBS AND KNOB BEZELS
The control knobs provided with this cooktop are designed for ease of use and
longevity. The “D” shaped design of the knob shaft ensures proper orientation
when reinstalling the knob.
IMPOR
TANT
IMPORT
Never block the holes in the control panel beneath the knobs, because this will impair
the flow of combustion air and adversely affect burner operation, possibly creating a
hazardous condition.
The knobs are made of a composite plastic. These components should be washed
regularly in warm, soapy water. Hand dishwashing liquid is excellent for this task.
Knobs should be removed by gently pulling them straight out and off of the valve
shafts. The spill protectors should be cleaned in place. Use caution to avoid
introduction of moisture into the control panel behind the bezels. To replace knobs,
align the “D-shaped” opening at the bottom of the knob with the “D-shaped” valve
shaft, then carefully press the knob onto the valve.
IMPOR
TANT
IMPORT
•
Turn the knobs to the “OFF” position prior to removing them from the valve
stems.
•
The cooktop should never be operated without the knobs in place.
•
Do not soak the knobs in water or place them in the dishwasher.
•
Do not expose the knobs to direct flame, hot utensils, or other sources of heat.
•
Do not use abrasive or corrosive cleaners or applicators, as these could cause
permanent damage.
CLEANING BURNER BASES
The burner base is permanently attached to the cooktop. The base should be
wiped clean using a soft cloth or sponge that has been lightly dampened with warm
water and hand dishwashing liquid. Thoroughly clean and dry the igniters to prevent
constant sparking of the reignition system. Refer to the Cleaning the Burner
Igniters section for cleaning tips.
19
20 Care and Cleaning
CLEANING BURNER RINGS
The brass burner rings spread the flame evenly around the burner perimeters. The
burner rings must seat properly in the burner bases to enable proper cooktop
operation. To ensure proper seating, positioning tabs have been placed on the
bottom of each burner ring to slide into corresponding notches in the fixed burner
base.
To remove the burner ring, first remove the grate, then lift off the porcelain burner
cap. The burner ring may then be removed from the burner base. Soak the burner
ring in a warm solution of hand dishwashing liquid and water, then rinse well with
clean water. Dry the burner thoroughly
Stubborn stains may be removed by applying a metal polishing compound. (If you
are unable to locate this type of polishing compound, please phone the Electrolux
Customer Service Department for a referral.)
Care and Cleaning
CLEANING THE BURNER IGNITORS
Under certain cooking or cleaning conditions, your cooktop igniters may become
coated with or corroded by food deposits, splattered grease or cleaning agents.
This condition can cause erratic or continuous sparking. Keeping the igniters clean
and dry will help to reduce this problem. To avoid unnecessary and costly service
calls, the homeowner should perform periodic cleaning of the igniters.
To clean the igniters:
1.
Be sure burners are cool to the touch. Remove the grate, burner cap and
burner heads.
2.
Brush completely around the igniter, including over and under the edge of the
metal cap and base. Use care while cleaning here. Parts of the igniter are
porcelain and can be fragile.
3.
DO NOT USE WATER when cleaning the igniters. If a liquid must be used to
clean the igniter effectively, use only a small amount of rubbing alcohol.
4.
After cleaning, reinstall the burner ring, burner cap and grate. Make sure the
brass burner ring is properly seated into the burner base.
5.
Test the burners. If erratic clicking is still present, make sure the igniter is
completely dry.
If the unit still exhibits problems after drying, please phone the Electrolux Customer
Service Department for further assistance.
CLEANING THE GAS GRILL (E36GC67ESS)
Your gas grill will develop greasy areas as a normal result of use. Clean all greasy
surfaces, including the heat control channel, with mild soap and a cloth.
Do not wash the U-shaped burner in a dishwasher. Clean the surface of the
U-shaped burner with soapy water and a soft bristle brush. Do not submerge the
burner in water. Rinse under water and dry thoroughly.
During cleaning, some material may get clogged in the holes of the gas tubing. Use
a paper clip or needle to free all plugged holes of lose material. Dump out all
cleaning materials from inside the U-shaped burner before reassembling the
appliance.
21
22 Troubleshooting
IF SERVICE IS REQUIRED
First, review the recommended checks listed in the Troubleshooting Guide.
Then, be certain that the appliance has been installed properly and is being
operated correctly. Familiarize yourself with the warranty terms and conditions
listed in the Warranty section.
If the above checks have been completed and the problem has not yet been
remedied, contact the dealer where you purchased the unit. State the Model and
Serial number and explain the problem. The Model and Serial number plate is
located on the bottom of the chassis box.
If you do not know the name of the selling dealer or local service company, you can
check online at www.electroluxusa.com or call 1-877-4Electrolux.
Troubleshooting
TROUBLESHOOTING GUIDE
IMPOR
TANT
IMPORT
Unnecessary service calls may be expensive, frustrating and time consuming. Before
you call for service, please review the potential problems, possible causes and
remedies shown in the table below.
Troubleshooting – What to check when problems occur
Problem
Possible Cause
Remedy
Nothing works.
• Cooktop is not connected to
electrical power.
• Power supply is not energized.
• Have cooktop connected to a properly sized
electrical power supply by a qualified technician.
• Have an electrician check power supply, including
the house circuit breaker, wiring and fuses.
Ignitors do not spark.
• Circuit breaker is tripped.
• House fuse is blown.
• Power outage in local area.
• Reset circuit breaker.
• Replace house fuse.
• Contact power company.
Sparking, but no flame ignition.
• Gas shut-off valve is on “off”
position.
• Gas supply is interrupted.
• Turn shut-off valve to “on” position.
• Contact gas company.
Burners ignite but flame is extremely • Burner ring ports are clogged.
• Clean burner ring ports with straightened paper
large, distorted or yellow.
clip, needle or wire.
• Burner ports or burner caps are not
• Remove and carefully re-install burner rings and
positioned properly.
caps.
• Ensure that the type of cooktop matches the gas
• Cooktop is being operated on the
supply (natural gas or L.P. gas).
wrong type of gas.
• Regulator is not installed, is faulty, • Check installation, replace regulator, or set
regulator for correct gas type.
or is set for the wrong type of gas.
Burner flame goes out at low setting. • Low gas supply pressure.
• Air intake holes around knobs are
obstructed.
Igniters spark continuously after
flame ignition.
• Power supply is not grounded.
• Power supply polarity is reversed.
• Igniters are wet or dirty.
• Contact gas company.
• Remove obstruction.
• Have power supply properly grounded.
• Have polarity corrected.
• Clean or dry igniters.
23
24 Warranty Information
COOKTOP WARRANTY Your cooktop is protected by this warranty
WARRANTY
PERIOD
THROUGH OUR AUTHORIZED SERVICERS,
WE WILL:
THE CONSUMER WILL BE
RESPONSIBLE FOR:
FULL ONE-YEAR
WARRANTY
One year from
original purchase
date.
Pay all costs for repairing or replacing any parts of this
product which prove to be defective in materials or
workmanship.
Costs of service calls that are listed under
NORMAL RESPONSIBILITIES OF THE
CONSUMER.*
LIMITED
WARRANTY
(Applicable to the
State of Alaska)
Time periods listed
above.
All of the provisions of the full warranties above and the
exclusions listed below apply.
Costs of the technician’s travel to the home and
any costs for pick up and delivery of the appliance
required because of service.
In the U.S.A., your appliance is warranted by Electrolux Home Products, Inc. We authorize no person to change or add to any of our obligations
under this warranty. Our obligations for service and parts under this warranty must be performed by us or an authorized Electrolux Home Products,
Inc. servicer. In Canada, your appliance is warranted by Electrolux Canada Corp.
*NORMAL
RESPONSIBILITIES
OF THE CUSTOMER
This warranty applies only to products in ordinary household use, and the consumer is responsible for the items
listed below:
1. Proper use of the appliance in accordance with instructions provided with the product.
2. Proper installation by an authorized servicer in accordance with instructions provided with the appliance and in
accordance with all local plumbing, electrical and/or gas codes.
3. Proper connection to a grounded power supply of sufficient voltage, replacement of blown fuses, repair of loose
connections or defects in house wiring.
4. Expenses for making the appliance accessible for servicing, such as removal of trim, cupboards, shelves, etc., which
are not a part of the appliance when it was shipped from the factory.
5. Damages to finish after installation.
6. Replacement of light bulbs and/or fluorescent tubes (on models with these features).
EXCLUSIONS
This warranty does not cover the following:
1. CONSEQUENTIAL OR INCIDENTAL DAMAGES SUCH AS PROPERTY DAMAGE AND INCIDENTAL EXPENSES
RESULTING FROM ANY BREACH OF THIS WRITTEN OR ANY IMPLIED WARRANTY.
Note: Some states do not allow the exclusion or limitation of incidental or consequential damages, so this limitation or
exclusion may not apply to you.
2. Service calls which do not involve malfunction or defects in workmanship or material, or for appliances not in ordinary
household use. The consumer shall pay for such service calls.
3. Damages caused by services performed by servicers other than Electrolux Home Products, Inc., Electrolux Canada
Corp., or its authorized servicers; use of parts other than genuine Electrolux Home Products parts; obtained from
persons other than such servicers; or external causes such as abuse, misuse, inadequate power supply or acts of God.
4. Products with original serial numbers that have been removed or altered and cannot be readily determined.
IF YOU NEED
SERVICE
Keep your bill of sale, delivery slip, or some other appropriate payment record. The date on the bill establishes the
warranty period should service be required. If service is performed, it is in your best interest to obtain and keep all
receipts. This written warranty gives you specific legal rights. You may also have other rights that vary from state to state.
Service under this warranty must be obtained by contacting Electrolux Home Products, Inc. or Electrolux Canada Corp.
This warranty only applies in the 50 States of the U.S.A. and Puerto Rico, and Canada. Product features or specifications as described or illustrated
are subject to change without notice. All warranties are made by Electrolux Home Products, Inc. In Canada, your appliance is warranted by
Electrolux Canada Corp.
USA
1-877-4ELECTROLUX
Electrolux Home Products, Inc.
P.O. Box 212378
Augusta, GA 30917
Canada
1-866-294-9911
Electrolux Canada Corp.
6150 McLaughlin Road
Mississauga, Ontario
L5R 4C2