1
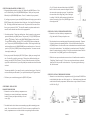
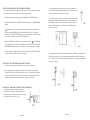
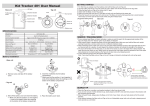
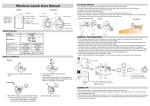
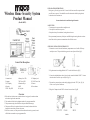
®
Wireless Home Security System
Product Manual
(Model #80355)
Installation Instructions
During set-up, if no key is pressed for 15 seconds it will come out of the setup mode and
you will have to start over. You should first read the instructions before keying them in,
so that the unit will not time out.
See macebrand.com for troubleshooting information.
Safety Tips
• Do not expose the system to direct sunlight or rain.
• Never place the unit close to your ear.
• Keep the unit away from radiators, heating ducts and stoves.
Do not permanently mount any of the pieces until following the testing directions to determine if the wireless system can communicate with all of the sensors.
Step One: Install the control unit
1. Remove the screw of main unit from battery compartment cover. Install a 9V battery
and replace cover. This provides back-up power in case of power failure. (Fig.1)
Control Unit Description
2. Plug the antenna into the plug labeled “ANT.” on the side of the unit. (Fig.2)
1. Antenna Jack
2. Antenna
3. LCD Display
4. Speaker
5. REC. /Play LED
6. Battery Low LED
7. DC Power LED
8. Numerical Keys
9. MIC
10. Line jack
11. Telephone jack
12. DC 9V Power Jack
13. Buzzer
14. Reset button
3. Connect the included phone cord to the jack on the control unit labeled “LINE.” Connect
the other end of the cord to your wall jack. (Fig. 3a)
4. You can also connect a phone to the unit by plugging it into the “TEL” jack. (Fig. 3a)
Check to see if you have a dial tone.
5. Plug the AC adapter into the DC9V socket on the control unit. (Fig 3b)
Overview
1. W hen the door/window sensor or motion detector is triggered, it sounds an alarm
and sends a signal to the control unit.
2. T
he control unit dials the first telephone number of your programmed list.
3. The person answering the call will hear the prerecorded alert message.
4. That person will have the option to listen in on the room, broadcast their voice
through the control unit, or disarm the system.
5.If there is no answer, or if the person does not disarm the security system, the unit
will dial the next number on your programmed list.
page 1
Step Two: Program the control unit
1.Change the default password by pressing “000” followed by the [PROG] button. “Password” will be flashing. Press the [ARM/DISARM] button. Enter your new password
followed by the [ARM/DISARM] button. (Choose 3-6 numbers for your password)
If you forget your password, press and hold [PROG] button while using a pen to touch the
[RESET] button which is located on the back of the unit. (See Control Unit Description
#14) The display will flash and return to normal. The password will be restored to the
factory pre-set password of “000.” The unit will remember your phone number and accessories, but the date and time will need to be reprogrammed.
2. S
et the date and time. The unit uses military time. Enter the setup by typing your new
password followed by the [PROG] button. Then press the [*/UP] or [#/DOWN] button
until the
is flashing. Then Press the [ARM/DISARM] button to select the clock.
The year should be flashing. Press the [*/UP] or the [#/DOWN] button to change the
year. Then press the [ARM/DISARM] button to confirm. Then change the month, day
and time and then press the [ARM/DISARM] button to confirm each one. You need to
press the [*/UP] or the [#/DOWN] button to change the numbers. You cannot enter the
time using the number pad.
3. Enter your password followed by the [REC/PLAY] button. Speak your message for the
unit. You have 20 seconds for your message. When you have finished recording your
message, press the [REC/PLAY] button. You need to include instructions in your message on how to disarm the unit, as you will probably not remember once the unit has been
activated.
Your message should be: “[your name]’s security system has been triggered. Press the 0
two times and then press the number 2, your password and then press 2 again to disarm.”
4. To listen to your recorded message press the [REC/PLAY] button.
(Fig. 4) Go back to the control unit and press the [HOME]
button. After 60 seconds, return to the magnetic door/window sensor and separate the two sensors. You should hear
the control unit sound a “Ding-Dong” chime if the signal
is working. If this fails, pull the antenna up from the door/
window sensor and try again. Press [HOME] again to turn
this testing mode off.
Step Four: Install the Motion Detector
1. Remove the screw from the battery compartment cover
(Fig.1) and install a 9V battery and replace cover.
2. Test the motion detector transmitting range before mounting it permanently. Temporarily place the detector at the mounting location. Go back to the control unit and press
the [HOME] button. After 60 seconds, return to the motion detector and make a motion
in front of the motion detector. You should hear the control unit sound a “Ding-Dong”
chime if the motion detector is working. If this fails, move the motion detector closer to
the control unit. Press [HOME] again to turn off the testing mode.
3. W
alk in the area you want the motion sensor to detect. It should continue to make the
“Ding-Dong” chime from step 2. If it does not, move the motion detector so that the
chime goes off when you walk in the selected area. If you cannot get the chime to go
off, move the sensor.
Step Five: Install the Remote Control
1. Remove the screw from the battery compartment cover (Fig.1) and install 3 LR44X3 batteries (included) and replace cover. Make sure the + or – of the batteries match the marks
on the inside of the battery compartment. The Remote has a range of about 20-30 meters
or 60-100 feet. (Fig. 2)
Step Three: Install the
Door/Window Sensor
1. Remove the screw from the battery compartment cover.
Remove the two sensors from the battery compartment.
Install a 9V battery and replace the battery cover and
screw. (Fig.1)
2. You should test the door/window sensor transmitting range before mounting it permanently. First, move the alarm switch to OFF. Put the two sensors you pulled out of the
battery compartment next to each other with the arrows pointing towards each other.
page 2
page 3
Step Six: ProgramMING THE Telephone numbers
We recommend using your cell phone as the first person on your list. Make sure you have
permission from each person on your list to use their phone number.
1. Enter the setup mode by pressing your password followed by the [PROG] button.
2. Press the [#/DOWN] button. “MEMORY” should be flashing. Press [ARM/DISARM]
to select.
3. “ 1 ” should be in the left corner. Key in the first phone number you want the unit to
call and press [ARM/DISARM] when you have finished keying it in. If you make a
mistake, press the [DEL/PAUSE] button to erase incorrect numbers. If you need to add a
pause in between numbers, press the [DEL/PAUSE] button.
2. Mount the magnetic door/window sensor. Choose a suitable location, drill holes, and install anchors and screws. Place the unit over the
screws and slide it down to secure in place. (Fig.2)
3. Mount the magnetic wired piece to the door or window frame and the
matching non-wired piece to the other side by using the double-sided
tape (included). (Fig.3) Make sure that the arrow on the wired sensor
points to the non-wired sensor. The two sensors should be no more
than ¼” apart. (Fig.4)
4. P
ress the [*/UP] button to advance to the second phone number. “ 2 ” should be showing in the left corner. Key in the second number you want the unit to call and press the
[ARM/DISARM] button when you have finished. You may program up to 5 numbers.
Once you program in a phone number, you will need to press the [DEL/PAUSE] button
to delete the existing number if you need to change it.
Step Seven: Test the Wireless Security System
A. Let the first person on your list know that you are about to test the system.
4. Permanently mount the wireless motion detector sensor. Drill holes and install anchors
and fix the bracket by screws. Place the main unit into the bracket and slide it down to secure in place. (Fig 2) You can adjust the bracket to obtain the best coverage of the intended
protected area. (Fig 3)
B. P
ress the [Arm] button on the Remote Control. Wait for a minute. At that time the
Control Unit will beep. Now trigger one of the sensors. The Control Unit will beep an
alarm sound and then call the first number on your list. Have the person on the other
end press 2 on the phone and then the password. Then press 2 to disarm.
Step Eight : Permanently mount the components
1. Mount the control unit to the wall, or place on a
sturdy table. For wall mount, drill holes and install
anchors and screws. Place the unit over the screws and
slide it down to a secure place. (Fig. 1)
page 4
page 5
Basic Operations
•To activate the security system without the remote type in your password followed by the
[ARM/DISARM] button.
•To deactivate the unit without the remote type in your password followed by the [ARM/
DISARM] button.
• The Panic Button: When you press the [PANIC] button on the control unit, or press and
hold the [PANIC] button for 2 seconds on remote control, the alarm will sound instantly for
30 seconds. At the same time, the Auto-Dialer will begin dialing the phone numbers you
programmed. To stop the alarm and the phone numbers from being dialed press your password and the [ARM/DISARM] button on the control unit or hold the [DISARM] button on
the remote control for 2 seconds.
• Telephone controls: When the unit dials in response to the alarm, you need to press “0”
twice on the phone to enter into the control mode. If you do not enter “0”twice it will
eventually call the next number on the list. Once it is in control mode, you can use any of
the following commands:
To listen in to the room press “*” twice,
To broadcast your voice press “#” twice,
To disarm the system press “2” then your password then “2,”
To end the call press “*”then “0,”
• W hen the battery is running low the LED will flash once every 1.5 seconds to indicate the
low battery. When a wireless sensor’s battery is low, the LCD will show the battery icon
and the sensor zone number.
• W hen the battery is running low on the accessories, the LED light will go on for 3 seconds
and off for 1 second. Change batteries immediately to ensure continuous operation of the
security system.
Additional Features
Siren Feature
When the siren feature is on, the control unit will make an alarm noise when the security
system is activated and then call the phone numbers on your list. When the siren is turned
off, the security system will silently dial the phone numbers on the list so as to not alert the
intruder. The control unit is preprogrammed to the on position. To change the siren “on” or
“off”:
1. Enter the programming mode by typing your password followed by the [PROG] Button.
2. Press the [#/DOWN] Button until the
symbol is flashing. Then select it by pressing
the [ARM/DISARM] button. Press the [#/Down] button to change it from on to off or
off to on.
3. Press the [ARM/DISARM] button to confirm your choice.
page 6
Auto Call Feature
The Auto Call feature is the part of the security system that calls the programmed phone
numbers if the sensors are triggered. By default, it is set to “on.” To change the Auto Call
feature “on” or “off”:
1. Enter your password followed by the [PROG] button to enter the programming mode.
2. Press the [#/DOWN] button until the
symbol is flashing. Then select it by pressing
the [ARM/DISARM] button. Press the [#/Down] button to change it from on to off or
off to on.
3. Press the [ARM/DISARM] button to confirm your choice.
Call Cycle Feature
The Security System is preset to call each person on your list for 3 cycles.Change the cycle
feature:
1. Enter your password followed by the [PROG] button to enter the programming mode.
2. Press the [#/DOWN] button until “CYCLE” is flashing. Then select it by pressing the
[ARM/DISARM] button. Press the [*/UP] or the [#/Down] button to change it from
1 to 5.
3. Press the [ARM/DISARM] button to confirm your choice.
Inbound Calling
The Security system accepts inbound calls, which enables you to control the unit by remote
control. The control unit is set up to answer calls by default after 5 rings. You can change
this to 3, 5, 7, or 10 rings. To change the number of rings:
1. Enter your password followed by the [PROG] button to enter the programming mode.
2. Press the [#/DOWN] button until the
symbol is flashing. Then select it by pressing
the [ARM/DISARM] button. Press the [*/UP] or the [#/Down] button to change it to the
number of rings you would like the machine to answer on.
3. Press the [ARM/DISARM] button to confirm your choice.
Remote Control Operation
This allows you to control the security system from a remote phone.
1. Call the phone number connected to the unit. The security system will answer after the
number of rings setup and it will make a beep tone.
2. Enter your password. You should hear 2 beep tones.
3. Enter “0” twice to put the Control Unit into the control mode.
4. Once it is in control mode, you can use any of the following telephone controls:
To listen in to the room press “*” twice,
To broadcast your voice press “#” twice,
To arm the system press “1” and your password then press “1,”
To disarm the system press “2,” and your password then press “2,”
To end the call press “*” then “0.”
ote: after 30 seconds it will beep a warning tone, after 50 seconds it will disconnect. You
N
may press “0” twice to put the system back into control mode at any time. You can then
reselect an option.
page 7
Entry Delay time
The control unit has been set for a 20 second delay. You can change this to 0, 5, 10, 15, or 20
seconds.
1. Enter your password followed by the [PROG] button to enter the programming mode.
2. Press the [#/DOWN] button until “Entry” is flashing. Then select it by pressing the
[ARM/DISARM] button. Press the [*/UP] or the [#/Down] button to change it to the
number of seconds you want.
3. Press the [ARM/DISARM] button to confirm your choice.
See macebrand.com for troubleshooting information.
Retrieve History of Alarm Being Triggered
You can get a list of the past five dates and times the unit has been activated by pressing the
[#/DOWN] button. Each time you press it, you will get the next number on the list.
Retrieve Current List of Telephone Numbers on Call List
You can get a list of the numbers you programmed to call if the security system is triggered
by pressing the [*/UP] button. Each time you press it, you will get
the next number on the list.
How to Add Additional Accessories
The control unit needs to learn the signal of any new wireless accessory. The system has 10
zones which identify the location of the sensors. Zone 1 through 8 can learn one ID code
for each. Zone 9 can learn 8 ID codes, and Zone 10 is labeled “remote” and is reserved for
remote controls only. Up to 8 remote controls can be programmed into the control unit in
Zone 10.
Instructions for adding a new sensor:
1. Take the new sensor, put the battery/batteries in and bring to the control unit.
2. Enter the password followed by the [PROG] Button. Press the [#/Down] Button twice.
“Learn” should be flashing. Press [ARM/DISARM] to select.
3. Press the [*/UP] or the [#/Down] Button until the ID number shows at the bottom of the
LCD. Numbers 1 and 2 should say FULL from the two sensors that came with the unit.
“NO ID CODE” should be showing on the number you want to select. Press [ARM/DISARM] to select. Note: Each one of these numbers is considered a sensor zone.
4. To activate the sensor: For the Motion detectors wave a hand in front of it. For the Door/
Window Sensors move the magnetic sensors back and forth. (See step three section 2) For
the remote control, press any key. At this point you will hear a long beep that confirms the
selection.
5. If you need to delete a sensor, go to the sensor number you want to remove. It should say
“FULL” Press the [DEL/PAUSE] button to delete the code. Then activate a replacement
sensor and the unit will beep to confirm the new sensor.
6. See the sections in this manual for how to test and install each accessory.
page 8
Limited Warranty
Seller warrants that this product is free from manufacturing defects, so we offer the original purchaser a limited one-year warranty from original date of purchase on workmanship and materials. Seller will repair or replace, at its sole discretion, your product if
found, under normal use and proper care, to be defective. The decision to replace or repair
a product is made by the Seller after receipt of the defective product.
Exclusion of Warranties
LIABILITY OF THE SELLER UNDER THE SALE SHALL BE LIMITED TO THE REPLACEMENT OF ANY DEFECTIVE GOODS. SELLER EXCLUDES, AND BUYER
HEREBY WAIVES, ALL WARRANTIES, GUARANTEES, AND OR LIABILITIES
NOT SET FORTH EXPRESSLY IN THIS AGREEMENT, WHETHER ARISING BY
LAW OR OTHERWISE (INCLUDING WITHOUT LIMITATION ANY OBLIGATION
OF SELLER WITH REGARD TO CONSEQUENTIAL AND INCIDENTAL DAMAGES) AND WHETHER OR NOT OCCASIONED BY SELLER’S NEGLIGENCE:
SELLER HEREBY EXCLUDES AND BUYER WAIVES, ALL WARRANTIES EXPRESSED OR IMPLIED, INCLUDING, WITHOUT LIMITATION, ANY IMPLIED
WARRANTY OF MERCHANTABILITY OR FITNESS FOR INTENDED USE OR
FOR A PARTICULAR, PURPOSE AND EXCLUDES AND WAIVES RECOVERY OF
CONSEQUENTIAL AND INCIDENTAL DAMAGES.
®
�