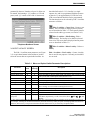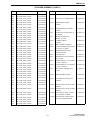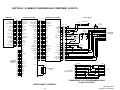
1
SERVICE
MANUAL
TRUNKED PORTABLE RADIO
LTR-NET 7243
UHF PORTABLE
™
7.5VDC
1 and 4 Watts
Part No. 242-7243-xxx
First Issue
November 2001
7243
LTR-NET™ PORTABLE RADIO
SERVICE MANUAL
UHF, 430-470 MHz
Part No. 242-7243-633
Copyright© 2001 by the E.F. Johnson Company
The E.F. Johnson Company, which was founded in 1923, provides wireless communication
systems solutions for public safety, government, and commercial customers. The company
designs, manufactures, and markets conventional and trunked radio systems, mobile and
portable subscriber radios, repeaters, and Project 25 digital radio products.
Viking Head/EFJohnson logo, LTR®, LTR-Net™, and Call Guard® are trademarks of the
E.F. Johnson Company. SMARTNET™ and SmartZone® are trademarks of Motorola, Inc. All
other company and/or product names used in this manual are trademarks and/or registered
trademarks of their respective manufacturer.
Information in this manual is subject to change without notice.
TABLE OF CONTENTS
TABLE OF CONTENTS
1
GENERAL INFORMATION
1.1
1.2
1.3
1.4
1.5
1.6
1.7
1.8
1.9
1.10
1.11
1.12
SCOPE OF MANUAL . . . . . . . . . . . . . . . . . . . . 1-1
TRANSCEIVER DESCRIPTION . . . . . . . . . . .1-1
PART NUMBER BREAKDOWN . . . . . . . . . . .1-1
TRANSCEIVER IDENTIFICATION . . . . . . . .1-1
TRANSCEIVER TUNING . . . . . . . . . . . . . . . . . 1-1
ACCESSORIES . . . . . . . . . . . . . . . . . . . . . . . . . 1-1
FACTORY CUSTOMER SERVICE . . . . . . . .1-2
FACTORY RETURNS . . . . . . . . . . . . . . . . . . .1-2
REPLACEMENT PARTS . . . . . . . . . . . . . . . . . 1-3
INTERNET HOME PAGE . . . . . . . . . . . . . . . . . 1-3
DISASSEMBLING TRANSCEIVER . . . . . . . . 1-3
BATTERY CHARGER INFORMATION. . . . . 1-4
General . . . . . . . . . . . . . . . . . . . . . . . . . . . . . . . . 1-4
Fast Charging . . . . . . . . . . . . . . . . . . . . . . . . . . . 1-4
Slow Charging . . . . . . . . . . . . . . . . . . . . . . . . . . 1-4
7243 SPECIFICATIONS . . . . . . . . . . . . . . . . . . 1-5
2
OPERATION
2.1
FEATURES . . . . . . . . . . . . . . . . . . . . . . . . . . . . . 2-1
General Features . . . . . . . . . . . . . . . . . . . . . . . . . 2-1
LTR-Net Features . . . . . . . . . . . . . . . . . . . . . . . . 2-1
LTR Features . . . . . . . . . . . . . . . . . . . . . . . . . . . 2-1
Conventional Features . . . . . . . . . . . . . . . . . . . . 2-1
CONTROLS AND DISPLAY . . . . . . . . . . . . . .2-2
Top AND SIDE Controls . . . . . . . . . . . . . . . . . . 2-2
Side Controls . . . . . . . . . . . . . . . . . . . . . . . . . . . 2-2
Display . . . . . . . . . . . . . . . . . . . . . . . . . . . . . . . . 2-2
Front Panel Keys . . . . . . . . . . . . . . . . . . . . . . . . 2-3
BASIC OPERATION . . . . . . . . . . . . . . . . . . . . . 2-5
Power-Up Sequence . . . . . . . . . . . . . . . . . . . . . . 2-5
Backlight Operation . . . . . . . . . . . . . . . . . . . . . . 2-5
Setting Volume Levels . . . . . . . . . . . . . . . . . . . . 2-5
System/Group Display Mode . . . . . . . . . . . . . . . 2-6
System and Group Select . . . . . . . . . . . . . . . . . . 2-6
Keypad Disable (Standard). . . . . . . . . . . . . . . . . 2-6
Keypad Disable (Using PASSWORD) . . . . . . . 2-6
Low Battery Indication. . . . . . . . . . . . . . . . . . . . 2-7
Option Switches . . . . . . . . . . . . . . . . . . . . . . . . . 2-7
Displaying Software Revision Number . . . . . . . 2-7
LTR-Net, LTR, and Conventional Operation. . . 2-7
Localities, Systems, and Groups . . . . . . . . . . . . 2-8
Placing and Receiving Standard Group Calls . . 2-9
Receiving a Standard Group Call . . . . . . . . . . . . 2-9
GENERAL FEATURES . . . . . . . . . . . . . . . . . . 2-9
Bank Select . . . . . . . . . . . . . . . . . . . . . . . . . . . . . 2-9
Call Indicator . . . . . . . . . . . . . . . . . . . . . . . . . . 2-10
Companding . . . . . . . . . . . . . . . . . . . . . . . . . . . 2-10
Emergency Switch . . . . . . . . . . . . . . . . . . . . . . 2-10
Encryption . . . . . . . . . . . . . . . . . . . . . . . . . . . . 2-11
Home System/Group Select . . . . . . . . . . . . . . . 2-11
2.2
2.3
2.4
Option Select. . . . . . . . . . . . . . . . . . . . . . . . . . . 2-11
Power Select . . . . . . . . . . . . . . . . . . . . . . . . . . . 2-11
Proceed (Clear-To-Talk) Tone . . . . . . . . . . . . . 2-11
Receive-Only Groups . . . . . . . . . . . . . . . . . . . . 2-11
Time-Out Timer . . . . . . . . . . . . . . . . . . . . . . . . 2-11
Tone Select . . . . . . . . . . . . . . . . . . . . . . . . . . . . 2-12
2.5
OPTION SWITCHES AND MENU MODE . .2-12
Option Switches . . . . . . . . . . . . . . . . . . . . . . . . 2-12
Menu Mode. . . . . . . . . . . . . . . . . . . . . . . . . . . . 2-12
2.6
SYSTEM AND GROUP SCANNING . . . . . .2-13
General . . . . . . . . . . . . . . . . . . . . . . . . . . . . . . . 2-13
Scan On-Off . . . . . . . . . . . . . . . . . . . . . . . . . . . 2-13
Scan Types . . . . . . . . . . . . . . . . . . . . . . . . . . . . 2-14
LTR-Net Mode Scanning . . . . . . . . . . . . . . . . . 2-14
LTR Mode Scanning. . . . . . . . . . . . . . . . . . . . . 2-14
Conventional Mode Scanning. . . . . . . . . . . . . . 2-15
Scan List Programming. . . . . . . . . . . . . . . . . . . 2-15
Saving Scan List . . . . . . . . . . . . . . . . . . . . . . . . 2-15
Scan Delay and Continue Timers . . . . . . . . . . . 2-15
Transmitting In The Scan Mode . . . . . . . . . . . . 2-16
2.7
DIAL MODE . . . . . . . . . . . . . . . . . . . . . . . . . . .2-16
Introduction. . . . . . . . . . . . . . . . . . . . . . . . . . . . 2-16
Selecting Dial Mode . . . . . . . . . . . . . . . . . . . . . 2-17
Dialing a Number . . . . . . . . . . . . . . . . . . . . . . . 2-17
Sending the Number . . . . . . . . . . . . . . . . . . . . . 2-17
Storing Numbers in Memory . . . . . . . . . . . . . . 2-17
Recalling Numbers From Memory . . . . . . . . . . 2-18
Exiting Dial Mode. . . . . . . . . . . . . . . . . . . . . . . 2-18
2.8
LTR-NET AND LTR FEATURES . . . . . . . . .2-18
Standard Group Calls . . . . . . . . . . . . . . . . . . . . 2-18
Calls on Priority ID Codes . . . . . . . . . . . . . . . . 2-18
Block ID codes and Access Priority . . . . . . . . . 2-19
Transmit Inhibit . . . . . . . . . . . . . . . . . . . . . . . . 2-19
2.9
LTR-NET FEATURES . . . . . . . . . . . . . . . . . . .2-19
LTR-Net Standard Calls . . . . . . . . . . . . . . . . . . 2-19
LTR-Net Special Calls . . . . . . . . . . . . . . . . . . . 2-19
Busy Queuing/Free System Ringback . . . . . . . 2-22
Roaming (Auto-Registration) . . . . . . . . . . . . . . 2-22
Over-The-Air Locality Channel Updates . . . . . 2-24
Transceiver Disable . . . . . . . . . . . . . . . . . . . . . 2-24
Home Channel Aliasing . . . . . . . . . . . . . . . . . . 2-24
2.10 LTR FEATURES . . . . . . . . . . . . . . . . . . . . . . .2-25
Standard Group Calls . . . . . . . . . . . . . . . . . . . . 2-25
Telephone Calls . . . . . . . . . . . . . . . . . . . . . . . . 2-25
LTR Features Not Available. . . . . . . . . . . . . . . 2-26
2.11 CONVENTIONAL FEATURES . . . . . . . . . . .2-26
Busy Indicator. . . . . . . . . . . . . . . . . . . . . . . . . . 2-26
Monitor Mode . . . . . . . . . . . . . . . . . . . . . . . . . . 2-26
Transmit Disable On Busy . . . . . . . . . . . . . . . . 2-27
Squelch Adjust . . . . . . . . . . . . . . . . . . . . . . . . . 2-27
Talk-Around . . . . . . . . . . . . . . . . . . . . . . . . . . . 2-27
Call Guard Squelch . . . . . . . . . . . . . . . . . . . . . . 2-27
External Encoders And Decoders . . . . . . . . . . . 2-28
iii
November 2001
Part No. 001-7240-001
TABLE OF CONTENTS
TABLE OF CONTENTS (CONT’D)
3.7
3.8
3.9
3.10
3.11
TRANSFER MENU . . . . . . . . . . . . . . . . . . . .
VIEW MENU . . . . . . . . . . . . . . . . . . . . . . . . . .
COMPORTS MENU . . . . . . . . . . . . . . . . . . . .
HELP MENU . . . . . . . . . . . . . . . . . . . . . . . . . .
ADDITIONAL PROGRAMMING
INFORMATION . . . . . . . . . . . . . . . . . . . . . .
Program Key . . . . . . . . . . . . . . . . . . . . . . . . . . .
Multiple Home Repeaters . . . . . . . . . . . . . . . . .
Channel Number Programming. . . . . . . . . . . . .
Repeater Numbering . . . . . . . . . . . . . . . . . . . . .
Specifying RIC-Equipped Repeaters. . . . . . . . .
Test Locality . . . . . . . . . . . . . . . . . . . . . . . . . . .
3.12 UPDATING RADIO SOFTWARE . . . . . . . .
Introduction . . . . . . . . . . . . . . . . . . . . . . . . . . . .
Data File . . . . . . . . . . . . . . . . . . . . . . . . . . . . . .
2.12 SUPERVISORY TONES . . . . . . . . . . . . . . . . 2-28
General Tones. . . . . . . . . . . . . . . . . . . . . . . . . . 2-28
LTR-Net Special Call Tones . . . . . . . . . . . . . . 2-29
LTR Telephone Call Tones . . . . . . . . . . . . . . . 2-29
Display Messages . . . . . . . . . . . . . . . . . . . . . . . 2-30
Menu Mode Messages . . . . . . . . . . . . . . . . . . . 2-31
2.13 TEST FUNCTIONS . . . . . . . . . . . . . . . . . . . . . 2-31
2.14 ERROR CODES . . . . . . . . . . . . . . . . . . . . . . . 2-31
General . . . . . . . . . . . . . . . . . . . . . . . . . . . . . . . 2-31
Reading Error Codes . . . . . . . . . . . . . . . . . . . . 2-32
3
PROGRAMMING
3.1
GENERAL. . . . . . . . . . . . . . . . . . . . . . . . . . . . . . 3-1
Programming Setup . . . . . . . . . . . . . . . . . . . . . . 3-1
Minimum Computer Requirements . . . . . . . . . . 3-1
Remote Programming Interface (RPI) . . . . . . . . 3-1
RPI Cables . . . . . . . . . . . . . . . . . . . . . . . . . . . . . 3-2
EEPROM Data Storage . . . . . . . . . . . . . . . . . . . 3-2
Hardware Hookup. . . . . . . . . . . . . . . . . . . . . . . . 3-2
MISCELLANEOUS PROGRAM
INFORMATION . . . . . . . . . . . . . . . . . . . . . . . 3-2
Basic Windows Knowledge . . . . . . . . . . . . . . . . 3-2
Software Installation. . . . . . . . . . . . . . . . . . . . . . 3-2
Starting Program. . . . . . . . . . . . . . . . . . . . . . . . . 3-3
MAIN WINDOW DESCRIPTION . . . . . . . . . . .3-3
Title Bar . . . . . . . . . . . . . . . . . . . . . . . . . . . . . . . 3-3
Menu Bar . . . . . . . . . . . . . . . . . . . . . . . . . . . . . . 3-3
Toolbar . . . . . . . . . . . . . . . . . . . . . . . . . . . . . . . . 3-3
Main Window Panes. . . . . . . . . . . . . . . . . . . . . . 3-4
Status Bar . . . . . . . . . . . . . . . . . . . . . . . . . . . . . . 3-4
PROGRAMMING PROCEDURE . . . . . . . . . . 3-4
Introduction . . . . . . . . . . . . . . . . . . . . . . . . . . . . 3-4
Getting Started . . . . . . . . . . . . . . . . . . . . . . . . . . 3-4
Programming Main Radio Parameters . . . . . . . . 3-4
Locality Programming . . . . . . . . . . . . . . . . . . . . 3-5
System Programming . . . . . . . . . . . . . . . . . . . . . 3-6
Group Programming . . . . . . . . . . . . . . . . . . . . . . 3-6
Bank Programming. . . . . . . . . . . . . . . . . . . . . . . 3-6
Programming Transceiver . . . . . . . . . . . . . . . . . 3-6
FILE MENU . . . . . . . . . . . . . . . . . . . . . . . . . . . . . 3-7
EDIT MENU . . . . . . . . . . . . . . . . . . . . . . . . . . . . 3-7
Introduction . . . . . . . . . . . . . . . . . . . . . . . . . . . . 3-7
Edit Radio Type Screen . . . . . . . . . . . . . . . . . . . 3-8
Basic Parameters Screen. . . . . . . . . . . . . . . . . . . 3-8
Timing Parameters Screen . . . . . . . . . . . . . . . . . 3-8
Menu Items Screen . . . . . . . . . . . . . . . . . . . . . . . 3-9
Key Assignment Screen . . . . . . . . . . . . . . . . . . . 3-9
Edit Telephone Numbers Screen . . . . . . . . . . . . 3-9
Edit Locality Screen . . . . . . . . . . . . . . . . . . . . . 3-10
Edit System Screen. . . . . . . . . . . . . . . . . . . . . . 3-11
Edit Groups Screen. . . . . . . . . . . . . . . . . . . . . . 3-11
Edit Banks Screen. . . . . . . . . . . . . . . . . . . . . . . 3-11
Edit Unique ID Screen . . . . . . . . . . . . . . . . . . . 3-11
3.2
3.3
3.4
3.5
3.6
3-13
3-13
3-13
3-13
3-13
3-14
3-14
3-14
3-14
3-14
4
CIRCUIT DESCRIPTION
4.1
POWER SWITCHING AND REGULATION. 4-1
Power Switching . . . . . . . . . . . . . . . . . . . . . . . . . 4-1
Five-Volt Regulators (U205, U206) . . . . . . . . . . 4-1
SYNTHESIZER DESCRIPTION. . . . . . . . . . . 4-1
Introduction . . . . . . . . . . . . . . . . . . . . . . . . . . . . . 4-1
Receive and Transmit VCOs, Buffer
Amplifiers (Q503, Q533-Q535). . . . . . . . . . . 4-1
VCO and TCXO Modulation . . . . . . . . . . . . . . . 4-2
Synthesizer Chip (U202) . . . . . . . . . . . . . . . . . . . 4-2
Lock Detect (Q201). . . . . . . . . . . . . . . . . . . . . . . 4-2
DC-DC Converter (U203), Loop Filter . . . . . . . . 4-2
RECEIVER CIRCUIT DESCRIPTION . . . . . . 4-3
RF Amplifier (Q301), First Mixer (Q302) . . . . . 4-3
IF Amplifier (Q401), Limiter/Mixer/
Detector (U401) . . . . . . . . . . . . . . . . . . . . . . . 4-3
Squelch Circuit (U401) . . . . . . . . . . . . . . . . . . . . 4-4
TRANSMITTER DESCRIPTION . . . . . . . . . . 4-4
Driver Amplifier (Q101), Power Amplifier
Module (U101). . . . . . . . . . . . . . . . . . . . . . . . 4-4
Antenna Switch and Low-pass Filter . . . . . . . . . 4-4
Power Control . . . . . . . . . . . . . . . . . . . . . . . . . . . 4-4
CONTROL LOGIC AND DISPLAY . . . . . . . . 4-5
Control Logic . . . . . . . . . . . . . . . . . . . . . . . . . . . 4-5
Display Assembly Description . . . . . . . . . . . . . . 4-5
RECEIVE AUDIO PROCESSING . . . . . . . . . 4-8
Introduction . . . . . . . . . . . . . . . . . . . . . . . . . . . . . 4-8
Bandpass Filter (U101) . . . . . . . . . . . . . . . . . . . . 4-8
Expander (U204) . . . . . . . . . . . . . . . . . . . . . . . . . 4-8
Audio Amplifier (U101, U102). . . . . . . . . . . . . . 4-9
RECEIVE AND TRANSMIT DATA
PROCESSING . . . . . . . . . . . . . . . . . . . . . . . 4-9
Receive Data Filter/Detector
(U102A/B, U103A/B) . . . . . . . . . . . . . . . . . . 4-9
Transmit Data Filter (U145A/B) . . . . . . . . . . . . . 4-9
TRANSMIT AUDIO PROCESSING. . . . . . . 4-10
Gate (U203), High-Pass Filter (U151) . . . . . . . 4-10
4.2
4.3
4.4
4.5
4.6
4.7
4.8
iv
3-11
3-12
3-13
3-13
November 2001
Part No. 001-7240-001
TABLE OF CONTENTS
TABLE OF CONTENTS (CONT’D)
4.9
Limiter (U151A). . . . . . . . . . . . . . . . . . . . . . . . 4-10
Low-Pass Filter (U146A/B) . . . . . . . . . . . . . . . 4-10
SMARTNET DATA PROCESSING . . . . . . .4-10
5
ALIGNMENT PROCEDURE
5.1
GENERAL. . . . . . . . . . . . . . . . . . . . . . . . . . . . . . 5-1
Introduction . . . . . . . . . . . . . . . . . . . . . . . . . . . . 5-1
Special Test Code Required . . . . . . . . . . . . . . . . 5-1
LOADING OPERATING CODE . . . . . . . . . . . 5-2
General . . . . . . . . . . . . . . . . . . . . . . . . . . . . . . . . 5-2
Saving Personality Information . . . . . . . . . . . . . 5-2
Loading Test Code . . . . . . . . . . . . . . . . . . . . . . . 5-2
PCTUNE DESCRIPTION . . . . . . . . . . . . . . . . . 5-3
PCTune Menu Bar . . . . . . . . . . . . . . . . . . . . . . . 5-3
Radio Tune Screen . . . . . . . . . . . . . . . . . . . . . . . 5-4
ALIGNMENT PROCEDURE . . . . . . . . . . . . . . 5-5
Test Setup . . . . . . . . . . . . . . . . . . . . . . . . . . . . . . 5-5
FREQUENCY CHECK/ADJUST . . . . . . . . . . .5-6
HIGH RF POWER ADJUST . . . . . . . . . . . . . . 5-6
LOW RF POWER ADJUST . . . . . . . . . . . . . . . 5-6
MODULATION BALANCE . . . . . . . . . . . . . . . 5-6
DATA DEVIATION . . . . . . . . . . . . . . . . . . . . . .5-6
AUDIO DEVIATION . . . . . . . . . . . . . . . . . . . . . 5-6
RECEIVE BANDPASS FILTER ADJUST . . . 5-7
RSSI AND SQUELCH ADJUST . . . . . . . . . . .5-7
OPENING TRANSCEIVER . . . . . . . . . . . . . . . 5-7
RECEIVER PERFORMANCE TESTS . . . . . . 5-8
Preliminary Setup . . . . . . . . . . . . . . . . . . . . . . . . 5-8
SINAD Sensitivity . . . . . . . . . . . . . . . . . . . . . . . 5-8
Squelch Sensitivity . . . . . . . . . . . . . . . . . . . . . . . 5-8
Audio Power And Distortion . . . . . . . . . . . . . . . 5-8
Receiver Current Drain. . . . . . . . . . . . . . . . . . . . 5-8
TRANSMITTER PERFORMANCE TESTS . . 5-9
Power Output . . . . . . . . . . . . . . . . . . . . . . . . . . . 5-9
Transmit Frequency . . . . . . . . . . . . . . . . . . . . . . 5-9
Transmit Modulation . . . . . . . . . . . . . . . . . . . . . 5-9
Transmitter Current Drain . . . . . . . . . . . . . . . . . 5-9
TEST CODE FUNCTIONS . . . . . . . . . . . . . . . 5-10
General . . . . . . . . . . . . . . . . . . . . . . . . . . . . . . . 5-10
Test Channels . . . . . . . . . . . . . . . . . . . . . . . . . . 5-10
Modulation Modes . . . . . . . . . . . . . . . . . . . . . . 5-10
Miscellaneous Functions . . . . . . . . . . . . . . . . . 5-10
Parameter Edit Modes . . . . . . . . . . . . . . . . . . . 5-11
5.2
5.3
5.4
5.5
5.6
5.7
5.8
5.9
5.10
5.11
5.12
5.13
5.14
5.15
5.16
6
LTR-NET OVERVIEW
6.1
INTRODUCTION . . . . . . . . . . . . . . . . . . . . . . . . 6-1
General . . . . . . . . . . . . . . . . . . . . . . . . . . . . . . . . 6-1
Compatibility With LTR . . . . . . . . . . . . . . . . . . 6-1
LTR-Net Features . . . . . . . . . . . . . . . . . . . . . . . . 6-2
Definitions . . . . . . . . . . . . . . . . . . . . . . . . . . . . . 6-3
SYSTEM ARCHITECTURE . . . . . . . . . . . . . . . 6-3
6.2
6.3
6.4
6.5
6.6
6.7
7
Introduction . . . . . . . . . . . . . . . . . . . . . . . . . . . . .
Subscriber Units . . . . . . . . . . . . . . . . . . . . . . . . .
Repeaters . . . . . . . . . . . . . . . . . . . . . . . . . . . . . . .
3000-Series Switch . . . . . . . . . . . . . . . . . . . . . . .
Call Processor . . . . . . . . . . . . . . . . . . . . . . . . . . .
System and Subscriber Manager . . . . . . . . . . . . .
STANDARD GROUP CALLS . . . . . . . . . . . .
WIDE AREA GROUP CALLS . . . . . . . . . . . .
SPECIAL CALLS . . . . . . . . . . . . . . . . . . . . . . .
General . . . . . . . . . . . . . . . . . . . . . . . . . . . . . . . .
Auxiliary Calls . . . . . . . . . . . . . . . . . . . . . . . . . .
Telephone Calls. . . . . . . . . . . . . . . . . . . . . . . . . .
Data Calls . . . . . . . . . . . . . . . . . . . . . . . . . . . . . .
HOME CHANNEL BACKUP . . . . . . . . . . . . .
Introduction . . . . . . . . . . . . . . . . . . . . . . . . . . . . .
Home Repeaters . . . . . . . . . . . . . . . . . . . . . . . . .
Status Repeaters . . . . . . . . . . . . . . . . . . . . . . . . .
Home Channel Aliasing . . . . . . . . . . . . . . . . . . .
OTHER LTR-NET FEATURES . . . . . . . . . . .
Unique ID Codes . . . . . . . . . . . . . . . . . . . . . . . . .
Electronic Serial Number (ESN) . . . . . . . . . . . . .
ESN and Unique ID Requests . . . . . . . . . . . . . . .
Interrogate . . . . . . . . . . . . . . . . . . . . . . . . . . . . . .
Kill and Sleep . . . . . . . . . . . . . . . . . . . . . . . . . . .
Auto-Registration and De-Registration. . . . . . . .
New Channel Updates . . . . . . . . . . . . . . . . . . . . .
6-3
6-3
6-4
6-4
6-5
6-5
6-5
6-5
6-6
6-6
6-6
6-6
6-6
6-6
6-6
6-7
6-7
6-7
6-7
6-7
6-8
6-8
6-8
6-8
6-8
6-9
PARTS LIST
Complete Assemblies . . . . . . . . . . . . . . . . . . . . . 7-1
Flexible Cable Assembly. . . . . . . . . . . . . . . . . . . 7-1
Keypad/Display Board Assembly . . . . . . . . . . . . 7-1
RF Board Assembly . . . . . . . . . . . . . . . . . . . . . . 7-2
Logic Board Assembly . . . . . . . . . . . . . . . . . . . . 7-7
Mechanical Parts . . . . . . . . . . . . . . . . . . . . . . . . 7-11
8
SCHEMATIC DIAGRAMS AND
COMPONENT LAYOUTS
Interconnect Schematic . . . . . . . . . . . . . . . . . . . .
Transceiver-To-RPI Programming Cable . . . . . .
RF Board Schematic . . . . . . . . . . . . . . . . . . . . . .
RF Board Top View . . . . . . . . . . . . . . . . . . . . . .
RF Board Bottom View. . . . . . . . . . . . . . . . . . . .
Logic Board Schematic . . . . . . . . . . . . . . . . . . . .
Logic Board Top View . . . . . . . . . . . . . . . . . . . .
Logic Board Bottom View . . . . . . . . . . . . . . . . .
Display/Keypad Board Schematic. . . . . . . . . . . .
Display/Keypad Board Bottom View . . . . . . . . .
Display/Keypad Board Top View . . . . . . . . . . . .
Flex Circuit Layout . . . . . . . . . . . . . . . . . . . . . . .
Transceiver Block Diagram. . . . . . . . . . . . . . . . .
v
8-1
8-1
8-2
8-3
8-3
8-4
8-5
8-5
8-6
8-7
8-7
8-7
8-8
November 2001
Part No. 001-7240-001
TABLE OF CONTENTS
TABLE OF CONTENTS (CONT’D)
LIST OF TABLES
1-1
1-2
2-1
3-1
3-2
3-3
3-4
3-5
3-6
4-1
5-1
LIST OF FIGURES
7243 Portable Accessories . . . . . . . . . . . . . . . . . . 1-1
Charger Indicators . . . . . . . . . . . . . . . . . . . . . . . . 1-4
Menu Mode and Option Switch Functions . . . .2-12
Menu and Option Sw. Parameter Descriptions . 3-10
Locality Programming Screen Description . . . . 3-15
System Programming Screen Description . . . . . 3-16
Group Programming Screen Description . . . . . 3-17
Bank Programming Screen Description . . . . . . 3-19
Call Guard Codes and Tones . . . . . . . . . . . . . . . 3-20
Microprocessor U208 Pin Descriptions . . . . . . . . 4-5
Test Channels . . . . . . . . . . . . . . . . . . . . . . . . . . 5-10
1-1
2-1
2-2
2-3
2-4
3-1
3-2
3-3
5-1
5-2
5-3
6-1
vi
Battery Charger . . . . . . . . . . . . . . . . . . . . . . . . . 1-4
Top Panel Controls . . . . . . . . . . . . . . . . . . . . . . 2-1
Display. . . . . . . . . . . . . . . . . . . . . . . . . . . . . . . . 2-2
Front Panel Keys . . . . . . . . . . . . . . . . . . . . . . . . 2-3
Programmer Error Code Screen . . . . . . . . . . . 2-32
Programming Setup. . . . . . . . . . . . . . . . . . . . . . 3-1
Main Window . . . . . . . . . . . . . . . . . . . . . . . . . . 3-5
Edit Menu . . . . . . . . . . . . . . . . . . . . . . . . . . . . . 3-7
Alignment Setup Diagram. . . . . . . . . . . . . . . . . 5-1
PCTune Tune Radio Screen . . . . . . . . . . . . . . . 5-4
Internal Adjustment Points . . . . . . . . . . . . . . . . 5-7
LTR-Net System Diagram. . . . . . . . . . . . . . . . . 6-1
November 2001
Part No. 001-7240-001
GENERAL INFORMATION
SECTION 1 GENERAL INFORMATION
1.1 SCOPE OF MANUAL
Model
From P.N.
This service manual contains operation, programming, alignment, and service information for the E.F.
Johnson 7243 LTR-Net™ portable transceiver.
7243
1.2 TRANSCEIVER DESCRIPTION
6 = LTR-Net
The 7243 LTR-Net portable transceiver operates
in the UHF 430-470 MHz frequency range. Power
output is selectable for low (1 watt) and high (4 watt)
levels.
Accessory
12345
Last Digit of Year
Part No.
Battery pack, nickel metal-hydride hi cap 587-7200-140
Rapid charger base, single unit with
585-7200-023
120 VAC power supply
Antenna, hybrid UHF
585-7200-044
Belt clip
585-7200-032
Contact Cust Serv
Extension Test Cable
Programming Accessories
LTR-Net 7243/98xx programming
023-9998-457
software, CD
PCTune software and test code, CD
023-9998-489
PCFlash soft. & LTR-Net op. code, CD 023-9998-501
Remote Prog Interface (RPI)
023-9800-000
Programming cable (RPI to xcvr)
597-7200-031
DB9 F to DB9 M 6-ft cable
597-5900-002
DB-25 M to DB-9 F 6-ft cable
597-0005-057
DB-25 F to DB-9 M adapter
515-9000-015
242 - 72 x 3 - x x 3
Freq Range
0 = Full band (800/
900 MHz)*
1 = 400-440 MHz*
3 = 430-470 MHz
5 = 470-512 MHz*
1.6 ACCESSORIES
3 = High Tier, dual BW
2 = LTR*
4 = Multi-Net*
5 = SMARTNET/SmartZone*
6 = LTR-Net
Week No.
of Year
U
Table 1-1 7243 Portable Accessories
The following is a breakdown of the part number
used to identify this transceiver.
Signaling
25 1
The field tuning procedure is described in
Section 5.
1.3 PART NUMBER BREAKDOWN
Type
A
1.5 TRANSCEIVER TUNING
A range of up to 16-100 systems are programmable, depending on the type and the number of
groups in each. Systems can be programmed for LTRNet, LTR, and conventional operation. Each system
can be programmed with up to 99 groups. Currently, all
transceivers have a telephone keypad and three
programmable option switches. Refer to Section 2.1
for more information on operating features.
Band
1 = VHF*
4 = UHF
8 = 800 MHz*
9 = 900 MHz*
x
Warranty
Revision Manufacture
Plant Number
Letter
Date
* These configurations are
The accessories available for this transceiver are
listed in Table 1-1. A brief description of some of
these accessories follows:
currently not available.
Extension Test Cable - This cable is required to
operate the transceiver when it has been opened to
access internal components. It reconnects the keypad/
display board to the audio/logic board.
1.4 TRANSCEIVER IDENTIFICATION
The transceiver identification number is printed
on a label that is attached to the chassis. The following
information is contained in the identification number:
Programming Hardware - The RPI provides the
interface between the programming computer and
1-1
November 2001
Part No. 001-7240-001
GENERAL INFORMATION
transceiver. The cables from the RPI to computer and
transceiver are not included with the RPI and must be
ordered separately.
Toll-Free: (800) 328-3911
Programming Software
E-Mail: [email protected] You can
also e-mail a person directly if you know their first
initial/last name (example: [email protected]).
FAX: (507) 835-6969
The following three types of programming can be
performed with 7243 portable transceivers:
NOTE: Emergency 24-hour technical support is also
available at the 800 and preceding numbers during off
hours, holidays, and weekends.
Personality Programming - This programming sets the
parameters that can be different for each transceiver
such as channel frequencies, system and group information, and locality information. This programming is
performed by the LTR-Net Programming software,
Part No. 023-9998-457, and described in Section 3 of
this manual.
When your call is answered at the E.F. Johnson
Company, you will hear a brief message informing
you of numbers that can be entered to reach various
departments. This number may be entered during or
after the message using a tone-type telephone. If you
have a pulse-type telephone, wait until the message is
finished and an operator will come on the line to assist
you. When you enter some numbers, another number
is requested to further categorize the type of information you need.
Transceiver Tuning (PCTune) - Most transceiver
adjustments are made electronically and stored by the
logic. The software used to perform these adjustments
is called PCTune, and it is described in Section 5.
NOTE: To run the PCTune software, the transceiver
must first be re-flashed with temporary test operating
software (see following).
You may also contact the Customer Service
Department by mail. Please include all information
that may be helpful in solving your problem. The
mailing address is as follows:
Loading Different Operating Code (PCFlash) - The
PCFlash software is used to upgrade the actual operating software of the transceiver. This software is
stored in a reprogrammable Flash memory device, and
is the basic operating code of the transceiver.
E.F. Johnson Company
Customer Service Department
299 Johnson Avenue
P.O. Box 1249
Waseca, MN 56093-0514
The LTR-Net operating software may be changed
to upgrade features, correct bugs, or tune the transceiver. Section 5.2 describes how temporary test operating code is loaded to tune the transceiver and LTRNet operating code is reloaded to restore normal operation. Test operating code is included on the PCTune
CD, and LTR-Net operating code is included on the
PCFlash CD (see Table 1-1).
1.8 FACTORY RETURNS
Repair service is normally available through local
authorized E.F. Johnson Land Mobile Radio Service
Centers. If local service is not available, the equipment
can be returned to the factory for repair. However, it is
recommended that you contact the Customer Service
Department before returning equipment. A service
representative may be able to suggest a solution to the
problem making return of the equipment unnecessary.
1.7 FACTORY CUSTOMER SERVICE
The Customer Service Department of the E.F.
Johnson Company provides customer assistance on
technical problems and the availability of local and
factory repair facilities. Regular Customer Service
hours are 7:30 a.m. - 5:30 p.m. Central Time, MondayFriday. The Customer Service Department can be
reached using the following telephone numbers:
Be sure to fill out a Factory Repair Request Form
#271 for each unit to be repaired, whether it is in or
out of warranty. These forms are available free of
charge by calling Customer Service (see Section 1.7)
or by requesting them when you send a unit in for
1-2
November 2001
Part No. 001-7240-001
GENERAL INFORMATION
nator (C512, for example) and the model number of
the equipment the part is from.
repair. Clearly describe the difficulty experienced in
the space provided and also note any prior physical
damage to the equipment. Include this form in the
shipping container with each unit. Your telephone
number and contact name are important as there are
times when the technicians may have specific questions that need to be answered in order to completely
identify and repair a problem.
You may also send your order by mail or FAX.
The mailing address is as follows and the FAX number
is shown in Section 1.7.
E.F. Johnson Company
Service Parts Department
299 Johnson Avenue
P.O. Box 1249
Waseca, MN 56093-0514
When returning equipment for repair, it is also
recommended that you use a PO number or some other
reference number on your paperwork in case you need
to call the repair lab about your unit. These numbers
are referenced on the repair order and make it easier
and faster to locate your unit in the lab.
1.10 INTERNET HOME PAGE
The E.F. Johnson Company has a site on the
World Wide Web that can be accessed for information
on the company about such things as products,
systems, and regulations. The address is
http://www.efjohnson.com.
Return Authorization (RA) numbers are not
necessary unless you have been given one by the Field
Service Department. RA numbers are required for
exchange units or if the Field Service Department
wants to be aware of a specific problem. If you have
been given an RA number, reference this number on
the Factory Repair Request Form sent with the unit.
The repair lab will then contact the Field Service
Department when the unit arrives.
1.11 DISASSEMBLING TRANSCEIVER
Proceed as follows to separate the front cover and
chassis:
For additional information on factory service, the
Depot Service Department can be contacted at the
following E-mail address:
1. Remove the battery pack and antenna.
2. Remove the two screws located on the back.
[email protected]
3. The front cover and chassis hinge at the top, so carefully separate the lower end of the chassis from the
cover and pivot the lower end outward.
1.9 REPLACEMENT PARTS
4. When reassembling these parts, make sure that the
rubber perimeter gasket is in the groove (if necessary, hold it in the curved area with your fingers).
Replacement parts can be ordered directly from
the Service Parts Department. To order parts by phone,
dial the toll-free number as described in Section 1.7.
When ordering, please supply the part number and
quantity of each part ordered. E.F. Johnson dealers
also need to give their account number. If there is
uncertainty about the part number, include the desig-
NOTE: To operate the transceiver with the front and
back separated, the extension test cable listed in Table
1-1 is required.
1-3
November 2001
Part No. 001-7240-001
GENERAL INFORMATION
Table 1-2 Charger Indicators
1.12 BATTERY CHARGER INFORMATION
1.12.1 GENERAL
Indication
The battery pack for the 7243 portable contains
six nickel metal hydride (NiMH) batteries connected
in series. Nominal battery pack voltage is 7.5 volts and
battery capacity is 1450 mAH.
Fast Charge
Slow Charge
Flashing Red [1] Checking battery
N/A
condition
Constant Red
Rapid charge mode
N/A
Constant Green Trickle charge mode Slow charge mode
Off [2]
No charging is
No charging is
occurring
occurring
[1] If condition persists, battery temperature may not within
required range (0 to +45° C).
[2] Possible causes are poor contact (clean the charger and
battery contacts) or a defective battery.
The 7243 charger shown in Figure 1-1 has two
slots in which to place a battery. The back slot is for
fast charging and the front slot is for slow charging.
Only the battery can be inserted in the fast charge slot
and the entire transceiver can be inserted in the slow
charge slot if desired. Batteries can be charged in both
slots at the same time. The operation of the LEDs is
shown in Table 1-2.
Fast Charge Slot
Indicator
The charger uses the ∆T/∆t (change in temperature/change in time) method to sense that the battery is
nearly fully charged and that switching to the trickle
mode should occur. This method detects when the
battery temperature begins increasing at a faster rate
which normally provides the first indication that the
battery is fully charged.
Slow Charge Slot
To provide fail-safe operation, the trickle rate is
also selected if the battery temperature rises above
+50° C (+122° F) or charge time in the rapid mode
exceeds 90 minutes ±20%.
Fast Charge Slot
Indicator
Slow Charge Slot Indicator
NOTE: Occasionally, a fully charged condition may be
falsely detected and the trickle mode entered after only
a few minutes of rapid charging. To resume normal
rapid charging if this occurs, momentarily lift the
battery out of the slot.
Figure 1-1 Battery Charger
1.12.2 FAST CHARGING
When a battery is placed in the fast charge slot,
the fast charge indicator briefly flashes red while the
battery is checked to determine if its temperature is
within the required range (0 to +45° C/+32 to +113°F).
If it is, fast charging begins and it changes to steady
red. The fast charge rate is 1320 mA ±100 mA. When
the battery is nearly fully charged, it switches to the
trickle rate of 20-40 mA and the indicator turns green.
It continues at the trickle rate until the battery is
removed from the charger. Approximate charge time
in this slot for a fully discharged battery is 1.5 hours.
1.12.3 SLOW CHARGING
Batteries charged in the front slot are always
charged at the slow rate of 100-120 mA. The slow
charge indicator turns green when charging is occurring. Typical charge time in this slot for a fully
discharged battery is 20 hours (with transceiver power
turned off if applicable). If the transceiver power is on,
this slot basically maintains the charge of the battery.
1-4
November 2001
Part No. 001-7240-001
GENERAL INFORMATION
7243 SPECIFICATIONS
The following are general specifications intended for use in testing and servicing the transceiver. For current
advertised specifications, refer to the 7243 product information sheet available from your E.F. Johnson sales representative. Specifications are subject to change without notice.
GENERAL
Operating Mode
Frequency Range
Systems Programmable
Groups Programmable
Transmit/Receive Separation
Channel Spacing
LTR-Net/LTR (trunked), and conventional (non-trunked)
430-470 MHz
Up to 16-100 depending on system type and number of groups
Up to 99 per system
Within channel spread, 0 MHz conventional talk-around
12.5 kHz - 2.5 kHz maximum deviation
25 kHz - 5 kHz maximum deviation
Frequency Stability (tx and rx)
2.0 PPM –22° to +140° F (–30° to +60° C)
Dimensions (with battery and controls) 5.7" H x 2.2" W x 1.4" D
145mm H x 55mm W x 35mm D
Weight (with battery)
15 oz. (410 g)
Power Source
7.5 VDC nickel metal-hydride (NiMH) battery pack, 1450 mAH
Typical Battery Life
(5-5-90) 7.3 hours (high power), 9.9 hours (low power)
Compliance
FCC parts 15 and 90
Circuit Protection
3-ampere fuse
RECEIVER
Sensitivity
Selectivity
Spurious and Image Rejection
Intermodulation
Audio Output Power
Audio Distortion
Audio Response
Channel Spread
Current Drain
0.35 µV (12 dB SINAD)
–65 dB at 25 kHz /–60 dB at 12.5 kHz
–65 dB
–65 dB
Internal Speaker - 0.5 watt (16-ohm load)
External - 1.5 V rms (680-ohm load)
Less than 5% at rated power (0.5 watt)
+1, –3 dB at 6 dB per octave de-emphasis characteristic
40 MHz
Standby (squelched) - 100 mA maximum
Rated Audio Output - 275 mA maximum
TRANSMITTER
High RF Power Output
Low RF Power Output
Spurious and Harmonic
FM Hum and Noise
Audio Distortion
Audio Frequency Response
Audio Modulation
Channel Spread
Current Drain (maximum)
Load Impedance
Duty Cycle (3-3-54 seconds)
4.0 watts
1.0 watt
–60 dB
–40 dB at 25 kHz, –34dB at 12.5 kHz
5% maximum at 1 kHz
+1, –3 dB from a 6 dB per octave pre-emphasis characteristic
11K0F3E, 16K0F3E
40 MHz
Low Power - 950 mA
High Power - 2 A
50 ohms
5% (Transmit-Receive-Standby)
1-5
November 2001
Part No. 001-7240-001
OPERATION
SECTION 2 OPERATION
On-Off/Volume
Option
Switch 1
•
•
•
•
•
•
•
•
Antenna Jack
Menu mode to select functions
Telephone mode for convenient number dialing
Three programmable option switches
Keypad lock (with and without password)
Call indicator
Time-out timer
Receive-only groups
Companding
Speaker
2.1.2 LTR-NET FEATURES
Microphone
The following features are available when an
LTR-Net system is selected.
Accessory
Connector
•
•
•
•
•
•
•
Roaming (automatic locality search)
Special calls including telephone, unique ID, and
directed group
Busy queuing of special calls by radio system
Transmit inhibit
Receive priority calls
Standard group calls (mobile-to-mobile)
Automatic registration/de-registration
2.1.3 LTR FEATURES
Figure 2-1 Top Panel Controls
The following features are available when an
LTR system is selected.
2.1.1 GENERAL FEATURES
•
•
•
The following features are available in all operating modes (LTR-Net/LTR/conventional).
2.1.4 CONVENTIONAL FEATURES
2.1 FEATURES
•
•
•
•
•
•
•
•
•
•
•
•
Up to 16-100 systems programmable depending on
type (LTR-Net/LTR/conv) and number of groups in
each.
Up to 99 groups programmable per system
LTR-Net™, LTR®, and conventional operating
modes
Unique 8-character system and group identification
tags
System and group scanning
User programmable system and group scan lists
Standard group and telephone calls
Transmit inhibit
Receive priority calls
Busy indicator
Talk-around
User-adjustable squelch level
Monitor mode
Call Guard® squelch control
Transmit disable on busy
NOTE: Programming determines the availability of
many of the preceding features.
2-1
November 2001
Part No. 001-7240-001
OPERATION
Phone
Group
System
Scan List
Dial
Mode
S
BUSY
Not
Used
Not Used
Low
Power Scan Call
O L
C
UID
M
8-Character
Not
Alphanumeric
Used
Display
Conv Ch
Busy
Low
Battery
Group Scan
List
Monitor
Priority
P2
G
Tx
UID/Aux
Group
Transmitter
Keyed
Keypad
Lock
Figure 2-2 Display
2.2 CONTROLS AND DISPLAY
Option
PTT
Switch 2 Switch
2.2.1 TOP AND SIDE CONTROLS
NOTE: These controls are shown in Figure 2-1.
On-Off Volume - Turning this knob clockwise turns
power on and sets the volume level. Turning it counterclockwise to the detent turns power off. Power is on
when information appears in the display. Refer to
Section 2.3.3 for more information on setting volume.
2.2.2 SIDE CONTROLS
Option Switch 2 - This switch can
be programmed to control a
specific function (see Section
2.5.1).
PTT (Push-To-Talk) - This switch
keys the transmitter so that a
message can be transmitted. The
“Tx” icon is displayed when the
transmitter is keyed.
Option Switch 1 - This switch can be programmed to
control a specific function (see Section 2.5.1).
Option
Switch 3
Antenna Jack - Connection point for the antenna.
Accessory Connector - When the protective cover is
removed, this connector can be used to access PTT,
speaker, and microphone lines for transceiver service
and testing. It is also the connection point for the
computer when programming the transceiver.
Option Switch 3 - This switch can
be programmed to control a
specific function (see Section
2.5.1).
2.2.3 DISPLAY
8-Character Alphanumeric Display - This area of
the display indicates the selected system and group
(Section 2.3.4), dialed number (Section 2.7), error
conditions, and other information (Section 2.12.4).
Battery Release Button (Not shown) - This button is
located on the bottom end of the transceiver, and it is
pressed to release the battery so that it can slide downward and be removed from the radio.
S - Indicates that the displayed system is in the scan
list and scanned normally (see Section 2.6.7).
- The base portion of this icon is displayed when
the displayed group is programmed for telephone
calls, and the top portion (receiver) is displayed when
the dial mode is selected (see Section 2.7).
NOTE: Turn off transceiver power before removing
the battery. This ensures that current settings are properly saved and the de-registration message is sent.
2-2
November 2001
Part No. 001-7240-001
OPERATION
O - Not currently used.
L - Indicates that low transmit power is selected (see
Section 2.4.8).
- Indicates that the scan mode is selected (see
Section 2.6.1).
- Not currently used.
C - Indicates that a call has been received on a group
programmed for a call indicator (see Section 2.4.2).
Press any key to turn this indication off.
Figure 2-3 Front Panel Keys
- Indicates that the monitor mode has been enabled
by the Monitor option switch (see Section 2.11.2).
function labeled on the key is usually selected by
simply pressing the key, and the function labeled
under the key is usually selected by first pressing
another key such as the FCN (Function).
P2 - “P” indicates that the displayed group is an
LTR-Net/LTR priority 1 group, and “P2” indicates that
it is a priority 2 group (see Section 2.8.2).
In addition, one set of key functions may be
available in the standard mode and another in the dial
mode (see Section 2.7). All key functions except 0-9
can also be assigned to an option switch and controlled
by both as described in Section 2.5.1. Holding a key
down causes repeating if applicable. These keys
operate as follows:
G - Indicates that the displayed group is in the scan
list and scanned normally (see Section 2.6.7).
BUSY - Indicates a carrier is being detected on the
selected conventional channel.
M - Not currently used.
FCN (SCAN)
- Indicates a low battery condition. The
battery should be recharged soon after this indication
appears (see Section 2.3.8).
Standard Mode
FCN - Enables the alternate function of the next key
that is pressed. This alternate function is active for
2 seconds or until another key is pressed, whichever occurs first.
FCN SCAN - Turns scanning on and off.
Dial Mode
FCN - Selects the alternate function of various keys
as described in the following information.
UID - Indicates that the displayed group is
programmed for an LTR-Net Unique ID or Directed
Group call (see Section 2.9.1).
- Indicates that the keypad has been locked by
pressing FCN
or FCN
(see Sections 2.3.6 and
2.3.7).
Tx - Indicates that the transmitter is keyed. This
occurs when the push-to-talk switch is pressed or a
register/de-register message is sent (see Section 2.9.4).
SYS (RCL)
Standard Mode
SYS - Pressing repeatedly selects next higher system.
SYS # - Selects the next higher system.
SYS
- Selects the next lower system.
SYS (xx) - Directly selects specified system.
FCN RCL - Momentarily displays the selected
(revert) system if it is not being displayed.
2.2.4 FRONT PANEL KEYS
The front panel keys are shown in Figure 2-3
above. Most keys control two or more functions. The
2-3
November 2001
Part No. 001-7240-001
OPERATION
FCN DIAL - Exits the dial mode without sending
the call termination characters.
Dial Mode
RCL - After recalling a number, scrolls through
other numbers programmed in memory.
FCN RCL (0-9) - Recalls the number stored in the
specified memory location.
FCN RCL
- Recalls the last number recalled
from memory.
FCN RCL # - Recalls the last number sent by FCN
SND.
4 (PAGE)
Standard Mode
FCN PAGE - The page function is currently not
available.
4 - Pressing this key with the PTT switch pressed
transmits the “4” digit.
Dial Mode
4 - Dials the “4” digit.
GRP (CLR)
Standard Mode
The GRP key changes or displays the selected group
similar to the “SYS” key just described.
Dial Mode
CLR - Erases the last digit in the display.
FCN CLR - Erases the entire number in the display.
5 (MENU)
Standard Mode
FCN MENU - Selects the menu mode (Section
2.5.2).
5 - Pressing this key with the PTT switch pressed
transmits the “5” digit.
Dial Mode
5 - Dials the “5” digit.
1 (HOME)
Standard Mode
FCN HOME - Selects the pre-programmed home
system/group.
1 - Pressing this key with the PTT switch pressed
transmits the “1” digit.
Dial Mode
1 - Dials the “1” digit.
6 (SQL)
Standard Mode
FCN SQL - Selects the squelch adjust mode for
conventional channels (Section 2.11.4).
6 - Pressing this key with the PTT switch pressed
transmits the “6” digit.
Dial Mode
6 - Dials the “6” digit.
2 (PHONE)
Standard Mode
FCN PHONE - Selects the dial mode and the first
telephone group in the current system.
2 - Pressing this key with the PTT switch pressed
transmits the “2” digit.
Dial Mode
2 - Dials the “2” digit.
FCN PHONE - Exits the dial mode and sends the
call termination characters.
7 (S.A/D)
Standard Mode
FCN S.A/D (System Add/Delete) - Changes the
scan list status of the currently displayed system.
The system is in the scan list and scanned
normally if “ S ” is displayed when not scanning.
7 - Pressing this key with the PTT switch pressed
transmits the “7” digit.
Dial Mode
7 - Dials the “7” digit.
3 (DIAL)
Standard Mode
FCN DIAL - Selects the dial mode without
changing the currently selected group.
3 - Pressing this key with the PTT switch pressed
transmits the “3” digit.
Dial Mode
3 - Dials the “3” digit.
8 (SEND)
Standard Mode
8 - Pressing this key with the PTT switch pressed
transmits the “8” digit.
2-4
November 2001
Part No. 001-7240-001
OPERATION
SYS # - Selects the next higher system (see
preceding “SYS” key description).
GRP # - Selects the next higher group (see
preceding “GRP” key description).
FCN
- Selects the keypad (standard) lock
feature.
Dial Mode
# - Dials the “ # ” digit.
FCN
- Displays the overflow digits.
FCN RCL # - Recalls the last number sent by FCN
SND.
Dial Mode
8 - Dials the “8” digit.
FCN SEND - Automatically transmits the number
in the display (after the system has been accessed
by briefly pressing the PTT switch).
9 (G.A/D)
Standard Mode
FCN G.A/D (Group Add/Delete) - Changes the scan
list status of the currently displayed group. The
group is in the scan list and scanned normally if
“ G ” is displayed when not scanning.
9 - Pressing this key with the PTT switch pressed
transmits the “9” digit.
Dial Mode
9 - Dials the “9” digit.
2.3 BASIC OPERATION
2.3.1 POWER-UP SEQUENCE
When power is turned on using the top panel onoff/volume control, a beep sounds, the backlight turns
on, all segments and icons in the display are momentarily enabled, and the last seven digits of the transceiver part number (see Section 1.3) are very briefly
displayed. The transceiver is then operational.
0 (STR)
Standard Mode
FCN STR - Changes between the numeric and alpha
display modes (Section 2.3.4).
0 - Pressing this key with the PTT switch pressed
transmits the “0” digit.
Dial Mode
0 - Dials the “0” digit.
FCN STR (0-9) - Stores the displayed number in
the specified memory location.
(
2.3.2 BACKLIGHT OPERATION
The display and keypad backlight automatically
turns on for 3 seconds whenever any key is pressed or
power is turned on. If the Backlight menu parameter is
enabled (see Section 2.5.2), selecting “On” enables
this operation and selecting “Off” disables it entirely.
)
Standard Mode
- Pressing this key with the PTT switch pressed
transmits the “ ” digit.
SYS
- Selects the next lower system (see
preceding “SYS” key description).
GRP
- Selects the next lower group (see
preceding “GRP” key description).
FCN
- Selects keypad (password) lock feature.
Dial Mode
- Dials the “ ” digit.
FCN
- Enters a pause when dialing a telephone
number.
FCN RCL
- Recalls the last number recalled
from memory.
2.3.3 SETTING VOLUME LEVELS
The relative volume level can be determined by
noting the position of the index on the volume knob. A
tone or background noise may also be enabled for use
in setting the volume as follows:
)
#(
Standard Mode
# - Pressing this key with the PTT switch pressed
transmits the “ # ” digit.
2-5
•
If key press tones are enabled, a short tone sounds
whenever any key is pressed.
•
If a conventional system is selected and the monitor
option switch is programmed (see Section 2.11.2),
press this switch. If someone is talking on the
channel, voice is heard. If no one is talking, the
squelch can be adjusted as described on Section
2.11.4 so that noise is heard. The transceiver cannot
be manually unsquelched when an LTR-Net or LTR
system is selected.
November 2001
Part No. 001-7240-001
OPERATION
2.3.4 SYSTEM/GROUP DISPLAY MODE
press GRP . As when selecting a system, holding
the
key down causes the function to repeat, and
after the lowest system or group is selected, wraparound occurs.
Two system/group display modes can be selected.
One is a numeric format and the other is an alpha tag
format. To switch between these modes, press FCN
STR or select the S/G DISPL menu parameter (see
Section 2.5.2). Turning power off does not change the
selected mode. These modes operate as follows:
•
Numeric Mode - The system and group numbers are
displayed as “Sxx Gxx” and the group alpha tag is not
displayed. For example, System 1 and Group 2 are
displayed as follows. When system or group scanning
is occurring, the numbers are replaced by dashes (see
Section 2.6.2)
.
To directly select a system or group number, press
SYS or GRP and then the number of the desired
system or group. For example, to select Group 9,
press GRP, 0, 9. A leading “0” must be entered to
select systems and groups 1-9.
2.3.6 KEYPAD DISABLE (STANDARD)
Occasionally, the front panel keys may be accidentally pressed, for example, if the transceiver is
carried on a belt and it brushes against an object. To
prevent this from happening, the front panel keys and
option switches can be quickly disabled by simply
pressing FCN
. The disabled condition is indicated
by the icon.
Numeric Display Mode
Alpha Tag Mode - The group alpha tag is displayed
instead of the system and group numbers. For
example, the “CAR 220” group is displayed as
follows. When system or group scanning is occurring,
the alpha tag is replaced by “SYS SCAN or “GRP
SCAN” (see Section 2.6.2). To briefly display the
selected system number, press FCN RCL.
If a key or option switch is then pressed, all that
happens is “LOCKED” is displayed. The on-off/
volume and PTT controls remain functional so that
calls can be received and transmitted. To re-enable the
keys and option switches, press FCN
again.
Turning power off does not change the selected mode.
2.3.7 KEYPAD DISABLE (USING PASSWORD)
To prevent unauthorized changing of the selected
system and group and other operating parameters, the
keypad and option switches can be disabled using a
password. To select this disable mode, press FCN
.
“PASSWORD” is then displayed to indicate that a
four-digit unlock password must be entered. This password can be any four-digit number except “0000”. The
desired password must be entered twice (the second
time is to confirm it). The keypad and option switches
are then disabled as indicated by “LOCKED” and
in the display.
Alpha Tag Display Mode
2.3.5 SYSTEM AND GROUP SELECT
Systems and groups are selected as follows.
When the system is changed, the last selected group in
the new system is displayed.
•
•
To increase the selected system, press SYS repeatedly or press SYS and then # (
). Likewise, to
increase the selected group, press GRP repeatedly or
press GRP # . Holding the # key down causes the
function to repeat. After the highest system or group
is selected, wrap-around to the lowest system or
group occurs.
If a key or option switch is then pressed, all that
happens is “PASS LCK” is displayed. To re-enable the
keypad and option switches, press FCN
again and
re-enter the four-digit password. As with the disable
mode described in the preceding section, the on-off/
volume and PTT controls remain active so that calls
can be received and transmitted normally.
To decrease the selected system, press SYS and then
(
). Likewise, to decrease the selected group,
2-6
November 2001
Part No. 001-7240-001
OPERATION
locality programmed for one of these modes. The type
of operation that is programmed is determined by the
type of repeater equipment being accessed. The differences in operation are described in the following information and also noted elsewhere as required.
NOTE: This password is not preprogrammed and
there is no override procedure. Therefore, if it is
forgotten, the transceiver must be reprogrammed to
return it to normal operation.
2.3.8 LOW BATTERY INDICATION
LTR-Net and LTR Operation
When the battery voltage drops to the point where
recharging is required, the
icon is indicated in
the bottom part of the display. In addition, a beep
sounds when this indication initially appears and
whenever the push-to-talk switch is released (if the
key press tone is enabled). The battery should be
recharged as soon as practical after this indication
appears.
The LTR-Net mode provides the most operating
features. Some features available only in the LTR-Net
mode include roaming (automatic locality search),
unique ID calls, and directed group calls. LTR-Net
features are described in Sections 2.8, and a general
overview of LTR-Net operation is located in Section 6.
Low transmit power is automatically selected
during a low battery condition (indicated by “L” in
display), and the current settings of switches and other
parameters continue to be saved in memory. The lowbattery indication is reset by turning power off and
then on again.
Operation in the LTR mode is similar to the LTRNet mode except that the preceding and some other
LTR-Net features are not available.The types of calls
that can be placed in the LTR mode are standard group
(mobile-to-mobile) and telephone. LTR features are
described in Sections 2.8 and 2.10 and also in the LTR
Application Note, Part No. 009-0001-020, Rev. 8 or
later.
2.3.9 OPTION SWITCHES
Both the LTR-Net and LTR modes provide automatic channel selection (trunking) and monitoring
before transmitting. Special tones and display
messages indicate busy and out-of-range conditions.
Telephone calls can be placed almost as conveniently
as with your home telephone. The information
programmed in LTR-Net and LTR systems and groups
is described in Section 2.3.12.
This transceiver has three option switches that
can be programmed to control various functions as
described in Section 2.5.1. These switches are the
push-button switch on the top panel, the switch immediately above, and the switch immediately below the
PTT switch on the side panel.
2.3.10 DISPLAYING SOFTWARE REVISION
NUMBER
Conventional Operation
To display the operating (Flash) software version
number, turn power on with PTT switch pressed. The
version number is displayed as “VER x.xx”. To return
to normal operation, press FCN RCL or cycle power.
The software version number can also be read using
the programmer by selecting the Transfer > Read
Factory Info function (see Section 3.7).
In the conventional mode, selecting a system
selects a radio channel, and selecting a group selects
the squelch control coding (CTCSS, CDCS, or carrier)
and other parameters (see Section 2.3.12). The squelch
level must be adjusted manually as described in
Section 2.11.4 to properly receive conventional calls.
With conventional operation, an out-of-range
condition is not indicated by a special tone or display
message because there is no data handshake with a
repeater that allows this condition to be detected. A
busy condition is detected automatically if the
Transmit Disable On Busy feature is used (see Section
2.11.3). Otherwise, it must be detected manually as
follows. Refer to Section 2.11 for more information on
conventional operation.
2.3.11 LTR-NET, LTR, AND CONVENTIONAL
OPERATION
Introduction
This transceiver can be programmed to operate in
the LTR-Net, LTR, and conventional modes. Each
selectable system can be programmed to select a
2-7
November 2001
Part No. 001-7240-001
OPERATION
unique alpha tag and can have a different display
number in each bank (see Section 2.4.1).
To manually monitor a conventional channel
before transmitting to determine if it is being used by
someone else, proceed as follows:
LTR-Net and LTR systems are programmed with
the home repeater number, a collection of groups, and
a transmit inhibit block of ID codes (see Section
2.8.4). The home repeater number and group ID code
form the address for group calls. In addition, the home
repeater is monitored for incoming call information
(the status repeater serves as a backup with LTR-Net
operation).
Using Busy Indicator - With scanning disabled and
the squelch control adjusted as described in Section
2.11.4, note if “BUSY” is indicated in the lower part
of the display. If it is, a carrier is being detected on the
currently selected conventional system (channel). If
this indication is not displayed, the channel is not busy
and the message can be transmitted.
Conventional systems select a specific radio
channel and include one or more groups, each of
which can select unique coded squelch information on
that channel (see following).
Using Monitor Mode - If scanning, pressing the
Monitor option switch (see Section 2.5.1) disables
scanning and enables the monitor mode indicated by
in the display. The monitor mode disables squelch
control features so that all messages are heard. If none
are heard, the channel is free and the message can be
transmitted. Refer to Section 2.11.2 for more information on monitoring.
Groups
The groups assigned to a system select individual
call information. Up to 99 groups can be assigned to
each system. With all three types of operation, each
group is programmed with a unique alpha tag, group
scan, call indicator, and other information. The available group types are as follows.
2.3.12 LOCALITIES, SYSTEMS, AND GROUPS
When any call is placed, a locality, system, and
group are selected. Definitions of these terms follow.
LTR-Net Group Types
Localities
Dispatch - Used to place and receive standard group
(mobile-to-mobile) calls. Encode and decode IDs
from 1-239 can be specified.
An LTR-Net or LTR locality is typically a single
repeater site in which the repeaters are co-located and
interconnected by a common bus to form a trunked
channel group. A conventional locality may or may
not include repeaters at the same physical site. A
locality can include up to twenty repeaters.
Telco - Used to place and receive telephone calls.
Auxiliary - Used to place and receive unique ID and
directed group calls.
Unique locality parameters include the channel
frequencies and bandwidth of each repeater at the site,
the status repeater (LTR-Net only), and the repeaters
equipped with telephone interconnect (LTR only) and
companding. Up to approximately 25 LTR-Net or 60
LTR/conventional localities can be programmed (the
maximum number decreases as the number of banks,
systems, and groups increases).
Data - Currently not available.
LTR Group Types
Dispatch - Used to place and receive standard group
(mobile-to-mobile) calls. Encode and decode IDs
from 1-250 can be specified when accessing an LTR
locality (site). If an LTR-Net locality is being
accessed, IDs from 1-239 can be specified.
Systems
Systems are a collection of groups and other
information unique to that system (see next paragraph). Each system is linked to one of the
programmed localities, and up to 99 systems can be
programmed. Each system is programmed with a
Telco - Used to place and receive telephone calls. A
RIC (interconnect) ID is also specified. This code is
one that has been reserved on the repeater system
for telephone calls.
2-8
November 2001
Part No. 001-7240-001
OPERATION
Conventional Group Types
•
If the radio system could not be accessed because
of an out-of-range condition or some other
reason, the intercept tone sounds (see Section
2.12) and “NO ACCES” is indicated in the
display. The PTT switch must then be released
and pressed again to make another access
attempt.
•
When responding, busy or no access conditions
may also occur the same as when placing a call
because the system is re-accessed for each
transmission with these calls.
Only dispatch calls can be programmed with
conventional operation. Conventional groups select
Call Guard squelch, group scan, call indicator, and
other information.
2.3.13 PLACING AND RECEIVING STANDARD
GROUP CALLS
General
These calls are between two or more mobile or
control station transceivers. The main difference
between these calls and the other types is that no
number is dialed using the keypad. The following
procedure applies to all three types of operation (LTRNet, LTR, and conventional).
Conventional Operation
•
If the channel is busy and the Transmit Disable
On Busy feature is programmed (see Section
2.11.3), “DSBL BSY” is indicated in the display
and the transmitter is disabled. Any channel
activity is heard while the PTT switch is pressed.
•
Otherwise, busy and out-of-range conditions are
not indicated and speaking can begin when the
PTT switch is pressed (if the channel is not busy).
If the proceed tone is enabled on conventional
systems, it indicates when speaking can begin but
does not indicate that the channel is free or has
been successfully accessed.
Placing a Standard Group Call
1. Turn transceiver power on and set the volume as
described starting with Section 2.3.1. With conventional operation, also make sure that the squelch is
properly set as described in Section 2.11.4.
2. Select the system and group of the mobile being
called as described in Section 2.3.5.
2.3.14 RECEIVING A STANDARD GROUP CALL
3. If a conventional call is being placed, monitor the
channel manually or automatically as described in
Section 2.3.11.
1. Select or scan the system and group programmed for
the call you want to receive (see Section 2.6.1 for
scan information).
4. Press (and hold) the microphone PTT (push-to-talk)
switch to talk and release it to listen. Operation with
LTR-Net, LTR, and conventional calls is as follows:
2. When the message is received, the display changes
to the system and group of the call. Press the PTT
switch to talk and release it to listen. If scanning or
if a priority call is received, a response may not
automatically occur on the group of the call. Refer
to Section 2.6.10 for more information.
LTR-Net and LTR Operation
•
•
If tones are enabled, the proceed tone sounds
shortly after the PTT switch is pressed if the radio
system was successfully accessed (see Section
2.4.9). If tones are disabled, no tone sounds when
the system is successfully accessed.
2.4 GENERAL FEATURES
2.4.1 BANK SELECT
If the radio system is busy, the busy tone sounds
(see Section 2.12) and “BUSY” is indicated in the
display. If the PTT switch continues to be pressed,
the system is accessed as soon as it is free.
A bank is a collection of selectable systems that
have been set up for a specific application. For
example, one bank could be programmed for operation
in Minneapolis and another for operation in
2-9
November 2001
Part No. 001-7240-001
OPERATION
system and group of the last call are displayed. Otherwise, the currently selected system/group is displayed.
Milwaukee. Up to sixteen banks can be programmed,
and each bank is identified by a unique alpha tag.
Banks are selected by the BANK menu
parameter. In the menu mode, select the “BANK SEL”
parameter and then the desired bank as described in
Section 2.5.2. If this menu parameter is not available,
banks are not selectable.
Call
Indicator
C
Each selectable group can be programmed so that
the Call indicator is activated when a call is received.
With conventional operation, the Call indicator is activated if the transceiver unsquelches for 2 seconds or
longer. Therefore, if Call Guard squelch is
programmed, it must also be detected for the call indication to appear (unless it is disabled by the monitor
mode).
When a different bank is selected, the last
selected system in that bank is displayed, and the
displayed group is the last selected group of that
system. These are the only user selected functions that
are stored on a per bank basis.
Any programmed system can be assigned to a
bank, and the system numbering can be different for
each bank. Only the systems in the currently selected
bank are selected or scanned, and at least one bank is
always programmed. Unique bank parameters include
Home system/group (see Section 2.4.6), default scan
enable status, and default scan list status of each
system.
2.4.3 COMPANDING
The companding feature is standard with this
transceiver and is available if it is enabled by programming. Companding improves audio quality by
decreasing the amount of noise present in the audio
signal. It does this by providing a 2:1 compression of
the audio signal on the transmit end and a 1:2 expansion on the receive end. Companding is especially
recommended for 12.5 kHz bandwidth channels
because audio quality improvement is usually
significant.
The default scan status of the bank is valid only
until the first time it is changed by the scan enable
(FCN SCAN) key. Cycling power or re-selecting the
bank does not restore the programmed status.
Likewise, the default scan list parameter permits
the default scan list status of each system to be set on a
per bank basis. If the SCN SAVE menu parameter is
then disabled and the default set to “Off”, the scan list
status of that system in that bank returns to the default
status whenever power is cycled. Otherwise, the
default status is valid only until the first time the scan
list status is changed by the S.A/D function.
If this feature is used, it must be utilized in both
the transmitting and receiving mobile. The best results
are obtained if companding is also used in the
repeater; however, improvement still results if it is
used in only the mobile and handheld transceivers.
With telephone calls, companding must be utilized at
the repeater if it is used in the mobile.
2.4.2 CALL INDICATOR
Each locality (site) channel can be individually
programmed for companding. Whenever a call is
received or transmitted on one of those channels,
companding is automatically enabled. Companding is
not selectable by the user, and the companding status
is not indicated in the display.
The call indicator is “C” in the upper part of the
display (see following illustration). This indicator
shows when a call was received while you were away
from the radio. Individual groups can be programmed
for this feature and it then turns on when a call is
received on one of those groups.
2.4.4 EMERGENCY SWITCH
This indicator is turned off by pressing any button
or cycling power. If scanning and the “Last Received”
configuration is programmed (see Section 2.6.10), the
The emergency switch function is not available
with this transceiver.
2-10
November 2001
Part No. 001-7240-001
OPERATION
•
2.4.5 ENCRYPTION
To enable it on conventional calls, check the
“Conventional Enabled” box in the same screen.
Encryption is currently not available.
The proceed tone normally sounds almost immediately when the PTT switch is pressed. However, with
some calls, such as wide area, the user should wait a
short time after pressing the PTT switch before
speaking. The proceed tone delay of 0-2.5 seconds can
be programmed in the Timing Parameters screen. This
delay can then be enabled on each group by checking
the “Delayed Proceed Tone” box. If this box is not
checked, no delay occurs.
2.4.6 HOME SYSTEM/GROUP SELECT
The Home Select feature provides a home
system/group quick select by pressing FCN HOME.
The home system/group programmed for the current
bank is then displayed and it becomes the selected
system/group. If no home system/group has been
programmed, this function is not available. If the home
system/group is selected while scanning, scanning
stops for the programmed scan delay period.
On LTR-Net and LTR systems, if the radio
system is busy when making a call, the busy tone
sounds instead of the proceed tone and “BUSY” is
indicated in the display. If an access attempt is unsuccessful, such as because of an out-of-range condition,
the intercept tone sounds and “NO ACESS” is indicated in the display. Refer to Section 2.12 for more
information on these conditions.
2.4.7 OPTION SELECT
Option select is currently not available.
2.4.8 POWER SELECT
If the proceed tone is enabled on conventional
systems and the Transmit Disable On Busy feature is
used to automatically perform monitoring, the proceed
tone does not sound if the channel is busy (see Section
2.11.3). Otherwise, it sounds even if the channel is
busy.
Either high (4 watts) and low (1 watt) transmit
power output is programmable on each locality (power
output is not user selectable). When low power output
is selected, “L” is indicated in the display. The low
power mode usually increases battery life and
decreases range, and the high power mode usually
causes the opposite to occur. The low power mode is
automatically selected during a low battery condition
(see Section 2.3.8).
2.4.10 RECEIVE-ONLY GROUPS
Receive (monitor) only groups can be
programmed in all operating modes so that transmitting is automatically disabled. To program receiveonly LTR-Net or LTR groups, program an encode ID
of “Disabled”. To program receive-only conventional
groups, on the group screen select Tx Option =
Disabled. If the PTT switch is pressed with one of
these groups selected, the intercept tone sounds and
“TX DISBL” is displayed.
2.4.9 PROCEED (CLEAR-TO-TALK) TONE
This is a tone that sounds shortly after the PTT
switch is pressed to indicate that the radio system has
been accessed and speaking can begin. This tone can
be programmed to be a single or distinctive
(3-beep) tone.
2.4.11 TIME-OUT TIMER
This tone always sounds with LTR-Net and LTR
standard group calls if tones are enabled (see Section
2.4.12). It can also be programmed to sound with
LTR-Net/LTR telephone and auxiliary calls (first
access only) and conventional calls as follows:
•
The time-out timer disables the transmitter if it is
keyed continuously for longer than the programmed
time. It can be programmed for 0.5 - 5.0 minutes or
disabled entirely. If the transmitter is keyed continuously for longer than the programmed time, the transmitter is disabled, “TIMEOUT” is indicated in the
display and the intercept tone sounds. The timer and
tone are reset by releasing the PTT switch.
To enable it on LTR-Net and LTR telephone and
auxiliary calls, check the “Conversation Enabled”
box in the Edit > Mobile Radio Parameters > Basic
Parameters screen.
2-11
November 2001
Part No. 001-7240-001
OPERATION
Table 2-1 Menu Mode and Option Switch Functions
Function
Backlight mode select
Bank select
Display mode
Monitor mode
Roaming on-off [3]
Scan type select
Scan continue on-off
Scan list save mode
Tone type select
Any Keypad Function
Menu Item
Option Switch
BACKLGHT
BANK SEL
S/G DISPL
X
ROAMING
SCN TYPE
SCN CONT
SCN SAVE
TONES
See Description in Section:
2.3.2
2.4.1
2.3.4
2.11.2
2.9.4
2.6.1
2.6.9
2.6.7
2.4.12
[2]
NOTES:
1. Functions left blank are not available.
[2] The option switches can also be programmed for any of the functions that are selectable by the keypad keys except 0-9.
For example, scanning can be turned on and off by the FCN SCAN keys and by an option switch programmed for the Scan
function (FCN does not need to be pressed when using the option switch). Programmable functions include: FCN, Scan, SYS,
RCL, GRP, CLR, Home, Phone, Dial, Page Menu, Squelch Adj., S.A/D, G.A/D, Send, Store,
, #,
,
, and Monitor.
[3] Available with LTR-Net operation only.
One use of the time-out timer feature is to prevent
a repeater from being kept busy for an extended period
by an accidentally keyed transmitter. It can also
prevent possible damage to the transmitter caused by
transmitting for an excessively long period.
Section 2.2.2) are programmable. The functions which
can be controlled by these switches are basically the
functions that are selectable by the front panel keys
plus monitor mode select (see “Option Switch”
column in Table 2-1). This provides a way to “quick
select” these functions. Functions may be controlled
by both the option switch and the keypad key, and
some or all option switches can be disabled if desired.
2.4.12 TONE SELECT
If the TONES menu parameter is selectable, the
tones that sound can be selected. Otherwise, the tones
that sound are fixed by programming. The following
choices are available. Refer to Section 2.5.2 for more
information on using the menu mode.
2.5.2 MENU MODE
Introduction
Silent - All tones are disabled.
Keys - Only the key press tones are enabled.
Alerts - All tones except the preceding key press tones
are enabled.
All - Both the key press and alert tones are enabled.
The menu mode is selected by pressing FCN
MENU. Functions which can be controlled by the
menu mode are indicated in Table 2-1 by an entry in
the “Menu Items” column. More information on each
function can be found in the section indicated in this
table. Other menu mode information is as follows:
2.5 OPTION SWITCHES AND MENU MODE
•
Programming determines which parameters are
displayed in the menu mode. Some functions can be
controlled by both an option switch and the menu
mode if desired.
•
Some functions can be set in a fixed condition by
not enabling the menu parameter or an option switch
2.5.1 OPTION SWITCHES
The push-button switch on the top panel (see
Section 2.2.1) and the two switches on the side panel
immediately above and below the PTT switch (see
2-12
November 2001
Part No. 001-7240-001
OPERATION
exited 2 seconds after a change is made or 8 seconds
after no changes are made.
and then programming a default condition in the
menu mode programming screen. However, if a
parameter can be changed by an option switch or
menu parameter, the default condition is maintained
only until the first time it is changed (cycling power
does not reselect the default condition).
•
2.6 SYSTEM AND GROUP SCANNING
2.6.1 GENERAL
Calls cannot be received or transmitted while the
menu mode is selected.
Introduction
The scan feature monitors, in sequence, the
systems and/or groups in the scan list. When a
message is detected that the transceiver is programmed
to receive, scanning stops and the message is received.
Shortly after the message is complete, scanning
resumes (unless it has been disabled). System and
group scanning or group scanning only may be
selected, and they operate as follows. Refer to Section
2.3.12 for more information on systems and groups.
Enter/Exit
Menu Mode
Press FCN MENU
PARAMETER
OPTIONS
MENU
PARAMETERS
Select by
pressing
Press
Bank 1
STR
BANK
SEL
Bank 2
System Scanning - Detects calls on all systems in
the system scan list (see Section 2.6.8). If system
scanning is not used, calls are detected on only the
currently selected system.
Bank x
Other Menu
Parameters
Menu Mode Flowchart
Group Scanning - Detects calls on all groups in the
group scan list. These groups are from the selected
system and also from scanned systems if system
scanning. If group scanning is not used, calls are
detected on only the selected group and higher
priority LTR-Net and LTR groups (see Section
2.8.2).
Using Menu Mode
Proceed as follows to select functions using the
menu mode. A flowchart of the menu mode is shown
above.
2.6.2 SCAN ON-OFF
1. Select the menu mode by pressing FCN MENU. The
first menu parameter is then displayed.
System and/or group scanning are turned on and
off by pressing FCN SCAN. When either type of scanning is enabled,
is indicated in the display as
shown in the following illustration. Then when system
scanning is actually occurring with the numeric
2. To scroll through the available menu parameters,
press the
(scroll down) and
(scroll up) keys.
3. To display the option that is currently selected for
the parameter, press the STR key.
System Scan List
4. To change the selected option, press the
keys.
Group Scan List
and
S
G
5. To exit back to the parameter and save the selected
option, press STR again.
System Scanning
Group Scanning
Occurring
Occurring
System or Group
Scanning Selected
6. When the desired condition of each menu parameter
is selected, exit the menu mode by pressing FCN
MENU again. The menu mode is also automatically
2-13
November 2001
Part No. 001-7240-001
OPERATION
detected, registration on that site occurs and only LTRNet systems are again scanned. This operation can
provide uninterrupted operation when traveling
through areas which have not yet been converted to
LTR-Net operation.
display mode selected, the system number is replaced
by dashes and likewise for the group number when
group scanning is occurring.
When the alpha tag display mode is selected,
group scanning is indicated by “GRP SCAN” in the
display, and system scanning is indicated by “SYS
SCAN”. The monitor mode must be disabled for
scanning to occur (see Section 2.11.2).
Other scan operation in this mode is as follows:
•
If Roaming = Off and System Scan = On with an
LTR-Net system selected, LTR-Net systems that are
in the scan list and programmed for the current
locality are scanned and LTR and conventional
systems are never scanned.
•
If Roaming = On and System Scan = Off with an
LTR-Net system selected, registration on other
LTR-Net sites can occur, but no other systems are
scanned. If an LTR or conventional system is
selected, roaming is disabled.
•
If Roaming and System Scan = On with an LTR or
conventional system selected, only LTR-Net or LTR
and conventional system types are scanned as
described previously.
•
If Roaming = Off and System Scan = On with an
LTR or conventional system selected, only the LTR
and conventional systems in the scan list are
scanned.
2.6.3 SCAN TYPES
The type of scanning selected is determined by
the menu mode SCN TYPE parameter (see Section
2.5.2). If this parameter is not selectable, the scan type
is fixed by programming. The available scan types are
as follows.
SYSTEMS - Both system and group scanning
GROUPS - Group scanning only
OFF - Both types disabled (scanning not selectable)
If the SCN TYPE menu parameter is disabled, the
programmed default scan type is always selected. The
selected system and group can be changed while scanning using the SYS and GRP keys in the normal
manner. Scanning resumes shortly after the change is
made.
When a call is received in the scan mode, the
display changes to the system and group of the call.
Programming determines if this change is temporary
or permanent, and if a response occurs on the system/
group of the call or the selected system/group. Refer to
Section 2.6.10 for more information.
2.6.5 LTR MODE SCANNING
When scanning with an LTR system selected and
roaming disabled, only LTR and conventional systems
in the scan list are scanned. LTR-Net systems are not
scanned. If roaming is enabled, only LTR-Net systems
are scanned if an LTR-Net locality is detected as
described in the preceding section.
2.6.4 LTR-NET MODE SCANNING
If an LTR-Net system is selected and both
roaming and system scan are enabled, registration on
other localities can occur and the only systems
scanned are LTR-Net systems that are in the scan list
and programmed for the current locality.
When LTR systems are scanned, the home
repeater of each LTR system in the scan list is
scanned. Scanning is sequential through all systems in
the scan list. If several systems are programmed with
the same LTR locality and home channel, channel
selection occurs only once. Therefore, there is no
delay to change channels which results in very efficient scanning. Each home repeater is scanned for only
as long as necessary to detect all calls. Priority calls
are also detected on LTR systems while scanning (see
Section 2.8.2).
However, if no LTR-Net locality could be located
during locality search, LTR and conventional systems
that are in the scan list are also scanned. If a signal is
detected on one of those systems, the transceiver
moves to it. However, searching continues for a
programmed LTR-Net locality, and when one is
2-14
November 2001
Part No. 001-7240-001
OPERATION
2.6.6 CONVENTIONAL MODE SCANNING
Deleting a system only temporarily deletes the
groups associated with that system because when a
system is added back into the scan list, the original
group scan list is again active. Scan lists can be
programmed even when scanning is disabled and
while listening to a message. If a system or group is
deleted while listening to a message, scanning resumes
after the receive delay time expires (if applicable).
As with LTR mode scanning, if a conventional
system is selected with roaming disabled, only
conventional and LTR systems in the scan list are
scanned. LTR-Net systems are not scanned. If roaming
is enabled, only LTR-Net systems are scanned if an
LTR-Net locality is detected (see Section 2.6.4).
2.6.8 SAVING SCAN LIST
Each conventional system selects a radio channel,
each system is scanned in order. Call Guard squelch is
detected if the monitor mode is disabled (see Section
2.11.2). If the monitor mode is enabled, all calls occurring on the channel are received.
If the menu mode SCN SAVE parameter is
enabled (see Section 2.5.2), the user can select if scan
list changes are saved or not saved. If “On” is selected,
changes are saved as they are made and the scan list
does not change when power is turned off. Conversely,
if “Off” is selected, they are not saved and the default
scan list status of all systems and groups is reselected
when power is turned on. If the menu SCN SAVE
parameter is not selectable, the scan list save mode is
fixed in the default mode selected by programming.
A feature called Adaptive Tone Scan (ATS) is
used when scanning conventional channels. If no
carrier is detected, the channel is scanned for only 40
ms. If a carrier is detected, searching for Call Guard
signaling occurs (if programmed). If the tone type of
Call Guard squelch is programmed, the channel is
monitored for 180-420 ms. The shorter time is when
the tone is outside certain limits, and the longer time is
if it is at or near the programmed value. If digital type
is programmed, approximately 350 ms is required to
determine an invalid code (less time is usually
required to detect valid codes).
2.6.9 SCAN DELAY AND CONTINUE TIMERS
Receive Delay
When a message is received while scanning, there
is a programmable delay of 0-7 seconds before scanning resumes. This delay is called the Receive Delay
Time, and it prevents scanning from resuming or a
message on some other system or group from being
received before a response can be made. This delay is
also in effect if a control is changed while scanning
such as selecting another system/group. This timer is
reset each time another call is received.
2.6.7 SCAN LIST PROGRAMMING
General
NOTE: The selected (displayed) system and group are
always scanned, even if they have been deleted from
the scan list.
NOTE: Scanning does not resume if it is disabled,
such as by selecting the monitor mode.
NOTE: Deleting LTR-Net systems from the scan list
also deletes them from locality searching when
roaming, even if scanning is disabled (see Section
2.9.4).
Call Delay Time
The receive delay time controls the scan delay
until the transmitter is keyed and then the Call Delay
Time controls the delay. This time is programmable
for 0-7 seconds, and it ensures that a response to your
message is heard instead of some other message occurring on another system/group. The Call Delay Timer
remains active for the remainder of the conversation,
and controls when normal scanning resumes, even if
additional responses are received.
The scan list status of the displayed system is
changed by pressing FCN S.A/D, and the scan list
status of the displayed group is changed by pressing
FCN G.A/D. The displayed system is in the scan list
and scanned normally when
is displayed, and the
displayed group is scanned when
is displayed (see
illustration in Section 2.6.2).
2-15
November 2001
Part No. 001-7240-001
OPERATION
respond to a call without having to manually change
the system/group. To return to the previously selected
system/group, it must be manually selected using the
SYS and GRP keys or FCN HOME if it was the home
system/group.
Scan Continue Timer
The scan continue timer controls the maximum
time that a call is received before scanning resumes.
This prevents scanning from being delayed for long
periods by lengthy calls. This time can be programmed
for 0-60 seconds in 1-second steps. If “0” is
programmed, there is no time limit and the entire
message is always received. If the SCN CONT menu
parameter is available (see Section 2.5.2), this feature
can be turned on and off by the user.
Temporary Last Received - The system/group
changes to the system/group of a call for only the
duration of the receive delay period described in
Section 2.6.9. Then when the delay expires and scanning resumes (if it is not disabled), transmissions
occur on the selected system/group. Therefore, you
can respond to a call without changing the selected
system/group as long as you do so before scanning
resumes.
2.6.10 TRANSMITTING IN THE SCAN MODE
When messages are received while scanning, the
programming of the “Scan Revert Mode” parameter
determines if the selected system/group does not
change or changes permanently or temporarily to the
new system/group. This in turn affects the system/
group on which responses occur. The display always
indicates the system/group on which a call is being
received, but this may not be the system/group on
which a response occurs (see mode descriptions which
follow).
2.7 DIAL MODE
2.7.1 INTRODUCTION
When placing calls that require dialing a number
(telephone and auxiliary), using the dial mode
provides the following features which make placing
these calls more convenient:
When an LTR-Net/LTR priority call is received
(see Section 2.8.2), the scan revert mode programming
also determines if the selected group changes and if a
response occurs on the displayed or selected group,
even if scanning is disabled. The three programmable
scan revert mode configurations operate as follows:
Last Selected - Transmissions always occur on the
system/group that was selected manually by the SYS
and GRP keys or automatically by roaming. Therefore,
if a message is received when scanning that is not on
the selected system/group, a response occurs on the
selected system/group, not the system/group of the
call. To respond to this type of call, select the system/
group of the call as follows:
•
Select it manually using the SYS and GRP keys.
•
Before scanning resumes, exit the scan mode by
pressing FCN SCAN. The system/group of the call
then becomes the selected system/group and it is not
necessary to change it manually.
•
The eight-character alphanumeric display is cleared
so that the dialed number can be displayed.
•
Numbers can be entered at any convenient rate,
dialing errors corrected, and then the number automatically transmitted when desired.
•
Up to ten 16-digit numbers can be stored in memory
and later recalled.
•
System and group scan are disabled. Therefore, calls
are received on only the selected system/group and
also on any higher priority groups if applicable.
•
The SYS and GRP keys become RCL (Recall) and
CLR (Clear) keys. Therefore, the selected system
and group cannot be changed with the dial mode
selected.
Telephone and Auxiliary calls can also be placed
without selecting the dial mode. However, the dialed
number does not appear in the display and therefore
cannot be stored or recalled. A number is manually
transmitted as follows:
Last Received - The selected system/group changes to
the system/group of a call. Therefore, you can always
2-16
November 2001
Part No. 001-7240-001
OPERATION
2.7.4 SENDING THE NUMBER
1. Access the radio system by briefly pressing the PTT
switch.
Access the radio system by briefly pressing the
PTT switch. Then when a dial tone is heard, send the
number in the display by pressing FCN SND. The
keypad remains active while in a conversation to allow
additional numbers to be dialed. Simply press the PTT
switch and dial the number. The number in the display
does not change when a number is dialed in this
manner.
2. When a dial tone is heard, dial the desired number
while pressing the PTT switch. If too much time
elapses between digits, the call terminates. Release
the PTT switch and wait for a response.
NOTE: When receiving telephone and other types of
calls, selection of the dial mode is optional because it
does not enhance operation.
The main difference in operation between LTRNet/LTR and conventional systems is when the
telephone number is sent (see following).
2.7.2 SELECTING DIAL MODE
Selecting Dial Mode and Telephone Group - To select
the dial mode and a telephone group in the current
system, press FCN PHONE. If there is more than one
group programmed for telephone calls in the current
system, the first higher numbered telephone group is
selected. If there is no telephone group or a conventional system is selected, “NO PHONE” is displayed
and an error tone sounds.
When an LTR-Net or LTR system is selected, the
PTT switch is briefly pressed to initiate a system
access. Then if the access is successful, the dial tone
sounds and the number can be sent.
When a conventional system is selected, the telephone number can be sent at any time if a carrier is not
being detected on the channel. If a carrier is detected,
the number is sent only if the monitor mode is active.
This ensures that the channel is monitored.
Selecting Dial Mode Only - To select the dial mode
without changing the currently selected group, press
FCN DIAL. This method should probably be used
when placing auxiliary calls because the auxiliary call
group must be selected, not a telephone group.
2.7.5 STORING NUMBERS IN MEMORY
The dial mode is indicated when the handset
portion
of the telephone icon is displayed, and a
telephone group is indicated when the base portion
is displayed. Selecting the dial mode using FCN
PHONE displays both icons. When an auxiliary call
group is selected, “UID” is displayed.
Up to ten 16-digit numbers can be stored in
memory and later recalled. Proceed as follows:
1. Enter the number as described in the preceding
“Dialing a Number” section.
2.7.3 DIALING A NUMBER
and
•
•
•
2. To store the number, press FCN STR and the
memory location from 0-9.
Enter the desired number by pressing the 0-9, # ,
keys. Other dialing functions are as follows:
3. If there is already a number in the selected location,
it is replaced by the new number. To clear a memory
location, simply store a blank display.
Only the last eight digits dialed are displayed. To
momentarily display the upper eight digits, press
FCN
.
4. If an attempt is made to store a number in a locked
position, “NOT AUTH” is displayed.
To erase the last digit, press the CLR key. To erase
the entire number, press FCN CLR.
To enter a pause, press FCN
one character).
NOTE: The
character is stored and sent normally
(no pause occurs unless it is preceded by FCN), and
the # character should not be stored because it may
terminate the call when it is sent.
(each pause equals
2-17
November 2001
Part No. 001-7240-001
OPERATION
2.7.6 RECALLING NUMBERS FROM MEMORY
To receive a standard group call, the group
programmed with the ID code being transmitted must
be selected or scanned. Calls with a higher priority
than the selected group are always received as
described in Section 2.8.2. The procedure used to
place and receive standard group calls is described in
Section 2.3.13.
From Specific Location - FCN RCL 0-9 (location
number)
Stored in Next Location - When a number is recalled as
just described, the number in the next location can be
displayed by simply pressing RCL.
2.8.2 CALLS ON PRIORITY ID CODES
Last Number Recalled from Memory - FCN RCL
LTR-Net transceivers use a different receive
priority scheme than has been used with other E.F.
Johnson transceivers. Instead of programming each
selectable system with one or two fixed priority ID
codes, each group is assigned a priority number which
determines if a call on that group can interrupt a call
on another group in that system. The following
priority information is programmed for each LTR-Net
and LTR group:
Last Number Sent by FCN SND - FCN RCL #
2.7.7 EXITING DIAL MODE
The dial mode is automatically exited when
power is cycled or approximately 60 seconds after no
keys are pressed. It can also be exited as follows:
Exiting Without Sending Call Termination Characters Press FCN DIAL. The call termination characters
should then be sent manually before exiting (see
following).
•
•
Priority number from 1-8.
Interruptible or not interruptible.
Exiting and Automatically Sending Call Termination
Characters - Press FCN PHONE and the call termination characters ( # ) are automatically sent to indicate
to the base equipment that the call is complete. Three
beeps sound when the call is successfully terminated.
The highest priority is programmed by “1” and
the lowest priority by “8”. When any priority 1 group
in the current system is displayed, is indicated in
the upper part of the display, and when any priority 2
group is displayed,
is indicated. Priority 3-8 groups
are not indicated.
If the call is not terminated in this manner, the
repeater being used is held until the end of the call is
detected automatically, such as by the absence of
voice. This occurs because with telephone and auxiliary calls, the repeater is held for the duration of the
call instead of just for the duration of a transmission as
with standard group calls.
If any type of call (standard, telephone, auxiliary) is detected on any group of the selected system
that has a higher priority than the selected group or the
call being received, it is received even if group scanning is not enabled. Exceptions are if the group is not
in the group scan list or the current call is on a group
programmed as not interruptible.
2.8 LTR-NET AND LTR FEATURES
Standard group calls with a lower priority than
the selected group are received only if group scanning
is enabled. Telephone and auxiliary calls of any
priority are always received if they are on a group in
the group scan list and no other call is being received.
If another call is being received, they are received only
if they have a higher priority than the current call.
2.8.1 STANDARD GROUP CALLS
Standard group (dispatch) calls are between
mobiles or groups of mobiles using the standard group
ID codes from 1-239 (LTR-Net) or 1-250 (LTR) that are
assignable to each home repeater. LTR-Net and LTR
standard calls are very similar and are placed and
received using the same procedure. Simply select a
group programmed with the ID code of the mobile
being called and then press the PTT switch. No number
is dialed to place this type of call.
If calls on certain groups are not to be interrupted
by higher priority calls, the group can be programmed
as not interruptible (telephone and auxiliary calls are
never interrupted by other calls). For example, if calls
on a certain group are not to be interrupted, that group
2-18
November 2001
Part No. 001-7240-001
OPERATION
access). The preceding section describes receive
priority which controls what calls are received.
can be programmed as not interruptible. This has the
same affect as programming it with a “1” priority.
However, if this was done instead of programming it
as not interruptible, calls on that group would interrupt
all other lower priority calls which may not be
desirable.
2.8.4 TRANSMIT INHIBIT
The Transmit Inhibit feature prevents the transmitter from keying if the mobile being called is busy
with a call not programmed for any group position.
When the transmitter is disabled by this feature, the
intercept tone sounds and “TX INHIB” is displayed
(see following illustration).
The transceiver displays the system and group of
the priority call while it is being received. The
programming of the “Scan Revert Mode” parameter
(see Section 2.6.10) determines if the change to the
priority group is temporary or permanent and if a
transmission occurs on the priority group.
With LTR-Net operation, incoming call information is received on the repeater to which a mobile is
trunked as well as the home and status repeaters.
Therefore, priority calls are detected when the transceiver is trunked to other repeaters.
This feature is enabled by programming LTR-Net
and LTR systems with a block of transmit inhibit ID
codes that can include all 239 or 250. If a code within
this block is detected up to 5 seconds before the PTT
switch is pressed, the transmitter is disabled as just
described. Even though the 5-second timer counts
down while the PTT switch is pressed, it is not
possible to access the system without first releasing
the PTT switch. A similar Transmit Disable On Busy
feature is available on conventional systems (see
Section 2.11.3).
With LTR operation, incoming call information is
received on only the home repeater. Therefore, priority
calls are not detected while trunked to some other
repeater. To reach most mobiles with a priority
message in this case, the operator can key the transmitter and then not begin speaking for several seconds.
This allows trunked-out mobiles time to finish the
transmission and return to the home repeater.
2.9 LTR-NET FEATURES
This operation still may not reach mobiles
making telephone calls because they hold a repeater
for the duration of a conversation (instead of the duration of the transmission as with dispatch calls). Other
times when priority calls could be missed with both
types of operation are when transmitting and when
some other system not programmed with the priority
ID is being monitored.
NOTE: Other LTR-Net features are described in
Section 2.8.
2.9.1 LTR-NET STANDARD CALLS
Refer to Section 2.8.1 for information on these
calls.
2.9.2 LTR-NET SPECIAL CALLS
2.8.3 BLOCK ID CODES AND ACCESS
PRIORITY
Introduction
This transceiver does not use blocks of ID codes.
However, with up to 99 groups programmable per
system and group scanning, it is usually possible to
program the transceiver to receive all desired calls.
Telephone
Unique ID
Special
Auxiliary
Directed Group
Access priority to control which transceivers can
access the system during busy periods is not available
with this transceiver (all transceivers have equal
The LTR-Net special calls originated by the
mobile include Telephone and Auxiliary as shown
above. Most other special calls such as Interrogate,
2-19
November 2001
Part No. 001-7240-001
OPERATION
The Directed Group call is received as a standard
group call because it is converted to that type by the
switch. Therefore, a group programmed with the ID
specified by the originating mobile must be selected or
scanned or be assigned to a higher priority group.
Mobile Disable, and Reassignment are originated by
the system operator or a dispatcher. Special LTR-Net
calls use the special call group ID codes from 240-254.
A telephone-type keypad and special programming are
required to place special calls. More information on
these calls follows.
Telephone (Telco) - These are interconnect calls to or
from a mobile made through the Public Switched Telephone Network (PSTN).
To receive landside originated telephone calls, the
transceiver must be programmed for telephone calls
even though the unique ID of the mobile may be specified when placing the call (see “Landside-Originated
Calls” which follows).
Auxiliary - These calls allow a mobile to communicate
with specific mobiles or groups at the same locality
(site) or another LTR-Net locality when several LTRNet repeater systems form a network. Calls to specific
mobiles are called Unique ID calls, and calls to specific
groups are called Directed Group calls.
With all special calls, the scan revert programming described in Section 2.6.10 also determines if
transceiver does not change or changes temporarily or
permanently to the group of the call.
Special Call Authorization
Directed Group calls allow communication with
groups that are otherwise not accessible because no
selectable system has been programmed with the home
repeater or group ID of those mobiles. Directed Group
calls can be made to any home repeater on any group
ID code from 1-239.
When a mobile is programmed to make Telephone calls, system authorization is needed before
service is available. This authorization is performed by
the system operator through the System and
Subscriber Manager, and it determines what type of
service is available. For example, a mobile may be
authorized to dial local numbers only. This authorization is keyed to the mobile’s unique ID which is transmitted when any call is made.
Transceiver Programming For Special Calls
Authorization is also required to make auxiliary
calls. Unique ID calls can be made to any mobile in
the same locality (site) or some other locality that is
programmed for Auxiliary calls. The same applies to
Directed Group calls except that the mobile receiving
the call does not need to be programmed for Auxiliary
calls, just the standard group ID being transmitted.
To originate a special call and then respond, the
selected group must be programmed for the special
call being made (Telephone or Auxiliary). The
programming software automatically loads the correct
ID codes for these calls. Refer to the following chart
for more information.
Type of Call
Telephone
Auxiliary
Unique ID
Dir Group
Originating Mobile Receiving Mobile
Encode/Decode ID Decode/Encode ID
Telephone
Telephone
Auxiliary
Auxiliary
Auxiliary
Group ID
Placing a Special Call
The following is the procedure for placing a
special call. These calls require that a number be
dialed using the front panel keypad.
1. Select an LTR-Net system programmed for the
special call being made.
To receive Telephone and Unique ID calls and
then respond, a group must be programmed for the
applicable call (Telephone or Auxiliary). However,
this group usually does not need to be selected or
scanned. Refer to Section 2.8.2 for more information.
2. If placing a telephone call, select the dial mode and
a telephone group by pressing FCN PHONE (see
Section 2.7).
2-20
November 2001
Part No. 001-7240-001
OPERATION
indicate that the number was accepted by the
system. If this beep does not sound, an unauthorized
number may have been dialed or a dialing mistake
may have been made. If a system resource busy
condition exists, the call is placed in a queue by the
system (see Section 2.9.3).
3. If placing a unique ID or directed group call, select
the auxiliary group in the normal manner using the
GRP key. Then select the dial mode by pressing
FCN DIAL. The dial mode and a telephone or auxiliary group are indicated as follows:
•
The handset portion
of the telephone icon is
displayed when the dial mode is selected.
•
The base portion
of the telephone icon is
displayed when a telephone call group is selected.
•
“UID” is indicated in the lower part of the display
when a auxiliary call group is selected (either
unique ID or directed group).
6. The various types of calls then proceed as follows:
Telephone Call - The normal landside ringing or
busy tone is heard. When the party answers, press
the PTT switch to talk and release it to listen as with
standard calls.
Unique ID Call - A “ringing” tone is heard which
indicates that the mobile is being rung. If there is no
answer, ringing stops after several rings or the call
can be terminated by pressing the FCN PHONE or
the * # keys (with PTT pressed). When the party
answers, press the PTT switch to talk and release it
to listen as with a standard call.
4. If a telephone call is being placed, dial the telephone
number of the landside party you are calling. If a
unique ID or directed group call is being made, the
following 1-10 digit numbers are dialed to specify
the destination of the call. Dial this number or recall
it from memory as described in Section 2.7.
Directed Group Call - A second beep sounds
which indicates that the path to the mobile is
complete and speaking can begin (no ringing of the
other mobile occurs). Press the PTT switch to talk
and release it to listen.
Unique ID Call (Current Locality)
1-5 digit unique ID of mobile/dispatcher
Unique ID Call (Directed Locality)
5-digit unique ID of mobile/dispatcher
NOTE: Since this transceiver operates half-duplex,
you cannot hear the other caller while transmitting
or speak to the other caller while receiving.
Directed Group Call (Current Locality)
3-digit home repeater number +
3-digit group ID
7. When the call is finished, terminate it by pressing
the FCN PHONE or FCN DIAL (see Section 2.7.7).
This tells the system that the call is complete and
prevents additional billing for the time required by
the system to automatically detect the end of the
call.
Directed Group Call (Directed Locality)
3-digit locality number +
3-digit home repeater number +
3-digit group ID
Unique ID Call (Using Telephone Number)
10-digit telephone number of mobile being
called
Receiving Special Calls
NOTE: Mobile-to-mobile unique ID calls can also
be placed by dialing the mobile’s telephone number
if it has one.
To receive a special call, all that is usually
required is that the system programmed for the special
call be selected. Refer to Section 2.8.2 for more information. When a Telephone or Unique ID call is
received, “ringing” is heard. If it is a Directed Group
call, only the voice of the calling party is heard
because no ringing occurs.
5. When the desired number is displayed, briefly press
the PTT switch and when the dial tone sounds, send
it by pressing FCN SND. A beep should sound to
2-21
November 2001
Part No. 001-7240-001
OPERATION
message occurs when the PTT switch is released after
dialing the digits.
Landside-Originate Special Calls
Calls can be also be made from any landside telephone to specific mobiles (Unique ID calls) or groups
(Directed Group calls). Calls can also be placed to
other sites similar to when they are mobile dialed.
If resources then become available, ringback is
heard and the PTT switch can then be pressed to
continue the call. If the call cannot be placed in the
allotted time, it is terminated and another voice
message informs the user that this has occurred.
If the system has DID lines, the landside caller
can dial a mobile directly because each mobile that
can receive these calls is given its own phone number.
If the system has standard trunk lines, the telephone
number of the system is dialed. Then when the system
answers, a short tone sounds to indicate that the digits
specifying the destination of the call should be dialed.
The same digits are dialed as described in “Placing a
Special Call”. The landside telephone must produce
standard DTMF tones to dial these digits.
2.9.4 ROAMING (AUTO-REGISTRATION)
General
The roaming (auto-registration) feature permits
all types of LTR-Net calls to be automatically routed
to the LTR-Net locality (site) in which the mobile is
operating. To utilize roaming, the following must be
selected:
After these digits are dialed, a beep is heard
which indicates that the number was accepted by the
system. Ringing then indicates that the mobile is being
rung unless it is a Directed Group call. With those
calls, no ringing of the mobile occurs and another beep
is heard which indicates the path is complete and
speaking should begin.
After the mobile answers, the landside party
should respond in the normal manner. Remember that
the mobile is operating half duplex and cannot hear the
landside party while transmitting. When the call is
finished, it should be terminated by the mobile party.
Three beeps indicate that the call has terminated.
•
An LTR-Net system must be selected if system
scanning is disabled (see Section 2.6.1).
•
Roaming must be enabled by the ROAMING menu
parameter or programming (if the menu parameter is
not available).
•
If system scanning is enabled, an LTR-Net system
does not need to be selected. However, the transceiver immediately roams to an LTR-Net locality in
the system scan list if one can be detected (see
Section 2.6.4)
2.9.3 BUSY QUEUING/FREE SYSTEM
RINGBACK
NOTE: Deleting LTR-Net systems from the scan list
also deletes them from locality searching when
roaming, even when scanning is disabled (see Section
2.6.7).
This transceiver does not have the busy queuing
or free system ringback features. Busy queuing places
a call in a queue if all channels are busy, and free
system ringback alerts the user when the repeater
system is no longer busy.
When roaming is enabled or disabled by the
menu mode, either “ON” or “OFF” is selected as
described in Section 2.5.2. If communication is to be
maintained on the current locality regardless of signal
strength, turn roaming off.
However, busy queuing may be provided at the
system level for LTR-Net telephone, unique ID, and
directed group calls (but not standard group calls). If
this feature is enabled by the System and Subscriber
Manager and resources are not available when one of
these calls are placed, a voice message informs the
user that the call has been placed in a queue. This
Registering on a New Locality
When power is turned on with an LTR-Net
system selected or if another LTR-Net system is
selected, registration is attempted on the currently
selected locality every 5 seconds if there is a free
channel. The registration message includes the
2-22
November 2001
Part No. 001-7240-001
OPERATION
new LTR-Net locality is displayed. The new system is
the next higher system with a different locality that
could be accessed. For example, if System 3 was
selected and System 5 is the next higher system with a
different locality number, that becomes the selected
system if it can be accessed (wrap-around occurs after
the highest system is checked).
mobile’s unique ID and the home repeater to be used.
The registration information is forwarded to the Call
Processor which then knows its location. This automatic registration occurs regardless of whether
roaming is on or off.
If the signal from a locality becomes weak (see
“Dropout and Capture Parameters” which follows) or
if two consecutive unsuccessful access attempts occur,
“NO ACESS” is displayed and the transceiver begins
automatic locality search. The unsuccessful access
counter is reset whenever power is cycled, the selected
system is changed, or a successful access occurs.
The selected group does not change when registration on a new locality occurs. This allows registration on a new locality to be nearly transparent to the
user. Therefore, when programming the transceiver,
the same group programming should be used in all
LTR-Net systems that a mobile roams into. If the same
group is not programmed in the new system, the last
selected group on the new system is selected. A call
can be received on the new locality before registration
occurs if the call is already active on the new locality.
During locality search, the status channels of
other LTR-Net localities in the system scan list are
checked (see Section 2.6.7). During the first pass,
“HSQ SRCH” (High Squelch Search) is displayed, the
locality that was just dropped is not checked, and the
Tight Squelch setting programmed for each locality is
used (see “Dropout and Capture Parameters” which
follows).
Dropout and Capture Parameters
The transceiver squelch is used to control when
searching for a new locality begins and also when registration on a new locality occurs. A reference squelch
level is set during alignment. In addition, three squelch
levels called Dropout, Capture, and Tight Capture
Percentage are programmed for each locality (see Table
3-2). These levels automatically tighten the squelch
setting in certain operating modes. The tightened
amount is the programmed percentage of the difference
between the reference level and the maximum tight
setting (equivalent to rotating a squelch knob fully
clockwise). These squelch levels function as follows:
If no localities are found on the first pass that
have a high enough signal level, the locality that was
just dropped is added back into the search list and all
localities in the scan list are checked using the Capture
setting programmed for each locality. The display
indicates “LCL SRCH”, and searching continues until
a strong enough locality is found. If none are found
before the PTT switch is pressed again, the transmission is attempted on the last registered locality, and
searching resumes when the transmission ends.
De-Registering
Dropout Percentage - This is the percentage that
squelch is tightened when not in a call. This prevents
the transceiver from staying on a weak locality when
another stronger locality may be nearby. The default
level is 33%, and setting higher levels may cause more
missed calls during weak signal periods. If there is no
other locality nearby, this parameter should be 0%.
If an LTR-Net system is selected when power is
turned off, a de-registration message is automatically
sent that tells the system that the mobile is no longer in
service. This increases system efficiency by reducing
the number of system resources used in trying to reach
out-of-service mobiles. Transceiver power is automatically held on until this message is sent. If power to the
transceiver is switched off immediately, such as by
removing the battery, this message cannot be sent.
Tight Capture Percentage - This is the percentage
the squelch is tightened during the first pass when
searching for a new locality (HSQ SRCH displayed).
This parameter should always be greater than or equal
to the Capture Percentage which follows, and it
ensures that registration occurs on a strong locality if
there is one. The default level is 80%.
Revert System/Group Selection After Registration
After registration on a new locality occurs, “LCL
SRCH” is no longer displayed and the system of the
2-23
November 2001
Part No. 001-7240-001
OPERATION
2.9.7 HOME CHANNEL ALIASING
Capture Percentage - This is the percentage that
squelch is tightened on the second and later passes
when searching for a new locality (LCL SRCH
displayed). This parameter should always be greater
than or equal to the Dropout Percentage, and it ensures
that registration occurs on a stronger locality. The
default level is 46%.
Introduction
The home channel aliasing feature increases the
number of standard group calls programmable on a
locality by allowing calls to be programmed on nonexistent home repeaters. Therefore, instead of being
limited to just the 239 ID codes on each active home
repeater, group calls can be programmed on each of
the up to 20 home repeaters allowed per locality (the
twentieth repeater is usually the status repeater which
is typically not assigned as a home repeater). This
permits up to 20 x 239 or 4780 group calls on each
locality.
NOTE: The transceiver uses the value programmed
for the locality being sampled, not the value
programmed for the locality which was just dropped.
2.9.5 OVER-THE-AIR LOCALITY CHANNEL
UPDATES
Localities are initially programmed with the
channel numbers of all repeaters currently in use.
These are then the channels that the transceiver can
access when placing and receiving calls. If new channels are later added to a locality, over-the-air programming is used to update the transceivers with the new
channels. This eliminates the need to bring them in for
reprogramming.
The active repeaters on each locality are designated by locality programming (see Section 3.4.4).
They are programmed with a frequency and have the
Active box checked, while non-existent repeaters do
not have a frequency or this box checked. If repeaters
are later added, they can be added to the locality by
over-the-air programming (see Section 2.9.5).
2.9.6 TRANSCEIVER DISABLE
If a mobile is lost or stolen or is being used to
interfere with communication, it can be temporarily or
permanently disabled by the system operator as
follows:
Operation With Home Channel Aliasing
If a system programmed with a non-existent
home repeater is selected, the next lower active home
repeater is monitored for incoming calls and go-to
repeater information. For example, if home repeater 6
is programmed on the selected system and the active
repeaters are 1, 10, and 20, repeater 1 is monitored. In
addition, all other mobiles on that locality with a
selected system programmed for home repeaters 1-9
monitor that repeater.
A mobile can be temporarily disabled by transmitting the Sleep command to the unique ID of the
affected mobile. When a transceiver receives this
command, SLEEPING is displayed continuously on
the lower line and no calls can be received or transmitted. However, registration on new localities
continues normally.The transceiver can be re-enabled
again by the system operator by sending an Interrogate
message. This is indicated when the display returns to
indicating normal system/group information.
If a group call is then placed, the home channel of
the call is the home channel programmed for the
selected system, not the repeater being monitored. The
call is detected like any other group call (it is received
if a system/group programmed for that home repeater/
group ID is selected or scanned).
A mobile can be permanently disabled by sending
the Kill command to the unique ID of the affected
mobile. The transceiver then responds that it has
received this message and then permanently disables
itself. It is then totally inoperative and CALL SVC is
displayed continuously. It must then be brought back
in for reprogramming to make it operational again.
NOTE: Since this feature does not increase system
capacity, adding too many users may result in unsatisfactory operation due to frequent busy conditions.
2-24
November 2001
Part No. 001-7240-001
OPERATION
make a call, the transceiver enters the telephone
operating mode.
Repeater Number Programming With Aliasing
Since the next lower numbered repeater is monitored when a system with a non-existent home repeater
is selected, a numbering scheme should be used that
equalizes, as much as possible, the gaps between the
active repeaters. This equalizes the loading on the
active channels.
To place an LTR telephone call, a telephone
group must be selected, and to receive an LTR telephone call, the telephone ID must be selected or
scanned or have a higher priority.
Since this transceiver operates half duplex, the
PTT switch must be pressed to talk and released to
listen the same time as with a dispatch call. Therefore,
the mobile user cannot hear the landside caller while
transmitting or speak to the landside caller while
receiving.
When repeater 1 is reached, wrap-around to
repeater 20 occurs. Therefore, the status repeater is
always assigned as Repeater 20 and Repeater 1 as an
active repeater. This prevents the status repeater from
being used as a home repeater which is not desirable
because it then has no backup repeater (see Section
6.6). Examples of repeater numbering schemes are as
follows:
No. of Repeaters
1
2
3
4
5
10
Placing an LTR Telephone Call
Numbering
1. Turn transceiver power on and set the volume as
described starting with Section 2.3.1.
20
1, 20
1, 10, 20
1, 7, 14, 20
1, 5, 10, 15, 20
1, 3, 5, 7, 9, 11, 13, 15, 17, 20
2. Select the desired LTR system if applicable. Then
select the dial mode and a telephone group as
follows:
•
To select the dial mode and a preprogrammed
telephone group, press FCN PHONE.
•
To select the dial mode without changing the
selected group, manually select a telephone group
if required and then press FCN DIAL.
2.10 LTR FEATURES
NOTE: Other LTR features are described in Section
2.8.
2.10.1 STANDARD GROUP CALLS
When the dial mode is selected, the handset
portion
of the telephone icon is displayed,
and then when a telephone group is selected, the
base portion
is displayed.
The two types of calls that can be placed with
LTR operation are standard group and telephone. Standard group calls are described in Section 2.8.1, and
telephone calls are described in the next section.
3. Dial the desired number using the keypad or recall it
from memory by pressing FCN RCL and the location number (0-9). Refer to the dial mode description starting in Section 2.7 for more information.
2.10.2 TELEPHONE CALLS
General
4. When the desired number is displayed, briefly press
the PTT switch and when the dial tone sounds, send
it by pressing FCN SND. Landside ringing (or a
landside busy condition) should then be heard. If the
radio system is busy or could not be accessed, busy
or no access conditions may be indicated the same
as described for standard group calls in Section
2.3.13.
LTR localities which are set up for LTR telephone
calls have a block of ID codes reserved for RIC
(repeater interconnect) calls. For the transceiver to
place and receive telephone calls on those localities,
an LTR telephone group must be programmed with an
ID code from this block. Then when this ID code is
decoded (received) or a telephone group is selected to
2-25
November 2001
Part No. 001-7240-001
OPERATION
seconds must elapse between digits or the call is
terminated.
5. When the other party answers, press the PTT switch
and respond. The PTT switch must be pressed to talk
and released to listen the same as with standard
group calls.
3. Ringing is then heard by the landside caller while
the mobile is being rung.
6. When the call is finished, it should be terminated
and the dial mode exited. A call is usually terminated by transmitting either the # or
#
characters (whichever is programmed). To automatically send these characters and exit the dial mode,
press FCN PHONE. To exit the dial mode without
sending these characters, press FCN DIAL. Termination is indicated by three beeps.
2.10.3 LTR FEATURES NOT AVAILABLE
The following LTR features are not available with
this transceiver:
•
•
•
Busy Queuing/Free System Ringback
System Search
Transpond
Receiving LTR Telephone Calls
2.11 CONVENTIONAL FEATURES
1. Select or scan the system and group programmed for
telephone calls. When a telephone group is selected,
the base portion
of the telephone icon is
displayed.
2.11.1 BUSY INDICATOR
When a carrier is being detected on the current
channel with scanning disabled, “BUSY” is indicated
in the display (see following illustration). The squelch
should be adjusted as described in Section 2.11.4 for
proper operation of this indicator.
2. When “ringing” is heard, press the PTT switch and
respond. The PTT switch must be pressed to talk and
released to listen the same as with standard calls.
3. When the call is finished, it should be terminated as
in step 6 of the preceding section.
Busy
Indicator
BUSY
Landside-Originate Telephone Calls
2.11.2 MONITOR MODE
Calls can be placed from a landside telephone to a
mobile transceiver (if the transceiver and radio system
have this capability). With most systems, a mobile
user can be called directly (each has a unique telephone number). With others, the mobile being called
must be specified as follows:
The monitor mode disables Call Guard Squelch
control (if programmed) so that all activity on the
selected channel (system) can be monitored. The
receiver unsquelches only if a carrier is detected. To
select the monitor mode, one of the option switches
must be programmed for the monitor function (see
Section 2.5.1). Pressing this switch toggles the
monitor mode on and off. When the monitor mode is
enabled,
is indicated in the display as shown in the
following illustration.
1. Dial the number of the radio system in which the
mobile transceiver is operating.
2. When the system answers, a short tone sounds to
indicate that the number of the mobile being called
should be dialed. This number is usually five digits
long and must be dialed using a tone-type telephone.
The first two digits are the home repeater number of
the mobile, and the last three digits are the telephone
ID code of the mobile. With LTR interconnect
equipment, the first digit must be dialed within 5
seconds of hearing the tone, and no more than 5
Monitor Mode
Selected
A conventional system must be selected to enable
monitoring. If the Monitor option switch is pressed
2-26
November 2001
Part No. 001-7240-001
OPERATION
1. Select a conventional system and group that is not
busy.
with an LTR-Net or LTR system selected, scanning
halts and “NOT CONV” is displayed, but monitoring
is not enabled. Refer to Section 2.3.11 for more information on channel monitoring.
2. Press FCN SQL to select the squelch adjust mode.
The monitor mode is automatically selected in this
mode. The currently selected level is indicated by
“SQ xxx” in the display.
2.11.3 TRANSMIT DISABLE ON BUSY
3. Press the
key until receiver noise is heard and
then press
until the noise just mutes. To
decrease or increase the selected level by 10 (or to
the minimum or maximum level if that is not
possible), press FCN
or FCN
, respectively.
The Transmit Disable On Busy feature automatically disables the transmitter if the selected system
(channel) is busy and it has not been monitored when
the PTT switch is pressed. When the transmitter is
disabled by this feature, “DSBL BSY” is indicated in
the display as follows:
NOTE: Slight readjustment may be required if weak
messages are not heard or unsquelching occurs when
no messages are present.
4. To exit this mode, press the FCN SQL again. This
also occurs automatically 2 seconds after no
activity.
While the PTT switch is pressed, the receiver is
unsquelched so that activity on the channel can be
monitored. The PTT switch must be released and then
pressed again to make another call attempt. Occasionally, a busy condition may be detected even though no
one is talking. To key the transmitter in this case,
release the PTT switch and then immediately press it
again.
5. If both narrow and wide band channels are used,
perform this adjustment for each type because separate settings are maintained.
2.11.5 TALK-AROUND
Normally, all transmissions go through a repeater.
However, there may be times when a user is out of
range of the repeater and unable to talk to anyone even
though the mobile being called is nearby. In this situation, the repeater talk-around feature can be used to
transmit on the receive frequency to allow direct
mobile-to-mobile communication.
Some repeaters may have delayed drop-out (hang
time) which causes this feature to disable the transmitter even though no busy condition exists. If this is a
problem, there is also a programmable option to allow
transmitting with a busy channel if the correct Call
Guard signal is detected.
The Transmit Disable On Busy feature is enabled
or disabled on each conventional group by programming. If this feature is disabled or if the monitor mode
is selected (see preceding section) the transmitter keys
even if the channel is busy.
Any conventional group can be programmed for
talk-around. It is then enabled by simply selecting one
of those groups. It is not selectable by an option switch
or indicated in the display unless it is indicated by the
group alpha tag. Talk-around is not available on LTRNet and LTR systems.
2.11.4 SQUELCH ADJUST
2.11.6 CALL GUARD SQUELCH
This function sets the squelch level used for
conventional calls. The squelch level for LTR-Net and
LTR calls is preset and cannot be changed. If conventional systems are programmed, adjust the squelch as
follows:
Introduction
Tone, digital, or inverted digital Call Guard
squelch can be programmed on each transmit and
receive channel in any order desired. There is also an
2-27
November 2001
Part No. 001-7240-001
OPERATION
data scheme used. The number specified when the
code is programmed is actually a seed for a special
algorithm used to generate the 23-bit data word. The
data is transmitted at a rate of 134.4 bits per second.
Therefore, approximately six words are transmitted
each second. When the data is decoded, 23-bit samples
are taken and then the bits are rotated to determine if a
valid code was received.
option to disable the reverse burst or turn-off code on
transmit channels programmed with Call Guard
squelch. The reverse burst or turn-off code are always
detected on receive channels programmed with Call
Guard squelch (if it is sent).
The Call Guard squelch feature eliminates
distracting messages intended for others using the
channel. This is done by using a subaudible tone or
digital code to control the squelch. This tone or code is
unique to a user or a group on that channel. This tone
or code is transmitted with the voice signal but is not
heard because it is in the subaudible range and is attenuated by a filter. Call Guard squelch must be used in
both the transmitting and receiving transceiver to be
functional. When the channel is monitored before
transmitting, Call Guard squelch may be temporarily
disabled by the monitor mode described in Section
2.11.2.
Digital Call Guard squelch can be programmed as
normal or inverted. The only difference is that the
waveform is inverted when “iDCG” is selected. The
inverted type may need to be programmed if the signal
is inverted by the repeater or another transceiver. If
digital Call Guard squelch does not function, try
changing to the other type.
2.11.7 EXTERNAL ENCODERS AND
DECODERS
Tone Call Guard Squelch
External encoders and decoders are currently not
supported by the LTR-Net operating code.
Tone-type Call Guard squelch utilizes subaudible
CTCSS tones from 67-254.1 Hz. Although there are
42 tones assigned, those above 33 are normally not
used because of their close proximity to the voice band
which starts at 300 Hz. In addition, tones 11, 39, 40,
41, and 42 are normally not used because they may
cause interference with adjacent tones (see Table 3-6).
2.12 SUPERVISORY TONES
2.12.1 GENERAL TONES
The following tones are heard at various times
when operating this transceiver. Some or all of these
tones can be disabled by the user if the menu
“TONES” parameter is available (see Section 2.4.12).
If the menu parameter is not available, the tones mode
cannot be selected by the user and is fixed by
programming.
A reverse burst (turn-off code) can be transmitted
when the push-to-talk switch is released to eliminate
the squelch tail (noise burst) in the receiving transceiver. However, both the transmitting and receiving
transceiver must be equipped with this feature for it to
be utilized. The reverse burst is a 180-degree phase
reversal for a period of time determined by the tone
frequency.
Busy Tone - This tone is similar to the standard telephone busy tone, and it indicates that the LTR-Net or
LTR radio system is currently busy. It is produced by
turning combined 480 and 620 Hz tones on and off at a
4 Hz rate. This tone sounds with all types of LTR-Net/
LTR calls (even if the proceed tone is enabled), and
“BUSY” is indicated in the lower part of the display
when it sounds. It does not sound on conventional
systems.
Digital Call Guard Squelch
Digital Call Guard squelch (CDCSS) uses digital
data instead of subaudible tones to control the squelch.
This data consists of continuous repetitions of 23-bit
words. No bit or word synchronization information is
used. When the push-to-talk switch is released, a turnoff code is transmitted which eliminates the squelch
tail similar to the reverse burst.
Continued access attempts are made while this
tone sounds. Therefore, it is possible to access the
system by holding the PTT switch down with this tone
sounding.
Although there are thousands of possible code
combinations with 23 bits, only 83 are unique with the
2-28
November 2001
Part No. 001-7240-001
OPERATION
Intercept Tone - This is a siren-like tone (alternating
high and low tones) consisting of 700 Hz and 800 Hz
tones alternating at approximately a 2 Hz rate. This
tone indicates the following no access and error
conditions:
2.12.2 LTR-NET SPECIAL CALL TONES
•
No Access - If this tone sounds 2-3 seconds after
pressing the PTT switch and “NO ACESS” is
displayed, the data handshake with the repeater
could not be completed. The usual cause is an outof-range condition. Six attempts are made before
this tone sounds. No more access attempts are then
made until the PTT switch is released and pressed
again.
Confirmation Tone - A short tone which sounds
when the number just dialed is accepted by the system.
Time-Out Timer - If this tone sounds after the transmitter has been keyed for an extended period and
“TIMEOUT” is displayed, the transmitter has been
disabled by the Time-Out Timer feature (see Section
2.4.11). This tone sounds in all operating modes.
End Call Tone - Three beeps which sound when the
end of the call has been detected by the system.
•
•
•
NOTE: The following tones are produced by the LTRNet switch and are heard only when placing special
calls.
Call Proceed Tone - With LTR-Net Directed Group
calls, ringing does not occur after the number is dialed.
Instead, this short tone sounds after the confirmation
tone to indicate that the audio path is complete and
speaking can begin.
Proceed Dialing Tone - When placing a landsideoriginate call to a mobile, the caller may dial the
number of the system and then when the system
answers, a number specifying the mobile being called.
This tone sounds to indicate when the number of the
mobile should be entered (see Section 2.9.2).
Transmit Inhibit - If this tone sounds as soon as the
PTT switch is pressed with an LTR system selected
and “TX INHIB” is displayed, the transmitter has
been disabled by the Transmit Inhibit feature (see
Section 2.8.4).
2.12.3 LTR TELEPHONE CALL TONES
Receive-Only Group - If “TX DSBL” is displayed
when this tone sounds, a receive-only group is
selected (see Section 2.4.10).
The following tones are generated by the LTR
interconnect equipment and are heard when making
LTR telephone calls.
Reorder Tone - Three beeps which indicate that the
call has been terminated by the system.
Proceed (Clear-To-Talk) Tone - This is a short (700
Hz, 50 ms) or a distinctive (three beep) tone which
sounds after the handshake is complete to indicate
when talking can begin (see Section 2.4.9).
Return Time Warning Tone - Two beeps which warn
that you have not transmitted for an extended period.
If you do not transmit within 5 seconds, the call is
automatically terminated by the system. The time
between transmissions is one of the parameters used
by the system to detect the end of a call when the #
character is not sent.
Key Press Tone - This is a short (700 Hz, 50 ms) tone
that sounds to indicate when an option switch is
pressed (in all modes).
Wrap-Around Tone - A 700 Hz, 80 ms tone followed
by an 800 Hz, 80 ms tone which indicates that the
highest or lowest programmed system or group was
displayed and that wrap-around has occurred (see
Section 2.3.5).
Conversation Time-Out Tone - Calls are limited to a
certain length by the system. Thirty seconds before
this time is reached, a “tick” begins sounding each
second. When the 30-second time expires, the call is
automatically terminated by the system.
Error Tone - A 1050 Hz, 80 ms tone followed by a
700 Hz, 80 ms tone which indicates that an error
condition occurred.
Turn-Around Tone - This is a single beep which may
be used to indicate to the landside party when to
2-29
November 2001
Part No. 001-7240-001
OPERATION
respond to your transmission. It sounds when you
release the PTT switch, and you may partially hear this
tone.
LCL SRCH - Indicates the transceiver is currently on
the second or later pass while searching for a new
locality on which to register (see Section 2.9.4).
Proceed Tone - This tone consists of two beeps and it
tells the landside caller when to enter the five-digit
number specifying the mobile being called. Dialing of
this number must be started within 5 seconds of hearing this tone, and a tone-type telephone must be used.
NO ACESS - Indicates that the repeater system could
not be accessed, perhaps because of an out-of-range
condition. Once this indication appears, no more
access attempts are made until the PTT switch is
released and then pressed again (see Section 2.12.1).
NO PHONE - Indicates that there is no telephone
group programmed in the current system when the dial
mode and telephone group are selected by FCN
PHONE (Section 2.7.2).
2.12.4 DISPLAY MESSAGES
The following messages appear in the display to
indicate various operating modes and error conditions. Selected system/group information appears in
this display during normal operation (see Section
2.3.4).
NOT AUTH - Indicates that an attempt was made to
store a telephone number in a locked memory location
(see Section 2.7.5).
NOT CONV - Indicates that an attempt was made to
enable a conventional mode feature on an LTR-Net or
LTR system.
72xx6xx - On power up, the last seven digits of the
transceiver part number (see Section 1.3) are displayed
on the top line very briefly. For example, a UHF
430-470 MHz, LTR-Net transceiver is indicated as
“7243633”. The eighth display digit is reserved for
future use and is always blank.
OUT-LOCK - Indicates that the synthesizer is
unlocked. The transceiver is nonfunctional until lock
is re-established.
* CODE xx - Indicates that an error condition has
occurred. It is displayed very briefly at power up (see
Section 2.14).
PROG ERR - Indicates an EEPROM read error.
Check transceiver programming or the EEPROM if
this condition persists (see Section 3.7).
BUSY - Indicates that the LTR-Net/LTR radio system
is currently busy (see “Busy Tone” in Section 2.12.1).
PRG MODE - Indicates that the transceiver is being
programmed (see Section 3.7).
CALL SVC - Indicates that the transceiver has been
totally disabled by an over-the-air message from the
system operator. To return the transceiver to service, it
must be reprogrammed (see Section 2.9.6).
SLEEPING - Indicates that the transmitter has been
temporarily disabled by an over-the-air message from
the system operator (see Section 2.9.6).
SQUELCH - Indicates that the conventional squelch
adjust mode is selected (see Section 2.11.4).
DSBL BSY - Indicates that the transmitter is disabled
by the conventional Transmit Disable On Busy feature
(see Section 2.11.3). It also indicates that the transmitter was keyed while receiving an LTR call.
SYS SRCH - Indicates that searching is occurring for
programmed system information.
FCN - Indicates that the function select mode is
selected by the FCN switch (see Section 2.2.4).
TIMEOUT - Indicates that the transmitter has been
disabled by the Time-Out Timer (see Section 2.4.11).
HSQ SRCH - Indicates the transceiver is currently on
the first pass while searching for a new locality on
which to register (see Section 2.9.4).
TYPE ERR - Indicates that the programming data is
incompatible with the transceiver (see Section 3.7).
2-30
November 2001
Part No. 001-7240-001
OPERATION
2.13 TEST FUNCTIONS
TX DSBL - Indicates that the selected group system is
programmed for monitoring only (see Section 2.4.10).
With the standard LTR-Net operating code, there
is no test mode that can be selected to perform testing.
To manually control the transceiver with this code,
program temporary conventional channels. When the
test operating code is loaded, several test functions are
available. Refer to Section 5 for more information.
TX INHIB - Indicates that the transmitter has been
disabled by the Transmit Inhibit feature (see Section
2.8.4).
2.12.5 MENU MODE MESSAGES
To display the software version number, turn
power on with PTT switch pressed. The version
number is displayed as “VER x.xx” (see Section
2.3.10). If any error codes are present (see next
section), the most recent error code is displayed
instead of the software version.
The following messages are displayed in the
menu mode that is described in Section 2.5.2. Enabled
or yes is indicated by “ON”, and disabled or no by
“OFF”.
2.14 ERROR CODES
BACKLGHT - Backlight on-off
• ON or OFF
2.14.1 GENERAL
BANK SEL - Bank select
• Alpha tag of programmed banks
SCN SAVE - Scan list save
• ON = save, OFF = not saved
If error conditions occur during operation that
interrupt normal program execution, reset occurs
which usually restores normal operation, and information on the error condition is stored. Up to 11 error
conditions can be stored. If more than 11 occur, the
first 10 continue to be stored and only the 11th code is
overwritten so it is always the most recent code. An
error condition can be caused by such things as a
defective memory chip or other hardware problems or
software problems.
SCN TYPE - Selects type of scanning
• SYSTEM - Both system and group
• GROUPS - Group scanning only
• OFF - Scanning off, switch disabled
When power is turned on after an error condition
has occurred, “ * CODE xx” is briefly displayed (see
following example). The “xx” indicates the latest
unread code.
ROAMING - LTR-Net roaming on-off
• ON or OFF
SCN CONT - Scan continue on-off
• ON or OFF
S/G DISPL - System/group display mode
• ALPHA
• NUMERIC
TONES - Tone type select
• SILENT - No tones sound
• KEYS - Only the Select switch and key press
tones sound
• ALERTS - All tones except preceding Key Beep
tones sound
• ALL - The preceding Key Beep and Alert tones
sound
To display the most recent error code, turn power
on with the PTT switch pressed and then release it. To
mark a code as read, press FCN CLR. A beep then
sounds and the next code is displayed if applicable.
Once all stored codes are marked as read, they can no
longer be displayed and “ * CODE xx” is not
displayed at power up. However, they continue to be
2-31
November 2001
Part No. 001-7240-001
OPERATION
Transfer > Read * Codes or click the
toolbar (see Section 3.7).
stored and can be read using the programmer (see next
section). To return to normal operation, cycle power
without the PTT switch pressed or press FCN RCL.*
icon in the
The screen shown in Figure 2-4 is then displayed
which indicates various information about each stored
error code. Contact the Customer Service Department
as described in Section 1.7 for additional information
on the displayed error codes. To permanently erase the
current error codes from the transceiver, click the
“Clear * Codes” button at the bottom of the screen.
2.14.2 READING ERROR CODES
The up to 11 error codes that can be stored can be
read out of the transceiver using the personality
programming software described in Section 3.7.
Connect the programming setup and then select
Figure 2-4 Programmer Error Code Screen
2-32
November 2001
Part No. 001-7240-001
PROGRAMMING
SECTION 3 PROGRAMMING
Remote Programming Interface (RPI)
Programming Cable
P.N. 597-7200-031
CAUTION
Attach the programming cable with
the cable end of the connector up
as shown. Attempting to attach it
the other way may result in
damage to the radio.
Figure 3-1 Programming Setup
3.1 GENERAL
The programming software requires a Windows
32-bit operating system such as Windows 95/98/2000
or NT 4.0 to run. A 16-bit operating system such as
Windows 3.1 cannot be used.
3.1.1 PROGRAMMING SETUP
The following items are required to program the
transceiver. The part numbers of this equipment are
shown in Table 1-1 in Section 1. The programming
set-up is shown above.
•
•
•
•
Since the program is relatively small (approximately 600K), it will run properly with the amount of
RAM recommended for the operating system. The
data files are also relatively small (approximately
25K), so minimal hard disk space is also required.
IBM® PC or compatible personal computer
E.F. Johnson Remote Programming Interface (RPI),
Part No. 023-9800-000.
Cables from the RPI to the computer and radio.
E.F. Johnson programming software for 7200series transceiver.
3.1.3 REMOTE PROGRAMMING INTERFACE
(RPI)
The RPI provides the required interface between
the computer and transceiver. It converts the RS-232
logic levels from the computer to the TTL logic levels
required by the transceiver microprocessor and vice
versa.
3.1.2 MINIMUM COMPUTER REQUIREMENTS
The programming software is designed to run on
an IBM PC or compatible computer that meets the
following minimum requirements:
•
•
•
RPI (Part No. 023-9800-000) is backward
compatible, so it can also be used to program most
other E.F. Johnson transceivers which require an RPI.
This new RPI is required for Flash programming
described in Section 3.12, and it has phone jacks for
Windows 95/98 or NT 4.0 operating system
CD-ROM drive
One unused serial port
3-1
November 2001
Part No. 001-7240-001
PROGRAMMING
ming software and the same setup used for personality
programming. Refer to Sections 3.12 and 5.2 for more
information.
injecting the transmit audio signal and monitoring
receive audio during alignment (see Section 5). Earlier
RPI’s, such as Part No. 023-5810-000 or 023-9750000, can be used to perform the standard personality
programming described in most of this section.
3.1.6 HARDWARE HOOKUP
When programming this transceiver, the switch on
the front panel of the RPI selects either the standard or
Flash programming mode. The standard mode is
selected when it is away from the LED and the indicator is green, and the Flash mode is selected when it is
toward the LED and the indicator is amber. The standard mode should be selected for all but Flash
programming.
The programming setup is shown in Figure 3-1.
The RPI-to-transceiver cable is connected from the
8-pin jack of the RPI to the accessory connector of the
transceiver (make sure it is connected with the cable
end up as shown in Figure 3-1). The RPI-to-computer
cable is connected from the serial port of the computer
to the DB9 connector on the RPI.
The RPI has a switch which selects standard or
Flash modes. Turn on transceiver power and then make
sure that the standard mode indicated by a green LED
is selected (position away from LED).
With remote mount mobile transceivers, this
switch is used to turn transceiver power on and off. A
separate 9-16 VDC, 200 mA power supply (such as
P.N. 563-0001-005) must then be plugged into the RPI
power jack to provide power to the RPI.
If it is the first time the program is run and a port
other than Serial Port 1 (COM1) is used, the serial port
may have to be selected. Refer to Section 3.9 for more
information.
3.1.4 RPI CABLES
The cables from the RPI to the computer and
transceiver are not included with the RPI. The RPI has
a female DB9 connector, and most computer serial
ports have a male DB9 or male DB25 serial connector.
Therefore, a male DB9 to either a female DB9 or
female DB25 cable is usually required. This is a standard cable available at most electronic and computer
supply stores. Suitable cables are also available from
the E.F. Johnson Company as listed in Table 1-1.
3.2 MISCELLANEOUS PROGRAM
INFORMATION
3.2.1 BASIC WINDOWS KNOWLEDGE
With the descriptions which follow in this section,
it is assumed that you have a basic understanding of
how to use your Windows-based operating system. If
you are not familiar with some of the Windows functions described, refer to the Windows Help Screens and
any manuals that may have been included with your
Windows software.
The cable from the RPI to the transceiver has an
8-pin telephone style connector on the RPI end and a
connector compatible with the accessory connector on
the transceiver end. The cable for this application is
also listed in Table 1-1.
3.2.2 SOFTWARE INSTALLATION
3.1.5 EEPROM DATA STORAGE
The programming software is supplied on a CDROM. Install this software as follows:
Most personality information programmed in the
following sections is stored in the EEPROM memory
device (U150). EEPROM devices store data indefinitely without the need for a constant power supply.
The battery can be removed from the transceiver indefinitely without affecting programming.
1. Make sure that there are no other Windows applications open during this installation procedure. This
also includes programs represented by icons in the
system tray (the area where the time is usually
displayed). Also, make sure that the computer meets
the minimum requirements listed in Section 3.1.2.
If the operating program needs to be updated,
reprogramming is performed using special program-
2. Insert the CD-ROM in the CD drive of your
computer.
3-2
November 2001
Part No. 001-7240-001
PROGRAMMING
3. Select
> Run and then click the Browse
button and select the “Setupex.exe” file on the CD.
4. Then click OK and follow the on-screen instructions
to install the program.The default directory for the
program is C:\Program Files\EFJohnson. If you
wish to use some other directory, click Browse and
select it or type the name to create a new one.
•
Program name (LTR-Net Programmer)
•
Window Minimize, Maximize, and Close buttons
3.3.2 MENU BAR
The menu bar (see Figure 3-2) displays the headings for the menus that are used to select program
functions. Quick access to the most frequently used
menu functions are provided by toolbar buttons. Refer
to Sections 3.5 - 3.10 for descriptions of menu
functions.
3.2.3 STARTING PROGRAM
From Start Menu
3.3.3 TOOLBAR
The program is started by clicking the shortcut
icon for the program. This shortcut is automatically
created when the program is installed, and is usually
selected by clicking
> Programs > LTR-Net
Programmer.
The toolbar (see Figure 3-2) provides quick
access to the most frequently used menu functions.
The toolbar can be turned on and off by selecting
View > Toolbar in the menu bar. The function of these
buttons and section in which the function is described
are as follows:
If this icon is not present or you want to create
another, select Start > Settings > Taskbar. Then select
the Start Menu Programs tab and click the Add button.
Click the Browse button and locate the program file
called LTRNetPgmr.exe where you installed it on your
hard drive (see preceding information). Click the
program name and continue following the instructions
that are displayed.
- Create a new programming file (Section 3.5).
- Open a disk file (Section 3.5).
- Save the current file (Section 3.5).
From My Computer or Windows Explorer
- Edit radio parameters (Section 3.6.3).
To start the program from My Computer or
Windows Explorer, locate the file LTRNetPgmr.exe
and then double click it.
- Create a new locality (Section 3.6.8).
- Edit a current locality (Section 3.6.8).
- Delete a locality (Section 3.6.8).
3.3 MAIN WINDOW DESCRIPTION
- Create a new system (Section 3.6.9).
3.3.1 TITLE BAR
- Edit a current system (Section 3.6.9).
The title bar is located at the top of the window
(see Figure 3-2) and indicates the following:
- Copy a system (Section 3.6.9).
- Delete a system (Section 3.6.9).
•
Clicking this control icon
displays the screen on the right
which can be used to perform the
indicated window control
functions.
- Edit a group (Section 3.6.10).
- Create a new bank (Section 3.6.11).
- Edit a current bank (Section 3.6.11).
•
Name of the current data file (Johnson_rad.mbl in
Figure 3-2).
- Delete a bank (Section 3.6.11).
3-3
November 2001
Part No. 001-7240-001
PROGRAMMING
- Read the programming data from radio (Section
3.7).
groups/banks must be programmed (see Section
2.3.12).
- Write programming data to a radio (Section 3.7).
Saved Info/LTR-Net Locality - Functions like the
Flash memory display just described to indicate the
amount of space remaining in EEPROM U150 for
saved information and LTR-Net localities.
- Read error code information stored in radio
(Section 2.14)
3.4 PROGRAMMING PROCEDURE
- Read version information from the transceiver
(Section 3.7).
3.4.1 INTRODUCTION
3.3.4 MAIN WINDOW PANES
The following is a general procedure that can be
used to program a 72xx-series portable transceiver.
Detailed information on the screens mentioned in the
procedure is located in Sections 3.5 - 3.10.
The left pane (Personality View) shown in Figure
3-2 displays the current programming information in a
Locality, Bank, or System hierarchy that is selectable
by clicking the applicable “View Type” button at the
top of the pane. To turn this pane on and off, select
View > Personality. Clicking a “+/– box or double
clicking a bold item expands/contracts that branch.
This pane always defaults to the on mode when the
program is started.
3.4.2 GETTING STARTED
1. Start the program as described in Section 3.2.3. The
main window shown in Figure 3-2 is displayed
when the program is started.
The right pane displays the information contained
in the current radio file. This information can be printed
by selecting File > Print or saved to a text file by
copying (Ctrl C) and pasting (Ctrl V) it into a word
processor program. To quickly display the data for a
locality, bank, or system, simply click it in the left pane.
2. Choose the data file to be edited using one of the
following methods:
3.3.5 STATUS BAR
New File - When the program is started, a new file
is automatically created that contains program
defaults. This file is named “Untitled” until it is
saved. A new file can also be created at any time by
File > New or clicking
in the toolbar.
The status bar is located at the bottom of the
screen (see Figure 3-2), and it indicates the following
information. The status bar can be turned on and off by
selecting View > Status Bar in the menu bar.
From Disk File - If a file stored on disk is to be
edited or used as a basis for programming another
file, open it by selecting File > Open or clicking
in the toolbar.
Status/Function - When pointing to a function or tool,
this area provides a brief description of it. At other
times, it indicates the current program status.
Read From Radio - If the data currently contained
in a radio is to be used as a basis for programming
another radio or is to be modified, it can be read
into the program. To do this, select Transfer > Read
Setup Params or click
in the toolbar (see
Section 3.7).
Radio Model - Indicates the specific radio model that
has been selected by the Edit > Radio Type menu (see
Section 3.6.2). Only the parameters applicable to the
selected radio are displayed on the various screens.
3.4.3 PROGRAMMING MAIN RADIO
PARAMETERS
Personality - Displays a running total of the amount of
space remaining in EEPROM memory of microprocessor U208 if the transceiver was programmed with
the current information. If this number reaches zero
before all data is entered, fewer localities/systems/
The Main Radio Parameters are parameters that
are the same regardless of the selected bank/system/
group. They are programmed as follows:
3-4
September 2001
Part No. 001-7240-001
PROGRAMMING
Title Bar Menu Bar Toolbar -
Status/
Function
U208
Memory
Left
Radio Type
Being Programmed
U150
Memory
Left
Status Bar -
Figure 3-2 Main Window
3. When all parameters in the Radio Parameters
Screens are programmed, click the OK button to
save all changes or the Cancel button to exit without
saving changes.
1. Select Edit > Radio Type and the displayed screen
selects the Type, Tier, Frequency Band, and Bandwidth of the programming file (Section 3.6.2).
2. Select Edit > Basic Radio Params (Parameters) or
click
to display the following screens which
program other radio-wide parameters:
3.4.4 LOCALITY PROGRAMMING
Basic Parameters - Select this screen by clicking
the tab at the top, and choose the desired configuration for each parameter (Section 3.6.3).
In general, a locality is a repeater site. At least
one Locality must be programmed before any Systems
can be programmed, and at least one System must be
programmed before a Group can be programmed and
likewise for banks. Proceed as follows to program
localities (Section 3.6.8):
Timing Parameters - Select this screen by clicking
the tab at the top, and choose the desired configuration for each parameter (Section 3.6.4).
Create New Locality - Select Edit > Localities >
Create New or click
in the toolbar.
Menu Parameters - Select this screen by clicking
the tab at the top. Checking the box enables the
parameter in the menu mode, and the drop down
menu programs the default configuration (Section
3.6.5).
NOTE: The frequency band is selected in the radio
type screen.
Edit Locality - Select Edit > Localities > Edit
Existing or click
in the toolbar.
Portable Key - Select this screen by clicking the tab
at the top and then choose the function for each key
from the drop-down menu (Section 3.6.6).
Delete Locality - Select Edit > Localities > Delete
Locality or click
in the toolbar.
Telephone Numbers - Select this screen by clicking
the tab at the top and then enter the preprogrammed
telephone numbers. (Section 3.6.7).
When all parameters in the Locality screen are
programmed, click the OK button to save all changes
3-5
November 2001
Part No. 001-7240-001
PROGRAMMING
button if deleting a group. To exit without saving the
current changes, click only the Done button.
and exit, or click the Cancel button to exit without
saving any changes.
3.4.5 SYSTEM PROGRAMMING
6. Repeat until the system has been programmed with
the desired groups. Then click the Done button to
exit. Repeat to program other systems if applicable.
Each system is linked to one of the localities.
Therefore, at least one locality must be created as just
described before systems can be created. Groups are
added to the systems by group programming described
next. Proceed as follows (Section 3.6.9):
3.4.7 BANK PROGRAMMING
At least one locality, system, and group must be
programmed before a bank can be programmed. Banks
are collections of systems that may be selected for a
unique application such as operation in different
geographical areas. System numbering and other
parameters can be different for each bank. At least one
bank must always be programmed even if bank select
is not used.
Create New System - Select Edit > Systems >
Create New or click
in the toolbar.
Copy System - To copy a system that is already
created for use as a basis in programming another,
select Edit > Systems > Copy Existing or click
in the toolbar.
1. Create, Edit, or Delete a bank as follows:
Delete System - Select Edit > Systems > Delete or
click
in the toolbar.
Create a New Bank - Select Edit > Banks > Create
New or click
in the toolbar.
When all parameters in the System screen are
programmed, click the OK button to save the changes
and exit, or click the Cancel button to exit without
saving any changes. Repeat this procedure to add
additional systems.
Edit Bank - Select Edit > Banks > Edit Existing or
click
in the toolbar.
Delete Bank - Select Edit > Banks > Delete or click
in the toolbar.
3.4.6 GROUP PROGRAMMING
2. When the bank programming screen is displayed,
select the display number of the system to be added,
edited, or deleted. Then select the system to be
assigned to that number if applicable. Also program
default scan list status of the system and other bank
information such as alpha tag and emergency and
home system/group if applicable.
Each group is linked to one of the systems.
Therefore, at least one system must be created as just
described before groups can be created. Groups
program individual call parameters. Proceed as
follows (Section 3.6.10):
1. To create a new group or edit a group, select Edit >
Groups or click
in the toolbar.
3. To make the selected changes to the system, click
the Add, Change, or Delete button, whichever is
applicable. To add, edit, or delete other systems,
repeat this procedure. When finished programming
the bank, click the Done button, or to exit without
making any changes, click the Cancel button.
2. A screen is then displayed which lists all current
systems. Select the system to which a group is be
added or in which a group is to be edited. Click the
OK button to display the groups in that system.
3. In the Group No. box, select the number or the
group to be added, edited, or deleted.
3.4.8 PROGRAMMING TRANSCEIVER
4. Program the group with the desired parameters.
When all the programming described in the
preceding sections is complete, the data is ready to be
downloaded to the transceiver as follows:
5. Click the Add button if adding a new group, the
Change button if editing a group, or the Delete
3-6
November 2001
Part No. 001-7240-001
PROGRAMMING
should be used periodically while editing a file to
prevent the loss of data if a power failure occurs or
program execution is interrupted for some other
reason. Files are automatically given the .mbl
extension.
1. Connect the computer to the transceiver as
described in Section 3.1.6.
2. Download the data to the transceiver by selecting
Transfer > Write Setup Params or click
in the
toolbar.
Save As - Same as “Save” except you are prompted to
enter a file name. This allows the current file to be
renamed and saved to a new file.
3. Click the Write button in the screen that is
displayed. Messages and the data are displayed as
programming occurs. Refer to Section 3.7 for more
information.
Print - This menu selection or shortcut key (Ctrl+P)
prints the current file. The information in the current
file is displayed in the Data Display Pane of the main
window. This information can also be saved to a text
file by selecting it and then copying (Ctrl C) and
pasting (Ctrl V) it to a word processor program.
3.5 FILE MENU
Recent Files - The file names of the previous files
opened by the program are listed. To open one of these
files, simply click the name.
Exit - Closes the program. If the current file has
unsaved changes, you are asked if you would like to
save it before exiting.
3.6 EDIT MENU
3.6.1 INTRODUCTION
The File Menu shown in the preceding illustration is used to perform these file operations:
The Edit Menu shown in Figure 3-3 or equivalent buttons in the toolbar select screens that program
various transceiver functions. The following information describes the screens selected by the Edit Menu.
New - This menu parameter or toolbar icon
creates a new programming data file that contains
default parameters. If a file with unsaved changes is
currently open, you are asked if you would like to save
it before opening the new file. New files are automatically named “Untitled”.
Open - This menu parameter or toolbar icon
opens a data file that was previously saved to disk.
This allows a disk file to be edited or used as a basis
for programming another transceiver. If a file with
unsaved changes is currently open, you are asked if
you would like to save it before opening the new file.
This function displays a screen listing all the files in
the current directory with the .mbl extension.
Save - This menu parameter or toolbar icon
saves the current programming data file to disk. If it is
the first time it is being saved, a screen is displayed
which allows a file name to be entered (similar to the
Save As function which follows). The Save function
Figure 3-3 Edit Menu
3-7
November 2001
Part No. 001-7240-001
PROGRAMMING
3.6.2 EDIT RADIO TYPE SCREEN
Conventional Enabled - When selected, the
proceed tone sounds with conventional calls in
addition to LTR-Net/LTR standard calls.
The Radio Type screen shown below selects the
type, tier, frequency band, and bandwidth parameters of
the programming file. This must match the radio being
programmed. If you are unsure of the capabilities of a
radio, note the model number on the transceiver identification label or the number that is briefly displayed
when power is turned on. Then refer to Sections 1.3 or
1.4 to determine radio type information
.
Conversation Enabled - When selected, the proceed
tone also sounds with LTR-Net/LTR telephone and
auxiliary calls (initial access only).
Scan Revert Mode - Selects the system/group on
which transmissions occur in the scan mode (Section
2.6.10).
Last Selected - Always on the selected.
Last Received - Always on the last received.
Temporary - On the last received if the transmitter
is keyed before scanning resumes.
Display Emergency - Currently, this parameter is not
used.
Encryption Installed - Encryption is currently not
available.
Edit Radio Type Screen
Pgm (Program) Key - To prevent unauthorized
reading of programming data from a transceiver, a
code consisting of up to eight keyboard characters can
be entered in this box. If this box is left blank, no
protection is used (Section 3.11.1).
NOTE: The screens described in Sections 3.6.3 - 3.6.6
which follow are displayed by selecting Edit > Basic
Mobile Parms or clicking
and then clicking the
tab at the top.
Verify Key - The exact code entered in the Pgm Key
box must be re-entered in this box for it to be accepted
as valid code.
3.6.3 BASIC PARAMETERS SCREEN
3.6.4 TIMING PARAMETERS SCREEN
Proceed-To-Talk Tone
Receive Delay - Selects the time from 0-7 seconds
before scanning resumes after receiving a message
(Section 2.6.9).
Type - Selects either a single (standard) or distinctive (triple) proceed-to-talk tone (Section 2.4.9).
3-8
November 2001
Part No. 001-7240-001
PROGRAMMING
condition is selected when power is turned on. Refer to
Section 2.5.2 for more menu mode information, and to
Table 3-1 for brief descriptions of items programmed
in the Menu Items screen.
Call Delay - Selects the time from 0-7 seconds before
scanning resumes after transmitting a message
(Section 2.6.9).
Scan Continue - Selects the maximum time from 0-60
seconds that a call is monitored before scanning
resumes (Section 2.6.9).
3.6.6 KEY ASSIGNMENT SCREEN
Proceed Tone Delay - Programs how long the proceed
tone is delayed after the PTT switch is pressed on
groups that have the delayed proceed tone feature
enabled. Times of 0-2.5 seconds can be programmed
(Section 2.4.9).
Transmit Time-Out - Programs the time-out timer
(Section 2.4.11).
3.6.5 MENU ITEMS SCREEN
The Key Assignment screen shown above
programs the three option switches. To program a
switch, select the desired function from the drop-down
list for that switch. When finished, click the OK button
to exit and save the changes or Cancel to exit without
saving.
The Menu Items screen shown above programs
the parameters that are selectable in the menu mode. It
also programs the default status of parameters not
controlled by the menu mode or an option switch.
Some functions can be controlled by both an option
switch and the menu mode.
All functions that are selectable by the keypad
(except 0-9) can also be assigned to an option switch
to allow them to be quickly selected. For example,
scanning could be turned on and off by pressing FCN
SCAN or the option switch on the top panel (FCN is
not pressed when the option switch is used). The
option switch functions that can be programmed are
listed in Table 3-1.
If a function is programmed as not selectable (no
check in the check box), it is fixed in the condition
selected in the drop-down list. For example, if “Tones”
is not checked and “All” is selected, the Tones menu
parameter is not selectable and all tones always sound.
3.6.7 EDIT TELEPHONE NUMBERS SCREEN
If a menu item is selectable by the menu mode or
an option switch, the default condition exists only until
the first time that function is changed manually or
automatically. The last selected and not the default
The Telephone Numbers screen which follows
pre-programs up to 10 telephone numbers that can be
recalled from memory using the dial mode. If the box
to the right of the number is checked, it can be repro-
3-9
November 2001
Part No. 001-7240-001
PROGRAMMING
grammed by the user. Numbers of up to 16 digits can
be entered, and entering a “@” produces a 1-second
pause (each “@” counts as one of the 16 characters).
described in Section 2.3.12, a locality is a single
repeater site, and it is programmed with the repeaters
at that site. Up to approximately 25 LTR-Net or 60
LTR or conventional localities can be programmed.
The functions that can be selected by Edit > Localities
menu are as follows:
Edit > Localities > Create New - Creates a new
locality. The screen that is displayed and its parameters are described in Table 3-2. The frequency band is
selected on the radio type screen (see Section 3.6.2).
Edit > Localities > Edit Existing - Edits a
current locality. The locality to be edited is selected
from a list. The screen that is displayed and its parameters are described in Table 3-2.
Telephone Numbers Screen
3.6.8 EDIT LOCALITY SCREEN
Edit > Localities > Delete Locality - Deletes a
locality.
The Edit > Localities menu parameter (see Figure
3-3) or equivalent buttons in the toolbar are used to
select the screen that sets up and edits localities. As
Edit > Localities > Test Locality - Creates a locality
that is used for test purposes. Currently, test localities
are not used.
Table 3-1 Menu and Option Switch Parameter Descriptions
Parameter
Menu
Item
Backlight
Bank Select
Display Mode Select
X
X
X
Monitor
Roaming On-Off
Scan Type Select
Scan Continue
X
X
X
Scan List Save
Tone Type Select
X
X
Any Keypad Function
except 0-9
Option
Switch [1]
X
X
Description
On = Turns on briefly when a key is pressed, Off = Always disabled.
Selects banks when two or more are programmed (Section 2.4.1).
Selects the alpha or numeric display mode. The display mode can also be toggled by FCN STR or STR option switch (Section 2.3.4).
Turns the monitor mode on and off (Section 2.11.2).
Turns roaming on and off (Section 2.9.4).
Selects group, system/group, or no scanning (Section 2.6.3).
Turns the scan continue feature on and off. This timer limits the amount of
time a message is received while scanning (Section 2.6.9).
When “on” is selected, changes to the scan list are saved (Section 2.6.7).
Selects the tones that sound (All, Alert, Key, Silent). See Section 2.4.12.
[1]
Programmable Functions: FCN, Scan, SYS, RCL, GRP, CLR, Home, Phone,
Dial, Menu, Squelch Adj., S.A/D, G.A/D, Send, Store, , # ,
,
, and
Monitor.
[1] The option switches can also be programmed for any of the functions that are selectable by the keypad keys except 0-9.
For example, scanning can be turned on and off by the FCN SCAN keys and by an option switch programmed for the Scan
function. (The FCN key is not pressed when the alternate function of a key is selected by an option switch.)
3-10
November 2001
Part No. 001-7240-001
PROGRAMMING
3.6.9 EDIT SYSTEM SCREEN
The Edit > Systems menu parameter (see Figure
3-3) or equivalent buttons in the toolbar select the
screen that sets up and edits systems. As described in
Section 2.3.12, a system is programmed with one or
more selectable groups and other unique information.
Up to 99 systems can be programmed. Groups are
added to systems using the group edit function
described in the next section. For a system to be
selected or scanned, it must be linked to a bank
(Section 3.6.11).
3.6.11 EDIT BANKS SCREEN
The Edit > Banks menu parameter (see
Figure 3-3) or equivalent buttons in the toolbar are
used to select the screen that sets up and edits banks.
As described in Section 3.4.7, banks are collections of
systems that may be selected, for example, for operation in different geographical areas.
The system programming functions that can be
selected by the Edit > Systems menu are as follows:
Edit > Systems > Create New - Creates a new
system. The screen that is displayed is described in
Table 3-3.
Up to sixteen banks can be programmed. System
numbering and other parameters can be different for
each bank. At least one bank must be programmed
even if bank select is not used. The functions that can
be selected by the Edit > Banks menu are as follows:
Edit > Systems > Edit Existing - Edits a current
system. The system to be edited is selected from a list.
The screen that is displayed is described in Table 3-3.
Edit > Systems > Copy Existing - Creates a
new system by copying one of the current systems.
The system to be copied is selected from a list. The
screen that is displayed is described in Table 3-3.
Edit > Banks > Create New - Creates a new
bank. The screen that is displayed is described in Table
3-5.
Edit > Systems > Delete - Deletes a system.
Edit > Banks > Edit Existing - Edits a current
bank. The bank to be edited is selected from a list. The
screen that is then displayed is described in Table 3-5.
Edit > Systems > Test System - Currently, test
systems are not used.
Edit > Banks > Delete - Deletes a bank.
3.6.12 EDIT UNIQUE ID SCREEN
3.6.10 EDIT GROUPS SCREEN
This function displays a screen that can be used to
edit the transceiver unique ID codes assigned to each
LTR-Net locality. This makes unique ID editing more
convenient than selecting each locality individually.
NOTE: Refer to Table 3-4 for descriptions of the Edit
Group screens.
The Edit > Groups menu parameter (see
Figure 3-3) or
button in the toolbar is used to
display the screens that set up and edit the groups
assigned to each system. The following screen is
displayed to select the system in which groups are to
be added or edited. After the desired system is
selected, click the OK button and the group editing
screen in Table 3-4 is displayed. Up to 99 groups can
be assigned to each system or to any one locality.
3.7 TRANSFER MENU
The Transfer menu which follows is used to Read
(upload) data from the transceiver to the computer and
also to Write (download) data from the computer to
the transceiver. It is also used to read error information
and version information stored in the transceiver.
More information follows:
3-11
November 2001
Part No. 001-7240-001
PROGRAMMING
PROG ERR - Indicates that an error was
detected when verifying the data programmed
into the transceiver.
Read Codes - This menu item or toolbar button
reads the error code log stored in the radio and
displays it. Refer to Section 2.14 for more information.
Read Setup Params - Reads the data contained
in a transceiver. This function can be used to check
transceiver programming or use the data in one transceiver as the basis for programming another. Proceed
as follows:
Read Factory Info - This menu item or toolbar
button displays the following screen and version information for the transceiver connected to the computer:
1. Connect the transceiver to the computer using the
RPI as described in Section 3.1.6.
2. Select Transfer > Read Setup Params or click the
toolbar button.
3. A screen is then displayed which indicates the
progress of the read operation.
ESN - Indicates the electronic serial number of the
transceiver that is stored in the logic.
4. If the transceiver contains a Program Key, you are
prompted to enter this key before the data is read.
Refer to Section 3.11.1 for more information.
Warranty Info - This is the transceiver identification number described in Section 1.4.
Write Setup Params - Programs a transceiver
with the data that has been entered in the program.
Proceed as follows:
Radio Config - These are digits 4-10 of the transceiver part number described in Section 1.3.
Software Version - Indicates the version of
operating software contained in the radio.
1. Connect the transceiver to the computer using the
RPI as described in Section 3.1.6.
3.8 VIEW MENU
2. Select Transfer > Write Setup Params or click the
toolbar button.
3. A screen is then displayed which indicates the
progress of the write operation.
4. The following messages may be displayed by the
transceiver:
This View menu is shown above, and it is used to
enable and disable portions of the main screen shown
in Figure 3-2. More information follows:
PGM MODE - Standard message while
programming is occurring.
TYPE ERR - Indicates that the programming
data is incompatible with the transceiver. A
possible reason for this is using a version of the
programming software that is not compatible
with the transceiver software.
View Toolbar - Enables and disables the toolbar (see
Section 3.3.3).
View Status Bar - Enables and disables the status bar
at the bottom of the screen (see Section 3.3.5).
3-12
November 2001
Part No. 001-7240-001
PROGRAMMING
To disable this feature so that no key is required
to read data from the transceiver, do not enter any
characters in the Pgm Key box, or if there already is a
code in this box, delete all characters. Then program
the transceiver with the data file. If the key is lost,
contact Customer Service as described in Section 1.7
for information on how this feature can be overridden.
View Personality - Enables or disables the left pane in
the main part of the screen which displays the current
programming information in a Locality, Bank, or
System hierarchy (see Section 3.3.4).
3.9 COMPORTS MENU
3.11.2 MULTIPLE HOME REPEATERS
Systems linked to the same locality should not be
programmed with different home repeaters as missed
calls may result. With LTR-Net and LTR operation,
each home repeater transmits incoming call information only for its mobiles and not for all mobiles
assigned to the locality. Therefore, calls on another
home repeater are not received while monitoring some
other home repeater. In addition, calls will be delayed
and access collisions will occur more often.
The ComPorts menu is shown above, and it is
used to select which computer serial port is used by
the RPI (see Section 3.1.3). The default is COM 1. If
another port is used, select it using this function. The
new port then becomes the default port, so this function only needs to be used when the port is changed.
If this type of system is necessary, select the LTRNet Multiple Home type of locality. This forces the
radio to monitor the status repeater instead of the
home repeater. Since the status repeater transmits
incoming call information for all home repeaters
assigned to a locality, this ensures that calls are not
missed. However, there is then no backup for that
repeater (see Section 6.6).
3.10 HELP MENU
Displays help information on the program. Most
screens also have a Help button that can be clicked to
display help on that screen.
3.11.3 CHANNEL NUMBER PROGRAMMING
3.11 ADDITIONAL PROGRAMMING
INFORMATION
In the UHF band, the channel frequencies are
always entered and channel numbers are not used.
Therefore, the “channel” display mode is not selectable on the locality screen.
3.11.1 PROGRAM KEY
Be sure to enter the repeater frequency and not
the mobile frequency. The bandwidth of 12.5 or 25
kHz is also specified with UHF channels. The
frequency band is selected in the Radio Type screen
before any localities are programmed (see Section
3.6.2).
An eight-character Programming Key can be
entered in the Basic Parameters screen (see Section
3.6.3) to prevent unauthorized reading of transceiver
data. If a transceiver is programmed with a data file
containing a key in this location, the programming
data cannot be read from that transceiver unless the
same key is entered.
3.11.4 REPEATER NUMBERING
Any keyboard character can be used when
entering this key (including spaces), and letter case is
considered. For example, entering “A” instead of “a”
that was programmed results in an invalid entry. Characters entered are displayed as asterisks (****). A key
must be re-entered in the Verify box to be accepted.
With LTR-Net and LTR repeaters, the repeaters at
a locality are assigned a unique number from 1-20.
Although these numbers can be assigned arbitrarily,
for maximum system efficiency, a scheme should be
used which equalizes, as much as possible, the gaps
3-13
April 2001
Part No. 001-7240-001
PROGRAMMING
microcontroller or a memory device such as an
EPROM. For example, the radio software may be
updated to correct software bugs or add feature
enhancements. This is possible because a reprogrammable Flash memory device is used for program
storage.
between numbers. For example, a five-repeater system
should be numbered 1, 5, 10, 15, and 20. These
numbers are programmed in the repeater and also each
mobile locality (see Section 3.6.8).
If Home Channel Aliasing is used (see Section
2.9.7), the status repeater should be repeater 20 and
repeater 1 should be an active repeater. The other
repeaters should then be spaced evenly from 1-20.
The same basic hardware setup used to program
personality information is also used to update radio
software. One requirement though is that only Remote
Programming Interface (RPI), Part No. 023-9800-000,
can be used. Other RPI’s such as the 023-9750-000,
023-5810-000, and 023-5300-000 do not work.
3.11.5 SPECIFYING RIC-EQUIPPED
REPEATERS
When programming the channel numbers of LTR
localities, you specify if the repeater is equipped with
an E.F. Johnson repeater interconnect (RIC) controller.
If a system with a transmit ID code programmed for
interconnect is then selected, the transceiver will
attempt to access only repeaters specified as equipped
with this controller. This allows both interconnect and
non-interconnect repeaters to be programmed in each
locality.
Programming is performed using separate
PCFlash programming software. The program requires
a special data file which contains the updated radio
software (see next section). Refer to Section 5.2 for
more information on loading new operating code.
3.12.2 DATA FILE
Without this feature, the transceiver may trunk to
a repeater not equipped with an interconnect controller
when a telephone call is made. No dial tone or other
supervision is then returned when the PTT switch is
released which may be confusing to the user.
To update the radio software, the data file
containing the new radio software is required. The
filename of this data file is 00342xx0.S19. The “xx”
characters indicate the version number of the software.
3.11.6 TEST LOCALITY
Contact your Customer Service or your sales
representative concerning the availability of a software
update for this transceiver. It may be available on a CD
with the PCFlash software (see Table 1-1) or on the
E.F. Johnson ACES® Bulletin Board System for
downloading. To access this system, dial toll-free
1-800-227-3997 (N, 8, 1, ANSI).
Currently, the test locality programmed by Edit >
Locality > Test Locality as described in Section 3.6.8
is not used. The sixteen channels programmed in this
locality are selected by the test mode which is also
currently not available (see Section 2.13).
3.12 UPDATING RADIO SOFTWARE
If you do not know your login ID or have questions or would like to sign up for service on this
system, call 1-800-328-3911, extension 7. Once the
data file is obtained, it must be copied to the directory
containing the program.
3.12.1 INTRODUCTION
The transceiver operating software (firmware)
can be updated in the field without replacing the
3-14
November 2001
Part No. 001-7240-001
PROGRAMMING
Table 3-2 Locality Programming Screen Description
This screen is used to create a new locality or edit a current locality. It is displayed by selecting the Edit > Localities
menu (see Section 3.6.8) or clicking one of the
buttons in the toolbar. In general, a locality is a repeater site.
Parameter
Description
Locality
Name
Number
This is an eight-character name given to the locality to identify it during programming. It is not displayed by the
transceiver.
The number from 1-1023 assigned to LTR-Net localities. Each LTR-Net locality that a mobile can access must
have a different locality number, and the same scheme must be used to program the mobiles and repeaters.
Selects the type of locality (LTR-Net, LTR-Net Multiple Home, LTR, or Conventional) when new localities are
created (see Section 3.11.2).
The frequency band in which the locality operates. The frequency band selected when the first locality is
created or before any localities are created by the Radio Type screen (see Section 3.6.2). Once a locality is created, the band cannot be changed.
With LTR-Net localities, programs the unique ID of the mobile when it accesses that locality. Numbers from
1-65503 can be programmed.
“0” is usually programmed unless two LTR or LTR-Net localities are close enough to interfere with each other.
One locality is then programmed “0” and the other “1”.
This is a non-editable field shown for reference only. It indicates the base receive and transmit frequency used
to derive the frequency of each channel.
Programs the power output that is selected when the transceiver accesses that locality. High (4 watts) or low
(1 watt) levels can be selected (Section 2.4.8).
Programs the percentage that the squelch is tightened when no call is occurring. The higher the percentage, the
sooner automatic locality search occurs. The default value is 33%. If there is no other site nearby, this percentage should always be 0% (Section 2.9.4).
Programs the percentage that the squelch is tightened after the first pass when searching for a new site (“LCL
SRCH” displayed). The higher the percentage, the stronger the signal must be in order to attempt registration on
a site. This parameter should always be greater than or equal to the preceding Dropout Percentage. The default
value is 46% (Section 2.9.4).
Programs the percentage squelch is tightened during the first pass when searching for a new site (“HSQ SRCH”
displayed). The higher the percentage, the stronger the signal must be in order to attempt registration on a site.
This parameter should always be greater than or equal to the preceding Capture Percentage. The default value is
80% (Section 2.9.4).
Type
Band
UID
Area
Rx/Tx Base
Frequency
Power
Dropout
Percentage
Capture
Percentage
Tight
Capture
Percentage
3-15
September 2001
Part No. 001-7240-001
PROGRAMMING
Table 3-2 Locality Programming Screen Description (Continued)
Parameter
Description
Display Selects if repeater frequencies are entered as programming Channel numbers or channel Frequencies. With the
Mode
UHF band, only channel frequencies can be used, so “Channel” is not selectable.
Frequency Programs the frequency of each repeater at the locality (Section 3.11.3). Note that repeater frequencies are
entered, not mobile frequencies.
Bandwidth Either 12.5 kHz (narrow band) or 25 kHz (wideband) can be selected for each repeater. Then when the transceiver accesses that repeater, it is automatically configured for the proper bandwidth.
Status
With LTR-Net operation only, one of the locality repeaters is designated as the status repeater.
Active
Only repeaters marked as active can be accessed by the transceiver.
Companding Programs if the repeater is equipped with a compandor. Companding is then automatically enabled whenever
that repeater is accessed (Section 2.4.3).
RIC
With LTR operation only, programs if the repeater is equipped with a RIC/TIC (interconnect) module. This
prevents attempted accesses on non-RIC repeaters to make telephone calls (Section 3.11.5).
Table 3-3 System Programming Screen Description
Repeater No.
(Conv. Systems)
This screen is used to create a new system or edit a current system. It is displayed by selecting the Edit > Systems menu
(see Section 3.6.9) or clicking one of the
buttons in the toolbar. Groups are added using the Edit > Groups function. For a
system to be selected or scanned, it must be linked to a bank using the bank programming screen described in Table 3-5.
Parameter
Description
System
Name
Locality ID
Home
This is an eight-character name given to the system. It is displayed briefly if the alpha display mode is selected
(Section 2.3.4). Otherwise, it is used only to identify it during programming.
This drop-down list selects the locality to which the system is linked.
Selects the home repeater when the system is linked to an LTR or LTR-Net locality, or the repeater number
when it is linked to a conventional locality.
With LTR-Net and LTR systems, selects the block of transmit inhibit ID codes up to all 250 (LTR localities) or
239 (LTR-Net localities). If an ID within this block is detected up to 5 seconds before the PTT switch is pressed,
the transmitter does not key (Section 2.8.4).
Transmit
Inhibit
3-16
September 2001
Part No. 001-7240-001
PROGRAMMING
Table 3-4 Group Programming Screen Description
This screen is used to add groups to a system or edit groups already assigned to a system. It is displayed by selecting the
Edit > Groups menu or clicking the
button in the toolbar (see Section 3.6.10). In the following screens, first select the
Group No. to be added or edited from the drop-down list or the list at the bottom. Then select the desired parameters and
make the changes by clicking the Change button (this is an Add button if adding a Group). To delete a group, select the Group
No. and then click the Delete button. When finished programming the system, click the Done button.
LTR and LTR-Net Group Programming Screen
RIC ID
(if LTR and
RIC group
type
selected)
Parameter
Description
Group No. This drop-down list selects the group to be added or edited in the screen.
Group Type This drop-down list selects one of the following call types:
LTR-Net Systems - Dispatch (standard group call), Telco (telephone call), Auxiliary (unique ID or directed
group call). Data calls are not currently available. See Sections 2.8.1 and 2.9.2.
LTR Systems - Dispatch (standard group call), RIC (telephone call). See Sections 2.8.1 and 2.10.2.
Alpha Tag This specifies the eight-character alpha tag that is displayed when the group is selected.
Priority Selects the receive priority of the group. Priority numbers of 1-8 are selectable with LTR-Net and LTR groups
(Section 2.8.2).
Encode ID With dispatch (group) calls, selects the ID code that is transmitted. Codes 1-239 can be programmed with LTRNet systems, and 1-250 can be programmed with LTR systems (Section 2.8.1). When “Disabled” is selected,
transmitting is disabled, so the group is receive only.
Decode ID Similar to Encode ID except selects the receive code that must be decoded to receive a call on the group.
RIC ID With LTR RIC group types only, selects the ID code on which a telephone call is received (Section 2.10.2).
Spare
With LTR-Net systems only, selects the number of additional groups that can be added to the system by overGroups the-air programming. This reserves space in memory so additional groups can be added. Space for 0-8 groups
can be reserved. Currently, over-the-air programming is not available, so this value should always be “0”.
Add to Grp Selects the default scan list status of the group. This programming can be overridden by the scan list A/D key if
Scan List available (Section 2.6.7).
Encryption Encryption is currently not available.
Available
Activate Call Selects if the call indicator is activated when a call is received on the group (Section 2.4.2).
Light
Interruptible Selects if calls on the group can be interrupted by higher priority calls (Section 2.8.2).
Delayed Selects if the proceed tone is delayed by the time programmed on the Timing Parameters screen when a call is
Proceed Tone placed on the group (Section 2.4.9).
3-17
September 2001
Part No. 001-7240-001
PROGRAMMING
Table 3-4 Group Programming Screen Description (Continued)
Conventional Group Programming Screen
Parameter
Description
Group
This drop-down list selects the group to be added or edited in the screen.
Number
Alpha Tag This specifies the eight-character alpha tag that is displayed when the group is selected.
Tx Option Always = Tx enabled, TDOB (Transmit Disable On Busy) disabled
Disable Busy = Tx and TDOB enabled, no transmit with carrier even with valid Call Guard
On Valid CG = Tx and TDOB enabled, transmit with carrier allowed only with valid Call Guard
Disabled = Tx disabled (receive-only channel). See Sections 2.4.10 and 2.11.3.
Tx Call Selects the type of transmit Call Guard squelch control as Tone (CTCSS), digital (DCS), inverted digital, or
Guard Type none (carrier). See Section 2.11.6.
Tx Call If tone or digital encode Call Guard squelch was selected above, selects the tone frequency or digital code that
Guard Code is transmitted. These tones and codes are listed in Table 3-6.
Rx Call Selects the type of receive Call Guard squelch control as Tone (CTCSS), digital (DCS), inverted digital, or none
Guard Type (carrier). See Section 2.11.6.
Rx Call If tone or digital decode Call Guard squelch was selected above, selects the tone frequency or digital code that
Guard Code must be decoded to receive a call. These tones and codes are also listed in Table 3-6.
Add to Grp Selects the default scan list status of the group. This programming can be overridden by the scan list A/D key if
Scan List available (Section 2.6.7).
Encryption Encryption is currently not available.
Available
Activate Call Selects if the call indicator is activated when a call is received on the group (Section 2.4.2).
Light
Talk-Around Selects if the talk-around mode is selected when transmissions are made on the group (Section 2.11.5).
Delayed Selects if the proceed tone is delayed by the time programmed on the Timing Parameters screen when a call is
Proceed Tone placed on the group (Section 2.4.9).
Send
Selects if the Call Guard turn-off code is sent when the PTT switch is released (Section 2.11.6).
Turn-off
3-18
November 2001
Part No. 001-7240-001
PROGRAMMING
Table 3-5 Bank Programming Screen Description
This screen is used to create a new bank or edit a current bank. It is displayed by selecting the Edit > Banks menu (see
Section 3.6.11) or clicking one of the
buttons in the toolbar. In the above screen, select the number of the system to be
added or edited in the System Display No. drop-down list and then select the desired parameters. Then make the changes by
clicking the Change button (this is an Add button if adding a system). To delete a system from the bank, select it from the
drop-down list or in the list at the bottom of the screen and then click the Delete button. When finished programming the
bank, click the Done button or click Cancel to exit without saving any changes. At least one bank must be programmed even
if bank select is not used.
Parameter
Description
Bank Name This is an eight-character name given to the bank. It is displayed when banks are selected (Section 2.4.1).
Otherwise, it is used only to identify it during programming.
Emergency The emergency switch is not available with this transceiver.
System/Grp
Home
Selects the home system/group selected by the Home select function on the bank (Section 2.4.6).
System/Grp
Bank Scan Programs the default scan status (on or off) when the bank is selected (Section 2.4.1).
Enable
System
Systems can be assigned unique display numbers in each bank. This drop-down list selects the number that is
Display No. displayed when the system is selected in the bank.
System
This is a drop-down list of all currently programmed systems that selects the system being added to the bank or
edited. Systems can also be selected by clicking them in the list at the bottom of the screen.
Add To Scan Selects the default scan list status of the selected system in the bank. This status is valid only until the first time
List
it is changed by the FCN S.A/D switch. Cycling power does not reselect the default status (Section 2.6.7).
Change/Add This is a Change button when editing a system and an Add button when adding a system. It is clicked to make
Button
the changes to the selected system.
Delete
Deletes the currently selected system from the bank.
Button
3-19
November 2001
Part No. 001-7240-001
PROGRAMMING
Table 3-5 Bank Programming Screen Description (Continued)
Parameter
Done Button
Cancel
Button
Default
Bank Button
Description
Click this button when finished editing the bank to save the changes.
Click this button to exit the screen without saving any changes to the bank.
A default bank can be programmed in the Menu Items screen (Section 3.6.5). Clicking this button assigns the
current bank as the default without having to select that screen. One use of default banks is when the Bank
menu parameter is disabled. Several banks can then be programmed and the desired bank can be selectively
enabled on a per transceiver basis. This button is displayed only if two or more banks are programmed and the
selected bank is not already the default.
Table 3-6 Call Guard Codes and Tones
Recommended Tone Call Guard Codes
Code
Freq
Code
Freq
Code
Freq
Code
Freq
01
67.0
10
94.8
19
127.3
28
173.8
02
71.9
11**
97.4
20
131.8
29
179.9
03
74.4
12
100.0
21
136.5
30
186.2
04
77.0
13
103.5
22
141.3
31
192.8
05
79.7
14
107.2
23
146.2
32
203.5
06
82.5
15
110.9
24
151.4
33
210.7
07
85.4
16
114.8
25
156.7
34*
218.1
08
88.5
17
118.8
26
162.2
35*
225.7
09
91.5
18
123.0
27
167.9
36*
233.6
* These tones normally are not used because of their close proximity to the voice frequencies.
** This tone is normally not used because it may cause interference with adjacent tones.
Code
Freq
37*
38*
39**
40**
41* **
42* **
241.8
250.3
69.3
206.5
229.1
254.1
654
662
664
703
712
723
731
732
734
743
754
Recommended Digital Call Guard Codes
023
025
026
031
032
043
047
051
054
065
071
072
073
074
114
115
116
125
131
132
134
143
152
155
156
162
165
172
174
205
223
226
243
244
245
251
261
263
265
271
306
311
315
331
343
346
351
364
365
371
411
412
413
423
3-20
431
432
445
464
465
466
503
506
516
532
546
565
606
612
624
627
631
632
September 2001
Part No. 001-7240-001
CIRCUIT DESCRIPTION
SECTION 4 CIRCUIT DESCRIPTION
Regulator U601 on the RF board provides the
C5V supply, and regulator U602 provides the T5V and
R5V supply. The T5V supply is enabled when the
DPTT (delayed PTT) signal goes low, and the R5V
supply is enabled when it goes high. The DPTT signal
is from pin 85 of the microprocessor, and it also
controls R5V supply switch Q204 on the audio/logic
board.
NOTE: A block diagram of the RF and logic boards is
located on page 8-8.
4.1 POWER SWITCHING AND REGULATION
4.1.1 POWER SWITCHING
Unswitched battery voltage is applied to the RF
power amplifier and power control stages on the RF
board. Otherwise, all power is switched by P-channel
MOSFETs Q205 and Q206 on the audio/logic board.
When the on-off switch is turned on, the SW BAT
supply is applied to switching transistor Q206. That
transistor then turns on and pulls the gates of Q205A
and Q205B low. This turns Q205A and Q205B on and
applies switched 7.5 volts to 5-volt regulators U205
and U206 and other parts of the transceiver.
4.2 SYNTHESIZER DESCRIPTION
4.2.1 INTRODUCTION
The synthesizer output signal is produced separate receive and transmit VCOs on the RF board. The
frequency of these VCOs is controlled by a DC
voltage produced by the phase detector in synthesizer
chip U202. The phase detector senses the phase and
frequency of the two input signals. One signal is the
reference frequency from TCXO U201, and the other
is from the VCO. If these signals are not the same
frequency, the phase detector changes the VCO control
voltage which changes the VCO frequency until both
signals are synchronized. The VCO is then “Locked”
on frequency.
When the power switch is turned off, the base of
Q206 is pulled low by R226 which turns Q206 off.
However, because of diode D201, Q205A and Q205B
do not turn off until C233 charges through R221. This
provides a slight turn-off delay to give the microprocessor time to take over power off control. The microprocessor immediately detects power turn off from the
signal on pin 32. It then changes the P_HOLD output
on pin 71 to a high level which turns Q206 again on
until current settings have been saved to memory and
other required power down functions have been
performed.
Channels are selected by programming the
counters in U202 to divide by different numbers. This
programming data comes from the microprocessor on
the logic board. The frequency stability of the synthesizer in both the receive and transmit modes is determined by the stability of TCXO U201. The stability of
this device is 1.5 PPM from –22° to +140° F (–30° to
+60°). The receive VCO output signal is buffered and
then fed to the receiver as the first injection signal, and
the transmit VCO signal is also buffered and fed to the
transmitter as the transmit signal.
4.1.2 FIVE-VOLT REGULATORS (U205, U206)
Regulator U206 in the logic unit provides the
L5V logic supply, and regulator U205 provides the
+5V supply. The +5V supply is in turn switched by
Q202-Q204 to provide the R5V, T5V, and +5S
supplies. These transistors are controlled by signals
from the microprocessor.
4.2.2 RECEIVE AND TRANSMIT VCOS, BUFFER
AMPLIFIERS (Q503, Q533-Q535)
The low battery detect signal is provided by a
voltage divider formed by R237 and R238. These
resistors divide down the 7.5V battery supply to
produce the signal that is applied to pin 95 of the
microprocessor.
There are separate receive and transmit VCOs on
the RF board. The VCO control voltage is applied to
both VCOs, but only one is active at a time because
they are powered by separate R5V (receive) and T5V
(transmit) power sources.
4-1
November 2001
Part No. 001-7240-001
CIRCUIT DESCRIPTION
With the receive VCO, Q501 produces the first
injection signal in the range of 385-425 MHz which is
then amplified by Q502. With the transmit VCO,
Q531 produces the transmit frequency in the range of
430-470 MHz) which is then amplified by Q532.
the A, N, and reference counters to divide by a certain
number. This programming is performed by the microprocessor via the serial data bus which consists of the
Clock, Data, and Latch Enable lines (pins 11-14 of
U202).
In the receive mode, part of the Q502 output
signal is fed back through C227 and R210 to pin 10 of
U202, and then other part is applied to buffer Q503.
Filtering is provided by L506, C520, and C521, and
the signal is then applied to one of the gates of dual
gate GaAs FET mixer Q302. This is the first injection
signal, and it is 45.3 MHz below the receive
frequency.
The divide numbers are chosen so that when the
VCO is operating at the correct frequency, the VCOderived input to the phase detector is the same
frequency as the TCXO-derived input. The TCXOderived is produced by the reference counter in U202.
This counter divides the 12.8 MHz TCXO frequency
by 2388 to produce a 6.25 kHz input to the phase
detector. Using a 6.25 kHz reference frequency allows
channels to be changed in 6.25 kHz steps.
In the transmit mode, part of the Q532 output
signal is fed back through buffer amplifier Q535 to pin
10 of U202, and the other part is applied to a buffer
amplifier formed by Q533 and Q534. This is a cascode
amplifier formed by common-emitter stage (Q533)
and common-base stage (Q534). A cascode amplifier
provides amplification also good isolation. The output
signal from Q534 is then applied to amplifier Q101 in
the transmitter.
The VCO-derived input is produced by dividing
the VCO frequency using the prescaler and N counter
in U202. The divide number of the prescaler is
controlled by the output signal from the A counter.
The A and N counters function as follows:
Both the A and N counters begin counting down
from the programmed number. When the A counter
reaches zero, it halts until the N counter reaches zero.
Both counters then reset and the cycle repeats. The
A counter is always programmed with a smaller
number than the N counter. When the A counter is
counting down, the control output to the prescaler
causes the prescaler to divide by 129. Then when the
A counter is halted, the control output changes states
and the prescaler divides by 128.
4.2.3 VCO AND TCXO MODULATION
Both the VCO and TCXO are modulated in order
to achieve the required frequency response. If only the
VCO was modulated, the phase detector in U202
would sense the frequency change and increase or
decrease the VCO control voltage to counteract the
change (especially at the lower audio frequencies).
Conversely, if only the TCXO was modulated, the
VCO frequency would not change fast enough (especially at the higher audio frequency).
4.2.5 LOCK DETECT (Q201)
When the synthesizer is locked on frequency, the
LD (Lock Detect) output of U202 on pin 8 is a high
signal. This turns lock detect transistor Q201 off and
the Lock Detect signal fed to the microprocessor is
low. When an unlocked condition is indicated, lowgoing pulses appear on pin 8 which turns Q201 on and
causes the Lock Detect signal to go high. The transceiver is then disabled by the control logic and an error
condition is indicated in the display.
However, by modulating both the VCO and
TCXO, the two phase detector inputs remain in phase
and no frequency shift is sensed. This produces a relatively flat audio response. Potentiometer 4 of U147 on
the logic board balances these signals, and potentiometers 1 and 3 set the data and audio deviation levels.
R203/R204 set the frequency of the TCXO by
adjusting the DC bias on pin 3.
4.2.4 SYNTHESIZER CHIP (U202)
4.2.6 DC-DC CONVERTER (U203), LOOP
FILTER
Synthesizer chip U202 contains a prescaler, A, N,
and reference counters, and a phase detector, and
charge pump. Channels are selected by programming
The supply voltage to an internal charge pump in
U202 on pin 4 is produced by DC-DC converter U203.
The DC-DC converter produces a 9.3-volt supply from
4-2
November 2001
Part No. 001-7240-001
CIRCUIT DESCRIPTION
frequency is from the synthesizer, and it is fed through
a low pass filter (C520, C521, L506) which attenuates
harmonic frequencies present in the injection signal.
the C5V input voltage. This converter has a built-in
relaxation oscillator and rectifier. The frequency of
operation is determined by L201. The built-in rectifier
combined with an internal temperature compensated
reference provide a stable output voltage with a
minimum number of external components. The output
voltage on pin 4 in U203 is filtered by R215, C218,
C220 and then fed to pin 4 in U202.
Impedance matching on the input of Q302 is
provided by C328, L307, and L308. Likewise, impedance matching on the output is provided by C341,
C337, C338, and L312. The first IF signal is then fed
to monolithic crystal filter XFL401/XFL402. This
filter attenuates wideband noise, adjacent channels,
frequencies resulting from intermodulation, and other
frequencies close to the receive channel.
The charge pump output on pin 6 of U202
charges and discharges C214 and C215 in the loop
filter to produce the VCO control voltage. The loop
filter is formed by R218-R221 and C214-C216. This is
a low-pass filter which controls synthesizer stability
and lock-up time and suppresses the 6.25 kHz reference frequency.
4.3.2 IF AMPLIFIER (Q401), LIMITER/MIXER/
DETECTOR (U401)
From crystal filter XFL401/XFL402, the IF
signal is fed to IF amplifier Q401 and then to limiter/
mixer/detector U401. This device contains second
mixer and oscillator, limiter, detector, squelch, and
RSSI stages.
4.3 RECEIVER CIRCUIT DESCRIPTION
NOTE: A block diagram of the RF and logic boards is
located on page 8-8.
4.3.1 RF AMPLIFIER (Q301), FIRST MIXER
(Q302)
The IF signal is fed in on pin 16 which is the
input of an internal mixer. The 45.3 MHz first IF
signal is mixed with the 44.845 MHz second injection
signal to produce a second IF of 455 kHz. The second
injection signal is produced by an internal oscillator
and controlled by crystal X401.
The receive signal from the antenna is fed
through the harmonic rejection filter (L107-L110,
C113-C118) and the PIN diode antenna switch (D101,
D102, L112) to RF amplifier Q301. The bandpass
filter on the input of this stage attenuates the image
and other unwanted frequencies and also prevents the
injection signal from being fed out to the antenna. The
passband of this filter is controlled by a signal from
pin 102 of the microprocessor. This voltage changes
the capacitance of varactor diodes D302 and D303 to
vary the center frequency from 430 to 470 MHz.
The 455 kHz second IF is fed out of U401 on
pin 3 and applied to ceramic filters XFL403 and
XFL404 which attenuate wideband noise. A switching
network consisting of D401A/B and D402A/B routes
the IF signal through XFL403 with wide band channels, and through XFL404 with narrow band channels. This switching network is controlled by the
narrow/wide signal from pin 45 of the microprocessor. This signal is high for wideband channels and
low for narrow band channels. Therefore, with wideband channels, U402B is on and U402A is off which
forward biases D401A/D402A and reverse biases
D401B/D402B. With narrow band channels, the opposite occurs.
Impedance matching with RF amplifier Q301 is
provided by C308, C314, and S301. The RF amplifier
stage is used to recover filter losses and improve
receiver sensitivity. The output of Q301 is fed to
another bandpass filter that is similar in design.
Impedance matching with this bandpass filter is
provided by C318-C322 and L304.
The 455 kHz signal from these filters is then fed
back into U401 on pin 5 and applied to a limiteramplifier stage. From the limiter the signal is fed to
the quadrature detector. An external phase-shift
network connected to pins 10 and 11 shifts the phase
of one of the detector inputs by 90° at 455 kHz (the
The output of second bandpass filter is applied to
gate 1 of first mixer Q302. This is a dual-gate GaAs
FET device which mixes the receive frequency with
the first injection frequency to produce a first IF of
45.3 MHz (low-side injection is used). The injection
4-3
November 2001
Part No. 001-7240-001
CIRCUIT DESCRIPTION
voltage to the first stage (Vbb Control) is from the
power control circuit, and the supply voltage to the last
stages (Vcc) is the unswitched battery supply.
other inputs are unshifted in phase). This network
consists of C410 and ceramic discriminator T401. The
detected audio signal is then amplified and fed out of
U401 on pin 9.
4.4.2 ANTENNA SWITCH AND LOW-PASS
FILTER
4.3.3 SQUELCH CIRCUIT (U401)
The audio output signal on pin 9 of U401
contains audio and also high-frequency noise. This
signal is fed to the receive audio and data processing
circuits on the logic board and also to the squelch
circuit which is part of U401. The amount of noise in
this signal tends to be inversely proportional to signal
strength (the higher the noise level, the lower the
signal strength and vice versa). Therefore, it can be
used for squelch control.
The antenna is switched between the receiver and
transmitter by an antenna switch consisting of D101,
D102 and several other components. In the transmit
mode, the T5V supply is enabled and current flows
through R105, L106, D101, L112, and D102. Since
D101 is forward biased, the transmit signal has a low
impedance path to the antenna.
The audio/noise input level to the filter is
adjusted by VR401 which sets the squelch threshold
level. The detected noise output is on pin 13, and it is
applied to pin 108 of the microprocessor in the logic
unit.
L106/C112/D101 and L112/D102 each form
discrete quarter-wave line that is AC grounded at one
end. When one end of a quarter-wave line is AC
grounded, the other end presents a high impedance to
the quarter-wave frequency. Therefore, L106/C112
isolate the 5-volt supply from transmitter RF, and the
other two circuits isolate the receiver. In the receive
mode, D101 and D102 are no longer forward biased so
the receive signal has a high impedance path into the
transmitter and a low impedance path into the receiver.
From the antenna switch the transmit signal is fed to a
low-pass filter consisting of C113-C116, C118, and
L107-L110. This filter attenuates harmonic frequencies occurring above the transmit band.
4.4 TRANSMITTER DESCRIPTION
4.4.3 POWER CONTROL
NOTE: A block diagram of the RF and logic boards is
located on page 8-8.
The power output circuit maintains a steady
power output level by controlling the supply voltage to
the first stage in power module U101 (Vbb Control).
The output power is monitored using a directional
coupler consisting of a microstrip two-line coupler,
C123, D103, C124 and several other components.
Reflected power is dissipated by R107 and forward
power is detected by C123 and D103. These components produce a DC voltage that increases with
forward power.
A bandpass filter that passes only noise frequencies occurring above the audio band is formed by an
op amp in U401 and external components. The input
to this filter is pin 8 and the frequency determining
components are connected to pin 7 (R410-R412,
C415, C416).
4.4.1 DRIVER AMPLIFIER (Q101), POWER
AMPLIFIER MODULE (U101)
In the transmit mode, the output signal from the
transmit VCO is the transmit frequency. This signal is
buffered by cascode amplifier Q533/Q534 (see
Section 4.2.2) and then fed to driver Q101 which
provides the required input level to power amplifier
module U101. Impedance matching between Q101
and U101 is provided by L102 and C106.
The rectified DC level is buffered by voltage
follower U102A and fed through R115 to pin 6 of
U102B. This stage amplifies the difference between
the forward power signal on pin 6 and the reference
voltage on pin 5. This reference voltage controls the
power output, and it is set by the control logic through
potentiometer 2 of U147 on the logic board.
Power amplifier module U101 provides up to 4
watts of RF power at the antenna jack. It contains two
internal amplifier stages, each of which has a separate
supply voltage (Vcc, Vbb Control). The supply
4-4
November 2001
Part No. 001-7240-001
CIRCUIT DESCRIPTION
EEPROM U150, digital potentiometer U147, and
LCD driver U501 on the keypad/display board.
As forward power increases, the output voltage
on pin 7 decreases. U103 then turns off more which
decreases the supply voltage applied to Vbb Control of
U101. This decreases power to maintain a stable
output level. The opposite occurs if forward power
decreases.
NOTE: A block diagram of the RF and logic boards is
located on page 8-8.
Another serial port formed by pins 54 and 56 is
used to transfer programming data to and from an
external computer. This port is fed out of the transceiver on pins 3 and 4 of the accessory connector
(UDC connector). Data is transferred to DTMF
encoder U201 by another serial bus formed by TxD0
and RxD0 (pins 53 and 57). Descriptions of the U208
pins are located in Table 4-1.
4.5.1 CONTROL LOGIC
4.5.2 DISPLAY ASSEMBLY DESCRIPTION
The digital control logic is based on 16-bit
CMOS microprocessor U208. The operating speed is
set by 9.8304 MHz crystal Y202. A clock shift signal
is applied to Q207. This signal goes high to shift the
clock frequency slightly on channels in which the
second harmonic interferes with the receive signal.
U501 on the display board is an intelligent LCD
display controller/driver. It communicates with the
microprocessor on the logic board over a serial bus
consisting of MSCK (serial clock, pin 91), MSO
(serial data, pin 89), and DISST (display strobe, pin
43) signals. U501 is set for 1/3 bias and 1/5 duty cycle
and drives an 8-character, 14-segment display at a 98
Hz frame frequency. LCD display EH1 has 128
segments that are driven by a 34-segment signal with
four common lines.
4.5 CONTROL LOGIC AND DISPLAY
A serial data bus formed by MSI, MSO, and
SER_CLOCK (pins 89-91) is used to transfer data to
and from three external devices. They are 16K x 8
Table 4-1 Microprocessor U208 Pin Descriptions
Pin No.
1
2
3
4
5
6
7
8
9
10
11
12
13
14
15
16
17
18
19
20
Port Name
In/Out
VCC
OPTB
CLR/CODE
KEYS0
KEYS1
Vss
KEYS2
KEYS3
KEYS4
BKLED
Vss
DISEN
KEYR0
Output
Output
Output
Output
Output
Output
Output
Output
Output
Input
Descriptions
Supply voltage (L5V)
Optional signal
Optional encryption control signal
Key matrix scan out
Key matrix scan out
Ground
Key matrix scan out
Key matrix scan out
Key matrix scan out
LCD backlight control signal
Ground
LCD driver chip enable signal
Key matrix scan in
4-5
Active
Low
Low
Low
-
November 2001
Part No. 001-7240-001
CIRCUIT DESCRIPTION
Table 4-1 Microprocessor U208 Pin Descriptions (Continued)
Pin No.
Port Name
In/Out
21
22
23
24
25
26
27
28
29
30
31
32
33
34
35
36
37
38
39
40
41
42
43
44
45
46
47
48
49
50
51
52
53
54
55
56
57
58
59
60
61
62
63
KEYR1
KEYR2
KEYR3
Vss
PTT_OUT
CLK_SHIFT
KEYPAD_INT
OFFREQIN
Vcc
DTMFT
RMUTE
AMUTE
Vss
DISST
PT
W_N
PLLSK
Vss
PLLSO
PLLST
ULOCK
Vcc
DTMFSO
TXD
RXD
DTMFCK
Vss
S5C
SN_TR
FEPCS
Input
Input
Input
Input
Output
Input
Input
Output
Output
Output
Output
Output
Output
Output
Output
Output
Input
Output
Output
Input
Output
Output
Output
Output
Descriptions
Key matrix scan in
Key matrix scan in
Key matrix scan in
Ground
PTT switch
Clock shift control (H = shift)
Keypad control
External pull-up
Main voltage supply switch
L5V
DTMF mute control signal
Receive audio mute control signal
Audio amplifier supply voltage control
Ground
LCD driver chip enable signal
Compander control signal
Wide/narrow band switching
PLL clock
Ground
PLL data
PLL strobe
PLL unlocked signal
L5V
DTMF data
Programming data out
Programming data in
Clock signal for DTMF
Ground
+5C supply control signal
SMARTNET circuit control signal
EEPROM chip select signal
4-6
Active
Low
High
Low
Low
Low
Low
High
Low
High
High
High
High
-
November 2001
Part No. 001-7240-001
CIRCUIT DESCRIPTION
Table 4-1 Microprocessor U208 Pin Descriptions (Continued)
Pin No.
64
65
66
67
68
69
70
71
72
73
74
75
76
77
78
79
80
81
82
83
84
85
86
87
88
89
90
91
92
93
94
95
96
97
98
99
100
101
102
103
104
105
106
Port Name
In/Out
BEEP
P_HOLD
FWE
RESET
L5V
Vcc
X-TAL
EX-TAL
Vss
Vcc
TMUT
T5C
DPTT
R5C
NPSPAC
MSO
MSI
SER_CLOCK
Avcc
Vref
BATT(VCC)
RSSI
L5V
Ground
VVC_LVL
AVss
Vss
TEST
TXPREC
Output
Input
Input
Input
Input
Output
Output
Output
Output
Output
Input
Output
Input
Input
Output
Output
Descriptions
External pull-up
Audio beep tone
Flash memory Write Enable
Reset pulse input
External pull-up
L5V
System clock connection terminal
System clock connection terminal
Ground
L5V
Not used
T5V supply control signal
Delayed PTT signal
R5V supply control signal
Controls NPSPAC channel audio level
Serial data output
Serial data input
Serial data clock
L5V
L5V
Low battery voltage detection
RSSI (Receive Signal Strength Indicator)
L5V
Ground
External pull-up
External pull-up
External pull-up
Ground
Ground
Bypass transmit data filter
Subaudible signaling tone/damp signal output
4-7
Active
High
Low
High
High
High
-
November 2001
Part No. 001-7240-001
CIRCUIT DESCRIPTION
Table 4-1 Microprocessor U208 Pin Descriptions (Continued)
Pin No.
107
108
109
110
111
112
113
114
115
116
117
118
119
120
Port Name
In/Out
MICMUTE
SQUELCH
BWC
RXDATA
TXDATA
SN_RX
MD0
MD1
BOOT1
DPOTST
EXT_DC
-
Output
Input
Output
Input
Output
Input
Input
Output
Input
-
Descriptions
Mutes microphone audio signal
Squelch control
Transmit/receive data filter bandwidth signal output
Receive data input
Subaudible tone/main audio signal output
SMARTNET receive data input
External pull-up
External pull-up
Flash ROM data import control
Digi-pot strobe signal
Option signal input
-
4.6 RECEIVE AUDIO PROCESSING
Also on the input of U101A, Q101 provides
NPSPAC compensation. The base of Q101 is high
when a NPSPAC channel is selected and low at other
times. This grounds R102 in the NPSPAC mode to
lower the input level since NPSPAC channel deviation is higher than narrow band deviation.
The receive audio and data signal from the
limiter/detector module on the RF board is applied to
the following circuits:
•
•
Low
High
Low
-
maintains a constant audio output level since the
higher deviation in the wideband mode results in a
higher input level.
4.6.1 INTRODUCTION
•
Active
Receive Audio Processing - Pin 2 of U101A (see
following information)
Receive Data Processing - Pin 3 of U102A (see
Section 4.7)
SMARTNET™ Data Processing - Pin 2 of U141B
(see Section 4.9)
4.6.3 EXPANDER (U204)
From U101A/B the signal is fed to pin 7 of the
expander in U204. When companding is enabled by a
low input on the PT input (pin 8) of U204, this stage
provides 1:2 expansion of the audio signal to remove
the 2:1 compression that occurred when it was transmitted. This compression and then expansion reduces
the amount of noise present in the audio signal. When
the PT input is high, companding is disabled and the
signal if fed through U204 without expansion.
4.6.2 BANDPASS FILTER (U101)
U101A and U101B form a bandpass filter which
passes frequencies from 300-3000 Hz. This attenuates
low frequency Call Guard (CTCSS/DCS) signaling
and high frequency harmonics. This filter also
provides de-emphasis of the audio signal.
The audio signal is fed out of U208 on pin 15 and
then fed to audio mute gate U202. This gate is
controlled by the RMUTE output (pin 36) of the
microprocessor. The audio is also muted by the audio
amplifier as described in the information which
follows.
On the input of U101A, Q102 provides wide and
narrow band compensation. The base of Q102 is high
in the wideband mode and low in the narrow band
mode. Therefore, R103 is grounded in the wideband
mode which lowers the input level to U101A. This
4-8
November 2001
Part No. 001-7240-001
CIRCUIT DESCRIPTION
Also applied at this point are the DTMF and beep
tones. Muting of the DTMF tones is provided by Q201
which is controlled by the pin 34 output of the microprocessor. The beep tones are synthesized by 5V and
0V levels from the microprocessor on pin 65.
approximately 150 Hz. Then when a high-frequency
Call Guard tone is received, Q103A turns off and the
cut-off frequency is approximately 190 Hz. This
switches additional capacitance into the circuit which
lowers the filter cut-off frequency.
4.6.4 AUDIO AMPLIFIER (U101, U102)
From the filter the data signal is applied to a DC
restoration circuit formed by U103B and U103A.This
circuit converts the data signal from AC floating at
half supply to a digital signal at 0 and 5-volt levels that
can be read by the microprocessor. U103B is a standard noninverting amplifier with a gain of approximately 5.6 set by R127 and R126 (R126 is AC
grounded by C120). Diodes D101 and D102 charge
and discharge C120 to establish a DC reference on
pins 2 and 6 of U103 that is the average of the positive
and negative going alternations of the data signal.
From mute gate U202, the audio signal is fed
through the keypad/display board to volume control
VR901 which sets the input level to the audio amplifiers. This signal from VR901 is fed back to the
keypad/display board and applied to pin 7 of audio
amplifiers U101 and U102.
With normal operation when the internal speaker
is used, U101 provides the required amplification.
However, when an external speaker is used, U101 is
disabled and U102 provides the required amplification. When any load of approximately 1k ohm or less
is connected to pin 10 of the accessory jack, Q106
turns on and Q102 turns off. This removes supply
voltage from U101 and applies it to U102.
The amplified data signal is applied to pin 3 of
U103A. When this level rises above the reference
level on pin 2, the output on pin 1 goes high (5 volts).
Conversely, when the data signal falls below the reference level, the output goes low (0 volts). In the
transmit mode, Q103B is turned on which effectively
grounds pin 3 of U103A and forces the output on pin 1
low.
The supply voltage to the audio amplifiers is also
controlled by Q103 and Q105. When the audio is
muted such as when no tones are sounding or no
message is being received, the AMUT (pin 37) output
of the microprocessor is low. This turns off both Q103
and Q105 and removes supply voltage from the audio
amplifiers which helps conserve battery power. The
receive audio signal is also muted by gate U202 as
previously described.
4.7.2 TRANSMIT DATA FILTER (U145A/B)
The transmit data signal is produced by the
TXDATA and TXPREC outputs of the microprocessor (pins 111 and 106). A pseudo sine wave is
produced by the four voltage levels that can be
produced by these outputs. This signal is fed to a
transmit data filter formed by U145A/B. This filter is
the same as the receive data filter described in the
preceding section. It attenuates harmonics present in
the waveform produced by the microprocessor.
4.7 RECEIVE AND TRANSMIT DATA
PROCESSING
4.7.1 RECEIVE DATA FILTER/DETECTOR
(U102A/B, U103A/B)
The input and output signals of the data filter are
fed to gate U141A. This gate is used to bypass the
transmit data circuit during alignment so that a wide
range of harmonic frequencies are passed for use in
setting modulation balance. The control signal to this
gate is the TEST signal from pin 105 of the microprocessor. This signal is low when the transmit data filter
is bypassed.
The receive data (and audio) signal from the
limiter/detector on the RF board is routed to a receive
data filter formed by U102A and U102B. This is a
low-pass filter which attenuates voice and other
harmonic frequencies above the data band. The passband of this filter is controlled by the bandwidth
control signal applied to Q103A. When digital Call
Guard data or a low-frequency Call Guard tone is
being detected, this signal is high which turns on
Q103A. The cut-off frequency of the filter is then
The signal is then routed to pin 3 on gate U141C
where either it or the SMARTNET™ data signal from
4-9
November 2001
Part No. 001-7240-001
CIRCUIT DESCRIPTION
approximately 300 Hz to attenuate frequencies that
could cause interference with the Call Guard signals.
U143A is selected. The data output signal on U141C,
pin 4 is then applied to pin 24 of U147 which is the
input of the digitally controlled potentiometer 1 in that
device. The data modulation level is set during alignment and controlled by the logic. The output of this
potentiometer on pins 22 and 23 is then fed to U148A
where it is combined with the transmit audio signal
(see Section 4.8.3).
4.8.2 LIMITER (U151A)
Pre-emphasis of the DTMF tone and microphone
audio signals is provided by C160/R168. U151A is an
amplifier functioning as a limiter (limiting occurs
when it saturates). Limiting prevents overmodulation
caused by high input levels from the internal or
external microphone. The bias voltage to this stage
and also to U151B is produced by voltage divider
R170/R171.
4.8 TRANSMIT AUDIO PROCESSING
4.8.1 GATE (U203), HIGH-PASS FILTER (U151)
The internal microphone audio signal is applied
to pin 6 of gate U201B on the keypad/display board,
and the external microphone signal from pin 2 of the
accessory connector is applied to pin 2 of gate U201A.
This gate is controlled by the Mic Sense signal from
pin 7 of the accessory connector. When no external
microphone is connected, this input is pulled high by
R202 and U201B is enabled and U201A disabled.
Q202 is controlled by the T5C signal and therefore is
on in the transmit mode and off in the receive mode.
4.8.3 LOW-PASS FILTER (U146A/B)
U146A and U146B from a low-pass splatter filter
which attenuates frequencies above approximately 3
kHz. This prevents adjacent channel interference
caused by the harmonic frequencies which that result
from amplitude limiting.
The output signal from this filter is applied to
digital potentiometer 3 on pin 20 of U147 which sets
the transmit audio/DTMF deviation level. This level is
set via the control logic when the transceiver is
aligned.
The microphone audio signal is then applied to
mic audio mute gate U203B on the logic board. This
gate is controlled by the signal on pin 107 of the
microprocessor (low = mute).
The transmit DTMF tones from pin 5 of U201 are
combined with the beep tones fed through R204 and
then applied through C204 and R203 to pin 2 of gate
U203A. This gate and Q201 are controlled by pin 34
of the microprocessor (low = mute).
The transmit audio/DTMF signal is then
combined with the transmit data signal by U148A. The
output signal on pin 1 of U148A is fed to the TCXO
on the RF board and also to digital potentiometer 4 on
pin 7 of U147. The output signal from this potentiometer on pin 8 is applied to the VCO on the RF board.
The level of this signal is set via the control logic
during alignment to balance the TCXO and VCO
modulation signals.
The microphone audio signal from U203B and
the DTMF tones from U203A are then combined and
applied to pin 3 of the compander in U204. When
companding is enabled by a low input on the PT input
(pin 8) of U204, this stage provides 2:1 compression
of the audio signal. This compression and then reexpansion when it is received reduces the amount of
noise present in the audio signal. When the PT input of
U204 is high, companding is disabled and the signal is
fed through U204 without compression.
4.9 SMARTNET DATA PROCESSING
NOTE: The SMARTNET™/SmartZone® data
processing circuit is not currently used.
A filter formed by U142A/B and U143A provides
filtering of both the transmit and receive SMARTNET/
SmartZone data signals. Switching of these signals is
provided by gate U141B which is controlled by pin 62
of the microprocessor. When this signal is low, the
The transmit audio/DTMF signal is fed out of
U204 on pin 2 and applied to a high-pass filter formed
by U151B. This filter has a –3dB cutoff frequency of
4-10
November 2001
Part No. 001-7240-001
CIRCUIT DESCRIPTION
signal from AC floating at half supply to DC levels of
0 and 5 volts that can be detected by the microprocessor. Diodes D141 and D142 charge and discharge
C148 and C150 to establish a DC reference on pin 6 of
comparator U143B that is the average of the positive
and negative going alternations. Q141 turns on in the
transmit mode which grounds pin 6 and disables this
circuit.
transmit data signal on pin 2 is selected is routed to the
filter, and when it is high the receive data signal on
pin 1 is routed to the filter.
U142B, U142A, and U143A form a 1800 Hz
low-pass filter which attenuates unwanted frequencies
above the SMARTNET/SmartZone data band. The
output of this filter on U143A, pin 1 is fed to
U144A/B which provide DC restoration when data is
being received. The signal is also fed to gate U141C in
the transmit data circuit to be transmitted when applicable.
In the transmit mode, gate U141C selects either
the SMARTNET data signal or the LTR/Call Guard
data signal. It is controlled by the same signal that
controls U141B. The output signal on pin 4 is then
applied to potentiometer 1 in U147. Refer to Section
4.7.2 for more information on the rest of this circuit.
The DC restoration circuit formed by U144A/B
and U143B is similar in function to the receive data
circuit described in Section 4.7.1. It converts the data
4-11
November 2001
Part No. 001-7240-001
ALIGNMENT PROCEDURE
SECTION 5 ALIGNMENT PROCEDURE
RPI-Transceiver Cable
Part No. 597-7200-031
Remote Programming Interface (RPI)
Part No. 023-9800-000
Audio
Generator
680-Ohm
Speaker Load
PC-Compatible
Computer
CAUTION
Make sure that the programming cable is
attached to the radio with the cable up as shown.
Attempting to attach it the other way may result
in serious damage to the radio.
50-ohm
Load
Signal Generator/
Comm. Monitor
Wattmeter
Figure 5-1 Alignment Setup Diagram
5.1 GENERAL
same as that used for programming. This equipment is
shown above and also described in Section 3.1.
NOTE: Special test operating code must be loaded
before this transceiver can be aligned using PCTune.
Refer to Section 5.1.2 for more information.
Only two adjustments are made manually and the
others are made digitally using the PCTune software.
The manual adjustments are squelch sensitivity and
TCXO frequency, and if they do not need to be reset,
the transceiver can be tuned without any disassembly
or the need for a special test cable.
5.1.1 INTRODUCTION
The alignment procedure described in this section
should be performed if repairs are made that could
affect the factory alignment. In addition, before a
transceiver is initially placed in service, the performance tests in Sections 5.14 and 5.15 should be
performed.
5.1.2 SPECIAL TEST CODE REQUIRED
This transceiver does not have a test mode that is
selected for alignment. Instead, special test operating
code is loaded and the PCTune program then automatically selects the frequencies and other test conditions
that are required to perform the alignment. Then when
To perform the alignment described in this
section, special PCTune and PCFlash software is
required (see Table 1-1). The setup is basically the
5-1
November 2001
Part No. 001-7240-001
ALIGNMENT PROCEDURE
bility and microphone and speaker audio jacks that are
required for alignment. Connect the test setup as
shown in Figure 5-1. Refer to Section 3.1 for more
information.
alignment is complete, the LTR-Net operating software is reloaded. The procedure is described in the
following section.
If the transceiver must be manually controlled to
perform testing or troubleshooting, program temporary
conventional channels or use the special test features
available with the test code (see Section 5.16).
Starting PCFlash and PCTune
Select Start > Programs > EFJohnson and then
click the PCFlash 72xx or PCTune icon as applicable.
5.2 LOADING OPERATING CODE
5.2.2 SAVING PERSONALITY INFORMATION
5.2.1 GENERAL
When temporary test operating software is loaded
using PCFlash, any personality information previously programmed in the transceiver (see Section 3) is
lost. Therefore, if you wish to restore this information
after the alignment is complete, save the personality
information to a disk file as follows before the test
software is loaded:
Introduction
This section describes how to re-Flash the transceiver with test operating code and then re-Flash it
again with LTR-Net operating code when alignment is
complete.
1. Start the personality program as described in
Section 3.2.3. Connect the test setup and make sure
that the switch on the RPI is away from the LED so
that it indicates green.
PCFlash and PCTune Software Installation
The PCFlash and PCTune programs are shipped
on separate CDs as shown in Table 1-1. These
programs are installed separately as follows:
2. With the test setup connected, upload the parameters
stored in the transceiver by selecting the Transfer >
Read Setup Params in the menu bar as described in
Section 3.7.
1. Close all applications that are currently running.
Insert the disk containing the software in the CD
drive.
3. Save the parameters to a disk file by selecting File >
Save As in the menu bar (see Section 3.5).
2. To install the PCFlash program, select from the
Windows® taskbar, Start > Run and then Browse to
the drive containing the CD and select the
“PCFlash.exe” file. Click OK and follow the onscreen instructions to install the program and data
files.
4. When alignment is complete and the LTR-Net operating software has been reloaded, open the saved file
by selecting File > Open. Then reprogram the transceiver by selecting Transfer > Write Setup Params
as described in Section 3.7.
3. To install the PCTune program, insert the CD
containing that program in the CD drive and select
the “PCTune.exe” file and follow the on-screen
instructions as in the preceding step.
5.2.3 LOADING TEST CODE
NOTE: If the transceiver contains personality information that you want to restore after the alignment is
complete, be sure to save it to a disk file as described
in the preceding section before performing this
procedure.
Test Setup
The same basic computer setup used to perform
personality programming is used to perform the alignment procedure described in the following information. Only Remote Programming Interface (RPI), Part
No. 023-9800-000, can be used for alignment because
this is the only RPI that has Flash programming capa-
Proceed as follows to load the temporary test
operating (Flash) code required to run the PCTune
program (see Section 5.1.2).
5-2
November 2001
Part No. 001-7240-001
ALIGNMENT PROCEDURE
NOTE: The test operating code also provides several
transceiver test functions that are described in Section
5.16.
1. Connect the test setup and make sure that the switch
on the front of the RPI is set to the Flash programming position (toward the LED so that it indicates
amber).
7. When alignment is complete, reload the LTR-Net
operating code by clicking the “Set File” button and
selecting the “00352xx0.s19” file. Then click the
“Program Radio” button. This file is included with
the PCFlash program and should have been automatically copied when the program was installed.
2. Cycle transceiver power. This display will be blank
when it powers up.
3. Start the PCFlash program as described in Section
5.2.1. The main screen which follows is then
displayed. (Clicking “PC Flash 72xx” instead of
“PC Flash” automatically selects the 72xx Boot
Loader file as described in the next step.)
8. Reprogram the personality parameter as described
Section 5.2.2, step 4, if they were previously saved
or as described in Section 3 if they were not saved.
5.3 PCTUNE DESCRIPTION
5.3.1 PCTUNE MENU BAR
PCFlash Main Screen
4. Select the Boot Loader file if required by clicking
the Set File button and selecting the
“72XX_loader.s19” file. This file contains the information required by PCFlash to program 7243
models. (This file and the Flash File should have
automatically copied to the PCFlash directory when
the program was installed.)
The main PCTune screen menu bar is shown
above. The following menus are selected:
File - Selects “Exit” which closes the PCTune
program.
5. Select the Flash File by clicking the Set File button
and selecting the “00342xx0.s19” file (the “xx”
indicates the software version number). This file
contains the test code that is loaded into the transceiver. It is included with the PCTune software, and
it also should have been automatically copied when
the program was installed.
ComPorts - Displays a screen which selects the
computer serial port being used.
Radio
Load Default Tune Parameters - Downloads to the
transceiver default settings for the various
electronic adjustments.
6. Make sure that the correct serial port is selected and
then click the “Program Radio” button to program
the transceiver with test software. When downloading is complete, PCTune can be used to tune the
transceiver as described in Section 5.4.
Tune Portable - Displays the screen shown in
Figure 5-2 which selects the various alignment
functions. Refer to Section 5.3.2 for more
information.
5-3
November 2001
Part No. 001-7240-001
ALIGNMENT PROCEDURE
Figure 5-2 PCTune Tune Radio Screen
Display Tune Parameters - Displays the following
screen which indicates the settings currently
programmed into the transceiver.
Display Factory Info Screen
5.3.2 RADIO TUNE SCREEN
CAUTION
Clicking any of the top six buttons on the Radio Tune
screen in Figure 5-2 selects that test and immediately
keys the transmitter. Therefore, make sure that no test
equipment is connected to the antenna jack that could
be damaged. Click the “Disable Transmit” button to
turn the transmitter off.
Display Electronic Factory Info - Displays the
following screen which indicates the model
number, serial number, and other information
programmed in the transceiver (see Sections 1.3
and 1.4).
The Radio Tune screen shown in Figure 5-2
selects the various alignment functions. This screen is
displayed by selecting Radio > Tune Portable in the
menu bar (see preceding section). The various adjust-
Help - Displays the PCTune version number.
5-4
November 2001
Part No. 001-7240-001
ALIGNMENT PROCEDURE
adapter may be required to connect test equipment to
this jack. An SMA male to BNC female adapter is
available by ordering Part No. 515-3102-060.
ments that are performed are shown on the eight
buttons on the left side. To perform just one adjustment or perform the adjustments individually, click the
applicable button for that adjustment. Alternatively, to
have the program automatically step through all
adjustments, click the “Tune Entire Radio” button on
the top.
Test Cable - An extension test cable (see Table 1-1) is
required to operate the transceiver when it is opened.
This cable reconnects the keypad/display board to the
audio/logic board.
RF Signal Generator - When connecting the generator to the antenna jack, use at least a 6 dB pad
between the generator and transceiver. This protects
the generator if the transmitter is accidentally keyed
and also ensures that a 50-ohm load exists. The input
levels listed in the PCTune screens are at the antenna
jack, so increase the generator output accordingly.
Power Source - If a battery is used to provide transceiver power during alignment, make sure it is in good
condition and fully charged. Power output levels are
with 7.5 volts applied to the transceiver. Typical
current when transmitting at high power is 2.0 A.
Power Adjust Screen
A typical adjustment screen is shown above. The
general function of the buttons in this screen are as
follows:
•
•
Wattmeter/Load - The wattmeter and dummy load
must measure and dissipate approximately 4 watts.
The Down, Down Fast, Up, and Up Fast buttons
change the setting.
Audio Generator - The audio generator is connected
to the larger (1/8”) mono phone jack of the RPI shown
in the following illustration.
The Next Data Point button selects the next
frequency or test point and the Prev Data Point
button selects the previous frequency or data point.
•
The Save Data button is clicked if the new tuning
values will be used.
•
The Exit button exits the tuning step. If the Save
Data button has not been pressed, another window is
then displayed to select if the data should be saved.
If “No” is selected, the new tune values are ignored
and the old values continue to be used.
Speaker Audio
Out Jack
2.6 mm/3/32”
Phone Jack
Mic Audio In
Jack
3.6 mm/1/8”
Phone Jack
Speaker Load - The speaker load is connected to the
smaller (3/32”) mono phone jack of the RPI as shown
above. This is a low level audio output that requires a
load of approximately 680 ohms.
5.4 ALIGNMENT PROCEDURE
5.4.1 TEST SETUP
Computer and RPI - The RPI is connected to the
computer and transceiver as described in Section 3.1.
Note that RPI, Part No. 023-9800-000 must be used.
Other RPI’s do not have the jacks required to inject
mic audio and monitor speaker audio with a computer
Connect the test setup shown in Figure 5-1. Additional information follows on equipment in this setup.
Antenna Jack Adapter - The transceiver antenna jack
is an SMA female type. Therefore, some sort of
5-5
November 2001
Part No. 001-7240-001
ALIGNMENT PROCEDURE
5.7 LOW RF POWER ADJUST
connected to the accessory jack. Make sure that the
switch on the RPI is away from the LED so that it
indicates green.
1. If manually selecting each test, click the “Low
Power” button in the screen shown in Figure 5-2.
Otherwise, this function is selected automatically
after completing the preceding High Power
adjustment.
The following sections describe the adjustments
that are made to align the transceiver.
2. Set the low power output for 1.0 watt at all data
points.
5.5 FREQUENCY CHECK/ADJUST
5.8 MODULATION BALANCE
NOTE: The transmitter immediately keys when the
following function is selected. To turn the transmitter
on and off, click the “Disable Transmit” button (see
screen which follows).
1. If manually selecting each test, click the “Mod
Balance” button in the screen shown in Figure 5-2.
Otherwise, this function is selected automatically
after completing the Low Power adjustment.
The transmit frequency should be checked with
the ambient temperature near the TCXO calibration
reference of 77° F (25° C). This ensures that the
frequency will be within tolerance at the temperature
extremes. At room temperature, this frequency should
be within ± 400 Hz. Checking the transmit frequency
also checks the receive frequency. Proceed as follows:
2. View the transmit modulation waveform on the CRT
of a communication monitor. If applicable, set the
monitor for de-emphasis off, high-pass/bandpass
filter off, low-pass filter 15 kHz, and FM peak
detection active.
1. Connect a wattmeter and dummy load to the antenna
jack as shown in Figure 5-1.
3. The detected signal should be a 100 Hz square wave
at a deviation of approximately 700 Hz. Follow the
instructions on the screen and adjust at all data
points for the best demodulated square wave with
minimum tilt and overshoot.
2. Click the “Tune Entire Radio” button to automatically step through all adjustments or click the “High
Power” button to perform only this adjustment.
5.9 DATA DEVIATION
3. Monitor the transmit frequency with a communications monitor set to the frequency displayed on the
screen.
1. If manually selecting each test, click the “Data
Deviation” button in the screen shown in
Figure 5-2. Otherwise, this function is selected automatically after completing the preceding Modulation Balance adjustment.
4. If readjustment is required, the transceiver must be
opened to access the manual adjustment point as
described in Section 5.13. Adjust capacitor in
TCXO U201 for the correct frequency (see Figure
5-3).
2. Monitor the transmit modulation signal with a
communication monitor set as in the preceding step.
Adjust the wideband and narrow band data deviation at all data points for the levels indicated on the
screen.
5.6 HIGH RF POWER ADJUST
5.10 AUDIO DEVIATION
1. The high power test should already be selected for
the preceding adjustment.
1. If manually selecting each test, click the “Audio
Deviation” button in the screen shown in
Figure 5-2. Otherwise, this function is selected automatically after completing the preceding Data Deviation adjustment.
2. Set the high power output for 4.0 watts at all data
points by clicking the Down/Down Fast or Up/Up
Fast buttons on the screen.
5-6
November 2001
Part No. 001-7240-001
ALIGNMENT PROCEDURE
ceiver must be opened as described in the next
section to access the adjustment point.
2. Inject a 1 kHz signal at the level indicated on the
screen into the Mic Audio jack of the RPI (see
Section 5.4.1).
5. Set the signal generator for the output signal
displayed on the screen and slowly adjust squelch
potentiometer VR401 (see Figure 5-3) until the
receiver just squelches (audio mutes).
3. Monitor the transmit modulation signal with a
communication monitor and adjust the wideband
and narrow band deviation at all data points for the
levels indicated on the screen.
5.11 RECEIVE BANDPASS FILTER ADJUST
5.13 OPENING TRANSCEIVER
1. If manually selecting each test, click the “Rx Bandpass Filter” button in the screen shown in
Figure 5-2. Otherwise, this function is selected automatically after completing the preceding Audio
Deviation adjustment.
NOTE: The following procedure needs to be
performed only if the frequency and squelch sensitivity
described in Sections 5.5 and 5.12 need to be adjusted.
1. If applicable, remove the programming cable from
to the accessory connector. Then open the transceiver as described in Section 1.11.
2. Set the signal generator to the indicated frequency
with an unmodulated output at a level of –95 dBm.
3. Click the Fast Up and Fast Down buttons to determine the peak reading. If there are several peaks, use
the center value.
2. Connect the optional extension test cable (see Table
1-1) between the jacks on the keypad/display and
audio/logic boards. This cable is required for the
transceiver to operate.
4. Adjust the D/A Setting at all data points for half the
highest real time RSSI level that was observed.
3. Reattach the battery pack to provide power to the
transceiver.
5.12 RSSI AND SQUELCH ADJUST
4. Temporarily reattach the programming cable to the
accessory connector (a rubber band can be used to
hold it in place). Perform the frequency and squelch
adjustments as described in the preceding sections.
The first part of this adjustment electronically
sets the RSSI, and the second part is used to manually
set the squelch threshold. Proceed as follows:
1. If manually selecting each test, click the “RSSI and
Squelch” button in the screen shown in Figure 5-2.
Otherwise, this function is selected automatically
after completing the preceding Rx Bandpass Filter
adjustment.
2. Connect a SINAD meter to the speaker output jack
of the RPI (see Section 5.4.1) and inject the channel
frequency and signal level indicated on the screen.
3. Follow the instructions on the screen to sample the
RSSI level at several data points.
VR401
(Sq Adjust)
4. When all the data points have been set, click the Exit
button. The squelch adjust screen is then displayed.
If the squelch sensitivity must be adjusted, the trans-
TCXO
Freq Adjust
Test Cable
Figure 5-3 Internal Adjustment Points
5-7
November 2001
Part No. 001-7240-001
ALIGNMENT PROCEDURE
PERFORMANCE TESTS
5.14 RECEIVER PERFORMANCE TESTS
2. Decrease the signal generator output to obtain a 12
dB reading on the SINAD meter. The signal generator output should be 0.35 µV maximum.
5.14.1 PRELIMINARY SETUP
With the standard LTR-Net operating code, the
transceiver does not have a special test mode that can
be selected to perform testing. Therefore, program
temporary conventional channels or use the functions
available with the test code to perform this function.
3. Check both wide and narrow band channels if applicable, and also check the channels on each end of
the band.
If programming test channels, program channels
near the low, middle, and high ends of the band (wideband, narrow band or both) and with and without Call
Guard (CTCSS/DCS) squelch as applicable. In addition, to check high and low power and talk-around
operation, program High/Low Power and Repeater
Talk-Around option switches.
With the test setup used for the preceding test,
slowly increase the signal generator output until the
squelch just opens (audio is enabled). Then decrease
the signal generator output until it just closes. The
squelch should open after 12 dB SINAD and close
before 6 dB SINAD.
When the temporary special test code is loaded as
described in 5.2, there are several test channels and
functions that can be selected. Refer to Section 5.16
for information on these test functions.
5.14.4 AUDIO POWER AND DISTORTION
5.14.3 SQUELCH SENSITIVITY
To measure audio output power, the actual level
across the speaker must be measured because full
output power is not available at the accessory
connector. If a load of approximately 1k ohm or less is
connected to the speaker output of the accessory
connector, it must be disconnected to enable the
internal speaker. Proceed as follows:
Proceed as follows to check receiver operation:
1. Select the channel near the center of the band
(around 450 MHz).
2. Connect the signal generator to the antenna jack (see
Section 5.4.1 for more information). Set the output
to the channel frequency, modulated with 1 kHz at 3
kHz (wideband channels) or 1.5 kHz deviation
(narrow band channels).
1. Open the transceiver as described in Section 5.13
and connect a 16-ohm load in place of the speaker.
Connect an AC voltmeter and distortion meter
across the load (both should have floating inputs).
2. Set the signal generator output for –60 dBm (220
µV). Minimum audio power should be 0.5 watt
across the 16-ohm load (2.8 V rms). Distortion
should be less than 5% at 0.5 watt.
5.14.2 SINAD SENSITIVITY
NOTE: The audio output level of the accessory connector is at a lower level than at the internal speaker.
In addition, the internal speaker automatically mutes
when a load of approximately 1k ohm or less is connected to this output.
5.14.5 RECEIVER CURRENT DRAIN
Maximum transceiver current with 0.5-watt audio
output is 275 mA. With the receiver squelched, it
should be 100 mA maximum.
1. Connect a SINAD meter to the speaker output of the
RPI (see Section 5.4.1).
5-8
November 2001
Part No. 001-7240-001
ALIGNMENT PROCEDURE
5.15 TRANSMITTER PERFORMANCE TESTS
5.15.3 TRANSMIT MODULATION
5.15.1 POWER OUTPUT
1. Select a channel not programmed for Call Guard
(CTCSS/DCS) squelch and monitor the transmit
signal with a communication monitor. Speak into
the microphone with a normal voice and modulation
should be approximately 3.4 kHz (wideband) or 1.4
kHz (narrow band).
Refer to Section 5.14.1 for information on test
channels. Proceed as follows:
1. Connect a wattmeter and dummy load to the antenna
jack as described in Section 5.4.1.
2. Select a channel programmed for Call Guard
squelch and with no voice or other microphone
input signal, data deviation should be 1.0 kHz
(wideband) or 0.8 kHz (narrow band) ± 200 Hz.
2. Key the transmitter and high power output should be
3.8 - 4.2 watts. Check channels on both ends of the
band and in the talk-around mode.
3. Speak into the microphone with a channel
programmed for Call Guard squelch selected.
Maximum total audio and Call Guard deviation
should be 4.7 kHz (wideband) or 2.3 kHz (narrow
band).
3. Select a low power channel and power output
should be 0.8-1.2 watt in the standard and talkaround modes.
5.15.4 TRANSMITTER CURRENT DRAIN
5.15.2 TRANSMIT FREQUENCY
Maximum current drain in the transmit mode
should be as follows:
Monitor the transmit frequency with a communication monitor set to the channel frequency. At room
temperature, the frequency should be within ± 400 Hz.
This also checks the receive frequency.
High Power - 2.0 A
Low Power - 950 mA
5-9
November 2001
Part No. 001-7240-001
ALIGNMENT PROCEDURE
5.16 TEST CODE FUNCTIONS
most six characters of the display (the right digit indicates the group number as described in the next
section). The last selected channel is saved at power
down. The test channels are listed in Table 5-1.
5.16.1 GENERAL
When the special test operating code has been
loaded as described in Section 5.2.3, various test channels and test functions can be selected. The functions
selected by the various keys and the section in which
they are described are as follows:
Key
5.16.3 MODULATION MODES
Up to seven different subaudible modulation
signals can be selected. To select the modulation select
mode, press the GRP key. The selected modulation
signal is indicated by the group number displayed as
the right-most digit in the display. Press the “*” key to
increase the group number and the “#” key to decrease
the group number.
Function (See Section)
SYS
GRP
FCN SYS
FCN GRP
FCN 1
FCN 4
Channel select mode (5.16.2)
Modulation select mode (5.16.3)
RF power toggle (5.16.4)
Wide/Narrow band select (5.16.4)
Microphone mute (5.16.4)
Carrier squelch (5.16.4)
Red Button Parameter Edit Mode (5.16.5)
The last selected group is saved at power down,
and the DCS/CTCSS schemes of Groups 4-7 are also
active in the receive mode. The modulation signals
selected by Groups 1-7 are as follows:
Table 5-1 Test Channels
Channel
Tx/Rx Freq.
(MHz)
1
2
3
4
5
6
7
8
9
10
11
12
13
14
15
16
17
430.0125
432.5375
435.1125
437.5375
440.0125
442.5375
445.1125
447.5375
450.0125
452.5375
455.1125
457.5375
460.0125
462.5375
465.1125
467.5375
469.9875
Group
1
2
3
4
5
6
7
Modulation Signal
No transmit subaudible modulation
134 Hz square wave
Tx data filter bypassed, 134 Hz square wave
DCS (Digital Call Guard squelch) 023 code
CTCSS (Tone CG squelch) 67.0 Hz code
CTCSS (Tone CG squelch) 100.0 Hz code
CTCSS (Tone CG squelch) 210.7 Hz code
5.16.4 MISCELLANEOUS FUNCTIONS
The following functions can be selected by
pressing the FCN key and then another key:
FCN SYS - Toggles RF output power. Low power is
indicated by the “L” icon in the display.
FCN GRP - Toggles receive IF bandwidth. Narrow
band is indicated by “C” in the display.
5.16.2 TEST CHANNELS
FCN 1 - Toggles microphone mute. The microphone
is muted when is indicated in the display.
Up to 17 test channels can be selected. To select
the channel select mode, press the SYS key and then
press the “*” key to increase the channel number and
the “#” key to decrease the channel number. The
selected channel frequency is indicated by the left-
FCN 4 - Selects carrier controlled squelch regardless
of the CTCSS/DCS code selected by the Group
function. This mode is indicated when
is
displayed.
5-10
November 2001
Part No. 001-7240-001
ALIGNMENT PROCEDURE
5.16.5 PARAMETER EDIT MODES
Selecting Parameters
General
The parameters that can be selected and the key
sequence used to select each are as follows:
Some levels set during alignment can be manually controlled by selecting the Parameter Edit mode.
This mode is selected and controlled by the following
keys:
FCN 5 (Receive RF Bandpass Filter) - Changing
the number changes the center frequency.
FCN 6 (Receiver Squelch) - Increasing the
number selects a tighter squelch setting for the
currently selected channel bandwidth.
Red Button on Top Panel - Enables and disables
the Parameter Edit mode indicated by the
icon
in the display.
“*”/“#” - Press the “*” key to increase the setting
and the “#” key to decrease the setting.
FCN 7 (Modulation Balance) - Increasing the
number increases the signal level at the modulation summing point.
FCN 0 - Saves the current setting and exits the
Parameter Edit mode.
FCN 8 (Audio Deviation) - Increasing the number
increases the transmit audio level.
FCN 3 - Does not save the current setting, restores
previous setting, and exits the Parameter Edit
mode.
FCN 9 (Data Deviation) - Increasing the number
increases the data deviation level.
FCN 0 (RF Power Output) - Increasing the
number increases the power output level for the
selected range.
FCN GRP - Changes the edit value to “0”.
5-11
November 2001
Part No. 001-7240-001
LTR-NET OVERVIEW
SECTION 6 LTR-NET OVERVIEW
Locality 1
Locality 2
Locality 3
Viking® VX Repeaters
Viking® VX Repeaters
Viking® VX Repeaters
Data
Bus
Data
Bus
Subscriber
Units
Data
Bus
Subscriber
Units
Subscriber
Units
Voice and
Data Link
System and Subscriber
Manager
Voice and
Data Link
Voice and
Data Link
3000-Series
Switch
3000-Series
Switch
Public Switched
Telephone Network
(PSTN)
Call Processor
Call Processor
Ethernet Link
Ethernet Link
Ethernet Link
Figure 6-1 LTR-Net System Diagram
6.1 INTRODUCTION
6.1.2 COMPATIBILITY WITH LTR
6.1.1 GENERAL
LTR Subscriber Units Operating in LTR-Net Systems
LTR-Net™ is the next generation of LTR®
trunked radio signaling. It provides many new
enhanced operating features while maintaining
compatibility with most current LTR equipment. Some
new LTR-Net features include roaming, unique ID
calls, and over-the-air reprogramming. Equipment
changes include the addition of an LTR-Net 3000Series switch and System and Subscriber Manager to
provide system control. A diagram of an LTR-Net
system is shown in Figure 6-1.
•
Standard group calls occur in the normal manner.
These calls can be to other LTR subscriber units or
between LTR and LTR-Net subscriber units.
•
Wide area group calls can be placed and received
(see Section 6.4).
•
LTR telephone calls can be placed and received in
the normal manner.
•
Enhanced LTR-Net features such as roaming and
unique ID calls are not available.
6-1
November 2001
Part No. 001-7240-001
LTR-NET OVERVIEW
•
System Control
Current LTR subscriber units can remain in service
and LTR-Net subscriber units added gradually. This
makes upgrading to LTR-Net very convenient and
less costly.
•
When new channels are added to a locality,
subscriber units can be updated with those channels
over the air. This eliminates the need to bring them
back in for reprogramming.
•
Over-the-air subscriber unit programming allows
the ID codes of up to 99 systems and 99 groups to be
changed.
•
The system/group currently selected by a subscriber
unit can be changed over the air.
LTR-Net Subscriber Units Operating on LTR Systems
•
•
LTR-Net subscriber units can be programmed for
LTR operation. Therefore, they can place and
receive LTR group and telephone calls in the normal
manner.
Enhanced LTR-Net features such as roaming and
unique ID calls are not available to LTR-Net
subscriber units operating on LTR systems.
A temporary UID keyed to the ESN can be assigned to
a subscriber unit when it roams to a new radio system
(this feature has not yet been implemented).
6.1.3 LTR-NET FEATURES
•
Unauthorized subscriber units can be temporarily or
permanently disabled.
•
A subscriber unit can be interrogated to determine if
it is currently in service. It can also be interrogated
for its ESN or unique ID code (see following).
Networking
•
Multiple LTR-Net and LTR localities may be linked
together to provide wide-area coverage.
•
LTR-Net subscriber units can roam between LTRNet localities and register and de-register automatically when entering and exiting.
Security
Calls from one type of subscriber unit can be
patched to another type of subscriber unit at another
locality. For example, an LTR-Net subscriber unit
could talk to a conventional subscriber unit. Calls can
even be cross-band, for example, an UHF conventional subscriber unit could talk to an 800 MHz LTRNet subscriber unit.
•
Each LTR-Net subscriber unit is assigned a unique
Electronic Serial Number (ESN), and no two
subscriber units in existence should have the same
ESN. This number can be interrogated as stated
above and is used for such things as assigning a
temporary UID.
•
Over 65,500 unique ID codes can be assigned in
each system. Each subscriber unit in a locality is
usually assigned a different unique ID code
although more than one can have the same code if
desired.
•
Unique ID and group validation (by home repeater/
group ID) is performed. If an unauthorized ID is
detected, the call is terminated.
Special Calls
•
•
Unique ID (UID) - Calls to be placed to specific
subscriber units in the same locality or some other
locality.
Directed Group - Calls can be placed to any group
in the same locality or some other locality.
•
Telephone - Calls can be placed over the public
switched telephone network (PSTN).
•
Data - Data can be transmitted to specific location
selected by unique ID code (not currently available).
Miscellaneous
•
6-2
Home channel backup is provided by the use of a
status channel at each locality. The status channel
can be used for voice traffic the same as normal
channels, but is usually not assigned as a home
channel.
November 2001
Part No. 001-7240-001
LTR-NET OVERVIEW
•
Typical access time for group calls is the same as
with LTR operation.
information for all subscriber units on that locality.
Refer to Section 6.6 for more information.
•
Priority access, automatic emergency calls, status
messaging, and system security keys are not
available.
System, Radio - This refers to the radio equipment and
other infrastructure that is accessed when a call is
placed.
System, Selectable - A subscriber unit has selectable
systems and groups. Each selectable system consists
or one or more groups and is programmed with a
unique home repeater (see Section 2.3.12 for more
information). A radio system refers to the radio equipment that is accessed when calls are placed.
6.1.4 DEFINITIONS
The following are some terms that are used
frequently when describing LTR-Net operation:
Group - A subscriber unit has selectable systems and
groups. Each system can have several groups. The
group selects the call type and the subscriber unit or
units which receive the call. Refer to Section 2.3.12
for more information.
Subscriber Unit - A generic term referring to both the
mobile and portable transceivers being used in the
radio system.
Trunked Radio System - A radio system which utilizes
multiple radio channels and automatic channel
switching to allow all users equal access to any
channel not in use. This results in minimum waiting to
make a call and maximum utilization of the available
radio channels.
Home Repeater - Each selectable system of LTR and
LTR-Net subscriber units has one of the locality
repeaters assigned as their “home” repeater. This is the
repeater from which “free” and “channel-in-use”
information is received (see Section 6.6). In addition,
with standard group calls, the home repeater number
and a group ID form the “address” of the recipient of a
call.
Unique ID - A unique number from 1-65503 assigned
to each subscriber unit. Although this number is
assignable on a per locality basis, the same number is
typically assigned on each locality a subscriber unit
can access.
Locality - A group of co-located repeaters typically
connected by a common data bus. Refer to Sections
6.2.3 and 2.3.12 for more information.
LTR Signaling - This popular EFJohnson radio
trunking system provides the basis for the LTR-Net
system. For a complete description of LTR trunking,
refer to the LTR Application Note, Part No. 009-0001002, Revision 8 or later.
6.2 SYSTEM ARCHITECTURE
6.2.1 INTRODUCTION
Mobile - A transceiver mounted in a vehicle. This term
may also be used generically to refer to any transceiver, either mobile or portable, since both operate
basically the same. See also “Subscriber Unit”.
A diagram of a typical LTR-Net system is shown
in Figure 6-1. The number or localities, repeaters per
locality, number of 3000-series switches, and other
system parameters are determined by the requirements of the particular system. The following is more
information on the components shown in Figure 6-1.
Portable - A small handheld transceiver usually battery
powered and carried by a person. See also “Subscriber
Unit”.
6.2.2 SUBSCRIBER UNITS
Subscriber units operating in an LTR-Net locality
must be the LTR-Net or LTR type. They may be the
mounted in a vehicle (mobiles) and or carried
(portables). The features available with each type are
as follows:
Site - See “Locality”.
Status Repeater - The repeater at a locality designated
to provide home channel backup. It transmits call
6-3
November 2001
Part No. 001-7240-001
LTR-NET OVERVIEW
A “locality” refers to repeaters at the same location that are interconnected by a common high-speed
data bus. Up to 20 repeaters can be interconnected, so
a locality can include up to 20 repeaters. Although
more than 20 repeaters could be co-located, they
would be considered separate localities because they
are not interconnected by the same data bus. A single
data bus can be up to 500 feet long.
LTR-Net Subscriber Units
These subscriber units are designed for operation
in an LTR-Net radio system and therefore have all
LTR-Net features. An optional DTMF keypad is
required to place telephone, directed group, and
unique ID calls. These subscriber units can also be
programmed for LTR and conventional operation, so
will operate in those types of radio systems. Standard
group and also telephone calls can be placed when
operating in an LTR system.
Standard LTR and conventional Viking VX and
8000-series repeaters can also be connected to the
3000-Series switch. However, since they would not be
using LTR-Net software, the only enhanced LTR-Net
feature provided would be wide area group calling (see
Section 6.4).
LTR Subscriber Units
These transceivers are designed for operation in
LTR and conventional radio systems. They can also be
used in an LTR-Net radio system to make standard and
wide area group calls and telephone calls. Standard
group calls are to mobiles in the same locality, and
wide area group calls are to mobiles in some other
locality. Enhanced LTR-Net features such as unique
ID calls and full roaming capability are not available.
6.2.4 3000-SERIES SWITCH
The 3000-Series Switch connects several
different forms of communication together to form a
communications network. Each switch is controlled by
a Call Processor and System and Subscriber Manager
(see next sections). A switch can consist of up to three
racks, each containing up to eight shelves. Since each
shelf has 12-16 device slots, up to 96-128 slots per
rack and up to 288-384 slots per switch are available.
Many different modules are available for installation
in these slots. The exact number and type required is
determined by the requirements of each system.
6.2.3 REPEATERS
Viking® VX 2000-series repeaters are used in an
LTR-Net system. Currently, models are available for
the UHF, 800 MHz, and 900 MHz frequency bands.
One repeater is required for each radio channel.
A single 3000-Series Switch can control up to 30
repeaters. Therefore, if a LTR-Net network consisting
of several localities has more than 30 repeaters, one
switch is required for every 30 repeaters. A switch can
be located at one of the repeater localities or it can be
at a separate location. An audio and data link connects
the switch to each repeater as described in the
preceding section.
As with standard LTR repeaters, all the signal
processing for the channel is performed by the logic
unit in each repeater. This is referred to as distributive
processing, and it eliminates the need for a separate
controller at each locality.
Audio (voice) and data signals are routed from
each repeater to a 3000-series switch. This allows the
switch to route the call to other localities and also
control certain repeater functions. The link to the
switch may be a direct connection if the switch is at
the same location or some other type such as microwave, fiber optic, RF, or telephone line. The audio
interface to the switch is a standard 600-ohm, fourwire path (transmit and receive pair). The data signal
can use an RS-232 interface or it can be FSK tones
using the same or a different audio path than the voice.
When a call is made by a subscriber unit in one
locality to a subscriber unit in another locality, the
switch provides the necessary patch. Likewise, when a
telephone call is placed by a subscriber unit, the switch
routes it to the Public Switched Telephone Network
(PSTN). Calls can also be routed to a PABX (Private
Automatic Branch Exchange). The dial access codes
and least cost routing facilities of the PABX can then
be utilized.
6-4
November 2001
Part No. 001-7240-001
LTR-NET OVERVIEW
6.2.5 CALL PROCESSOR
information can then be exported and used by
billing software to generate customer billing.
The Call Processor is a Windows NT-based
personal computer running switch management software. The Call Processor serves as an interface
between the switch and the System and Subscriber
Manager (see next section). It contains the database
used to process calls on the switch and also logs call
information from the switch. The Call Processor
performs such tasks as processing wide area calls,
subscriber unit registration, and Interrogate and Reassign requests. One Call Processor is required per
switch, and it is connected to the switch by two 19,200
baud data links.
6.3 STANDARD GROUP CALLS
Standard group calls are between subscriber units
at the same locality and use ID codes 1-239 that are
assignable on each home repeater. A group ID can be
assigned to one subscriber unit or a group of
subscriber units as desired. To place a standard group
call, all the user does is select the group programmed
for the group being called and press the PTT switch.
No number is dialed using a DTMF keypad as with
special calls described in Section 6.5.
6.2.6 SYSTEM AND SUBSCRIBER MANAGER
Selectable groups used to make standard group
calls are programmed with a group ID code, and the
selectable system is programmed with a home repeater
number. This home repeater/ID code form the
“address” of the group call. Since each selectable
system can be programmed with a different home
repeater, standard group calls can be placed to any
group in a locality.
The System and Subscriber Manager (SSM) is
also a Windows NT-based personal computer. It runs
the software which provides overall system control.
One or more SSMs may be used to control the system.
This allows, for example, the system administrator to
have overall system control and then permit other
operators limited control privileges. Access is by password only, and only functions authorized to a particular user can be accessed. This ensures that only
authorized personnel can modify and monitor system
resources.
Standard group calls hold a repeater for only the
duration of a transmission, not for the entire call. This
provides maximum system efficiency because the time
between transmissions can be used by others.
Some SSM functions are as follows:
6.4 WIDE AREA GROUP CALLS
•
Set up and authorize auxiliary and telephone interconnect calls on a unique ID basis. Also authorize
group calls on a locality/home/group basis.
•
Track the location of individual LTR-Net subscriber
units by unique ID.
•
Control wide area auxiliary calls by unique ID.
•
Track wide area group calls by locality/home/group
or unique ID.
•
Set up command calls such as Reassign, Interrogate,
Mobile Disable, and others.
•
Monitor and display information on system activity.
•
Record information on individual subscriber unit
system usage in a standard database format. This
The wide area group calling feature allows standard group calls from LTR or LTR-Net subscriber
units to be routed to any locality in the LTR-Net
system.
Specific locality/home/group ID combinations
can be programmed in the SSM (see Section 6.2.6) for
wide area calls. Then when a standard group call is
detected on one of these combinations, it is automatically routed to the specified localities as well as occurring on the home locality. The home/group can be
different on each wide area locality if desired.
Each wide area locality/home/group involved in a
wide area call can be programmed as follows:
•
6-5
The call is always routed to the specified locality,
home, and group (if resources are available).
November 2001
Part No. 001-7240-001
LTR-NET OVERVIEW
•
•
6.5.3 TELEPHONE CALLS
The call is routed to a specified locality only if a call
on the home/group has been recently detected. This
results in more efficient use of system resources.
Telephone calls allow calls to be placed over the
public switched telephone network. After the system is
accessed, a dial tone sounds and the telephone number
being called is entered using the DTMF keypad. Since
most subscriber units are half-duplex (do not transmit
and receive at the same time), it is not possible for the
mobile user to talk and listen at the same time.
The call is routed to a specific locality if a tracked
unique ID is registered on that locality.
Wide area group calls can also be made over standard LTR and conventional Viking VX repeaters that
are connected to a 3000-series LTR-Net switch.
However, no other LTR-Net enhanced features are
available with those repeaters.
If a unique telephone number has been assigned
to subscriber unit, it can be called directly from a landside telephone. If not, the radio system is called and
then the unique ID of the mobile must be overdialed
similar to when a unique ID call is placed by a
subscriber unit.
Wide area group calls continue to be received
while registration on a new locality occurs. For
example, the transceiver can exit a locality while
receiving a call, register on a new locality, and then
continue receiving the call on the new locality. In addition, a call can be received on the new locality before
registration occurs if the call is already active on the
new locality.
If a subscriber unit has been assigned a unique
telephone number, that number can also be used for
unique ID calls. This allows mobile-to-mobile unique
ID calls to be made by simply dialing the telephone
number of the desired subscriber unit.
6.5 SPECIAL CALLS
6.5.4 DATA CALLS
6.5.1 GENERAL
NOTE: Data calls are not currently available.
LTR-Net subscriber units can place Auxiliary,
Telephone, and Data special calls. These calls are not
available to LTR subscriber units being used on an
LTR-Net system. When a special call is placed, a
number is dialed which specifies the recipient of the
call. The DTMF keypad used to dial this number may
be optional, and it is located on the microphone with
mobile subscriber units and on the front panel with
portable units. Special calls hold the channel until the
entire call is complete, not just until the transmission is
complete as with group calls. More information on
each special call follows.
Data calls allow data to be transmitted to a
specific unique ID. The audio of the receiving equipment is automatically muted as data is received. Data
may be transmitted back and forth several times until
the entire data exchange is complete because the
channel is held for the duration of the call. To transmit
a data call, a group programmed for the data special
call is selected and then the unique ID is entered,
usually automatically by the data equipment. Data
calls are received the same as unique ID calls.
6.5.2 AUXILIARY CALLS
6.6.1 INTRODUCTION
Auxiliary calls include Unique ID and Directed
Group calls. Unique ID calls allow calls to be selectively placed to an individual subscriber unit in any
locality. Likewise, Directed Group calls allow standard group calls allow group calls to be selectively
placed to any group in any locality. Refer to Section
2.9.2 for more information on these calls.
An LTR-Net repeater locality (site) consists of up
to twenty interconnected repeaters (see Section 6.2.3).
One of these repeaters is usually designated as status
repeater and the others are designated as home
repeaters (see following). The subscriber units are
programmed with the channel numbers of these
repeaters. Data signaling can occur continuously with
6.6 HOME CHANNEL BACKUP
6-6
November 2001
Part No. 001-7240-001
LTR-NET OVERVIEW
repeater, it continues to monitor that repeater. If a
message is detected that has its home repeater as the
“channel-in-use” or “free” repeater, the subscriber unit
then returns to monitoring its home repeater.
voice on any repeater because the data occupies the
subaudible frequencies below the voice band.
6.6.2 HOME REPEATERS
A roaming subscriber unit also monitors the
status repeater in this manner when the home repeater
signal drops below the threshold level. However, the
status repeater signal level will probably also be below
the threshold, so the subscriber unit then begins
searching for a new locality.
The home repeater is used by the subscriber unit
as its primary source of incoming call and free
repeater information. When not receiving or transmitting a call, it is monitoring this repeater. The home
repeater is always used to make a call if it is not busy.
In addition, if roaming mobiles searching for a new
locality cannot locate a suitable status repeater, the
home repeater is monitored (see Section 2.9.4). As
previously mentioned, up to 239 group ID codes can
be assigned on each home repeater, and the home
repeater and ID code form the “address” when making
group calls. All programmable systems which access
the same locality should be programmed with the same
home repeater (see Section 3.11.2).
6.6.4 HOME CHANNEL ALIASING
The LTR-Net Home Channel Aliasing feature
increases the number of addresses available on a
locality for group calls. It does this by allowing calls
to be programmed on non-existent home repeaters.
Each home repeater can be programmed with up
1-239 group ID codes. Assume a locality has four
active repeaters and one of these is the status repeater
(which is normally not assigned as a home repeater as
described in Section 6.6.3). The number of groups that
can be programmed are then as follows:
6.6.3 STATUS REPEATERS
General
One repeater at each locality is designated the
status repeater. The primary function of this repeater is
to provide backup for the other repeaters at a locality
that are assigned as home repeaters. It continuously
transmits call information for all calls occurring at that
locality. The status repeater is used for voice traffic,
but is usually not assigned as a home repeater because
there would then be no home channel backup on that
repeater (see following). Roaming mobiles searching
for a new locality monitor the status repeaters. Then
after registration occurs, the home repeater is
monitored.
Without Aliasing - 3 x 239 or 717 groups
With Aliasing - 20 x 239 or 4780 groups
When a call is placed on a non-existent home
repeater, the subscriber unit automatically uses the
next lower numbered active repeater. Refer to Section
2.9.7 for more information.
NOTE: Since this feature does not increase system
capacity, adding too many users may result in unsatisfactory operation due to frequent busy conditions.
Backup Operation
6.7 OTHER LTR-NET FEATURES
If subscriber units were limited to only their
home repeater to receive update information and that
repeater became inoperative, all subscriber units that
were assigned to that repeater would then be unable to
place or receive calls. To prevent this from happening,
the status repeater can also be monitored for call information.
6.7.1 UNIQUE ID CODES
Each LTR-Net subscriber unit in an LTR-Net
system is assigned a unique ID (a different unique ID
can be programmed for each locality if desired). Up to
65,504 user ID codes are assignable in each locality,
and a few other codes are used for system functions.
When an LTR-Net subscriber unit places a special call,
it transmits its unique ID code along with other information such as the call type. This data is received by
the repeater and passed on to the SSM.
If the signal from the home repeater is lost or falls
below a minimum threshold, the subscriber unit automatically begins monitoring the locality status
repeater. If a usable signal is detected from the status
6-7
November 2001
Part No. 001-7240-001
LTR-NET OVERVIEW
edge message, and this will be indicated on the system
manager’s screen.
Uses of unique ID codes include registering and
de-registering on a locality, unit identification, airtime
billing, and unique ID calls (see “Unique ID Calls” in
Section 6.5.2). A call can also be made to individual
subscriber units using a group call if the group is
assigned to only one subscriber unit.
6.7.5 KILL AND SLEEP
If a subscriber unit has been lost or stolen or is
being used to interfere with communications, it can be
permanently disabled by the kill command or temporarily disabled by the Sleep command. If the Kill
command is sent, the unit responds indicating that it
has received the message and then it permanently
disables itself. It must then be brought back in for
reprogramming to make it functional again. If the
sleep command is sent instead, the transceiver is
disabled until the Interrogate command is sent. Refer
to Section 2.9.6 for more information.
A temporary unique ID code can also be assigned
over-the-air. This may be required to allow a full
roaming subscriber unit to access a locality that is not
part of its network. Temporary unique ID codes are
keyed to the ESN of the subscriber unit (see next
section). A roaming subscriber unit may also request a
temporary unique ID code. If no response is received
from the system after two temporary ID requests, it is
interpreted as a denied access and the mobile then
selects another locality.
6.7.6 AUTO-REGISTRATION AND
DE-REGISTRATION
NOTE: The preceding feature has not yet been
implemented.
LTR-Net subscriber units are programmed with
the locality information of all localities they can roam
into. This includes the channel number or frequency of
the status repeater of each locality. The repeaters that
are active at each site can then be determined by automatic channel update messages (see Section 6.7.7).
Roaming must be enabled and an LTR-Net system
selected for roaming to occur (it is not necessary to
enable scanning).
6.7.2 ELECTRONIC SERIAL NUMBER (ESN)
Each subscriber unit, both mobile and portable, is
given an electronic serial number at the factory. No
two LTR-Net subscriber units should ever have the
same ESN. This is a 32-bit number with the first 7 bits
reserved for the manufacturer code and the other 25
for the serial number. This allows for up to 128 manufacturers and over 33.5 million serial numbers per
manufacturer. The ESN can be interrogated over the
air as described next.
Normally, a subscriber unit monitors its home
channel for incoming call and free channel information. When moving out of range of a locality, the
signal from the home repeater decreases below a
programmable threshold level. With all transceivers
except the 8170 portable, this threshold level is determined by squelch levels, and with the 8170, it is determined by the percentage of good data messages
received over a certain period.
6.7.3 ESN AND UNIQUE ID REQUESTS
The system operator can request the Electronic
Serial Number (see preceding section) or unique ID
(see Section 6.7.1) that is programmed in a subscriber
unit. If the ESN is desired, the unique ID code of the
subscriber unit is specified, and vice versa. The
subscriber unit then responds with the requested
information.
When the home repeater signal strength drops
below the threshold, the status channel of that locality
is then monitored (see Section 6.6). If its signal
strength is also below the threshold, the subscriber unit
then begins searching for another locality by checking
the status repeater of other programmed localities. If
one is located with a signal above the programmed
threshold, it will attempt to register on the locality. If
no suitable status repeaters could be located, the
programmed home repeaters are monitored.
6.7.4 INTERROGATE
A system manager can interrogate any subscriber
unit in the field to determine if it is in service. The unit
is selected by specifying its unique ID code. If it is in
service, it automatically responds with an acknowl-
6-8
November 2001
Part No. 001-7240-001
LTR-NET OVERVIEW
When a new locality is located, the subscriber
unit registers on the locality by sending messages indicating its unique ID code and the home channel it will
monitor. The system then knows the location of that
subscriber unit and will automatically route unique ID
calls to the new locality.
system from wasting resources trying to reach out-ofservice units. Power is automatically held on until this
message is sent. De-registration is not available with
8170 portable transceivers.
Automatic locality search can be automatically
initiated if two consecutive unsuccessful access
attempts occur. This feature is always enabled except
with 8170 portable transceivers where it can be
enabled or disabled by programming.
New subscriber units are initially programmed
with the channel numbers of all repeaters at each
locality. These are then the channels that can be
accessed when placing and receiving calls on that
locality. If new channels are later added, the subscriber
units can be updated with the new channels over the
air. This eliminates the need to bring subscriber units
back in for reprogramming. Refer to Section 2.9.5 for
more information.
6.7.7 NEW CHANNEL UPDATES
When a subscriber unit is no longer in service
(power is turned off), a de-registration message is
automatically sent if possible. This prevents the
6-9
November 2001
Part No. 001-7240-001
PARTS LIST
SECTION 7 PARTS LIST
KEYPAD/DISPLAY BOARD ASSEMBLY
Ref No
Description
Part No.
Ref No
COMPLETE ASSEMBLIES
A001*
A002*
A003*
A004*
Keypad/display board 51300081
Logic board 51300035
RF board 51300013
Plastic front cover 20101361
(includes items 1-14 on page 6-11)
A005* Flex cable w/microsw 51300134
022-3909-002
022-3909-016
022-3909-023
022-3909-025
022-3909-053
FLEXIBLE CABLE ASSEMBLY
C902
C903
GRM39Y5V104Z25PT capacitor
GRM39Y5V104Z25PT capacitor
022-3909-074
022-3909-074
R902
S901
S902
S903
S904
CR 1/16W 103JV resistor
Dome switch 4K-2928
Dome switch 4K-2928
Dome switch 4K-2928
Dome switch 4K-2928
022-3909-006
-
VR901* 20k ohm vol control/on-off switch 022-3909-162
7007A203001
KEYPAD/DISPLAY BOARD ASSEMBLY
C101
C102
C103
C104
C105
C106
C107
C108
C109
C110
C111
C113
C115
C202
C203
C204
GRM39Y5V104Z25PT capacitor
ECS-T1CY475 capacitor
GRM39X7R103K50PT capacitor
ECS-T1CY475 capacitor
GRM39Y5V104Z25PT capacitor
GRM39Y5V104Z25PT capacitor
GRM39Y5V224Z16PT capacitor
GRM39Y5V104Z25PT capacitor
ECS-T1CY475 capacitor
GRM39COG101J50PT capacitor
ECS-T1AC226M capacitor
GRM39Y5V104Z25PT capacitor
ECS-T1AD476M capacitor
GRM39Y5V104Z25PT capacitor
GRM39Y5V224Z16PT capacitor
GRM39COG330J50PT capacitor
022-3909-074
022-3909-111
022-3909-073
022-3909-111
022-3909-074
022-3909-074
022-3909-087
022-3909-074
022-3909-111
022-3909-071
022-3909-110
022-3909-074
022-3909-112
022-3909-074
022-3909-087
022-3909-089
7-1
Description
Part No.
C205
C206
C207
C501
C502
ECS-T1CX106 capacitor
ECS-T1CY105 capacitor
ECS-T1CY105 capacitor
GRM39X7R182K50PT capacitor
GRM39Y5V104Z25PT capacitor
022-3909-109
022-3909-108
022-3909-108
022-3909-233
022-3909-074
D303
D304
D305
D306
D307
D308
D309
D310
D401
D402
D403
D404
D405
D901
D902
17-21VGC/TR8 backlight LED
17-21VGC/TR8 backlight LED
17-21VGC/TR8 backlight LED
17-21VGC/TR8 backlight LED
17-21VGC/TR8 backlight LED
17-21VGC/TR8 backlight LED
17-21VGC/TR8 backlight LED
17-21VGC/TR8 backlight LED
DA114 diode to key switch
DA114 diode to key switch
DA114 diode to key switch
DA114 diode to key switch
DA114 diode to key switch
94-22VGC LCD backlight LED
94-22VGC LCD backlight LED
022-3909-202
022-3909-202
022-3909-202
022-3909-202
022-3909-202
022-3909-202
022-3909-202
022-3909-202
022-3909-191
022-3909-191
022-3909-191
022-3909-191
022-3909-191
022-3909-200
022-3909-200
EH1*
J801
J802
12000020 LCD 1710T4138001
022-3909-201
AXN330130P logic bd connector 022-3909-121
04-6206-020-000-800 flex circuit 022-3909-124
connector
MK1
MK2
MK3
31.5 x 1.5 x 2.5 zebra
21600024 (3K-2684) reflector
22000060 (3K2687) LCD brkt
022-3909-120
022-3909-141
022-3909-143
Q101
Q102
Q103
Q104
Q105
Q106
Q201
Q202
Q301
Q302
Q401
BCX51-16TR driver SOT89
UMT3904 switching SC-70
UMT3904 switching SC-70
BCX51-16TR driver SOT89
UMT3904 switching SC-70
UMT3906 switching SC-70
DTC144EUA switching SC-70
DTC144EUA switching SC-70
UMT3906 switching SC-70
UMT3904 switching SC-70
DTA123EUA switching SC-70
022-3909-165
022-3909-170
022-3909-170
022-3909-165
022-3909-170
022-3909-171
022-3909-172
022-3909-172
022-3909-171
022-3909-170
022-3909-226
November 2001
Part No. 001-7240-001
PARTS LIST
KEYPAD/DISPLAY BOARD ASSEMBLY
Ref No
Description
RF BOARD ASSEMBLY
Part No.
Q402
Q403
Q404
DTA123EUA switching SC-70
DTA123EUA switching SC-70
UMT3904 switching SC-70
022-3909-226
022-3909-226
022-3909-170
R101
R102
R103
R104
R105
R106
R107
R108
R109
R110
R111
R112
R115
R116
R201
R202
R203
R204
R205
R206
R207
R208
R301
R302
R303
R304
R305
R306
R307
R308
R310
R311
R401
R402
R403
R404
R408
R409
R411
R412
R413
CR 1/16W 104JV resistor
CR 1/16W 473JV resistor
CR 1/16W 220JV resistor
CR 1/16W 473JV resistor
CR 1/16W 4R7JV resistor
CR 1/16W 4R7JV resistor
CR 1/16W 104JV resistor
CR 1/16W 473JV resistor
CR 1/16W 220JV resistor
CR 1/16W 473JV resistor
CR 1/16W 273JV resistor
CR 1/16W 4R7JV resistor
CR 1/16W 273JV resistor
CR 1/16W 473JV resistor
CR 1/16W 104JV resistor
CR 1/16W 223JV resistor
CR 1/16W 333JV resistor
CR 1/16W 103JV resistor
CR 1/16W 123JV resistor
CR 1/16W 123JV resistor
CR 1/16W 272JV resistor
CR 1/16W 272JV resistor
CR 1/16W 221JV resistor
CR 1/16W 221JV resistor
CR 1/16W 221JV resistor
CR 1/16W 221JV resistor
CR 1/16W 221JV resistor
CR 1/16W 221JV resistor
CR 1/16W 472JV resistor
CR 1/16W 104JV resistor
CR 1/16W 104JV resistor
CR 1/16W 000JV resistor
CR 1/16W 473JV resistor
CR 1/16W 473JV resistor
CR 1/16W 473JV resistor
CR 1/16W 473JV resistor
CR 1/16W 104JV resistor
CR 1/16W 104JV resistor
CR 1/16W 104JV resistor
CR 1/16W 104JV resistor
CR 1/16W 104JV resistor
022-3909-007
022-3909-042
022-3909-019
022-3909-042
022-3909-245
022-3909-245
022-3909-007
022-3909-042
022-3909-019
022-3909-042
022-3909-026
022-3909-245
022-3909-026
022-3909-042
022-3909-007
022-3909-022
022-3909-031
022-3909-006
022-3909-010
022-3909-010
022-3909-227
022-3909-227
022-3909-020
022-3909-020
022-3909-020
022-3909-020
022-3909-020
022-3909-020
022-3909-041
022-3909-007
022-3909-007
022-3909-001
022-3909-042
022-3909-042
022-3909-042
022-3909-042
022-3909-007
022-3909-007
022-3909-007
022-3909-007
022-3909-007
Ref No
R414
R415
R416
R501
R502
R503
R504
R505
R506
R508
Description
Part No.
CR 1/16W 104JV resistor
CR 1/16W 104JV resistor
CR 1/16W 473JV resistor
CR 1/16W 104JV resistor
CR 1/16W 473JV resistor
CR 1/16W 562JV resistor
CR 1/16W 123JV resistor
CR 1/16W 332JV resistor
CR 1/16W 332JV resistor
CR 1/16W 332JV resistor
022-3909-007
022-3909-007
022-3909-042
022-3909-007
022-3909-042
022-3909-045
022-3909-010
022-3909-030
022-3909-030
022-3909-030
RT509 NTCC16Y 473K 410H thermistor 022-3909-231
U005* CMS27P44 internal microphone
13200025
U101* NJM2073M external audio amp
11100048
U102* NJM2073M internal audio amp
11100048
U201 TC4W66FU in/ext mic sel sw
SSOP-8
U501 LC75834W LCD driver, SQFP48
022-3909-204
022-3909-179
022-3909-179
022-3909-189
022-3909-117
RF BOARD ASSEMBLY
C102
C105
C106
C108
C109
C110
C112
C113
C114
C115
C116
C118
C120
C122
C123
C124
C125
C126
C127
C130
C132
7-2
GRM39COG050C50PT capacitor
GRM39COG471J50PT capacitor
GRM39COG050C50PT capacitor
GRM39X7R102K50PT capacitor
ECS-T1CY475 capacitor
GRM39Y5V104Z25PT capacitor
GRM39X7R102K50PT capacitor
GRM39COG050C50PT capacitor
GRM39COG080D50PT capacitor
GRM39COG1R5C50PT capacitor
GRM39COG080D50PT capacitor
GRM39COG050C50PT capacitor
GRM39COG220J50PT capacitor
GRM39COG220J50PT capacitor
GRM39COG101J50PT capacitor
GRM39COG331J50PT capacitor
GRM39COG221J50PT capacitor
GRM39COG471J50PT capacitor
GRM39X7R102K50PT capacitor
GRM39X7R223K50PT capacitor
GRM39X7R102K50PT capacitor
022-3909-065
022-3909-096
022-3909-065
022-3909-072
022-3909-111
022-3909-074
022-3909-072
022-3909-065
022-3909-068
022-3909-246
022-3909-068
022-3909-065
022-3909-083
022-3909-083
022-3909-071
022-3909-090
022-3909-084
022-3909-096
022-3909-072
022-3909-086
022-3909-072
November 2001
Part No. 001-7240-001
PARTS LIST
RF BOARD ASSEMBLY (CONT’D)
Ref No
C136
C137
C138
C140
C141
C142
C143
C144
C145
C201
C202
C203
C206
C207
C208
C210
C211
C214
C215
C216
C218
C219
C220
C221
C222
C223
C224
C225
C227
C301
C302
C303
C304
C305
C306
C307
C308
C312
C313
C314
C315
C316
C317
C318
C320
C321
Description
Part No.
ECS-T1CY475 capacitor
GRM39X7R103K50PT capacitor
GRM39COG471J50PT capacitor
GRM39X7R102K50PT capacitor
GRM39Y5V224Z25PT capacitor
ECS-T1CY475 capacitor
GRM39COG221J50PT capacitor
ECS-T1CX106 capacitor
GRM39COG101J50PT capacitor
ECS-T1CY106 capacitor
GRM39Y5V104Z25PT capacitor
ECS-T1CY475 capacitor
ECS-T1CX106 capacitor
GRM39X7R102K50PT capacitor
GRM39COG471J50PT capacitor
GRM39Y5V224Z25PT capacitor
GRM39X7R103K50PT capacitor
GRM39Y5V104Z25PT capacitor
ECS-T1CY225 capacitor
GRM39Y5V104Z25PT capacitor
GRM39Y5V104Z25PT capacitor
ECS-T1CY475 capacitor
ECS-T1CY475 capacitor
GRM39Y5V104Z25PT capacitor
ECS-T1CX106 capacitor
GRM39X7R473K50PT capacitor
ECS-T1CY475 capacitor
GRM39Y5V104Z25PT capacitor
GRM39COG050C50PT capacitor
GRM39COG070D50PT capacitor
GRM39COG070D50PT capacitor
GRM39COG180J50PT capacitor
GRM39COG030C50PT capacitor
GRM39COG030C50PT capacitor
GRM39COG180J50PT capacitor
GRM39COG050C50PT capacitor
GRM39COG030C50PT capacitor
GRM39X7R103K50PT capacitor
GRM39X7R103K50PT capacitor
GRM39COG030C50PT capacitor
GRM39COG150J50PT capacitor
GRM39X7R102K50PT capacitor
GRM39COG471J50PT capacitor
GRM39COG030C50PT capacitor
GRM39COG120J50PT capacitor
GRM39COG090D50PT capacitor
022-3909-111
022-3909-073
022-3909-096
022-3909-072
022-3909-087
022-3909-111
022-3909-234
022-3909-109
022-3909-238
022-3909-239
022-3909-074
022-3909-111
022-3909-109
022-3909-072
022-3909-096
022-3909-087
022-3909-073
022-3909-074
022-3909-240
022-3909-074
022-3909-074
022-3909-111
022-3909-111
022-3909-074
022-3909-109
022-3909-098
022-3909-111
022-3909-074
022-3909-065
022-3909-067
022-3909-067
022-3909-082
022-3909-063
022-3909-063
022-3909-082
022-3909-065
022-3909-063
022-3909-073
022-3909-073
022-3909-063
022-3909-079
022-3909-072
022-3909-096
022-3909-063
022-3909-077
022-3909-069
Ref No
C322
C323
C324
C325
C326
C327
C328
C330
C331
C333
C336
C337
C338
C340
C341
C401
C403
C404
C406
C407
C408
C410
C411
C412
C413
C414
C415
C416
C417
C418
C420
C421
C422
C423
C424
C425
C426
C427
C428
C429
C500
C501
C502
C503
C504
C505
7-3
Description
Part No.
GRM39COG050C50PT capacitor
GRM39COG050C50PT capacitor
GRM39COG090D50PT capacitor
GRM39COG040C50PT capacitor
GRM39COG060D50PT capacitor
GRM39COG120J50PT capacitor
GRM39COG030C50PT capacitor
GRM39COG020C50PT capacitor
GRM39X7R103K50PT capacitor
GRM39COG030C50PT capacitor
GRM39COG471J50PT capacitor
GRM39COG050C50PT capacitor
GRM39COG030C50PT capacitor
GRM39X7R102K50PT capacitor
GRM39COG240J50PT capacitor
GRM39COG160J50PT capacitor
GRM39COG050C50PT capacitor
ECS-T1CX106 capacitor
GRM39COG220J50PT capacitor
GRM39Y5V474Z25PT capacitor
GRM39Y5V224Z25PT capacitor
GRM39COG820J50PT capacitor
GRM39X7R102K50PT capacitor
ECS-T1CY475 capacitor
GRM39X7R223K25PT capacitor
GRM39X7R472K50PT capacitor
GRM39COG221J50PT capacitor
GRM39COG221J50PT capacitor
GRM39X7R473K50PT capacitor
GRM39X7R103K50PT capacitor
GRM39X7R102K50PT capacitor
GRM39Y5V104Z25PT capacitor
GRM39X7R472K50PT capacitor
GRM39X7R472K50PT capacitor
GRM39X7R103K50PT capacitor
GRM39COG220J50PT capacitor
GRM39COG390J50PT capacitor
GRM39X7R103K50PT capacitor
GRM39X7R103K50PT capacitor
GRM39X7R103K50PT capacitor
GRM39COG100D50PT capacitor
GRM39X7R223K25PT capacitor
GRM39COG040C50PT capacitor
GRM39COG3R3C50PT capacitor
GRM39COG471J50PT capacitor
GRM39COG080D50PT capacitor
022-3909-065
022-3909-065
022-3909-069
022-3909-064
022-3909-066
022-3909-077
022-3909-063
022-3909-062
022-3909-073
022-3909-063
022-3909-096
022-3909-065
022-3909-063
022-3909-072
022-3909022-3909-081
022-3909-065
022-3909-109
022-3909-083
022-3909-099
022-3909-087
022-3909-106
022-3909-072
022-3909-111
022-3909-086
022-3909-097
022-3909-084
022-3909-084
022-3909-098
022-3909-073
022-3909-072
022-3909-074
022-3909-097
022-3909-097
022-3909-073
022-3909-083
022-3909-092
022-3909-073
022-3909-073
022-3909-073
022-3909-070
022-3909-086
022-3909-064
022-3909-247
022-3909-096
022-3909-068
November 2001
Part No. 001-7240-001
PARTS LIST
RF BOARD ASSEMBLY (CONT’D)
Ref No
C506
C507
C508
C510
C511
C512
C513
C514
C515
C516
C517
C518
C520
C521
C529
C530
C531
C532
C533
C534
C535
C536
C537
C538
C539
C540
C541
C544
C545
C546
C547
C548
C550
C551
C601
C602
C603
C604
C605
C606
C607
C608
C610
C611
C612
Description
Part No.
GRM39COG220J50PT capacitor
GRM39COG070D50PT capacitor
GRM39COG471J50PT capacitor
GRM39COG471J50PT capacitor
GRM39COG070D50PT capacitor
GRM39COG050C50PT capacitor
GRM39COG050C50PT capacitor
GRM39COG020C50PT capacitor
GRM39X7R102K50PT capacitor
GRM39COG330J50PT capacitor
GRM39COG050C50PT capacitor
GRM39COG471J50PT capacitor
GRM39COG130J50PT capacitor
GRM39COG150J50PT capacitor
GRM39COG561J50PT capacitor
GRM39COG090D50PT capacitor
GRM39X7R223K25PT capacitor
GRM39COG040C50PT capacitor
GRM39COG030C50PT capacitor
GRM39X7R103K50PT capacitor
GRM39COG070D50PT capacitor
GRM39COG220J50PT capacitor
GRM39COG070D50PT capacitor
GRM39COG471J50PT capacitor
GRM39COG1R5C50PT capacitor
GRM39COG471J50PT capacitor
GRM39COG050C50PT capacitor
GRM39COG050C50PT capacitor
GRM39COG471J50PT capacitor
GRM39COG471J50PT capacitor
GRM39COG471J50PT capacitor
GRM39COG030C50PT capacitor
GRM39COG050C50PT capacitor
GRM39COG030C50PT capacitor
ECS-T1CY475 capacitor
GRM39Y5V104Z25PT capacitor
GRM39X7R103K50PT capacitor
GRM39X7R103K50PT capacitor
ECS-T1CY475 capacitor
GRM39Y5V104Z25PT capacitor
ECS-T1CY475 capacitor
ECS-T1CY475 capacitor
GRM39X7R103K50PT capacitor
GRM39X7R103K50PT capacitor
ECS-T1CY105 capacitor
022-3909-083
022-3909-067
022-3909-096
022-3909-096
022-3909-067
022-3909-065
022-3909-065
022-3909-062
022-3909-072
022-3909-089
022-3909-065
022-3909-096
022-3909-078
022-3909-079
022-3909-101
022-3909-069
022-3909-086
022-3909-064
022-3909-063
022-3909-073
022-3909-067
022-3909-083
022-3909-067
022-3909-096
022-3909-246
022-3909-096
022-3909-065
022-3909-065
022-3909-096
022-3909-096
022-3909-096
022-3909-063
022-3909-065
022-3909-063
022-3909-111
022-3909-074
022-3909-073
022-3909-073
022-3909-111
022-3909-074
022-3909-111
022-3909-111
022-3909-073
022-3909-073
022-3909-108
Ref No
Part No.
C613
C614
C615
C616
GRM39X7R103K50PT capacitor 022-3909-073
GRM39X7R103K50PT capacitor 022-3909-073
ECS-T1CY475 capacitor
022-3909-111
GRM39Y5V104Z25PT capacitor 022-3909-074
D101
D103
D301
D302
D303
D305
D306
D401
D402
D501
D531
D533
UPP9401 RF power switching, PIN
diode
UPP9401 RF power switching, PIN
diode
HSM88AS Schottky diode, SC-59
HSM88AS Schottky diode, SC-59
1SV270 variable capacitor
1SV270 variable capacitor
1SV270 variable capacitor
1SV270 variable capacitor
MA862 switching diode
MA862 switching diode
1SV270 variable capacitor
1SV270 variable capacitor
1SV270 variable capacitor
022-3909-195
022-3909-195
022-3909-199
022-3909-199
022-3909-199
022-3909-199
022-3909-196
022-3909-196
022-3909-199
022-3909-199
022-3909-199
J1
CLP-110-02-F-DH connector
022-3909-122
L101
L102
L105
L106
L107
L108
L110
L112
L201
L215
L301
L302
L303
L304
L305
L306
L307
L308
L310
L312
L404
L501
0805CIH21T18NJ chip coil
0805CIH21T22NJ chip coil
SBY201209T320Y-S chip bead
0805ASR47K01 chip coil
351604TL chip air coil
351604TL chip air coil
351604TL chip air coil
45144TL chip air coil
LQH4N122K04M coil molded
0805CIL21J2R2K chip coil
351604TL chip air coil
351604TL chip air coil
0805CIH21T27NJ chip coil
0805CIH21T18NJ chip coil
351604TL chip air coil
351604TL chip air coil
0805CIH21T18NJ chip coil
0805CIH21T22NJ chip coil
0805CIH21T39NJ chip coil
0805CIL21TR39K chip coil
0805ASR47K01 chip coil
0805ASR15K01 chip coil
022-3909-208
022-3909-209
022-3909-128
022-3909-206
022-3909-205
022-3909-205
022-3909-205
022-3909-127
022-3909-215
022-3909-103
022-3909-205
022-3909-205
022-3909-210
022-3909-208
022-3909-205
022-3909-205
022-3909-208
022-3909-209
022-3909-212
022-3909-214
022-3909-206
022-3909-244
D102
7-4
Description
022-3909-197
022-3909-197
November 2001
Part No. 001-7240-001
PARTS LIST
RF BOARD ASSEMBLY (CONT’D)
Ref No
Description
Part No.
L503
L504
L505
L506
L510
L531
L532
L533
L534
L535
0805CIH21T33NJ chip coil
0805CIH21T15NJ chip coil
0805CIH21T27NJ chip coil
0805CIH21T15NJ chip coil
300905TR chip air coil
0805ASR47K01 chip coil
260904TL chip air coil
0805CIH21T27NJ chip coil
0805CIH21T22NJ chip coil
0805CIH21T27NJ chip coil
022-3909-211
022-3909-207
022-3909-210
022-3909-207
022-3909-241
022-3909-206
022-3909-125
022-3909-210
022-3909-209
022-3909-210
MK1
22000025 (3K-3210) can, VCO
022-3909-146
Q101
2SC3357 NPN tx power driver,
SOT-89
KRA102S PNP switching, SOT23
AT-41533 NPN low noise amp,
SOT-23L
3SK240 first mixer, GaAs N-Ch.
MES FET
2SC4226 NPN first IF amp, SC-70
2SC4226 NPN rx oscillator, SC-70
2SC4226 NPN rx VCO amp,
SC-70
2SC3356 rx VCO buffer, SOT-23
2SC4226 NPN tx oscillator, SC-70
2SC4226 NPN tx VCO amp,
SC-70
2SC4226 NPN tx predriver amp,
SOT-23
2SC4226 NPN tx predriver amp,
SOT-23
2SC4226 NPN tx VCO buffer,
SOT-23
KRA105S PNP switching,
SOT-23L
022-3909-166
Q201
Q301
Q302
Q401
Q501
Q502
Q503
Q531
Q532
Q533
Q534
Q535
Q601
R101
R102
R103
R104
R105
R107
R108
R110
R111
CR 1/16W 000JV resistor
CR 1/16W 822JV resistor
CR 1/16W 362JV resistor
CR 1/16W 562JV resistor
CR 1/16W 221JV resistor
CR 1/16W 820JV resistor
CR 1/16W 472JV resistor
CR 1/16W 153JV resistor
CR 1/16W 122JV resistor
Ref No
022-3909-168
022-3909-113
022-3909-177
022-3909-167
022-3909-167
022-3909-167
022-3909-242
022-3909-167
022-3909-167
022-3909-167
022-3909-167
022-3909-167
022-3909-169
022-3909-001
022-3909-057
022-3909-033
022-3909-045
022-3909-020
022-3909-055
022-3909-041
022-3909-014
022-3909-009
7-5
Description
Part No.
R115
R116
R117
R120
R121
R122
R125
CR 1/16W 333JV resistor
CR 1/16W 333JV resistor
CR 1/16W 124JV resistor
CR 1/16W 683JV resistor
CR 1/16W 153JV resistor
CR 1/16W 821JV resistor
CR 1/16W 182JV resistor
022-3909-031
022-3909-031
022-3909-011
022-3909-051
022-3909-014
022-3909-056
022-3909-017
R202
R203
R204
R205
R206
R207
R210
R216
R217
R218
R219
R220
R221
R223
R301
R302
R303
R304
R305
R306
R307
R308
R310
R312
R313
R314
R315
R317
R400
R401
R402
R403
R404
R405
R406
R409
R410
CR 1/16W 152JV resistor
CR 1/16W 823JV resistor
CR 1/16W 124JV resistor
CR 1/16W 242JV resistor
CR 1/16W 100JV resistor
CR 1/16W 333JV resistor
CR 1/16W 390JV resistor
CR 1/16W 102JV resistor
CR 1/16W 100JV resistor
CR 1/16W 471JV resistor
CR 1/16W 680JV resistor
CR 1/16W 122JV resistor
CR 1/16W 152JV resistor
CR 1/16W 103JV resistor
CR 1/16W 104JV resistor
CR 1/16W 104JV resistor
CR 1/16W 681JV resistor
CR 1/16W 822JV resistor
CR 1/16W 332JV resistor
CR 1/16W 123JV resistor
CR 1/16W 104JV resistor
CR 1/16W 104JV resistor
CR 1/16W 821JV resistor
CR 1/16W 151JV resistor
CR 1/16W 101JV resistor
CR 1/16W 000JV resistor
CR 1/16W 100JV resistor
CR 1/16W 000JV resistor
CR 1/16W 331JV resistor
CR 1/16W 184JV resistor
CR 1/16W 152JV resistor
CR 1/16W 104JV resistor
CR 1/16W 152JV resistor
CR 1/16W 392JV resistor
CR 1/16W 104JV resistor
CR 1/16W 223JV resistor
CR 1/16W 563JV resistor
022-3909-013
022-3909-058
022-3909-011
022-3909-024
022-3909-003
022-3909-031
022-3909-034
022-3909-005
022-3909-003
022-3909-040
022-3909-048
022-3909-009
022-3909-013
022-3909-006
022-3909-007
022-3909-007
022-3909-049
022-3909-057
022-3909-030
022-3909-010
022-3909-007
022-3909-007
022-3909-056
022-3909-012
022-3909-004
022-3909-001
022-3909-003
022-3909-001
022-3909-029
022-3909-018
022-3909-013
022-3909-007
022-3909-013
022-3909-036
022-3909-007
022-3909-022
022-3909-046
November 2001
Part No. 001-7240-001
PARTS LIST
RF BOARD ASSEMBLY (CONT’D)
Ref No
Description
Part No.
R411
R412
R413
R414
R415
R416
R417
R418
R420
R421
R422
R501
R502
R503
R504
R505
R506
R507
R510
R511
R512
R513
R514
R526
R530
R531
R532
R533
R534
R535
R536
R537
R539
R540
CR 1/16W 154JV resistor
CR 1/16W 472JV resistor
CR 1/16W 153JV resistor
CR 1/16W 153JV resistor
CR 1/16W 223JV resistor
CR 1/16W 153JV resistor
CR 1/16W 153JV resistor
CR 1/16W 223JV resistor
CR 1/16W 392JV resistor
CR 1/16W 103JV resistor
CR 1/16W 103JV resistor
CR 1/16W 100JV resistor
CR 1/16W 392JV resistor
CR 1/16W 682JV resistor
CR 1/16W 331JV resistor
CR 1/16W 682JV resistor
CR 1/16W 562JV resistor
CR 1/16W 391JV resistor
CR 1/16W 332JV resistor
CR 1/16W 822JV resistor
CR 1/16W 123JV resistor
CR 1/16W 561JV resistor
CR 1/16W 100JV resistor
CR 1/16W 680JV resistor
CR 1/16W 333JV resistor
CR 1/16W 100JV resistor
CR 1/16W 332JV resistor
CR 1/16W 682JV resistor
CR 1/16W 221JV resistor
CR 1/16W 682JV resistor
CR 1/16W 331JV resistor
CR 1/16W 332JV resistor
CR 1/16W 154JV resistor
CR 1/16W 393JV resistor
022-3909-015
022-3909-041
022-3909-014
022-3909-014
022-3909-022
022-3909-014
022-3909-014
022-3909-022
022-3909-036
022-3909-006
022-3909-006
022-3909-003
022-3909-036
022-3909-050
022-3909-029
022-3909-050
022-3909-045
022-3909-035
022-3909-030
022-3909-057
022-3909-010
022-3909-044
022-3909-003
022-3909-048
022-3909-031
022-3909-003
022-3909-030
022-3909-050
022-3909-020
022-3909-050
022-3909-029
022-3909-030
022-3909-015
022-3909-037
R543
CR 1/16W 000JV resistor
022-3909-001
R545
R546
R547
R548
R550
R551
CR 1/16W 123JV resistor
CR 1/16W 221JV resistor
CR 1/16W 562JV resistor
CR 1/16W 182JV resistor
CR 1/16W 820JV resistor
CR 1/16W 124JV resistor
022-3909-010
022-3909-020
022-3909-045
022-3909-017
022-3909-055
022-3909-011
Ref No
R552
Description
Part No.
CR 1/16W 820JV resistor
022-3909-055
RT401 NTCC16Y 103 J370H thermistor
022-3909-232
T401* CDB455CX24 resonator
12700037
022-3909-220
U101* M68723HA RF power module
11200353
U102 TA75W01F tx low pass filter, op
amp, SSOP8
U103 UMD6N switching array
transistor, SC-88A
U201* 12.8 MHz oscillator
12700029
U202 LMX1511TM PLL, MTC20
U203* TK11817M charge pump, DC/DC
up converter, 11100108
U204 UMH9N NPN narrow/wide
switching, SC-88A
U401 BA4116FV IF IC
U402 UMH9N narrow/wide switching
array, SC-88A
U601* R1120N501B C5V, +5V regulator,
SOT-23-5 11100135
U602* R1120N501B T5V, +5V regulator,
SOT-23-5 11100135
U603 UMC5N R5V, switching array,
SC-88A
022-3909-181
022-3909-178
022-3909-174
022-3909-219
022-3909-185
022-3909-115
022-3909-175
022-3909-183
022-3909-175
022-3909-180
022-3909-180
022-3909-173
VR401 EVM-ISSX50B54 volume
022-3909-060
X401* 44.845 MHz 2nd local xtal osc
12700032
022-3909-130
XFL401* 45R12B4 (UM-5) 1st IF xtal filter 022-3909-218
12800254
XFL402* 45R12B4 (UM-5) 1st IF xtal filter 022-3909-218
12800254
XFL403* CFWC455E-TC 2nd IF ceramic
022-3909-216
filter, wideband 12700002
XFL404* CFWC455H-TC 2nd IF ceramic
022-3909-217
filter, narrow band 12700004
7-6
November 2001
Part No. 001-7240-001
PARTS LIST
LOGIC BOARD ASSEMBLY
Ref No
Description
Part No.
Ref No
LOGIC BOARD ASSEMBLY
C047
C101
C102
C103
C104
C105
C106
C107
C108
C110
C111
C112
C113
C114
C115
C116
C117
C118
C120
C121
C141
C142
C143
C144
C145
C146
C147
C148
C150
C151
C152
C153
C154
C155
C156
C157
C160
C161
C162
C163
C164
GRM39X7R103K50PT capacitor 022-3909-073
GRM39X7R103K50PT capacitor 022-3909-073
GRM39COG471J50PT capacitor 022-3909-096
GRM39X7R821K50PT capacitor 022-3909-107
GRM39Y5V104Z25PT capacitor 022-3909-074
GRM39X7R393K50PT capacitor 022-3909-094
GRM39X7R103K50PT capacitor 022-3909-073
GRM42-6Y5V105Z25PT capacitor 022-3909-076
GRM42-6Y5V105Z25PT capacitor 022-3909-076
GRM42-6Y5V105Z25PT capacitor 022-3909-076
GRM42-6Y5V105Z25PT capacitor 022-3909-076
GRM42-6Y5V105Z25PT capacitor 022-3909-076
GRM39Y5V104Z25PT capacitor 022-3909-074
GRM39X7R103K50PT capacitor 022-3909-073
GRM39X7R103K50PT capacitor 022-3909-073
GRM39X7R222K50PT capacitor 022-3909-085
GRM39Y5V104Z25PT capacitor 022-3909-074
GRM39X7R332K50PT capacitor 022-3909-091
ECS-T1CY475M capacitor
022-3909-111
GRM39Y5V104Z25PT capacitor 022-3909-074
GRM39X7R682K50PT capacitor 022-3909-105
GRM39X7R153K50PT capacitor 022-3909-080
GRM39X7R681K50PT capacitor 022-3909-104
GRM39X7R392K50PT capacitor 022-3909-093
GRM39X7R332K50PT capacitor 022-3909-091
GRM39X7R562K50PT capacitor 022-3909-102
GRM39X7R332K50PT capacitor 022-3909-091
GRM42-6Y5V105Z25PT capacitor 022-3909-076
GRM42-6Y5V105Z25PT capacitor 022-3909-076
GRM42-6Y5V105Z25PT capacitor 022-3909-076
GRM39X7R103K50PT capacitor 022-3909-073
GRM39X7R103K50PT capacitor 022-3909-073
GRM39Y5V104Z25PT capacitor 022-3909-074
GRM39X7R222K50PT capacitor 022-3909-085
GRM39X7R332K50PT capacitor 022-3909-091
GRM39Y5V104Z25PT capacitor 022-3909-074
GRM39X7R562K50PT capacitor 022-3909-102
GRM39Y5V104Z25PT capacitor 022-3909-074
GRM42-6Y5V105Z25PT capacitor 022-3909-076
GRM39COG330J50PT capacitor 022-3909-089
GRM42-6Y5V105Z25PT capacitor 022-3909-076
7-7
Description
Part No.
C165
C166
C167
C168
C170
C171
C173
C174
C176
C177
C180
C181
C182
C183
GRM39X7R272K50PT capacitor 022-3909-235
GRM39X7R681K50PT capacitor 022-3909-104
GRM39X7R333K50PT capacitor 022-3909-236
GRM39X7R392K50PT capacitor 022-3909-093
GRM39COG680J50PT capacitor 022-3909-237
GRM42-6Y5V105Z25PT capacitor 022-3909-076
GRM42-6Y5V105Z25PT capacitor 022-3909-076
GRM39COG330J50PT capacitor 022-3909-089
GRM39COG330J50PT capacitor 022-3909-089
GRM39COG330J50PT capacitor 022-3909-089
GRM39COG330J50PT capacitor 022-3909-089
GRM39Y5V104Z25PT capacitor 022-3909-074
GRM39COG330J50PT capacitor 022-3909-089
GRM39Y5V104Z25PT capacitor 022-3909-074
C186
C188
C203
C204
C205
C206
C207
C208
C210
C211
C212
C221
C222
C223
C224
C225
C226
C227
C228
C230
C231
C232
C233
C234
C235
C236
C237
C238
C239
C240
GRM39COG330J50PT capacitor 022-3909-089
GRM39COG330J50PT capacitor 022-3909-089
GRM39X7R103K50PT capacitor 022-3909-073
GRM39Y5V104Z25PT capacitor 022-3909-074
GRM39X7R103K50PT capacitor 022-3909-073
GRM42-6Y5V105Z25PT capacitor 022-3909-076
GRM39X7R472K50PT capacitor 022-3909-097
GRM39X7R682K50PT capacitor 022-3909-105
GRM39X7R682K50PT capacitor 022-3909-105
GRM42-6Y5V105Z25PT capacitor 022-3909-076
GRM42-6Y5V105Z25PT capacitor 022-3909-076
ECS-T1CY475M capacitor
022-3909-111
GRM39X7R102K50PT capacitor 022-3909-072
GRM39X7R102K50PT capacitor 022-3909-072
GRM42-6Y5V105Z25PT capacitor 022-3909-076
GRM42-6Y5V105Z25PT capacitor 022-3909-076
ECS-T1CY475M capacitor
022-3909-111
GRM39Y5V104Z25PT capacitor 022-3909-074
ECS-T1CY475M capacitor
022-3909-111
GRM39Y5V104Z25PT capacitor 022-3909-074
ECS-T1CX106R capacitor
022-3909-109
GRM39Y5V104Z25PT capacitor 022-3909-074
GRM42-6Y5V105Z25PT capacitor 022-3909-076
ECS-T1CY475M capacitor
022-3909-111
GRM39X7R102K50PT capacitor 022-3909-072
GRM39COG330J50PT capacitor 022-3909-089
GRM42-6Y5V105Z25PT capacitor 022-3909-076
ECS-T1CY475M capacitor
022-3909-111
GRM39Y5V104Z25PT capacitor 022-3909-074
GRM39COG330J50PT capacitor 022-3909-089
November 2001
Part No. 001-7240-001
PARTS LIST
LOGIC BOARD ASSEMBLY (CONT’D)
Ref No
Description
Part No.
C241
C242
C243
C244
C245
C246
C247
C248
C250
C251
C252
C253
C254
C255
C256
C257
C258
C260
C261
C262
C263
C264
C265
C266
C267
C268
C270
GRM39X7R103K50PT capacitor
GRM39Y5V104Z25PT capacitor
GRM39COG270J50PT capacitor
GRM39COG270J50PT capacitor
GRM39COG030C50PT capacitor
GRM39Y5V104Z25PT capacitor
GRM39Y5V104Z25PT capacitor
GRM39Y5V104Z25PT capacitor
GRM39Y5V104Z25PT capacitor
GRM39Y5V104Z25PT capacitor
GRM39Y5V104Z25PT capacitor
GRM39COG330J50PT capacitor
GRM39COG330J50PT capacitor
GRM39COG330J50PT capacitor
GRM39Y5V104Z25PT capacitor
GRM39COG330J50PT capacitor
GRM39COG330J50PT capacitor
GRM39COG330J50PT capacitor
GRM39COG330J50PT capacitor
GRM39COG330J50PT capacitor
GRM39COG330J50PT capacitor
GRM39COG330J50PT capacitor
GRM39COG330J50PT capacitor
GRM39COG330J50PT capacitor
GRM39COG330J50PT capacitor
GRM39COG330J50PT capacitor
GRM39Y5V104Z25PT capacitor
022-3909-073
022-3909-074
022-3909-088
022-3909-088
022-3909-063
022-3909-074
022-3909-074
022-3909-074
022-3909-074
022-3909-074
022-3909-074
022-3909-089
022-3909-089
022-3909-089
022-3909-074
022-3909-089
022-3909-089
022-3909-089
022-3909-089
022-3909-089
022-3909-089
022-3909-089
022-3909-089
022-3909-089
022-3909-089
022-3909-089
022-3909-074
D101
D102
D141
D142
D201
D202
D203
D204
D205
D206
D207
D208
D209
D211
D213
DA114 switching diode, SC-70
DA114 switching diode, SC-70
DA114 switching diode, SC-70
DA114 switching diode, SC-70
DA114 switching diode, SC70
DA114 switching diode, SC70
S1A reflector diode
DA114 switching diode, SC70
UDZ3.9B 3.9V zener, SC76
UDZ16B 16V zener, SC76
UDZ5.6B 5.6V zener, SC76
UDZ5.6B 5.6V zener, SC76
UDZ5.6B 5.6V zener, SC76
UDZ5.6B 5.6V zener, SC76
DA114 switching diode, SC70
022-3909-191
022-3909-191
022-3909-191
022-3909-191
022-3909-191
022-3909-191
022-3909-198
022-3909-191
022-3909-193
022-3909-192
022-3909-194
022-3909-194
022-3909-194
022-3909-194
022-3909-191
F201*
TR3216CP (3A) fuse 19700005
022-3909-221
Ref No
Part No.
J1
J2
J3
FLSH-110-01-F-DH connector
AXN430430P connector
AXN420330S connector
022-3909-122
022-3909-123
-
MK1
21300032 (3K-3217) battery
contact
22500088 (3K-3208) battery
gasket
022-3909-138
UMT3904 NPN switching
transistor, SC-70
UMT3904 NPN switching
transistor, SC-70
UMH9N two-array switching
transistor, SC-88A
DTC144EUA NPN switching transistor, SC-70
DTC144EUA NPN switching transistor, SC-70
DTC144EUA NPN switching transistor, SC-70
UMC5N two-array switching transistor, SC-88A
UMC5N two-array switching transistor, SC-88A
UMC5N two-array switching transistor, SC-88A
SI9953DY dual N-channel FET,
SO-8
UMT3904 NPN switching
transistor, SC-70
UMT3904 NPN switching
transistor, SC-70
UMT3904 NPN switching
transistor, SC-70
022-3909-170
CR 1/16W 103JV resistor
CR 1/16W 563JV resistor
CR 1/16W 104JV resistor
CR 1/16W 103JV resistor
CR 1/16W 154JV resistor
CR 1/16W 104JV resistor
CR 1/16W 000JV resistor
CR 1/16W 473JV resistor
CR 1/16W 473JV resistor
CR 1/16W 104JV resistor
022-3909-006
022-3909-046
022-3909-007
022-3909-006
022-3909-015
022-3909-007
022-3909-001
022-3909-042
022-3909-042
022-3909-007
MK2
Q101
Q102
Q103
Q141
Q142
Q201
Q202
Q203
Q204
Q205
Q206
Q207
Q208
R101
R102
R103
R104
R105
R106
R107
R108
R110
R111
7-8
Description
022-3909-152
022-3909-170
022-3909-175
022-3909-172
022-3909-172
022-3909-172
022-3909-173
022-3909-173
022-3909-173
022-3909-176
022-3909-170
022-3909-170
022-3909-170
November 2001
Part No. 001-7240-001
PARTS LIST
LOGIC BOARD ASSEMBLY (CONT’D)
Ref No
R112
R113
R114
R115
R116
R117
R118
R119
R120
R121
R122
R123
R124
R125
R126
R127
R128
R129
R141
R142
R143
R144
R145
R146
R147
R148
R149
R150
R151
R152
R153
R154
R155
R156
R157
R158
R160
R161
R162
R163
R164
R165
R167
R168
R170
Description
CR 1/16W 394JV resistor
CR 1/16W 124JV resistor
CR 1/16W 273JV resistor
CR 1/16W 564JV resistor
CR 1/16W 154JV resistor
CR 1/16W 562JV resistor
CR 1/16W 103JV resistor
CR 1/16W 154JV resistor
CR 1/16W 223JV resistor
CR 1/16W 104JV resistor
CR 1/16W 104JV resistor
CR 1/16W 473JV resistor
CR 1/16W 473JV resistor
CR 1/16W 334JV resistor
CR 1/16W 104JV resistor
CR 1/16W 334JV resistor
CR 1/16W 104JV resistor
CR 1/16W 104JV resistor
CR 1/16W 103JV resistor
CR 1/16W 103JV resistor
CR 1/16W 103JV resistor
CR 1/16W 333JV resistor
CR 1/16W 123JV resistor
CR 1/16W 123JV resistor
CR 1/16W 223JV resistor
CR 1/16W 103JV resistor
CR 1/16W 103JV resistor
CR 1/16W 223JV resistor
CR 1/16W 153JV resistor
CR 1/16W 333JV resistor
CR 1/16W 333JV resistor
CR 1/16W 103JV resistor
CR 1/16W 104JV resistor
CR 1/16W 474JV resistor
CR 1/16W 273JV resistor
CR 1/16W 273JV resistor
CR 1/16W 104JV resistor
CR 1/16W 104JV resistor
CR 1/16W 473JV resistor
CR 1/16W 473JV resistor
CR 1/16W 334JV resistor
CR 1/16W 103JV resistor
CR 1/16W 000JV resistor
CR 1/16W 562JV resistor
CR 1/16W 563JV resistor
Part No.
Ref No
022-3909-038
022-3909-011
022-3909-026
022-3909-047
022-3909-015
022-3909-045
022-3909-006
022-3909-015
022-3909-022
022-3909-007
022-3909-007
022-3909-042
022-3909-042
022-3909-032
022-3909-007
022-3909-032
022-3909-007
022-3909-007
022-3909-006
022-3909-006
022-3909-006
022-3909-031
022-3909-010
022-3909-010
022-3909-022
022-3909-006
022-3909-006
022-3909-022
022-3909-014
022-3909-031
022-3909-031
022-3909-006
022-3909-007
022-3909-043
022-3909-026
022-3909-026
022-3909-007
022-3909-007
022-3909-042
022-3909-042
022-3909-032
022-3909-006
022-3909-001
022-3909-045
022-3909-046
R171
R172
R173
R174
R175
R176
R177
R178
R180
R181
R182
R183
R184
R185
R186
R187
R188
R192
R193
R196
R197
R202
R203
R204
R205
R207
R208
R212
R213
R214
R215
R216
R218
R220
R221
R222
R223
R224
R225
R226
R227
R228
R229
R230
R231
7-9
Description
Part No.
CR 1/16W 333JV resistor
CR 1/16W 105JV resistor
CR 1/16W 102JV resistor
CR 1/16W 821JV resistor
CR 1/16W 474JV resistor
CR 1/16W 303JV resistor
CR 1/16W 823JV resistor
CR 1/16W 332JV resistor
CR 1/16W 823JV resistor
CR 1/16W 124JV resistor
CR 1/16W 562JV resistor
CR 1/16W 683JV resistor
CR 1/16W 563JV resistor
CR 1/16W 473JV resistor
CR 1/16W 103JV resistor
CR 1/16W 103JV resistor
CR 1/16W 000JV resistor
CR 1/16W 000JV resistor
CR 1/16W 683JV resistor
CR 1/16W 103JV resistor
CR 1/16W 103JV resistor
CR 1/16W 000JV resistor
CR 1/16W 205JV resistor
CR 1/16W 103JV resistor
CR 1/16W 104JV resistor
CR 1/16W 473JV resistor
CR 1/16W 103JV resistor
CR 1/16W 393JV resistor
CR 1/16W 223JV resistor
CR 1/16W 274JV resistor
CR 1/16W 182JV resistor
CR 1/16W 102JV resistor
CR 1/16W 474JV resistor
CR 1/16W 104JV resistor
CR 1/16W 104JV resistor
CR 1/16W 104JV resistor
CR 1/16W 104JV resistor
CR 1/16W 222JV resistor
CR 1/16W 103JV resistor
CR 1/16W 103JV resistor
CR 1/16W 102JV resistor
CR 1/16W 104JV resistor
CR 1/16W 104JV resistor
CR 1/16W 104JV resistor
CR 1/16W 104JV resistor
022-3909-031
022-3909-008
022-3909-005
022-3909-056
022-3909-043
022-3909-027
022-3909-058
022-3909-030
022-3909-058
022-3909-011
022-3909-045
022-3909-051
022-3909-046
022-3909-042
022-3909-006
022-3909-006
022-3909-001
022-3909-001
022-3909-051
022-3909-006
022-3909-006
022-3909-001
022-3909-054
022-3909-006
022-3909-007
022-3909-042
022-3909-006
022-3909-037
022-3909-022
022-3909-228
022-3909-017
022-3909-005
022-3909-043
022-3909-007
022-3909-007
022-3909-007
022-3909-007
022-3909-021
022-3909-006
022-3909-006
022-3909-005
022-3909-007
022-3909-007
022-3909-007
022-3909-007
November 2001
Part No. 001-7240-001
PARTS LIST
LOGIC BOARD ASSEMBLY (CONT’D)
Ref No
R233
R234
R235
R236
R237
R238
R240
R241
R242
R243
R244
R251
R252
R255
R256
R257
R261
R262
R263
R265
R266
R267
R280
R301
R302
R303
R304
R305
R306
U101
U102
Description
CR 1/16W 104JV resistor
CR 1/16W 472JV resistor
CR 1/16W 471JV resistor
CR 1/16W 105JV resistor
CR 1/16W 684JV resistor
CR 1/16W 334JV resistor
CR 1/16W 104JV resistor
CR 1/16W 104JV resistor
CR 1/16W 104JV resistor
CR 1/16W 000JV resistor
CR 1/16W 000JV resistor
CR 1/16W 471JV resistor
CR 1/16W 471JV resistor
CR 1/16W 104JV resistor
CR 1/16W 471JV resistor
CR 1/16W 000JV resistor
CR 1/16W 104JV resistor
CR 1/16W 220JV resistor
CR 1/16W 104JV resistor
CR 1/16W 104JV resistor
CR 1/16W 473JV resistor
CR 1/16W 473JV resistor
CR 1/16W 000JV resistor
CR 1/16W 000JV resistor
CR 1/16W 000JV resistor
CR 1/16W 000JV resistor
CR 1/16W 000JV resistor
CR 1/16W 000JV resistor
CR 1/16W 000JV resistor
TA75W01FU bandpass filter op
amp, SSOP8
LM2904 rx data LPF, SO-8
Part No.
Ref No
Description
Part No.
U103
U141
U142
U143
U144
U145
U146
U147
LM2904 rx DC restoration, SO-8
C4053DT analog s/w, SOP-16
LM2904 rx/tx data LPF, SO-8
LM2904 data LPF, SO-8
LM2904 DC restoration, SO-8
LM2904 tx data LPF, SO-8
TA75W01FU tx LPF, SSOP8
AD8403ARU100 tx data/audio
digital volume TSSOP (RU24)
U148 LM2904 tx combiner, SO-8
U150 X25138-S14I EEPROM, SOIC
U151 TA75W01FU tx high pass filter,
op amp, SSOP8
U201 PCD3312CT DTMF/tone
generator, SO8
U202 TC4S66F single analog switch,
SSOP5
U203 TC4W66FU analog sw, SSOP8
U204 MC33111D low voltage
compander, SO-16
U205* R1120N501B 5V regulator,
SOT-23-5 11100135
U206* R1120N501B 5V regulator,
SOT-23-5 11100135
U207 TPS3801L50 reset, SC-70
U208 HD64F2357TE20 CPU, TFP120
U210 BU4S11F NAND gate, SSOP5
022-3909-243
022-3909-186
022-3909-243
022-3909-243
022-3909-243
022-3909-243
022-3909-178
022-3909-118
022-3909-129
022-3909-178
Y201* FCX-01, 3.579545 MHz crystal
12700044
Y202* FCX-01, 9.8304 MHz crystal
12700059
022-3909-243
* Service Parts
022-3909-007
022-3909-041
022-3909-040
022-3909-008
022-3909-052
022-3909-032
022-3909-007
022-3909-007
022-3909-007
022-3909-001
022-3909-001
022-3909-040
022-3909-040
022-3909-007
022-3909-040
022-3909-001
022-3909-007
022-3909-019
022-3909-007
022-3909-007
022-3909-042
022-3909-042
022-3909-001
022-3909-001
022-3909-001
022-3909-001
022-3909-001
022-3909-001
022-3909-001
7-10
022-3909-243
022-3909-119
022-3909-178
022-3909-184
022-3909-188
022-3909-189
022-3909-116
022-3909-180
022-3909-180
022-3909-182
022-3909-190
022-3909-187
022-3909-131
November 2001
Part No. 001-7240-001
PARTS LIST
MECHANICAL PARTS
Item No. From
Pg 6-12
Desig. /
Locator
1
A004*
2
3
4
5
6
7
8
9
10
11
12
13
14
15
16
17
18
19
20
21
22
23
24
25
26
27
28
29
30
31
32
33
34
35
36
37
38
39
40
41
42
43
* Service Parts
Assembly
Description
Part No.
Complete assy’s 20101361 Plastic front cover assembly
(includes items 1-14)
MK7*
Front Panel
216000074 (3K-3146) window, LCD
MK8*
Front Panel
23300432 (4K-2855) nut, volume
MK10*
Front Panel
22300055 (#1500) knob, spring (included w/item 5)
MK4*
Front Panel
21400096 knob and spring (item 4)
S90x*
Flex Circuit 29801715 dome switch (4K-2928)
MK6*
Front Panel
21400033 (3K-3144) button, PTT
VR901*
Flex Circuit 07007A203001 20k ohm vol control/on-off switch
A005*
Complete assy’s 51300134 flex cable assy (complete w/microswitches)
MK11*
Front Panel
22500112 (3K-2692) gasket, UDC
SPK1*
Front Panel
13200062 40-16BB-07 speaker
MK12*
Front Panel
22600031 (4K-2849) felt, speaker
MK5*
Front Panel
21400014 (3K-3209) button, emergency
MK9*
Front Panel
21800061 (4K-2887) insert
MK2*
Misc
23300188 (4K-2489) screw, lock-A
MK1*
Misc
20100784 (2K-2539) cover, UDC
MK13*
Front Panel
22900163 (3K-3142) rubber keypad
MK3*
Front Panel
21200047 (4K-2988) bushing, mic
U5*
Key/Dsply Bd 13200025 CMS27P44 internal microphone
MK3*
Key/Dsply Bd 21900145 (3K2687) LCD bracket
EH1*
Key/Dsply Bd 12000020 LCD 1710T4138001
MK1*
Key/Dsply Bd 12200490 31.5 x 1.5 x 2.5 zebra
MK2*
Key/Dsply Bd 21600024 (3K-2684) reflector
A001*
Complete assy’s 51300081 Keypad/Display PC Board (complete)
MK14*
Front Panel
23300494 (BH2,4L) fastener, t/p screw
MK1*1
Chassis
22900183 (4K-2993) cushion, RF
MK4*
Chassis
22000013 (3K-3014) can, control shield
MK3*
Chassis
22000060 (3K-3347) can, RF shield
MK1*
RF board
22000025 (3K-3210) can, VCO
MK9*
Chassis
23300220 (BHM2, 4L) fastener, m/c screw
A003*
Complete assy’s 51300013 RF PC board assembly (complete)
A002*
Complete assy’s 51300035 Logic PC board assembly (complete)
MK1*
Logic board 21300022 (3K-3217) battery contact
MK5*
Chassis
22500095 (3K-3192) gasket, main
MK2*
Logic board 22500088 (3K-3208) battery contact gasket
MK6*
Chassis
22500092 (4K-2495) gasket, frame
MK2*
Chassis
20500171 (1K-0011) frame
MK14*
Chassis
SMA jack nut
MK10*
Chassis
23300437 (4K-2947) washer, plate
MK3*
Misc
23101070 (4K-2930) label, spec
MK13*
Chassis
22000059 antenna connector ground clip
MK11*
Chassis
19800077 antenna connector (w/o nut, washer)
MK4*
Misc
23300200 (CHM2.6, 8L) screw, machine
7-11
022-3909-025
022-3909-142
022-3909-160
022-3909-149
022-3909-135
022-3909-137
022-3909-139
022-3909-162
022-3909-053
022-3909-150
022-3909-203
022-3909-154
022-3909-140
022-3909-147
022-3909-148
022-3909-132
022-3909-157
022-3909-136
022-3909-204
022-3909-143
022-3909-201
022-3909-120
022-3909-141
022-3909-002
022-3909-225
022-3909-061
022-3909-145
022-3909-144
022-3909-146
022-3909-224
022-3909-023
022-3909-016
022-3909-138
022-3909-151
022-3909-152
022-3909-153
022-3909-223
022-3909-100
022-3909-161
022-3909-158
022-3909-095
022-3909-039
022-3909-159
November 2001
Part No. 001-7240-001
PARTS LIST
EXPLODED VIEW
7-12
November 2001
Part No. 001-7240-001
SECTION 8 SCHEMATIC DIAGRAMS AND COMPONENT LAYOUTS
RF BOARD
J101
AUDIO/LOGIC BOARD
J1
Battery In
Modulation In
1
2
Battery Out
Modulation Out
Battery In
Sw Narrow/Wide In
3
4
Battery Out
Narrow/Wide Out
J2
J801
KEYPAD/DISPLAY BOARD
Sw Battery In
Gnd
1
2
Sw Battery Out
Gnd
Display Strobe Out
Serial Clk Out
3
4
Display Strobe In
Serial Clock In
NC
Power Control In
5
6
TMUT
Tx Power Out
Display Enable Out
L5V Out
5
6
Display Enable In
L5V In
RSSI Out
BPF Shift In
7
8
RSSI In
BPF Shift Out
BK LED Out
Key R0
7
8
Bk LED In
Key R0
Squelch Out
NC
9
10
Squelch In
NC
Key S0
RxD
9
10
Key S0
RxD
Lock Detect Out
Gnd
11
12
Syn Unlock In
Gnd
TxD
T5C Out
11
12
TxD
T5C In
Latch Enable In
Sw Battery In
13
14
PLL Strobe Out
Sw Battery Out
Key R1
Key R2
13
14
Key R1
Key R2
Data In
Audio Out
15
16
PLL SO
Detect In
Key R3
Key S1
15
16
Key R3
Key S1
Clock In
Mod Balance
17
18
PLL SK Out
LTR Out
Key S2
Key S3
17
18
Key S2
Key S3
Delayed PTT In
Gnd
19
20
R5C Out
Gnd
NC
AMUTE Out
19
20
NC
AMUTE In
Keypad Int In
Audio VRIN Out
21
22
Keypad Int Out
Audio VRIN In
Reset
Mic Audio In
23
24
Reset
Mic Audio Out
Key S4
NC
25
26
Key S4
NC
MSO
MICE
27
28
MSO
PTT/Flash
Gnd
Bat Out
29
30
Gnd
Bat In
J3
1
Tx In
2
3
Gnd
Tx Out
4
5
CLR/CODE
T5C
6
7
NC
NC
8
TO OPTIONAL 9
ENCRYPTION 10
MODULE
11
NC
NC
FLEX CIRCUIT
Internal Speaker
J902
J802
Gnd
PTT/Flash
1
2
Int Spkr +
Gnd
3
4
Int Spkr Aux Sw
5
6
Audio VR In
Audio VR Out
7
8
Batt
9
Emer Sw
10
Function Sw
11
TxD
12
RxD
Sw Batt In
13
14
Ext Mic Audio
Gnd
15
16
Reset
UDC Sense
17
18
UDC Mic Sense
Ext Spkr
19
20
+
SPK1
J901
J901
S901
PTT Switch
PTT/Flash
Ext Mic Audio
Power Sw
VR901A
S903
Aux Sw
C902
0.1
R902
10k
R901
0
S902
FCN Sw
Vol Ctrl
VR901B
20k
C903
0.1
TxD
RxD
Sw Bat Out
Gnd
UDC Mic Sense
Reset
Ext Spkr Audio Out
UDC Sense
1
2
3
4
5
6
7
ACCESSORY
CONNECTOR
8
9
10
S904
Emer Sw
Sw Bat Out
Gnd
12
13
AMUTE In
Beep Out
14
15
AMUTE Out
Opt B
16
17
Ext DC
Rx Out
18
19
PTT In
Rx In
20
PTT Out
Bat +
+
BT100
7.5 VDC BATTERY
PACK
_
Bat -
1
2
3
4
5
To Transceiver
Accessory Connector 6
7
8
9
10
PTT/Flash
Ext Mic Audio
TxD
RxD
Sw Bat Out
Gnd
UDC Mic Sense
Reset
Ext Spkr Audio Out
UDC Sense
RxD
Gnd
Mic Audio
Hanger
20V Prog
Bat
Rx Audio
TxD
A
1
2
3 To RPI
4
5
6
B
TRANSCEIVER-TO-RPI PROGRAMMING CABLE
Part No. 597-7200-031
INTERCONNECT SCHEMATIC
8-1
November 2001
Part No. 001-7240-001
BANDPASS FILTER
C304
3pF
C302
7pF
C305
3pF
C303
18pF
R5V
R305
3.3k
R304
8.2k
C306
18pF
C308
3pF
C320
12pF
C314
3pF
S301
18nH
L304
18nH
C318
3pF
R303 Q301
680 AT-41533
C307
5pF
BANDPASS FILTER
C322
C325
5pF
4pF
C321
9pF
C323
5pF
R301
100k
C330
2pF
R302
100k
D303
C326
6pF
L301
L308
22nH
R307
100k
45.3 MHz CRYSTAL FILTERS
C337
5pF
L307
18nH
XFL401
1
XFL402
3
1
C401
16pF
2
R401
180k
R400
330
C420
1000pF
C418
0.01
R402
1.5k C406
22pF
Q401
2SC3356
3
16
C403
5pF
C407
0.47
R308
100k
4
11
10
Vcc
IF Out
Quad
+
R420
3.9k
Mixer
Gnd Out
15
3
C424
0.01
N Detect
12
RSSI
IF In
5
C422
4700pF
C423
4700pF
C417
0.047
DC-DC CONVERTER
U203
TK11817
R217
10
C225
0.1
L201
C224
+
4.7
C206
10
2 OS
T1 6
3 DK
Gnd 5
R216
1k
15
13
11
13
Latch Enable
14
+ C219
4.7
R412
4.7k
C202
0.1
2
Vcc
C203 +
4.7
DO
Out
1
Q501
2SC4226
R505
6.8k
C502
4pF
L510
D501
C505
8pF
R503
6.8k
Q502
2SC4226
C507
7pF
C506
22pF
R504
330
2
Gnd
Gnd 5
6
Gnd
6
C515
1000pF
BUFFER AMP
R506
5.6k
R510
3.3k
TRANSMIT VCO
(430-470 MHz)
R220
1.5k
XIN
C216
0.1
R218
470
C530
9pF
L531
470nH
R221
1.5k
C531
0.022
C534
0.01
Q531
2SC4226
C539
1.5pF
C532
4pF
L532
C535
7pF
R533
6.8k
C215 +
2.2
R204
120k
D402B
1 U402A
UMH9N
2
R417
15k
R415
22k
R526
68
R539
150k
C513
5pF
R534
220
C518
470pF
U402B
UMH9N
5
H= Wide
L = Narrow
Sw Nar/Wide
Switched Bat In
C601
4.7
L506
15nH
C517
5pF
Q503
2SC3356
C520
13pF
C602
0.1
C603
0.01
C610 +
0.01
U601
C5V REGULATOR
R1120N501
3 In
Out 1
4 CE
Gnd NC
C604 + C605
2
5
4.7
0.01
C521
15pF
C514
2pF
C546
470pF
C5V
Source
+
C606
0.1
C607
4.7
5V REGULATOR
R537
3.3k
C541
7pF
Q532
2SC4226
C544
5pF
R543
0
C538
470pF
R535
6.8k
R548
1.8k
R547
5.6k
R545
12k
T5V
Source
C611 +
0.01
C612
4.7
BUFFER AMP
Q533
2SC4226
C5V
Tx SWITCH
Q601
KRA105
U602
R1120N501
3 In
Out 1
4 CE
Gnd NC
2
5
Q534
2SC4226
C547
470pF
R536
330
L534
22nH C548
3pF
U603
UMC5N
C613
0.01
Rx SWITCH
R5V
Source
3
R540
39k
C529
560pF
C545
470pF
R546
220
C614 +
0.01
Tx Freq
1
5
C615
4.7
C616
0.1
NC
NC
BATT
T5V
R224
Not Used
2
C5V
3
R104
5.6k
R223
10k
L101
18nH
U204
UMH9N
R105
0 C105
470pF
C108
C109
1000pF + 4.7
R103
3.6k
L102
22nH
C110
0.1
C140
1000pF
C134
1000pF
PA MODULE
C106
5pF
C141
0.22
+
C142
4.7
ANTENNA SWITCH
C145
100pF
R105
T5V 220
TRANSMITTER
C102
5pF
3
U101
M68732
C112
1000pF
2
C122
22pF
L112
In
Out
1
In
S101
Out
C130
2200pF
2
POWER CONTROL
3
R116
33k
5
Power Control
C138
470pF
R125
1.8k 4
+
C136
4.7
D301
C115
1.5pF
D101
AMPLIFIER
C137
0.01
10
2
R121
15k
U102B
TA75W01
+
7
5
6
U103
UMD6N
R115
33k
2
1
4
T5V
8
+ 3
1
R122
820
R120
68k
C127
1000pF
R111
1.2k
R108
4.7k
C126
470pF
C125
220pF
R110
15k
2
1
Ground
Ground
HARMONIC FILTER
Forward Power Co
2
C123
100pF
Is
3
R107
82
D103
3
U102A
TA75W01
Battery In
C120
22pF
L107
C113
5pF
1
19
1
3
4
Vbb Control
L105
D102
Delayed PTT
BATT
Source
Battery In
Rx RF
L106
470nH
DIRECTIONAL COUPLER
4
BATT
6
C143
C144
220pF + 10
Vcc
1
Q101
2SC3357
4
WIDE/NARROW SWITCH
R102
8.2k
5
BATT
3
5
1
14
C608
4.7
4
R203
82k
R530
33k
6
4
C427
0.01
POWER SUPPLIES
+
L505
27nH
C516
33pF
C201
10
VCO Mod
XLF404
3, 4
R416
15k
4
R512
12k
T5V
C537
7pF
C536
22pF
D533
R513
560
L533
27nH
C533
4pF
D531
L504
15nH
C540
470pF
R532
3.3k
R511
8.2k
R507
390
C512
5pF
C214
0.1
2
R514
10
R5V
C508
470pF
R531
10
T5V
C5V
3 VC
C227
5pF
C511
7pF
U201
R202
1.5k
TCXO
Mod
C501
0.022
R210
39
R219
68
R422
10k
6
D402A
C429
0.01
C510
470pF
L503
33nH
NC 2
C207
1000pF
1
C504
470pF
R502
3.9k
C503
3.3pF
LOOP FILTER
+
18
C530
10pF
8 LD
12.800 MHz TCXO
4
R501
10
SQUELCH
LEVEL ADJ
R5V
2
NARROW BAND
1
16
R409
22k
R421
10k
3
L501
150nH
C211
0.01
R207
33k
D401B
Audio Out
C413
0.022
VR401
50k
R5V
RECEIVE VCO
(385-425 MHz)
LE
LOCK DETECT
Lock Detect
C5V R205
2.4k
C222
10
Gnd 7
Q201
KRA102
11
+
C221
0.1
XLF403
RT401
10k
R410
56k
3, 4
R550
82
R418
22k
Clock
Data
C550
9pF
R552
82
SYNTHESIZER
WIDE BAND
1
7
R406
100k
C415
220pF
R414
15k
D401A
Q535
2SC4226
C220
4.7
Vpp 4
Data
C5V
C218 +
0.1
R551
120k
Vcc
C208
470pF
Clock
L535
27nH
C551
3pF
VCOs
FIN 10
17
T5V
L215
2.2uH
SYNTHESIZER
U202
LMX1511
R206
10
5
C210
0.22
VO 4
C223
0.047
C5V
+
1 VI
C428
0.01
C414
0.047
R411
150k
L404
470nH
R413
15k
R405
3.9k
AF Out 9
Filter
In
8
Filter
Out
7
Dec
6
455 kHz CERAMIC FILTERS
C5V
RSSI Out
C408
0.22
C416
220pF
C426
39pF
Part of
J101
Squelch Out
9
13
Rx Freq Minus 45.3 MHz
Part of
J101
BP Filter Sel
8
R403
100k
C404
10
U401
BA4116
Osc 2
2
C425
22pF
L306
C313
0.01
R404
1.5k
Mix In
C333
3pF
L310
39nH
C412
4.7
R5V
1 Osc 1
X401
44.845 MHz
R310
820
T401
SECOND MIXER/
DETECTOR
C410
82pF
14 N Rect
2
C336
470pF
R312
100
C421
0.1
D306
C331
0.01
L302
R314
0
2 Q302
SGM2016 C338
3pF
1
3
4
L305
C312
0.01
R317
0
C327
12pF
RF AMP
D305
D302
C328
3pF
C324
9pF
L312
390nH
C341
24pF
R5V
R5V
R5V
IF AMP
C340
1000pF
C317
470pF
L303
27nH
C315
15pF
R313
100
FIRST MIXER
RECEIVER
C316
1000pF
C301
7pF
R315
10
+
C404
1000pF
R306
12k
L108
C114
8pF
12
20
L110
C116
8pF
C118
5pF
Antenna Jack
2
C124
330pF
C132
1000pF
RF BOARD SCHEMATIC
8-2
November 2001
Part No. 001-7240-001
6
5
C
16
1
E
E
B
3
8
9
2
C
1
E
4
2
1
2
3
4
C
E
B
E
C
B
19
E
E
B
10
B
E
C
11
20
C
C
C
E
1
RT401
B
C
E
B
B C
C
E
B
20
E
1
E C
B
C
11-23-00
Antenna
Jack
RF BOARD BOTTOM VIEW
RF BOARD TOP VIEW
8-3
November 2001
Part No. 001-7240-001
MICROCONTROLLER
Rx AUDIO GATE
20
NPSPAC
10
Wide/Narrow
19
Q101
R101 UMT3904
10k
R104
10k
Q102
UMT3904
R102
56k
300-3000 Hz
BANDPASS FILTER
R112
390k
C101
0.01
R107
0
Rx Audio In
R108
47k
C105
0.039
R113
120k
R114
27k
C108
1
8
6
7
4
R111
100k
Rx Audio Out
C106
0.01
5 +
R5V
R118
10k
C110
1
R120
22k
6
Out 1
Comp In
+5S
16
R119
150k
Vdd
Comp Out
13 NC
5 Comp Cap
+5S
C117
0.1
C114
0.01
R121
100k
2
1
C115
0.01
7
5 +
U102B
LM2904
C118
3300pF
R125
330k
C116
2200pF
Q103A
UMH9N
Bandwidth Control
6
R124
47k
U102A
LM2904
4
3
BANDWIDTH CONTROL
2
DTMF
GATE
3
+
R202
0
Osc 1
SDA
8
Y201
3.5795 MHz
3
P30/TXD0
57 P34/SCK0
65
P26/PO6/TIOCA5/TMO0
Tones
C112
1
U203B
+5S
TC4W66
8
5
C211
1
R212
39k
6
D101
107
P15/PO13/TIOCB1/TCLKC
110 P12/PO10ITI0CC0ITCLKA
T5V
2
Q103B
UMH9N
1
4
DATA MUTE
C148
1
DATA DETECTOR
Rx/Tx SMARTNET DATA PROCESSING
LOW-PASS FILTER
Y
16
Tx SN Data
2
R141
10k
15
R142
10k
Y0
Ctrl
10
+5S
6
R143
10k
R145
12k
8
7
5 +
C141
6800pF
R147
22k
C144
3900pF
3 +
U142B
LM2904
4
C143
680pF
Ctrl
R151
15k
1
3 +
U142A
LM2904
5
J105
J106
7
1
3 +
4 U144A
LM2904
C151
1
TEST
SWITCH
U141A
74HC4053
R165
10k
+5S
16
Vdd
8
1
U145A
4
LM2904
14 X X1
X0
Ctrl
11
TRANSMIT DATA PROCESSING
C157 LOW-PASS FILTER
U145B
0.1
LM2904
13
12
R304
0
2
R163
47k6
3
R162
47k
L5V
D208
R164
330k
C156
3300pF
14
C152
0.01
7
C155
2200pF
5
R266
47k
+5S
R158
27k
R161
100k
R306
0
Reset
Q141
DTC144
C154
0.1 +5S
3
RxD
Boot1
R303
0
5
Z1
Inhib
6
TxD
L5V
T5V
C150
1
Z0
4 Z
R197
10k
R196
10k
63
MSI
MSO
Ser Clk
R155
100k
R160
100k
C153
0.01
D209
R252
470
R251
470
16
Tx Data
R156
470k
R267
47k
Tx Precursor
R157
27k
R305
0
Q142
DTC144
BANDWIDTH
CONTROL
4
Vdd
R229
100k
Reset
R222
100k
3
Gnd 2
5 MR
P63/_TEND1
90 P51/RXD2
89
P50/TXD2
91 P52/SCK2
L5V
U207
TPS3801L50
+5V
R302
0
4
R153
33k
D142
2
+5V R301
0
Gnd
Rx SN Data
6
4
C147
3300pF
R154
10k
8
+
J103
J104
U143B
LM2904
+5S
U143A
LM2904
8
Vcc 14
13
Hold
WP 6
1
CS
SO 2
8
SI
SCK 9
RESET
J101
J102
R152
33k
+5S
2
R149
10k
C145
3300pF
DATA SELECT SWITCH
U141C
9 74HC4053
15
R148
10k
1
U144B
LM2904
L5V
12
13
D141
7
5 +
R150
22k
C146
5600pF
2
R146
10k
+5S
8
6
LOW-PASS FILTER
+
1
7
Vee
Y1
R144
33k
C142
0.015
U141B
74HC4053
LOW-PASS FILTER
+
DATA SELECT
U150
X25138
3 NC
4
NC
5 NC
10
NC
11 NC
12
NC
7 Vss
6
D102
P40/AN0
Rx Data
16K x 8 EEPROM
73
C241
0.01
C242
0.1
C250
0.1
C251
0.1
Clock Shift
XTAL 77
_RES
D207
5.6V
Gnd 1
112
P10/PO8/TIOCA0/_DACK0
111 P11/PO9/TIOCB0/_DACK1
106
P16/PO14/TIOCA2
109 P13/PO11ITIOCD0ITCLKB
83
PF5/_RD
56 P33/RXD1
54
P31/TXD1
37 PE3/D3
9
PC6/A6
29 P67/_CS7/_IR03
8 PC5/A5
7 PC4/A4
5
PC3/A3
23 PA3/A19
22
PA2/A18
21 PA1/A17
4 PC2/A2
20 PA0/A16
13
PB2/A10
17 PB5/A13
43
PDO/D8
C243
27pF
95
Q207
UMT3904
C245
3pF
C244
27pF
Vcc
C247
0.1
R238
330k
10
PC7/A7
PB0/A8 11
12
PB1/A9
PB3/A11 14
16
PB4/A12
PB6/A14 18
19
PB7/A15
PA4/A20/_IR04 25
27
PA6/A22/_IR06
P65/_IR01 31
35
PE1/D1
PE4/D4 39
40
PE5/D5
PE6/D6 41
42
PE7/D7
PD6/D14 50
58
P35/SCK1
P61/I_TEND0I_CS5 61
66
P25/PO5/TIOCB4/TMI1
P24/PO4/TIOCA4/TMRI1 67
68
P23/PO3/TIOCD3/TMCI0
P22/PO2/TIOCC3/TMRI0 69
70
P21/PO1/TIOCB3
PF1/_BACK 87
92
P53/_ADTRG
PG1/_CS3 117
118
PG2/_CS2
PG4/_CS0 120
86
PF2/_LCASI_WAIT/_BREQ0
P43/AN3 98
6
GND6
GND15 15
GND24 24
R280
0
R237
680k
R234
4.7k
C246
0.1
C248
0.1
R244
0
GND38 38
47
GND47
GND59 59
79
GND79
103
AGND/03
104
GND104
P32/RXD0 55
L5V
R242
100k
R230
100k
Q208
UMT3904
5
2
U210
1 TC4S11
4
_WDTOVF-FWE 72
115
MD2
17
Y202
9.8304 MHz
R235
470
R236
1M
EXTAL 78
34 PE0/D0
2
PC0/A0
108
P14/PO12/TIOCA1
88
PF0/_BREQ
29
6
20
30
4
R127
R126 330k
100k
PA7/A231_IR07 28
28
3
1
Vcc1 1
33
Vcc33
Vcc52 52
76
Vcc76
Vcc81 81
30 R231
P66/_CS6/_IR02
100k
_STBY 75
64 R263
P27/PO7/TIOCB5/TMO1
100k
R233
NMI 74
100k
R240
113
MD0
114
100k
MD1
80 R265
PF7
100k
R261
P44/AN4 99
100
100k
P45/AN5
P46/ANGIDA0 101
93
AVCC93
VREF 94
97 R262
P42/AN2
22
53
R205
100k
2
U103A
LM2904
R128
100k
7
1
SCL
7
Gnd
1
R203
2M
24
31
14
7
25
26
27
Osc 0 4
U201
PCD3312
6 A0
U203A
TC4W66
7
MIC AUDIO
GATE
2
C120
4.7
5
9
DATA
DETECTOR
+
17
R123
47k
8
3 +
R122
100k
C121
0.1
+5S
U103B
LM2904
5 8
+
6
Q201
DTC144
Vcc
5 Tone Out
C204
0.1
L5V
U208
H8S-2357
48 PD4/D12
46
PD3/D11
45 PD2/D10
44
PD1/D9
71 P20/PO0ITIOCA3
84
PF4/_HWR
105 P17/PO15/TIOCB2/TCLKD
102
P47/AN7IDA1
32 P64/_IR00
26
PA5/A21/_IR05
3 PC1/A1
2
R204
100k
R208
10k
DTMF ENCODER
4
C111
1
RECEIVE DATA PROCESSING
LOW-PASS FILTER
R207
47k
R218
470k
Gnd 1
4
CM
EM 12
11 Exp Cap
C113
0.1
C112
1
3
Out 2 10
Inv 2
R129
10
C203 +5S
0.01
Tones
C205
0.01
PT 8
14 Exp In
U101B
TA75W01
R116
150k
C107
1
C47
0.01
Rx Audio
Exp Out 15
7 Inv 1
R115
560k
2
Vdd = Pin 5 (+5S)
Vss = Pin 3 (Gnd)
P41/AN1
119 PG3/_CS1
116 PG0/_CAS
85 PF3/_LWR
82
PF6/_AS
62 P62/_DREQ1
36
PE2/D2
60 P60/_DREQ0/_CS4
51
PD7/D15
49
PD5/D13
22
5
4
23
3
2
10
COMPANDOR
U204
MC33111
3 +
C102
470pF
R106
100k
1
C104
0.1
R5V
R117
5.6k
U101A
TA75W01
2
1
R110
47k
C206
1
4
C103
820pF
R103
100k
R105
150k
18
U202
TC4S66
RECEIVE AUDIO PROCESSING
96
8
21
11
1
9
15
R241
100k
D206
3
R257
0
TRANSMIT AUDIO PROCESSING
C168
3900pF
T5V
C171
0.1
8
6
7
U146B 4
TA75W01
R182
5.6k
+ 5
C165
2700pF
LOW-PASS FILTER
R181
120k
R180
82k
R178
3.3k
C170
68pF
2
1
+ 3
U146A
TA75W01
C167
0.033
R177
82k
R176
30k
C164
1
R173
1k
26
C163
33pF
R172
1M
LIMITER
2
C160
5600pF
R167
0
8
R175
470k
R174
820
U151A
TA75W01
R214
270k
D211
5.6V
R215
1.8K
C207
4700pF
R256
470
D213
L5V
6
7
1
+ 3
C166
680pF
R255
100k
C210
6800pF
U151B
TA75W01
T5V
HIGH PASS FILTER
R168
5.6k
+ 5
4
C208
6800pF
R171
33k
C162
1
R213
22k
R216
1k
SW BATT
Source
R170
T5V
56k
C258
33pF
C161
0.1
C257
33pF
C256
0.1
C252
0.1
C253
33pF
C254
33pF
C255
33pF
J2
Sw Batt In
Gnd
L5V
1
2
3
DISST
SER CLOCK
12
4
5
DISEN
L5V Out
6
7
BKLED
KEYR0
DIGITAL POTENTIOMETER
+5V
13
12 SDI
12
14 CLK
11
R187
10k
VCC 16
15
RS
7.5V SUPPLY SWITCHES
Q205B
S19953
3
5, 6
11 CS
C174
33pF
T5V
3 A2
R193
68k
R192
0
Pwr Control
VCO Modulation
B1 24
4 W2
R221
100k
W1 22
2 B2
B3 20
8 W4
W3 18
Transmit Audio
7.5 VDC
BATTERY PACK
SHDN 10
5 GND4
GND1 21
9 DGND
GND2 1
F201
3A
1
D203
+
C231
10
C232
0.1
R220
100k
R186
10k
2
1
TCXO Modulation
U148A
LM2904
4
NC
5
C226
4.7
C227
0.1
CE
Q202
UMC5N
5
SW BATT
R183
68k
D205
3.9V
C240
33pF
+ 3
R184
56k
AMPLIFIER/COMBINER
R224
2.2k
3 In
7, 8
D201
C234
4.7 +
C235
1000pF
R223
100k
C236
33pF
+
1
NC
5
C237 + C238
4.7
1
C239
0.1
C181
33pF
C180
33pF
C178
33pF
C177
33pF
C176
33pF
C175
33pF
3
L5V
2
VCO Modulation
Battery Out
Wide/Narrow
TMUT
10
9
Tx Power Ctrl
RSSI
8
7
6
BPF Shift
Squelch
NC
Syn Unlock
5
Gnd
PLL Strobe
Vcc
4
Sw Battery Out
PLL SO
3
Detect
PLL SK
2
31
TCXO Modulation
DPTT Out
C188
33pF
C186
33pF
Gnd
22
23
24
25
KEYS4
NC
26
27
MSO
MICE
C268
33pF
C267
33pF
C266
33pF
C265
33pF
C264
33pF
C263
33pF
C262
33pF
C261
33pF
28
29
Gnd
BATT Out
C260
33pF
30
BATT
4
D204
R225
10k
R227
1k
R226
10k
Q206
UMT3904
C223
1000pF
1
25
24
1
2
T5C
NC
R5V
Source
2
NC
NC
4
+
1
C224
1.0
L5V
C225
1000pF
1
7
8
To RF Board
11
12
13
14
15
16
Tx Out
CLR/CODE
27
3
4
5
6
J3
Tx In
Gnd
R5V SWITCH
3
Q204
UMC5N
5
9
10
20
21
RESET
MIC
C270
0.1
T5V
Source
To Key and Display
Board
18
19
Keypad Int
Audio VRIN
23
13
Q203
UMC5N
5
J1
Battery Out
C222
1000pF
T5V SWITCH
BATT
C182
33pF
C221
4.7
16
17
NC
AMUTE
30
22
Power Hold
C183
33pF
+5S
Source
Out 1
Gnd
2
14
15
KEYS2
KEYS3
R243
0
4
L5V
Source
12
13
KEYR3
KEYS1
3
+
L5V REGULATOR
U206
R1120N501
4
D202
+5V
R185
47k
+5V
8
C230
0.1
2
Tx Audio/Data
_
R188
0
C228
4.7
Out 1
Gnd
2
KEYR1
KEYR2
+5S SWITCH
2
Q205A
S19953
BATT
Source
BT100 +
A3 19
17 GND3
4
+5V
Source
CE
3 In
+
10
11
TxD
T5C
C233
1
A1 23
6 B4
7 A4
C173
1
Transmit Data
+5V REGULATOR
U205
4 R1120N501
Vcc
Source
8
9
KEYS0
RxD
POWER SUPPLIES
U147
AD8403
Sw Batt
R228
100k
NC
Sw Batt Out
Gnd
AMUTE In
28
Beep Out
AMUTE Out
29
21
18
Opt B
Ext DC
19
26
Rx In
PTT Out
Rx Out
PTT In
1
2
3
4
5
6
7
8
9
10 To Encryption Module
11
12
13
14
15
16
17
18
19
20
17
18
19
20
8-4
LOGIC BOARD SCHEMATIC
November 2001
Part No. 001-7240-001
C
1
B E
J106
E B
C
J103
1
61
J104
91
1
2
E B
15
16
C
B
C
E
B
31
120
19
1
1
20
C
E
B
E
C
30
11
20
10
1
1
1
1
C
1
1
E
B
10-5-00
10-5-00
LOGIC BOARD TOP VIEW
LOGIC BOARD BOTTOM VIEW
8-5
November 2001
Part No. 001-7240-001
KEYPAD
Sw Batt
J801
Sw Batt Out
21
22
23
24
25
26
27
28
29
30
S11
"0"
S8
"8"
S5
"5"
C110
100pF
S2
"2"
R413
100k
KEYR2
KEYR3
S12
"#"
S9
"9"
S6
"6"
KEYS3
NC
R401
47k
AMUT
Keypad Interrupt
R414
100k
R402
47k
S13
"FCN"
(F1)
S14
"SYS"
(F2)
R440
S15
"GRP"
(F3)
Open
R1
R2
MIC
KEYS4
R3
NC
MSO
R415
100k
PTT/Flash
GND
BATT
L5V
S4
R403
47k
Q401
DTA123
Q402
DTA123
Q403
DTA123
R404
47k
Sw Batt
R104
47k
R102
47k
R409
100k
KINT
R416
47k
INTA +
8 INTA 5
INTB 6 INTB +
External Speaker
R112
47
C113
0.1
C101
C102
0.1 + 4.7
Internal Speaker +
C107
0.22
4
Gnd
1
Out A
3
Out B
Vcc 2
Q101
BCX51
C103
0.01
Internal Speaker –
R105
47
R106
47
C105
0.1
C106
0.1
R115
27k
Q102
UMT3904
L5V
L5V
C104
4.7 +
R101
100k
D405
C115
47
INTERNAL SPEAKER
AUDIO AMP
7
Q106
UMT3906
R109
22
R116
47k
Gnd 4
1
Out A
Out B 3
2
Vcc
U101
NJM2073
Q105
UMT3904
R110
47k
UDC SENSE
R0
AUDIO-VRIN
RESET
R108
47k
AMUTE
+
C108 + C109
4.7
0.1
R107
100k
D404
S3
L5V
KEYS1
KEYS2
C111
22
Q104
BCX51
Sw Batt
S3
"3"
R111
27k
U102
NJM2073
7 INTA +
8
INTA 6 INTB +
5
INTB -
+
EXTERNAL SPEAKER
AUDIO AMP
D403
Audio-VR Out
Q103
UMT3904
R408
100k
R103
22
Q404
UMT3904
J802
Gnd
PTT/Flash
Int Spkr +
Gnd
Int Spkr Aux Sw
Audio-VR In
Audio-VR Out
Batt
R506
3.3k
R505
3.3k
Emer Sw
FCN Sw
R503
3.3k
L5V
TxD
RxD
Sw Batt
R502
47k
DISEN
R508
3.3k
R504
12k
C501
1800pF
C502
0.1
R308
100k
LCD
RT509
47k
1
2
3
4
5
6
7
8
9
10
11
12
1
P1/S1
2
P2/S2
3 P3/S3
4 P4/S4
5
P5/S5
6 P6/S6
36
35
COM2
COM1
34
S34
33
S33
32
S32
S31 31
LCD
DRIVER
7 P7/S7
8
P8/S8
9 S9
10
S10
11
S11
12
S12
36
35
30
S30
29
S29
28
S28
27
S27
26
S26
S25 25
U501
LC75834W
36
35
34
33
32
31
30
29
28
27
26
25
37
35
32
31
28
27
24
23
34
21
20
19
16
15
12
11
8
7
4
3
1
44
2
3
43
42
4
5
41
40
6
7
39
38
8
9
37
36
10
11
35
34
12
13
33
32
14
15
31
30
16
17
29
28
18
19
27
26
20
21
25
24
22
23
38
37
35
33
30
38
22
29
26
25
MIC MUTE
R302
220
8
L5V
Q302
UMT3904
D303
D304
R311
0
D305
D307
D306
D308
1
22
18
17
External Mic
Mute
L5V
C205
10
R301
220
D902
D309
D310
R303
220
R304
220
R305
220
R306
220
14
13
10
9
Gnd
Reset
1
T5C
UDC-Sense
UDC-Mic Sense
R117
0 (Not Used)
C207
1
U201A
TC4W66
Ext Spkr
R208
2.7k
R206
12k
+
R501
100k
DISPLAY/KEYPAD
BACKLIGHT
D901
R307
4.7k
R310
100k
EH1
AT4138AZR
MSO
Q301
3906
Sw Batt
Ext Mic
Sw Batt
Source
+
DISST
MSCK
38
37
19
20
S1
"1"
S2
23
24
17
18
T5C
Source
T5C
KEYR1
21
22
15
16
RXD
TXD
19
20
To J2
Logic Board
13
14
R412
100k
KEYR0
KEYS0
17
18
11
12
*
S4
"4"
S1
L5V
BKLED
48
DI
CL 47
46
CE
_INH 45
44
OSC
VSS 43
42
VLCD2
VLCD1 41
40
VLCD
VDD 39
38
COM4
37
COM3
9
10
S7
"7"
S10
D402
S13
14
S14
15 S15
16
S16
17
S17
18
S18
19
S19
20
S20
21
S21
22 S22
23
S23
24
S24
7
8
L5V
Source
13
5
6
Serial Clock
DISEN
D401
R411
100k
15
16
3
4
Gnd
DISST
S0
13
14
1
2
2
External Mic Audio
R201
100k
C203
0.22
R204
10k
3
4
5
6
7
8
9
To Flex
10
Circuit
11
12
13
14
15
16
17
18
19
20
L5V
7
Q202
DTC144
1
2
R202
22k
Q201
DTC144
L5V
C202
0.1
Internal Mic
Mute
3
5
R203
33k
6
4
U201B
TC4W66
R205
12k
C204
33pF
U5
Internal Mic
R207
2.7k
C206
1
1
6
5
2
DISPLAY/KEYPAD BOARD SCHEMATIC
8-6
November 2001
Part No. 001-7240-001
U5
Mic
22
1
D901
D902
EH1
1
10-5-00
48
23
44
S13
J802
S1
E B
C
C
GRP
D303
D304
E B
S15
SYS
FCN
1
20
S14
S2
3
2
1
D306
Top Panel
Option Sw
S3
D305
-
S4
S5
S6
4
5
6
4
S9
6
8
10
2
D307
D308
B C E
B C E
C
C
C
S7
B E B E
B E B E
S8
C
C
C
C
7
C
B E B E B E B E
D310
8
D309
9
S10
S11
S12
*
0
#
+
To Accessory
Connector
1
3
S902
Upper Opt
Sw
S901
PTT Sw
S903
Lower Opt
Sw
To Speaker
5
7
9
C
C
B E
B E
16
30
J801
1
15
To J802 (Keypad/Display Bd)
DISPLAY/KEYPAD BOARD BOTTOM VIEW
DISPLAY/KEYPAD BOARD TOP VIEW
8-7
FLEX CIRCUIT LAYOUT
November 2001
Part No. 001-7240-001
AUDIO/LOGIC BOARD
RECEIVE AUDIO PROCESSING
300-3000 Hz
Audio
Bandpass Filter
Expander
Gate
U101A,
U101B
U202
U204B
DTMF
U201
MICROCOMPUTER
36
PE2
U208
65
P26
Tones
RF BOARD
108
96
RF Amp
Two-Pole
BP Filter
45.3 MHz
Crystal Filter
Two-Pole
BP Filter
Q301
IF Amp
XFL401/402
Second Mixer/Detector
Squelch Out
Low-Pass Filter
RSSI Out
U102A,
U102B
U401
Q401
Audio Out
Data Detector
110
U103A/B
SYNTHESIZER
Reference
Divider
U201
Div by 64/65
Prescaler
Main
Divider
fR
fV
Charge
Pump
Phase
Detector
PD2
U207
RES
112
P10
Key S0-S4
Data Type Sel
U141C
VCO Assembly
Receive VCO
(385-425 MHz)
C214C216
Q501/
Q502
Lock
Detect
Transmit VCO
(430-470 MHz)
Q531/
Q532
Q201
106
Keypad
Key R0-R4
PA5
111
Q503
Buffers
Q533/
Q534
Q535
Prescaler
Control
Tx DATA PROCESSING
Test/Norm Sel Low-Pass Filter
U141A
U145A/B
Buffer
EH1
73
62 P62
Loop
Filter
Display
U501
Reset
Narrow/Wide In
U203
Synthesizer IC
U202
Display
Driver
P12
SMARTNET Rx/Tx DATA PROCESSING
Rx/Tx Data Sel
Low-Pass Filter
Data Detector
U141B
Rx Data
U142A/B,
U144A/B,
Tx Data
U143A
U143B
Squelch
Adj
VR401
455 kHz
Ceramic Filters
DC-DC
Converter
12.800 MHz
TCXO
NB
XLF404
Switching
Switching
Rx Freq Minus
45.3 MHz
WB
XLF403
Internal
Speaker
U150
45
X401
44.845 MHz
Second Injection
Audio
Amp
U101
P14
P41
16k x 8
EEPROM
RECEIVE DATA PROCESSING
Mixer
Q302
Volume Control
VR901B
Speaker Audio
DTMF Encoder
RECEIVER
KEYPAD/DISPLAY
BOARD
Buffers
P16
Q402
P17
Q403
Aux Sw
S903
Q401
Emer Sw
S904
Tx Data
105
Digital
Potentiometers
U147
Combiner
PTT Sw
S901
26
P11
Fcn Sw
S902
Tx AUDIO PROCESSING
VCO Modulation
U148A
Tx Audio
Power Control
Low-Pass Filter
Limiter
U146A/B
U151A
High-Pass Filter Compressor
T5V
VCO Freq
U151B
U204A
TCXO Modulation
Tx Freq
DTMF Gate
U203A
Mic Audio Gate
U203B
Mod Balance
Internal
Microphone
Rx Freq
Unswitched Bat Out
TRANSMITTER
Amplifier
Q101
Power Amplifier Module
S101
U101
Power Control
Switch Driver
Antenna
Directional Coupler
Forward
Power
D101, D102
Sw Batt
Power On-Off Sw
POWER SUPPLIES
L107, L108,
L110
Antenna Switch
7.5V Supply Sw
+5V Regulator
+5S Switch
U205
Q205B
VR901A
Switched Bat In
Q206
Low-Pass Filter
Q202
U102A/B,
U103
+5S
T5V Switch
Q203
Bat
7.5V Supply Sw
T5V
L5V Regulator
R5V Switch
7.5VDC
Battery
Q205A
U206
L5V
Q204
R5V
TRANSCEIVER BLOCK DIAGRAM
8-8
November 2001
Part No. 001-7240-001
Part Number 001-7240-001NR
11-01hph Printed in U.S.A.