1
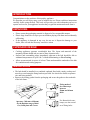
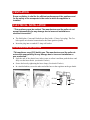
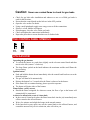
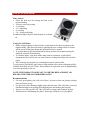
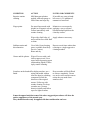
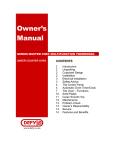
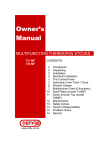
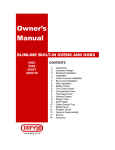
Owner’s
Manual
DOMINO RANGE HOBS
GAS [LPG]
SOLID PLATES
CERAN
www.defy.co.za
CONTENTS
2
2
2
2
3
3
3
4
4
6
7
8
9
11
11
11
12
Introduction
Unpacking
Cupboard Design
Installation
Ventilation
Electrical Installation
LPG Gas Installation
Control Panel Symbols
LPG Gas Hob
Solid Plate Hob
Ceran Smooth Top Hob
Safety Advice
Care Guide For Stainless Steel
Problem Check
Owner’s Responsibility
Service
Technical Specifications
INTRODUCTION
Congratulations on the purchase of this quality appliance.
We trust that you will enjoy many years of trouble free use. Please read these instructions
carefully before using the hob. This book will provide you with information on how to
operate and care for your appliance in order that you gain the maximum benefit from it.
UNPACKING
•
•
•
Please ensure that packaging material is disposed of in a responsible manner.
Plastic bags should be cut up to prevent children playing with them and accidentally
suffocating.
If the appliance is damaged in any way, do not use it. Report the damage to your
dealer, who will take the necessary corrective action.
CUPBOARD DESIGN
•
•
•
Cooking appliances generate considerable heat. The layout and materials of the
mounting cabinet should take account of these characteristics.
Surfaces and surrounding edges immediately adjacent to the hob should be able to
withstand temperatures of up to 100 C without delaminating or discolouring.
Allow an unrestricted air space of at least 75mm underneath the underside of the hob
for ventilation and cooling purposes.
INSTALLATION
• The hob should be installed in a ventilated cupboard fitted with a sturdy worktop and
20
must be secured using the fixing brackets provided. See sketch for details on aperture
size and fixing method.
• Remove the sealing gasket from the packaging and secure the gasket to the underside
of the hob frame.
0
49
26
8
30
60 in)
(m
(m 100
in
)
Fixing method
for countertops
between
20mm and 40 mm
thick.
Aperture (268 mm x 490 mm )
for the Domino range of hobs.
Gas, Solid plate and Ceran.
40
50
For 40mm thick countertops, use the second
set of fixing holes.
VENTILATION
Room ventilation is vital for the efficient performance of the appliance and
for the safety of the occupants in the room in which the appliance is
installed.
ELECTRICAL INSTALLATION
“This appliance must be earthed. The manufacturer and the seller do not
accept responsibility for any damage due to incorrect installation or
electrical connection.”
• The Solid plate, Ceran and Gas hobs are fitted with a 15 Amp 3 pin plug.( The Gas
hob requires an electrical connection for the flame ignition system)
• Insert the plug into an earthed 15 Amp wall socket.
LPG GAS INSTALLATION
“This appliance uses LPG (bottle) gas. The manufacturer and the seller do
not accept responsibility for any damage due to incorrect installation or
gas connection.”
• Soak the end of the plastic hose in hot water to soften it and then push the hose end
fully over the hose nozzle. (see sketch 1 below)
• Secure the hose by tightening the hose clamp. (See sketch 2 below)
• In a similar fashion, secure the other end of the hose to the regulator on the gas bottle.
O Seal
1
2
Nozzle
Clamp
Hose
Caution: Never use a naked flame to check for gas leaks
•
•
•
•
•
•
•
•
Check for gas leaks after installation and whenever a new or re-filled gas bottle is
used for the first time.
Ensure that the control knobs on the hob are in the OFF position.
Open the valve on the Gas bottle.
Using a small paintbrush, apply some soapy water to all the connections.
If there is a leak, bubbles will appear.
If this happens, close the valve on the gas bottle.
Check and tighten the connections immediately.
Repeat the procedure to ensure that there are no further leaks.
THE CONTROL PANEL SYMBOLS
REAR
PLATE
FRONT
PLATE
LPG GAS HOB
Operating the gas burners
• To switch the burner on, push down slightly on the relevant control knob and then
turn it to the left (counter – clockwise)
• The large flame symbol on the knob indicates the maximum and the small flame the
lowest setting.
Ignition button
• Push and hold the button down immediately after the control knob has been set to the
desired position.
• The gas will then be lit automatically.
• Release the button 3 to 5 seconds after the flame is observed at the burner.
• If the flame fails to continue burning, please repeat the sequence.
• The button will ignite either of the burners.
Flame failure –safety cut out.
• Should the flame extinguish for whatever reason, the flow of gas to the burner will
automatically be terminated.
Action to be taken in the event of a burn back
• In the event of a burn back (where the flame burns back into the jet) immediately turn
off the control to the affected burner.
• Wait a few minutes and relight the burner in the normal manner.
• If the burn back occurs again, turn off the control knob to the affected burner, and
consult the nearest Defy service technician, who will advise you.
Maintenance and servicing
• Removable burner parts should be washed weekly with hot water and detergent.
• Take care to remove any encrustations and ensure that the burner holes are clear.
• The condition of the gas hose and valve should be inspected for leaks every time the
gas bottle is re-filled
• Note: If required, the cleaning of the valves should only be carried out by a qualified
Defy technician
Burner
Cap Cover
Fit Burner Cap
cut-out over
the spigot
of the
Burner Cap Body
Flame failure
sensor
Ignition
button
Burner control
knobs
Ignition electrode
Burner
Cap
Burner
Cap Body
SOLID PLATE HOB
Plate controls
• Select the heat level by turning the knob to the
required setting.
• You may select any setting
• 1= warming
• 2-3 =simmering
• 4= cooking
• 5-6 = frying and boiling
An indicator light will glow when the plate is switched
on.
Caring for Solid Plates
• Before using the plates for the first time, switch them on for about 4 minutes at the
highest setting. This allows the factory applied protective coating to burn in. Fumes
will be given off the plate during this operation but this is normal.
• To prevent blotchy discolouration and corrosion, moisture from spatters and spills
should be cleaned off immediately.
• To clean the plates, wipe them with a damp cloth or nylon pad. A little liquid
detergent may be used. Do not use metal scourers or sharp metal objects to clean the
plates.
• After cleaning, dry the plates by switching them on for a short while.
To prevent rust, periodically apply some sewing machine oil or electrical hotplate polish available from Defy Service Centres. Extra attention is required in areas of high humidity
or in close proximity to the sea.
NOTE: THE WARRANTY DOES NOT COVER THE REPLACEMENT OR
REPAIR OF RUSTED OR CORRODED PLATES.
Recommendations
• Use only good quality pots with a level base. An uneven base can prolong cooking
times and waste energy.
• Use pots with a base diameter slightly larger than the plate. This will ensure even heat
distribution and prevent spillage from dripping onto and staining the hot plate.
• Always cover the pot with a lid. This will conserve energy and minimise spillage.
• Thermal shock could damage the plates. Do not put cold pots on very hot plates.
CERAN SMOOTH TOP HOB
WARNING In the unlikely event of sustaining
accidental damage and cracking, switch off the
appliance at the mains to avoid electric shock and have
the panel replaced before further use.
Plate controls
• Select the heat level by turning the knob to the
required setting.
• 1= warming 2-3 =simmering 4= cooking 5-6 =
frying and boiling
• An indicator light will glow when the plate is switched
on.
Caring for the Ceran hob
• Ceran is a tough, durable material, which provides a beautiful, functional and long
lasting cooking surface. To keep it looking good, it needs to be treated with care and
cleaned regularly.
• Spillage should be wiped off as soon as possible with a damp cloth, preferably while
the Ceran is still warm.
• Clean the Ceran with a nylon pad and ‘Smooth top cleaner’. A sample of this cleaner
is supplied with the unit. Replenishment cleaner is available from all Defy Service
Centres.
• If necessary stubborn spills may be removed using the blade scraper provided.
• Do not use metal scourers or coarse abrasive powders as these could scratch the
Ceran.
• Regular cleaning after use will prevent dirt build up and ensure that the hob remains
bright and attractive.
• Wipe the hob surround with a damp hot soapy cloth and dry.
Recommendations (see also the enclosed ‘CERAN’ leaflet)
•
•
•
•
•
•
•
Use only pots with a solid level base. An uneven base will prolong cooking time and
waste energy.
Use pots with a base diameter slightly larger than that of the thermal area. This will
ensure even heat distribution and prevent spillage from dripping onto and staining the
hot zone.
Always cover the pot with a lid. This will conserve energy and minimize spillage.
Save energy by switching the plate off 5 to 10 minutes before the end of a lengthy
cooking period. The Ceran hob will retain sufficient residual heat to complete the
cooking process.
A pot with rough edges could scratch the Ceran if it were dragged across the surface
of the hob.
Any spillage of sugar solution such as jam, must be removed immediately. If allowed
to cool on the Ceran it could pit and damage the surface.
Do not cover the Ceran with aluminium foil and do not use poor quality aluminium
pots. These will leave unsightly deposits which in time, could adhere to the Ceran.
SAFETY ADVICE
•
•
•
•
•
•
•
•
•
When using Gas, ensure that the room is well ventilated.
Always keep children away from the product when it is in use.
Only use the hob for preparing food.
Use a deep pan, large enough to cover the appropriate heating element.
Always dry food thoroughly before placing it in hot oil or fat. Frozen food in
particular will spit and splatter if added too quickly.
Never fill the pan more than one third full of fat or oil.
Never heat fat or fry with a lid on the pan.
Do not fry too much food at once. This lowers the temperature of the oil or fat and
results in fatty foods.
Do not leave hot fat or oil unattended. If overheating occurs, these could catch fire.
In the event of a pan fire
• Switch off the Electricity and or Gas supply.
• Smother the flames with a blanket or damp cloth.
• Burns and injuries are usually caused by picking up the burning pan and rushing
outside with it.
• Do NOT use water to extinguish an oil or fat fire.
CARE GUIDE FOR STAINLESS STEEL
Stainless steel is not adversely affected by normal household use but because of it’s
reputation for durability, it is sometimes assumed to be indestructible, and therefore
subjected to misuse or even abuse. Care should be taken to avoid such ‘abnormal’ use.
DO USE
• A soft cloth or synthetic sponge.
• Soap, or mild household detergent.
(Handy Andy)
• Diluted ammonia in warm water.
• A nylon bristle brush.
• Cleaners labelled “Suitable for stainless
steel”.
DO NOT USE
Acids.
Coarse abrasive cleaning powders.
Metallic scourers, steel wool or metal
scrapers.
Wire brushes or emery paper.
So called ‘silver cleaners’.
Kitchen scourer / foam pads.
Cleaning procedure
• Frequent cleaning is recommended rather than an occasional aggressive clean.
• Routine cleaning will preserve the corrosion resistance and appearance of the
stainless steel for many years.
• Clean the stainless steel as often as necessary ( ie. when noticeably dull or dirty ) and
use the simplest cleaning method that will effectively do the job.
• Use clean water, or a mild detergent solution applied with a soft cloth or sponge.
Rinse well and wipe dry.
• Always wipe in the direction of the brushed texture on the stainless steel.
CONDITION
ACTION
NOTES AND COMMENTS
Requires routine
cleaning
Mild detergent solution
applied with soft sponge or
cloth. Rinse and wipe dry.
If possible use warm to handhot water. A 5% addition of
ammonia is beneficial.
Finger prints
Pre-treat finger marks with
alcohol or an organic solvent.
Follow immediately with
routine cleaning.
Minimize re-occurrence by
applying a wax or silicone
based household polish to the
clean dry surface.
Wipe with a little baby oil
Apply whenever necessary.
and a soft lint free cloth. Buff
to shine.
Stubborn stains and
discolouration
Use a little Ceran cleaning
paste. (available from Defy
Service Centres)
Rinse and dry.
Repeat several times rather than
resorting to a single aggressive
cleaning method.
Grease and fat splatter. Wipe off excess with a soft
cloth or paper towel. Use a
water borne degreasing agent
(dishwashing liquid). Follow
up by routine cleaning.
Scratches on the brushed For slight scratches, use a
finish.
nylon pad loaded with an
iron free abrasive polishing
compound. Follow the
direction of the original
texture. Follow up with
routine cleaning. For deep
scratches use a coarser
abrasive initially and follow
up as for light scratches.
Deep scratches will be difficult
to remove completely. Do not
use steel wool or metal scourers
unless they are made from
stainless steel.
It must be appreciated that some of the above suggested procedures will alter the
surface appearance of the treated area.
They should therefore only be applied with due consideration and care.
PROBLEM CHECK
Before calling a service technician to assist with a problem, PLEASE CHECK THE
FOLLOWING:
Electric hobs
• Check house fuses or trip switches.
• Check if there is power to the unit by plugging another small appliance into the wall
socket
Gas hobs
• Check house fuses or trip switches.
• Check if there is power to the unit by plugging another small appliance into the wall
socket.
• Check that there is gas in the bottle and that the valve is open.
Remember that you may be charged for a service call even during the warranty period if
the fault is due to or caused by any of the above.
OWNER’S RESPONSIBILITY
Since the following are not factory faults, they are the owner’s responsibility.
• Damage to exterior finish.
• Breakage of glass and other components.
• Damage through improper use or installation of the appliance.
• Damage caused by moving the appliance.
• Rusted or corroded solid plates.
SERVICE
If you have followed the instructions and still have a problem, contact the nearest Defy
Service Centre. They will be able to advise you on any aspect of the machine or send a
qualified technician to repair it.
TECHNICAL SPECIFICATIONS
LPG gas
Solid plate
Ceran
Width
288 mm
288 mm
288 mm
Depth
510 mm
510 mm
510 mm
Height
71 mm
71 mm
71 mm
Aperture width
268 mm
268 mm
268 mm
Aperture Depth
490 mm
490 mm
490 mm
Supply voltage
230 V—50 Hz
230 V—50 Hz
230 V—50 Hz
Related fuse setting
3A
16 A
16 A
180 mm hotplate
—
1500 W
—
145 mm hotplate
—
1000 W
—
180 mm Ceran plate
—
—
1700 W
145 mm Ceran plate
—
—
1200 W
Total electric power
—
2500 W
2900 W
Total gas power
4000 W
—
—
Large burner
3000 W
—
—
Small burner
1000 W
—
—
Safety device
Lockable gas valves
—
—
Electrical
—
—
4.5 kg.
5.0 kg.
4.5 kg.
Ignition
Net weight
The Manufacturer strives for continuous improvements. For this reason, the text and
illustrations in this book are subject to change without notice.
Part Number 060 783