1
Appendix
1
Creating Labels
User's Guide
Introduction
Contents . . . . . . . . . . . . . . . . . . . . . . . . . . . . . . . . . . . . . . . . . . . . . . . . . . . . . . . . . . . . . . . . . . . . . . . . . . . . . . . . . . . .2
Introduction
Contents
Introduction . . . . . . . . . . . . . . . . . . . . . . . . . . . . . . . . . . . . . . . . . . . . . . . . . . . . . . . . . . . . . . . . . . . . . . . . . . . . . . . .3
About This Guide ........................................................................................................... 3
Manual Structure ........................................................................................................... 3
Symbols Used in this Guide .......................................................................................... 3
Appendix . . . . . . . . . . . . . . . . . . . . . . . . . . . . . . . . . . . . . . . . . . . . . . . . . . . . . . . . . . . . . . . . . . . . . . . . . . . . . . . . . 26
Printing Directly from Other Applications ........................................................................ 26
Setting the Printer Driver ............................................................................................. 26
Printing from Other Applications .................................................................................. 28
Uninstalling Software ...................................................................................................... 29
For Windows ................................................................................................................ 29
For Mac ....................................................................................................................... 30
LED Lamp ....................................................................................................................... 32
Maintenance ................................................................................................................... 33
Print head maintenance ............................................................................................... 33
Roller maintenance ...................................................................................................... 33
Label outlet maintenance ............................................................................................ 34
Troubleshooting .............................................................................................................. 35
Potential types of problems ......................................................................................... 35
Specifications .................................................................................................................. 36
Product Specifications ................................................................................................. 36
Operating Environment ................................................................................................ 36
2
Appendix
Label Creation Overview ................................................................................................... 4
From Label Creation to Printing ..................................................................................... 4
How to use the P-touch Editor for Windows ..................................................................... 6
Starting P-touch Editor .................................................................................................. 6
Start P-touch Editor Help ............................................................................................. 10
Creating Labels with Other Applications ...................................................................... 12
How to Use the P-touch Address Book ........................................................................... 18
Starting the P-touch Address Book ............................................................................. 18
Creating a New Contact .............................................................................................. 20
How to Use P-touch Library ............................................................................................ 21
Starting up the P-touch Library .................................................................................... 21
Searching labels .......................................................................................................... 22
How to use the P-touch Editor for Mac ........................................................................... 23
Starting the P-touch Editor .......................................................................................... 23
Start P-touch Editor Help ............................................................................................. 25
Creating Labels
Creating Labels . . . . . . . . . . . . . . . . . . . . . . . . . . . . . . . . . . . . . . . . . . . . . . . . . . . . . . . . . . . . . . . . . . . . . . . . . . . .4
The Brother QL-570 label printer (hereafter referred to as "the machine") enables you to quickly and easily
print custom labels created with the label software, P-touch Editor.
About This Guide
Introduction
Introduction
This guide (PDF) is included on the CD-ROM.
In this guide, when the mouse pointer changes to
you can just click to jump to the corresponding
pages.
For the basic functions of Adobe® Reader®, see the Adobe® Reader® Help files.
The following guides are provided to help you use the machine correctly, and understand all features.
Make sure to read and understand them before using the machine.
Setup & Operation Guide
• Read the Setup and Operations Guide before reading this User's Guide.
• The guide includes information you should read before using the machine, such as general precautions for
use, installation and setting up of the main unit, and how to create.
• Also included is information describing how to install the accompanying software to connect the machine to
a computer.
Creating Labels
Manual Structure
User's Guide (this guide)
• If you use a Windows®, this guide can be viewed from the P-touch Setup application when it is run from
the CD-ROM.
After installing this guide on the computer, you can also view it from the Start menu.
• If you use a Mac®, see the PDF files in the [Manuals] folder on the CD-ROM.
Symbols Used in this Guide
The symbols used throughout this guide are as follows:
This symbol shows information or directions that should be followed. Ignoring them may result in injury,
damage, or failed operations.
This symbol shows information or directions that can help you better understand and use the machine
more efficiently.
3
About This Guide
Appendix
This guide describes how to create labels using the P-touch Editor software that has been installed on a
computer connected to the machine.
Introduction
Creating Labels
Label Creation Overview
This section describes the general procedure for creating labels using the machine.
For details on step-by-step instructions, see Help files.
From Label Creation to Printing
1
Choose the type of label you want to create. There is a variety to choose from.
Appendix
Creating Labels
Label examples
2
Prepare the appropriate DK Roll for the label you want to create.
The machine is supplied with one or more sample rolls. (Other rolls can be purchased separately.)
Choose the appropriate DK Roll for the type
of label you will create.
ÎSetup & Operation Guide
Install the DK Roll.
ÎSetup & Operation Guide
4
From Label Creation to Printing
Create a label
Print the label
Using P-touch Editor
Windows
Express Mode
Enter the text
Mac
Edit the label
Express Mode
Edit the label
Standard Mode
Professional Mode
Creating Labels
Standard Mode
Enter the text
Windows
Introduction
Create and print the label.
Professional Mode
Enter the text
Windows/Mac
Edit the label
Snap Mode
The result may differ.
• Screen capture
• Print text
• Drag and drop
Using an application from another publisher (Windows only)
Microsoft Word/Excel/Outlook
• Add-In functions
• Import the text
Using P-touch Address Book (Windows only)
Enter/Import the text
Edit the label
5
From Label Creation to Printing
Appendix
3
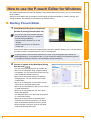
This section explains the procedure for starting P-touch Editor. With P-touch Editor, you can create various
kinds of labels.
See the P-touch Editor Help for samples of various kinds of labels and details on creating, printing, and
saving the labels. The following is the example for Windows Vista™.
Introduction
How to use the P-touch Editor for Windows
Starting P-touch Editor
Click [Start]-[All Programs (Programs)][Brother P-touch]-[P-touch Editor 5.0].
You can also start P-touch Editor using the
following methods (only if you created the
shortcut during installation):
• Double-click the shortcut icon on the
desktop.
• Click the shortcut icon on the Quick
Launch bar.
When P-touch Editor is launched, the [New/Open] dialog box appears, allowing you to choose whether
you want to create a new label layout or open an existing label.
Creating Labels
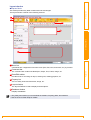
1
To specify how the P-touch Editor works when it starts, click [Tools]-[Options] to display the
[Options] dialog box. In the [General] tab, you can choose the setting in the [Operations] list box
in the [Startup Settings]. Normally, choose [Display Startup Dialog Box].
Choose an option in the [New/Open] dialog
box and click
.
• You can choose the label printer and media size.
• When you choose [Open File], the [Open] dialog
box appears. You can choose and open the file you
have created and stored previously.
• When you choose [View History], the [History]
dialog appears. You can choose from recently
created labels.
• When you choose [New], choose either vertical
writing style or horizontal writing style.
• When you choose [Select by Use], you can choose
by label applications.
• When you choose [Help-How To], the P-touch
Editor Help appears.
The Help files allow you to learn step by step how
to create a label layout.
• When you choose [Check for Updates] with a
computer connected to the Internet, you will be
taken to the Brother Solutions Center. Use this
Brother Solutions Center to check for the latest
software downloads and FAQs.
6
Starting P-touch Editor
Appendix
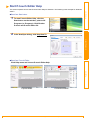
2
Layout window
Express Mode
Introduction
This mode provides easy label creation with texts and images.
The layout window consists of the following sections:
1
2
3
5
Creating Labels
4
6
2 Command bar
The command bar contains the New/Open, Paper, Text, Frame, Image, etc.
3 Draw/Edit toolbar
Provides tools for choosing an object, entering text, drawing graphics, etc.
4 Property bar
You can easily insert and format text, image, etc.
5 Layout window
The layout window is used to display and edit objects.
6 Database window
Displays a database.
• The [View] menu allows you to show/hide the toolbars, Property pallet, and windows.
• See the P-touch Editor Help for details.
7
Starting P-touch Editor
Appendix
1 Menu bar
Commands are categorized under each menu (File, Edit, View, and Insert, etc.) by function.
Professional Mode
Introduction
This mode provides full-scale label creation from creating the templates.
The layout window consists of the following sections:
1
2
3
4
5
Creating Labels
7
6
1 Menu bar
Commands are categorized under each menu (File, Edit, View, and Insert, etc.) by function.
3 Property pallet
The property pallet contains the Print, Paper, Text, Layout, and property boxes. Click on the left side of
each pallet to show/hide the box.
4 Draw/Edit toolbar
Provides tools for choosing an object, entering text, drawing graphics, etc.
5 Layout window
The layout window is used to display and edit objects.
6 Database window
Displays a database.
7 Side bar
Selecting the tab, you can easily insert and format text, barcodes, frames, tables, figures, sort, the objects,
etc.
• The [View] menu allows you to show/hide the toolbars, pallet, and windows.
• See the P-touch Editor Help for details.
8
Starting P-touch Editor
Appendix
2 Standard toolbar
A group of frequently used commands (New Layout, Open, Save, Print, etc.) are provided in this toolbar.
Snap Mode
1
Introduction
With this mode, you can capture the screen, print it as image, and save it for future use. To start the snap
mode, follow the steps below.
When you click [Snap Mode], the
description of the snap mode dialog
appears. Click
.
The snap mode appears.
See the P-touch Editor Help for details.
Appendix
2
Creating Labels
If you put a checkmark on the [Do Not Display
This Dialog Again], you can go to the snap
mode directly from next time.
9
Starting P-touch Editor
This section explains how to start P-touch Editor Help for Windows. The following is the example for Windows
Vista™.
Start from Start button
1
In the New/Open dialog, click Help-How To.
Creating Labels
2
To start P-touch Editor Help, click the
Start button on the task bar, point to All
Programs (or Programs). Click Brother
P-touch and P-touch Editor 5.0.
Introduction
Start P-touch Editor Help
Start from P-touch Editor
Appendix
Click Help menu and choose P-touch Editor Help.
Express Mode
Professional Mode
10
Start P-touch Editor Help
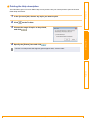
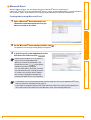
The information given in P-touch Editor Help can be printed. Use your normal printer to print the P-touch
Editor Help information.
1
In the [Contents] tab, choose any topic you want to print.
2
Click
Choose the range of topics to be printed,
and click
.
Specify the [Printer] item and click
.
Choose a normal printer that supports general paper sizes, such as Letter.
Creating Labels
4
on the Toolbar.
Appendix
3
Introduction
Printing the Help description
11
Start P-touch Editor Help
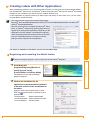
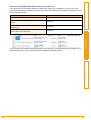
When installing the software, if you choose the Add-In function, a P-touch icon will be automatically added
onto the Microsoft® Word, Excel, and Outlook® toolbar. (Only if Microsoft® Word, Excel, Outlook® are already
installed on your computer.) The Add-In funtion is valid for Windows only.
In each application, by choosing the text you want to print and clicking on the P-touch icon, you can create
and print labels quickly and easily.
Introduction
Creating Labels with Other Applications
For details or installation information, see the P-touch Editor Help.
Creating Labels
• The Add-In function supports the following applications:
Microsoft® Word 97/2000/2002/2003/2007, Microsoft® Excel 97/2000/2002/2003/2007, and Microsoft®
Outlook® 2000/2002/2003/2007
• After the Add-In function is installed into Microsoft® Word,
Excel, or Outlook®, the [Security Options] dialog box may
appear when starting these applications, depending on the
application's security settings. If this dialog box appears,
check the [Always trust macros from this source] checkbox,
and click on [Enable Macros]. For details on security
settings, see the Help files for the application.
Registering and canceling the Add-In funtion
Before running this program, close the Word, Excel and Outlook® programs.
Click [Start]-[All
Programs(Programs)]-[Brother Ptouch]-[P-touch Tools][P-touch Editor 5.0 Add-Ins Utility].
Appendix
1
The [Brother P-touch Add-In Settings]
dialog box appears.
2
Click on the checkboxes for the
applications in which the Add-In function is
to be used, and turn off the checkboxes for
the others.
[Apply] is used to specify what action is taken
when the
(Add-In button) is pressed in each
application.
• Express Mode
: Starts Express Mode.
• Professional Mode : Starts Professional mode.
• Print Immediately : Prints the label.
12
Creating Labels with Other Applications
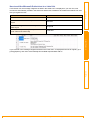
With the Add-In function, you can directly copy the text in Microsoft® Word to a label layout.
If Microsoft® Outlook® is running and Microsoft® Word is chosen as the standard editor, you won't be able to
use the Add-In function in Microsoft® Word. Exit Microsoft® Outlook® and restart Microsoft® Word.
Creating labels using Microsoft Word
2
Open a Microsoft® Word document and
choose the text you want to print.
On the Microsoft® Word ribbon/standard toolbar, click
Creating Labels
1
Introduction
Microsoft Word
.
For details on how to automatically add the text to a Label List, see "How to add the Microsoft®
Word text to a Label List" described below.
How to add Microsoft Word text to the Label List
For first time use, the message "Register the data in the Label List?" is displayed. If you click Yes, new
records are automatically created in the Label List and the text is added to each field shown below from next
time you register the text:
Added field
Date of creation
Date field
The first line
Title field
All lines including the first line
Body field
Detected ZIP/Postal code
Code field
If you click No in the message "Register the data in the Label List?" is displayed and want to register, go to
[Tools]-[Options], and check "Automatically Record Data Imported With Add-In."
13
Creating Labels with Other Applications
Appendix
The text
With the Add-In function, you can directly copy text in Microsoft® Excel to a label layout.
If Microsoft® Outlook® is running and Microsoft® Excel is chosen as the standard editor, you won't be able to
use the Add-In funtion in Microsoft® Excel, Exit Microsoft® Outlook® and restart Microsoft® Excel.
Creating labels using Microsoft Excel
2
Open a Microsoft® Excel worksheet and
choose the cells that contain the text you
want to include on the label.
On the Microsoft® Excel standard toolbar, click
.
The [Brother P-touch Import Setup] dialog box appears.
3
Creating Labels
1
Introduction
Microsoft Excel
In [Label Layout], make adjustments to the
line feed in the cells and click
.
3
Appendix
[Label Layout] enables you to change the
way your text is displayed/printed.
When you choose any listed item in the
[Fields] box and click
, a new field is
added to the [Label Layout] box.
You can enter spaces, line feeds, commas,
and characters for each cell and print them
on a label. You can also remove fields in
this screen by highlighting the field and
pressing the delete key on your keyboard.
• For details on how to automatically add the text to a Label List, see "How to add Microsoft® Excel
text to a Label List" described on the page 15.
• If you want to include the data into the Code field of the Label List, choose [Text Imported Into
the "Code" Field of the Label List] in the [Brother P-touch Import Setup] dialog box.
14
Creating Labels with Other Applications
The text
Added field
Date of creation
Date field
The first line in the text that is specified in the Label
Layout
Title field
All lines including the first line in text specified in the
Label Layout
Body field
Content of cell specified in [Text Imported Into the
"code" Field of the Label List]
Code field
Appendix
If you click No in the message "Register the data in the Label List?" is displayed and want to register, go to
[Tools]-[Options], and check "Automatically Record Data Imported With Add-In."
Creating Labels
For first time use, the message "Register the data in the Label List?" is displayed. If you click Yes, new
records are automatically created in the Label List and the text is added to each field shown below from next
time you register the text:
Introduction
How to add the Microsoft Excel text to the Label List
15
Creating Labels with Other Applications
With the Add-In function, you can directly copy the text in Microsoft® Outlook® to a label layout.
Items you can import are: Contacts, Calendar items, Deleted Items, Drafts, Inbox, Journal, Notes (text in the
Notes dialog box is not available), Outbox, Sent Items and Tasks windows.
Creating labels using the Contacts data in Microsoft Outlook
1
Introduction
Microsoft Outlook
Open Microsoft® Outlook® Contacts and
choose the Contact information you want
to include.
Creating Labels
In Microsoft® Outlook®, you can include not
only the Contact data but also the text in a
message, as you can do in Microsoft®
Word.
On the Microsoft® Outlook® standard toolbar, click
.
For details on how to automatically add the text to the Label List, see "How to add the Microsoft®
Outlook® text to a Label List" described on the page 17.
Appendix
2
16
Creating Labels with Other Applications
The text
Added field
Date of creation
Date field
The first line in the text that is specified in the Label
Layout
Title field
All lines including the first line in text specified in the
Label Layout
Body field
Content of cell specified in [Text Imported Into the
"code" Field of the Label List]
Code field
Appendix
If you click No in the message "Register the data in the Label List?" is displayed and want to register, go to
[Tools]-[Options], and check "Automatically Record Data Imported With Add-In."
Creating Labels
For first time use, the message "Register the data in the Label List?" is displayed. If you click Yes, new
records are automatically created in the Label List and the text is added to each field shown below from next
time you register the text:
Introduction
How to add the Microsoft Outlook text to a Label List
17
Creating Labels with Other Applications
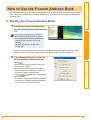
This section describes the procedure for creating labels from contacts efficiently using the P-touch Address
Book. The P-touch Address Book is valid for Windows only. The following is the example for Windows XP,
except for step 1.
Introduction
How to Use the P-touch Address Book
Starting the P-touch Address Book
You can also start the P-touch Address
Book using the following methods: (Only if
you created the shortcut during installation)
• Double-click the shortcut icon on the
desktop.
• Click the shortcut icon on the Quick
Launch bar.
When the P-touch Address Book is launched, the [Startup] dialog box appears, letting you make
settings to create new contacts, import CSV format data or Outlook® contacts, and so on.
2
Creating Labels
Click [Start]-[All Programs(Programs)][Brother P-touch]-[P-touch Address Book
1.1] .
In the [Startup] dialog box, specify how
the P-touch Address Book works and
click
.
• When [Create a New Contact] is chosen, the
layout window appears.
• When [Import Contacts from a CSV File] or
[Import Contacts from Outlook] is chosen, you
can import contacts in other formats.
• Click
to open the P-touch Address
Book Help files.
The P-touch Address Book Help offers detailed
information on available features and explains
how to use the P-touch Address Book.
18
Starting the P-touch Address Book
Appendix
1
Layout window
Introduction
The layout window consists of the following eight sections:
1
2
3
4
7
6
8
Creating Labels
5
1 Menu bar
Commands are categorized under each menu (File, Edit, View, and Insert, etc.) by function.
3 Text toolbar
Used to adjust text attributes such as font size and alignment for text formatting.
4 Layout style selection view
Displays layout styles stored in the folder.
5 Layout work area
This area is used to display or edit a layout that uses the layout style in the layout style selection view.
6 Contact list combo box
Displays the contact list that is currently specified. You can choose from [Personal], [Business], [Other1],
[Other2] and [Other3].
7 Index tab
You can search within the field in Record View. Click [Tools]-[Sort] to open the [Sort] dialog box, and
specify the field to be searched using [Key1].
8 Record View
The Contact data is displayed in each field. The data can also be edited (added to, deleted or modified).
19
Starting the P-touch Address Book
Appendix
2 Standard toolbar
A group of frequently used commands (such as New Contact, Edit Contact, Find, Print, etc.) are provided
in this toolbar.
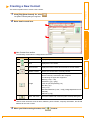
Creating a New Contact
1
2
Click [File]-[New Contact]. Or, click
The [New Contact] dialog box appears.
Introduction
This section explains how to create a new contact.
.
Enter data for each item.
1
Creating Labels
2
1 New Contact form toolbar
The following commands are categorized in the menu:
Button name
Function
Previous
Displays the previous contact.
Next
Displays the next contact.
New Contact
Displays the New Contact form window for a new contact.
Delete Contact
Deletes the contact that is currently chosen.
Image
Allows you to insert an image for a contact from a file or a
camera currently connected to the computer.
The following file types are supported:
• Bitmap (*.bmp, *.dib)
• JPEG file (*.jpg, *.jpeg)
• TIFF file (uncompressed) (*.tif )
• GIF file (*.gif )
• Icon (*.ico)
• Windows Meta File (*.wmf, *.emf) (*Image adjustment is not
allowed.)
• PNG file (*.png)
Save and Close
Saves the contact and closes the [New Contact] dialog box.
2 Contact form
Used to enter each item such as name, address, phone number, company information, and E-mail
address for the new contact.
3
When you finish entering the data, click
20
to store.
Creating a New Contact
Appendix
Icon
P-touch Library: This application allows you to manage P-touch label templates and other data on the
computer. You can print a label from the P-touch Library using the machine.
Starting up the P-touch Library
Introduction
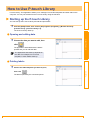
How to Use P-touch Library
You can start up the P-touch Library and edit and print labels.
1
Click the [Start] button, then choose [All programs (Programs)] - [Brother P-touch] [P-touch Tools] - [P-touch Library 2.1].
The P-touch Library starts up.
Opening and editing data
Choose the data you want to edit, then
click
Creating Labels
1
.
The application associated with the data is
opened and you can edit the data.
The application that starts up depends on
the data. For example, for a P-touch
template, P-touch Editor starts up.
Printing labels
Choose the label templates you want to print,
then click
.
Appendix
1
The label is printed by the connected printer.
21
Starting up the P-touch Library
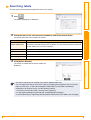
Searching labels
1
Click
Introduction
You can search label templates registered in the P-touch Library.
.
The [Search] dialog box is displayed.
2
Check the items to be used as search conditions and set the search items.
Settings
Details
Multiple Parameters
This sets the method for combining multiple search items. If you choose AND, files
are searched for that satisfy all the conditions. If you choose OR, files are searched
for that satisfy any one of the conditions.
Name
Inputs the data name to search for.
Type
Chooses the data type to search for.
Size
Sets the data size to search for.
Date
Sets the date and time at which the data to search for was last modified.
Click [Search Results].
The search is started and the search results are
displayed.
Appendix
3
Creating Labels
The search items that can be set are as follows.
• The search results can be checked in the Search Results folder view.
• You can register the data in the P-touch Library by dragging and dropping to the All contents
folder or its list view. To have label templates created with P-touch Editor automatically
registered in the P-touch Library, use the following method.
1. From the P-touch Editor menu, choose [Tools] - [Options].
2. In the [Options] dialog box [General] tab, click [Registration Settings].
3. Choose the timing for registering label templates created with P-touch Editor, then click [OK].
22
Searching labels
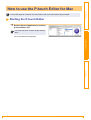
This section gives an overview of P-touch Editor. See the P-touch Editor Help for details.
Starting the P-touch Editor
Double click the [Applications] and then
[P-touch Editor 5.0].
If an Alias has been created, double-click the
Alias.
Creating Labels
The Layout Window is displayed.
Appendix
1
Introduction
How to use the P-touch Editor for Mac
23
Starting the P-touch Editor
Layout Window
Standard Mode
Introduction
This mode provides easy label creation with texts and images.
The layout window consists of the following sections:
1
2
4
Creating Labels
3
1 Command bar
The command bar contains the New/Open, Paper, Text, Frame, Image, etc.
2 Draw/Edit toolbar
Provides tools for choosing an object, entering text, drawing graphics, etc.
3 Inspector
You can easily insert and format text, image, etc.
4 Layout window
The layout window is used to display and edit objects.
5 Database window
Displays a database.
• The [View] menu allows you to show/hide the toolbars and windows.
• See the P-touch Editor Help for details.
24
Starting the P-touch Editor
Appendix
5
Snap Mode
1
Introduction
With this mode, you can capture the screen, print it as image, and save it for future use. To start the snap
mode, follow the steps below.
When you click [Snap Mode], the
description of the snap mode dialog
appears. Click
.
2
Creating Labels
If you put a checkmark on the [Do Not Display
This Dialog Again], you can go to the snap
mode directly from next time.
The snap mode appears.
See the P-touch Editor Help for details.
Start P-touch Editor Help
This section explains how to start P-touch Editor Help for Mac. The following is the example for Mac OS® X
10.4.9.
Appendix
Start from New/Open dialog
In the New/Open dialog, click Help-How To.
Start from P-touch Editor
To start the P-touch Editor Help, click Help and choose P-touch Editor Help.
25
Start P-touch Editor Help
Printing Directly from Other Applications
Introduction
Appendix
You can use this machine to print directly from most Windows® applications, by installing the printer driver.
Because the paper size for this machine is different from other regular printers, you may not be able to
print even after installing the driver and application software, unless the application software allows the
correct label size to be set.
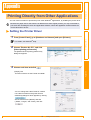
Setting the Printer Driver
From [Control Panel], go to [Hardware and Internet] and open [Printers].
Creating Labels
1
For details, see Windows® Help.
2
Choose "Brother QL-570", and click
[Select printing preferences].
The [Brother QL-570 printing preferences]
dialog box appears.
Choose each item and click
.
• [Paper] Tab
This tab is used to set the Format and Width.
Appendix
3
You can change the Label Format or create a
new Label Format from the [Label Format
definitions] dialog box which appears by clicking
.
Set the format name ("Name") and size
("Width", "Length", and "Feed"), and click
.
26
Setting the Printer Driver
Introduction
• [Graphics] Tab
You can set "Halftone", "Brightness", and
"Contrast" in this tab.
Creating Labels
• [Option] Tab
You can set "Auto cut" with number of labels
between cuts, "Mirror Printing", "Cut at end",
and "Unit" in this tab.
The cutting options will vary according to the
model.
Close the [Printers] window.
Appendix
4
27
Setting the Printer Driver
Printing from Other Applications
1
Click
and
Introduction
We will use Microsoft® Word as an example.
.
The [Print] dialog box appears.
2
Choose "Brother QL-570".
Creating Labels
You can change the settings of the Printer Driver
from the [Properties] dialog box which appears by
clicking
.
3
Click
4
Click [Page Layout] and a mark on the right bottom of the Page Setup.
, and close the [Print] dialog box.
The [Page Setup] dialog box appears.
5
Click the [Paper] tab, and choose the
paper size that you want to print.
Appendix
You can also choose the Label Format that you
have added in ÎPage 26.
Set page margins in the [Margins] tab as well.
6
Click
7
Click
.
The size of the Microsoft® Word window is adjusted to the paper size that you have just chosen. Edit
the document as needed.
.
The specified labels are printed.
28
Printing from Other Applications
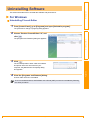
This section describes how to uninstall the software and printer driver.
For Windows
Introduction
Uninstalling Software
Uninstalling P-touch Editor
1
From [Control Panel], go to [Programs] and open [Uninstall a program].
The [Uninstall or change a program] dialog appears.
2
Choose "Brother P-touch Editor 5.0", and
click
.
Creating Labels
The [Programs and Features] dialog box appears.
3
Click
.
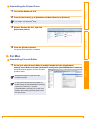
4
Close the [Programs and Features] dialog.
P-touch Editor has been uninstalled.
The P-touch Address Book, and Software User's Guide (PDF) can also be uninstalled by following
the same procedure.
29
For Windows
Appendix
The uninstall operation starts. After the software
and printer driver are removed from your
computer, the [Maintenance Complete] dialog
box appears.
1
Turn off the Brother QL-570.
2
From [Control Panel], go to [Hardware and Sound] and open [Printers].
Introduction
Uninstalling the Printer Driver
For details, see Windows® Help.
4
Choose "Brother QL-570", and click
[Delete this printer].
Creating Labels
3
Close the [Printers] window.
The printer driver has been uninstalled.
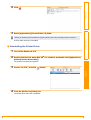
For Mac
Uninstalling P-touch Editor
On the drive where P-touch Editor is installed, double-click the [Applications]
folder-[P-touch Editor 5.0] folder-[Uninstall P-touch] folder-[UninstallPtEditor.command].
[Terminal] window appears, and then uninstall
operation starts.
Appendix
1
Administrator rights is required for the
uninstall operation.
In case [Terminal] window doesn't appear by
double-clicking the [UninstallPtEditor.command],
right click (or control key + click) the
[UninstallPtEditor.command], the context menu
appears. Open with the [terminal] window from
the context menu.
30
For Mac
2
Click
3
Delete [Applications]-[P-touch Editor 5.0] folder.
Introduction
.
Creating Labels
Before you delete the [P-touch Editor 5.0] folder, please check if any necessary files are saved in it.
P-touch Editor has been uninstalled.
Uninstalling the Printer Driver
1
2
Turn off the Brother QL-570.
Double-click the drive where Mac OS® X is installed, and double-click [Applications][Utilities]-[Printer Setup Utility].
The [Printer List] dialog box appears.
3
Choose "QL-570", and click
4
Close the [Printer List] dialog box.
Appendix
(Delete).
The printer driver has been uninstalled.
31
For Mac
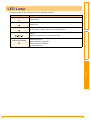
LED lamp on the QL-570 indicates the current operating condition.
Lamp
Orange lamp is lighting
Orange lamp is flashing
Red lamp is flashing
Power is ON.
The roll cover is opening. Close the roll cover properly.
Cooling
(Waiting for temperature of print head to lower)
Indicates one of the following errors.
• Label sensor error
(End of DK Roll or label jam)
• Incorrect DK Roll installed
• Transmission error
Creating Labels
Green lamp is lighting
Power is OFF.
Appendix
Not lighting
Condition
Introduction
LED Lamp
32
For Mac
Maintenance of the machine must be done as needed. However, some environments require that maintenance
must be done more frequently (e.g. in dusty conditions).
Print head maintenance
Introduction
Maintenance
The DK Roll (thermal recording paper type) used with the machine is designed to clean the print head
automatically. When the DK Roll passes the print head during printing and label feeding, the print head is
cleaned. If the print head is not cleaned enough, use cotton swab and wipe the head.
Roller maintenance
When doing maintenance on the roller, be sure to use the cleaning sheet exclusive for this machine
only.
If using other cleaning sheet, the surface of roller may be scratched or it may cause a malfunction.
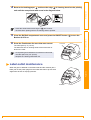
2
3
Turn the Brother QL-570 off.
Hold the DK Roll compartment cover at the front of the
Brother QL-570 and firmly lift up to open the cover.
Pull up the roll release lever and remove the DK Roll.
• Make sure that the spool arms are inserted firmly in the
spool guides on the left and right.
• Insert the spool with the DK Roll located on the right
hand side of the Brother QL-570.
33
Print head maintenance
Appendix
1
Creating Labels
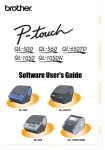
Clean the roller using the cleaning sheet (separately available).
The machine contains only one cleaning sheet. To purchase additional cleaning sheets, refer to Î
"Accessories (For USA Only)" in page 20 of Setup & Operation Guide as needed.
Remove the backing paper
and insert the edge
of cleaning sheet into the printing
unit until the area pointed with arrow in the diagram below.
Introduction
4
• Insert the sheet without removing the
part of sheet.
• Check that the printing surface of cleaning sheet is upward.
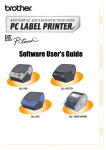
6
Close the DK Roll compartment cover and press the ON/OFF button (
Brother QL-570 on.
Press the Feed button for more than one second.
Feed button
The roller spins by 4" (10 cm).
The adhesive face of cleaning sheet removes the stain or
dust on the roller.
) to turn the
Creating Labels
5
• If not pressing the Feed button for more than one second,
the roller spins only 1/3" (8 mm).
• Dispose the cleaning sheet after use.
Label outlet maintenance
Appendix
When the glue is attached on the label outlet and the machine jam a
label, pull out the power plug from the outlet and clean it up with cloth
dipped into ethanol or isopropyl alcohol.
Label outlet
34
Label outlet maintenance
If the problems occur while using this machine, the following may help you to solve the problems.
Potential types of problems
Solution
• The QL-570 does not
print, or a printing error is
received.
• Is the USB cable loose?
Check that the USB cable is connected correctly.
• Is the DK Roll installed correctly?
If not, remove the DK Rolls and reinstall.
• Is there enough roll remaining?
Check that there is enough roll remaining.
• Is the DK Roll compartment cover open?
Check that the DK Roll compartment cover is closed.
• Is print error or transmission error occurred?
Turn off the Brother QL-570 and on again. If the problem is still occurred,
contact Brother Customer Service at 1-877-4-P-touch.
• The power button does
not light up.
• Is the power cord plugged correctly?
Check that the power cord is plugged. If plugged correctly, try plugging it to
another electrical outlet.
* If the power button still does not light up, contact Brother Customer Service
at 1-877-4-P-touch.
• The printed label
contains streaks or poor
quality characters, or the
label is not fed correctly.
• Is the print head or roller dirty?
While the print head generally remains clean under normal use, lint or dirt from
the roller may become stuck on the printer head. If this occurs, clean the roller.
See Î"Roller maintenance" in page 33.
Creating Labels
Problem
Introduction
Troubleshooting
• Labels are jammed in the • Is there dirt or lint on the roller preventing it from rolling freely?
cutter or are not ejected
Use a Cleaning Sheet to clean the roller. For details, see Î"Roller
correctly after printing.
maintenance" in page 33.
• Layout style is not
updated when Add-in is
still activated and a new
label roll is installed.
• Is new label roll installed before activating the P-touch Add-In (The P-touch
function is added to your standard Microsoft toolbar)?
Exit the P-touch Add-In, load the 2nd label roll type, reactivate the P-touch
Add-in, choose "Select Layout", and then verify the layout.
• The icon of P-touch
Add-In is not displayed
on Microsoft® Word.
• Is Microsoft® Outlook® started up?
• Is Microsoft® Word chosen for the editor usually used for Microsoft® Outlook®?
Due to limitation of the program, the Add-In of Microsoft® Word is unable to use
with above settings. Quit Microsoft® Outlook®, and restart Microsoft® Word.
• Is the DK Roll installed properly?
• Is the link lever removed? Set the
link lever properly.
• The DK Roll compartment
cover does not close.
• Link lever is removed.
• Set the link lever properly.
35
Potential types of problems
Link lever
Appendix
• Is the correct port chosen?
Check that the correct port is chosen from the “Print to the following port” list in
• A data transmission error
the Printer Properties dialog box.
appears on the personal
• Is the QL-570 in cooling mode (the LED lamp is flashing in orange)?
computer.
Wait until the LED lamp stops flashing and then try printing again.
Product Specifications
Items
Specifications
Printing
LED lamp (green, red, orange)
Printing method
Direct thermal printing via thermal head
Printing speed
Max. 4.3 inch (110 mm)/sec, Max. 68 labels/min.
(Standard Address Labels)
Print head
300 dpi/720 dot
Maximum Printing Width
2.3 inch (59 mm)
Minimum printing length
0.5 inch (12.7 mm)
Buttons
ON/OFF button (
FEED button
CUT button
)
Interface
USB
Power source
120V AC 60 Hz 1.7 A
Dimensions
5.2" (133 mm) × 8.2" (208 mm) × 5.6" (143 mm)
Weight
Approx. 2.5 lb. (1.1 kg) (Without DK Rolls)
Cutter
Durable automatic cutter
Creating Labels
Display
Introduction
Specifications
Operating Environment
Items
Interface
Hard Drive
Memory
Monitor
2000 Professional/XP *1 / Windows VistaTM
Windows®
Mac®
Mac OS® X 10.3.9 ~ 10.4.10
Windows®
USB port (USB Spec. 1.1 or 2.0 protocol)
Mac®
USB port (USB Spec. 1.1 or 2.0 protocol)
Windows
Over 70 MB of available space *2
®
Mac®
Over 100 MB of available space *2
Windows®
Windows® 2000 Professional/XP: More than 128 MB*2
Windows VistaTM: More than 512 MB*2
Mac®
More than 128 MB
Windows
Mac
SVGA, high color or higher graphics card
®
More than 256 colors
®
Others
CD-ROM drive
Operating Temperature
50°F to 95 °F (10°C to 35°C)
Operating Humidity
20% to 80% (without condensation)
®
*1 The computer should meet Microsoft ’s recommendations for the OS installed.
*2 Required available space when installing the software with all of the options.
36
Product Specifications
Appendix
OS
Specifications
Windows®