1
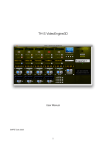
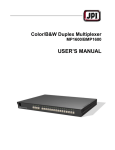
Titan Training Course Notes Level 1 CONTENTS: CHAPTER 1: INTRODUCTION CHAPTER 2: WORKSPACES CHAPTER 3: PATCHING CHAPTER 4: GROUPS CHAPTER 5: CONTROLLING FIXTURES CHAPTER 6: PALETTES CHAPTER 7: PLAYBACKS CHAPTER 8: BASIC TIMINGS CHAPTER 9: CHASES CHAPTER 10: SHAPES CHAPTER 11: RUNNING THE SHOW Avolites Ltd 184 Park Avenue, Park Royal, London, NW10 7XL, England. www.avolites.com Written by Emma Thompson. Last Update 07/08/13 Page 1 of 24 CHAPTER 1: INTRODUCTION History of Avolites Avolites started with two gentlemen who built their own dimmers for use for tours that they were on. They were that good that the production company asked for more and the decision of manufacturing dimmers for a living was made. The FD dimmer came to fruition soon after. Lots of people know us for our consoles but it was the dimmers where it all began. 1991 – The current shareholders succeeded in a Management buy-out and built on the wellrespected QM range of consoles from the 80’s The first Pearl came out in September 1995 and became the industry standard. Since then the range grew, but continued to be designed and made in London. We are now completely focusing on our Titan range of consoles, which range from the USB dongle Titan One right up to our top of the range Sapphire Touch which is aimed at the touring arena market. Getting Started All the consoles have a soft power on/off switch. All you need to do is press this once and the console will either boot up into the last active showfile, or shut itself down without the need for further user intervention. On the Pearl Expert it is in the bottom left under the hand rest, and on the Sapphire Touch it is inside the flip drawer. The Tiger Touch Pro, Expert Pro and Sapphire Touch all have a built in UPS to protect from power failure. Console Layout All Titan consoles run exactly the same software and showfiles are therefore completely cross compatible. The smaller range of hardware consoles, the Titan Mobile, Tiger Touch and Pearl Expert can all do 4 physical lines of DMX, and up to 12 over Art–Net, whilst the Sapphire Touch has 8 physical DMX ports and does up to 16 universes over Art-Net. With the release of the Avolites Titan Net Processor (TNP), you can expand the DMX capacity of any Titan console. All hardware consoles also have a MIDI port for MIDI Timecode connectivity and MIDI Triggers. Basic console components: - Attribute bank – these buttons let you select attributes such as pan/tilt, dimmer, colour etc and attach them to the encoder wheels for direct hands on control Function buttons - these are the command buttons on the console, letting you patch fixtures, delete items, copy items etc Numeric keypad – lets you type in syntax, apply live palette fades and more Avo logo button – this acts as a shift function, useful for many shortcuts in programming Dedicated cue list control section – contains all the main controls you need to edit and managing cue lists. Avolites Ltd 184 Park Avenue, Park Royal, London, NW10 7XL, England. www.avolites.com Written by Emma Thompson. Last Update 07/08/13 Page 2 of 24 - Window control buttons – lets you arrange your workspaces and windows as per the individual shows requirements Macro and Executor buttons – completely configurable by the user to run any command Workspaces – four predefined workspaces are available, and you can make any arrangement of windows to create your own customized workspaces. Playbacks – save either a cue, chase or cue list onto any playback or preset fader on a Titan console. The number of physical handles will differ depending on which console you have. Hint: A handle can refer to either a physical fader, or a virtual button on the touch screen. It refers to a location where you can save information, such a fixture, group, palette or playback. Starting a New Show To start a new show, press [Disk] and then [New Show]. You will then be prompted to enter a name for your new show, to make it easier to identify Quicksaves and Autosaves. Exercise: Start a new show Avolites Ltd 184 Park Avenue, Park Royal, London, NW10 7XL, England. www.avolites.com Written by Emma Thompson. Last Update 07/08/13 Page 3 of 24 CHAPTER 2: WORKSPACES Workspace windows A workspace window is an arrangement of windows in a configuration that suits the user. When a new show is created, it will be made with 4 default workspaces: Groups and Palettes – quadscreen view, very useful for programming and busking Fixtures and Groups – patch your dimmers and fixtures into here Fixture Attributes – a visual way to work with your fixtures, including a colour picker, blade control and CITP image thumbnails Effect Editor – our pixel mapper You can open new windows very easily by using the shortcut buttons on the console or the [Open Workspace Window] option on the softkeys. Have a go at moving windows around using the [Size/Position], [Min/Max] and [Close] buttons. You can also move windows between screens using [Shift] + [Size/Position] You can save a new workspace using quick record by simply setting up the windows you want to save. Once you have set them up, click into an empty workspace window and enter a name, then press [Enter] to save it. Exercise: Have a go at recording a workspace. Avolites Ltd 184 Park Avenue, Park Royal, London, NW10 7XL, England. www.avolites.com Written by Emma Thompson. Last Update 07/08/13 Page 4 of 24 CHAPTER 3: PATCHING This section will cover simple patching in of dimmers and moving lights. Anything with more than one DMX channel we call a Fixture, this can be anything from an LED parcan, a moving light or a strobe. Since Titan V6, we now have a Patch View window, which makes it a lot easier to patch your show. To get into this, press [Patch], then select softkey G [Patch View]. You will see there are 5 tabs along the top – the 2 main ones we’re going to look at in the Level 1 course are [Patched Fixtures] and [Personality List] [Patched Fixtures] – All types of fixtures and dimmers patched in the show appear in this window. You can filter by colour code, or DMX line, and have a variety of sort options. You can see information about the fixtures, including the mode they’re patched in, their DMX address, and whether they’re inverted or frozen. [Personality List] – lets you find a personality file to patch in. Hint: Why not save the Patch View as a workspace? Patching dimmers Using the patch sheet for the Titan Level 1 Show File, let’s try patching some Source 4s: Select the Personality List tab, and type in ‘generic dimmer’, and choose [Generic Dimmer] from the list. [A] – Quantity (how many you have, so 6 Source 4s. This only works if you have consecutive addresses, or have entered the correct offset under [Options]) [B] – DMX Line (choose 1 – 12, so for the source 4s we need line 4) [C] – Address (make sure this matches up to the address of the dimmer, in this case 25) [D] – User Number (this is the consoles ID for the dimmer, you can number it whatever you like. Each dimmer/fixture has a unique User Number) [E] – Legend (name for the dimmer/fixture – in this case, call it ‘Source 4) [F] – Patch Generic Dimmer (if you press this, the console will patch the Source 4s into the first available slot in the Fixture Window. Alternatively, open the Fixture Window and specify which handle you wish to patch onto. This alternative lets you decide exactly how to lay out your patch) [G] – Options (contains options such as preset palettes, auto groups, and the new options of offset if you have gaps in the DMX addresses) Patch all the dimmers into the first tab of the Fixture Window. Please note you must ALWAYS set up the information contained in softkeys [A] – [E] before you choose patch the fixtures. Avolites Ltd 184 Park Avenue, Park Royal, London, NW10 7XL, England. www.avolites.com Written by Emma Thompson. Last Update 07/08/13 Page 5 of 24 Make sure when you have finished patching, that you come out of the Patch menu BEFORE you try and select fixtures – as long as you are in the patch menu with a DMX line and address showing, whenever you press a fixture button you are telling the console to patch to there. To come out of the menus, [Exit] will always bring you back one layer of menu, to exit all the way back to the root menu, hold down [Shift] + [Exit] Exercise: Make sure you have patched the Source 4s before you move onto the next section. Patching fixtures When patching in a fixture (a light with more than one DMX channel), you will need to first know the manufacturer, model and mode that it is in – for this Robe Light Converse theatre for example, we have the Robe MMX Spot in Mode 2. If you patch a fixture in an incorrect mode then it will not react as you expect it to, as the DMX channels will not match up – for example if you change tilt it might start to strobe. This time, search in the personality list for ‘’MMX spot’ – you will see the list filter down to all the personality files with that text in their name. Choose Robe MMX Spot in Mode 2 from the list. If you are using one of the other Light Converse training theatres, make sure you search for the correct spot – check your patch list. Go through the same process as when you were patching the dimmers in – set the correct quantity, DMX Line and Address in before you choose where to patch them. Under softkey [G] Options you can enable/disable preset palettes (automatic colours, gobos and positions), which are created for each fixture type. Also you can enable/disable auto groups (when enabled, this will create a master group for that fixture type, and if you patch a quantity greater than 1, it will also create a group for those fixtures). There is also the option for an offset, by default this will show the amount of channels the fixture has, if you wish to input a space between the fixtures, do it here. Hint: When you have the [Fixtures] window open, if you look above the Workspaces on the Tiger Touch/Expert/Titan Mobile, or under the window options button on the Sapphire Touch, there is a [Pages Hide/Pages Show] toggle. If you set it to [Pages Show], then you can easily organise your patch into different pages. Have a go at patching the moving lights into the second page to keep them separate from your dimmers. On the Expert you can patch into both the physical blue buttons and the fixture window. You can only patch one fixture per handle, you can patch multiple dimmers per handle but they will always be controlled together. Exercise: Make sure you have patched in all of the Spots and Washes before moving on to the next section. Avolites Ltd 184 Park Avenue, Park Royal, London, NW10 7XL, England. www.avolites.com Written by Emma Thompson. Last Update 07/08/13 Page 6 of 24 Deleting Fixtures If you have accidentally patched in too many fixtures, or the wrong type of fixture, you can very easily delete them. You must be in the Patch menu to delete fixtures to stop you accidentally deleting them during programming. Press [Patch] then [Delete] and select the fixture you wish to delete. It will go red, you can simply press it again to delete, or press [Confirm] on softkey A. To delete a range of fixtures, again press [Patch] [Delete], then click and hold down on one, and drag across to select a range. To confirm your selection press [Confirm] from softkey A. Moving Fixtures You can lay your fixtures out how ever you want. Use the [Move] option to move your fixtures once they’ve been patched in. You can even separate them out over pages by having the Fixture Window selected, then press the [Pages Hide/Show] in the context options. Exercise: Arrange your fixtures as they are in the rig. Have a page for spots, a page for washes, and a page for dimmers. View Fixture Information When you’ve patched your fixtures in, you will often need to be able to see various bits of information, including it’s current DMX address and what mode it’s in. You can get a general overview of your whole patch from the Patch View. You have the Fixture Type column on the left of the window, showing you each fixture type in the showfile with it’s own colour code. If you select one of the fixture types from this column, then the DMX lines will highlight showing where the fixtures are patched. Next to this is the DMX Line column, which has a visual indicator of how full the DMX line is. If you select a DMX line from here, it will show you which fixtures are patched to this line. However, if you want to get more in depth information on a particular fixture, you can press [View] for the appropriate fixture in the Patch View, or from the Fixtures Window you can press [Open/View] then the fixture you want to view. There are three tabs in this view: - Channels: this gives you a complete channel listing, with the option to freeze or invert individual channels. Dip Switches – lets you see a visual representation of the DMX Address of the fixture in dip switches Personality – gives you the history of the personality file, and any updates made Exercise: Have a go at viewing one of the Spots, and selecting some channels to invert and freeze (make sure you put them back before the next section!) Hint: Don’t forget to regularly save your work! Press [Disk], then [Save] to save your work as a version of your current showfile. [Save As] lets you start a new folder of work. Avolites Ltd 184 Park Avenue, Park Royal, London, NW10 7XL, England. www.avolites.com Written by Emma Thompson. Last Update 07/08/13 Page 7 of 24 CHAPTER 4: GROUPS A Group is simply a shortcut to selecting some fixtures. In this section we will look at making new groups, and deleting and renaming them. Open the [Fixture and Groups] workspace. You will see that with the [Autogroups] option turned on, that several autogroups have been created already. Renaming Groups and other items Often you will want to change the name of an autocreated group. You can use [Set Legend] on softkey C on the root menu to rename anything on the console. To change the name of a group, press [Set Legend] then select the group you want to rename. A touch keyboard will pop up automatically on the Tiger Touch and Sapphire Touch (the Expert has a built in keyboard and on the Titan Mobile it is expected that you are using a PC with a keyboard attached) Exercise: Try renaming the [6 x Dimmers] group to read “Source 4s” Hint: You can use [Set Legend] -> [Page Legends] to name pages. It will default to the playback page, but you can touch any other page to name it. Why not try naming the 3 fixture pages you set up earlier? Making Groups In order to speed up programming, you will almost certainly need to make some new groups of your own. Creating a new group is very easy, but remember that only the fixtures that are currently selected will be saved into the group. All you need to do is select the fixtures you want in the group, and then click into an empty group button. It will go red, and at this point you can enter a name for the group. Press [Enter] to confirm and save. This method of recording is called Quick Record, it refers to removing the need for the user to press [Record] before creating certain items and can also be used with palettes. Exercise: Spend some time creating groups for the different trusses of spots, for example front, mid, back. Hint: be aware that the order in which you first select the fixtures is also saved into the group, and this will affect how things like Fan and Fixture Overlap work later Deleting Groups To delete a group, press [Delete] then double tap the group you wish to delete. If you wish to delete more than one group, press [Delete], click and drag a range and then choose [Confirm] from the softkeys Hint: most functions on the console will perform the function once and then exit the menu. To be able to perform a function multiple times, such as deleting lots of items, you can latch most menus. On the Titan Mobile and Sapphire, press the [Latch] button whilst in the menu you want to latch. On the Avolites Ltd 184 Park Avenue, Park Royal, London, NW10 7XL, England. www.avolites.com Written by Emma Thompson. Last Update 07/08/13 Page 8 of 24 Tiger Touch and Expert, the [ML Menu/Fixture Tools] button will function as a latch option. To then exit a menu you have latched, press [Exit] Moving Groups To move a group or any item, press either the [Move] button on the Sapphire or Titan Mobile or press [Copy/Move/Link] until the [Move] option is highlighted. Then select the item to move, and you will see it goes red, then choose an empty handle to move it onto. To move more than one item at a time, go into the [Move] menu, select a range of items, and then press one handle to move the items from that button forwards. Pattern Selection To make more complex groups, such as odds/evens and syntax selections, you can use the [All] button to create a more advanced selection. If you first select a group of fixtures, and then press [All], you will see several options on the softkeys. Choose [1 in 3] and look at the Fixtures window – you will see only 1 out of every 3 fixtures is selected. You can then use the [+] and [-] buttons next to [All] to jump to 2 in 3, then 3 in 3. Exercise: Have a go at creating Odd and Even groups out of the All Spots group. CHAPTER 5: CONTROLLING FIXTURES Avolites Ltd 184 Park Avenue, Park Royal, London, NW10 7XL, England. www.avolites.com Written by Emma Thompson. Last Update 07/08/13 Page 9 of 24 Titan Control Philosophy – Think Like an Avo! All Titan consoles work on the concept of having a “programmer”, which is like the consoles temporary brain. Any fixtures and attributes you select or change are all compiled in the programmer, and the console uses this information when it records groups, palettes or playbacks. As soon as you press [Clear], all this information is forgotten and you begin with a blank slate. A fixture is defined as being in the programmer as soon as you select it, however none of it’s attributes are. An attribute is put into the programmer as soon as you change it, you can see which fixtures and attributes are in the programmer as they are highlighted in a different colour. Any information in the programmer will override information from playbacks. [Clear] is a function designed to remove information from the programmer. The Avolites default for [Clear] is to remove and drop dimmer values to the next highest value coming from a playback. However, all other values will remain at their current value and not reset. The reason for this is that when busking, if you’ve been applying palettes live during a show, when you press [Clear], you don’t want these values to immediately drop out. You can change this by holding down [Clear] and choosing [Clear Options] from the softkeys. If you change the option that currently reads [Freeze Current Values] to [Release to Playback Values], then when you press [Clear] the fixtures will release back to the last playback value or to home values. Lamp on and Basic Control The first thing you will need to do once you’ve patched your fixtures in generally is to lamp them on (unless you’re using a visualiser!) Select your fixtures, then Lamp On is found in the [ML/Fixture Tools] and then [Macros] option. You then need to actually turn them on so you can start working with them. With Avolites we have a function called [Locate], which will turn the lights on to full intensity, reset them to open white, no gobo, 50/50 pan tilt etc. To use this, select a group of fixtures and then press [Locate]. When you use [Locate], although the fixture’s attributes are reset, this does not put any values for the attributes into the programmer. The Attribute Bank provides quick access to changing attributes. After you’ve selected and used [Locate] to turn your fixtures on, press the [Pan/Tilt] button, and you will see these values are now assigned to the encoder wheels. Exercise: Have a go at selecting some fixtures, Locating them and choosing different attributes to control with the encoder wheels. Titan also has a workspace window called the Attribute Editor. This provides a much more graphic representation of different attributes, and provides a very different way to interact with fixtures. For fixtures with either CMY or RGB colour mixing, you get a full colour picker, for profile fixtures with shutters you get visual shutter controls, and it’s also great for media server work as you get CITP Thumbnails and on screen keystone control. Avolites Ltd 184 Park Avenue, Park Royal, London, NW10 7XL, England. www.avolites.com Written by Emma Thompson. Last Update 07/08/13 Page 10 of 24 If you click and hold down on a percentage value attribute, such as zoom, and then drag your finger from side to side, you get a slide bar come up which lets you adjust the range without having to use on the encoder wheels. Exercise: Have a go at control using the attribute editor window by Locating some of the spots and using the colour picker. Then try the zoom attribute by holding down on it and sliding your finger across. Titan consoles have the ability to undo changes made to the programmer. To use these functions, either press [Shift] + [Left Arrow] (on the Tiger Touch and Expert) or the [Undo] button on the Titan Mobile and Sapphire Touch. You can also use Redo to reinstate the changes by either using [Shift] + [Right Arrow] or [Shift] + [Undo] on the Titan Mobile and Sapphire Touch. You can undo/redo 20 steps backwards and forwards in the programmer, and it will undo clear. Exercise: Have a go at selecting some fixtures, Locating them and changing attributes, then using Undo. More Controls Once you’ve mastered the basic controls of [Locate], the Attribute Bank and the encoder controls, there are a few more things to make programming quicker and simpler for you. Fan will help you make position looks that would take far longer to do manually. It takes the fixtures in the order you have selected them, and as you change a value such as pan, it will adjust them incrementally, rather than all at once. To use fan, select some fixtures, press [Locate] so you can see them, and then press [Fan] and adjust an attribute. Note that when you change attribute, Fan will cancel. Select the group of the 6 floor spots and press [Locate]. Now tilt them all down together, then press [Fan] and this time adjust the pan attribute. Highlight is also a function which is incredibly useful for creating position palettes. Highlight will take the current fixture selection, and set it into two colours – yellow for currently selected, blue for not currently selected. You can the move fixtures one at a time using the [+] and [-] buttons to jump through the selection. First select a group of fixtures, then press [Locate] to turn them all on. Now press the [Highlight] button – you will see they all go yellow. Now press [+] and you will see that one fixture is now in yellow, and the rest go to blue. Try using pan and tilt – you will see that only the one fixture moves. Now hit [+] – you will see the next fixture is now selected. Hint: all fixtures have default highlight colours of blue and yellow, whilst dimmer channels have default values of 20%/100% intensity for highlight and lowlight. CHAPTER 6: PALETTES Palette Basics Avolites Ltd 184 Park Avenue, Park Royal, London, NW10 7XL, England. www.avolites.com Written by Emma Thompson. Last Update 07/08/13 Page 11 of 24 Palettes are a very useful tool both when programming and operating a show, they allow you to store a value such as a particular colour or position, so that when you want to use it again, all you need to do is press the button where it is saved to, rather than having to do it all from scratch every time. When you are using palettes when programming, and then store a cue, the console stores the reference to that palette. This means that if you update the palette, then all cues which reference that palette are also updated. This will save a lot time when reprogramming, especially on tour, as all you need to do is update one palette for centre vocals, and cues which use that value will immediately be updated. This can mean the difference between an hour updating say 30 palettes, and spending 8 hours reprogramming your show every day. There are two types of palette on all Avolites consoles, a shared palette and a normal palette. A shared palette takes one piece of information, such as the colour mixing values for red, and shares it across all fixtures of the same type. This means that if you save a shared colour palette using one of the spots then the rest of the spots can use it, because they are exactly the same fixture, in exactly the same mode. If you then selected a wash and tried to use that colour palette, as it is a different fixture then it will not be able to use that colour information. So, to create a colour palette for blue for all fixtures, select at least one of each type of fixture, set them all to blue and then save it. As long as the fixtures of the same type all have the same value, the console will automatically save it as shared. As it is a shared palette, if you then add more fixtures of the same type into the showfile, they will immediately be able to use the shared values. A normal palette will save each light in the programmer’s individual value into the palette. This is mainly used for position palettes. If you point 4 fixtures at the centre vocals spot, they will all have different values for pan and tilt, and a normal palette will save these individual values for you. However, this means that the palette will only work for the fixtures that have values in the programmer when you save the palette. If you wish to add more fixtures into the palette later on you will need to update it. On Classic, the way you would tell the console which type of palette it will be saving is by the number of fixtures in the programmer. If you had one fixture in the programmer, it will be shared, if you have more than one it will be normal, and there is no way you can change this. This gets very frustrating if you have several different kinds of fixtures and you are creating shared palettes. On Titan, you can now select one of each type of fixture, 2 of each type, or 20 – as many as you like, as long as all fixtures of each type are set to the same value, ie all in green, then the console will save it as a shared palette. If they have different values, such as one in red, one in green, one in blue, the console will save a normal palette. You can always save it as a different type manually. Making Palettes Creating a shared palette: Avolites Ltd 184 Park Avenue, Park Royal, London, NW10 7XL, England. www.avolites.com Written by Emma Thompson. Last Update 07/08/13 Page 12 of 24 First select one or more of your spots. Press [Locate], then open the [Fixture Attributes] workspace, and use the colour picker to set the spots to red. Now click into an empty button in the Colour window and press [Enter]. You will see that a palette appears with a red scribble, the letter ‘C’ highlighted at the bottom of the palette, indicating that colour information has been stored there, and with an ‘S’ in the top right, indicating that this is a shared palette. Now try using it on all your spots – press [Clear], then select the All Spot group, press [Locate] then click the palette you just made – you’ll now see that all the spots go red. Now repeat the above, but select at least one each of the spots and washes, set them to the same colour using the colour picker, and save this. That palette can now be used on any spot or wash. Hint: the colour picker will work across both RGB and CMY fixtures, allowing you to select any kind of colour mixing fixture and set them all to the same colour Creating a normal palette: Select the 6 floor spots, press [Locate]. Now use a combination of Fan and Highlight to position them on the drummer. Now click into an empty palette button in the Position window and call it ‘Drums’ and press [Enter]. You will now see ‘P’ indicating position information lit up at the bottom of the palette, and ‘N’ for normal in the top right. Now try using it on all your spots – press [Clear], then select the All Spot group, press [Locate] then click the palette you just made – you’ll see that only 6 of the 18 spots move to the drums. This is because you had only put values for 6 of them into the programmer, so the palette only contains information for those 6. To be able to send all 18 spots to the drum position, you would need to have recorded all 18 pointing there. Exercise: Now follow the Scenario sheet and create the palettes indicated on there. Quick Record When you click into an empty palette button to record, each window will automatically apply a record mask to save the correct information. Each window will mask off certain attributes, for example, you can only save colour into the Colour window, pan/tilt information into the Position window, and anything else into the Gobo and Beams Window. The windows apply the following record modes: o o o Colour – saves ONLY colour information, and will always save ALL the colour channels of the fixtures in the programmer, regardless of what you’ve touched Position – saves ONLY position information, and will always save pan AND tilt for the fixtures in the programmer, regardless of whether you have changed one or both Gobo and Beams – will only save what you’ve CHANGED, out of everything else (ignores colour and position values) including dimmer, shutter, gobo, zoom, focus, iris, prism values Picture Legends Avolites Ltd 184 Park Avenue, Park Royal, London, NW10 7XL, England. www.avolites.com Written by Emma Thompson. Last Update 07/08/13 Page 13 of 24 In order to make your show more customisable, we have created a function called Quicksketch which allows you to use images to label up palettes, groups and cues. Press [Set Legend] and then choose a palette. If the touch keyboard does not open automatically on your console, press [Picture] on softkey B. There are now 4 tabs along the top: Keyboard – lets you input a text name Pencil – lets you draw any image you want to (keep it clean!) Picture Frame – lets you choose a predrawn image from our library Folder – lets you import static images to use as labels. Once you’ve imported an image, it then goes into the ‘Imported’ folder in the console library Exercise: Have a go at either drawing or picking a drum kit image from the library to label your drum palette Deleting Palettes To delete a palette, as with a group, press [Delete] then double tap a palette. Updating palettes The best way to update a palette is to first play back the palette, so we can see what the palette currently looks like. Once you have done this, make the changes to the palette, and you then record and merge the changes into the palette. To update the drum palette, let’s try adding in the other 12 fixtures into it. First select the All Spot group, press [Locate], and then play back the drum palette. As expected, only the 6 floor spots will move to the drum position. Now use a combination of Fan and Highlight to move the other 12 onto the drum position. Once all 18 are on the drums, now press [Record]/[Record Palette] depending on which console you have, and double tap the drum palette. This will result in what we call a Quick Merge, where the console will only update information which already exists in the palette, in this case position information. If you had touched dimmer information, or colour, the console would ignore this information so you don’t accidentally record it into your palette. Exercise: Have a go at updating a gobo palette and changing the legend to match. CHAPTER 7: PLAYBACKS Exercise: Before you start this section, make sure to load the showfile called ‘Level 1 Titan Training’ There are three types of playback you can create in Titan – a cue, which is a static look, a chase, which is a series of cues which run in a loop, and a cue list, which is a much more structured list of cues. In Level 1 we will look at creating cues and chases. Avolites Ltd 184 Park Avenue, Park Royal, London, NW10 7XL, England. www.avolites.com Written by Emma Thompson. Last Update 07/08/13 Page 14 of 24 When you record any kind of playback, you always have 3 main record modes: Channel mode - records only the channels you have changed for the fixtures in the programmer. Does not record values taken from [Locate] Fixture mode - Stores all the channels for all the fixtures in the programmer, regardless of whether you have changed all the attributes or not Stage mode - records all the channels for all patched fixtures which have a dimmer value of more than 0, regardless of whether that information comes from the programmer or from playbacks Try this: Press [Clear], then select the All Spots group and press [Locate]. Apply a band position palette and a colour palette. On the display above the wheels you can see that only position and colour information are in the programmer. Press [Record Cue] and on Softkey A that you can choose between Channel/Fixture/Stage mode. Now record this information in both Channel and Fixture mode onto 2 separate playbacks. Press [Clear] and repeat this process with the same group of fixtures, this time with an audience position palette and a gobo palette. Press [Locate] and [Clear]. You should now have ended up with 4 cues, 2 in Channel Mode and 2 in Fixture Mode. Fire the first fixture mode cue. You’ll see that that it’s recorded a value for everything, even dimmer, even though dimmer wasn’t in the programmer. With this still up, fire the second fixture mode cue. Now even though colour wasn’t in the programmer, the console recorded it’s current value, which was open white, so it has overridden it with open white. Fixture is the safest record mode, as the lights that you have been using will always go to the state when you recorded them, regardless of what they were doing before. Select the fixtures, press [Locate] then [Clear] Fire the first channel mode cue. The console is only being told to change position and colour information, it has not saved anything else – even though locate puts dimmer at full, it wasn’t in the programmer so wasn’t saved into the cue. Select the fixtures and put dimmer to full using the dimmers channel, NOT [Locate], proving that the desk is playing back the values that have been saved. Select the fixtures, press [Locate] then [Clear] Repeat this for the second record by channel playback. Select the fixtures, press [Locate] then [Clear] The console has not saved zero values for the other channels in the cue, it’s just completely ignored them. Now, fire the first fixture mode cue, then with this up, fire the second channel mode cue. Because the second cue only contains values for position and gobo, it will carry the last value for colour through, as it has nothing to change it with. Avolites Ltd 184 Park Avenue, Park Royal, London, NW10 7XL, England. www.avolites.com Written by Emma Thompson. Last Update 07/08/13 Page 15 of 24 Now, have a go at record by Stage by keeping these playbacks up, then adding blinders information on top in the programmer and saving this first by Fixture, then the same information in Stage. Select the fixtures, press [Locate] then [Clear] Now, fire the record by Fixture playback you just created – this has only saved the information in the programmer – ie the blinders. Kill this one, and fire the Stage playback – you’ll see that it has captured everything that was above 0 intensity, regardless of whether the information came from the programmer or playbacks. Exercise: Now record the cues listed on the Scenario sheets. Updating Playbacks To update a playback, there are a few ways of doing it. The simplest is to fire it, so you can see what it is currently doing, make the changes you want and then record it over the top. To do this, press [Record]/[Record Cue], and double tap the same playback again. This will keep the existing information, and merge the new information into the cue. Hint: the console will ALWAYS merge in Channel mode to preserve unchanged palette information. You can also use the [Update] Function. To use this method to update, fire the cue, make the changes you want to it, then press [Update], you will see the cue you have fired is highlighted in the softkey menu. To confirm this update, simply press [Enter] Playback view There is a new Playback View window in Titan, which gives you an overview of the cue, or cues if you have a chase or cue list. To access this , press [View] and then the blue swop of the cue you wish to view. In this view, you can see the fade and delay times of the cue, the fixture overlap value, and the option to see a full cue breakdown by pressing the button under the ‘View Cue’ column. Open the playback view for a cue, and then press the [View Cue] button. You toggle this view between looking at levels, shapes and timings. There is also the option to show or hide palette information, depending on if you want to see the palette references, or raw DMX information. You can also edit information in the cue from this window, by selecting a cell, and then either typing in a new value, or choosing from the softkeys. Exercise: Try changing the colour of one of the Fixture mode playbacks and updating it Avolites Ltd 184 Park Avenue, Park Royal, London, NW10 7XL, England. www.avolites.com Written by Emma Thompson. Last Update 07/08/13 Page 16 of 24 CHAPTER 8: BASIC TIMINGS HTP/LTP Channels There are two categories of channels on most lighting consoles, Avolites included – HTP and LTP HTP = highest takes precedence LTP = latest takes precedence On Avolites consoles, dimmer channels are HTP and all other channels are LTP in normal circumstances. Avolites Ltd 184 Park Avenue, Park Royal, London, NW10 7XL, England. www.avolites.com Written by Emma Thompson. Last Update 07/08/13 Page 17 of 24 With HTP, this means the dimmer channel will take it’s information from the playback with the highest value for it. Everything else, as LTP values (colour, gobo, position for example) will get changed by the latest value, for example if you have a playback where the fixtures are in red, and then fire a playback that has the fixtures recorded in blue, they will change to this by default. The default trigger point for all LTP channels is 10% of the fader value, and HTP is relative to the fader. Basic Timings To edit these defaults, press Softkey A on the root console menu [Edit Times], then press the blue swop of the playback you wish to edit. You will then get the following options: A – Delay In – this sets the delay in time for all fixtures (we call this the global delay) B – Fade In – this sets the fade in time for all fixtures (we call this the global fade in) C – Fade Out – this sets the fade out time of all fixtures. By default this is disabled, and you have manual control of the HTP fade out on the fader. LTP channels will remain as determined in the cue. D – Fixture Overlap – this sets the overlap percentage of the cue E – Fade Mode – this determines how the times and channels behave in the cue F – Attribute Group Times – this lets you set timings for groups of channels, ie colour or position. You can also get to this directly by pressing the [Colour] or [Position] button whilst in [Edit Times] G – Fixture Order – this lets you change the overlap order in the cue Avolites Ltd 184 Park Avenue, Park Royal, London, NW10 7XL, England. www.avolites.com Written by Emma Thompson. Last Update 07/08/13 Page 18 of 24 Let’s try some simple timings. Using the colour/position Fixture mode cue you created earlier, create a global time of 3 seconds. Select the fixtures, press [Locate] then [Clear] Now fire the cue, you will see that everything is fading over the 3 seconds – dimmer, position, colour Now try setting a colour delay - On the same cue, go back into [Edit Times], press [Colour], and set a colour delay of 3 seconds. Select the fixtures, press [Locate] then [Clear] Now fire the cue, dimmer and position are fading in, but the colour will delay until the fixtures are in position, then start the colour fade. NB: Remember that certain attributes will never fade, such as colour wheels and gobo wheels. You can also set individual delay or fade times on any channel in the cue, from the Cue View window. Fixture Overlap Fixture Overlap is an effect on a single cue that will set the point at which each fixture in the cue starts to fade in. You need both a fade time and an overlap percentage between 0% - 100% to see the effect of this. When the cue is set to 100%, then all fixtures in the cue start and finish fading together, when it’s at 0% the first fixture will start and finish it’s fade, then the next fixture starts and so on. If the value is set to 50%, then the first fixture starts fading, when it gets to 50% of it’s final cue value, then the next fixture starts, and so on. Try setting an overlap – use the second fixture mode cue you created: Go back into [Edit Times] and set a global fade time of 5 seconds. Select the fixtures in the cue, press [Locate] then [Clear]. Fire the cue – you can see that all the fixtures are starting and finishing the fade together. Go back into [Edit Times], and set a fixture overlap value of 50%. This means that when the first fixture in the cue gets to 50% of it’s final cue value, the next fixture will start fading, when that gets to 50% the next fixture goes and so on. Now [Locate] and [Clear] them, and fire the cue again – look at the difference. You will see they are running from the front truss of spots to the back truss of spots one at a time – this is because they are taking the order of the group you selected when you first created the cue (in this case the All Spot group. The fade time is divided by the number of steps in the cue, so if you have 12 fixtures in a cue with a 5 second fade, it’s dividing 5 by 12, so the overlap will be very fast. Avolites Ltd 184 Park Avenue, Park Royal, London, NW10 7XL, England. www.avolites.com Written by Emma Thompson. Last Update 07/08/13 Page 19 of 24 You can change the order and number of steps in the cue by using the option [Fixture Order] in the [Edit Times] menu. Once you have selected this option, open the [Fixtures] window – you will see that all the fixtures which are not included in the cue are greyed out, and all the ones which are in the cue have a number. If you have used the All Spot group, then the three trusses of spots will be numbered 1 – 12 from front left to back right. To change this order, you can specify the step number on softkey A, and then simply press a fixture handle to assign it that step number. If you want to assign more than one fixture the same step number, make sure that [Auto Increment] on softkey B is turned off. Exercise: Try setting the front truss to step 1, middle truss to step 2, and back truss of spots to step 3, and see how different the effect now looks. Remember – because there are now 3 steps in the cue rather than 12, it will be moving a lot more slowly. Fade Modes Mode 0 – obeys the set Fade In time, but will always be a manually controlled fade out, determined by the speed at which the fader is brought down. Mode 1 – always obeys both the Fade In and Fade Out time Mode 2 – sets everything to be controlled by the fader, including LTP channels. Instant LTP channels such as colour wheel are still snapped in at 10% of the fader value. This mode also lets you bring values back to where they were at the start of the cue, again determined by the speed at which you bring the fader back down again. Mode 3 – crossfades all other playbacks out in the time this playback fades in. Mode 3 is the only mode which will force other HTP channels off. Set the first Channel mode colour and position change cue to mode 2. Fire your fixture overlap cue, and with this still up, you will see that the mode 2 cue is moving as you move the fader. As you bring the fader back down, it will reset to it’s original position and colour. Keep the fixture overlap cue on and now at the moment, if you bring the record by Fixture cue with the blinders in, it will not affect the cue with the Colorspots in as they are different fixures. Now, set the Blinders to Mode 3 and set a fade time using [Edit Times]. Now fire the Mode 3 cue, and as this cue fades in, it will black out the other playbacks that are on stage. Exercise: Now try setting different fixture overlap values and modes on the playbacks you created from the Scenario sheet. Deleting playbacks To delete a playback, press [Delete] then double tap the blue swop button of the playback to delete. To delete a range, press [Delete], select a range then press [Confirm] on softkey A. CHAPTER 9: CHASES Avolites Ltd 184 Park Avenue, Park Royal, London, NW10 7XL, England. www.avolites.com Written by Emma Thompson. Last Update 07/08/13 Page 20 of 24 As well as recording a single cue, you can also record a series of cues which run in a loop, we call this a chase. You have the same record modes available for chases as for cues: channel, fixture or stage. Recording a Chase The first thing you do when recording a chase is assign a handle that the chase will be saved to. To do this, press [Record]/[Record Chase or Cue List], and make sure that the option on the softkeys shows [Create Chase], then press a flashing blue button to assign that handle. NB. The first time you press the blue button, this does NOT record a step, simply assign a handle. Once in Record Mode for a Chase, you have the following options shown on the softkeys: A – Record Mode- choose from Channel/Fixtures/Stage B – Step Number – shows the step you’re about to record. C – Append Step – pressing this button records a step. Pressing the flashing button you are saving the chase onto also has this effect. D – Shapes and Effects – lets you record shapes and pixel map effects into a step of your chase E – Renumber All Cues – renumbers all cues to consecutive whole numbers. Let’s try recording a simple chase in Fixture Mode. Press [Record], make sure [Create Chase] is selected, and choose a handle. Make sure softkey A reads [Record Mode Fixture].Now build your first step – select the All Spot group and build a look using palettes. Save this by pressing [Append Step]. Create two more steps by first setting up your look, then pressing [Append Step]. To finish recording a chase, press [Exit], and then remember to press [Clear] before running your chase. Exercise: Now create the chases on the Scenario Sheet Running a Chase When running a chase, unless you have changed the user setting, then as soon as you fire a chase it will connect to the encoder wheels. You can then speed up or slow down the chase, and change the crossfade live. When the crossfade is set to 100%, the chase takes the whole of the step time to fade from one step to the next, when it is set to 0% then the console will snap to the step state and hold this for the step time. You also have the option to use the [Stop] and [Go] buttons to start and stop the chase. Fixture Overlap in Chases You can also use Fixture Overlap to change a simple two step chase into a more interesting effect. Assign a handle for the chase. Now select the floor spot group, locate them and apply a colour palette. Record this as your first step, in Record by Fixture. Next, apply an audience position palette and a different colour palette. Record this as your second step, then press [Exit] then [Clear]. Avolites Ltd 184 Park Avenue, Park Royal, London, NW10 7XL, England. www.avolites.com Written by Emma Thompson. Last Update 07/08/13 Page 21 of 24 Playback the chase – all the fixtures are moving together. Now go into [Edit Times] and change the fixture overlap, in the same way as you did for the static cues. Set it to 35% - now you have a chase with a really quick and easy overlap effect. This works very well with dimmer, colour and position chases. Editing a Chase To edit a chase, we use a method called Unfold. This will take chase and lay it out a step at a time on the playback section, so that each step gets its own fader, and can then be edited in a similar way to a static cue. Once in the Unfold Menu, you have the following options on the softkeys: A – Record Step – this is used for both updating existing steps and recording new steps B – Insert Step – this is used to add a new step inbetween existing steps C – Edit Times – this lets you edit times of individual steps D – Shapes and Effects – add shapes and pixel map effect to steps E – Set Step Legend – change the name of steps F – Previous Page - lets you page through the steps if you have more than can fit on your bottom playback section G – Next Page – lets you page through the steps if you have more than can fit on your bottom playback section Unfold the Spot chase you created earlier: If you want to edit a step, you edit it in the same way as a static cue. Fire step one, change the colour then press [Record step] and double press the blue swop of the playback to merge the new colour information in. If you want to insert a step, set it up and then press [Insert Step], and then press the swop of fader 2 – step 2 will then be bumped along to 3, and your new step will be created in between. To delete a chase step, press [Delete] then double tap the playback swop of the step to delete. Press [Unfold] again to exit this menu, and playback the chase again to show the changes. Exercise: Now have a go at editing the chases you made earlier. Remember that [Exit]will not bring you out of the Unfold Menu – you must press [Unfold] again! CHAPTER 10: SHAPES A shape is a premade effect that runs on an attribute, such as position or dimmer. A shape is relative, so depending on where the attribute currently is, then the shape will run using that as a Avolites Ltd 184 Park Avenue, Park Royal, London, NW10 7XL, England. www.avolites.com Written by Emma Thompson. Last Update 07/08/13 Page 22 of 24 centre point. This means you can set a circle shape to run around a position on stage for example. Shapes are grouped by category, so you have Dimmer, Position, Colour, Gobo, Beam and Effect shapes. In this section we are going to look at making shapes and using them in a show. Creating Shapes Try creating a shape - select the All Spots groups, and create a shape by pressing softkey D on the root menu [Shapes and Effects]. You will see the Shape Library window has opened, showing you the available shapes for the fixture you have selected. This is filtered by attribute bank, so if you have Position selected, it will only show you pan/tilt shapes, if you have Colour selected it will only show you colour shapes, but if you have Dimmer selected it will show you all shapes. Choose the Tilt Saw shape, and you will then be brought into the shape control menu. A shape has 3 parameters you can control - size, speed and spread on the wheels. The spread value refers to how many fixtures need to be counted before the shape repeats, so a spread value of 2 will give an odd / even spread, a value of 3 will mean that the first and 4th fixtures will be in synchronisation. If you have fixtures with multiple cells selected, you will be prompted as to whether you want to run the shapes on the sub fixtures (ie all 10 cells of a Sunstrip individually), or on the super fixture, which makes all the cells act as one. Exercise: Try adjusting the speed and spread of the shape, and look at the effect. NB. If using a dimmer shape on a sunstrip, or colour shape on an LED Batten, try using the [Reverse Selected Fixtures]option. Recording Shapes When you have created a shape you want to save, they can be recorded into a playback in the same way you would record a normal cue, by pressing [Record] and pressing the blue swop button of a free handle. To get the most flexibility out of your shapes, it is best to save them in Channel mode. Exercise: Try recording the Tilt Saw you just created in Channel Mode. Playing Back Shapes Shapes by default will behave like LTP values – ie at 10% of the fader value they will jump to the full size and speed they were recorded at. You can get them to be relative to the fader level in the same way Mode 2 behaves, by pressing [Playback Options], then choosing the blue swop of the playback containing the shape. You can then toggle the items displayed as [Shape Size] and [Shape and Effect Speed] between being ‘Fixed’ and ‘On Fader’ CHAPTER 11: RUNNING THE SHOW Avolites consoles are ideally suited to running both entirely preprogrammed shows, and busking shows. Live fixture overlap and live palette fades are both essential tools in busking. Avolites Ltd 184 Park Avenue, Park Royal, London, NW10 7XL, England. www.avolites.com Written by Emma Thompson. Last Update 07/08/13 Page 23 of 24 Live Use of Palettes There are multiple ways to use palettes live during a show. The simplest way is to select a group of fixtures, type in a number then press a palette. For example: [Select Fixtures] -> [5] -> [Red palette] will fade the selected fixtures to red in 5 seconds. Hint: remember that only CMY/RGB palettes will fade, colour wheels will always snap in If you have no fixtures selected, then pressing a palette will apply this palette to all fixtures that it has values for. This is called a Quick Palette, and can be disabled in [User Settings] by pressing [Shift] + [Softkey B]. This can also be used with a fade time by entering a number before pressing the palette. Be aware that Quick Palettes do not go into the programmer. You can also filter palettes straight into playbacks without the need for selecting fixtures. Press [Clear], then put a time in seconds into the keypad, then hold down a colour palette and press the blue swop of the playback that is active. You will now see the fixtures in that playback fade to the chosen colour in the specified time. You can also use fixture overlap live, by entering a number in percentage first, pressing softkey C [Set Overlap], then entering a fade time and selecting a palette as normal. Exercise: Try this whilst a playback containing the Spots is live: Select the [All Spots] group-> [50] -> [Set Overlap] -> [5] -> [Red Palette] Other Useful Settings You might also want to adjust the lamp dimmer intensity during your show. The controls for this are in System Mode ([Shift] + [Disk]) on the Sapphire Touch, Tiger Touch Pro and Pearl Expert Pro. You can also disable the Grand Master, if you don’t want to risk accidentally blacking out your show, in [User Settings] Have a go at running a show! Well done on completing Level 1, why not come back for Level 2 and 3? All feedback is very welcome; email your thoughts to [email protected] Avolites Ltd 184 Park Avenue, Park Royal, London, NW10 7XL, England. www.avolites.com Written by Emma Thompson. Last Update 07/08/13 Page 24 of 24