1
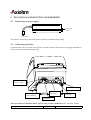
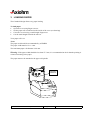
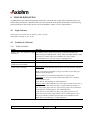
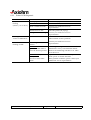
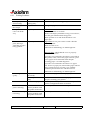
THERMAL PRINTING SOLUTIONS TPOS PRINTER SERIES SET-UP GUIDE Reference 3107243 Issue A April 2003 AXIOHM 1, rue d'Arcueil, BP 820 92542 MONTROUGE CEDEX FRANCE Tel : (33) 1 58 07 17 17, Fax : (33) 1 58 07 17 18 www.axiohm.biz CONTENTS 1 2 YOUR PRINTER .......................................................................... 2 1.1 Package.................................................................................................... 2 1.2 General description ................................................................................ 2 1.3 Printer location........................................................................................ 3 PLUGGING & CONNECTING YOUR PRINTER ........................ 4 2.1 Connecting the power supply................................................................ 4 2.2 Connecting the printer............................................................................ 4 2.3 Connector pin out / features .................................................................. 5 2.3.1 Power connector ....................................................................... 5 2.3.2 Communications interface connectors ..................................... 5 2.3.3 Drawer kick-out connector (optional)........................................ 5 2.3.4 USB connector.......................................................................... 6 2.4 General safety specification .................................................................. 6 3 LOADING PAPER........................................................................ 7 4 CUTTING FEATURES ................................................................. 8 5 STANDARD DEFAULT SETTINGS ............................................. 8 6 DUTY CYCLE............................................................................... 8 7 POWER SUPPLY KITS................................................................ 8 8 TROUBLESHOOTING ................................................................ 9 9 8.1 Light indicator ......................................................................................... 9 8.2 Problems & Solutions............................................................................. 9 8.2.1 Printer Problems ....................................................................... 9 8.2.2 Printer LED Diagnostic ........................................................... 10 8.2.3 Printing Problems.................................................................... 11 8.2.4 Auto Cutting Problems............................................................ 12 CLEANING YOUR PRINTER.................................................... 12 TPOS PRINTER SERIES Set-up Guide Page 1 / 12 Reference: FDE-3107243 Issue A 1 YOUR PRINTER 1.1 Package The packing box contains: Printer Power supply (optional) Power cable to be set between power supply and power network (optional) Set Up Guide 1.2 General description The TPOS is a complete printer designed with the clamshell easy paper loading system. Opening cover Finger recesses to open cover Tear bar Light indicator Access to manual operation of blade (optional) Paper feed button Reset button Note 1: when resetting the printer, every running operation is stopped and all information sent before resetting are lost. Note 2: to print a self-test ticket, activate both On and paper feed buttons according to the following instructions: Switch the power Off. Activate the paper feed button while turning the power On. Release the On/Off button keeping the paper feed button pushed. Release the paper feed button as soon as the printer starts to print the self-test ticket. TPOS PRINTER SERIES Set-up Guide Page 2 / 12 Reference: FDE-3107243 Issue A 1.3 Printer location This printer can be used either horizontally or wall mounted (fixing holes on printer bottom for 3 mm screws, not included). The external dimensions (W×L×H) are: 121×185×125 mm (with cover closed). The printer should be set on a stable holder in a place where the following conditions are achieved: temperature from 0 to 50°C for operating (-40 to +70 for storage). no risk of water exposure. no mechanical vibration or stress. Wall mounting diagram: TPOS PRINTER SERIES Set-up Guide Page 3 / 12 Reference: FDE-3107243 Issue A 2 PLUGGING & CONNECTING YOUR PRINTER 2.1 Connecting the power supply To the power network To the printer The cable to connect the printer to the power network is included in the package. 2.2 Connecting the printer Connections have to be set at the rear of printer: open the rear-door and set the power supply and interface cables as shown on the following drawing. "Cash drawer kick out" label USB Connector Power Supply cable connector RS232 Connector USB LED Cash drawer Note: All connectors should be SELV types in order to safety standards (Safety extra low voltage). TPOS PRINTER SERIES Set-up Guide Page 4 / 12 Reference: FDE-3107243 Issue A 2.3 Connector pin out / features To reduce the electromagnetic emissions and susceptibility, all cables should be shielded. If you are not using cables supplied by Axiohm for this purpose, make sure that your cables match the printer and are rated at the appropriate voltage and current capacities. *Use of an inappropriate cable may seriously damage your printer! 2.3.1 Power connector Function Pin Numbers Function The connector is a shielded 3-pin female mini-Din plug. 3 Not Used + 24V 2 1 Shell - Shield 2.3.2 GND Communications interface connectors RS232 interface uses 9-pin D-type male connectors. RS232 Connector Cable for DTR/DSR protocol CONNECTOR VIEW 1 2 6 3 7 4 8 male DB9 connector 5 9 N/C RXD TXD DTR GND DSR RTS CTS N/C 1: 2: 3: 4: 5: 6: 7: 8: 9: male DB9 connector :1 :2 :3 :4 :5 :6 :7 :8 :9 N/C RXD TXD DTR GND DSR RTS CTS N/C Note: RTS/CTS should be tied together if using DOS print commands on a PC station. 2.3.3 Drawer kick-out connector (optional) The following illustration shows the pinouts for the cash drawer connector on the printer. Pin 1 Pin 6 Pin Number 1 2 3 4 5 6 Cash Drawer Connector Switch (-ve) Drawer 2 Solenoid +24 Volts (to Solenoid +ve) Status Switch + Drawer 1 Solenoid (common with drawer2) Frame Ground The connector used to open a cash drawer and monitor, whether the drawer is opened or closed, is a 6-pin modular RJ11 connector. TPOS PRINTER SERIES Set-up Guide Page 5 / 12 Reference: FDE-3107243 Issue A 2.3.4 USB connector The connector is located at the rear of the printer, and is of B-type. The maximum recommended cable length is 3 meters. Refer to USB specification rev 1.1, chapter 6, for more information. USB PARAMETERS Axiohm’s implementation of USB complies with “Universal Serial Bus Specification” revision 1.1. 2.3.4.1 Capabilities: TPOS is only a device, and doesn’t provide hub capabilities. Full speed communications (12Mbits/sec) are supported. 2.3.4.2 Connector: The connector is located at the rear of the printer, and is of B-type Refer to USB specification rev 1.1 chapter 6 for more information. 2.3.4.3 Interface: The data is exchanged between host and printer via four endpoints: 1) Endpoint 0x00: CONTROL Default endpoint 2) Endpoint 0x02: BULK OUT For transmission of all printable data and commands from host to printer 3) Endpoint 0x82: BULK IN For return of all synchronous data, status or other types of information except unsolicited status mode messages, from printer to host 4) Endpoint 0x01: INTERRUPT OUT For transmission of real time commands from host to printer. 2.3.4.4 Other information: Vendor Id Axiohm USB Vendor Id = 0x05D9 Product Id TPOS Product Id = 0xA000 2.4 General safety specification All communication connectors should be SELV connectors in order to meet safety standards. Use of an inappropriate cable or power supply may seriously damage your printer and affect safety standards of the printer. The power supply main connector should be accessed to enable power disconnection. The power supply cable is a disconnect device. Power supply input requirements: 110/240 VAC, 50/60 Hz. Operating temperature: 0 to 50°C. TPOS PRINTER SERIES Set-up Guide Page 6 / 12 Reference: FDE-3107243 Issue A 3 LOADING PAPER The Clamshell design allows easy paper loading. To load paper: Open the cover using finger recesses. Set the paper roll as indicated on the inside of the cover (see drawing). Close the cover leaving a small length of paper out. Cut the small length left with the tear bar. Your paper roll is set. Notes: The paper used should be recommended by AXIOHM. The paper width must be 58 0/-0.3 mm. The maximum paper roll diameter is 90 mm. Warning: If the paper width should be less than 57.7 mm, it is recommended to check that the printing is centered according to the paper. The paper must not be attached to the paper roll spindle. Roll setting indications TPOS PRINTER SERIES Set-up Guide Page 7 / 12 Reference: FDE-3107243 Issue A 4 CUTTING FEATURES The printer is equipped with a high performance guillotine cutter that can provide total and partial cuts by software command. The partial cut leaves a 2 mm center tab. 5 STANDARD DEFAULT SETTINGS Print density: 100% Pre heating: Off Baud rate: 115200 Parity: None Flow control: Dtr/Dsr Reception error: Ignore 6 DUTY CYCLE 7 25°C Duty cycle is 30% 50°C Duty cycle is 20% POWER SUPPLY KITS Reference A3107446 A3107447 A3107448 A3107589 Designation POWER SUPPLY KIT TPOS EU (12 items/kit) POWER SUPPLY KIT TPOS US (12 items/kit) POWER SUPPLY KIT TPOS GB (12 items/kit) POWER SUPPLY KIT TPOS AUST (12 items/kit) TPOS PRINTER SERIES Set-up Guide Page 8 / 12 Reference: FDE-3107243 Issue A 8 TROUBLESHOOTING Axiohm printers are simple and generally trouble-free, but from time to time minor problems may occur. Follow these procedures to determine the cause and resolution of any problems the printer may be having. If the procedures in this section do not correct the problem, contact a service representative. 8.1 Light indicator When light is on continuously, the printer is ready to operate. When light is flashing, an error occurs. 8.2 Problems & Solutions 8.2.1 Printer Problems Problem What to Do Printer does not function when Check that printer cables are properly connected on both ends. turned on. When using the USB interface, check if the USB LED indicates data transmission. Check if the On/Off button is in On position. Check that the host or power supply is getting power. Printer LED is off. Check the power-supply and cable connections. Printer LED is continuously on but Check if the interface cable is properly connected. printer does not operate. Printer LED is flashing. Auto-cutter: Check that the mobile blade does not interfere with the cover blade. Remove the Paper jam button. Using a screwdriver; turn the gear until the blade disappears. Then open the cover and check that there is no paper jam. Important: Do not press on the switch when the cover is opened. Then close the cover. If the LED is still flashing, see LED diagnostic. Manual cutter: Check that the cover is properly closed; if not close it. Open the cover and make sure there is paper left in the printer; if not, remove the paper roll core, place a new paper roll as indicated in the chapter "Loading paper". See LED diagnostic. Open the cover and make sure there is no paper jam. In case of paper jam, unwind the paper until no more wrinkle appear; close the cover with the wrinkled part out and cut it with the tear bar. If the LED is still flashing, see LED diagnostic. TPOS PRINTER SERIES Set-up Guide Page 9 / 12 Reference: FDE-3107243 Issue A 8.2.2 Printer LED Diagnostic Problem Possible Causes What to Do LED, slow continuous flashing Out of paper. Put in a new paper roll. (1 flash / sec or more). Cover is off. Put the cover on. Knife is unable to home. Contact your authorized service representative. Print head is too hot. Turn the printer off (unplug). Voltages are out of range. Contact your authorized service representative. Flashing LED in various combinations. Fast continuous flashing of LED: These indicate serious problems. Main Program CRC Test Failure. Contact your authorized service representative. Auto cutter: The cover is opened and the cutter is not in its normal position. Turn the gear using a screwdriver until the LED flashes slowly. Check that the mobile blade is not interfering with the cover. Then close the cover. Manual cutter: (no mobile blade) Open the cover and refer to the chapter "Set knife option" to disable the knife. You are in auto cutter mode. If the problem continues, please contact your authorized service representative. TPOS PRINTER SERIES Set-up Guide Page 10 / 12 Reference: FDE-3107243 Issue A 8.2.3 Printing Problems Problem Possible Causes What to Do Print quality is deteriorating. Print head may be getting dirty. See next chapter ”Cleaning your printer”. Colored stripe on the receipt. Paper is low. Change the paper. Receipt does not come out all the way. Paper is jammed. Auto-cutter: Check that the mobile blade does not interfere with the cover blade. Remove the Paper jam button. Using a screwdriver; turn the gear until the blade disappears. Then open the cover and check that there is no paper jam. Printer starts to print, but stops while the receipt is being printed. Paper is jammed. Important: Do not press on the switch when the cover is opened. Then close the cover. If the LED is still flashing, see LED diagnostic. Manual cutter: Check that the cover is properly closed; if not close it. Open the cover and make sure there is paper left in the printer; if not, remove the paper roll core, place a new paper roll as indicated in the chapter "Loading paper". See LED diagnostic. Open the cover and make sure there is no paper jam. In case of paper jam, unwind the paper until no more wrinkle appear; close the cover with the wrinkled part out and cut it with the tear bar. If the LED is still flashing, see LED diagnostic. Print is light or spotty. Paper roll is loaded incorrectly. Check that the paper is loaded properly. Thermal print head is dirty. Use recommended thermal receipt paper. See next chapter "Cleaning your printer". Variations in paper. Increase print density in “Set Hardware Options” of printer Configuration Menu as needed. Vertical column of print is missing. This indicates a serious problem with the printer electronics. Contact your authorized service representative. One side of receipt is missing. This indicates a serious problem with the printer electronics. Contact your authorized service representative. TPOS PRINTER SERIES Set-up Guide Page 11 / 12 Reference: FDE-3107243 Issue A 8.2.4 Auto Cutting Problems Problem What to Do What to Do The ticket is out of the Cut command is not used printer, but the cutter correctly. does not cut. Faulty cutter. Review the User Manual command sets. Contact your authorized service representative. Total cuts instead of partial cuts. Un-adapted partial cut setting Contact your authorized service representative. Cutter jam. Paper used is too thick. Auto-cutter: Check that the mobile blade does not interfere with the cover blade. Intrusion of external object. Remove the Paper jam button. Using a screwdriver; turn the gear until the blade disappears. Then open the cover and check that there is no paper jam. Important: Do not press on the switch when the cover is opened. Then close the cover. If the LED is still flashing, see LED diagnostic. Then close the cover. If the LED is still flashing, see LED diagnostic. 9 CLEANING YOUR PRINTER Depending on the environment in which the printer is used, it can accumulate dust. Therefore it is necessary to clean it periodically to maintain a good print quality. The cleaning period depends on the environment and the usage of the printer, but the print head should be cleaned at least once a year or up to one month in heavy duty applications. Cleaning Instructions: Unplug the printer. Never clean the head immediately after printing, the head may be hot. Open the cover, clean the heating dots line of the head with a cotton stick containing a solvent alcohol (ethanol, methanol, or IPA) but do not touch the print head with your fingers! Allow the solvent to dry and close the cover. N.B AXIOHM can provide cleaning kits Ref: CK60000A TPOS PRINTER SERIES Set-up Guide Page 12 / 12 Reference: FDE-3107243 Issue A