1
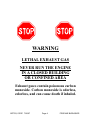
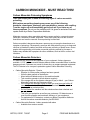
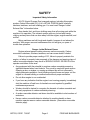
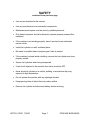
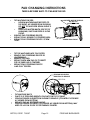
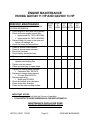
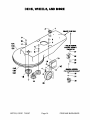
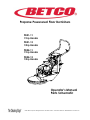
Propane Powerered Floor Burnishers
PB21-11
11hp Honda
PB21-13
13hp Honda
PB24-11
11hp Honda
PB24-13
13hp Honda
Operator's Manual
Parts Schematic
© 2007 Betco Corporation. All Rights Reserved. 1001 Brown Avenue · Toledo Ohio 43607-0127· 888-GO-BETCO · www.betco.com
TABLE OF CONTENTS
COVER PAGE
LEFT BLANK INTENTIONALLY
TABLE OF CONTENTS
WARNING - CARBON MONOXIDE
CARBON MONOXIDE - SYMPTOMS AND DETECTORS
SAFETY INSTRUCTIONS
TANK USE AND STORAGE
BEFORE STARTING THE MACHINE
STARTING AND STOPPING THE ENGINE
BELT TENSIONING INSTRUCTIONS
PAD CHANGING INSTRUCTIONS
ENGINE MAINTENANCE
DECK, WHEELS, AND MORE - PARTS
HANDLE - PARTS
FLEX LOK PAD DRIVER ASSEMBLY - PARTS
CENTRIFUGAL CLUTCH OPTION
FUEL SYSTEM - PARTS
ELECTRICAL SYSTEM - PARTS
TROUBLE SHOOTING
WARRANTY
1
2
3
4
5
6-7
8
9
10
11
12
13
14 - 15
16 - 17
18
19
20
21
22
23
WARNING
LETHAL EXHAUST GAS
NEVER RUN THE ENGINE
IN A CLOSED BUILDING
OR CONFINED AREA
Exhaust gases contain poisonous carbon
monoxide. Carbon monoxide is odorless,
colorless, and can cause death if inhaled.
BETCO, CORP. 7/26/07
Page 4
PROPANE BURNISHER
CARBON MONOXIDE - MUST READ THIS!
Carbon Monoxide Poisoning Symptoms
Train your employees to know the warning signs of carbon monoxide
poisoning.
Mild carbon monoxide poisoning may cause any of the following:
headache, drowsiness, faintness, poor coordination, nausea, and vomiting.
Turn the engine off and immediately get to fresh air if you have any of
these symptoms. Do not run the machine until it is given an emissions test and
repairs made by a Betco Corporation distributor.
Moderate or severe carbon monoxide poisoning causes confusion, unconsciousness,
chest pain, shortness of breath, and coma. Thus, most victims are not able to move
themselves and must be rescued. Severe poisoning is often fatal.
Carbon monoxide is dangerous because a person may not recognize drowsiness as a
symptom of poisoning. Consequently, someone with mild poisoning can go to sleep and
continue to breathe the carbon monoxide until severe poisoning or death occurs. Some
people with long-standing, mild carbon monoxide poisoning caused by furnaces or
heaters may mistake their symptoms for other conditions, such as the flu or other viral
infections.
Carbon Monoxide Detectors
CO detectors are a must for safe operation of your equipment. Various types are
available. A “CO” carbon monoxide detector detects carbon monoxide before it reaches
dangerous levels. Detectors are a must for those who run propane powered equipment.
The CO Detector is for everyone’s protection against Carbon Monoxide Poisoning.
x
Carbon Monoxide Detector - Passive
o Effective for 30 days after package has been opened.
o Write the date opened on the detector.
o Mount with self-adhesive strip on the machine handle.
o Train machine operator to check detector regularly.
o If the orange disk on the detector changes to gray or black - your Carbon
Monoxide Levels are at a Dangerous Level.
o If the orange disk changes to gray or black you must turn your buffer off
immediately and return it to your nearest authorized Betco Corporation.
distributor for an emissions test.
o Do Not Restart the machine until the emissions have been checked and
corrected.
o This is for your protection as well as your customers. CO detectors are a
must for safe operation and maximum efficiency of your equipment.
o For replacement CO detectors, contact your Betco Corporation distributor.
Ask for the carbon monoxide detector, part E012426.
x
Carbon Monoxide Detector - battery operated with alarm
o Available from various sources.
BETCO, CORP. 7/26/07
Page 5
PROPANE BURNISHER
SAFETY
lmportant Safety Information
All LPG (Liquid Propane Gas) powered engines, including this engine,
produce Carbon Monoxide (CO). It is a LETHAL POISON that is colorless,
odorless, tasteless, and non-irritating gas. You must read “Danger: Lethal
Exhaust Gas” information below.
Keep hands, feet, and loose clothing away from all moving parts while the
machine is in operation. The exhaust system gets very hot so keep hands,
clothing and any items that can burn away from the engine, engine manifold, and
muffler.
Betco machines are built tough and durable, however do not abuse the
machine. With proper care and maintenance this unit will give you years of
trouble free operation.
Danger: Lethal Exhaust Gases
Engine exhaust gases contain poisonous carbon monoxide. Carbon
monoxide is odorless, colorless, tasteless, and can cause death if inhaled.
Failure to provide proper venting of CO, failure to properly maintain the
engine, or failure to properly train personnel of the dangers and warning signs of
carbon monoxide exposure may result in SERIOUS INJURY OR DEATH to the
operator and others in the area.
x
Any equipment with the potential to produce carbon monoxide presents a
significant hazard when used indoors. They must be used with great caution.
Opening a door or window, or running an exhaust fan will not necessarily
supply adequate ventilation. Avoid inhaling exhaust fumes and never run the
engine in a closed building or confined area without proper ventilation.
x
Do not allow engine to run unattended.
x
If you have any indication that the engine is not running properly, immediately
shut the machine off and have it checked over and repaired by qualified
maintenance personnel.
x
Workers should be trained to recognize the hazards of carbon monoxide and
the early symptoms of carbon-monoxide poisoning.
x
A carbon-monoxide detector and alarm should be available to alert workers of
emissions.
x
Have a carbon monoxide detector attached to machine handle or have
machine operator wear a carbon monoxide detector. (See carbon monoxide
detector page).
BETCO, CORP. 7/26/07
Page 6
PROPANE BURNISHER
SAFETY
continued from previous page
x
Use only as described in this manual.
x
Use only manufacturer’s recommended components.
x
Maintenance and repairs must be done by qualified personnel.
x
Only trained operators should be allowed to operate propane powered floor
machines.
x
If the machine is not working properly, have it serviced by an authorized
service center.
x
Install fuel cylinder in a well ventilated place.
x
Be aware of possible leaks of propane gas if odor is present.
x
If the machine is stored inside a building, remove the fuel cylinder and store
properly outside.
x
Secure fuel cylinders when being transported.
x
If tank is left attached to the machine then valve should be OFF.
x
Never store fuel cylinders in a vehicle, building, or area where they may
exposed to high temperature.
x
Do not operate the machine with any openings blocked.
x
Keep openings free of debris that may reduce airflow.
x
Remove fuel cylinder and disconnect battery before servicing.
BETCO, CORP. 7/26/07
Page 7
PROPANE BURNISHER
TANK USE AND STORAGE
We use the Worthington gas cylinders designed for vapor
withdrawal. The fuel lock offs, regulators, and engines are also designed
for vapor withdrawal.
x Use the OPD (Overflow Protection Device) vapor withdrawal type
cylinder. These style tanks have a triangle shaped valve handle.
x Do not overfill - the best gauge is a scale - never allow tank to weigh
over 36 pounds for an aluminum tank and 43 pounds for a steel tank.
x Store tanks outside in a well-ventilated area.
x Never store fuel cylinders in a vehicle, building, or area where they
may exposed to high temperature.
x If the machine is stored inside a building, remove the fuel cylinder and
store properly outside.
x Connect fuel cylinder to machine in a well ventilated place.
x Be aware of possible leaks of propane gas if odor is present.
x Secure fuel cylinders when being transported.
x If tank is left attached to the machine then valve should be OFF.
x Store tanks in the upright position (valves up).
BETCO, CORP. 7/26/07
Page 8
PROPANE BURNISHER
BEFORE STARTING THE MACHINE
Before the machine is operated, you first should read your Engine Operation Manual and your
Owner’s Manual.
x
Your machine is shipped ready operation; however there is no fuel in the tank. When having
the tank filled, you must make sure the tank is never over filled.
o
The best way to do this is to tell the filling station to weigh the tank full. On an aluminum
tank, it should weigh no more than 36 pounds and on a steel tank no more than 43
pounds. (See more information at “Tank Storage and Maintenance” page.)
x
Adjust the handle for comfortable operation. Remove hairpin cotter pins from clevis pins,
remove pins, and adjust to the hole alignment that gives the most comfortable height.
Replace clevis pins and hairpin cotter pins. Tighten nuts and bolts if needed.
x
Make sure pad is not torn, pad is well attached and centering device is tightened.
x
Check Oil Level: Starting the engine without the proper amount of oil will cause severe
engine damage. Always keep the engine oil level between the full and add marks on the
dipstick. Do not loosen oil fill cap or remove dipstick while engine is running.
o
Park your burnisher on a level surface.
o
Turn the oil fill cap counter clockwise and then lift from the fill tube.
o
Wipe the dip stick clean and push it back into the oil fill tube until the cap seats and then
withdraw it to check: the oil level. (Do not screw cap on to check oil). Add if necessary. If
the oil level is low, add API Class SM oil having a SAE viscosity grade appropriate for
the expected temperatures as indicated in the Operators Manual (Usually a HD30 or
10W30).
o
Important Note: DO NOT OVERFILL
o
Replace oil cap.
x
Inspect fuel hoses and fittings for wear and leaks. Have all worn hoses and leaks repaired
before operating..
x
Look and listen for exhaust leaks. Have all leaks repaired before operating.
x
Check the carburetor filter and air filter for debris. Clean and replace if necessary.
x
Connect fuel hose to tank by screwing the hose fitting to tank. You must tighten all the way
down to make fuel connection. Turn tank knob slowly until you hear the flow of fuel into fuel
system.
BETCO, CORP. 7/26/07
Page 9
PROPANE BURNISHER
STARTING AND STOPPING
THE HONDA ENGINE
STARTING THE HONDA ENGINE
The Honda engine is equipped with a 110 volt AC starter.
1) Install tank.
2) Attach propane hose coupling and fully tighten.
3) Tilt machine back so that pad is off the floor.
4) Open propane tank valve (turn counterclockwise). Hose will fill.
Must not be any leaks.
5) Put throttle cable into the “fast” position.
6) Hook cord to starter connection and plug into wall outlet.
7) Push red start button and hold until the engine starts. Do not
crank for more than 20 seconds at a time and wait at least one
minute between tries when cranking. See troubleshooting guide if
the engine does not start after several tries.
8) After engine starts, unplug cord and return to storage position on
handle.
9) Set throttle to a slow operating speed until the motor warms up.
Can increase engine speed after 3 to 5 minutes.
STOPPING THE HONDA ENGINE
1) Turn propane tank valve to the closed position (turn clockwise)
and allow the engine to continue running until it runs out of fuel.
BETCO, CORP. 7/26/07
Page 10
PROPANE BURNISHER
BELT TENSIONING INSTRUCTIONS
USE 15/16 SOCKET WITH EXTENSION
TO TIGHTEN TENSIONER IN DIRECTION
SHOWN TO PUSH INSIDE OF BELT OUT
TENSIONER BOLT
USE 9/16"
WRENCH
TEST TENSION BY
PUSHING OR
PULLING ON
BELT. WITH BELT
PROPERLY
TENSIONED, THE
PULLEY ON THE
TENSIONER ARM
SHOULD MOVE
ONLY ABOUT
AN INCH.
TO TIGHTEN THE BELT TENSIONER
(Tensioner may have slipped, or belt may have stretched)
1.
Tilt machine back onto rear caster.
2.
Using a 3/4" open end wrench, secure the top of the shaft and remove pad driver
assembly. (see "Pad Changing Instructions" page)
3.
On the top of the deck, use a 9/16” wrench to loosen tensioner bolt. Leave a little snug to
help hold tensioner in place after adjustment.
4.
Using a 15/16” socket with an extension, fully tighten tensioner from the underside of
deck, and back off 10 to 15 degrees. This will be about 2 inches at the end of the socket
handle. (Note: This is about one mark on the tensioner. There are five marks on the side
of the tensioner, which are difficult to see with the tensioner in place. Each mark is equal
to about 15 degrees. This leaves the tensioner at about 60 degrees of tightness.)
5.
While holding position tensioner in this proper location, fully tighten the tensioner bolt
from the top. TIGHTEN SECURELY!
6.
Make sure tensioner did not slip by pushing or pulling on side of belt away from
tensioner. Belt should be tight and move the tensioner arm 10 to 15 degrees (about 1 ").
BELTS FOR PROPANE POWERED FLOOR BURNISHERS
ENGINE
KAWASAKI OR HONDA
HONDA
KAWASAKI
KAWASAKI
PAD SIZE
21”
24”
24”
28”
PART DESCRIPTION
BX41 V-BELT
BX48 V-BELT
BX53 V-BELT
BX51 V-BELT
PART NUMBER
E010294
E010303
E010475
E010472
PULLEYS FOR PROPANE POWERED FLOOR BURNISHERS
PAD SIZE
21”
24”
28”
BETCO, CORP. 7/26/07
PART DESCRIPTION
10.0” PULLEY
8.5” PULLEY
7.5” PULLEY
Page 11
PART NUMBER
E010428
E012403
E012401
PROPANE BURNISHER
PAD CHANGING INSTRUCTIONS
THERE ARE THREE WAYS TO CHANGE THE PAD
•
•
•
•
•
•
•
•
•
TILT MACHINE ON SIDE.
•
HONDA MACHINE MUST BE TILTED TO
THE RIGHT, AS VIEWED FROM THE REAR.
DO NOT TILT AIR FILTER DOWN. RIGHT IS
RIGHT.
•
DOES NOT MATTER WHICH SIDE TO TILT
KAWASAKI, SINCE AIR FILTER IS IN THE
FRONT.
REMOVE PAD CENTERING DEVICE.
REPLACE PAD. BE SURE IT IS CENTERED WELL.
REPLACE PAD CENTERING DEVICE. SCREW
TIGHT.
AIR FILTER MUST BE TILTED UP.
DO NOT TILT
AIR FILTER DOWN.
VIEWED FROM FRONT
TILT THE MACHINE BACK ON CASTER.
REMOVE PAD CENTERING DEVICE BY
UNSCREWING.
REMOVE OLD PAD.
REPLACE WITH NEW PAD OF CORRECT
SIZE. BE SURE PAD IS CENTERED.
REPLACE PAD CENTERING DEVICE
AND FULLY TIGHTEN.
SPIN PAD DRIVER THIS
DIRECTION TO REMOVE
SEE DETAIL
•
•
•
•
•
TILT MACHINE BACK
PLACE 3/4" OPEN END WRENCH ON FLATS ON TOP OF SHAFT
SPIN PAD DRIVER IN DIRECTION SHOWN TO REMOVE (COUNTER-CLOCKWISE
AS VIEWED FROM BOTTOM)
REPLACE PAD AS DESCRIBED ABOVE
SPIN PAD DRIVER ON SHAFT (CLOCKWISE AS VIEWED FROM BOTTOM). MAY
NEED TO LAY ON FLOOR TO GET THREADS STARTED.
BETCO, CORP. 7/26/07
Page 12
PROPANE BURNISHER
ENGINE MAINTENANCE
HONDA GXV340 11 HP AND GXV380 13 HP
PERIODIC MAINTENANCE
PLEASE REFER TO ENGINE OWNERS MANUAL
FOR MORE INFORMATION
BEFORE EVERY EVERY EVERY EVERY
EACH
25
50
100
200
USE
HOURS HOURS HOURS HOURS
Check engine oil level and add if needed
Check and clean engine bonnet filter
x replacement for 11HP is E010944
x replacement for 13HP is E010942
x General check for loose or lost nuts and
screws, oil leakage, etc…
x Check fuel hose and connections
x
x
x
x
x
x
Clean air cleaner foam element
Clean air cleaner paper element
Check belt tensions
Check battery electrolyte level
x
Change engine oil (1)
*
*
*
*
*
*
*
*
*
*
Clean dust and dirt from cylinder and
cylinder head cooling fins
x Tighten nuts and screws
x Clean and reset gap on spark plugs
x
x
x
x
x
x
x
*
*
*
Replace air cleaner paper element
x Carburetor filter E012279
Replace air cleaner foam element
x Pre-carb filter E012278
Replace spark plug
x Spark plug E010964
Check and adjust valve clearance
Clean combustion chamber
Clean and lap valve seating surface
*
*
*
*
*
IMPORTANT NOTES:
x (1) Change engine oil after first 8 hours of operation
x PLEASE REFER TO ENGINE OWNERS MANUAL FOR MORE INFORMATION
MAINTENANCE SHOULD BE DONE
BY QUALIFIED PERSONNEL ONLY
BETCO, CORP. 7/26/07
Page 13
PROPANE BURNISHER
BETCO, CORP. 7/26/07
Page 14
PROPANE BURNISHER
DECK, WHEELS, AND MORE
ITEM NO. PART NO.
1
E012282
2
E010111
3
E012366
4
E010112
5
E012445
6
E010113
9
E010116
10
E010117
11
E012447
12A
E011281
12B
E011281
12C
E011840
13A
E012356
13B
E012391
13C
E012296
14
E010902
15
E012365
16
E010141
17
E012284
18
E010459
20
E012285
21
E012368
22
E012367
23
E012283
24
E010135
25
E012470
26
E010462
27
E010710
28
E012444
29
E010199
BETCO, CORP. 7/26/07
DESCRIPTION
HOUR METER P15387
RIVET, AAP48
WASHER, FLAT, 5/16"
BOLT, 5/16-18 x 1.25
NUT, LOCK, 5/16"
BOLT, 1/2-13 x 1-1/4
BOLT, 7/16-14 x 1.25
WASHER, LOCK, 7/16"
WASHER, FLAT, 7/16"
DECK, 21"
DECK, 24"
DECK, 28"
BUMPER GUARD, 52" (FOR 21" DECK)
BUMPER GUARD, 63" (FOR 24" DECK)
BUMPER GUARD, 76" (FOR 28" DECK)
BOLT, 5/16-18 x 2-1/2, GRADE 8
WHEEL BRACKET, ADJUSTABLE
NUT, JAM, 5/16"
FRONT END HOUSING, COMPLETE
BELT TENSIONER
WHEEL, 6", WITH BUSHING
NUT, JAM, 3/8-16
WASHER, FLAT, 5/16"
CASTER, SWIVEL WITH POST (PREDATOR MODEL ONLY)
WASHER, FLAT, 3/8" (PREDATOR MODEL ONLY)
NUT, LOCK, 3/8" (PREDATOR MODEL ONLY)
CASTER, SWIVEL, PLATE MOUNT
SCREW, FLAT HD SOCKET, 5/16-18 x 1
WASHER, FLAT, SAE, 5/16"
NUT, ELASTIC JAM, 5/16-18
Page 15
PROPANE BURNISHER
BETCO, CORP. 7/26/07
Page 16
PROPANE BURNISHER
HANDLE PARTS FOR HONDA
ITEM NO. PART NO.
1
E012390
2A
E010861
3
E012406
4
E010723
5
E012407
6A
E012281
7
E010724
8
E012408
9
E010266
10
E012410
11
E010725
12A
E012293
13
E012294
14
E010726
15
E010727
16
E012366
17
E012445
18
E010112
19
E010120
20
E012290
21
E012291
22
E010768
23
E012466
24
E010724
BETCO, CORP. 7/26/07
DESCRIPTION
HAND GRIP (24") (NOT ON PREDATOR)
UPPER HANDLE, HONDA 110V START
BOLT, 1/2-13 x 1.75
WASHER, LOCK, 1/2
WASHER, FLAT, SAE, 1/2
THROTTLE CABLE, HONDA, 38"
NUT, LOCK, 1/4-20
WASHER, LOCK, STAR, 1/2
SCREW, 10-32 x 1.75 PPHMS
NUT, LOCK, 1/2-13
BOLT, 1/4-20 x 1.75
LOWER HANDLE, HONDA 110V START
LATCH SCREW
FELT, 24"
FELT, 13"
WASHER, FLAT, 5/16"
NUT, LOCK, 5/16"
BOLT, 5/16-18 x 1.25
NUT, LOCK, 10-32
KEY FOR KEY SWITCH
SWITCH, KEY SWITCH
KEY SWITCH BOX AND COVER
RIVET, AAP54
NUT, LOCK, 1/4-20
Page 17
PROPANE BURNISHER
FLEX-LOC PAD DRIVER ASSEMBLY
5
6
2
1A
1B
1C
7
3
8
4
ITEM NO.
1
1B
1C
2
3
4
5
6
7
8
PART NO. QTY. DESCRIPTION
E010250 1 FLEX-LOC 21
E010250
FLEX-LOC 24
E010251
FLEX-LOC 28
E010586 1 SHAFT TO PAD DRIVER COUPLING
E012517 1 CENTER-LOC 2 (COMES AS A SET 1 OF 2)
E012517 1 CENTER-LOC 2 (COMES AS A SET 2 OF 2)
E012247 6 BOLT, HEX, 5/16-18 x 1.25
E011505 6 WASHER, LOCK, 5/16
E011176 6 NUT, NYLOC, 5/16-18
E010118 3 RIVET, AAP64
COMPLETE PAD DRIVER ASSEMBLED (ALL PARTS SHOWN)
BURNISHER SIZE
21”
24”
28”
BETCO, CORP. 7/26/07
PART DESCRIPTION
21” FLEX LOK COMPLETE ASSEMBLY
21” FLEX LOK COMPLETE ASSEMBLY
21” FLEX LOK COMPLETE ASSEMBLY
Page 18
PART NUMBER
PE50028
PE50027
PE50039
PROPANE BURNISHER
CENTRIFUGAL CLUTCH OPTION
THE LARGER WASHERS ARE PUT ON
THE ENGINE SHAFT SO THE CLUTCH
IS PARALLEL TO THE TENSIONER AND
PULLEY. THIS CAN VARY A LITTLE
FROM MACHINE TO MACHINE.
1
6
THE KEY IS INSTALLED
AND THE CLUTCH IS
PUSHED ON THE SHAFT.
4
THE INSIDE OF THE CLUTCH IS
FILLED WITH 7/16 FLAT WASHERS
UNTIL THEY ARE ALMOST EVEN WITH
THE BOTTOM OF THE CLUTCH.
5
7
5
THE LARGER WASHER,
FLAT WASHER, LOCK
WASHER, AND BOLT ARE
INSTALLED TO SECURE
THE CLUTCH.
ITEM NO.
1
2
3
4
5
6
7
2
3
PART NO. QTY. DESCRIPTION
E012427 15 WASHER, BUSHING, 1" ID x 14 GA
E012409 1 WASHER, LOCK, 7/16
E010598 1 BOLT, HEX HEAD, 7/16-20 x 1.75 UNF GR5
E011289 1 KEY 1/4 x 1/4
E012447 13 WASHER, FLAT, 7/16 SAE 68
E012434 1 CLUTCH, CENTRIFUGAL
E011501 1 WASHER, FLAT, 7/16 USS
BETCO, CORP. 7/26/07
Page 19
PROPANE BURNISHER
FUEL SYSTEM
HONDA STANDARD MODEL
4
13
8
3
2
5
7
12
1
6
7
3
11
10
9
12
12
ITEM NO.
1
2
3
4
5
6
7
8
9
10
11
12
13
BETCO, CORP. 7/26/07
PART NO. QTY. DESCRIPTION
E010746 1 FUEL REGULATOR MODEL T60-F-N
E010741 1 FUEL LOCK OFF, MODEL VFF30-2-4
E012359 2 STANDARD FUEL HOSE
E010751 1 TANK COUPLING, 7141F
E010082 1 UNION, HALF UNION, .375 x.25
E010083 1 ELBOW, STREET ELBOW, 0.125
E010077 2 HOSE BARB, 1/8 x 1/8
*
1 FITTING COMES WITH REGULATOR
E010081 1 HOSE BARB, BRASS, 90, .375 x .375
E010074 1 FUEL HOSE, 6 LOLA, 1.67 FT.
E010119 1 FITTING, PLASTIC, VACUUM TEE
E010752 3 VACUUM HOSE
E010084 1 ELBOW, BRASS, .375 x .25
Page 20
PROPANE BURNISHER
ELECTRICAL SYSTEM
HONDA ENGINE
SEE
"STARTING THE HONDA ENGINE"
INSTRUCTION PAGE.
STARTER CORD
STORAGE
CONNECT TO
110V OUTLET
STARTER CORD, 10 FT
PART # E012411
CONNECT RECEPTACLE END OF
STARTER CORD TO STARTER BOX.
THIS IS USUALLY LEFT CONNECTED
WHEN STORED ON HANDLE.
HOUR METER
BLACK
RED
TO RECTIFIER
ON HONDA
ENGINE
GROUND
TO DECK
BETCO, CORP. 7/26/07
Page 21
PROPANE BURNISHER
TROUBLE SHOOTING
PROBLEM
CAUSE
Engine will not turn over.
(a) Battery is dead.
(b) Loose wire or bad
connection.
(c) Bad electrical component
(Starter, solenoid, etc…)
Engine turns over, but will not
start.
(a)
(b)
(c)
(d)
Hard to start.
Engine problem
Lacks power.
Engine problem.
Engine stops suddenly and will
not restart.
Engine stops suddenly and will
restart, but then stops again.
(Optima line of burnishers)
Engine overheats.
(a) Out of propane.
(b) Low oil.
Emission shut-down system
engaged.
Machine vibrates excessively
Machine hard to push or pulls left
excessively
Nothing I find here fixes the
problem.
Tank valve in off position.
Propane tank empty.
Engine problem.
Fuel system problem.
(a) One of the air filters is
dirty.
(b) Incorrect oil level.
(a) Pan not centered
(b) Pad damaged
(c) Loose bolts
Front end bearing housing
needs to be set up properly
Problem could have several
causes. Everything cannot be
covered here.
POSSIBLE SOLUTION
(a) Recharge battery or replace if
necessary.
(b) Check wires and connections.
(c) Replace bad component.
Refer to engine owner’s
manual and read IMPORTANT
below.
(a) Turn on valve. (This is the first
thing to check.)
(b) Fill tank.
(c) and (d) Refer to engine
owner’s manual and read
IMPORTANT below
Refer to engine owner’s manual
and read IMPORTANT below
Refer to engine owner’s manual
and read IMPORTANT below.
(a) Get propane
(b) Add oil.
Problem with engine or fuel
system. Have serviced.
Read IMPORTANT below.
(a) Clean filters.
(b) Add or remove oil to proper
level.
(a) Center pad
(b) Replace pad
(c) Check and tighten bolts
Set up according to front end
bearing housing set up
Read IMPORTANT below.
IMPORTANT
x
x
x
x
PROPANE FUELED COMBUSTION ENGINES PRODUCE DANGEROUS GASES
AND MUST BE SERVICED BY AUTHORIZED SERVICE PERSONNEL TRAINED
SPECIFICALLY TO SERVICE PROPANE FUELED ENGINES AND FUEL SYSTEMS.
THE TROUBLE-SHOOTING TIPS ARE NOT INTENDED TO TAKE THE PLACE OF
AUTHORIZED SERVICE PERSONNEL.
IF YOU ARE UNSURE OF WHAT TO DO—THEN DO NOT DO ANYTHING,
EXCEPT TO CONTACT AUTHORIZED SERVICE PERSONNEL.
BEFORE WORKING ON THIS MACHINE, YOU MUST BE FAMILIAR WITH THE
SAFETY INSTRUCTIONS IN THIS MANUAL.
BETCO, CORP. 7/26/07
Page 22
PROPANE BURNISHER
Betco Warranty Express Program™
Revised November 1, 2006
10 Year Coverage
3 Year Coverage
1 Year Coverage
Subject to the conditions stated
below, Betco Corporation
warrants parts and labor on
rotationally molded polyethylene
tanks/housings and injection
molded vacuum head assemblies
to be free from defects in
materials and workmanship for a
period of ten years to the original
purchaser.
Subject to the conditions stated
below, Betco Corporation
warrants parts and labor on all
other Betco components to be
free from defects in materials and
workmanship for a period of three
years to the original purchaser.
Subject to the conditions stated
below, Betco Corporation offers a
limited warranty on parts and
labor on the following equipment,
parts and accessories to be free
from defects in material and
workmanship for a period of one
year to the original purchaser.
ƔDM Series Vacuums:
#85506-00, #85507-00
ƔBac Pac Lite Vacuum:
#85903-00
ƔFiberPRO® Floor Dryer:
#85507-00
ƔWORKMAN™ Series Vacuums:
#85024-00, #85025-00,
#85026-00, #85027-00
ƔCV100T Vacuum:
#85023-00
ƔAll Tools and Accessories
ƔAll Battery Chargers
ƔAll Batteries are pro-rated for 1 year.
Allowable Travel Time Warranty Reimbursement:
Eligible equipment: All battery and propane powered equipment products.
Warranty period: 90 days from date of sale to the original purchaser. A maximum 60 mile round trip at 44
cents per mile will be allowed for warranty consideration.
Propane Machine Warranty:
Honda engines are warranted by Honda for a period of 2 years against manufacturer defect. Kawasaki
engines are warranted by Kawasaki for a period of 2 years against manufacturer defect. All other
components (except wear items)* are warranted by Betco Corporation for a period of 3 years.
*Wear items exempt from warranty consideration include but may not be limited to: power
cords, transport wheels, vacuum bags, belts, squeegee blades, pad drivers, clutch plates,
handle grips, filters, screens, throttle cables, brushes and carbon brushes.
Subject to the conditions and exceptions stated in this warranty, Betco warrants the Betco products to be
free from defects in material and workmanship, under normal use and service, for the periods listed under
the warranty policy to the original purchaser. At any time during the warranty period, Betco will furnish
replacement parts for the Betco products to the original purchaser. Such parts will be furnished and charged
including transportation costs, to the original owner through any Betco authorized Service Distributor. If the
original part is returned within the warranty policy period from date of delivery for inspection by Betco and is
found to be defective, the owner will be credited for the cost of replacement parts plus shipping and
handling. Replacement parts that have become defective through wear or abuse are not included in this
warranty.
This warranty does not apply to damage or defect caused by accident, misuse, negligence, fire or to any
Betco product which has been serviced or repaired by other than an authorized Betco Service Distributor or
Betco factory personnel. This warranty is void if products are used for any purpose other than that which
was intended. There are no other warranties expressed or implied. In no event shall Betco be liable for
incidental or consequential damages or any damage to person or property. (Please note some states do not
allow the exclusion or limitations for incidental and consequential damages.)
©2006 Betco Corporation
All Rights Reserved.
1001 Brown Avenue
Toledo, Ohio 43607-0127
888-462-3826
www.betco.com