1
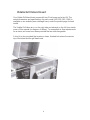
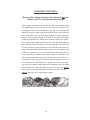
Owners Manual
Vidalia Outdoor Products
308 Miracle Lane, Vidalia GA
www.vidaliagrill.com
TABLE OF CONTENTS
Thank You...
Introducing the New Standard for Grilling
...2
3
Vidalia Grill Island Insert ........................................................................... 5
Operating Instructions ............................................................................... 6
Lighting Instructions .................................................................................. 8
Cooking Directions ................................................................................... 10
Cleaning Your Grill.................................................................................... 13
Directions for Indirect Cooking................................................................... 14
Recipes ................................................................................................... 15
Thank YOU for your purchase of a Vidalia Grill. Your grill is
designed for a lifetime of use. Great care and testing went into the design
and development of this grill and we want you to be totally satisfied with
your purchase. Most components of the grill are made from aluminum
which conducts heat very evenly and very fast. You will find that even on
the indirect side, your Vidalia Grill will cook everything evenly without hot
or cold spots. Most internal components that come in contact with a direct
flame are made from stainless steel, including the burner, which is a high
quality 304 stainless steel. The marinade and Flavor Bar pans are also
made from stainless steel and the burners are stainless steel tubes. The
Vidalia Grill is built to last and last and last. . . who said you can't take it
with you? We didn't!
Introducing the new standard for grilling!
The Vidalia Grill offers many features not found on traditional outdoor grills. Because of its
unique reversible twin pan design and dual direct and indirect cooking surfaces, The Vidalia Grill
can grill and sear to perfection and can also roast, smoke, steam, bake, boil and even fry without the
addition of expensive accessories.
The Vidalia Grill cooks with the convenience of bottled or natural gas with flavor
enhancements from wood or charcoal if desired. The amount of added flavor can be regulated by
using more or less wood, charcoal or pellets. Simply add the wood chips or charcoal to the Flavor
Bars in the left stainless steel pan that is positioned directly over the burner. Ashes from the wood
or charcoal will accumulate in a stainless steel tray at the base of the grill's burner. The steel tray
slides out after cooking for easy cleaning.
The right side of the grill from the center is used for indirect cooking. Since your food is never
exposed to a direct flame on this side of the grill, there is never a worry about flare up. This also
eliminates the need to constantly turn your food to prevent burning. Larger meats such as whole
chickens, turkeys and hams can be easily and thoroughly cooked without using a rotisserie. The
drippings from the food are retained in a stainless marinade pan which becomes hot when the grill is
at operating temperatures. The drippings falling into the pan's heated water return flavor to the food
as the water evaporates and also provides moisture to the heated air inside the grill so that food
remains moist and juicy even if it is overcooked. By adding liquid seasonings to the water under
the food, The Vidalia Grill can baste and marinate the food as it cooks. Apple cider vinegar, lemon
juice, pineapple juice, liquid smoke or Worcestershire sauce work really well for adding extra flavor
to your food.
Ready to do more? By simply lifting out the left side stainless steel Flavor Bar pan and
sliding the stainless steel marinade pan from the right side of the grill to the left side, which is
directly over the burner, you have converted your grill into a steamer. Now you can steam your
favorite foods such as oysters, shrimp, lobster, sausage and even vegetables. You can even place
food in the boiling water to boil and steam at the same time. Imagine boiling shrimp and steaming
lobster at the same time! Instead of water, a small amount of cooking oil can be added to the
stainless steel pan allowing you to stir-fry foods or prepare scrambled eggs and pancakes. The
stainless steel pan lifts right out for quick, easy clean up.
Because of its rust free stainless steel and aluminum construction, water and years of
outdoor use are not a problem. That1 s why we offer the following warranty:
• 99-Year rust-through warranty on grill body.
• Pro-rated burner warranty for 10 years.
• 20-Year warranty on grates & pans
• 2-Year warranty on: knobs, igniter, wheels & casters, regulator, gas hose,
and manifold.
(Warranty is for parts only and does not include shipping cost.)
The Vidalia Grill is available in four sizes (models 440, 628, 983 and 1396). Each grill’s model
number relates to its square inch cooking surface.
3
For Additional Information Please Contact:
308 Miracle Lane • P.O. Box 1912 Vidalia, GA
30475
(912) 538-7570
Toll Free: (800) 453-1668
Fax: (800) 359-3681
www.vidaliagrill.com
E-mail: [email protected]
4
Vidalia Grill Island Insert
Your Vidalia Grill Island Insert comes with two (2) air boxes and a trim Kit. The
actual dimensions and specifications for each model (440, 628, 983, 1396) is
available on our website (www.vidaliagrill.com) under the product page for each
model.
The Vidalia Grill takes air in on the right side and exhaust on the left (see inside
cover of this manual for diagram of airflow). To accomplish air flow requirements
for an insert, air boxes have been provided that are interchangeable.
A trim kit is also provided that creates a clean, finished look where the counter
top of the island and the grill head meet.
5
PLEASE READ INSTRUCTIONS CAREFULLY BEFORE
OPERATING YOUR GRILL!
OPERATING INSTRUCTIONS
¾
Open lid before attempting to light. (Lid should remain open until burner is lit).
¾
Follow instructions on the grill's instruction panel very carefully.
¾
Make sure that the marinade pan contains at least 1/2 inch of water before lighting
the grill. Check frequently while cooking. Do not allow all water to evaporate while
cooking. Add water carefully from the top as needed and always maintain at least
1/4 inch of water or liquid.
¾
Do not touch any metal parts of the grill while hot. V Do not attempt
to move a hot grill.
¾
Keep children and pets away from a hot grill to avoid severe burns.
¾
Grills are designed for outdoor use only.
¾
Make sure grill is cool before removing the flavor bar pan or the marinade pan for
cleaning or changing the positions for steaming.
¾
V Always use barbeque mitts or hot pads to protect hands while adding or
removing food from a hot grill or adding water to the water pan.
¾
If there is any part of your grill or instructions that you do not understand, please
call us before attempting to light. (800) 453-1668 • Monday - Friday 9:00 a.m. 5:00 pm.
Please refer to model number when calling.
6
BEFORE USING YOUR NEW GRILL FOR THE
FIRST TIME
Before using your new grill for the first time, it is necessary to "season" it. Remove the cooking
grate(s) and the water pan from the right side of the grill and wash them in mild soap and water.
Replace water pan and grate(s) and add water, approximately 1/2 inch deep, to the water pan. Light
all the burners, close the lid and operate the grill for 20 minutes or so on high heat or until grill
reaches 500°.. Turn off the grill and allow the grill to completely cool with lid closed. Be sure to check
all the gas fittings and connections each time you use a gas-fired grill to be sure there are no
leaks and make sure hoses are not touching bottom of grill. See Example A.
IMPORTANT!
DO NOT ALLOW THE REGULATOR HOSE TO COME
IN CONTACT WITH THE BOTTOM OF THE GRILL.
CORRECT
INCORRECT
00
NO!
CAUTION: Check all hoses and
connections before lighting grill for the
first time.
7
LIGHTING INSTRUCTIONS
1. Open lid.
2. Add water to the stainless steel Water Pan on the right side of the grill.
Water should be at least 1/2 inch deep and should be checked
frequently during the cooking process. Do not allow all of the water
to evaporate before adding more. Always add water carefully by
pouring it slowly from top of the grill through the grate. Do not
attempt to lift the grate on a hot grill.
3. Connect gas bottle at the back of the grill. Make sure the connection
on the gas bottle is facing the rear of the grill. Connect the gas bottle
to the grill by turning the connector on the grill clockwise until tightened.
Make sure the gas line is not touching the bottom of the grill,
(see Example A)
4. Turn on gas at tank by turning the valve counterclockwise.
5. For Model 440 & 628, turn burners 1 & 2 on high to ignite (See
Example B). For Model 983 & 1396, turn burners 2 & 3 on high to
ignite (See Example C).
6. Wait 5 seconds then press and hold the igniter button until the grill
lights but not for more than 10 seconds. You should hear a clicking sound when the ignitor is pressed. If
you do not hear a clicking sound when the igniter button is pressed, you may need to replace the battery in
the back of the igniter.
7. If ignition does not take place after 10 seconds, turn burner(s) to OFF
position, wait 5 minutes with lid open, then repeat procedure beginning
with number 4 above.
MANUAL LIGHTING PROCEDURE
1. Do not use Manual Lighting Procedure on a hot grill.
2. Open lid.
3. Look under burner control panel and locate the 1 inch hole in the
bottom of the grill cooking chamber on the left side of the front burner
controls. (See example B for Model 440 & 628 or C for Model 983 &
1396).
4. Turn burners 1 & 2 on high on Model 440 & 628. Turn burners 2 & 3
on high on Model 983 & 1396.
5. IMMEDIATELY light long match and insert the tip of match into the
round hole of the cooking chamber. Always use a long kitchen or preferably fireplace match. Do not
attempt to manually light burner with a short paper match.
6. If the burner does not light in two or three seconds, remove match
and turn burner off. DO NOT ATTEMPT TO RELIGHT!!! Please call
us toll free (800) 453-1668 for assistance or further instructions.
8
MODEL 628 - EXAMPLE B
Burner
1
Burner
2
Burner 1
Burner 2
REFER TO MANUAL LIGHTING PROCEDURE
MODEL 983 - EXAMPLE C
Burner 2
Ignitor Button
Burner 3
REFER TO MANUAL LIGHTING PROCEDURE
9
DIRECT COOKING
The left side of The Vidalia Grill, from the center, is designed for grilling
and searing over direct heat. On this side, the grill will have one front and
one rear burner controls on Model 440 & 628 and will have four burner
controls on Models 983 & 1396. These can be set at the same setting
(low-high) or at different settings which allow you to have a section of this
area for high temperature searing and another section for lower temperature
cooking. This gives you the ability to sear at a high temperature, then cook
at a lower temperature to retain more natural juices. You may choose to
use the left side of the grill to sear, then finish cooking on the indirect side
of the grill. This method works very well on a thick steak that you wish to
cook to well done. The direct side will add sear marks to foods for that
appealing grilled look.
INDIRECT COOKING
The right side of you grill, from the center, is designed for indirect cooking.
Since your food is never exposed to a direct flame there is never a worry
about flame up. This also eliminates the need to constantly turn your food
to prevent burning. Most foods will only need to be turned one time for
complete browning on both sides. On the indirect side your food is browning
from the top. The indirect side can be used for any foods that have a
tendency to dry out when cooked, such as fish, pork or chicken. The
drippings from your food on the indirect side are retained in a stainless
steel pan which becomes very hot when the grill is at operating temperatures.
The drippings falling into the pan's heated water add flavor and return
moisture to the food as it evaporates and also provides moisture to the
heated air inside the grill so that your food remains moist and juicy, even if
it is overcooked. Other liquids can be added to the water pan which has a
basting or marinating effect on your food as it cooks. Apple cider vinegar
works well for pork or chicken, while Worcestershire sauce creates and
excellent flavor on beef. It is important to note that the indirect side of the
grill maintains excellent browning capabilities. Do not allow all the water
to evaporate. Always maintain at least 1/4 inch of water or liquid when
cooking, Adding it carefully from the top.
10
SMOKING
Soak a few of your favorite wood chips in water for at least two hours, or
preferably overnight. A small handful will be more than adequate since
most of the smoke flavor is obtained in the first 30 minutes of cooking. You
will only be using one (1) burner for smoking in order to maintain a
temperature of 210 to 250 degrees. Fill water pan with at least 1/2 inch of
water. Place the wood chips on top of the Flavor Bar over the burner
you intend to use, usually the front. Light the front burner and turn on the
lowest setting. Leave other burner(s) off. Place food on the right side of
the grill away from direct flame. Close lid and maintain desired cooking
temperature. For smoking a turkey, we recommend cooking at 250 degrees
for the first hour then increase to 375 degrees until done. Wood pellets
work very well for smoking and are available in many flavors. They are
available at most stores that sell charcoal. Just follow the easy instructions
on the package.
CHARCOAL COOKING
If you want to cook with charcoal the following directions must be followed
in order not to damage your Vidalia Grill. When cooking with charcoal
you will be using a combination of charcoal and gas (charcoal for flavor
and gas to maintain a constant temperature 400°.) One to two
handfuls spread evenly across the top of the flavor bars on the direct side,
is all that is needed to provide charcoal flavor. Using more than the
recommended amount can damage you grill because of excess heat.
DO NOT LET THE TEMPERATURE GUAGE ON THE HOOD
EXCEED 600°.
11
STEAMING
Converting your grill into a steamer can be accomplished in only a matter
of seconds. On a cold grill, remove the Flavor Bar Tray from the left side
of the grill. Now simply move the marinade pan from the right side of the
grill to the left side. This places the water tray directly over the burner.
Add water (approximately 1-1/2 to 2 inches deep) and you're steaming your
favorite seafood or vegetables. Foods such as hot dogs or shrimp can
also be cooked directly in the boiling water.
• Check water frequently and add as needed to maintain a minimum of 1
inch deep.
• When grill is producing steam always raise the lid very slowly to check
on food!!!!
• Open lid approximately two inches and allow some steam to escape
for a few seconds before completely opening the lid.
• Wear elbow length barbeque mitts when operating the grill.
FRYING
Converting your grill into a Fryer can be accomplished in only a matter of
seconds. On a cold grill, remove the Flavor Bar Tray from the left side
of the grill. Now simply move the marinade pan from the right side of the
grill to the left side. This places the water tray directly over the burner, but
instead of water, use a small amount of cooking oil. Your grill is now a
stainless steel griddle. You can cook eggs, pancakes or even stir fry your
favorite vegetables! DO NOT CLOSE THE GRILL LID WHEN FRYING.
DEEP FRY PAN - Optional
To convert your grill for deep-frying, on a cold grill, remove the flavor bar
tray from the left side of the grill. Now insert your optional deep fry pan on
the left side of the grill. Add the necessary amount of cooking oil to your
pan depending on what you are cooking. Be careful not to over fill, oil
can splash and create a fire hazard. IMPORTANT: DO NOT CLOSE
LID WHEN USING DEEP FRY PAN. NEVER TRY TO REMOVE THE
DEEP FRY PAN WHEN HOT. ALLOW TO COOL COMPLETELY BEFORE
REMOVING.
12
CLEANING YOUR GRILL
Because the cooking chamber is aluminum, do not use
stainless steel or any other abrasive cleaner.
Allow the grill to completely cool down after cooking. A special grate scraper
was supplied with your grill. Use this to remove any food buildup on the
cooking grate. Next remove the grate from your grill. Lift out the right side
water pan and pour out the contents which will be mostly liquid. Wash with
warm soapy water and rinse. Next, wash the grate and rinse in the same
manner. A soapy steel wool pad can be used for any hard to clean spots
(grates and marinade pan). Cleaning can be done outside with a garden
hose if desired. Dawn dishwashing liquid works very well for this purpose.
After washing, rinse with a garden hose and dry the grill with a soft cloth
or towel. After drying, spray a generous coat of WD-40 on the exterior of
the grill and wipe with a soft cloth leaving a good film on the grill's exterior
surface. As a general rule it will not be necessary to clean the exterior of
the grill frequently. It is always best to spray a light coat of WD-40 on the
grill's outside surface after each use to clean and protect it. We do not
recommend covering your grill. Water that might get trapped under a grill
cover can stain your grill's finish. If you choose to cover your grill, make
sure grill has completely cooled down and is completely dry as well. Make
sure the grill cover is dry. Never place a wet cover on your grill. Always
apply a generous coat of WD-40 before covering your grill to prevent
staining. Staining is not covered under warranty.
13
DIRECTIONS FOR INDIRECT COOKING
1. Add water, at least 1/4 inch deep, to the water pan on the
right side of your Vidalia Grill.
2. Add one to two cups of your favorite marinade. We have found
that apple cider vinegar works well with most meats.
3. Preheat grill to 400 degrees. (Note: burners do not have to be set on
same setting for even indirect cooking. If one burner is on low setting
and the other on a higher setting it will not effect the indirect cooking
process.) The most important thing to remember is to maintain correct
cooking temperature. When in doubt, start at a lower temperature. You
can always increase temperature in the last few minutes of cooking to
achieve the desired browning results. As a general rule, 400 degrees
is the best setting. Foods such as whole chickens, ribs, pork tenderloins,
turkeys and hams should be turned one time to achieve proper browning
on both sides. Remember on the right side of the grill (indirect), you
are cooking and browning mostly from the top down. A fish filet, such
as salmon, can be easily cooked without turning. Place the filet on the
right side of the grill with the skin side down. Cook until done.
You are now ready to cook pork ribs, pork tenderloins, whole chickens,
whole turkeys, chicken halves, boston butts or fish. Always use a meat
thermometer to insure that pork and chicken are thoroughly cooked for
health and safety reasons. Season your food with your favorite seasonings
before cooking.
14
"Recipes for Indirect Cooking"
Here are a few of our favorites. For additional recipes visit our
website: www.vidaliagrill.com
PORK RIBS
¾ Add approximately 1/4 inch of water to
the marinade pan on the right side of the
grill (indirect side).
¾ Add 1 cup apple cider vinegar (optional) to the water pan.
¾ Select quality baby-back ribs (Smithfield is a good brand)
¾ Season with Instant Vidalia Seasoning Salt (medium-heavy) and
black pepper (medium)
¾ Brown both sides for 25-30 minutes each, on the indirect side. Start
browning with bone side of rib facing up.
¾ After browning both sides wrap in heavy-duty foil. For best results,
wrap in two layers of aluminum foil, being careful not to tear the foil.
¾ Place wrapped ribs back on grill (indirect) and cook for
1 hour.
Total cooking time is 2 hours at 400°.
PORK TENDERLOINS
¾ Add approximately 1/4 inch of water to the marinade pan on the
right side of the grill (indirect side). Add 1 cup apple cider vinegar
(optional) to the water pan.
¾ Quality pork tenderloin (Smithfield is a good brand) not
a whole loin.
¾ Season with Instant Vidalia Seasoning Salt (medium-heavy)
and black pepper (medium)
¾ Cook both sides for 25 minutes each on the indirect side.
15
¾ After 50 minutes cut tenderloin in half at its thickest part.
If you do not see blood, it is done. You will see juices but
they should not be bloody. If you see bloody juices, cook
for another 5-10 minutes and re-cut.
Total cooking time 50 minutes to 1 hour at 400°.
WHOLE
TURKEY
Add approximately 1/4 inch of water to the marinade pan on
the right side of the grill (indirect side). Add 1 cup apple cider
vinegar (optional) to the water pan.
Quality whole chicken, 4 to 4.5 Ibs.
Season with Instant Vidalia Seasoning Sale (medium-heavy)
and black pepper (medium).
Cooking on the indirect side, with back of chicken facing
up, cook both sides for 30 minutes each. After 1 hour, turn
chicken to even browning and cook for another 30 minutes.
After 1 1/2 hours leg bone should easily turn and pull out.
Total cooking time 1 1/2 hours at 400°.
BONELESS, SKINLESS
CHICKEN BREAST (BSCB)
¾
4 Add approximately 1/4 inch of water to the marinade
pan on the right side of the grill (indirect side). Add 1 cup
apple cider vinegar (optional) to the water pan.
¾
+ Quality BSCB.
¾
Season with Instant Vidalia Seasoning Salt (medium-heavy)
and black pepper (medium).
¾ Cook on indirect for approximately 10 minutes on each
side, depending on the thickness of the breast. After 20
minutes, cut breast. If it looks raw, cook for another 5
minutes and re-cut.
Total cooking time approximately 20 minutes at 400°.
16
WHOLE TURKEY
¾
4 Add approximately 1/4 inch of water to the marinade
pan on the right side of the grill
(indirect side). Add 1 cup apple cider
vinegar (optional) to the water pan.
¾ 4 Quality whole turkey, 14 to 15 Ibs.
¾ 4 Season with Instant Vidalia
Seasoning Salt (medium-heavy) and black pepper
(medium).
¾ 4 Cook on indirect side with back of turkey facing up.
Cook both sides for 1 hour each. After 2 hours, use meat
thermometer to check for doneness. Temperature should
read 170 degrees. Turn turkey to even browning and
continue to cook until 170 degrees is achieved.
Total cooking time 2 to 2 1/2 hours at 400°-425°.
VIDALIA ONION
CHEESE BURGER
¾
Add approximately 1/4 inch of water to the marinade pan
on the right side of the grill (indirect side). Add 1 cup apple
cider vinegar (optional) to the water pan.
¾ 1/2 pound of ground chuck
¾ 1/2 each green, red and yellow bell peppers
¾ 2 Vidalia Onions (if available) or two large yellow sweet
onions
Peel Onions. Core out onions in a cone shape. Using steak
knife, begin coring the onion from the top. Core should be 23 inches wide across the top of the onion. DO NOT CUT
CORE THROUGH BOTTOM OF ONION. Place cored onion
on sheet of aluminum foil. Dice up 1 onion core and bell
peppers. Mix diced onions and peppers with ground chuck.
Season meat with Vidalia Seasoning Salt (medium-heavy) and
black pepper (medium).
Pack 1/4 Ib. of ground chuck in onion core. Using finger
push a hole in center of meat.
17
Fill hole with Worcestershire
sauce. Wrap onion in aluminum foil (should look like
Hershey Kiss)
Cook indirect for 45 minutes to 1 hour at 400°-425°.
Onion will become spongy when done. When done, punch
holes in bottom of foil to allow juice to pour into grill pan.
Carefully open top of foil and sprinkle shredded cheese on
top of onion and reseal.
After 1 minute, remove onion from grill. Carefully remove
hot foil and place onion onto a serving plate. You may cut
onion into quarters or leave whole.
WHOLE PORK LOIN CHOPS
¾
4 Add approximately 1/4 inch of water to the marinade
pan on the right side of the grill (indirect side). Add 1 cup
apple cider vinegar (optional) to the water pan.
¾ 4 Quality whole pork loin (Smithfield is a good brand)
¾ 4 Cut loin into 1 to 2 inch chops
¾ 4 Season with Vidalia Seasoning Salt (medium) and
black pepper (medium)
¾ 4 Cook both sides for 10-12 minutes each on the indirect
side. Depending on thickness of chops, they should be done
in 20-25 minutes.
Total cooking time is 20-25 minutes at 400°-425°.
BOSTON BUTT
¾
¾
¾
¾
¾
4 Add approximately 1/4 inch of water to the marinade
pan on the right side of the grill (indirect side). Add 1 cup
apple cider vinegar (optional) to the water pan.
Quality Boston Butt
4 Season with Instant Vidalia Seasoning Salt
(medium/heavy) and black pepper (medium/heavy)
Brown both sides for 30-35 minutes each on the indirect
side at 450°.
4 After browning both sides, double wrap the Boston Butt
with aluminum foil, making sure it is sealed properly to lock
in the juices.
18
¾
4 Continue cooking for 3-1/2 hours at 400°. Remove
meat from grill and allow meat to cool before handling.
SHRIMP KABOKS
It should be noted that any fish filets can be cooked following
this recipe. Depending on the thickness of the filet and how
done you want it, will determine the length of time to cook.
¾
4 Add approximately 1/4 inch of water to the marinade
pan on the right side of the grill (indirect side). Add 1 cup
apple cider vinegar (optional) to the
water pan.
¾
Quality shrimp 30-40 count
¾
Bacon
¾
Teriyaki/honey marinade
¾
Wrap shrimp in bacon
Skewer pineapple, the bacon wrapped shrimp. Repeat until
skewer is full. Cook on indirect side at 400°. When bacon
starts to brown, baste skewer with Teriyaki/honey marinade and
turn skewers over. Normally bacon with start browning in 1015 minutes. Baste other side once bacon starts to brown.
Cooking time: 20-30 minutes.
SALMON FILETS
¾
Add approximately 1/4 inch of water to the marinade pan
on the right side of the grill (indirect side).
¾ Add 1 cup apple cider vinegar (optional) to the water pan.
¾ Quality salmon with the skin on.
¾ Season with Instant Vidalia Seasoning Salt (light-medium),
Lawry's Garlic Seasoning (heavy), and black pepper (lightmedium).
Cook on indirect side with skin side down at 400°.
Cooking time 15-20 minutes, depending on the thickness
of the filet. If you like it well done but still tender and moist,
cook for a total of 30 minutes.
19