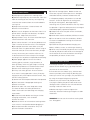
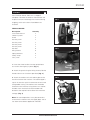
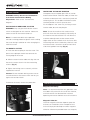
1
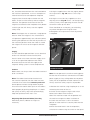
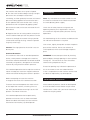
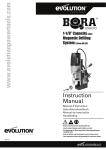
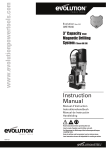
EVO42
42mm MAGNETIC DRILLING SYSTEM
Original
Instruction
Manual
Read instructions before operating this tool.
Guard omitted for illustrative purposes only.
www.evolutionsteel.com
EC - DECLARATION OF CONFORMITY
GB
GB
We, manufacturer and importer
Evolution Power Tools Ltd.
Venture One
Original
Instruction
Manual
Sheffield
S20 3FR
Declare that the product
Part numbers: EVO42
Evolution: EVO42
Read instructions before operating this tool.
42mm Magnetic Drilling System
Complies with the essential requirements of the
TABLE OF CONTENTS
GB
following European Directives:
2006/42/EC – Machine Directive
EC - Declaration of Conformity
p3
2006/95/EC – Low Voltage Directive
Important Information
p4
2004/108/EC – EMC Directive
12 Month Limited Warranty
p4
2002/95/EC – Restriction of the use of Certain
General Safety Rules
p4
Hazardous Substances in Electrical and Electric
Health Advicep5
Equipment
Specific Safety Rules
p6
Additional Safety Advice
p6
The following standards have been applied:
Labels & Symbols
p7
EN55014-1 : 2006
Specificationsp7
EN55014-2 : 1997+A1+A2
Assemblyp8
EN61000-3-2 : 2000
Getting Startedp9
EN61000-3-3 : 1995+A1+A2
Operating Instructions
EN61029-2-9 : 2002
p10
Operating Advicep10
EN60825-1 : 1994+A1+A2
Maintenancep11
EN61029-1:2009
Environmental Protection
p11
EN ISO 12100-2/A1:2009
Service Parts Diagram
p12
ISO 12100-2:2003
Original Instructions
All documentation is held on file at the above
This instruction manual was originally written
address and is available, on request for review.
in English.
Authorised Signatory
Date: 21/10/2011
Mr Matthew J Gavins
Managing Director
3
www.evolutionsteel.com
EVO42
IMPORTANT INFORMATION
GB
no warranty – written or verbal – for drill bits or
cutters. In no event shall Evolution Power Tools
Please read these operating and safety instructions
be liable for loss or damage resulting directly or
carefully and completely. For your own safety, before
indirectly from the use of our merchandise or from
using this equipment check that the voltage is correct
any other cause.
and that all handles and parts are firmly secured.
If you are uncertain about any aspect of using this
Evolution Power Tools is not liable for any costs
equipment, please contact our Technical Helpline.
incurred on such goods or consequential damages.
No officer, employee or agent of Evolution Power
Technical Helpline UK:
0870 609 2297
Tools is authorised to make oral representations of
fitness or to waive any of the foregoing terms of
Congratulations on your purchase of an
sale and none shall be binding on Evolution Power
Evolution Power Tools machine.
Tools. Questions relating to this limited warranty
Please complete your product registration
should be directed to the company’s head office or
online to validate your machine’s warranty
call the appropriate Helpline number.
period and ensure prompt service if needed.
We sincerely thank you for selecting a product
from Evolution Power Tools.
IMPORTANT SAFETY INSTRUCTIONS
To reduce the risk of electric shock, this equipment
12 MONTH LIMITED WARRANTY
GB
Evolution power tools reserves the right to
is fitted with an approved cord and plug for its
intended country of use. Do not change the cord or
plug in any way.
make improvements and modifications to
design without prior notice.
GENERAL SAFETY RULES
GB
Evolution Power Tools will, within twelve (12)
WARNING: When using electric tools, basic safety
months from the original date of purchase, repair
precautions should always be followed to reduce
or replace any goods found to be defective in
the risk of fire, electric shock and personal injury.
materials or workmanship. This warranty is void
Please read all of these instructions before
if the machine being returned has been used to
attempting to operate this machine. Save this
cut materials beyond the recommendations in the
manual for future reference.
Instruction Manual or if the machine has been
damaged by accident, neglect, or improper service.
1. Keep work area clear. Cluttered work areas invite
accidents.
This warranty does not apply to machines and / or
2. Consider work area environment. Do not expose
components which have been altered, changed, or
tools to rain. Do not use tools in damp or wet
modified in any way, or subjected to use beyond
locations. Keep work area well lit. Do not use tools
recommended capacities and specifications.
in the presence of flammable liquids or gases.
3. Guard against electric shock. Avoid body contact
Electrical components are subject to respective
with earthed or grounded surfaces (e.g. pipes,
manufacturers’ warranties. All goods returned
radiators, ranges, refrigerators).
defective shall be returned prepaid freight to
4. Keep other people away. Do not let others,
Evolution Power Tools. Evolution Power Tools
especially children, come close to the work, and
reserves the right to optionally repair or replace
touch the tool or the extension lead. Keep them
it with the same or equivalent item. There is
away from the work area.
www.evolutionsteel.com
4
5. Store idle tools. When not in use, tools should
18. Use outdoor extension leads. When the tool is
be stored in a dry locked-up place, out of reach of
used outdoors, use only extension cords intended
children.
for outdoor use and so marked.
6. Do not force the tool. It will do the job better and
19. Stay alert. Watch what you are doing, use
safer at the rate for which it was intended.
common sense and do not operate the tool when
7. Use the right tool. Do not force small tools to
you are tired.
do the job of a heavy duty tool. Do not use tools
20. Check damaged parts. Before further use of
for purposes not intended; for example do not use
tool, it should be carefully checked to determine
circular saws to cut tree limbs or logs.
that it will operate properly and perform the
8. Dress properly. Do not wear loose clothing or
intended function. Check for alignment of moving
jewellery, they can be caught in moving parts.
parts, mountings and any other components that
Non-skid footwear is recommended when working
may affect its operation. A guard or other part that
outdoors. Wear protective hair covering to contain
is damaged should be properly repaired or replaced
long hair.
by an authorised service centre unless otherwise
9. Use protective equipment. Use safety glasses. Use
indicated in this instruction manual. Have defective
face or dust mask if working operations create dust.
switches replaced by an authorised service centre.
10. Connect dust extraction equipment. If the tool
Do not use the tool if the switch does not turn it
is provided for the connection of dust extraction
on and off.
and collection equipment, ensure these are
21. WARNING. The use of any accessory or
connected and properly used.
attachment other than one recommended in this
11. Do not abuse the cord. Never yank the cord to
instruction manual may present a risk of personal injury.
disconnect it from the socket. Keep the cord away
22. Have your tool repaired by a qualified person.
from heat, oil and sharp edges.
This electric tool complies with relevant safety
12. Secure work. Where possible, use clamps or
rules. Repairs should only be carried out by
a vice to hold the work. It’s much safer than using
qualified persons using original spare parts.
your hand.
Otherwise this may result in considerable danger
13. Don’t over reach. Keep proper footing and
to the user.
balance at all times.
14. Maintain tools with care. Keep cutting tools
sharp and clean for better and safer performance.
HEALTH ADVICE
GB
Follow instructions for lubricating and changing
WARNING: When drilling, sanding, sawing or
accessories. Inspect tool cords periodically and,
grinding, dust particles will be produced. In some
if damaged, have them repaired by an authorised
instances, depending on the materials you are
service facility. Inspect extension cord periodically
working with, this dust can be particularly harmful
and replace immediately if damaged. Keep handles
to you (e.g. lead from old gloss paint).You are
dry, clean and free from oil and grease.
advised to consider the risks associated with the
15. Disconnect tools. When not in use, before any
materials you are working with and to reduce the
servicing and when changing accessories such
risk of exposure.
as blades, bits, cutters, disconnect tool from the
power source
You should:
16. Remove adjusting keys and spanners. Form
the habit of checking to see the keys and adjusting
•
•
Work in a well-ventilated area.
Work with approved safety equipment, such as
spanners are removed from the tool before turning it on.
dust masks that are specially designed to filter
17. Avoid unintentional starting. Ensure switch is in
microscopic particles.
“off” position when plugging in.
5
www.evolutionsteel.com
EVO42
SPECIFIC SAFETY RULES
GB
P) Check for damaged parts. Before further use
of the tool, a guard or other part that is damaged
A) Keep guards in place and in working order.
should be carefully checked to determine that
B) Remove adjusting keys and wrenches. Form the
it will operate properly and perform its intended
habit of checking to see that keys and adjusting
function - check for alignment of moving parts,
wrenches are removed from the machine before
binding of moving parts, breakage of parts,
turning it on.
mounting, and any other conditions that may affect
C) Keep work area clean. Cluttered areas and
its operation. A guard or other part that is damaged
benches invite accidents.
should be properly repaired or replaced.
D) Don’t use in dangerous environment. Don’t use
Q) Keep hands out of the path of the saw blades,
power tools in damp or wet locations, or expose
drill bits or cutters
them to rain. Keep work area well lit.
R) Never reach around saw blades, drill bits or cutters
E) Keep children away. All visitors should be kept a
S) Turn off tool and wait for saw blades, drill bits
safe distance from the work area.
or cutters to stop before moving the machine or
F) Don’t force the tool. It will do the job better and
changing settings.
safer if used at the rate for which it was designed.
T) Disconnect the power before changing saw
G) Use proper extension cord. Make sure your
blades, drill bits, cutters, or servicing or cleaning.
extension cord is in good condition. When using an
U) Never carry the tool by the power cord. Carrying
extension cord, be sure to use one heavy enough
the tool by the power cord could cause damage to
to carry the current your machine will draw. An
the insulation or the wire connections resulting in
undersized cord will cause a drop in line voltage
the possibility of electric shock or fire.
resulting in loss of power and possible overheating.
H) Wear proper apparel. Do not wear loose
clothing, gloves, neckties, rings, bracelets, or
ADDITIONAL SAFETY ADVICE
GB
other jewellery which may get caught in moving
1. Although compact, this machine is heavy. To
parts. Nonslip footwear is recommended. Wear
reduce the risk of back injury, get help whenever
protective hair covering to contain long hair.
you have to lift the machine.
I) Always use safety glasses. Also use face or
2. To reduce the risk of back injury, hold the tool
dust mask if cutting operation is dusty. Everyday
close to your body when lifting. By bending your
eyeglasses only have impact resistant lenses, they
knees you can lift with your legs, not your back. Lift
are NOT safety glasses.
by using the integral lifting/carrying handle.
J) Secure work. Use clamps to hold work when practical.
3. Never carry the machine by the power cord.
K) Don’t overreach. Keep proper footing and
Carrying the tool by the power cord could cause
balance at all times.
damage to the insulation or the wire connections
L) Maintain tools with care. Keep tools sharp
resulting in electric shock or fire.
and clean for best and safest performance.
4. Before moving the machine tighten the
Follow instructions for lubricating and changing
secondary slide lock knob to guard against sudden
accessories.
movement.
M) Disconnect tools before servicing and when
changing accessories, such as blades
WARNING: Do not use the machines cutting head
drill bits or cutters.
as a ‘lifting point’.
N) Reduce the risk of unintentional starting. Make
sure switch is in off position before plugging in.
O) Use recommended accessories. Only use
genuine Evolution accessories.
www.evolutionsteel.com
6
LABELS & SYMBOLS
GB
Noise and Vibration Data
WARNING: Do not operate machine if warning
Sound pressure level (LpA):
89.4dB(A)
and / or instruction labels are missing or damaged.
Sound power level (LwA):
102.4dB(A)
Contact your supplier for replacement labels.
K=
3dB(A)
Symbol
Vibration Data
Description
V
Volts
A
Amperes
Hz
Hertz
min-1
Minutes
~
Alternating current
No
no load speed
Ah = 0.629 m/s2
K = 1.5 m/s2
Vibration level:
The declared vibration total value has been
measured in accordance with a standard test
method and may be used for comparing one tool
with another. The declared vibration total value
may also be used in a preliminary assessment of
exposure.
WARNING: The vibration emission during actual
use of the power tool can differ from the declared
Wear Safety Goggles
total value depending on the ways in which the tool
is used. The need to identify safety measures and
Wear Ear Protection
to protect the operator are based on an estimation
of exposure in the actual conditions of use (taking
Only use genuine Evolution replacement parts.
account of all parts of the operating cycle, such
Unauthorized parts may be dangerous!
as the times the tool is switched off, when it is
To obtain an additional copy of your manual, please
running idle, in addition to trigger time).
contact your supplier.
ADDITIONAL ACCESSORIES
SPECIFICATIONS
GB
In addition to the standard accessories supplied
with this machine, other accessories are available
from your supplier.
Motor (230V ~ 50 Hz) (Watts):
1200
Maximum Cutter Diameter (mm):
42
Maximum Cutting Depth (mm): 50
RPM No Load (min-1 ):
450
Recommended Max Duty Cycle (Mins):
30
Weight (kg):
11.2
Max Dimensions
(Rack Fully Raised) (mm):
570 x 300 x 170
Magnet Dimensions (mm):
40 x 90 x 180
Magnetic Adhesion (kg):
1300 LNF
These include the following items:
HTA 47
Chuch Adaptor
HTA153
Chuck & Key 13mm
HTA 030
Countersink Bit 0-30mm
HTxxS
HTxxL
Cutter Retainer (Weldon Shank)
Internal Diameter (mm):
7
19
www.evolutionsteel.com
Short 25mm Cutters
12mm - 42mm
Long 50mm Cutters
12mm - 42mm
EVO42
ASSEMBLY
GB
Your Evolution Power Tools saw is shipped
complete. Remove all contents from the box and
inspect to ensure no damage was incurred during
FIG 1
shipping, and that the items listed below are
included.
ITEMS SUPPLIED
Description
Quantity
Instruction Manual
1
Coolant System
1
Guard
1
Hex Key 2mm
1
Hex Key 3mm
1
Hex Key 4mm
1
Hex Key 5mm
1
FIG 2
Handles3
Wing Screws 2
Spring Washers
2
Safety Strap 1
Carry Case1
1. Insert the three handles into the spindle boss
and screw them tightly in place. (Fig. 1)
2. Attach the guard using the Wing Screws/Socket
Headed Screws and washers provided. (Fig. 2)
3. Attach the coolant tank and coolant pipe to the
FIG 3
Left Hand side of the machine. The coolant pipe is
a push fit onto the quick fit connector on Left Hand
side gearbox casing. The coolant tank should be
fastened to the machine using the ø 6 mm socket
headed screw inserted into the threaded hole
located at the top Left Hand side of the machines
carriage. (Fig. 3)
Note: For some operations it may be convenient
to remove the coolant tank and supply pipe, and to
use alternative coolant application methods.
www.evolutionsteel.com
8
GETTING STARTED
GB
INSTALLING THE CHUCK ADAPTOR
The optional chuck adaptor (part HTA 47) can be
WARNING: Always Disconnect The Machine
fitted into the EVO42 machines arbor, and then the
From Power Source Before Making
machine can be fitted with a standard 3 jawed self
Adjustments. Refer to the “Service Parts
centering chuck. This enables the EVO42 to take
Diagram”.
standard parallel twist drills up to ø13mm.
Fit the adapter in the same way as fitting a cutter
INSTALLING OR REMOVING A CUTTER
into the arbor, but omit the pilot pin.
WARNING: Only use genuine Evolution cutters
which are designed for this machine. Select the
Note: To use the machine with standard twist
correct cutter for the material to be cut.
drills will mean that the secondary slide facility of
the machine must be utilised. This will allow the
Note: It is recommended that the operator
machine to be adjusted to take account of the
considers wearing protective gloves when handling
longer reach of the standard chuck and twist drills.
the cutter during installation or when changing the
The locking lever for the secondary slide has a left
machines cutter.
hand thread and is found on the lower Left Hand
side of the gearbox housing. (Fig. 5)
TO INSERT A CUTTER
1. Insert the relevant pilot pin into the cutter. The
‘point’ of the pilot pin should face towards the
FIG 5
cutting edge of the cutter.
2. Slide the cutter into the arbor and align the two
flats on the cutters shank with the two locking
screws. (Fig. 4)
3. Tighten the locking screws securely with the
supplied hex wrench.
Caution: Ensure that both locking screws are on
a machined flat on the cutters shank and not just
against the rounded shank.
To remove the cutter, reverse the procedure.
OPERATING INSTRUCTIONS
FIG 4
GB
Magnetic Drill Safety
Note: It is recommended that only operators who
have been fully trained in the use of this machine,
and have read and understood the machines
operating manual are allowed to use this machine.
Magnetic Adhesion
The drills magnetic adhesion depends upon the
thickness and condition of the workpiece. Rust
and multi-layer paint buildup can affect magnetic
adhesion. Whenever possible loose rust and paint,
9
www.evolutionsteel.com
EVO42
etc, should be removed from the work area before
1. Using the supplied 3mm Hex Key slightly loosen
the machine is positioned. 10 mm is the optimum
the 3 cap screws. (Fig. 6A shows 1 of the cap
material thickness for safe operation. Keep the
screws).
magnet clean of metal chips and other dirt and
2. Using the 2 mm Hex Key supplied turn the 3
debris. These can also seriously reduce magnetic
adjusting screws (Fig. 6B shows 1 of the adjusting
adhesion. The operator should ensure that the
screws), evenly whilst operating the crank handle
magnet has adhered to the workpiece firmly before
to move the slide up and down.
switching on the drill. Always use the supplied
There should be so no free play, yet no binding
safety strap.
anywhere throughout the range of travel.
3. Re-tighten the 3 cap screws when adjustment
Note: The Magnet has an automatic 2 stage power
is complete.
feature. When the magnet is first switched on it
will operate at approximately 50% adhesion power,
allowing the operator to make final adjustments to
FIG 6
the machines position. When the motor is started
the magnet will switch to full magnetic adhesion
A
power.
Supply
The drill should be operated from its own electrical
outlet with a Residual Current Device (RCD)
fitted. If other units share a common supply (such
as an on-site generator) operator care should
B
be exercised to ensure that the supply to the
magnetic drilling system is never compromised.
OPERATING ADVICE
Coolant
GB
Before each use always check the coolant feed and
level is sufficient.
Note: Do not operate this machine wearing gloves.
Ensure that the machine is connected to a suitable
Note: The coolant feed can be checked with
power supply and any trailing cables do not pose a
the machine in position, but the motor must be
safety risk to the operator or other workers on site.
switched off and the cutter stationary and cold.
Always attach the safety strap if at all possible.
Never operate without cutting coolant or paste.
Ensure that the coolant feed tap is on and coolant
1. Position the machine using the pilot pin as an aid
feeds properly by pushing the pilot pin. If it feeds
to locating the center of the cut.
too quickly or slowly, adjust the tap accordingly.
2. Switch on the magnet using the red switch
Keep the tap closed when not in use.
located at the back of the machine.
Note: The machines motor will not operate until
Adjusting Gibs (Dovetail Slides) Free Play
the machines magnet has been switched on.
Periodically check, lubricate and adjust as
3. Check that the cutter is still in the correct
necessary.
position and the machine is securely held onto the
workpiece.
4. With the motor head in the raised position,
switch on the motor using the switch on the top of
www.evolutionsteel.com
10
the machine and allow to run up to full speed.
5. Turn the crank handle to begin cutting. Use light
MAINTENANCE
GB
pressure at first to keep the cutter from
wandering, and then gradually increase until normal
Note: Any maintenance must be carried out with
pressure is being applied. Do not force the tool –
the machine switched off and disconnected from
let the speed of the cutter do the work. Cutting
the mains/battery power supply.
performance will not improve by applying more
pressure on the tool, and cutter and motor life will
Check that all safety features and guards are
be reduced.
operating correctly on a regular basis. Only use
this machine if all guards/safety features are fully
6. Regulate the flow of cutting coolant as required
operational.
with the coolant feed tap. Use less pressure as the
cutter exits through the material. Always provide
All motor bearings in this machine are lubricated for
a method of catching the slug, where the ejected
life. No further lubrication is required.
slug may cause injury.
Use a clean, slightly damp cloth to clean the plastic
Caution: The slug ejected at the end of a cut can
parts of the machine. Do not use solvents or
be very hot.
similar products which could damage the plastic
parts.
Overload Protection
This machine is fitted with an overload protection
WARNING: Do not attempt to clean by inserting
device, which prevents damage to the machine
pointed objects through openings in the machines
should the motor be overloaded. Overload could be
casings etc. The machines air vents should be
caused by using a blunt, damaged or an oversized
cleaned using compressed dry air.
cutter or by using excessive feed-in pressure.
Excessive sparking may indicate the presence of
If the overload protection device trips the machines
dirt in the motor or worn out carbon brushes.
motor will stop, but maximum magnetic adhesion
If this is suspected have the machine serviced and
will be maintained holding the machine in position.
the brushes replaced by a qualified person.
Before attempting to restart the machine
investigate the cause of the overload situation.
ENVIRONMENTAL PROTECTION
GB
To restart the machine operate the motor switch
Waste electrical products should not be disposed
on the top of the machine, switching it first to
of with household waste. Please recycle where
the ‘OFF’ position before returning it to the ‘ON’
facilities exist. Check with your Local Authority or
position. The motor will restart.
retailer for recycling advice.
If the overload protection device persistently
operates and causes such as those mentioned
above have been eliminated, have the machine
checked and serviced by a qualified person.
11
www.evolutionsteel.com
EVO42
www.evolutionsteel.com
12
UK 25.10.11